Appium实战-元素定位
元素定位有时候很简单,有时候也很头疼,对于原生的定位方式很简单,对于混合编程和跨平台来说,定位方式就复杂了。有时候使用工具进行定位之后,代码运行起来却定位不到。
因为我们的app是跨平台应用uni-app,所以下面的讲述就以uni-app定位方式,也会将各种场景中的问题一一展示。
工具
自动化框架:Appium2
定位工具:Appium Inspector(网页版)。定位工具的选择一般选择对应的自动化框架,否则有可能会出现问题。
怎么安装和使用这里不做讲解,百度都能搜索
Capability配置如下:
{
  "platformName": "Android",
  "appium:automationName": "uiautomator2",
  "appium:deviceName": "3e4f046e",
  "appium:appPackage": "io.dcloud.UNI0F29818.dis",
  "appium:appActivity": "io.dcloud.PandoraEntry",
  "appium:platformVersion": "15",
  "appium:ignoreHiddenApiPolicyError": true,
  "appium:disableWindowAnimation": true,
  "appium:enforceAppInstall": true
}
定位方式
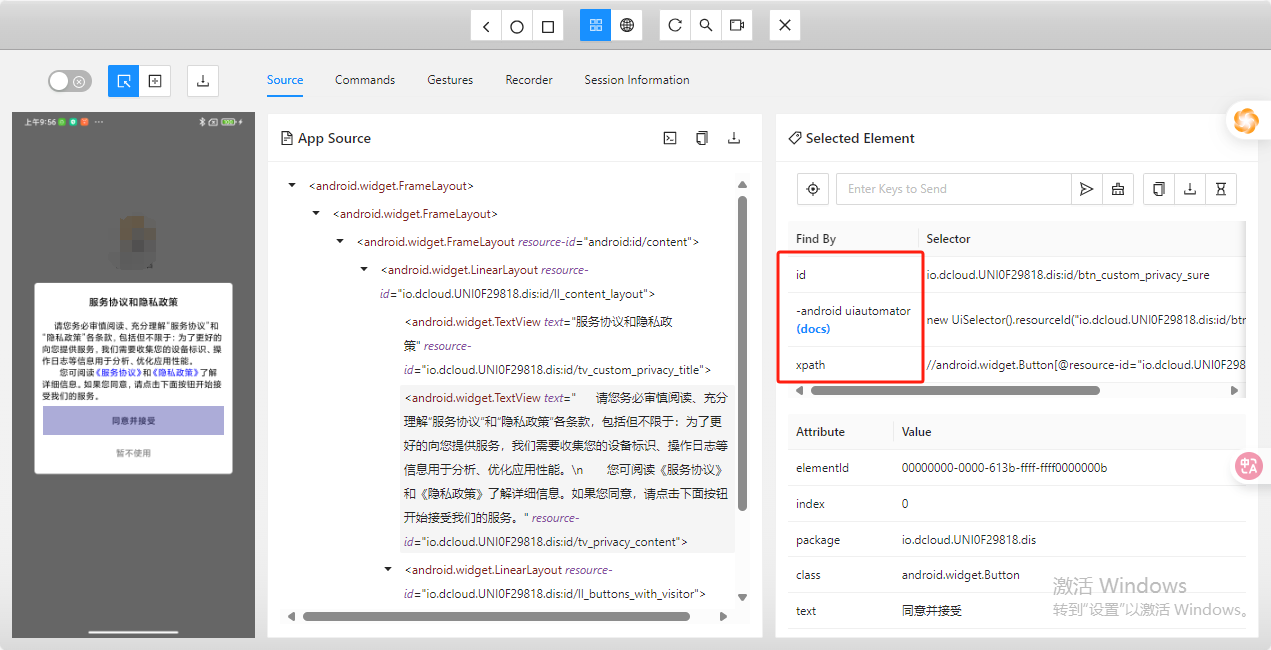
1.常规定位方式。如图,可以使用id, -android uiautomator, xpath等,根据右侧能直接定位的方式,选择简单的,直接照抄就行
driver.find_element(AppiumBy.XPATH, "//*[@class='android.widget.Toast']")
driver.find_element(AppiumBy.ANDROID_UIAUTOMATOR, 'new UiSelector().text("设备")')
driver.find_element(AppiumBy.ACCESSIBILITY_ID, '异常')
常见问题
1.定位不到,uni-app页面跳转或者弹窗有时会定位不到,使用Appium Inspector检测仍然显示上一个页面元素
解决方案:使用坐标定位 driver.tap([(222, 2224)], 100)
2.列表或者页面比较长,手机屏幕显示不全,需要进行滑动
方法一:滑动定位,滑动直到找到元素。(有限制,只会滑动几次,不能一直滑动)
driver.find_element(AppiumBy.ANDROID_UIAUTOMATOR, 'new UiScrollable(new UiSelector().scrollable(true).instance(0)).scrollIntoView(new UiSelector().text("保存").instance(0))').click()
方法二:滑动。滑动到元素位置之后,使用上述常规方法进行定位,如果定位不到元素,使用坐标定位
# 上滑
    def swipe_up(self, driver, duration=200):
        size = driver.get_window_size()
        start_x = size['width'] // 2
        start_y = size['height'] * 0.8  # 起始点 Y 坐标为屏幕高度 80%
        end_y = size['height'] * 0.2  # 终点 Y 坐标为屏幕高度 20%
        driver.swipe(start_x, start_y, start_x, end_y, duration)
# 下滑
   def swipe_down(self, driver, duration=200):
        size = driver.get_window_size()
        start_x = size['width'] // 2
        start_y = size['height'] * 0.2  # 起始点 Y 坐标为屏幕高度 80%
        end_y = size['height'] * 0.8  # 终点 Y 坐标为屏幕高度 20%
        driver.swipe(start_x, start_y, start_x, end_y, duration)
3.Android13以上输入框无法输入,无法使用send_keys()方法进行输入
解决方法:使用物理键进行输入。实际输入跟物理键不同,需要进行映射,下面是一个完整的封装。
class KeyCodeActions:
    def __init__(self, driver):
        self.driver = driver

        # 定义常见按键的 keycode 映射
        self.keycodes = {
            # 常用硬件键
            "home": 3,
            "back": 4,
            "volume_up": 24,
            "volume_down": 25,
            "enter": 66,
            "menu": 82,
            "search": 84,
            "camera": 27,
            "power": 26,

            # 数字键 0-9
            "0": 7,
            "1": 8,
            "2": 9,
            "3": 10,
            "4": 11,
            "5": 12,
            "6": 13,
            "7": 14,
            "8": 15,
            "9": 16,

            # 字母键 A-Z
            "a": 29,
            "b": 30,
            "c": 31,
            "d": 32,
            "e": 33,
            "f": 34,
            "g": 35,
            "h": 36,
            "i": 37,
            "j": 38,
            "k": 39,
            "l": 40,
            "m": 41,
            "n": 42,
            "o": 43,
            "p": 44,
            "q": 45,
            "r": 46,
            "s": 47,
            "t": 48,
            "u": 49,
            "v": 50,
            "w": 51,
            "x": 52,
            "y": 53,
            "z": 54,
        }

    def press_key(self, key_name):
        """根据按键名称按下对应的键"""
        if key_name in self.keycodes:
            self.driver.press_keycode(self.keycodes[key_name])
        else:
            print(f"按键 '{key_name}' 不存在!")

if __name__ == '__main__':
    number = "18288889999"
    for i in number:
        KeyCodeActions.press_key(i)

 浙公网安备 33010602011771号