[Pycharm] Symbol Review
From: http://learnpythonthehardway.org/book/ex37.html
1. with X as Y: pass
1.1 yield
2. exec
2.1 namespace
3. lambda
3.1 map
3.2 map and reduce
4. raise

| KEYWORD | DESCRIPTION | EXAMPLE |
|---|---|---|
| and | Logical and. | True and False == False |
| as (1) | Part of the with-as statement. | with X as Y: pass |
| assert | Assert (ensure) that something is true. | assert False, "Error!" |
| break | Stop this loop right now. | while True: break |
| class | Define a class. | class Person(object) |
| continue | Don't process more of the loop, do it again. | while True: continue |
| def | Define a function. | def X(): pass |
| del | Delete from dictionary. | del X[Y] |
| elif | Else if condition. | if: X; elif: Y; else: J |
| else | Else condition. | if: X; elif: Y; else: J |
| except | If an exception happens, do this. | except ValueError, e: print e |
| exec (2) | Run a string as Python. | exec 'print "hello"' |
| finally | Exceptions or not, finally do this no matter what. | finally: pass |
| for | Loop over a collection of things. | for X in Y: pass |
| from | Importing specific parts of a module. | from x import Y |
| global | Declare that you want a global variable. | global X |
| if | If condition. | if: X; elif: Y; else: J |
| import | Import a module into this one to use. | import os |
| in | Part of for-loops. Also a test of X in Y. | for X in Y: pass also 1 in [1] == True |
| is | Like == to test equality. | 1 is 1 == True |
| lambda (3) | Create a short anonymous function. | s = lambda y: y ** y; s(3) |
| not | Logical not. | not True == False |
| or | Logical or. | True or False == True |
| pass |
This block is empty. | def empty(): pass |
| Print this string. | print 'this string' | |
| raise (4) | Raise an exception when things go wrong. | raise ValueError("No") |
| return | Exit the function with a return value. | def X(): return Y |
| try | Try this block, and if exception, go to except. | try: pass |
| while | While loop. | while X: pass |
| with | With an expression as a variable do. | with X as Y: pass |
| yield (1.1) | Pause here and return to caller. | def X(): yield Y; X().next() |
1. with-as statement(也称context manager)
From: http://zhoutall.com/archives/325
(1) 常见写法,但比较啰嗦
try:
    f = open('xxx')
except:
    print 'fail to open'
    exit(-1)
try:
    do something
except:
    do something
finally:
    f.close()
(2) 使用封装如何?不用反复写finally,但导致:所有的函数都要被 controlled_execution( ) 下,太累赘。
def controlled_execution(callback):
    set things up
    try:
        callback(thing)
    finally:
        tear things down

def my_function(thing):
    do something

controlled_execution(my_function)
(3) 另一个办法是使用生成器,但是只需要生成一次数据,我们用for-in结构去调用他:
def controlled_execution():  //因为thing只有一个,所以yield语句只需要执行一次,从代码可读性也就是优雅的角度来说这简直是糟糕透了
    set things up
    try:
        yield thing  //--> see "yield"
    finally:
        tear things down

for thing in controlled_execution():
    do something with thing
(4) with-as新方案
class controlled_execution:
    def __enter__(self):
        set things up
        return thing
    def __exit__(self, type, value, traceback):
        tear things down

with controlled_execution() as thing:
        do something
当python执行这一句时,会调用__enter__函数,然后把该函数return的值传给as后指定的变量。之后,python会执行下面do something的语句块。最后不论在该语句块出现了什么异常,都会在离开时执行__exit__。
另外,__exit__除了用于tear things down,还可以进行异常的监控和处理,注意后几个参数。要跳过一个异常,只需要返回该函数True即可。
在python2.5及以后,file对象已经写好了__enter__和__exit__函数,我们可以这样测试:
>>> f = open("x.txt")
>>> f
<open file 'x.txt', mode 'r' at 0x00AE82F0>
>>> f.__enter__()
<open file 'x.txt', mode 'r' at 0x00AE82F0>
>>> f.read(1)
'X'
>>> f.__exit__(None, None, None)
>>> f.read(1)
Traceback (most recent call last):
    File "<stdin>", line 1, in <module>
之后,我们如果要打开文件并保证最后关闭他,只需要这么做:
with open("x.txt") as f:
    data = f.read()
    do something with data
如果有多个项,我们可以这么写:
with open("x.txt") as f1, open('xxx.txt') as f2:
    do something with f1,f2
上文说了__exit__函数可以进行部分异常的处理,如果我们不在这个函数中处理异常,他会正常抛出,这时候我们可以这样写(python 2.7及以上版本,之前的版本参考使用contextlib.nested这个库函数):
try:
    with open( "a.txt" ) as f :
        do something
except xxxError:
    do something about exception
总之,with-as表达式极大的简化了每次写finally的工作,这对保持代码的优雅性是有极大帮助的。
1.1 yield
From: http://www.ibm.com/developerworks/cn/opensource/os-cn-python-yield/
清单 1. 简单输出斐波那契數列前 N 个数
 def fab(max):
    n, a, b = 0, 0, 1
    while n < max:
        print b         // 不太好! 其实改为yield就好了。
        a, b = b, a + b
        n = n + 1
执行 fab(5),我们可以得到如下输出:
 >>> fab(5)
 1
 1
 2
 3
 5
结果没有问题,但有经验的开发者会指出,直接在 fab 函数中用 print 打印数字会导致该函数可复用性较差,因为 fab 函数返回 None,其他函数无法获得该函数生成的数列。
要提高 fab 函数的可复用性,最好不要直接打印出数列,而是返回一个 List。
以下是 fab 函数改写后的第二个版本:
清单 2. 输出斐波那契數列前 N 个数第二版
 def fab(max):
    n, a, b = 0, 0, 1
    L = []
    while n < max:
        L.append(b)
        a, b = b, a + b
        n = n + 1
    return L       // 暂用内存太大!
可以使用如下方式打印出 fab 函数返回的 List:
 >>> for n in fab(5):
 ...     print n
 ...
 1
 1
 2
 3
 5
改写后的 fab 函数通过返回 List 能满足复用性的要求,但是更有经验的开发者会指出,该函数在运行中占用的内存会随着参数 max 的增大而增大。
如果要控制内存占用,最好不要用 List来保存中间结果,而是通过 iterable 对象来迭代。例如,在 Python2.x 中,代码:
清单 3. 通过 iterable 对象来迭代
for i in range(1000): pass //会导致生成一个 1000 个元素的 List
for i in xrange(1000): pass // iterable对象是解决的办法!
在每次迭代中返回下一个数值,内存空间占用很小。因为 xrange 不返回 List,而是返回一个 iterable 对象。
利用 iterable 我们可以把 fab 函数改写为一个支持 iterable 的 class,以下是第三个版本的 Fab:
清单 4. 第三个版本
 class Fab(object):

    def __init__(self, max):
        self.max = max
        self.n, self.a, self.b = 0, 0, 1

    def __iter__(self):
        return self

    def next(self):
        if self.n < self.max:
            r = self.b
            self.a, self.b = self.b, self.a + self.b
            self.n = self.n + 1
            return r
        raise StopIteration()
Fab 类通过 next() 不断返回数列的下一个数,内存占用始终为常数:
 >>> for n in Fab(5):
 ...     print n
 ...
 1
 1
 2
 3
 5
然而,使用 class 改写的这个版本,代码远远没有第一版的 fab 函数来得简洁。
如果我们想要保持第一版 fab 函数的简洁性,同时又要获得 iterable 的效果,yield 就派上用场了:
清单 5. 使用 yield 的第四版
 def fab(max):
    n, a, b = 0, 0, 1
    while n < max:
        yield b
        # print b
        a, b = b, a + b
        n = n + 1
第四个版本的 fab 和第一版相比,仅仅把 print b 改为了 yield b,就在保持简洁性的同时获得了 iterable 的效果。
调用第四版的 fab 和第二版的 fab 完全一致:
 >>> for n in fab(5):   // for执行一次函数,其实只是调用了函数内的一次运算;再调一次就再继续算一次!
 ...     print n
 ...
 1
 1
 2
 3
 5
也可以手动调用 fab(5) 的 next() 方法(因为 fab(5) 是一个 generator 对象,该对象具有 next() 方法),这样我们就可以更清楚地看到 fab 的执行流程:
清单 6. 执行流程
 >>> f = fab(5)  // fab(5) 是iterable function,这里就是指的fab的实例
 >>> f.next()    // 与清单4 中的next比较下,其实是相同的思想
 1
 >>> f.next()
 1
 >>> f.next()
 2
 >>> f.next()
 3
 >>> f.next()
 5
 >>> f.next()
 Traceback (most recent call last):
  File "<stdin>", line 1, in <module>
 StopIteration
当函数执行结束时,generator 自动抛出 StopIteration 异常,表示迭代完成。在 for 循环里,无需处理 StopIteration 异常,循环会正常结束。
2. exec
From: http://blog.sina.com.cn/s/blog_76e94d210100w1bl.html
exec语句用来执行储存在字符串或文件中的Python语句。
例如,我们可以在运行时生成一个包含Python代码的字符串,然后使用exec语句执行这些语句。
下面是一个简单的例子。
>>> exec 'print "Hello World"'
Hello World
eval语句用来计算存储在字符串中的有效Python表达式。下面是一个简单的例子。
>>> eval_r('2*3')
6
eval_r(str [ globals [ locals ]])函数将字符串str当成有效python表达式来求值,并返回计算结果。
同样地, exec语句将字符串str当成有效Python代码来执。.提供给exec的代码的名称空间和exec语句的名称空间相同。
最后,execfile(filename [, globals [, locals ]]) 函数可以用来执行一个文件。
>>> eval_r('3+4')
7
>>> exec 'a=100'
>>> a
100
>>> execfile(r'd:\code\ex\test.py')
hello world!
>>>
默认的,eval_r(), exec, execfile() 所运行的代码都位于当前的名字空间中.
eval_r(), exec 和 execfile()函数 也可以接受一个或两个可选字典参数作为代码执行的全局名字空间和局部名字空间。
2.1 Python命名空间和作用域
From: http://blog.cipherc.com/2015/04/25/python_namespace_and_scope/#assignment-rule
Namespace(只)是 从名字到对象的一个映射 (a mapping from name to objects) 。
大部分namespace都是按Python中的字典来实现的。
有一些常见的namespace:built-in中的集合( abs() 函数等)、一个模块中的全局变量等。
从某种意义上来说,一个对象(object)的所有属性(attribute)也构成了一个namespace.
在程序执行期间,可能(其实是肯定)会有多个名空间同时存在。不同namespace的创建/销毁时间也不同。此外,两个不同namespace中的两个相同名字的变量之间没有任何联系。
scope
Scope是Python程序的一块文本区域(textual region)。
在该文本区域中,对namespace是可以直接访问,而不需要通过属性来访问。
Scope是定义程序该如何搜索确切地“名字-对象”的名空间的层级关系。(The “scope” in Python defines the “hirerchy level” in which we search namespaces for certain “name-to-object” mappings.)
直接访问:对一个变量名的引用会在所有namespace中查找该变量,而不是通过属性访问。

属性访问:所有名字后加.的都认为是属性访问。如 module_name.func_name,需要指定 func_name 的名空间,属于属性访问;而 abs(-1),abs 属于直接访问。
scope 与 namespace的关系
在Python中,scope是由namespace按特定的层级结构组合起来的。

scope一定是namespace,但namespace不一定是scope。 // 感觉namespace范围更大?
LEGB-rule
在一个Python程序运行中,至少有4个scopes是存在的。
直接访问一个变量可能在这四个namespace中逐一搜索。
- Local (innermost)
-
包含局部变量。
比如一个函数/方法内部。
- Enclosing
-
包含了非局部(non-local)也非全局(non-global)的变量。
比如两个嵌套函数,内层函数可能搜索外层函数的namespace,但该namespace对内层函数而言既非局部也非全局。
- Global (next-to-last)
-
当前脚本的最外层。
比如当前模块的全局变量。
- Built-in (outtermost)
-
Python
__builtin__模块。
包含了内建的变量/关键字等。
* 那么,这么多的作用域,Python是按什么顺序搜索对应作用域的呢?
* 著名的”LEGB-rule”,即scope的搜索顺序:
Local -> Enclosing -> Global -> Built-in
当有一个变量在 local 域中找不到时,Python会找上一层的作用域,即 enclosing 域(该域不一定存在)。
enclosing 域还找不到的时候,再往上一层,搜索模块内的 global 域。最后,会在 built-in 域中搜索。
对于最终没有搜索到时,Python会抛出一个 NameError 异常。
作用域可以嵌套。比如模块导入时。
这也是为什么不推荐使用 from a_module import * 的原因,导入的变量可能被当前模块覆盖。
两条很重要的规则:
- 赋值语句通常隐式地会创建一个局部(local)变量,即便该变量名已存在于赋值语句发生的上一层作用域中;
- 如果没有global关键字声明变量,对一个变量的赋值总是认为该变量存在于最内层(innermost)的作用域中;
也就是说在作用域内有没有发生赋值是不一样的。
但是,在这点上,Python 2和Python 3又有不同, Python access non-local variable:


Python’s scoping rules indicate that a function defines a new scope level,
and a name is bound to a value in only one scope level – it is statically scoped.

…

In Python 2.x, it is not possible to modify a non-local variable;
1) you have either read-only access to a global or non-local variable,
2) or read-write access to a global variable by using the global statement,
3) or read-write access to a local variable (by default).

In Python 3.x, the nonlocal statement has been introduced with a similar effect
to global, but for an intermediate scope.
循环中的大坑
CipherChen@CIPHERC ~/Development/Workspace/test_python $ python2
Python 2.7.9 (default, Jan 25 2015, 13:42:57)
[GCC 4.2.1 Compatible Apple LLVM 6.0 (clang-600.0.56)] on darwin
Type "help", "copyright", "credits" or "license" for more information.
>>> for i in range(10): print i
...
0
1
2
3
4
5
6
7
8
9
>>> print i
9                <---- 大坑
>>>
for 后面跟着的变量(target list)在循环结束后是不会被删除的,
但如果 for 循环的序列为空,这些变量是完全不会被赋值的。
这在Python中是个大坑啊。
避免这个坑的解决办法就是规范命名规范。
比如用于循环的变量尽量使用单字符。在任何有疑议的情况可以直接将索引值初始化。
很不幸,Python 3中这点没有改变。
是否 引入新的作用域
class A(object):
    a = 3
    b = list(a + i for i in range(10))
cipher@Rachel ~/Development/Workspace/test_Python $ python a.py
Traceback (most recent call last):
  File "a.py", line 3, in <module>
    class A(object):
  File "a.py", line 5, in A
    b = list(a + i for i in range(10))
  File "a.py", line 5, in <genexpr>
    b = list(a + i for i in range(10))
NameError: global name 'a' is not defined
class没有作用域(scope),但有一个局部的名空间(namespace),它并不构成一个作用域。
---- 这意味着在类定义中的表达式可以访问该名空间。
但在类体(class body)中, 对 b 的赋值表达式中,该表达式引入了一个新的作用域,该作用域并不能访问类的名空间。
就像刚刚说的,函数会引入一个新的作用域(之前定义的a失效了),所以报错!
class C(object):
    a = 2
    def foo(self):
        return a    # NameError: name 'a' is not defined, use return self.__class__.a
未引入新的作用域的例子,所以可以执行 print a:
Python 2.7.9 (default, Jan 25 2015, 13:42:57)
[GCC 4.2.1 Compatible Apple LLVM 6.0 (clang-600.0.56)] on darwin
Type "help", "copyright", "credits" or "license" for more information.
>>> [a for a in range(3)]
[0, 1, 2]
>>> print a   //未引入新的作用域 就可以直接读出持续的值
2
要解决这个问题(哪个问题?),有几种解决办法:
1. 用生成器表达式
b = [a + i for i in range(10)]
2. 用函数/lambda引入新的作用域
b = (lambda a: ((a + i for i in range(10))))(a)
访问权限表 (难点)
| Can access class attributes | Python 2 | Python 3 |
| list comp. iterable | Y | Y |
| list comp. expression | Y | N |
| gen expr. iterable | Y | Y |
| gen expr. expression | N | N |
| dict comp. iterable | Y | Y |
| dict comp. expression | N | N |
3. lambda
map( lambda x: x*x, [y for y in range(10)] )
def sq(x):
    return x * x

map(sq, [y for y in range(10)])
进一步讲,匿名函数本质上就是一个函数,它所抽象出来的东西是一组运算。这是什么意思呢?类比
a = [1, 2, 3]
f = lambda x : x + 1
现在回头来看 map() 函数,它可以将一个函数映射到一个可枚举类型上面。沿用上面给出的 a 和 f,可以写:
map(f, a)
map( lambda x : x + 1, [1, 2, 3] )
和其他很多语言相比,Python 的 lambda 限制多多,最严重的当属它只能由一条表达式组成。这个限制主要是为了防止滥用,因为当人们发觉 lambda 很方便,就比较容易滥用,可是用多了会让程序看起来不那么清晰,毕竟每个人对于抽象层级的忍耐 / 理解程度都有所不同。
lambda的主体是一个表达式,而不是一个代码块。仅仅能在lambda表达式中封装有限的逻辑进去。
lambda表达式是起到一个函数速写的作用。允许在代码内嵌入一个函数的定义。
如下例子:定义了一个lambda表达式,求三个数的和。
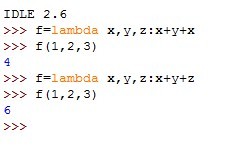
一种表达式,可以带参数的表达式,参数即给最外层的lambda的赋值,然后return表达式的计算结果。
- lambda表达式也可以用在def函数中。
看例子:
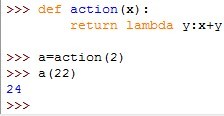
这里定义了一个action函数,返回了一个lambda表达式。其中lambda表达式获取到了上层def作用域的变量名x的值。
a是action函数的返回值,a(22),即是调用了action返回的lambda表达式。
- 这里也可以把def直接写成lambda形式。如下

3.1 map
map(function, sequence[, sequence, ...]) -> list
map(lambda x: x ** 2, [1, 2, 3, 4, 5])

返回结果为:
map(lambda x, y: x + y, [1, 3, 5, 7, 9], [2, 4, 6, 8, 10])

map返回的list中第一个元素为,参数序列1的第一个元素加参数序列2中的第一个元素(1 + 2),
list中的第二个元素为,参数序列1中的第二个元素加参数序列2中的第二个元素(3 + 4),
依次类推,最后的返回结果为:
[3, 7, 11, 15, 19]
map(None, [1, 3, 5, 7, 9], [2, 4, 6, 8, 10])

返回结果为:
3.2 map and reduce
提起map和reduce想必大家并不陌生,Google公司2003年提出了一个名为MapReduce的编程模型[1],用于处理大规模海量数据,并在之后广泛的应用于Google的各项应用中,2006年Apache的Hadoop项目[2]正式将MapReduce纳入到项目中。
好吧,闲话少说,今天要介绍的是Python函数式编程中的另外两个内建函数 map()和reduce(),而不是Google的MapReduce。
1.map()
格式:map( func, seq1[, seq2...] )
Python函数式编程中的map()函数是将func作用于seq中的每一个元素,并用一个列表给出返回值。如果func为None,作用同zip()。 // 同3.1
当seq只有一个时,将func函数作用于这个seq的每个元素上,得到一个新的seq。
下图说明了只有一个seq的时候map()函数是如何工作的(本文图片来源:《Core Python Programming (2nd edition)》)。
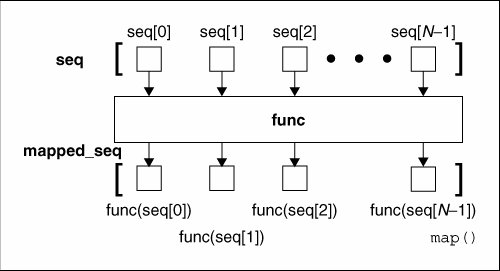
可以看出,seq中的每个元素都经过了func函数的作用,得到了func(seq[n])组成的列表。
# 使用map
print map( lambda x: x%3, range(6) )  # [0, 1, 2, 3, 4, 5] --> [0, 1, 2, 0, 1, 2]

#使用列表解析
print [x%3 for x in range(6)]         # [0, 1, 2, 0, 1, 2] 多于一个range,就没办法搞了
这里又和上次的filter()一样,使用了列表解析的方法代替map执行。那么,什么时候是列表解析无法代替map的呢?
原来,当seq多于一个时,map可以并行地对每个seq执行如下图所示的过程:
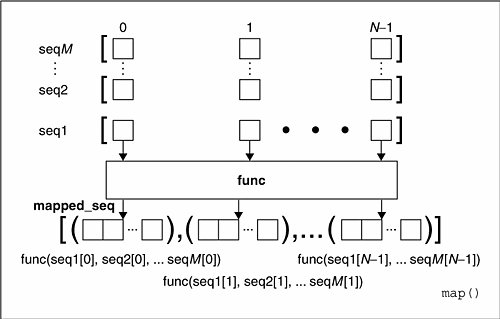
也就是说每个seq的同一位置的元素在执行过一个多元的func函数之后,得到一个返回值,这些返回值放在一个结果列表中。
下面的例子是求两个列表对应元素的积,可以想象,这是一种可能会经常出现的状况,而如果不是用map的话,就要使用一个for循环,依次对每个位置执行该函数。
print map( lambda x, y: x*y, [1, 2, 3], [4, 5, 6] ) # [4, 10, 18]
也可以是一个元组。下面的代码不止实现了乘法,也实现了加法,并把积与和放在一个元组中。
还有就是上面说的func是None的情况,它的目的是将多个列表相同位置的元素归并到一个元组,在现在已经有了专用的函数zip()了。
print map( None, [1, 2, 3], [4, 5, 6] )  # [(1, 4), (2, 5), (3, 6)]
print zip( [1, 2, 3], [4, 5, 6] )        # [(1, 4), (2, 5), (3, 6)]
需要注意的是,不同长度的多个seq是无法执行map函数的,会出现类型错误。
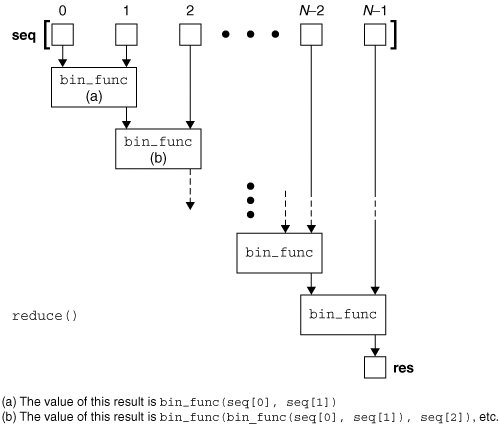
2.reduce()
格式:reduce( func, seq[, init] )
reduce函数即为化简,它是这样一个过程:
"每次迭代,将上一次的迭代结果(第一次时为init的元素,如没有init则为seq的第一个元素)与下一个元素一同执行一个二元的func函数。"
在reduce函数中,init是可选的,如果使用,则作为第一次迭代的第一个元素使用。
简单来说,可以用这样一个形象化的式子来说明:
reduce( func, [1, 2, 3] ) = func( func(1, 2), 3)
下面是reduce函数的工作过程图:
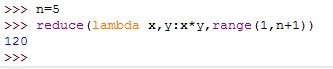
举个例子来说,阶乘是一个常见的数学方法,Python中并没有给出一个阶乘的内建函数,我们可以使用reduce实现一个阶乘的代码。
n = 5
print reduce(lambda x,y: x*y, range(1, n + 1))  # 120
那么,如果我们希望得到2倍阶乘的值呢?这就可以用到init这个可选参数了。
m = 2
n = 5
print reduce( lambda x,y: x*y, range( 1, n + 1 ), m )  # 240
4. raise
From: http://www.cnblogs.com/IPrograming/p/Python_error_handler.html
1. 抛出异常和自定义异常
Python用异常对象(exception object)表示异常情况,遇到错误后,会引发异常。
如果异常对象并未被处理或捕捉,程序就会用所谓的回溯(Traceback,一种错误信息)终止执行。
1.1 raise 语句
Python中的raise 关键字用于引发一个异常,基本上和C#和Java中的throw关键字相同,如下所示:

1 # -- coding: utf-8 --
2
3 def ThorwErr():
4     raise Exception("抛出一个异常")     # raise关键字后面是抛出是一个通用的异常类型(Exception),
5
6 # Exception: 抛出一个异常
7 ThorwErr()
一般来说抛出的异常越详细越好,Python在exceptions模块内建了很多的异常类型,通过使用dir函数来查看exceptions中的异常类型,如下:
import exceptions

# ['ArithmeticError', 'AssertionError'.....]
print dir(exceptions)
传递异常
捕捉到了异常,但是又想重新引发它(传递异常),可以使用不带参数的raise语句即可:
 1 # -- coding: utf-8 --
 2 class MuffledCalculator:
 3     muffled = False
 4     def calc(self,expr):
 5         try:
 6             return eval(expr)
 7         except ZeroDivisionError:
 8             if self.muffled:
 9                 print 'Division by zero is illegal'
10             else:
11                 raise
1.2 自定义异常类型
Python中也可以自定义自己的特殊类型的异常,只需要要从Exception类继承(直接或间接)即可:
class SomeCustomException(Exception):
    pass
2. 捕捉异常
和C#中的try/catch类似,Python中使用try/except关键字来捕捉异常,如下:
# -- coding: utf-8 --

try:
    print 2/0
except ZeroDivisionError:
    print '除数不能为0'
2.1 捕捉多个异常 (以下两种选择)
在一个except语句只捕捉其后声明的异常类型,如果可能会抛出的是其他类型的异常就需要再增加一个except语句了,或者也可以指定一个更通用的异常类型比如:Exception,如下:
# -- coding: utf-8 --
try:
    print 2/'0'
except ZeroDivisionError:
    print '除数不能为0'
except Exception:
    print '其他类型异常'
为了捕获多个异常,除了声明多个except语句之外,还可以在一个except语句之后将多个异常作为元组列出来即可:
# -- coding: utf-8 --
try:
    print 2/'0'
except (ZeroDivisionError,Exception):
    print '发生了一个异常'
2.2获取异常信息
每个异常都会有一些异常信息,一般情况下我们应该把这些异常信息记录下来:
# -- coding: utf-8 --
try:
    print 2/'0'
except (ZeroDivisionError,Exception) as e:
    # unsupported operand type(s) for /: 'int' and 'str'
    print e
3. finally子句
finally子句和try子句联合使用但是和except语句不同,finally不管try子句内部是否有异常发生,都会执行finally子句内的代码。所有一般情况下,finally自己常常用于关闭文件或者在Socket中。

 浙公网安备 33010602011771号