

Problem:
You want to enable end-users visiting your web-site to dynamically customize the look and feel of it. Specifically, you want to enable them to choose different content layouts for the site, as well as different style experiences (colors, fonts, etc).
When building this customization system, you want to make sure you avoid duplicating logic throughout the multiple pages. Instead, you want to be able to author the dynamic personalization logic once and have all pages inherit it.
Solution:
ASP.NET 2.0 makes dynamically customizing the UI experience of a web-site easy. Specifically, it provides a flexible mechanism for defining page layouts using a feature called “Master Pages”. It also provides a flexible mechanism for defining a page’s style look and feel via a feature called “Themes”.
What is nice about both “Master Pages” and “Themes” is that they can be configured either statically (by specifying the Master Page or Theme to use within an ASP.NET Page’s <% Page %> directive), or dynamically at runtime by setting the Page’s MasterPageFile and Theme properties via code. This later approach can be easily used to enable dynamic user personalization of UI on a web-site. The below walkthrough demonstrates how to implement this. You can also download a complete sample that shows how to-do this here.
Step 1: Create a New Web-Site
Begin by starting a new web-site in either Visual Studio or Visual Web Developer (which is free). Create two master page files called “Site1.Master” and “Site2.Master” within it.
We will use these two master-pages to provide two alternative layout views for the site that end-users will be able to pick between. For the purposes of this sample we’ll keep each master file simple (although obviously you could add much more layout and content to each). Here is a trivial example of what you could have in “Site1.Master” to start with for the purposes of this sample:
<%@ Master Language="VB" CodeFile="Site1.master.vb" Inherits="Site1" %>
<html>
<head runat="server">
<title>Site1 Template</title>
</head>
<body>
<form id="form1" runat="server">
<div>
<h1>Site1 Master Template</h1>
<asp:contentplaceholder id="MainContent" runat="server">
</asp:contentplaceholder>
</div>
</form>
</body>
</html>
After creating the two master-pages, add two new ASP.NET pages to the project – and choose to have them built using a Master Page. Call these two new pages “Default.aspx” and “Personalize.aspx”, and have them be based on the Site1.Master template above.
Step 2: Add Two Themes to the Site
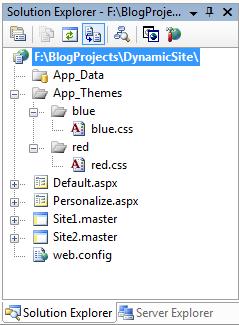
Right-click on the Solution Explorer within VS and choose the “Add ASP.NET Folder->Theme” context menu option. This will create a folder called “App_Themes” immediately underneath your application root directory. You should then create two sub-folders underneath the “App_Themes” folder called “Blue” and “Red”. This will define two separate themes for the site. Within each theme folder you can add CSS stylesheets, images, and .skin files to customize the site’s appearance however you want.
For the purposes of this sample, we’ll add a “blue.css” stylesheet under the “Blue” folder and a “red.css” stylesheet under the “Red” folder. For now we’ll keep their implementations trivial and just set the background color for pages in them:
body
{
background-color:blue;
}
Once this is done, our site project layout should look like this:
Now we are ready to enable end-users visiting our site to dynamically personalize which Master Page file is used (allowing them to control the layout of the site), as well as which Theme/Stylesheet is used (allowing them to control the style of the site).
Step 3: Enable ASP.NET Personalization
We could save our visitors’ layout and style preferences in a variety of different places (within an http cookie, within a custom database, in a directory on the file-system, etc). For the purposes of this sample, I’m going to use the new ASP.NET 2.0 Profile Personalization feature. This allows me to easily save/retrieve information about users accessing the site with minimal code.
You can use the ASP.NET Profile Personalization feature in combination with any authentication mechanism (Windows Authentication, Forms Authentication, Passport, or any other authentication approach you want). For this sample I’m just going to use Windows Authentication to login and identify the user. If you aren’t familiar with how Windows authentication works, please read my previous Enabling Windows Authentication Recipe.
Once I’ve configured the site to use Windows Authentication, I can enable the ASP.NET Profile system by adding a <profile> section within my web.config file that lists the properties I want to store about users. For the purposes of this sample I’m going to store two string properties:
<profile>
<properties>
<add name="ThemePreference" type="string" defaultValue="Blue"/>
<add name="MasterFilePreference" type="string" defaultValue="~/Site1.master"/>
</properties>
</profile>
If you have SQL Express installed on your machine, then you are done. ASP.NET will automatically provision a new SQL Express database within your app_data folder at runtime that has the appropriate Profile tables configured to save your profile data above. You don’t need to take any additional steps to configure this.
If you don’t have SQL Express installed, and instead want to use a SQL Server to store the Profile data, you’ll need to create a database within SQL to store the ASP.NET Application Service tables, and update your web.config file to point at the database. The good news is that this is easy to-do. If you haven’t done this before, please read my previous Configuring ASP.NET 2.0 Application Services to use SQL Recipe that demonstrates how to do this.
Step 4: Building the Personalize.aspx Page
Now that we have enabled ASP.NET Profile Personalization, we can go to work building a Personalize.aspx page that we can use to enable end-users on the site to dynamically pick which Master Page and Theme they want to use. To do this we’ll add two <asp:dropdownlist> controls to the page to enable users to select the appropriate choices:
<asp:Content ID="Content1" ContentPlaceHolderID="MainContent" Runat="Server">
<h2>
Pick your master file:
<asp:DropDownList ID="ddlMasterFilePreference" runat="server">
<asp:ListItem Text="Site Choice One" Value="~/Site1.Master" />
<asp:ListItem Text="Site Choice Two" Value="~/Site2.Master" />
</asp:DropDownList>
</h2>
<h2>
Pick your theme preference:
<asp:DropDownList ID="ddlThemePreference" runat="server">
<asp:ListItem Text="Blue" />
<asp:ListItem Text="Red" />
</asp:DropDownList>
</h2>
<div>
<asp:Button ID="UpdateBtn" runat="server" Text="Update" />
</div>
</asp:Content>
Within the code-behind of the Personalize.aspx page we’ll then write this code to save and restore the selection to the ASP.NET Profile system:
Partial Class Personalize
Inherits System.Web.UI.Page
Sub Page_Load(ByVal sender As Object, ByVal e As System.EventArgs) Handles Me.Load
If (Page.IsPostBack = False) Then
ddlMasterFilePreference.SelectedValue = Profile.MasterFilePreference
ddlThemePreference.SelectedValue = Profile.ThemePreference
End If
End Sub
Sub UpdateBtn_Click(ByVal sender As Object, ByVal e As System.EventArgs) Handles UpdateBtn.Click
Profile.MasterFilePreference = ddlMasterFilePreference.SelectedValue
Profile.ThemePreference = ddlThemePreference.SelectedValue
Response.Redirect("default.aspx")
End Sub
End Class
Notice that ASP.NET automatically adds a strongly-typed “Profile” object to our pages that we can use to easily get type-safe access to the Profile collection we defined within our web.config file previously. It automatically handles saving/retrieving the user’s profile data from the configured profile database.
When the Personalize.aspx page is visited, an end-user will now be able to pick which layout and style choice they want:
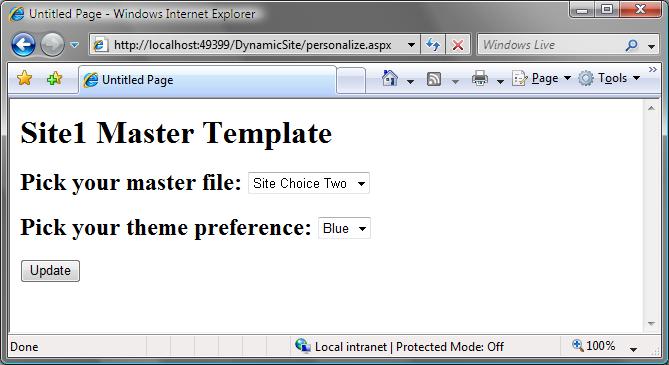
When the end-user clicks “Update” their settings will be persisted in the ASP.NET Profile database automatically. When they revisit the Personalize.aspx page later, their preferences will be retrieved and populated within the dropdownlists.
Step 5: Building a Base Page Class to Personalize Page Content
We want to avoid having to repeatedly add the same logic to set the Master Page and Theme on every page of the site. We’ll instead create a base page class that encapsulates this functionality, and have each of the pages on our site inherit from it.
To-do this, we’ll create a new class called “MyBasePage” that will live within our app_code directory (if we are using the VS 2005 Web Site Project option):
Imports System.Web.UI.Page
Public Class MyBasePage
Inherits System.Web.UI.Page
Protected Overrides Sub OnPreInit(ByVal e As System.EventArgs)
MyBase.OnPreInit(e)
Dim MyProfile As System.Web.Profile.ProfileBase
MyProfile = HttpContext.Current.Profile
Me.MasterPageFile = MyProfile.GetPropertyValue("MasterFilePreference")
Me.Theme = MyProfile.GetPropertyValue("ThemePreference")
End Sub
End Class
The above class inherits the base ASP.NET Page Class (System.Web.UI.Page), and overrides the OnPreInit method (which is called when the “PreInit” event on a page executes). Within this method we then set the page’s “MasterPageFile” and “Theme” properties with the values the user persisted within the ASP.NET Profile Store.
Note that when accessing the Profile data in the code above, I’m accessing it via the “GetPropertyValue()” helper method. This code will work both within the web-site project, as well as any companion class-library projects I might want to use to store this base class in instead (enabling me to easily re-use it across multiple projects).
Step 6: Using the Base Page Class within Pages
Using the base page class we built above with pages is simple. Just open the code-behind file of any of the pages within the site, and update its base class declaration from:
Partial Class _Default
Inherits System.Web.UI.Page
End Class
To instead be:
Partial Class _Default
Inherits MyBasePage
End Class
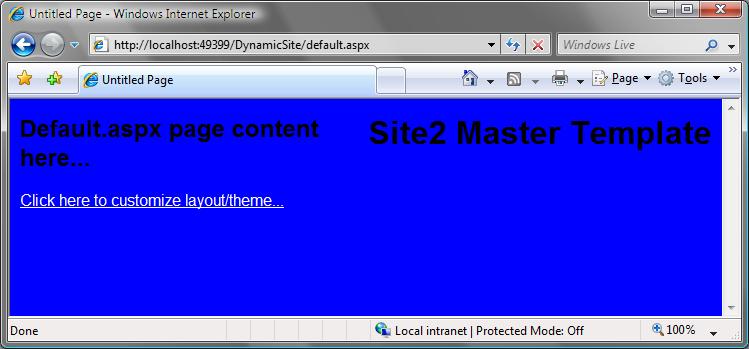
Now when the pages within our site run, the OnPreInit method within our base class will execute, and we’ll dynamically update the Page’s Master Page and Theme to reflect what the user has personalized. For example:
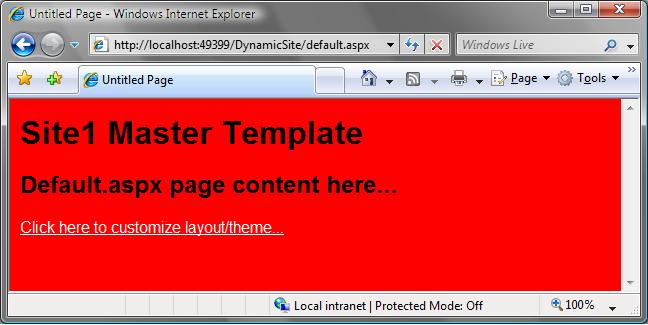
Or:
This is all of the logic we need to enable dynamic layout and style personalization for the site. We can now pass off the master page templates and CSS style-sheets to a designer to customize to make them as rich and attractive as we want.
Summary
The above walkthrough illustrates the basics of how you can enable rich site layout and style personalization. It also demonstrates how you can encapsulate common page functionality within a base class that you can easily re-use across multiple pages in a site – a very useful approach that can be used far beyond just personalization.

 浙公网安备 33010602011771号