在WSL2中搭建Matter CHIP Tool环境
1. 简介
本文介绍如何在Windows的WSL(Windows Subsystem for Linux)环境中搭建Matter CHIP Tool环境,无需开发者准备树莓派或原生Linux电脑。然后列举如何简单使用CHIP Tool对一台Matter设备进行测试。
阅读本文前,确保你掌握基本的Linux命令、网络、Docker知识。
目前仅测试了Matter Over Thread. 未测试Matter over Wi-Fi
如果你追求快速稳定搭建CHIP Tool,不在乎搭建树莓派或Linux PC的成本,请直接参考官方文档:
2. 前期准备
-
一台Windows电脑,已安装WSL2 Ubuntu 24.04
- 已经安装好USBIPD,可以把Windows的USB设备Attach到WSL中
- 安装USBIPD的图形界面wsl-usb-manager,方便操作
-
一台用于测试的Matter设备,可以用烧录好Matter例程的开发板代替
-
网络可访问DockerHub
注意:
如果你之前没装过WSL2,记得安装时考虑磁盘容量
Windows家庭版默认不包含Hyper-V,需要自行搜索方式安装Hyper-V和WSL2
网络代理工具推荐开启Tun模式,这样才能代理WSL2内的网络
较老的WSL2 linux内核(5.x版本)可能并不包含bluetooth驱动,这里给出我的内核版本:
$ uname -r
6.6.87.2-microsoft-standard-WSL2
如果你需要升级内核,在Windows中使用管理员权限运行Power Shell,执行:
wsl --update
3. 准备USB Dongle
烧录固件
准备Blutooth USB dongle固件
你可以自己编译:
编译HCI USB固件:
v3.1.0\zephyr\samples\bluetooth\hci_usb,板子选择nrf52840dongle/nrf52840编译得到的app固件路径:
build\hci_usb\zephyr\zephyr.hex
也可以用我编译好的:
hci_usb_52840dongle_app_v3.1.0.hex
准备Thread RCP固件
你可以自己编译:
编译Thread: Co-processor固件:
v3.1.0\nrf\samples\openthread\coprocessor编译得到的app固件路径:
build\hci_usb\zephyr\zephyr.hex
也可以用我编译好的:
thread_rcp_52840dongle_app_v3.1.0.hex
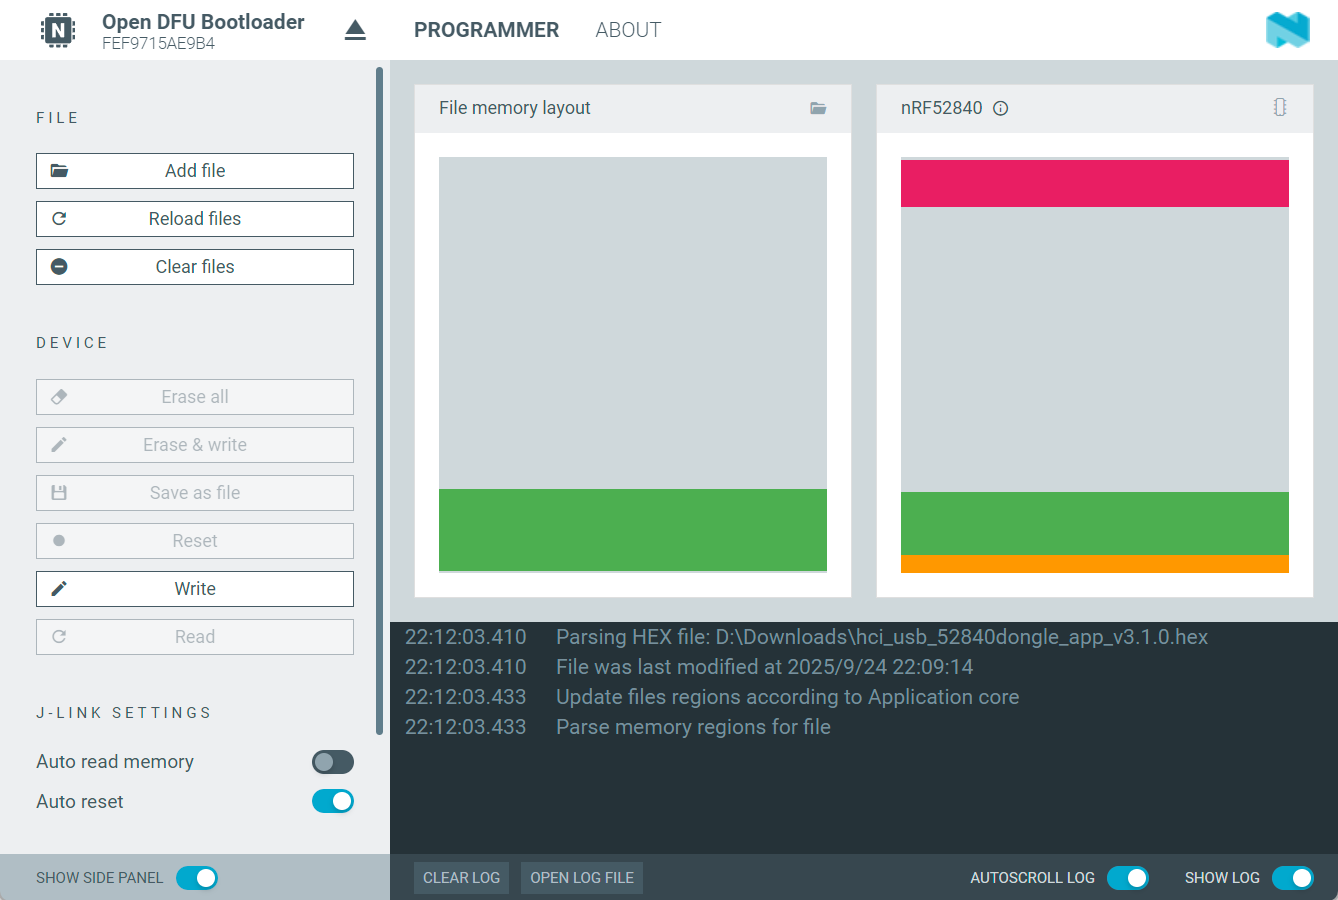
给2个52840dongle烧录固件
按住reset按钮的同时,插入USB到电脑:

观察到红色呼吸灯,说明在bootloader模式。
在nRF Connect for Desktop的Programmer工具中,分别给2个dongle烧录前面的2个固件:
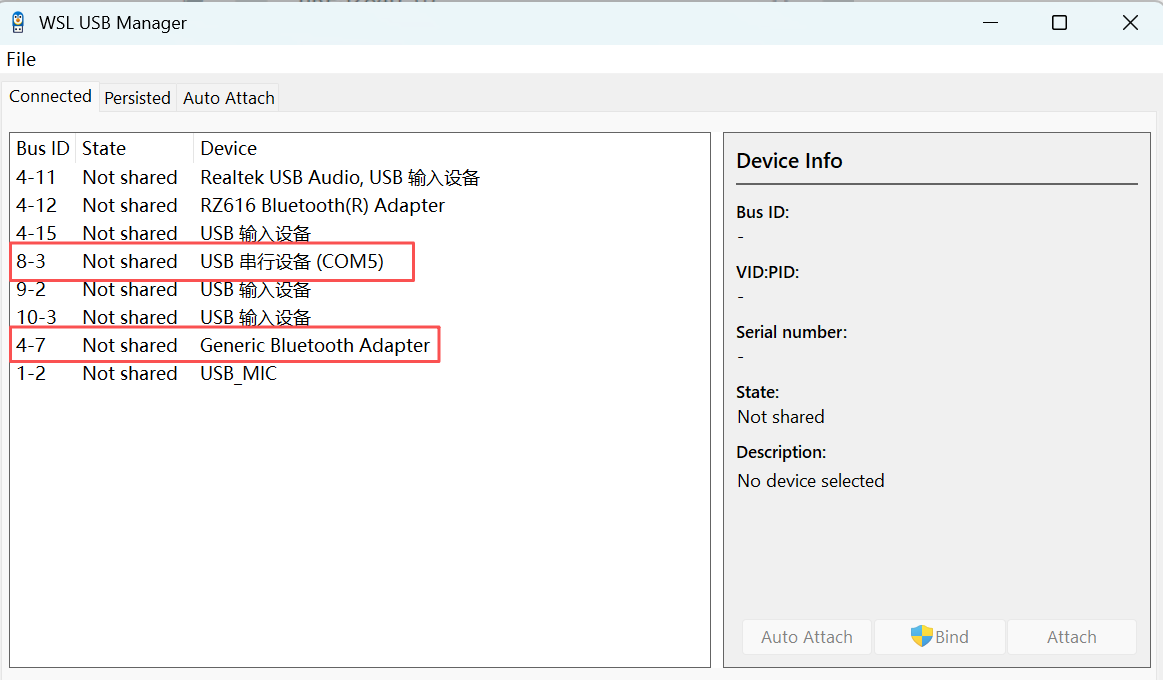
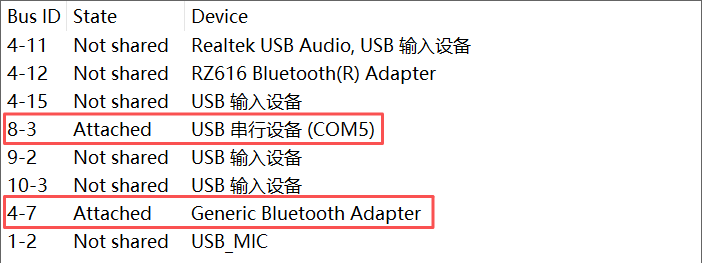
把2个USB Dongle附着到WSL2
先在WSL2中安装依赖:
sudo apt update
sudo apt install bluez bluez-tools bluetooth usbutils
安装Nordic USB规则:
sudo apt install libusb-1.0-0

# download from https://github.com/NordicSemiconductor/nrf-udev/releases
sudo dpkg -i nrf-udev_1.0.1-all.deb
检查内核是否已经有开启蓝牙驱动,如果没有就加载这个内核模块:
lsmod | grep btusb

sudo modprobe btusb
目前的内核版本(6.6.87.2-microsoft-standard-WSL2)应该默认就已经开启了蓝牙驱动。
在Windows的WSL USB Manager中查看多出来的两个USB设备,右键点击,先bind,再Attach:
在WSL中检查:
$ lsusb
Bus 001 Device 001: ID 1d6b:0002 Linux Foundation 2.0 root hub
Bus 001 Device 002: ID 1915:0000 Nordic Semiconductor ASA Thread Co-Processor
Bus 001 Device 003: ID 2fe3:000b NordicSemiconductor USB-DEV
Bus 002 Device 001: ID 1d6b:0003 Linux Foundation 3.0 root hub
检查Thread串口tty是否出现:
$ ls /dev/ttyACM*
/dev/ttyACM0
然后检查蓝牙,你可以在bluetoothctl交互式命令中使用power on, list, scan on等进行测试,用exit退出:
$ hciconfig
hci0:   Type: Primary  Bus: USB
        BD Address: 00:00:00:00:00:00  ACL MTU: 27:3  SCO MTU: 0:0
        UP RUNNING
        RX bytes:702 acl:0 sco:0 events:62 errors:0
        TX bytes:381 acl:0 sco:0 commands:62 errors:0

$ bluetoothctl
Waiting to connect to bluetoothd...[bluetooth]# hci0 new_settings: powered bondable le secure-conn static-addr
[bluetooth]# Agent registered
[bluetooth]# [CHG] Controller C1:A2:0D:11:AE:6E Pairable: yes
[bluetooth]# list
Controller C1:A2:0D:11:AE:6E DESKTOP-KLNH3ME [default]
[bluetooth]# power on
[bluetooth]# Changing power on succeeded
[bluetooth]# scan on
[bluetooth]# SetDiscoveryFilter success
[bluetooth]# Discovery started
[bluetooth]# [CHG] Controller C1:A2:0D:11:AE:6E Discovering: yes
[bluetooth]# [NEW] Device 6C:EC:A5:98:63:AD 6C-EC-A5-98-63-AD
[bluetooth]# [NEW] Device D5:B7:10:B1:20:21 HB7930785605
[bluetooth]# [NEW] Device 7A:10:6A:1A:36:14 7A-10-6A-1A-36-14
[bluetooth]# [NEW] Device 68:D0:F4:5C:F6:F9 68-D0-F4-5C-F6-F9
[bluetooth]# [NEW] Device 24:F1:50:56:37:10 24-F1-50-56-37-10
[bluetooth]# [NEW] Device 26:F1:C5:BB:E7:3D 26-F1-C5-BB-E7-3D
[bluetooth]# [NEW] Device 44:48:FF:76:DA:F3 U-BACDAF2
[bluetooth]# [NEW] Device A0:99:21:05:6A:D5 midea
......
......
[bluetooth]# exit
4. 准备CHIP Tool可执行文件
推荐直接下载Nordic编译好的可执行文件:Releases · nrfconnect/sdk-connectedhomeip
如果你想自己编译,参考:CHIP Tool for Linux or macOS
下载好可执行文件chip-tool_x64,重命名为chip-tool,添加到PATH环境变量,并用chmod a+x chip-tool增加可执行权限。
确保你可以执行chip-tool即可。
5. 安装OTBR Docker
官方文档:Running OTBR using Docker
安装依赖
sudo apt update
sudo apt install avahi-daemon avahi-utils docker.io
注:avahi-daemon和avahi-utils是官方文档没有提到,并且WSL2中缺少的。它负责mDNS功能。
配置otbr网络
# Start the Docker daemon
sudo systemctl start docker

# Create an IPv6 network for the OpenThread Border Router container in Docker
sudo docker network create --ipv6 --subnet fd11:db8:1::/64 -o com.docker.network.bridge.name=otbr0 otbr
拉取镜像
注意镜像版本(fbde28a)要和官方文档最新版本一致:
docker pull nrfconnect/otbr:fbde28a
检查拉取的镜像:
docker image ls
REPOSITORY        TAG       IMAGE ID       CREATED         SIZE
nrfconnect/otbr   fbde28a   62c4237aa6f4   11 months ago   1.49GB
运行容器
在运行之前,确保内核加载了ipv6功能:
sudo modprobe ip6table_filter
这里只是一次性加载,每次重启WSL后都要执行重新加载
运行容器:
sudo docker run -it --rm --privileged --name otbr --network otbr -p 8080:80 \
--sysctl "net.ipv6.conf.all.disable_ipv6=0 net.ipv4.conf.all.forwarding=1 net.ipv6.conf.all.forwarding=1" \
--volume "/dev/ttyACM0:/dev/radio" nrfconnect/otbr:fbde28a --radio-url "spinel+hdlc+uart:///dev/radio?uart-baudrate=1000000"
- 这个容器名称是otbr,使用的网络名称也叫otbr,是前面创建的
--rm参数会让这个容器在停止时自动被删除,无需手动清理- 命令中的
/dev/ttyACM0就是附着到WSL2中的Thread RCP。如果你的串口号不一样记得修改。- 相比于官方文档,这里部分参数我加了引号
",这样才能让zsh等shell正常执行。
容器运行时会占用shell终端,可以先按Ctrl+P,松开,再按Ctrl+Q,让容器去后台运行。
你也可以在运行时直接加上
-d参数,这样一开始docker就会在后台运行。后台运行的话,可以用
docker logs otbr查看历史日志。这里介绍一些docker快捷键:
快捷键 作用 说明 Ctrl+P, Ctrl+Q脱离容器但不停止 最常用 Ctrl+C停止容器 发送 SIGTERM 信号 Ctrl+Z暂停容器 发送 SIGTSTP 信号 Ctrl+D退出容器 如果使用 docker exec进入
设置Thread网络
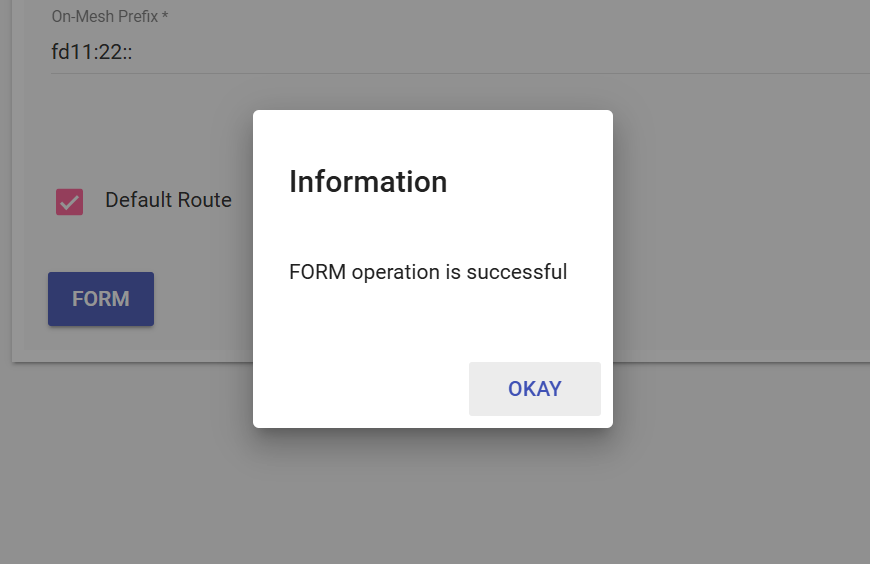
方式一:本地网页开启Thread网络
OTBR容器会开启一个网页服务器,用浏览器访问 http://localhost:8080/
在Form页面,记下On-Mesh Prefix,然后点击FORM开启网络:

检查Thread网络状态:
sudo docker exec -it otbr sh -c "sudo service otbr-agent status"
 * otbr-agent is running

sudo docker exec -it otbr sh -c "sudo ot-ctl state"
leader
Done
方式二:命令开启Thread网络
# create new dataset
docker exec otbr ot-ctl dataset init new

# check new dataset
docker exec otbr ot-ctl dataset

# commit this dataset
docker exec otbr ot-ctl dataset commit active

# Start network
docker exec otbr ot-ctl ifconfig up
docker exec otbr ot-ctl thread start

# wait for about 7s
sleep 7

# check network state
docker exec -it otbr sh -c "sudo ot-ctl state"

# Set On-Mesh prefix: fd11:22::/64
docker exec -it otbr ot-ctl prefix add fd11:22::/64 paos
docker exec -it otbr ot-ctl netdata register
添加路由规则
我们希望让chip-tool向Thread网络内的地址发出的IPv6 UDP包能被正确路由。
这里要用到上一步记住的On-Mesh Prefix,假设是fd11:22::/64,添加路由:
sudo ip -6 route add fd11:22::/64 dev otbr0 via fd11:db8:1::2
这是一次性添加,每次重启WSL后要重新执行
检查路由表是否成功添加:
ip -6 route
fd11:22::/64 via fd11:db8:1::2 dev otbr0 metric 1024 pref medium
fd11:db8:1::/64 dev otbr0 proto kernel metric 256 pref medium
fe80::/64 dev eth0 proto kernel metric 256 pref medium
fe80::/64 dev veth2f60c62 proto kernel metric 256 pref medium
fe80::/64 dev otbr0 proto kernel metric 256 pref medium
可以看到第一行的路由规则,所有发往fd11:22::/64的数据包,都将被路由到otbr0网卡。如果你发现重启后这一条没了,就再次执行前面的命令。
6. CHIP Tool运行测试
本节只介绍通过ble配网Matter over Thread设备。更多方式请参考官方文档:Using CHIP Tool for Matter device testing
找一个开发板,编译并烧录Matter: Light bulb例程(nrf\samples\matter\light_bulb),运行,查看串口日志:
...
...
I: 238 [DL]Device Configuration:
I: 241 [DL]  Serial Number: 11223344556677889900
I: 245 [DL]  Vendor Id: 65521 (0xFFF1)
I: 249 [DL]  Product Id: 32773 (0x8005)
I: 252 [DL]  Product Name: not-specified
I: 256 [DL]  Hardware Version: 0
I: 259 [DL]  Setup Pin Code (0 for UNKNOWN/ERROR): 20202021
I: 264 [DL]  Setup Discriminator (0xFFFF for UNKNOWN/ERROR): 3840 (0xF00)
I: 271 [DL]  Manufacturing Date: 2022-01-01
I: 275 [DL]  Device Type: 65535 (0xFFFF)
I: 278 [SVR]SetupQRCode: [MT:6FCJ142C00KA0648G00]
I: 283 [SVR]Copy/paste the below URL in a browser to see the QR Code:
I: 289 [SVR]https://project-chip.github.io/connectedhomeip/qrcode.html?data=MT%3A6FCJ142C00KA0648G00
I: 298 [SVR]Manual pairing code: [34970112332]
E: 302 [DL]Long dispatch time: 258 ms, for event type 2
I: 309 [DL]CHIPoBLE advertising started
I: 313 [DL]NFC Tag emulation started
灯泡这个例程是开机自动开启配网广播的,不需要操作。
记录下Pin Code: 20202021和Discriminator: 3840。
获取当前Thread网络密钥
sudo docker exec -it otbr sh -c "sudo ot-ctl dataset active -x"
例如:
sudo docker exec -it otbr sh -c "sudo ot-ctl dataset active -x"
0e0800000000000100004a0300001435060004001fffe00708fdc22a566b13a4e10c0402a0f7f8051000112233445566778899aabbccddeeff030e4f70656e54687265616444656d6f0410445f2b5ca6f2a93a55ce570a70efeecb000300000f0208111111112222222201021234
Done
注意每次重启Docker容器,密钥都会发生微小的变化。记得重新获取。
设备入网
chip-tool pairing ble-thread <node_id> hex:<operational_dataset> <pin_code> <discriminator>
node_id:用户自定义的一个正数id,代表当前要绑定的设备hex:<operational_dataset>:Thread网络密钥<pin_code>:设备的pin code<discriminator>:设备的discriminator
例如:
chip-tool pairing ble-thread 0x101 hex:0e08000000000001000000030000114a0300001635060004001fffe00208f238904e09085f280708fdf0b133259ede240510499ab47780ab5caa763e9137e92acfa5030f4f70656e5468726561642d37313734010271740410d15cae05d12237c4be2c167faea01e5c0c0402a0f7f8 20202021 3840 --bypass-attestation-verifier true
注:这里使用
--bypass-attestation-verifier true跳过了证书验证。各种测试证书、生产的正式证书设置不在本文讨论范围。
最终没有错误日志输出,即可说明配网成功:
......
[1758729999.505] [6784:6786] [CTL] Successfully finished commissioning step 'SendComplete'
[1758729999.505] [6784:6786] [CTL] Commissioning stage next step: 'SendComplete' -> 'Cleanup'
[1758729999.505] [6784:6786] [CTL] Performing next commissioning step 'Cleanup'
[1758729999.505] [6784:6786] [CTL] Successfully finished commissioning step 'Cleanup'
[1758729999.505] [6784:6786] [DIS] Closing all BLE connections
[1758729999.505] [6784:6786] [IN] Clearing BLE pending packets.
[1758729999.505] [6784:6786] [BLE] Auto-closing end point's BLE connection.
[1758729999.505] [6784:6786] [DL] Closing BLE GATT connection (con 0x74aa1c024530)
[1758729999.505] [6784:6785] [DL] Close BLE connection: peer=DE:4A:50:3D:16:29
[1758729999.661] [6784:6786] [IN] SecureSession[0x74aa140054c0]: MarkForEviction Type:1 LSID:14320
[1758729999.661] [6784:6786] [SC] SecureSession[0x74aa140054c0, LSID:14320]: State change 'kActive' --> 'kPendingEviction'
[1758729999.661] [6784:6786] [IN] SecureSession[0x74aa140054c0]: Released - Type:1 LSID:14320
[1758729999.661] [6784:6786] [CTL] Commissioning complete for node ID 0x0000000000000101: success
[1758729999.662] [6784:6786] [TOO] Device commissioning completed with success
[1758729999.662] [6784:6785] [DL] BLE connection closed: conn=0x74aa1c024530
[1758729999.662] [6784:6786] [DMG] ICR moving to [AwaitingDe]
[1758729999.662] [6784:6786] [EM] <<< [E:35636i S:14321 M:191290806 (Ack:148794768)] (S) Msg TX from 000000000001B669 to 1:0000000000000101 [5CA5] [UDP:[fd11:22::ae46:4779:ebf3:9b3b]:5540] --- Type 0000:10 (SecureChannel:StandaloneAck) (B:34)
[1758729999.662] [6784:6786] [EM] Flushed pending ack for MessageCounter:148794768 on exchange 35636i
[1758729999.662] [6784:6786] [DL] HandlePlatformSpecificBLEEvent 16390
[1758729999.662] [6784:6786] [BLE] No endpoint for unsubscribe complete
[1758729999.662] [6784:6786] [BLE] No endpoint for connection error
[1758729999.662] [6784:6784] [CTL] Shutting down the commissioner
[1758729999.662] [6784:6784] [PAF] WiFiPAF: Closing all WiFiPAF sessions to shutdown
[1758729999.662] [6784:6784] [CTL] Shutting down the controller
[1758729999.662] [6784:6784] [IN] Expiring all sessions for fabric 0x1!!
[1758729999.662] [6784:6784] [IN] SecureSession[0x74aa1400e6f0]: MarkForEviction Type:2 LSID:14321
[1758729999.662] [6784:6784] [SC] SecureSession[0x74aa1400e6f0, LSID:14321]: State change 'kActive' --> 'kPendingEviction'
[1758729999.662] [6784:6784] [IN] SecureSession[0x74aa1400e6f0]: Released - Type:2 LSID:14321
[1758729999.662] [6784:6784] [FP] Forgetting fabric 0x1
[1758729999.662] [6784:6784] [TS] Pending Last Known Good Time: 2023-10-14T01:16:48
[1758729999.662] [6784:6784] [TS] Previous Last Known Good Time: 2023-10-14T01:16:48
[1758729999.662] [6784:6784] [TS] Reverted Last Known Good Time to previous value
[1758729999.662] [6784:6784] [CTL] Shutting down the commissioner
[1758729999.662] [6784:6784] [PAF] WiFiPAF: Closing all WiFiPAF sessions to shutdown
[1758729999.662] [6784:6784] [CTL] Shutting down the controller
[1758729999.662] [6784:6784] [CTL] Shutting down the System State, this will teardown the CHIP Stack
[1758729999.662] [6784:6784] [DMG] All ReadHandler-s are clean, clear GlobalDirtySet
[1758729999.662] [6784:6784] [FP] Shutting down FabricTable
[1758729999.662] [6784:6784] [TS] Pending Last Known Good Time: 2023-10-14T01:16:48
[1758729999.662] [6784:6784] [TS] Previous Last Known Good Time: 2023-10-14T01:16:48
[1758729999.662] [6784:6784] [TS] Reverted Last Known Good Time to previous value
[1758729999.666] [6784:6784] [DL] Wrote settings to /tmp/chip_counters.ini
[1758729999.666] [6784:6784] [DL] NVS set: chip-counters/total-operational-hours = 0 (0x0)
[1758729999.666] [6784:6784] [DL] Inet Layer shutdown
[1758729999.666] [6784:6784] [DL] BLE Layer shutdown
[1758729999.666] [6784:6784] [DL] WiFi-PAF Layer shutdown
[1758729999.666] [6784:6784] [PAF] WiFiPAF: Closing all WiFiPAF sessions to shutdown
[1758729999.666] [6784:6784] [DL] System Layer shutdown
控制设备测试
比如控制led亮灭:
chip-tool onoff toggle <node_id> <endpoint_id>
node_id:前面配网时,用户自己分配的一个正数IDendpoint_id:onoff这个功能所在的endpoint。这个取决于设备端的Matter Cluster配置(使用zap-tool配置)
例如:
chip-tool onoff toggle 0x101 1
反复执行此命令,能观察到开发板上led亮灭。
至此,chip-tool搭建成功。
7. 自动化脚本
每次重启电脑都要重新开一遍OTBR太麻烦,这里给出一个自动化脚本:
包含:
- 硬件、内核驱动、服务检查
- 开启OTBR docker
- 自动FORM Thread网络
- 自动设置On-Mesh prefix
- 自动设置路由表
- 自动获取Thread网络密钥
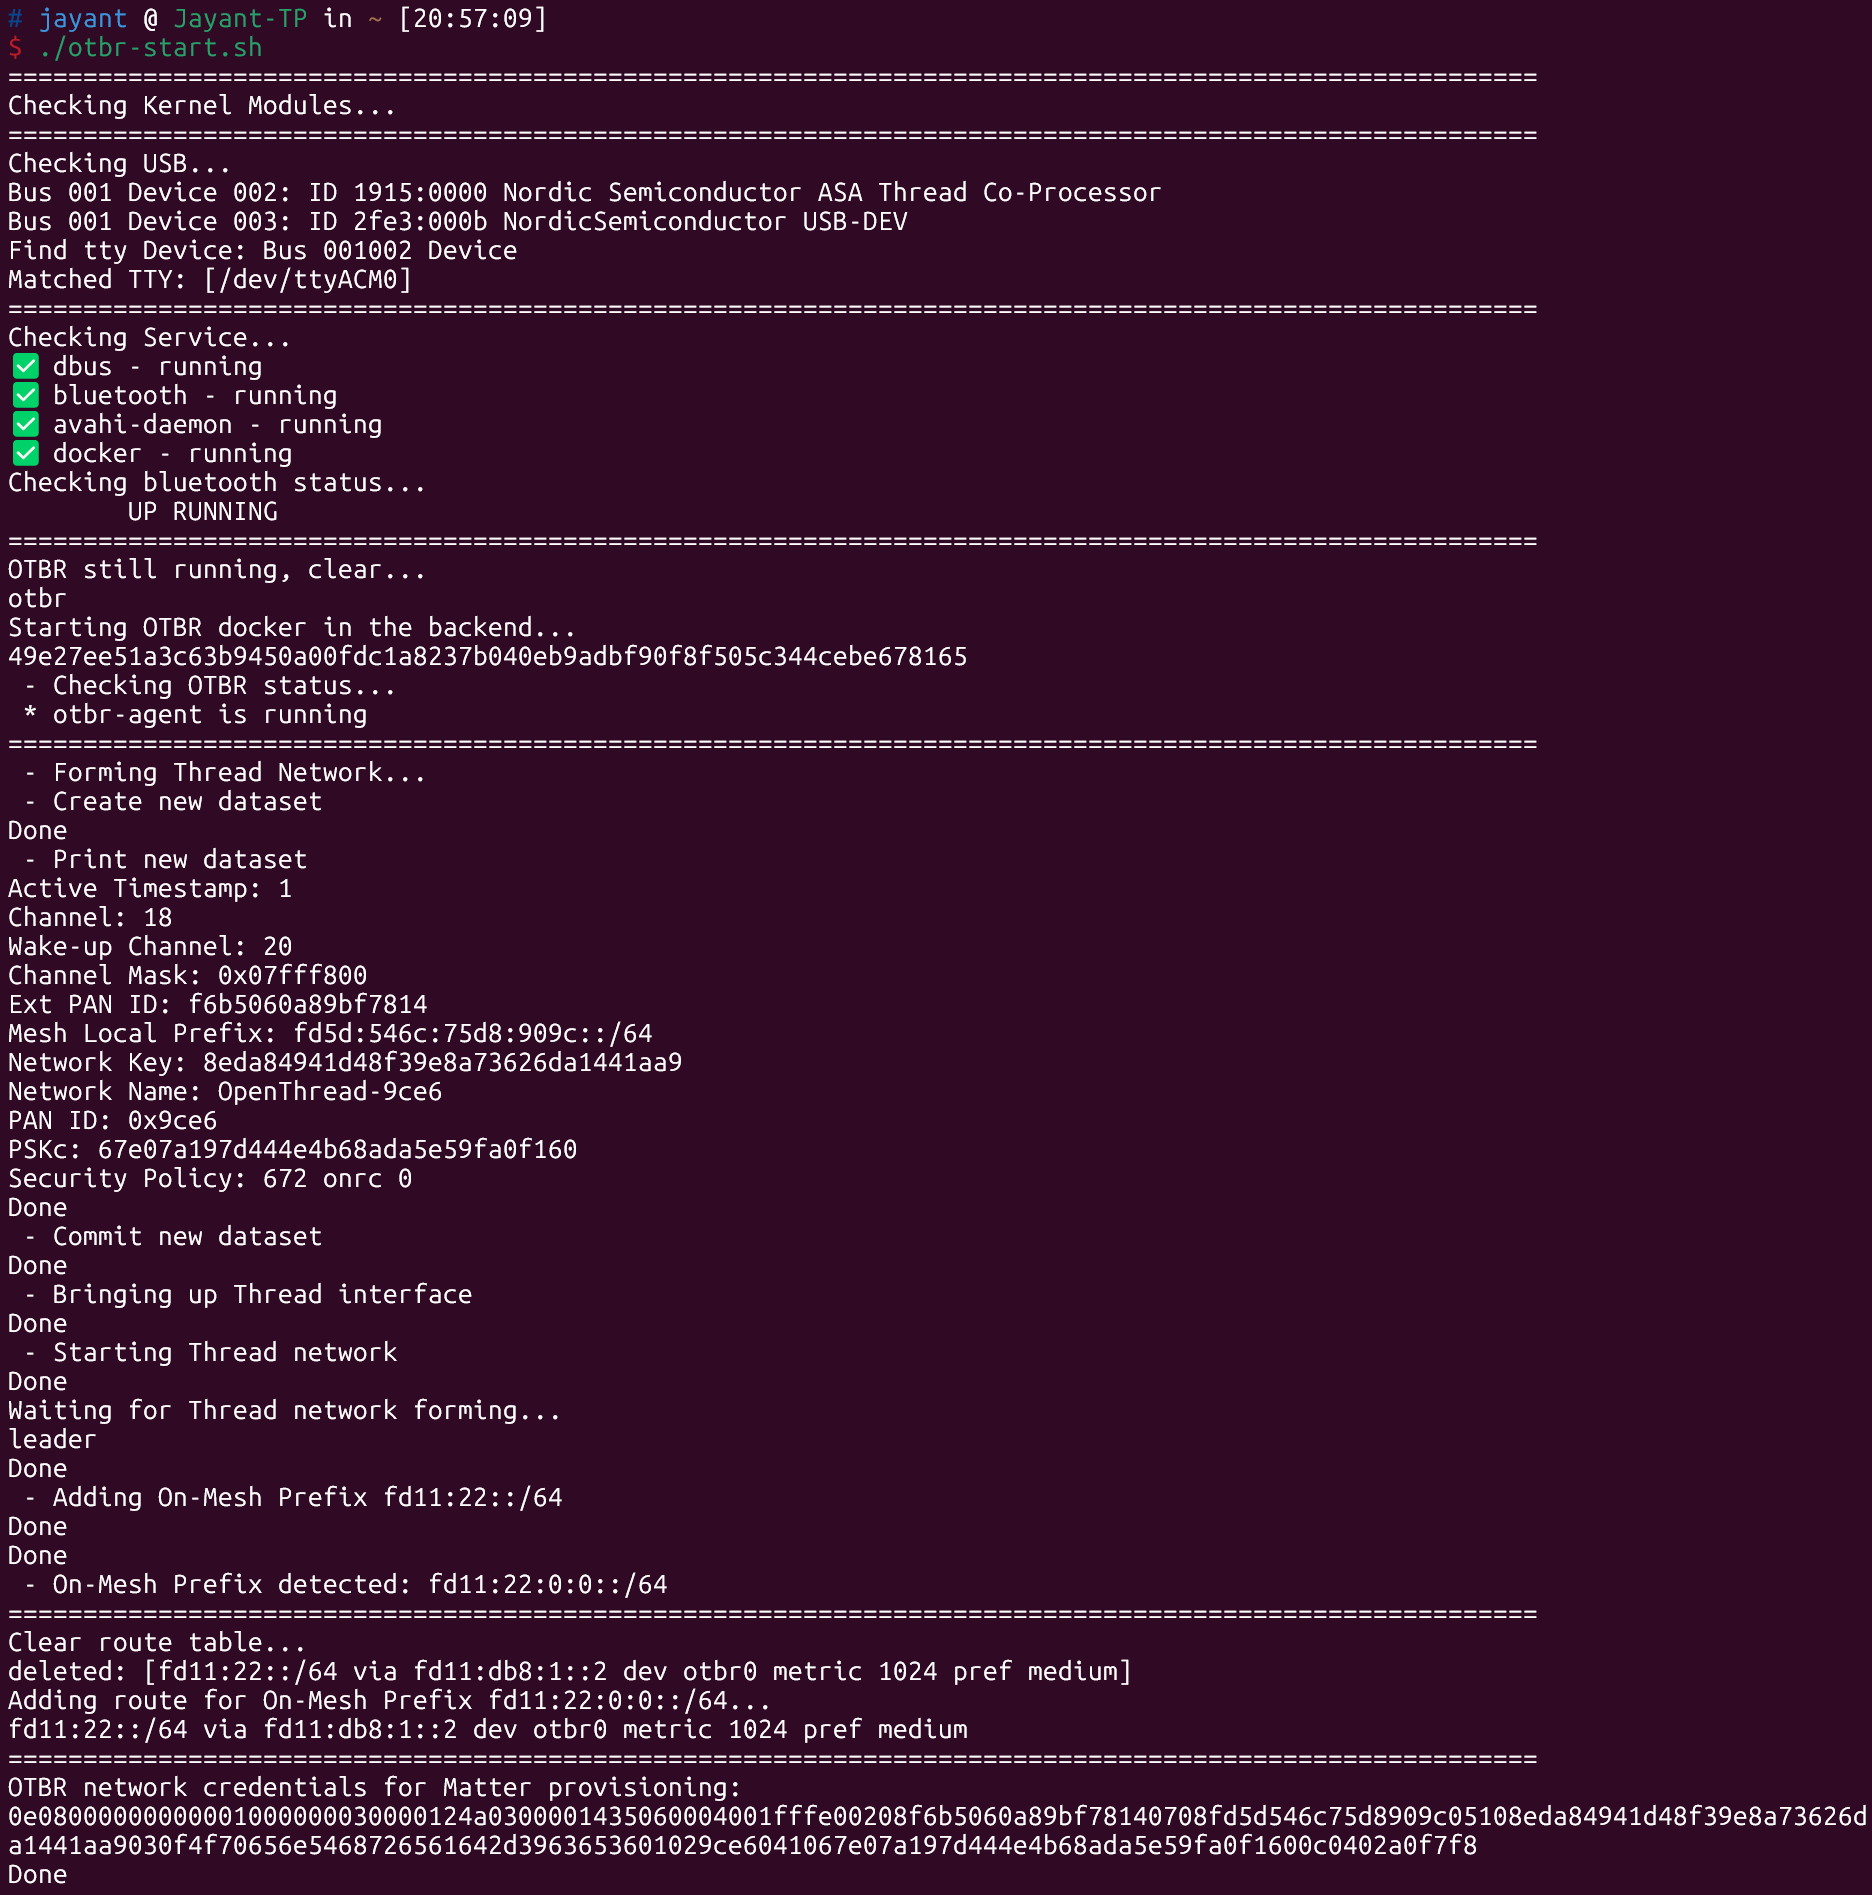
otbr-start.sh:
#!/bin/sh

# from Thread RCP USB Dongle
# Nordic VID:PID = 1915:0000
VID="1915"
PID="0000"

## dependency check
echo ======================================================================================================
echo "Checking Kernel Modules..."
lsmod | grep -q btusb
if [ $? -ne 0 ]; then
    sudo modprobe btusb
fi
lsmod | grep -q ip6table_filter
if [ $? -ne 0 ]; then
    sudo modprobe ip6table_filter
fi

echo ======================================================================================================
echo "Checking USB..."
lsusb | grep "Thread Co-Processor"
if [ $? -ne 0 ]; then
    echo "No Nordic Thread RCP device found. Please plug in the device and try again."
    exit 1
fi
lsusb | grep "NordicSemiconductor USB-DEV"
if [ $? -ne 0 ]; then
    echo "No Nordic BLE device found. Please plug in the device and try again."
    exit 1
fi

# find Thread RCP tty
bus_device=$(lsusb | grep "$VID:$PID" | awk '{print $2":"$4}' | sed 's/://' | sed 's/$//')

if [ -n "$bus_device" ]; then
    bus=$(echo "$bus_device" | cut -d':' -f1)
    device=$(echo "$bus_device" | cut -d':' -f2)
    echo "Find tty Device: Bus $bus Device $device"

    for otrcp_tty in /dev/ttyACM*; do
        if [ -e "$otrcp_tty" ]; then
            tty_name=$(basename "$otrcp_tty")

            udev_info=$(udevadm info --name="$otrcp_tty" --query=property)

            if echo "$udev_info" | grep -q "ID_VENDOR_ID=$VID" && echo "$udev_info" | grep -q "ID_MODEL_ID=$PID"; then
                echo "Matched TTY: [$otrcp_tty]"
                found=1
            fi
        fi
    done

    if [ $found -eq 0 ]; then
        echo "USB exists, but no corresponding ttyACM interface found."
        exit 1
    fi
else
    echo "No USB device found with VID:PID = $VID:$PID"
    exit 1
fi

echo ======================================================================================================
echo "Checking Service..."
services="dbus bluetooth avahi-daemon docker"
for service in $services; do
    if systemctl is-active --quiet "$service"; then
        echo "✅ $service - running"
    else
        echo "❌ $service - stopped"
    fi
done

echo "Checking bluetooth status..."
hciconfig | grep "UP RUNNING"
if [ $? -ne 0 ]; then
    echo "BLE HCI dongle not working"
    exit 1
fi

echo ======================================================================================================
## Checking OTBR docker
docker ps --filter="name=otbr" | grep -q "otbr"
if [ $? -eq 0 ]; then
    echo "OTBR still running, clear..."
    docker stop otbr
    while docker ps -a --filter "name=otbr" | grep -q "otbr"; do
        sleep 1
    done
fi

## Starting OTBR docker
echo "Starting OTBR docker in the backend..."

# add `-d` to run container in the background
# add `--rm` to auto-remove container when it stops
sudo docker run -it --rm -d --privileged --name otbr --network otbr -p 8080:80 \
--sysctl "net.ipv6.conf.all.disable_ipv6=0 net.ipv4.conf.all.forwarding=1 net.ipv6.conf.all.forwarding=1" \
--volume $otrcp_tty:/dev/radio nrfconnect/otbr:fbde28a --radio-url spinel+hdlc+uart:///dev/radio?uart-baudrate=1000000

sleep 4

echo " - Checking OTBR status..."
docker exec -it otbr sh -c "sudo service otbr-agent status"

## Form the Thread Network
echo ======================================================================================================
echo " - Forming Thread Network..."
set -e

echo " - Create new dataset"
docker exec -it otbr ot-ctl dataset init new

echo " - Print new dataset"
docker exec -it otbr ot-ctl dataset

echo " - Commit new dataset"
docker exec -it otbr ot-ctl dataset commit active

echo " - Bringing up Thread interface"
docker exec -it otbr ot-ctl ifconfig up

echo " - Starting Thread network"
docker exec -it otbr ot-ctl thread start

echo "Waiting for Thread network forming..."
sleep 7
docker exec -it otbr sh -c "sudo ot-ctl state"

# Add On-Mesh Prefix after network is formed
echo " - Adding On-Mesh Prefix fd11:22::/64"
docker exec -it otbr ot-ctl prefix add fd11:22::/64 paos
docker exec -it otbr ot-ctl netdata register

# Wait a bit for prefix propagation
sleep 3

# Get the actual On-Mesh Prefix
onmesh_prefix=$(docker exec -it otbr ot-ctl prefix | grep "paos" | awk '{print $1}' | tr -d '\r')
echo " - On-Mesh Prefix detected: $onmesh_prefix"

set +e

## Configuring route table
GATEWAY=$(docker inspect -f '{{range .NetworkSettings.Networks}}{{.GlobalIPv6Address}}{{end}}' otbr)
echo ======================================================================================================

echo "Clear route table..."
ip -6 route show | grep "via $GATEWAY dev" | while read route; do
    echo "deleted: [$route]"
    sudo ip -6 route del $route
done

echo "Adding route for On-Mesh Prefix $onmesh_prefix..."
sudo ip -6 route add $onmesh_prefix dev otbr0 via $GATEWAY

ip -6 route show | grep "via $GATEWAY dev"

echo ======================================================================================================
echo "OTBR network credentials for Matter provisioning:"
docker exec otbr sh -c "sudo ot-ctl dataset active -x"
8. 已知问题
目前,通过USBIPD把2个USB Dongle附着到WSL中似乎已经是极限带宽。如果再额外附着一个Nordic开发板到WSL,会导致ThreadRCP无响应,进而导致OTBR配置失败。
部分docker exec -it otbr ot-ctl xxxx命令会返回:
connect session failed: No such file or directory
因此最好确保只有2个52840 dongle连接到WSL。

 浙公网安备 33010602011771号