

MySQL安装之CentOS 7下使用yum安装5.7与8.0版本
安装MySQL有3种方式:rpm包安装;源码安装;yum源安装(属于rpm包安装),本文讲解一下yum源安装。
参考资料:
下载各版本官网地址:https://downloads.mysql.com/archives/community/
yum官方安装指南:https://dev.mysql.com/doc/mysql-yum-repo-quick-guide/en/#repo-qg-yum-installing
博客:https://www.cnblogs.com/luohanguo/p/9045391.html
博客:https://blog.csdn.net/z13615480737/article/details/78906598
1、配置MySQL的yum源,指定版本
vim /etc/yum.repos.d/mysql-community.repo
[mysql80-community]
name=MySQL 8.0 Community Server
baseurl=http://repo.mysql.com/yum/mysql-8.0-community/el/7/$basearch/
enabled=0
gpgcheck=0
gpgkey=file:///etc/pki/rpm-gpg/RPM-GPG-KEY-mysql

[mysql57-community]
name=MySQL 5.7 Community Server
baseurl=http://repo.mysql.com/yum/mysql-5.7-community/el/7/$basearch/
enabled=1
gpgcheck=0
gpgkey=file:///etc/pki/rpm-gpg/RPM-GPG-KEY-mysql
注意:
1)如果是CentOS6版本的系统“/el/7/$basearch/”中的7要改为6。
2)enabled控制安装版本,enabled=0不安装,enabled=1安装 ,安装的是该版本中最新的。
3)gpgcheck=0,安装时不检测公钥、密钥,否则可能安装失败。
4)安装5.7将下面的enabled设置为1,上面的enabled设置为0,安装8.0则相反。
2、查看使用的版本
yum repolist enabled | grep mysql
yum list|grep mysql

3、执行安装命令
yum -y install mysql-community-server
4、启动
sudo service mysqld start
5、查看首次启动默认密码
grep 'temporary password' /var/log/mysqld.log

6、修改密码
mysql -uroot -p
ALTER USER 'root'@'localhost' IDENTIFIED BY 'SLei1234!';
1)不允许设置为简单密码。(如果设置为简单密码,参考下面的7)
2)默认情况下,至少包含一个大写字母,一个小写字母,一位数字和一个特殊字符,长度不少于8位。
3)先使用默认密码登录后再修改。
7、设置简单密码
5.7与8.0设置简单密码的操作不同
1)5.7版本
vim /etc/my.cnf
# For advice on how to change settings please see
# http://dev.mysql.com/doc/refman/5.7/en/server-configuration-defaults.html

[mysqld]
#
# Remove leading # and set to the amount of RAM for the most important data
# cache in MySQL. Start at 70% of total RAM for dedicated server, else 10%.
# innodb_buffer_pool_size = 128M
#
# Remove leading # to turn on a very important data integrity option: logging
# changes to the binary log between backups.
# log_bin
#
# Remove leading # to set options mainly useful for reporting servers.
# The server defaults are faster for transactions and fast SELECTs.
# Adjust sizes as needed, experiment to find the optimal values.
# join_buffer_size = 128M
# sort_buffer_size = 2M
# read_rnd_buffer_size = 2M
datadir=/var/lib/mysql
socket=/var/lib/mysql/mysql.sock
validate-password=OFF
# Disabling symbolic-links is recommended to prevent assorted security risks
symbolic-links=0

log-error=/var/log/mysqld.log
pid-file=/var/run/mysqld/mysqld.pid
~
注意:添加了语句:validate-password=OFF,取消验证密码,可以使用简单密码。
2)8.0版本
mysql> set global validate_password.policy=0;
mysql> set global validate_password.length=1;
或
mysql> set global validate_password_policy=0;
mysql> set global validate_password_length=1;
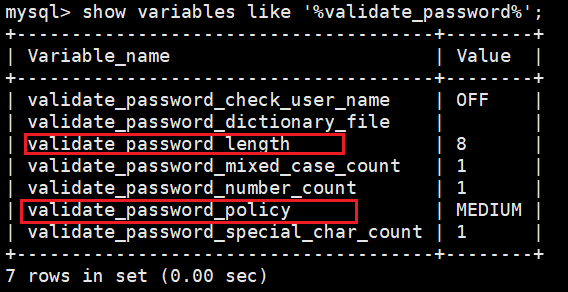
注意:如果报错ERROR 1193 (HY000): Unknown system variable 'policy',说明参数不存在,可执行如下命令查看:
show variables like '%validate_password%';
8、修改root密码为简单密码
ALTER USER 'root'@'localhost' IDENTIFIED BY '123456';
9、给远程授权
5.7与8.0给远程授权的操作不同
1)5.7版本
GRANT ALL PRIVILEGES ON *.* TO 'root'@'%'IDENTIFIED BY '123456';
flush privileges;
注意:flush privileges;命令有时可以不使用。
2)8.0版本
create user sl@'%' identified by '123456';
grant all privileges on *.* to sl@'%' with grant option;
flush privileges;
ALTER USER 'sl'@'%' IDENTIFIED WITH mysql_native_password BY '123456';
注意:最后一句是修改远程连接用户的加密规则;远程授权必须创建新用户,不能直接给root用户远程授权

 浙公网安备 33010602011771号