element ui 登录验证,路由守卫
<template>
    <!--
      el-form
        :label-position="labelPosition" 设置label的位置
        :model 用来给表单设置数据模型(对象)
        :rules 用来设置表单验证规则的
        ref 用来引用当前的表单组件

      el-form-item
            prop  它是modle对象中的一个属性,当使用表单验证,或者表单重置的时候,必须使用该属性

     -->
     <div id="bbgg">

    <el-row type="flex" class="row-bg" justify="center" align="middle">
        <el-col  id="bgc"  :xs="12" :sm="10" :md="8" :lg="6" :xl="4" >

                <el-form :label-position="labelPosition" :model="loginForm" :rules="rules" ref="loginForm"  class="demo-loginForm"   >
             <el-form-item label="用户名:" prop="username">
                  <el-input v-model="loginForm.username"></el-input>
             </el-form-item>


             <el-form-item label="密 码:" prop="password">
                  <el-input v-model="loginForm.password" type="password"></el-input>
            </el-form-item>

      <el-form-item>
            <el-button type="primary" @click="submitForm">登录</el-button>
            <el-button @click="resetForm">重置</el-button>
      </el-form-item>

      </el-form>

        <div class="grid-content bg-purple"></div></el-col>
    </el-row>

</div>


</template>

<script>
import axios from 'axios'

  export default {
    data() {
      return {
        labelPosition: 'right',
        loginForm: {
              username:"",
              password:""
        },
        rules: {
          username: [
                // required  是否为必填项, trigger:表单验证的触发时机,失去焦点进行验证
            { required: true, message: '请输入用户名', trigger: 'blur' },
            { min: 3, max: 6, message: '用户名长度在 3 到 6 个字符', trigger: 'blur' }
          ],
          password: [
            { required: true, message: '请输密码', trigger: 'blur' },
            { min: 3, max: 6, message: '密码长度在 3 到 6 个字符', trigger: 'blur' }
          ],

        }
      };
    },
    methods: {
      login(){//登陆功能
          //使用axios发送请求
          // 接口地址  http://localhost:8888/api/private/v1/Login
          axios.post('http://localhost:8888/api/private/v1/Login',this.loginForm)
               .then(res=>{
                    // const data = res.data.data
                    // const meta = res.data.meta
                    //下面是ES6中结构语法,和上边的两句话一个意思;意思是从res.data中取出data和meta
                    const {data,meta}=res.data
                    console.log(data)
                   if(meta.status===200){
                      // console.log("登录成功")
                      //01如果登录成功,将登录成功的标识(token)储存到localStorage中,并且跳转到主页
                      localStorage.setItem('token',data.token)
                      this.$router.push('/home')
                   }else{
                     console.log('登录失败',meta.msg)
                      this.$message({
                           message: '用户名或密码错误',
                           type: 'error',
                           duration:'1000'
                  });

                   }


               })
      },
      submitForm() {
            // ref 用在组件中,就表示当前组件  通过 $refs.xxx可以拿到所有ref的集合
            // this.$refs.loginForm  //当前的表单对象
       this.$refs.loginForm.validate((valid) => {
          if (valid) { //valid成功为ture,失败为false
                //发送请求 ,调用登录接口
                this.login()

          } else {
            console.log('校验失败');
            return false;
          }
        });
      },
      resetForm(formName) {//表单重置
        this.$refs.loginForm.resetFields();
      }
    }
  }
</script>

<style >
#app{
  height: 100%;
}
    #bbgg {
        height: 100%;
        background-color: #2d434c;

    }
    .row-bg.el-row.is-justify-center.is-align-middle.el-row--flex{
      height: 80%;
    }
    #nav{
      padding: 0;
    }

    #bgc{
      background-color: #fff;
      padding: 20px 30px;
      border-radius: 10px;
      min-width: 160px;
    }
</style>
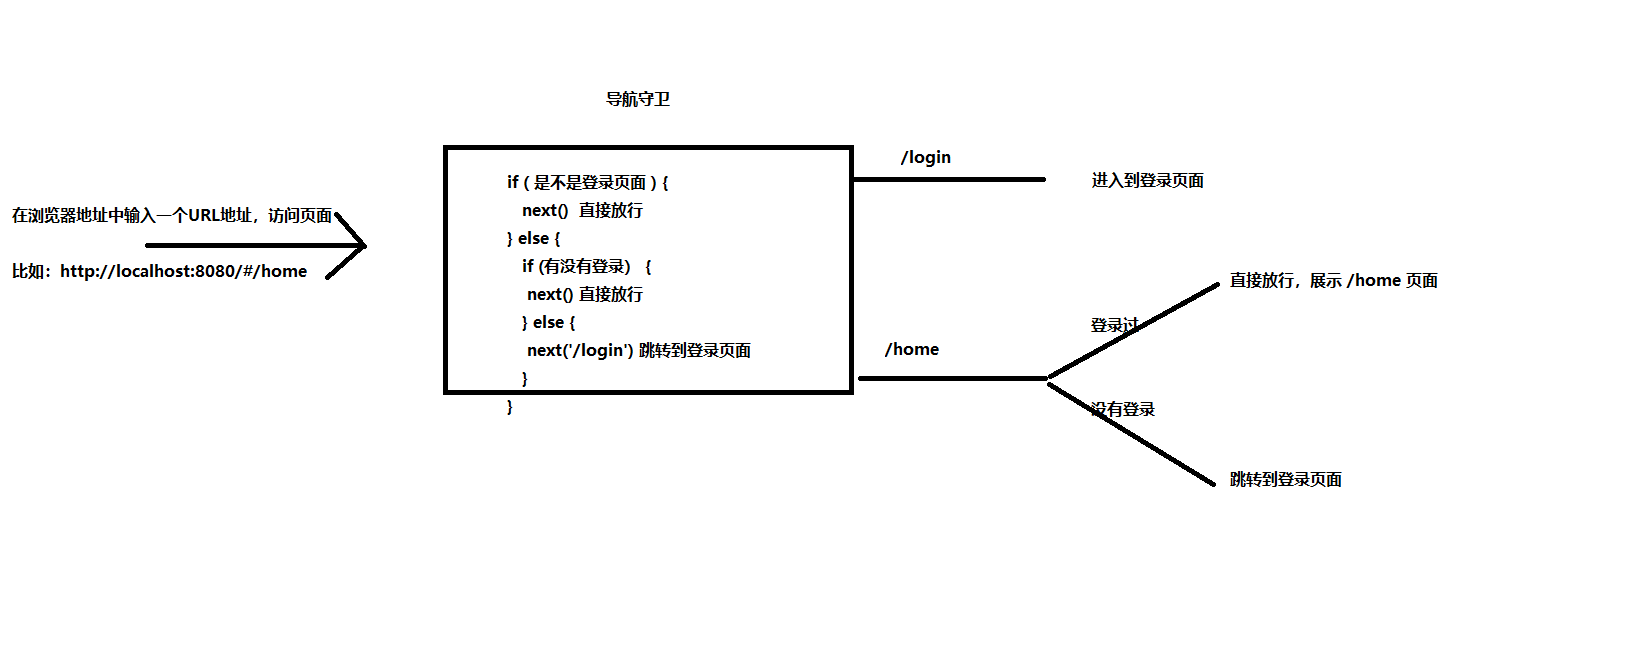
router.js中 设置路由守卫
import Vue from 'vue'
import Router from 'vue-router'

import Login from './components/login/Login.vue'
import Home from './components/home/home.vue'

Vue.use(Router)

 const router=new Router({
  routes: [
    { path:'/Login' , component:Login},
    { path:'/Home' , component:Home}
  ]
})

//全局路由守卫
//所有的路由都会先走守卫
//添加导航守卫之后,不管是访问哪个路由,都会执行这个回调函数中的代码
//因为所有的路由,都会经过该导航守卫,所以就可以在这个导航守卫的回调函数中,判断有没有登录
router.beforeEach((to, from, next) => {//to去哪里    from从哪来   next放行

      if(to.path==='/login'){//如果访问的是login页面直接方行,  不管有没有登录都可以访问login页面
          next()//调用next表示:访问什么页面就展示什么页面的内容
      }else{
          //如果访问的不是login页面,先判断有没有登录,如果已经登录直接调用next()方法,如果没有跳转login页面

          // 通过登录成功时候保存的token,来作为判断  有没有登录成功的条件
          const token = localStorage.getItem('token')
          if(token){
              //有,登录成功
              next()
          }else{
              // 没有,登录失败
              next('/login')

          }

      }


})

export default router

 浙公网安备 33010602011771号