Java创建多线的方式
方式一:继承Thread类
① 定义继承Thread类的子类;
② 重写run()方法,run()方法的主体即为线程体
③ 实例化继承Thread的子类的对象,即创建线程对象;
④ 通过实例对象调用start()方法启动线程
  注意:想要启动多线程必须调用start()方法,通过start()方法调用run()方法,若手动调用run()方法,则不会启动多线程。
      因为run()方法必须由JVM调用,至于什么时候调用,执行过程的控制都有操作系统的调度决定。
 1 package com.exercise.mulTreadTest;
 2 //方式1: 通过继承Thread类的方式实现多线程:
 3
 4 /**
 5  * ① 定义继承Thread类的子类;
 6  * ② 重写run()方法,run()方法的主体即为线程体
 7  * ③ 实例化继承Thread的子类的对象,即创建线程对象;
 8  * ④ 通过实例对象调用start()方法启动线程
 9  */
10 public class extendsThread {
11     public static void main(String[] args) {
12         myThread1 thread1 = new myThread1();
13         thread1.start();
14
15         myThread1 thread2 = new myThread1();
16         thread2.start();
17     }
18 }
19
20 class myThread1 extends Thread{
21     @Override
22     public void run() {
23         for (int i = 0; i < 100; i++) {
24             if (i % 2 == 0){
25                 System.out.println(Thread.currentThread().getName() + " : " + i);
26             }
27         }
28     }
29 }
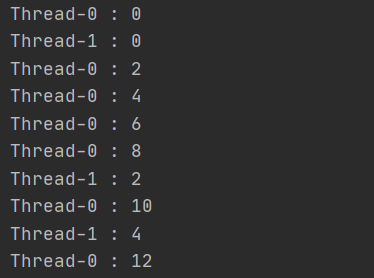
上述代码创建多线程的运行结果如下:可见线程1和线程2交替执行。
方式二:实现Runnable接口
 ① 创建一个实现Runnable接口的子类myThread;
 ② 重写Runnable接口中的run()方法;
 ③ 创建该子类myThread的对象;
 ④ 创建Thread类的对象,并且将子类myThread创建的对象作为Thread类含参构造器的实参
 ⑤ 调用start()方法启动线程
package com.exercise.mulTreadTest;

/**
 * 方式二:实现Runnable接口
 * ① 创建一个实现Runnable接口的子类myThread;
 * ② 重写Runnable接口中的run()方法;
 * ③ 创建该子类myThread的对象;
 * ④ 创建Thread类的对象,并且将子类myThread创建的对象作为Thread类含参构造器的实参
 * ⑤ 调用start()方法启动线程
 *
 */
public class implRunnable{
    public static void main(String[] args) {
        myThread2 myThread2 = new myThread2();
        Thread thread1 = new Thread(myThread2);
        Thread thread2 = new Thread(myThread2);
        thread1.start();
        thread2.start();
    }

}

class myThread2 implements Runnable{
    @Override
    public void run() {
        for (int i = 0; i < 100; i++) {
            if (i % 2 == 0){
                System.out.println(Thread.currentThread().getName() + " : " + i);
            }
        }
    }
}
继承Thread类和实现Runnable接口创建多线程方式的区别:
区别:
  ①继承Thread类的方式重写了Thread类的run()方法并将线程代码放在里面;
  ②实现Runnable接口的方式重写了Runnable接口中的run()方法,线程代码存在其中。

实现Runnable接口创建多线的好处:
  ①避免单继承性的局限性:接口的好处
  ②多个接口共享同一个接口实现类的对象,非常适合多个相同线程处理同一份资源。
方式三: 实现Callable接口
①创建一个实现Callable接口的实现类;
②在实现类中重写call()方法,即线程体;
③创建实现类的实例;
④使用实现类的实例作为参数创建一个FutureTask类的实例;
⑤使用FutrueTask类的实例作为参数创建一个Thread类的实例并调用start()方法启动线程;
⑥使用FutureTask实例调用get()方法获取call()方法的返回值。
 1 package com.exercise.mulTreadTest;
 2
 3 import java.util.concurrent.Callable;
 4 import java.util.concurrent.ExecutionException;
 5 import java.util.concurrent.FutureTask;
 6
 7 public class implCallable {
 8     public static void main(String[] args) {
 9         //3.创建实现类myThread3的实例
10         myThread3 myThread3 = new myThread3();
11         //4.使用myThread3作为参数创建FutureTask类的实例
12         FutureTask futureTask = new FutureTask(myThread3);
13         //5.使用futureTask作为参数创建Thread类的实例
14         Thread thread = new Thread(futureTask);
15         //6.启动线程
16         thread.start();
17
18         try {
19             //7.获取call()方法的返回值
20             Object o = futureTask.get();
21             System.out.println(o);
22
23         } catch (InterruptedException e) {
24             e.printStackTrace();
25         } catch (ExecutionException e) {
26             e.printStackTrace();
27         }
28
29     }
30 }
31
32 //1.创建接口Callable的实现类
33 class myThread3 implements Callable {
34     //重写call()方法
35     @Override
36     public Object call() throws Exception {
37         int sum = 0;
38         for (int i = 0; i < 100; i++) {
39             sum += i;
40         }
41         return sum;
42     }
43 }
方式四: 使用线程池
 1 package com.exercise.java2;
 2
 3 import java.util.concurrent.ExecutorService;
 4 import java.util.concurrent.Executors;
 5 import java.util.concurrent.ThreadPoolExecutor;
 6
 7 /**
 8  * 创建线程的方式四:使用线程池
 9  * 好处:
10  *  1.提高响应速度(减少创建线程的时间);
11  *  2.降低资源消耗(重复利用线程池中的线程,不需要每次都创建)
12  *  3.便于线程管理
13  *      √ corePoolSize: 核心池的大小
14  *      √ maximumPoolSize: 最大线程数
15  *      √ keepAliveTime: 线程没有任务是最多保持多长时间后会终止
16  */
17
18 class NumberThread implements Runnable{
19     @Override
20     public void run() {
21         for (int i = 0; i < 100 ; i++) {
22             if(i % 2 == 0){
23                 System.out.println(Thread.currentThread().getName() + ":" + i);
24             }
25         }
26     }
27 }
28
29 class NumberThread1 implements Runnable{
30     @Override
31     public void run() {
32         for (int i = 0; i < 100 ; i++) {
33             if(i % 2 == 1){
34                 System.out.println(Thread.currentThread().getName() + ":" + i);
35             }
36         }
37     }
38 }
39
40 public class ThreadPool {
41     public static void main(String[] args) {
42         //1.提供指定线程数量的线程池
43         ExecutorService executorService = Executors.newFixedThreadPool(10);
44
45         ThreadPoolExecutor service1 = (ThreadPoolExecutor)executorService;
46
47         service1.setCorePoolSize(15);;
48         //设置线程池的属性
49         System.out.println(executorService.getClass());
50
51         //2.执行指定的线程操作.需要实现Runnable接口或Callable接口类的对象
52         executorService.execute(new NumberThread());   //适合适用于Runnable
53         executorService.execute(new NumberThread1());
54
55
56 //        executorService.submit(Callable callable);    //适合使用于Callable
57         //3.关闭线程池
58         executorService.shutdown();
59     }
60 }
本文来自博客园,作者:凸云,转载请注明原文链接:https://www.cnblogs.com/jasonXY/p/15257241.html

 浙公网安备 33010602011771号