2018年2月7日学习总结
1.标签的margin值:
用来控制标签的外边距,分别控制上、右、下、左的外边距

<style>
#d1{
width: 500px;
height: 500px;
background-color: aqua;
margin-bottom: 20px;
padding: 30px;
}
#d2{
width: 500px;
height: 500px;
background-color: blueviolet;
margin-top:20px;
padding-top: 30px;
}
</style>
当只输入一项数值时,所有方向上的外边距被统一设定,而输入两个值时,则分别控制上下、左右的外边距,四个值全部输入则分别控制上、右、下、左的外边距
2.标签的padding值:
用来控制内容和边框之间的间距,分别控制上、右、下、左的内边距
1 #d1 {
2     width: 400px;
3     height: 400px;
4     background-color: blue;
5     padding: 30px;
6
7 }
margin:auto,实现的是居中效果
3.盒子模型
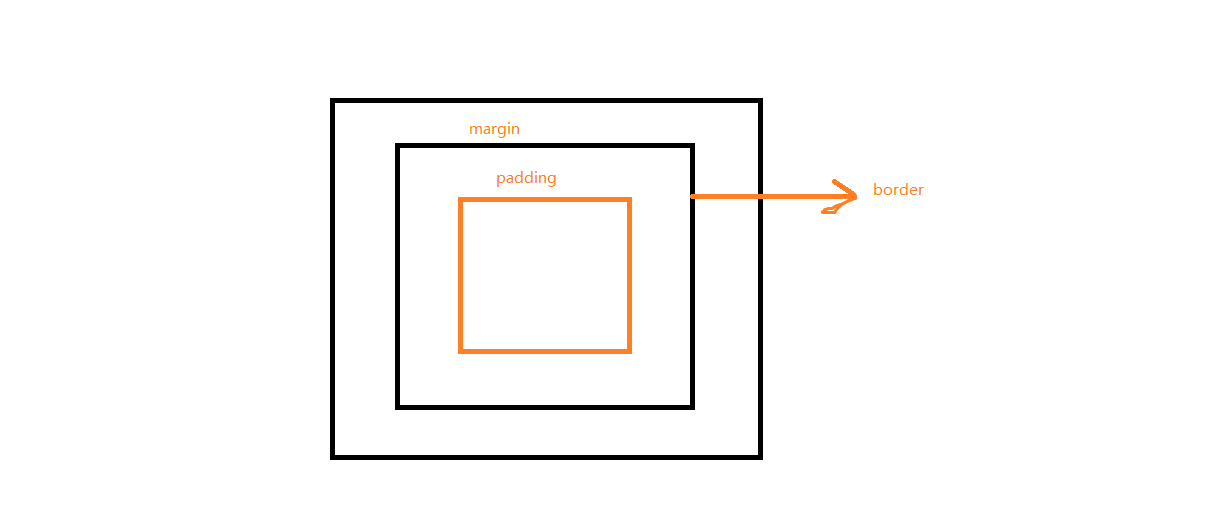
高度=自身高度+padding(如果上下都有padding则加两倍,只有一边加一倍,没有不加)+border(加的数值同padding一样的规律)+margin(加的数值同padding一样的规律)
宽度=自身宽度+padding(如果上下都有padding则加两倍,只有一边加一倍,没有不加)+border(加的数值同padding一样的规律)+margin(加的数值同padding一样的规律)
4.外边距合并
两个相邻的元素之间会发生外边距的合并现象:
 1 <!doctype html>
 2 <html>
 3 <head>
 4 <meta charset="utf-8">
 5 <title>无标题文档</title>
 6     <style>
 7         #d1 {
 8             width: 500px;
 9             height: 100px;
10             background-color: red;
11             margin-bottom: 10px;
12
13         }
14         #d2 {
15             width: 500px;
16             height: 100px;
17             background-color: blue;
18             margin-top: 20px;
19         }/*外边距合并,取最大值合并*/
20         /*只有普通文档流中块框的垂直外边距才会发生外边距合并。行内框、浮动框或绝对定位之间的外边距不会合并。*/
21     </style>
22 </head>
23
24 <body>
25     <div id="d1"></div>
26     <div id="d2"></div>
27 </body>
28 </html>
5.position,定位属性
position属性可用来调整元素的位置,通过设置位置属性以及 top/right/bottom/left的数值来实现多种位移效果
position有如下3种常用属性:
(1)fixed:固定,可以令元素固定在一个位置,不管滚动条如何滚动,都会固定在该位置,可以用来固定侧面导航栏等
 1 #d1 {
 2     width: 200px;
 3     height: 200px;
 4     background-color: blue;
 5     margin: 100px 10px 30px 50px;
 6     float: left;
 7     position: fixed;
 8     left: 300px;
 9     top: 50px;
10 }
(2)relative:相对位置,元素移动时参考的坐标是当前的位置
 1 #d2 {
 2     width: 200px;
 3     height: 200px;
 4     background-color: blue;
 5     margin: 20px 10px 10px 20px;
 6     float: left;
 7     position: relative;
 8     left: 30px;
 9     top: 10px;
10 }
id为d2的元素相对于现在自身的位置向右移动了30px,向下移动了10px
(3)absolute:绝对位置,元素移动时的参考为最近的有position属性的父元素,逐级向上寻找直到body标签,如果想利用该属性进行精确地位置调整,需要在上一级父元素设置position属性
<head>
    <style>
         #d1 {
            width: 300px;
            height: 200px;
            background-color: red;
            margin: 10px;
            position: relative;
    }
         #d2 {
            width: 120px;
            height: 80px;
            background-color: blue;
            margin: 15x;
            position: absolute;
            left: 20px;
    }
    </style>
</head>
<body>
    <div id="1">
         <div id="2">
          456
        </div>
    </div>
</body>
PS:输入位移数据时注意,上下左右代表的是远离上下左右方向多少距离,而不是向上下左右移动多少距离,当然,把数值设为负就可以起到该效果
6.元素堆叠次序 z-index
该项属性可以控制重叠元素的显示优先级,默认值为0,数值越大优先级越高,数值可为负
z-index 仅能在定位元素上奏效(例如 position:absolute;)
 1 <!doctype html>
<html>
<head>
<meta charset="utf-8">
<title>无标题文档</title>
</head>

<body>
<style>

	#d1{
		width: 50px;
		height: 50px;
		background-color: chartreuse;
		position: absolute;
		right: 50px;
		top:50px;
		z-index: 104;
	}
	#d2{
		width: 50px;
	    height: 50px;
	    background-color: yellow;
		position: absolute;
		right: 40px;
		top: 40px;
		z-index: 102;

	}


	</style>

	<div id="d2"></div>
	<div id="d3"></div>

</body>
</html>
下面两张图片展示了id为d1的div设置z-index的前后的效果,谁的值大谁在上面
设置前:
设置后:
7.行内元素与块级元素之间的转换
通过设置display的block/inline属性来实现块级元素和行内元素自定义
(1)ul、li块级元素转为行内元素,可以实现横向导航栏:
 1 <!DOCTYPE html>
 2 <html>
 3 <head>
 4     <style>
 5     ul
 6         {
 7             list-style-type:none;
 8             margin:0;
 9             padding:0;
10     }
11     li
12         {
13         display:inline;
14     }
15     </style>
16 </head>
17
18 <body>
19     <ul>
20         <li>
21             <a href="#home">Home</a>
22         </li>
23         <li>
24             <a href="#news">News</a>
25         </li>
26         <li>
27             <a href="#contact">Contact</a>
28         </li>
29         <li>
30             <a href="#about">About</a>
31         </li>
32     </ul>
33
34 </body>
35 </html>

(2)行内元素转为块级元素
 1 <!doctype html>
 2 <html>
 3 <head>
 4 <meta charset="utf-8">
 5 <title>无标题文档</title>
 6     <style>
 7         span {
 8             display: block;
 9             color: aliceblue;
10             background-color: darkcyan;
11         }
12     </style>
13 </head>
14
15 <body>
16     <span>I'm block!</span>
17
span标签变为块元素,独占一行
18 </body>
19 </html>


 浙公网安备 33010602011771号