003.MMM双主-双从读写分离部署
一 前期规划
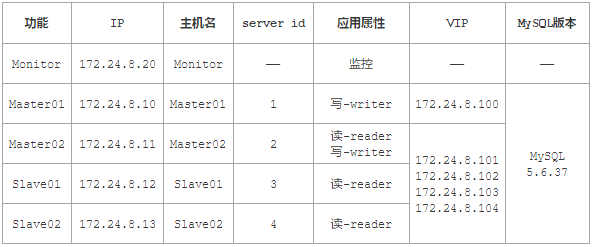
1.1 主机规划
1.2 虚拟IP规划
1.3 用户列表
提示:以上角色需要在所有节点添加。
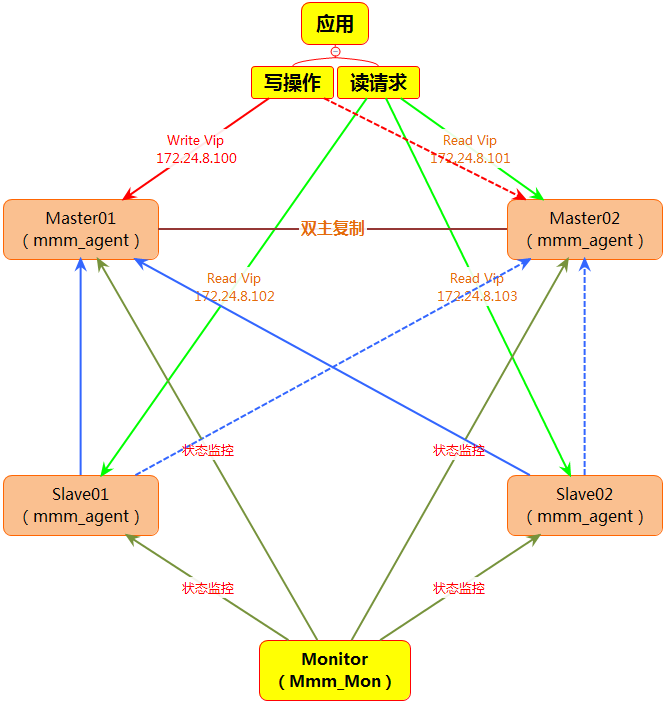
1.4 整体架构
1.4 hosts修改
  1 [root@localhost ~]# vi /etc/sysconfig/network
  2 NETWORKING=yes
  3 HOSTNAME=Master01
  4 [root@Master01 ~]# vi /etc/hosts
  5 Master01    172.24.8.10
  6 Master02    172.24.8.11
  7 Slave01     172.24.8.12
  8 Slave02     172.24.8.13
  9 Monitor     172.24.8.20
提示:所有主机添加对应的hostname和hosts,此步骤非必须,为方便之后简化配置,建议修改hosts。
1.5 NTP配置
略,具体可参考笔记NTP-《003.NTP客户端配置》。
提示:针对高可用的优化,建议所有节点均配置NTP服务。
二 部署MySQL
2.1 安装MySQL
略,具体可参考MySQL主从复制-《MySQL高可用主从复制部署》。
提示:除去monitor节点外所有节点均需要部署。
三 双主复制部署
3.1 master01 my.cf配置
  1 [root@Master01 ~]# vi /etc/my.cnf
  2 [mysqld]
  3 ……
  4 server-id=1				#设置主服务器master的id
  5 log-bin=mysql-bin			#配置二进制变更日志命名格式
  6 replicate-wild-ignore-table=mysql.%
  7 replicate-wild-ignore-table=test.%
  8 replicate-wild-ignore-table=information_schema.%
  9 sync-binlog=1              		#每条自动更新,安全性高,默认是0
 10 auto_increment_increment=2  	#字段一次递增多少
 11 auto_increment_offset=1    		#自增字段的起始值
 12 log_slave_updates          		#当一个主故障,另一个立即接管
 13 read_only=1
注意:
master开启二进制日志后默认记录所有库所有表的操作,可以通过配置来指定只记录指定的数据库甚至指定的表的操作,具体在mysql配置文件的[mysqld]可添加修改如下选项:
方法一:
  1 # 不同步哪些数据库
  2 binlog-ignore-db = mysql
  3 binlog-ignore-db = test
  4 binlog-ignore-db = information_schema
  5 # 只同步哪些数据库,除此之外,其他不同步
  6 binlog-do-db = mysqltest
方法二:
建议采用以下方式配置过滤:
  1 replicate-wild-ignore-table=mysql.%	#从库配置不同步表
  2 replicate-wild-do-table=test.%		#从库配置需要同步的表
提示:不要在主库使用binlog-ignore-db和binlog-do-db,也不要在从库使用replicate-wild-ignore和replicate-wild-do-table。
3.2 Master02 my.cf配置
  1 [root@Master01 ~]# service mysqld start
  2 [root@Master01 ~]# mysql -uroot -px120952576
  3 mysql> grant replication slave on *.* to 'repl_user'@'172.24.8.%' identified by 'x12345678';
#创建用于复制的账号
  4 mysql> grant replication client on *.* to 'mmm_monitor'@'172.24.8.%' identified by 'x12345678';
#创建用于监控MySQL服务健康的账号
  5 mysql> grant super,replication client,process on *.* to 'mmm_agent'@'172.24.8.%' identified by 'x12345678';
#创建用于切换只读模式、同步Master信息的账号
  6 mysql> grant select,insert,update,delete,create,drop on *.* to 'mmm_test'@'172.24.8.%'  identified by 'x120952576' with grant option;        #创建之后用于读写分离测试的账号
  7 mysql> flush privileges;
  8 [root@Master01 ~]# service mysqld restart
  9 [root@Master01 ~]# mysql -uroot -px120952576
 10 mysql> show master status;
master01:
file:mysql-bin.000001
position:120
注意:读写分离对于用于super或者all privileges权限的用户无效,需要创建普通用户进行测试。
3.4 Master02创建账号
略,同3.3 Master01创建账号同样操作即可。
  1 [root@Master01 ~]# service mysqld restart
  2 [root@Master01 ~]# mysql -uroot -px120952576
  3 mysql> show master status;
master02:
file:mysql-bin.000001
position:120
3.5 启动双主复制
提示:如果Master01和Master02已经存在数据,则在开启主备复制之前,需要将Master01和Master02手动同步一次(/var/lib/mysql整个目录打包tar.gz),具体方法略。
注意:本实验都是重新安装的MySQL,可直接启动同步。
  1 [root@Master01 ~]# mysql -uroot -px120952576
  2 Enter password:
  3 mysql> change master to master_host='172.24.8.11',
  4     -> master_user='repl_user',
  5     -> master_password='x12345678',
  6     -> master_log_file='mysql-bin.000001',
  7 -> master_port=3306,
  8     -> master_log_pos=120;
  9 mysql> start slave;
 10 mysql> show slave status\G			#查看slave状态
略
3.3 启动Master02的slave功能
  1 [root@Master02 ~]# mysql -uroot -px120952576
  2 mysql> change master to master_host='172.24.8.10',
  3     -> master_user='repl_user',
  4     -> master_password='x12345678',
  5     -> master_log_file='mysql-bin.000001',
  6     -> master_log_pos=120;
  7 mysql> start slave;
  8 mysql> show slave status\G			#查看slave状态
略
提示:
slave的I/O和SQL线程都已经开始运行,而且Seconds_Behind_Master不再是NULL。日志的位置增加了,意味着一些事件被获取并执行了。如果你在master上进行修改,你可以在slave上看到各种日志文件的位置的变化,同样,你也可以看到数据库中数据的变化。
四 其他节点配置
4.1 所有Slave节点配置配置
  1 [root@Master01 ~]# scp /etc/my.cnf root@172.24.8.12:/etc/
  2 [root@Master01 ~]# scp /etc/my.cnf root@172.24.8.13:/etc/
  3 [root@Slave01 ~]# vi /etc/my.cnf
  4 [mysqld]
  5 ……
  6 server-id=3				#设置主服务器Slave01的id
  7 [root@Slave02 ~]# vi /etc/my.cnf
  8 [mysqld]
  9 ……
 10 server-id=4				#设置主服务器Slave02的id
提示:从Master01将复制my.cnf至所有节点(除去monitor外),并修改相应的server id。
4.2 所有Slave节点创建账号
  1 [root@Slave01 ~]# service mysqld start
  2 [root@Slave01 ~]# mysql -uroot -px120952576
  3 mysql> grant replication slave on *.* to 'repl_user'@'172.24.8.%' identified by 'x12345678';			                               #创建用于复制的账号
  4 mysql> grant replication client on *.* to 'mmm_monitor'@'172.24.8.%' identified by 'x12345678';			                               #创建用于监控MySQL服务健康的账号
  5 mysql> grant super,replication client,process on *.* to 'mmm_agent'@'172.24.8.%' identified by 'x12345678';
                                       #创建用于切换只读模式、同步Master信息的账号
  6 mysql> grant select,insert,update,delete,create,drop on *.* to 'mmm_test'@'172.24.8.%'  identified by 'x120952576' with grant option;	               #创建之后用于读写分离测试的账号
  7 mysql> flush privileges;
提示:Slave02如上操作。
4.2 Slave节点配置Master01为主
  1 [root@Slave01 ~]# service mysqld restart
  2 [root@Slave01 ~]# mysql -uroot -px120952576
  3 mysql> change master to master_host='172.24.8.10',
  4     -> master_user='repl_user',
  5     -> master_password='x12345678',
  6     -> master_log_file='mysql-bin.000001',
  7     -> master_log_pos=120;
  8 mysql> start slave;
  9 mysql> show slave status\G        #查看slave状态
略
提示:Slave02如上操作。
注意:读写分离对于用于super或者all privileges权限的用户无效,需要创建普通用户进行测试。
五 安装MMM组件
5.1 监控Monitor节点安装MMM
  1 [root@Monitor tmp]# wget http://mirrors.ustc.edu.cn/epel/epel-release-latest-6.noarch.rpm
  2 [root@Monitor tmp]# rpm -ivh epel-release-latest-6.noarch.rpm
  3 [root@Monitor ~]# yum -y install mysql-mmm*
5.2 其他节点安装MMM
  1 [root@Master01 ~]# wget http://mirrors.ustc.edu.cn/epel/epel-release-latest-6.noarch.rpm
  2 [root@Master01 ~]# rpm -ivh epel-release-latest-6.noarch.rpm
  3 [root@Master01 ~]# yum -y install mysql-mmm-agent
注意:
- MMM组件在常规YUM中不包含,需要安装epel源;
- 除monitor节点外其他节点只需要安装mysql-mmm-agent即可。
提示:若yum安装出现以下报错,建议在所有节点改用编译安装,操作见附1-附2:
附1 添加安装Perl脚本
  1 [root@Master01 ~]# cat install.sh
  2 #!/bin/bash
  3 wget http://xrl.us/cpanm --no-check-certificate
  4 mv cpanm /usr/bin
  5 chmod 755 /usr/bin/cpanm
  6 cat > /root/list << EOF
  7 install Algorithm::Diff
  8 install Class::Singleton
  9 install DBI
 10 install DBD::mysql
 11 install File::Basename
 12 install File::stat
 13 install File::Temp
 14 install Log::Dispatch
 15 install Log::Log4perl
 16 install Mail::Send
 17 install Net::ARP
 18 install Net::Ping
 19 install Proc::Daemon
 20 install Thread::Queue
 21 install Time::HiRes
 22 EOF
 23 for package in `cat /root/list`
 24 do
 25     cpanm $package
 26 done
附2 编译安装
  1 [root@Master01 tmp]# wget http://mysql-mmm.org/_media/:mmm2:mysql-mmm-2.2.1.tar.gz
  2 [root@Master01 tmp]# mv \:mmm2\:mysql-mmm-2.2.1.tar.gz mysql-mmm-2.2.1.tar.gz
  3 [root@Master01 tmp]# tar -zxvf mysql-mmm-2.2.1.tar.gz
  4 [root@Master01 tmp]# cd mysql-mmm-2.2.1/
  5 [root@Master01 mysql-mmm-2.2.1]# make install
注意,注意,注意:
通常使用以上编译安装也会失败,强烈建议使用yum安装,但yum安装必须使得MySQL版本为mysql-community-server-5.6.37(或以上)!
5.3 目录构成
六 配置MMM
6.1 Master01的mmm_agent配置
  1 [root@Master01 ~]# vi /etc/mysql-mmm/mmm_agent.conf
  2 include mmm_common.conf
  3 this db1
提示:设置db1的配置信息,此db1名字可自定义,但必须和mmm_common.conf 中一致。
6.2 Master01的mmm_common配置
  1 [root@Master01 ~]# vi /etc/mysql-mmm/mmm_common.conf
  2 active_master_role      writer
  3 #当设置为writer的时候,需要在所有MySQL节点设置“read_only=1”,则MMM会本剧每个节点的角色进行动态判断,当MMM的角色设置<role writer>时候,则会自动添加“set global read_only=0”操作,即打开写权限。
  4 <host default>
  5 cluster_interface       eth0			        #设置网络接口,不能为子接口。
  6 pid_path                /var/run/mysql-mmm/mmm_agentd.pid	#设定PID文件路径
  7 bin_path                /usr/libexec/mysql-mmm/		#设置MMM可执行文件路径
  8 replication_user        repl_user			        #设置复制的用户名
  9 replication_password    x12345678			        #设置复制的用户名的密码
 10 agent_user              mmm_agent			        #设置更改只读操作的用户
 11 agent_password          x12345678			        #设置更改只读操作用户的密码
 12 </host>
 13
 14 <host db1>                          #设置db1的配置信息,此db1名字可自定义,但必须和mmm_agent.conf中一致。
 16 ip      172.24.8.10			#设置db1的物理IP
 17 mode    master			#设置db1角色为Master
 18 peer    db2				#设置db1对等的主机名,即db2和db1均为Master
 19 </host>
 20
 21 <host db2>				#类似db1的设置
 22 ip      172.24.8.11
 23 mode    master
 24 peer    db1
 25 </host>
 26
 27 <host db3>				#类似db1的设置
 28     ip      172.24.8.12
 29     mode    slave			#设置db3的角色为Slave
 30 </host>
 31
 32 <host db4>				#类似db1的设置
 33     ip      172.24.8.13
 34     mode    slave			#设置db4的角色为Slave
 35 </host>
 36
 37 <role writer>			#设置可写角色
 38 hosts   db1, db2			#设置可执行写操作的主机
 39 ips     172.24.8.100		#设置可写的虚拟IP
 40 mode    exclusive	                #设置角色的模式为互斥,互斥角色只有一个IP,并且同一时间只能分配一个主机。
 41 </role>
 42
 43 <role reader>			#设置只读角色
 44 hosts   db1, db2, db3, db4		#设置只读角色的主机
 45 ips     172.24.8.101, 172.24.8.102, 172.24.8.103, 172.24.8.104
 46 #设置可读的虚拟IP,可以有多个。
 47 mode    balanced
#设置角色的模式为负载均衡,在负载均衡角色中,可以有多个IP,这些IP被均衡地、动态地分配给多个MySQL主机。
 49 </role>
6.3 Master01的mysql-mmm-agent配置
  1 [root@Master01 ~]# vi /etc/default/mysql-mmm-agent
  2 ENABLED=1
注意:使用yum安装则不需要配置mysql-mmm-agent ,默认已经添加了ENABLED=1。
6.4 其他节点配置
  1 [root@Master01 ~]# scp /etc/mysql-mmm/mmm_common.conf root@172.24.8.11:/etc/mysql-mmm/
  2 [root@Master01 ~]# scp /etc/mysql-mmm/mmm_common.conf root@172.24.8.12:/etc/mysql-mmm/
  3 [root@Master01 ~]# scp /etc/mysql-mmm/mmm_common.conf root@172.24.8.13:/etc/mysql-mmm/
  4 [root@Master01 ~]# scp /etc/default/mysql-mmm-agent root@172.24.8.11://etc/default/
  5 [root@Master01 ~]# scp /etc/default/mysql-mmm-agent root@172.24.8.12://etc/default/
  6 [root@Master01 ~]# scp /etc/default/mysql-mmm-agent root@172.24.8.13://etc/default/
提示:所有节点的mysql-mmm-agent和mmm_common.conf内容一致,从Master01复制即可,Monitor不需要配置agent。
  1 [root@Master02 ~]# vi /etc/mysql-mmm/mmm_agent.conf
  2 include mmm_common.conf
  3 this db2
  4 [root@Slave01 ~]## vi /etc/mysql-mmm/mmm_agent.conf
  5 include mmm_common.conf
  6 this db3
  7 [root@Slave02 ~]## vi /etc/mysql-mmm/mmm_agent.conf
  8 include mmm_common.conf
  9 this db4
6.5 管理Monitor节点配置
  1 [root@Monitor ~]# vi /etc/mysql-mmm/mmm_mon.conf
  2 include mmm_common.conf
  3 <monitor>
  4     ip                  127.0.0.1                          #为了安全,只设置本机监听,mmm_mond默认监听的端口为9988
  6     pid_path            /var/run/mysql-mmm/mmm_mond.pid    #设置mmm_mond进程pid文件位置
  8     bin_path            /usr/libexec/mysql-mmm             #mmm可执行文件路径
 10     status_path         /var/lib/mysql-mmm/mmm_mond.status #mmm集群的状态文件
 12     ping_ips            172.24.8.10, 172.24.8.11, 172.24.8.12, 172.24.8.13
 13 #用于测试的IP,只要其中有一个地址能ping通,代表网络正常,不要写入本机(即Monitor)IP。
 14     auto_set_online     60                                 #设置是否自动上线,若大于0,抖动的主机在抖动时间范围过后,自动上线。
 16 ……
 17 </monitor>
 18
 19 <host default>
 20     monitor_user        mmm_monitor                        #设置mmm_monitor账号。
 22     monitor_password    x12345678                          #设置mmm_monitor密码。
 24 </host>
 25 debug 0                                                    #mmm管理器的运行模式,1为debug模式,0为正常模式。
注意:mmm-mon.conf只需要在监控管理Monitor节点上配置即可。
七 MMM集群的启动
7.1 管理监控Monitor节点启动
  1 [root@Monitor ~]# /etc/init.d/mysql-mmm-monitor start
  2 [root@Monitor ~]# chkconfig mysql-mmm-monitor on
7.2 所有agent节点启动
  1 [root@Master01 ~]# /etc/init.d/mysql-mmm-agent start
  2 [root@Master01 ~]# chkconfig mysql-mmm-agent on
  3 [root@Master02 ~]# /etc/init.d/mysql-mmm-agent start
  4 [root@Master02 ~]# chkconfig mysql-mmm-agent on
  5 [root@Slave01 ~]# /etc/init.d/mysql-mmm-agent start
  6 [root@Slave01 ~]# chkconfig mysql-mmm-agent on
  7 [root@Slave02 ~]# /etc/init.d/mysql-mmm-agent start
  8 [root@Slave02 ~]# chkconfig mysql-mmm-agent on
八 MMM基本维护
8.1 MMM常见命令
  1 [root@Monitor ~]# mmm_control help
  2 Valid commands are:
  3     help                              - show this message	        #显示帮助信息
  4     ping                              - ping monitor		#测试网络运行状态
  5     show                              - show status		        #显示MMM集群节点状态
  6     checks [<host>|all [<check>|all]] - show checks status          #显示MMM集群中指定(所有)节点的详细状态
  8     set_online <host>                 - set host <host> online      #将MMM集群中的节点设置为online状态
 10     set_offline <host>                - set host <host> offline     #将MMM集群中的节点设置为offline状态
 12     mode                              - print current mode.         #显示MMM集群当前的运行模式,有active(默认)、manual和passive三种模式。
 14     set_active                        - switch into active mode.
 15     set_manual                        - switch into manual mode.
 16     set_passive                       - switch into passive mode.   #切换MMM集群到以上三种模式。
 18     move_role [--force] <role> <host> - move exclusive role <role> to host <host>
 19 #在互斥模式下切换角色
 20                                      (Only use --force if you know what you are doing!)
 21     set_ip <ip> <host>                - set role with ip <ip> to host <host>
 22 #用来在被动模式下操纵角色
8.2 查看集群状态
1 [root@Monitor ~]# mmm_control show
解释:
ONLINE:节点运行正常,处于在线状态;
ADMIN_OFFLINE:节点是通过手动模式离线的;
HARD_OFFLINE:节点是MMM集群执行ping操纵失败或检测到MySQL失败而切换的一种状态;
AWAITING_RECOVERY:等待恢复状态;
REPLICATION_FAIL:主从复制失败状态,一般由于复制主线程没运行导致;
REPLICATION_DELAY:复制日志有延迟,一般是由于检测日志失败导致的。
8.3 查看集群运行模式
1 [root@Monitor ~]# mmm_control mode
解释:
ACTIVE:表示主动模式,也是默认模式,即活动的Master故障后另一个备份的Master可自动接管故障Master角色,继续提供服务。Slave故障后其他节点的Slave也会自动接管故障Slave角色,继续提供服务。
MANUAL:表示手动模式,该模式不会自动执行切换,节点故障需要手动进行切换。
PASSIVE:表示被动模式,在此模式下,MMM管理端不会改变集群节点的角色,也不更新状态文件和发送任何信息给每个agent节点。
8.4 检查节点情况
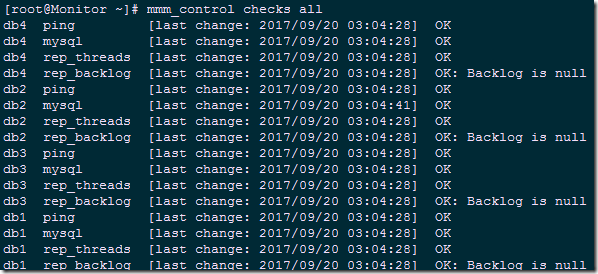
1 [root@Monitor ~]# mmm_control checks all
解释:
ping:主要用来探测网络可用性;
MySQL:检测MySQL服务器是否运行正常;
rep_threads:检测MySQL的复制线程是否正常运行;
rep_backlog:检测MySQL的复制日志是否有积压。
注意:
以上四个检测任何一项出现问题,都会进行角色切换操作,从而保证MySQL服务的高可用性。
8.5 日志文件
db端:/var/log/mysql-mmm/mmm_agentd.log
监控端:/var/log/mysql-mmm/mmm_mond.log
九 测试MMM
9.1 测试集群复制功能
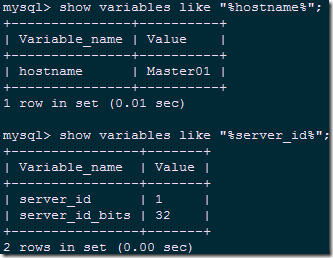
  1 [root@Client ~]# mysql -uroot -px120952576 -h172.24.8.100
  2 mysql> show variables like "%hostname%";
  3 mysql> show variables like "%server_id%";
  1 mysql> create database mysqltest;
  2 mysql> use mysqltest;
  3 mysql> create table user(id int(5),name char(10));
  4 mysql> insert into user values (00001,'zhangsan');
在Slave从服务器上进行验证:
  1 [root@Master02 ~]# mysql -uroot -px120952576
  2 mysql> show databases;
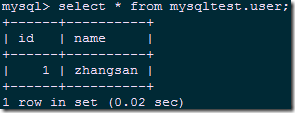
  3 mysql> select * from mysqltest.user;
其他所有slave节点测试略。
9.2 读写分离测试
  1 [root@Client ~]# mysql -ummm_test -px120952576 -h172.24.8.101
  2 mysql> use mysqltest;
  3 mysql> create table test_mmm(id int,email varchar(100));
结论:从reader权限的vip进入后只能进行读,不能写,实现了读写分离。
9.3 故障转移测试
A Master转移
1 [root@Monitor ~]# mmm_control show #查看现有集群情况
  1 [root@Master01 ~]# service mysqld stop		#停止Master01节点
  2 [root@Monitor ~]# mmm_control show			#再次查看集群节点情况
  1 [root@Master01 ~]# service mysqld start		#再次启动Master01节点
  2 [root@Monitor ~]# mmm_control show
结论:由上可知当Master01节点故障时,writer vip自动切换到Master02上,当Master01节点重新启动,writer vip并不会切回Master01,类似Keepalived中的不抢占模式,若需要Master01切回writer,可执行以下命令手动切回:
  1 [root@Monitor ~]# mmm_control move_role writer db1
  2 [root@Monitor ~]# mmm_control show
B Slave转移
  1 [root@Slave01 ~]# service mysqld stop
  2 [root@Monitor ~]# mmm_control show
  1 [root@Slave01 ~]# service mysqld start
  2 [root@Monitor ~]# mmm_control show
结论:由上可知当Slave01节点故障时,reader vip自动切换到Master02上,当Slave01节点重新启动,reader vip会切回Slave01。
十 MMM总结
- Master02节点宕机不影响集群的状态,只是移除了Master02节点的读状态;
- Master01主节点宕机,由Master02主节点接管写角色,Slave01、Slave02指向新Master02主库进行复制,Slave01、Slave02会自动change master到Master02;
- MMM架构需要多个节点、多个IP,对服务器数量有要求;
- 在读写非常繁忙的业务系统下表现不是很稳定,可能会出现复制延时、切换失效等问题;
- MMM方案并不太适应于对数据安全性要求很高,并且读、写繁忙的环境中
参考资料1:http://www.cnblogs.com/chenmh/p/5563778.html
参考资料2:http://www.cnblogs.com/gomysql/p/3671896.html
参考资料3:《循序渐进Linux》
作者:木二
出处:http://www.cnblogs.com/itzgr/
关于作者:云计算、虚拟化,Linux,多多交流!
本文版权归作者所有,欢迎转载,但未经作者同意必须保留此段声明,且在文章页面明显位置给出原文链接!如有其他问题,可邮件(xhy@itzgr.com)咨询。







 浙公网安备 33010602011771号