

AWS EKS部署Prometheus和Grafana
一、创建Prometheus工作区
1.创建工作区
为了可以把Prometheus数据写入到AWS managed Prometheus,需要先在AWS Prometheus控制台中创建工作区

2.保存工作区配置
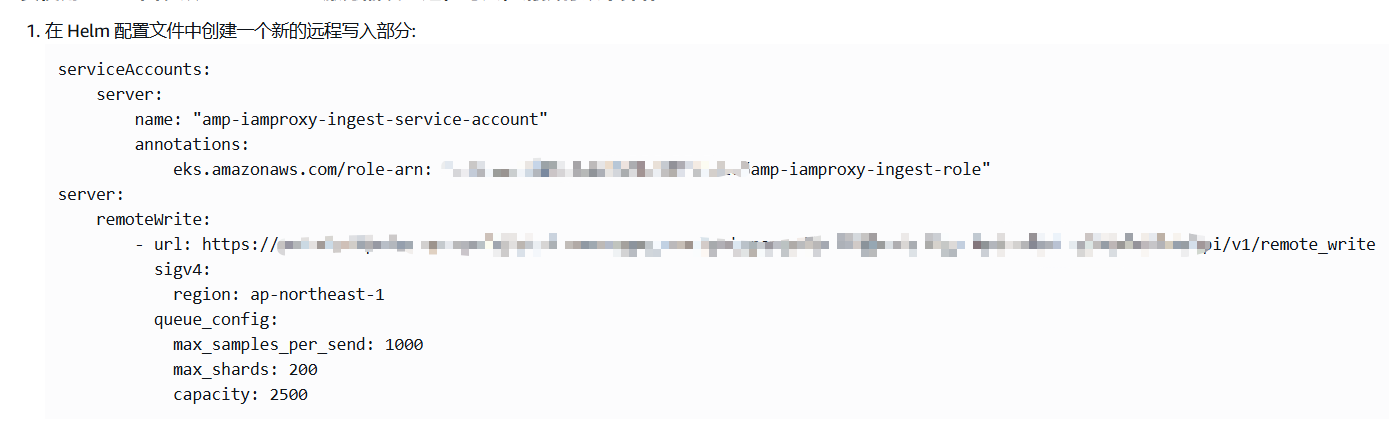
点击AWS Prometheus工作区ID进入详情,将提取/收集 中的配置保存为prometheus.yaml,后面会在安装prometheus时使用。
3.创建从EKS提取指标的role
使用以下内容创建名为 createIRSA-AMPIngest.sh 的文件。将 <my_amazon_eks_clustername> 替换为您集群的名称,并将 <my_prometheus_namespace> 替换为您的 Prometheus 命名空间
#!/bin/bash -e
CLUSTER_NAME=<my_amazon_eks_clustername>
SERVICE_ACCOUNT_NAMESPACE=<my_prometheus_namespace>
AWS_ACCOUNT_ID=$(aws sts get-caller-identity --query "Account" --output text)
OIDC_PROVIDER=$(aws eks describe-cluster --name $CLUSTER_NAME --query "cluster.identity.oidc.issuer" --output text | sed -e "s/^https:\/\///")
SERVICE_ACCOUNT_AMP_INGEST_NAME=amp-iamproxy-ingest-service-account
SERVICE_ACCOUNT_IAM_AMP_INGEST_ROLE=amp-iamproxy-ingest-role
SERVICE_ACCOUNT_IAM_AMP_INGEST_POLICY=AMPIngestPolicy
#
# Set up a trust policy designed for a specific combination of K8s service account and namespace to sign in from a Kubernetes cluster which hosts the OIDC Idp.
#
cat <<EOF > TrustPolicy.json
{
  "Version": "2012-10-17",
  "Statement": [
    {
      "Effect": "Allow",
      "Principal": {
        "Federated": "arn:aws:iam::${AWS_ACCOUNT_ID}:oidc-provider/${OIDC_PROVIDER}"
      },
      "Action": "sts:AssumeRoleWithWebIdentity",
      "Condition": {
        "StringEquals": {
          "${OIDC_PROVIDER}:sub": "system:serviceaccount:${SERVICE_ACCOUNT_NAMESPACE}:${SERVICE_ACCOUNT_AMP_INGEST_NAME}"
        }
      }
    }
  ]
}
EOF
#
# Set up the permission policy that grants ingest (remote write) permissions for all AMP workspaces
#
cat <<EOF > PermissionPolicyIngest.json
{
  "Version": "2012-10-17",
   "Statement": [
       {"Effect": "Allow",
        "Action": [
           "aps:RemoteWrite",
           "aps:GetSeries",
           "aps:GetLabels",
           "aps:GetMetricMetadata"
        ],
        "Resource": "*"
      }
   ]
}
EOF

function getRoleArn() {
  OUTPUT=$(aws iam get-role --role-name $1 --query 'Role.Arn' --output text 2>&1)

  # Check for an expected exception
  if [[ $? -eq 0 ]]; then
    echo $OUTPUT
  elif [[ -n $(grep "NoSuchEntity" <<< $OUTPUT) ]]; then
    echo ""
  else
    >&2 echo $OUTPUT
    return 1
  fi
}

#
# Create the IAM Role for ingest with the above trust policy
#
SERVICE_ACCOUNT_IAM_AMP_INGEST_ROLE_ARN=$(getRoleArn $SERVICE_ACCOUNT_IAM_AMP_INGEST_ROLE)
if [ "$SERVICE_ACCOUNT_IAM_AMP_INGEST_ROLE_ARN" = "" ];
then
  #
  # Create the IAM role for service account
  #
  SERVICE_ACCOUNT_IAM_AMP_INGEST_ROLE_ARN=$(aws iam create-role \
  --role-name $SERVICE_ACCOUNT_IAM_AMP_INGEST_ROLE \
  --assume-role-policy-document file://TrustPolicy.json \
  --query "Role.Arn" --output text)
  #
  # Create an IAM permission policy
  #
  SERVICE_ACCOUNT_IAM_AMP_INGEST_ARN=$(aws iam create-policy --policy-name $SERVICE_ACCOUNT_IAM_AMP_INGEST_POLICY \
  --policy-document file://PermissionPolicyIngest.json \
  --query 'Policy.Arn' --output text)
  #
  # Attach the required IAM policies to the IAM role created above
  #
  aws iam attach-role-policy \
  --role-name $SERVICE_ACCOUNT_IAM_AMP_INGEST_ROLE \
  --policy-arn $SERVICE_ACCOUNT_IAM_AMP_INGEST_ARN
else
    echo "$SERVICE_ACCOUNT_IAM_AMP_INGEST_ROLE_ARN IAM role for ingest already exists"
fi
echo $SERVICE_ACCOUNT_IAM_AMP_INGEST_ROLE_ARN
#
# EKS cluster hosts an OIDC provider with a public discovery endpoint.
# Associate this IdP with AWS IAM so that the latter can validate and accept the OIDC tokens issued by Kubernetes to service accounts.
# Doing this with eksctl is the easier and best approach.
#
eksctl utils associate-iam-oidc-provider --cluster $CLUSTER_NAME --approve
执行以上脚本创建role
bash createIRSA-AMPIngest.sh
使用以下内容创建名为 createIRSA-AMPQuery.sh 的文件。将 <my_amazon_eks_clustername> 替换为集群的名称,并将 <my_prometheus_namespace> 替换为您的 Prometheus 命名空间。
#!/bin/bash -e
CLUSTER_NAME=<my_amazon_eks_clustername>
SERVICE_ACCOUNT_NAMESPACE=<my_prometheus_namespace>
AWS_ACCOUNT_ID=$(aws sts get-caller-identity --query "Account" --output text)
OIDC_PROVIDER=$(aws eks describe-cluster --name $CLUSTER_NAME --query "cluster.identity.oidc.issuer" --output text | sed -e "s/^https:\/\///")
SERVICE_ACCOUNT_AMP_QUERY_NAME=amp-iamproxy-query-service-account
SERVICE_ACCOUNT_IAM_AMP_QUERY_ROLE=amp-iamproxy-query-role
SERVICE_ACCOUNT_IAM_AMP_QUERY_POLICY=AMPQueryPolicy
#
# Setup a trust policy designed for a specific combination of K8s service account and namespace to sign in from a Kubernetes cluster which hosts the OIDC Idp.
#
cat <<EOF > TrustPolicy.json
{
  "Version": "2012-10-17",
  "Statement": [
    {
      "Effect": "Allow",
      "Principal": {
        "Federated": "arn:aws:iam::${AWS_ACCOUNT_ID}:oidc-provider/${OIDC_PROVIDER}"
      },
      "Action": "sts:AssumeRoleWithWebIdentity",
      "Condition": {
        "StringEquals": {
          "${OIDC_PROVIDER}:sub": "system:serviceaccount:${SERVICE_ACCOUNT_NAMESPACE}:${SERVICE_ACCOUNT_AMP_QUERY_NAME}"
        }
      }
    }
  ]
}
EOF
#
# Set up the permission policy that grants query permissions for all AMP workspaces
#
cat <<EOF > PermissionPolicyQuery.json
{
  "Version": "2012-10-17",
   "Statement": [
       {"Effect": "Allow",
        "Action": [
           "aps:QueryMetrics",
           "aps:GetSeries",
           "aps:GetLabels",
           "aps:GetMetricMetadata"
        ],
        "Resource": "*"
      }
   ]
}
EOF

function getRoleArn() {
  OUTPUT=$(aws iam get-role --role-name $1 --query 'Role.Arn' --output text 2>&1)

  # Check for an expected exception
  if [[ $? -eq 0 ]]; then
    echo $OUTPUT
  elif [[ -n $(grep "NoSuchEntity" <<< $OUTPUT) ]]; then
    echo ""
  else
    >&2 echo $OUTPUT
    return 1
  fi
}

#
# Create the IAM Role for query with the above trust policy
#
SERVICE_ACCOUNT_IAM_AMP_QUERY_ROLE_ARN=$(getRoleArn $SERVICE_ACCOUNT_IAM_AMP_QUERY_ROLE)
if [ "$SERVICE_ACCOUNT_IAM_AMP_QUERY_ROLE_ARN" = "" ];
then
  #
  # Create the IAM role for service account
  #
  SERVICE_ACCOUNT_IAM_AMP_QUERY_ROLE_ARN=$(aws iam create-role \
  --role-name $SERVICE_ACCOUNT_IAM_AMP_QUERY_ROLE \
  --assume-role-policy-document file://TrustPolicy.json \
  --query "Role.Arn" --output text)
  #
  # Create an IAM permission policy
  #
  SERVICE_ACCOUNT_IAM_AMP_QUERY_ARN=$(aws iam create-policy --policy-name $SERVICE_ACCOUNT_IAM_AMP_QUERY_POLICY \
  --policy-document file://PermissionPolicyQuery.json \
  --query 'Policy.Arn' --output text)
  #
  # Attach the required IAM policies to the IAM role create above
  #
  aws iam attach-role-policy \
  --role-name $SERVICE_ACCOUNT_IAM_AMP_QUERY_ROLE \
  --policy-arn $SERVICE_ACCOUNT_IAM_AMP_QUERY_ARN
else
    echo "$SERVICE_ACCOUNT_IAM_AMP_QUERY_ROLE_ARN IAM role for query already exists"
fi
echo $SERVICE_ACCOUNT_IAM_AMP_QUERY_ROLE_ARN
#
# EKS cluster hosts an OIDC provider with a public discovery endpoint.
# Associate this IdP with AWS IAM so that the latter can validate and accept the OIDC tokens issued by Kubernetes to service accounts.
# Doing this with eksctl is the easier and best approach.
#
eksctl utils associate-iam-oidc-provider --cluster $CLUSTER_NAME --approve
执行以上脚本,创建role
bash createIRSA-AMPQuery.sh
二、部署Prometheus
1.添加helm仓库
helm repo add prometheus-community https://prometheus-community.github.io/helm-charts
helm repo add kube-state-metrics https://kubernetes.github.io/kube-state-metrics
helm repo update
2.创建部署Prometheus的命名空间
kubectl create namespace monitoring
3.检查Amazon EBS CSI
如果EBS CSI组件没有附加对应的IAM role,需要在IAM 控制台中创建附有AmazonEBSCSIDriverPolicy权限且类型为AWS账号的role,否则EKS创建PVC时会报错

4.创建storageClass
#cat sc.yaml
apiVersion: storage.k8s.io/v1
kind: StorageClass
metadata:
  name: ebs-sc
  annotations:
    storageclass.kubernetes.io/is-default-class: "true"
provisioner: ebs.csi.aws.com
allowVolumeExpansion: true
volumeBindingMode: WaitForFirstConsumer
parameters:
  type: gp3

#kubectl apply -f sc.yaml
5.部署Prometheus
helm install prometheus prometheus -n monitoring -f prometheus.yaml
6.查看Prometheus是否部署成功
kubectl get pods -n monitoring
7.部署grafana
#cat grafana.yaml
---
apiVersion: v1
kind: PersistentVolumeClaim
metadata:
  name: grafana-pvc
spec:
  accessModes:
    - ReadWriteOnce
  resources:
    requests:
      storage: 1Gi
---
apiVersion: apps/v1
kind: Deployment
metadata:
  labels:
    app: grafana
  name: grafana
spec:
  selector:
    matchLabels:
      app: grafana
  template:
    metadata:
      labels:
        app: grafana
    spec:
      securityContext:
        fsGroup: 472
        supplementalGroups:
          - 0
      containers:
        - name: grafana
          image: grafana/grafana:latest
          imagePullPolicy: IfNotPresent
          ports:
            - containerPort: 3000
              name: http-grafana
              protocol: TCP
          readinessProbe:
            failureThreshold: 3
            httpGet:
              path: /robots.txt
              port: 3000
              scheme: HTTP
            initialDelaySeconds: 10
            periodSeconds: 30
            successThreshold: 1
            timeoutSeconds: 2
          livenessProbe:
            failureThreshold: 3
            initialDelaySeconds: 30
            periodSeconds: 10
            successThreshold: 1
            tcpSocket:
              port: 3000
            timeoutSeconds: 1
          resources:
            requests:
              cpu: 250m
              memory: 750Mi
          volumeMounts:
            - mountPath: /var/lib/grafana
              name: grafana-pv
      volumes:
        - name: grafana-pv
          persistentVolumeClaim:
            claimName: grafana-pvc
---
apiVersion: v1
kind: Service
metadata:
  name: grafana
spec:
  ports:
    - port: 3000
      protocol: TCP
      targetPort: http-grafana
  selector:
    app: grafana
  sessionAffinity: None
  type: ClusterIP

#kubectl apply -f grafana.yaml -n monitoring
三、访问Prometheus和grafana
Prometheus和grafana部署完成以后,可以将SVC类型改为nodeport,然后通过ALB暴露出来,通过公网进行访问
grafana默认用户密码为admin/admin

 浙公网安备 33010602011771号