
深度学习面试题30:卷积的梯度反向传播
目录
基础概念
自定义一个网络为例
初始化模型参数
计算卷积核上的梯度
梯度更新
PyTorch实战
参考资料
在很多机器学习的资料中,对梯度反向传播在全连接神经网络的应用介绍的比较多;但是较少有介绍过卷积网络的梯度是如何反向传播的,这也是知乎公司算法部门的一道面试题。
其实这个题目并不难,我们举一个例子,然后结合pytorch工具做验证。
|
基础概念 |
卷积网络的模型参数是分布在卷积核与偏置上的。所以梯度就是损失函数对卷积核上参数和对偏置参数的导数构成的向量。
|
自定义一个网络为例 |
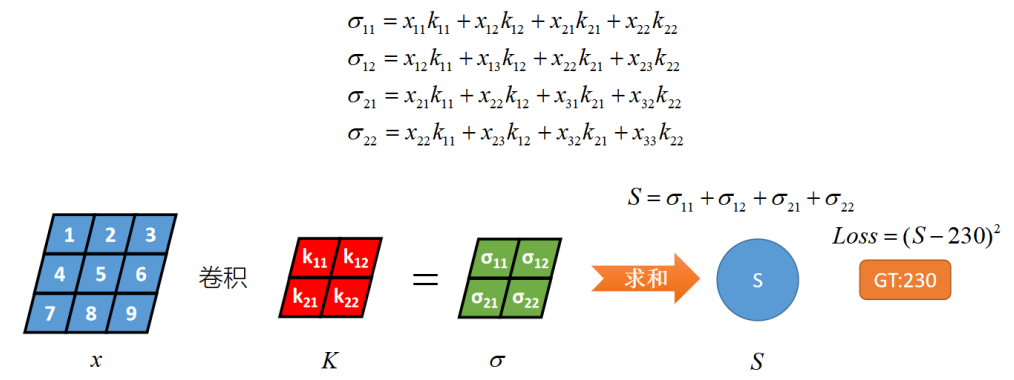
x和卷积核K做卷积运算,得到σ,对σ的每个元素做一个求和聚合,得到S(这里没有把σ拉直然后连接全连接的原因是,简化计算,让演示更加方便),然后S与GT计算MSE损失。
|
初始化模型参数 |
这里重点演示卷积核上参数的更新,忽略了偏置项。

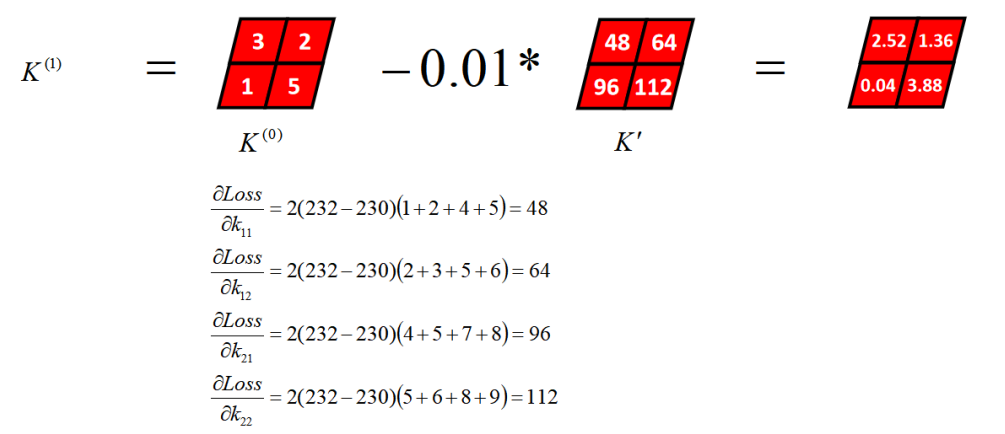
假设卷积核的初始值如上图为K(0)所示
|
计算卷积核上的梯度 |
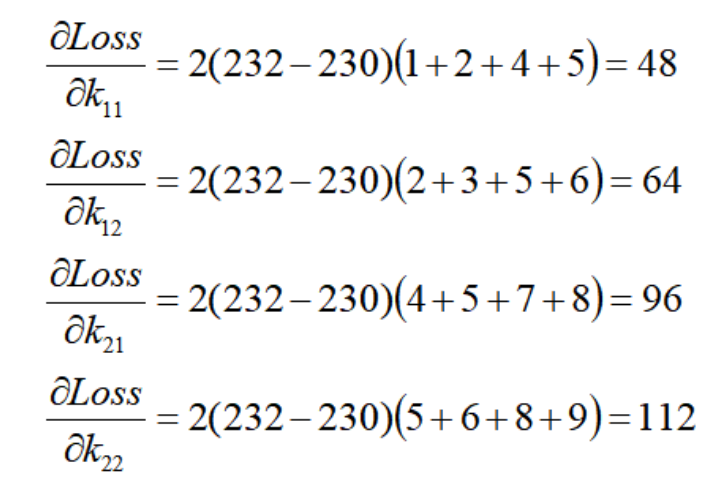
下图描述的是卷积核上第一个元素的梯度值:
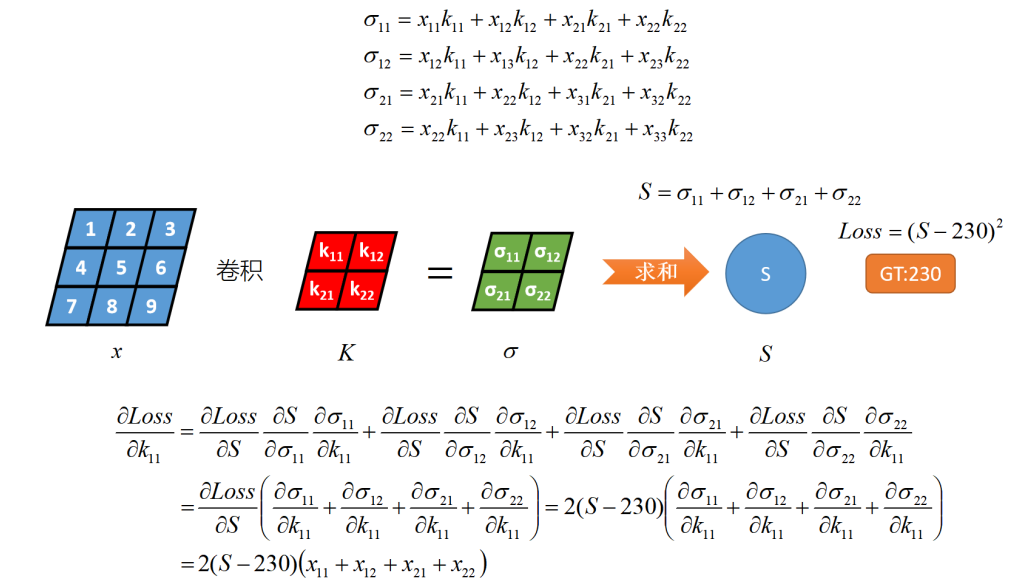
同理,计算出卷积核上所有参数的梯度值
|
梯度更新 |
|
PyTorch实战 |
代码里介绍了手工计算的方式和调库计算的方式


# -*- coding: utf-8 -*-
import torch
import torch.nn as nn


class Net(nn.Module):
    def __init__(self):
        super(Net, self).__init__()
        self.conv1 = nn.Conv2d(1, 1, 2, bias=False)  # 默认padding=0 即valid卷积

    def forward(self, x):
        # Max pooling over a (2, 2) window
        x = self.conv1(x)
        return x.sum()


if __name__ == '__main__':
    net = Net()
    print("网络结构为:")
    print(net)
    print()
    weight1 = torch.tensor([3., 2., 1., 5.])
    weight1 = weight1.view(1, 1, 2, 2)
    net.conv1._parameters['weight'].data = weight1  # 自定义卷积核

    input = torch.tensor([[1., 2., 3.],  # 自定义输入
                          [4., 5., 6.],
                          [7., 8., 9.]])
    input = input.view(1, 1, 3, 3)
    output = net(input)
    print("前向传播输出:")
    print(output)
    print()

    # Loss Function
    target = torch.tensor(230.)
    criterion = nn.MSELoss()
    loss = criterion(output, target)
    print("MSE loss:", loss)
    print()

    # Backprop
    net.zero_grad()  # zeroes the gradient buffers of all parameters
    loss.backward()
    print("卷积核的梯度:")
    print(net.conv1.weight.grad)
    print()

    use_module = True
    if not use_module:
        # Update the weights     weight = weight - learning_rate * gradient
        learning_rate = 0.01
        for f in net.parameters():
            f.data.sub_(f.grad.data * learning_rate)
        print("手动更新")
        print(list(net.parameters()))
        """
        tensor([[[[2.5200, 1.3600],
                  [0.0400, 3.8800]]]], requires_grad=True)]
        """

    else:
        # However, as you use neural networks, you want to use various different update rules such as SGD,
        # Nesterov-SGD, Adam, RMSProp, etc. To enable this, we built a small package: torch.optim that
        # implements all these methods. Using it is very simple:
        import torch.optim as optim

        # create your optimizer
        optimizer = optim.SGD(net.parameters(), lr=0.01)

        # in your training loop:
        optimizer.zero_grad()  # zero the gradient buffers
        output = net(input)
        loss = criterion(output, target)
        loss.backward()
        optimizer.step()  # Does the update
        print("optim更新")
        print(list(net.parameters()))
        """
        tensor([[[[2.5200, 1.3600],
                  [0.0400, 3.8800]]]], requires_grad=True)]
        """
|
参考资料 |
《图解深度学习与神经网络:从张量到TensorFlow实现》_张平

 浙公网安备 33010602011771号