防火墙
华为仿真防火墙USG6000V
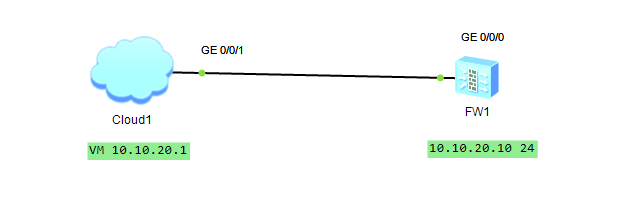
实验拓扑
初始化更改密码
初次使用设置密码
Username:admin
Password:Admin@123
The password needs to be changed. Change now? [Y/N]: Y
Please enter old password: Admin@123
Please enter new password: admin@123
Please confirm new password: admin@123

 Info: Your password has been changed. Save the change to survive a reboot.
*************************************************************************
*         Copyright (C) 2014-2018 Huawei Technologies Co., Ltd.         *
*                           All rights reserved.                        *
*               Without the owner's prior written consent,              *
*        no decompiling or reverse-engineering shall be allowed.        *
*************************************************************************


<USG6000V1>
配置IP
设置端口的IP地址,用于访问web或者远程
[USG6000V1]interface GigabitEthernet 0/0/0
[USG6000V1-GigabitEthernet0/0/0]ip address 10.10.20.10 24
开放权限
开放权限有服务分开给,按需求给权限,但是我选择all全部给权限不仅可以web访问还可以Telnet访问
[USG6000V1]interface GigabitEthernet 0/0/0
[USG6000V1-GigabitEthernet0/0/0]service-manage ?
all ALL service
enable Service manage switch on/off
http HTTP service
https HTTPS service
ping Ping service
snmp SNMP service
ssh SSH service
telnet Telnet service
[USG6000V1-GigabitEthernet0/0/0]service-manage all permit
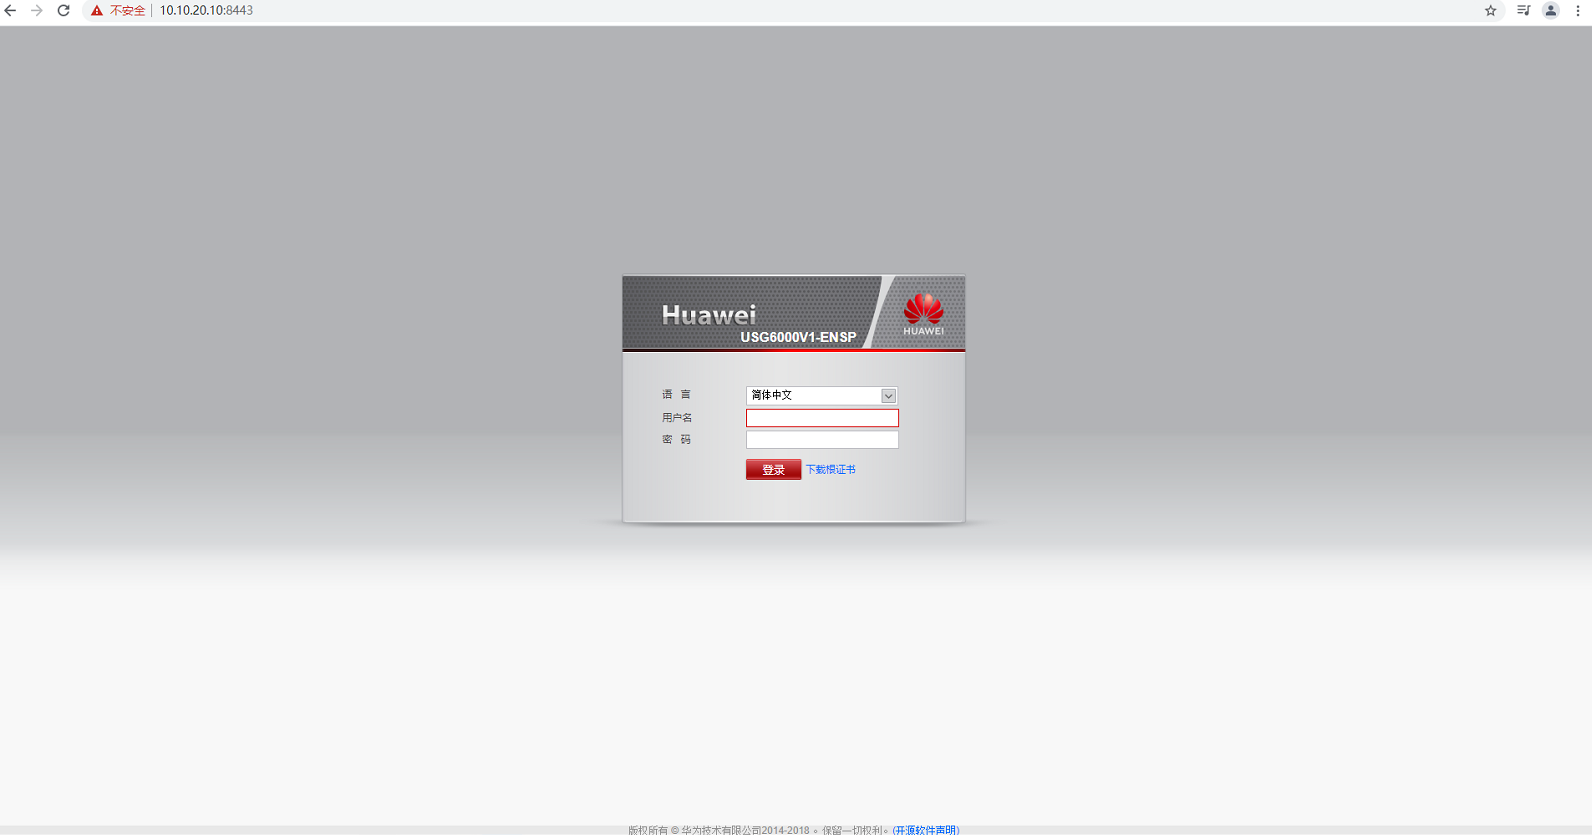
"防火墙里面不能ping外面,但是外面可以ping通防火墙"http的方式访问同通过HTTPS的方式加密端口8443访问华为web页面
防火墙的基础配置
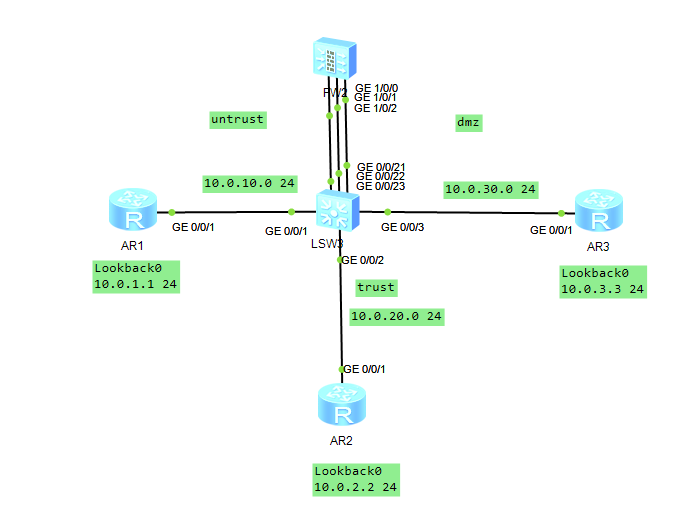
实验拓扑
- 掌握防火墙安全区域的配置方法
- 掌握安全策略的配置方法
你是公司的网络管理员。公司总部的网络分成了三个区域,包括内部区域(Trust)、外部区域(Untrust)和服务器区域(DMZ)。你设计通过防火墙来实现对数据的控制,确保公司内部网络安全,并通过DMZ区域对外网提供服务。
配置与 IP 编址
<Huawei>system-view
Enter system view, return user view with Ctrl+Z.
[Huawei]sysname R1
[R1]interface GigabitEthernet 0/0/1
[R1-GigabitEthernet0/0/1]ip address 10.0.10.1 24
[R1-GigabitEthernet0/0/1]quit
[R1]interface loopback 0
[R1-LoopBack0]ip address 10.0.1.1 24

<Huawei>system-view
Enter system view, return user view with Ctrl+Z.
[Huawei]sysname R2
[R2]interface GigabitEthernet0/0/1
[R2-GigabitEthernet0/0/1]ip address 10.0.20.1 24
[R2-GigabitEthernet0/0/1]quit
[R2]interface loopback 0
[R2-LoopBack0]ip address 10.0.2.2 24

<Huawei>system-view
Enter system view, return user view with Ctrl+Z.
[Huawei]sysname R3
[R3]interface GigabitEthernet 0/0/1
[R3-GigabitEthernet0/0/1]ip address 10.0.30.1 24
[R3-GigabitEthernet0/0/1]quit
[R3]interface loopback 0
[R3-LoopBack0]ip address 10.0.3.3 24
防火墙默认会启用GigabitEthernet0/0/0接口的ip地址,为避免干扰,可以删除。
<USG6300>system-view
Enter system view, return user view with Ctrl+Z.
[USG6300]sysname FW
[FW]int GigabitEthernet 0/0/0
[FW-GigabitEthernet0/0/0]undo ip address
[FW-GigabitEthernet0/0/0]quit
[FW]interface GigabitEthernet 1/0/0
[FW-GigabitEthernet1/0/0]ip address 10.0.10.254 24
[FW-GigabitEthernet1/0/0]quit
[FW]interface GigabitEthernet 1/0/1
[FW-GigabitEthernet1/0/1]ip address 10.0.20.254 24
[FW-GigabitEthernet1/0/1]quit
[FW]interface GigabitEthernet 1/0/2
[FW-GigabitEthernet1/0/2]ip address 10.0.30.254 24
[FW-GigabitEthernet1/0/2]quit
配置交换机
配置交换机的IP地址和VLAN的划分
[Quidway]sysname S1
[S1]vlan batch 11 to 13
[S1]interface GigabitEthernet 0/0/1
[S1-GigabitEthernet0/0/1]port link-type access
[S1-GigabitEthernet0/0/1]port default vlan 11
[S1-GigabitEthernet0/0/1]quit
[S1]interface GigabitEthernet 0/0/2
[S1-GigabitEthernet0/0/2]port link-type access
[S1-GigabitEthernet0/0/2]port default vlan 12
[S1-GigabitEthernet0/0/2]quit
[S1]interface GigabitEthernet 0/0/3
[S1-GigabitEthernet0/0/3]port link-type access
[S1-GigabitEthernet0/0/3]port default vlan 13
[S1-GigabitEthernet0/0/3]quit
[S1]interface GigabitEthernet 0/0/21
[S1-GigabitEthernet0/0/21]port link-type access
[S1-GigabitEthernet0/0/21]port default vlan 11
[S1-GigabitEthernet0/0/21]quit
[S1]interface GigabitEthernet 0/0/22
[S1-GigabitEthernet0/0/22]port link-type access
[S1-GigabitEthernet0/0/22]port default vlan 12
[S1-GigabitEthernet0/0/22]quit
[S1]interface GigabitEthernet 0/0/23
[S1-GigabitEthernet0/0/23]port link-type access
[S1-GigabitEthernet0/0/23]port default vlan 13
在R1、R2和R3上配置缺省路由,在FW上配置明确的静态路由,实现三个Loopback0接口连接的网段之间路由畅通。
[R1]ip route-static 0.0.0.0 0 10.0.10.254
[R2]ip route-static 0.0.0.0 0 10.0.20.254
[R3]ip route-static 0.0.0.0 0 10.0.30.254

[FW]ip route-static 10.0.1.0 24 10.0.10.1
[FW]ip route-static 10.0.2.0 24 10.0.20.1
[FW]ip route-static 10.0.3.0 24 10.0.30.1
配置防火墙区域
防火墙上默认有四个区域,分别是“local“、”trust“、”untrust“、”dmz“。实验中我们使用到“trust“、”untrust“和”dmz“三个区域,分别将对应接口加入各安全区域,由于默认配置将GE0/0/0加入了“trust”区域,为避免干扰,将其删除。
[FW]firewall zone dmz
[FW-zone-dmz]add interface GigabitEthernet 1/0/2
[FW-zone-dmz]quit
[FW]firewall zone trust
[FW-zone-trust]add interface GigabitEthernet 1/0/1
[FW-zone-trust]undo add interface GigabitEthernet 0/0/0
[FW-zone-trust]quit
[FW]firewall zone untrust
[FW-zone-untrust]add interface GigabitEthernet 1/0/0
[FW-zone-untrust]quit
配置安全策略
如果防火墙域间没有配置安全策略,或查找安全策略时,所有的安全策略都没有命中,则默认执行域间的缺省包过滤动作(拒绝通过)。配置安全策略,仅允许Trust区域访问其他区域,不允许其他区域之间的访问。
[FW]security-policy
[FW-policy-security]rule name policy_sec_1
[FW-policy-security-rule-policy_sec_1]source-zone trust
[FW-policy-security-rule-policy_sec_1]destination-zone untrust
[FW-policy-security-rule-policy_sec_1]action permit
[FW-policy-security-rule-policy_sec_1]quit
[FW-policy-security]rule name policy_sec_2
[FW-policy-security-rule-policy_sec_2]source-zone trust
[FW-policy-security-rule-policy_sec_2]destination-zone dmz
[FW-policy-security-rule-policy_sec_2]action permit
[FW-policy-security-rule-policy_sec_2]quit
[FW-policy-security]quit
检查配置结果:
[FW]display security-policy all
Total:3
RULE ID RULE NAME STATE ACTION HITTED
----------------------------------------------------------------------------
0 default enable deny 0
1 policy_sec_1 enable permit 0
2 policy_sec_2 enable permit 0
----------------------------------------------------------------------------

[FW]display security-policy rule policy_sec_1
 (0 times matched)
rule name policy_sec_1
 source-zone trust
 destination-zone untrust
 action permit
[FW]display security-policy rule policy_sec_2
 (0 times matched)
rule name policy_sec_2
 source-zone trust
 destination-zone dmz
 action permit
测试连通性
检查从trust到untrust和dmz的连通性:
[R2]ping -a 10.0.2.2 10.0.1.1
 PING 10.0.1.1: 56 data bytes, press CTRL_C to break
 Reply from 10.0.1.1: bytes=56 Sequence=1 ttl=254 time=1 ms
 Reply from 10.0.1.1: bytes=56 Sequence=2 ttl=254 time=1 ms
 Reply from 10.0.1.1: bytes=56 Sequence=3 ttl=254 time=1 ms
 Reply from 10.0.1.1: bytes=56 Sequence=4 ttl=254 time=1 ms
 Reply from 10.0.1.1: bytes=56 Sequence=5 ttl=254 time=1 ms
 --- 10.0.1.1 ping statistics ---
 5 packet(s) transmitted
 5 packet(s) received
 0.00% packet loss
 round-trip min/avg/max = 1/1/1 ms

[R2]ping -a 10.0.2.2 10.0.3.3
 PING 10.0.3.3: 56 data bytes, press CTRL_C to break
 Reply from 10.0.3.3: bytes=56 Sequence=1 ttl=254 time=1 ms
 Reply from 10.0.3.3: bytes=56 Sequence=2 ttl=254 time=1 ms
 Reply from 10.0.3.3: bytes=56 Sequence=3 ttl=254 time=1 ms
 Reply from 10.0.3.3: bytes=56 Sequence=4 ttl=254 time=1 ms
 Reply from 10.0.3.3: bytes=56 Sequence=5 ttl=254 time=1 ms
 --- 10.0.3.3 ping statistics ---
 5 packet(s) transmitted
 5 packet(s) received
 0.00% packet loss
round-trip min/avg/max = 1/1/1 ms

检查从untrust到trust和dmz的连通性:
[R1]ping -a 10.0.1.1 10.0.2.2
 PING 10.0.2.2: 56 data bytes, press CTRL_C to break
 Request time out
 Request time out
 Request time out
 Request time out
 Request time out
 --- 10.0.2.2 ping statistics ---
 5 packet(s) transmitted
 0 packet(s) received
 100.00% packet loss
以trust区域为源的数据可以访问untrust和dmz,但以其他区域为源的数据不能互访。
配置域间包过滤策略,允许Untrust区域访问DMZ区域的特定服务器。DMZ区域有一台服务器,IP地址为10.0.3.3,需要对Untrust区域开放Telnet服务。同时为了测试网络,需要开放ICMP Ping测试功能
[FW]security-policy
[FW-policy-security]rule name policy_sec_3
[FW-policy-security-rule-policy_sec_3]source-zone untrust
[FW-policy-security-rule-policy_sec_3]destination-zone dmz
[FW-policy-security-rule-policy_sec_3]destination-address 10.0.3.3 mask 255.255.255.255
[FW-policy-security-rule-policy_sec_3]service icmp
[FW-policy-security-rule-policy_sec_3]service telnet
[FW-policy-security-rule-policy_sec_3]action permit
为了能在进行Telnet测试,在R3上开启Telnet功能
[R3]telnet server enable
[R3]aaa
[R3-aaa]local-user test password irreversible-cipher Admin@123
[R3-aaa]local-user test service-type telnet
[R3-aaa]quit
[R3]user-interface vty 0 4
[R3-ui-vty0-4]authentication-mode aaa
[R3-ui-vty0-4]protocol inbound telnet
在R1上面进行测试
<R1>telnet 10.0.3.3
 Press CTRL_] to quit telnet mode
 Trying 10.0.3.3 ...
 Connected to 10.0.3.3 ...
Login authentication
Username:test
Password:
 -----------------------------------------------------------------------------
 User last login information:
 -----------------------------------------------------------------------------
 Access Type: Telnet
 IP-Address : 10.0.10.1
 Time : 2016-09-25 03:29:23+00:00
 -----------------------------------------------------------------------------
<R3>quit
 Info:Configuration console exit, please retry to log on
 The connection was closed by the remote host

 浙公网安备 33010602011771号