容器功能
组件添加
1、@Configuration
full表示全配置:每次调用对应方法创建组件时springboot都会判断ioc容器中是否包含该组件,如果包含那么就不会创建一个新的组件,如果不包含则创建一个组件
lite表示轻量级配置:每次调用对应方法创建组件时springboot不会进行判断容器中是否含有该组件,无论ioc容器中是否包含该组件都会创建一个新的组件
推荐两种模式的使用场景:
- 配置 类组件之间无依赖关系用Lite模式加速容器启动过程,减少判断
- 配置类组件之间有依赖关系,方法会被调用得到之前单实例组件,用Full模式
#############################Configuration使用示例######################################################
/**
 * 1、配置类里面使用@Bean标注在方法上给容器注册组件,默认也是单实例的
 * 2、配置类本身也是组件
 * 3、proxyBeanMethods:代理bean的方法
 *      Full(proxyBeanMethods = true)、【保证每个@Bean方法被调用多少次返回的组件都是单实例的】
 *      Lite(proxyBeanMethods = false)【每个@Bean方法被调用多少次返回的组件都是新创建的】
 *      组件依赖必须使用Full模式默认。其他默认是否Lite模式
 *
 *
 *
 */
@Configuration(proxyBeanMethods = false) //告诉SpringBoot这是一个配置类 == 配置文件
public class MyConfig {

    /**
     * Full:外部无论对配置类中的这个组件注册方法调用多少次获取的都是之前注册容器中的单实例对象
     * @return
     */
    @Bean //给容器中添加组件。以方法名作为组件的id。返回类型就是组件类型。返回的值,就是组件在容器中的实例
    public User user01(){
        User zhangsan = new User("zhangsan", 18);
        //user组件依赖了Pet组件
        zhangsan.setPet(tomcatPet());
        return zhangsan;
    }

    @Bean("tom")
    public Pet tomcatPet(){
        return new Pet("tomcat");
    }
}


################################@Configuration测试代码如下########################################
@SpringBootConfiguration
@EnableAutoConfiguration
@ComponentScan("com.atguigu.boot")
public class MainApplication {

    public static void main(String[] args) {
        //1、返回我们IOC容器
        ConfigurableApplicationContext run = SpringApplication.run(MainApplication.class, args);

        //2、查看容器里面的组件
        String[] names = run.getBeanDefinitionNames();
        for (String name : names) {
            System.out.println(name);
        }

        //3、从容器中获取组件

        Pet tom01 = run.getBean("tom", Pet.class);

        Pet tom02 = run.getBean("tom", Pet.class);

        System.out.println("组件:"+(tom01 == tom02));


        //4、com.atguigu.boot.config.MyConfig$$EnhancerBySpringCGLIB$$51f1e1ca@1654a892
        MyConfig bean = run.getBean(MyConfig.class);
        System.out.println(bean);

        //如果@Configuration(proxyBeanMethods = true)代理对象调用方法。SpringBoot总会检查这个组件是否在容器中有。
        //保持组件单实例
        User user = bean.user01();
        User user1 = bean.user01();
        System.out.println(user == user1);


        User user01 = run.getBean("user01", User.class);
        Pet tom = run.getBean("tom", Pet.class);

        System.out.println("用户的宠物:"+(user01.getPet() == tom));


    }
}
2、@Bean、@Component、@Controller、@Service、@Repository
这些注解都可以使用,只要这些注解使用在我们包扫描的范围内都可以使用
3、@ComponentScan、@Import
@ComponentScan
该注解和原先的使用方式相同,不做过多的解释。该注解详细内容见博客超链接
@import
@Import注解导入组件
举例示范
/*      @Import({User.class, DBHelper.class})
 *      给容器中自动创建出这两个类型的组件、默认组件的名字就是全类名
 */

@Import({User.class, DBHelper.class})
@Configuration(proxyBeanMethods = false) //告诉SpringBoot这是一个配置类 == 配置文件
public class MyConfig {
}
该注解还可以导入引入的jar包,不仅可以导入自创建的组件还可以导入别人的类作为组件。使用该注解导入的组件名字就是这个组件的全类名
4、@Conditional
条件装配,满足Conditional指定的条件,则进行组件注入

举例示范
=====================测试条件装配==========================
@Configuration(proxyBeanMethods = false) //告诉SpringBoot这是一个配置类 == 配置文件
//@ConditionalOnBean(name = "tom")
@ConditionalOnMissingBean(name = "tom")
public class MyConfig {


    /**
     * Full:外部无论对配置类中的这个组件注册方法调用多少次获取的都是之前注册容器中的单实例对象
     * @return
     */

    @Bean //给容器中添加组件。以方法名作为组件的id。返回类型就是组件类型。返回的值,就是组件在容器中的实例
    public User user01(){
        User zhangsan = new User("zhangsan", 18);
        //user组件依赖了Pet组件
        zhangsan.setPet(tomcatPet());
        return zhangsan;
    }

    @Bean("tom22")
    public Pet tomcatPet(){
        return new Pet("tomcat");
    }
}

public static void main(String[] args) {
        //1、返回我们IOC容器
        ConfigurableApplicationContext run = SpringApplication.run(MainApplication.class, args);

        //2、查看容器里面的组件
        String[] names = run.getBeanDefinitionNames();
        for (String name : names) {
            System.out.println(name);
        }

        boolean tom = run.containsBean("tom");
        System.out.println("容器中Tom组件:"+tom);

        boolean user01 = run.containsBean("user01");
        System.out.println("容器中user01组件:"+user01);

        boolean tom22 = run.containsBean("tom22");
        System.out.println("容器中tom22组件:"+tom22);


    }
原生配置文件引入
@ImportResource
我们在以前学习的spring中,使用beans.xml的这种配置,可以直接配置上,在创建ioc容器的时候指定配置文件即可,然后ioc容器中就包含了我们的bean对象,
但是在springboot中它并不能直接知道你的这个beans.xml就是要配置的bean对象,因为我们的springboot没有说明是否有bean的配置类,所以我们需要告诉springboot这个beans.xml是我们的配置bean对象的配置文件
这时候我们就可以在我们的配置类上使用这个注解,这个注解就可以告诉spriingboot哪个是xml注册组件的配置文件,然后去加载它
举例示范
======================beans.xml=========================
<?xml version="1.0" encoding="UTF-8"?>
<beans xmlns="http://www.springframework.org/schema/beans"
       xmlns:xsi="http://www.w3.org/2001/XMLSchema-instance"
       xmlns:context="http://www.springframework.org/schema/context"
       xsi:schemaLocation="http://www.springframework.org/schema/beans http://www.springframework.org/schema/beans/spring-beans.xsd http://www.springframework.org/schema/context https://www.springframework.org/schema/context/spring-context.xsd">

    <bean id="haha" class="com.atguigu.boot.bean.User">
        <property name="name" value="zhangsan"></property>
        <property name="age" value="18"></property>
    </bean>

    <bean id="hehe" class="com.atguigu.boot.bean.Pet">
        <property name="name" value="tomcat"></property>
    </bean>
</beans>
@ImportResource("classpath:beans.xml")
public class MyConfig {}

======================测试=================
        boolean haha = run.containsBean("haha");
        boolean hehe = run.containsBean("hehe");
        System.out.println("haha:"+haha);//true
        System.out.println("hehe:"+hehe);//true
如果不使用@ImportResource这个注解在配置类,那么测试输出的都是flase
绑定配置文件
配置绑定是什么,是干什么的。我们之前在写jdbc的时候,会将url、driver、username、password等等的一些信息写到一个以properties结尾的配置文件当中,然后使用Properties这个类进行读取并封装到某个对应的javabean当中去使用,这整个过程十分繁琐。
而我们的springboot帮助我们节省了这个自己使用propertes类读取配置文件信息,并将对应信息封装到javabean中并存入ioc容器当中的这个过程
@ConfigurationProperties(prefix="")
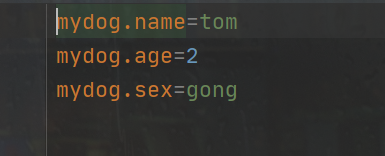
首先在application.xml中配置我们需要绑定的属性

至于为什么都用mydog为头的命名方式后面解释
然后给我们的Dog类使用绑定配置文件的注解
@ConfigurationProperties(prefix = "mydog")
public class Dog {
    private String name;
    private int age;
    private String sex;

    public Dog() {
    }

    public String getName() {
        return name;
    }

    public void setName(String name) {
        this.name = name;
    }

    public int getAge() {
        return age;
    }

    public void setAge(int age) {
        this.age = age;
    }

    public String getSex() {
        return sex;
    }

    public void setSex(String sex) {
        this.sex = sex;
    }
}
可以发现我们前面使用mydog为前缀是因为@ConfigurationProperties这个注解表示:能够读取的前缀.属性=值的这个格式的内容,这就是为什么我们要使用mydog.为前缀设置属性了
但是现在还用不了,因为如果我们想使用springboot的强大功能的话,必须给想使用springboot功能的类注册为一个组件,也就是创建它的bean对象
接下来我们给这个类注册一个组件,使用@Component注册组件
@Component
@ConfigurationProperties(prefix = "mydog")
public class Dog {
    private String name;
    private int age;
    private String sex;

    public Dog() {
    }

    public String getName() {
        return name;
    }

    public void setName(String name) {
        this.name = name;
    }

    public int getAge() {
        return age;
    }

    public void setAge(int age) {
        this.age = age;
    }

    public String getSex() {
        return sex;
    }

    public void setSex(String sex) {
        this.sex = sex;
    }
}
我们进行测试
@RestController
public class HelloController {
    @Autowired
    Dog diandian;

    @RequestMapping("/car")
    public Dog dog(){
        return diandian;
    }
}
启动测试

发现成功绑定了配置,再次感叹,springboot的简便
@EnableConfigurationProperties + @ConfigurationProperties
@EnableConfigurationProperties注解的作用有两个:
第一个是开启Dog配置绑定功能;
第二个是把这个Dog这个组件自动注册到容器中
使用这两个注解我们同样可以完成绑定配置的功能
@ConfigurationProperties(prefix = "mydog")
public class Dog {
    private String name;
    private int age;
    private String sex;

    public Dog() {
    }

    public String getName() {
        return name;
    }

    public void setName(String name) {
        this.name = name;
    }

    public int getAge() {
        return age;
    }

    public void setAge(int age) {
        this.age = age;
    }

    public String getSex() {
        return sex;
    }

    public void setSex(String sex) {
        this.sex = sex;
    }
}
配置类内容如下
@Configuration(proxyBeanMethods = true)
@EnableConfigurationProperties(Dog.class)
//1、开启Dog配置绑定功能
//2、把这个Dog这个组件自动注册到容器中
public class MyConfig {
    /**
     * 给容器中添加组件,以方法名作为组件的id,返回类型就是组件类型,就是组件在容器中的类型
     */
    @Bean("diandian")
    public Dog createDog() {
        return new Dog();
    }

}
自动配置原理
见尚硅谷笔记
https://www.yuque.com/atguigu/springboot/qb7hy2


 浙公网安备 33010602011771号