Pytest实战
安装pytest,先打开cmd-->输入命令pip3 install pytest,回车
创建一个unitApi文件夹,在文件夹下面创建一个test_add.py,代码如下:
def add(a,b):
    return a+b
def test_add_001():
    assert add(1,1)==2

def test_add_002():
    assert add('hi','!')=="hi!"
运行代码的过程如下:
点击Terminal
进入Terminal后

Pytest执行命令:(需要先进入到代码的包下才能执行)
如在创建的测试代码文件tes_add.py,代码如下:
import pytest

def add(a,b):
    return a+b

@pytest.mark.add
def test_add_001():
    assert add(1,1)==2

@pytest.mark.add
def test_add_002():
    assert add('hi','!')=="hi!"

def test_add_003():
    assert 2==9

@pytest.mark.skip(reason='该功能已取消')
def test_add_004():
    pass

@pytest.mark.add
def test_admin_001():
    pass

class TestLogin(object):
    def test_login_001(self):
        pass

    def test_login_002(self):
        pass

    def test_logout_001(self):
        pass

    def test_register_001(self):
        pass

if __name__ == '__main__':
    pytest.main(['-v', '-s', 'test_add.py::TestLogin::test_login_002'])
执行测试包下所有的测试模块 --> python -m pytest -v tests (tests包名)
python -m pytest -v 测试模块名称 --> python -m pytest -v tests/test_add.py

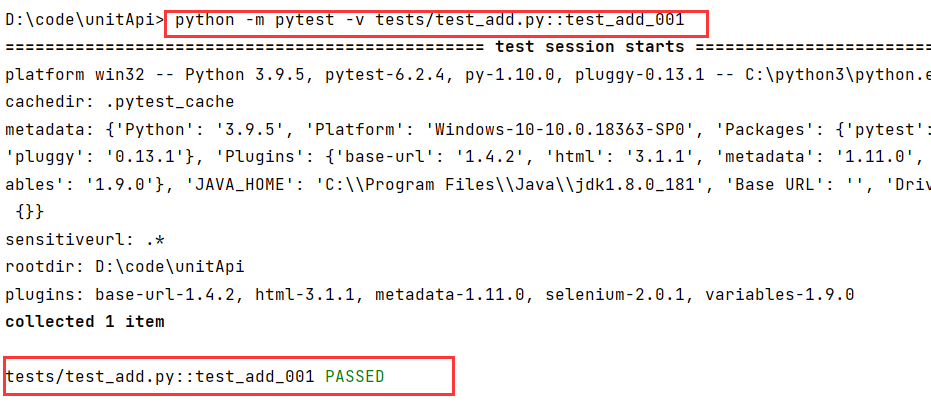
python -m pytest -v 测试模块::测试函数--> python -m pytest -v tests/test_add.py::test_add_001
![]()
执行模块下测试类里面的测试方法:(测试代码test_add.py)
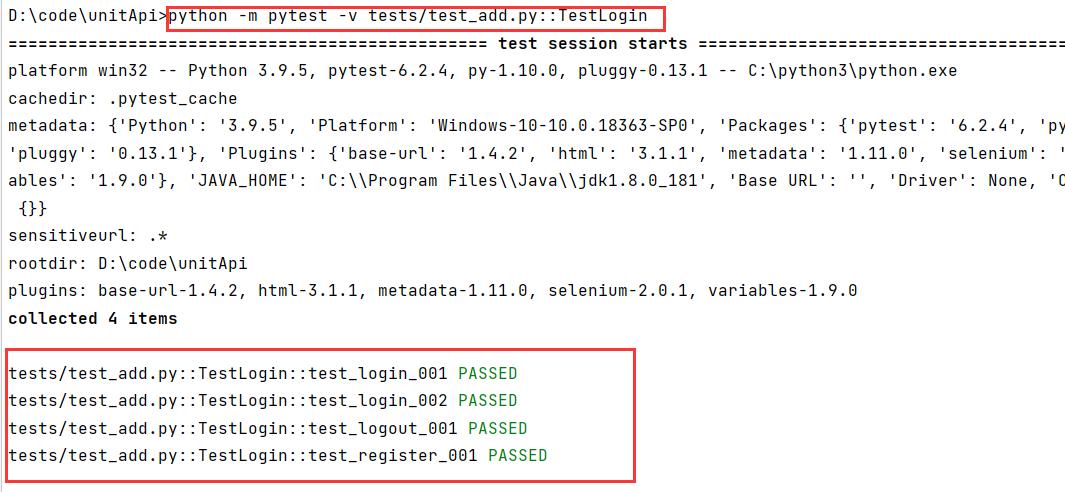
python -m pytest -v 测试模块::测试类 --> python -m pytest -v tests/test_add.py::TestLogin
![]()
python -m pytest -v 测试模块::测试类::测试方法-->python -m pytest -v tests/test_add.py::TestLogin::test_login_002
![]()

-s 输出 python -m pytest -v -s tests/test_add.py::test_add_001
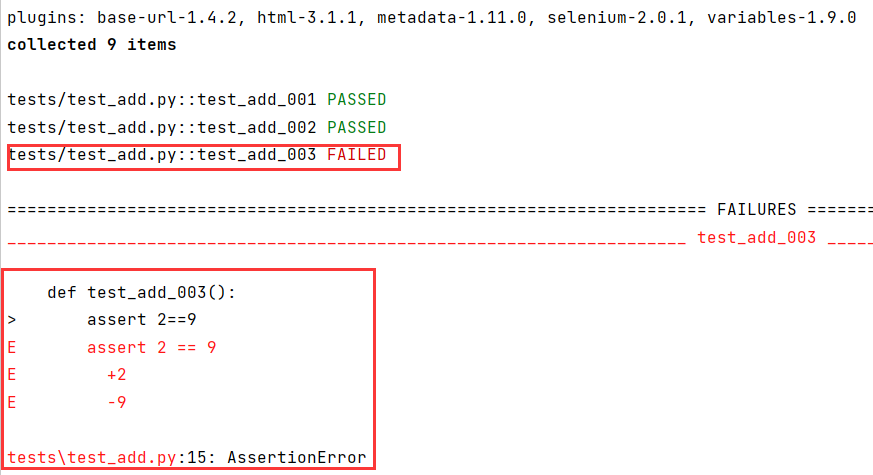
-x失败立即停止运行(多用于调试):python -m pytest -v -x tests/test_add.py
![]()
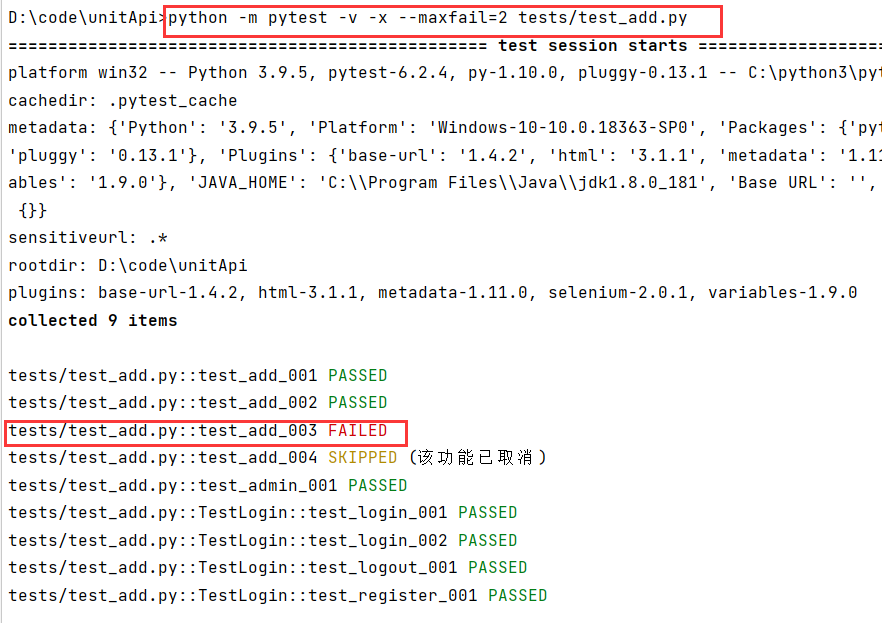
--maxfail=指定失败次数。当然也可以指定失败的次数,⽐如最⼤能够忍耐的失败次数,⽐如2,或者0,案例就为2,
python -m pytest -v -x --maxfail=2 tests/test_add.py
![]()
![]()

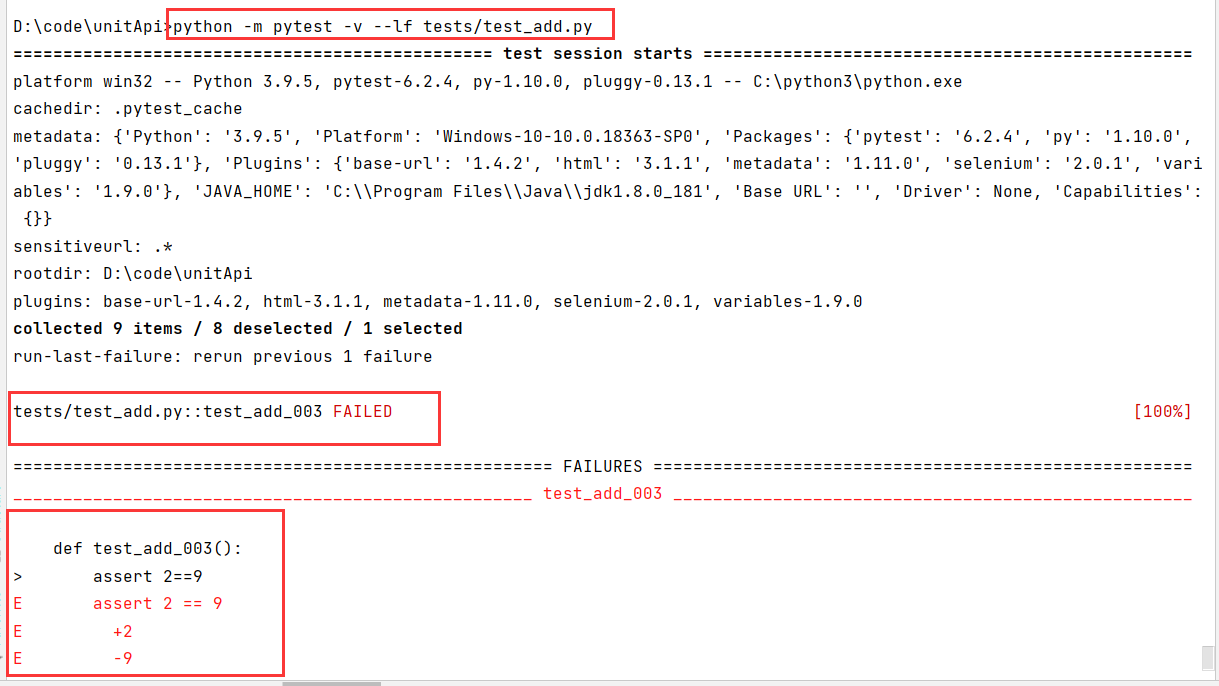
定位错误--lf
在执⾏的时候出错,我们希望能够快速定位出具体是哪⼀⾏出错了,就会使⽤到--lf。
python -m pytest -v --lf tests/test_add.py。
![]()
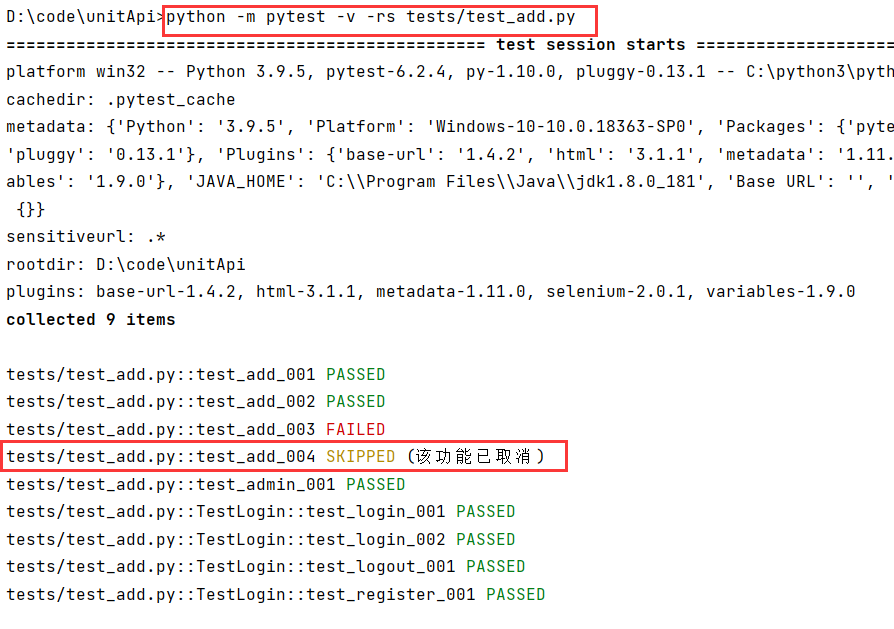
-rs 忽略测试用例 python -m pytest -v -rs tests/test_add.py
按分类执行,需要使⽤到-k的命令,它主要是允许使⽤ 表达式指定希望运⾏的测试⽤例,或者多个前缀或者是后缀的测试⽤例名称相同 如在创建的tes_exmple.py,
代码如下:
import pytest

def test_login_001():
    pass

def test_login_logout_002():
    pass

def test_logout_001():
    pass

def test_register_001():
    pass
执行命令后的结果
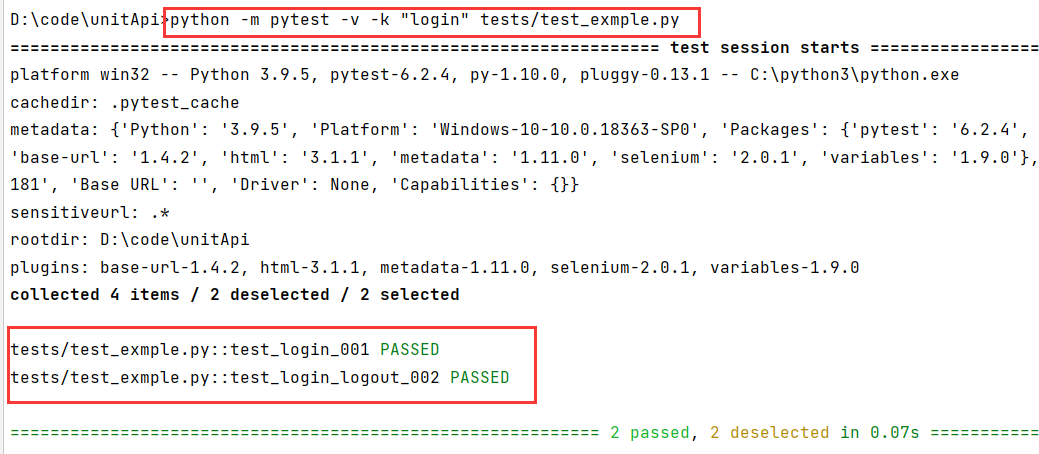
python -m pytest -v -k "login" tests/test_exmple.py -k关键字
![]()
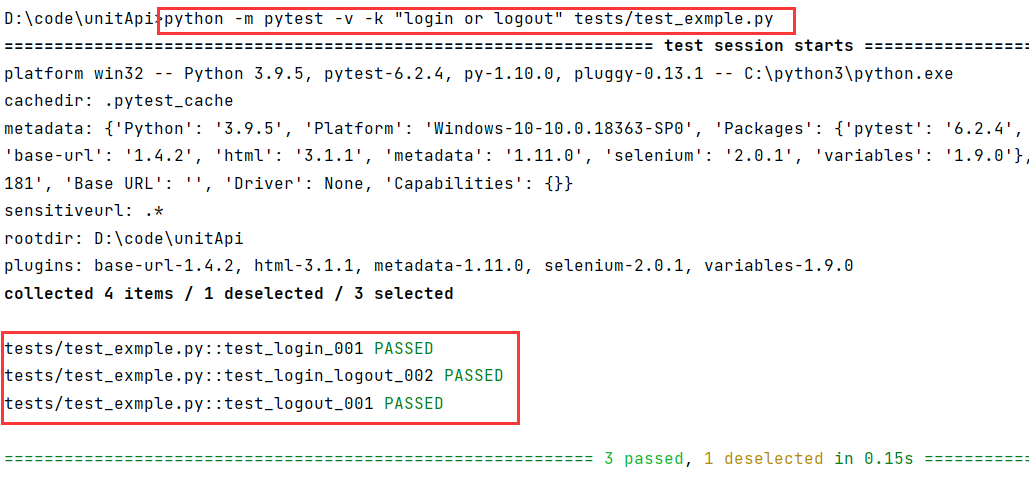
python -m pytest -v -k "login or logout" tests/test_exmple.py or是带有login和logout关键字的都被执行(分别是两个测试)7
![]()
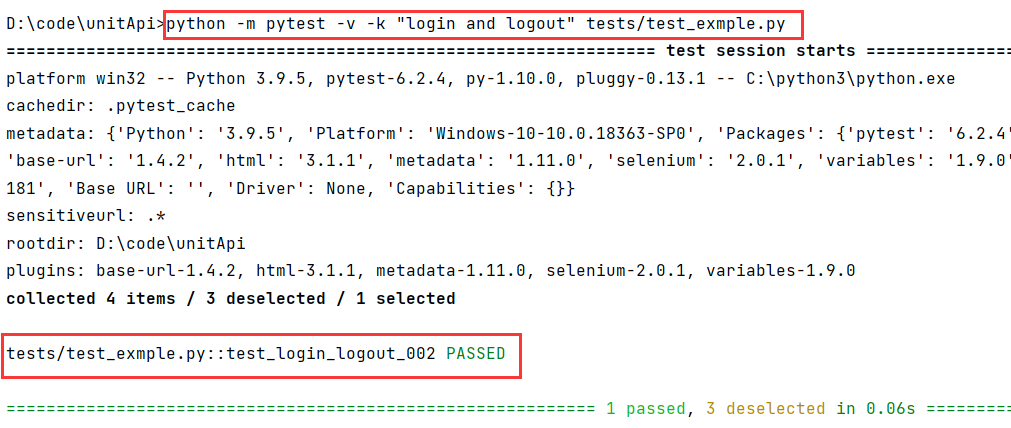
python -m pytest -v -k "login and logout" tests/test_exmple.py (-k "login and logout" and表示login和logout两个关键字在同一个测试名称里面)
![]()
按快速分组执行,命令-m可以快速的找到分组并且执⾏,对代码进⾏修改,增加装饰器。创建一个test_share.py,代码如下
import pytest

#和test_exmple.py写法不一样,含义一样
@pytest.mark.login
def test_001():
    pass

@pytest.mark.logout
def test_exit_001():
    pass

@pytest.mark.login
@pytest.mark.logout
def test_002():
    pass

@pytest.mark.reister
def test_reg_001():
    pass
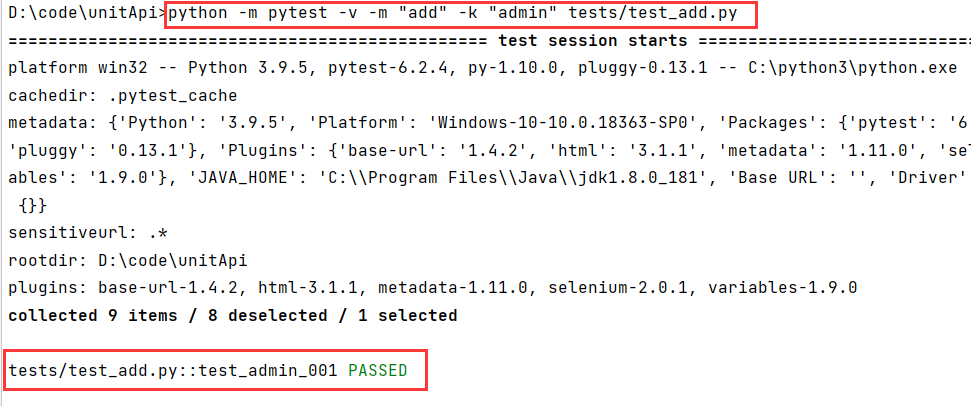
python -m pytest -v -m "add" -k "admin" tests/test_add.py -m -k分组执行(和and差不多,需要-m和-k的关键字都存在)
创建一个test_ui.py,代码如下:
指定测试浏览器 python -m pytest -v --driver Chrome tests/test_ui.py
import pytest
import time as t

def test_baidu_title(selenium):
    selenium.maximize_window()
    selenium.get('https://www.baidu.com')
    selenium.implicitly_wait(30)
    assert selenium.title=='百度一下,你就知道'

def test_baidu_so(selenium):
    selenium.maximize_window()
    selenium.get('https://www.baidu.com')
    selenium.implicitly_wait(30)
    so=selenium.find_element_by_id('kw')
    so.send_keys('周杰伦')
    t.sleep(2)
    assert so.get_attribute('value')=='周杰伦'
输出信息展示
--tb=no:关闭信息
--tb=short:只输出assert的错误信息
--tb=line:⼀⾏展示所有的信息,
练习1:python -m pytest -v --driver Chrome tests/test_ui.py (指定测试浏览器)
#test_ui.py
@pytest.mark.parametrize('username,password,divText',[
    ('','','请输入邮箱名'),
    ('lyl2580@sina.com',123,'登录名或密码错误'),
    ('lyl',369,'您输入的邮箱名格式不正确')
    ])

def test_sina_login(selenium,username,password,divText):
    selenium.maximize_window()
    selenium.get('https://mail.sina.com.cn/')
    selenium.implicitly_wait(30)
    selenium.find_element_by_id('freename').send_keys(username)
    selenium.find_element_by_id('freepassword').send_keys(password)
    selenium.find_element_by_link_text('登录').click()
    t.sleep(3)
    errorText=selenium.find_element_by_xpath('/html/body/div[3]/div/div[2]/div/div/div[4]/div[1]/div[1]/div[1]/span[1]')
    assert errorText.text==divText
练习2:python -m pytest -v --driver Chrome tests/test_params.py (指定测试浏览器)
#! /usr/bin/env pytho
# -*- coding:utf-8 -*-
#test_params.py

import  time as t


def test_file_qq_002(selenium):
    '''登录验证:校验点击注册跳转到注册的页面'''
    selenium.maximize_window()
    selenium.get('https://file.qq.com/')
    selenium.implicitly_wait(30)
    selenium.switch_to.frame('login_frame1')
    t.sleep(2)
    selenium.switch_to.frame('ptlogin_iframe')
    t.sleep(2)
    t.sleep(2)
    nowHandler=selenium.current_window_handle
    selenium.find_element_by_link_text('注册新帐号').click()
    allHandlers=selenium.window_handles
    for handler in allHandlers:
        if nowHandler!=handler:
            selenium.switch_to.window(handler)
            t.sleep(2)
            assert selenium.title=='QQ注册'
            selenium.close()

def test_file_qq_003(selenium):
    '''登录验证,登录的提示信息'''
    selenium.maximize_window()
    selenium.get('https://file.qq.com/')
    selenium.implicitly_wait(30)
    selenium.switch_to.frame('login_frame1')
    t.sleep(2)
    selenium.switch_to.frame('ptlogin_iframe')
    t.sleep(2)
    selenium.find_element_by_link_text('帐号密码登录').click()
    t.sleep(2)
    username=selenium.find_element_by_xpath('//*[@id="uin_tips"]')
    assert username.text=='支持QQ号/邮箱/手机号登录'
实例化参数parametrize, 创建test_params.py,代码如下:
import pytest
def add(a,b):
    return a+b

# @pytest.mark.parametrize('x,y,result',[   #传递参数
@pytest.mark.parametrize('data',[   #传递参数
    (1,2,3),
    (3,4,7),
    ('hi','!','hi!'),
    (1.0,2.0,3.0),
    (1,2.0,3.0),
    (0,0,0)
])
# def test_add_many(x,y,result):
#     assert add(a=x,b=y)==result
def test_add_many(data):
    # print(data[0])
    assert add(a=data[0],b=data[1])==data[2]

if __name__ == '__main__':
    pytest.main(['-v','-s','test_params.py'])

 浙公网安备 33010602011771号