SpringBoot日记——MQ消息队列整合(二)
基于第一篇文章搭建好环境以后,我们这篇文章继续介绍如何在springboot中使用RabbitMQ。
1)、单播:添加好pom文件和自定义配置后,来看:
    @Autowired
    RabbitTemplate rabbitTemplate;

    @Test
    public void contextLoads() {

        // 对象被默认JAVA序列化发送,参数:Exchange,routingKey,消息
        rabbitTemplate.convertAndSend("exchange.direct", "iceoooodin.news", "瓦尔克莉");
    }
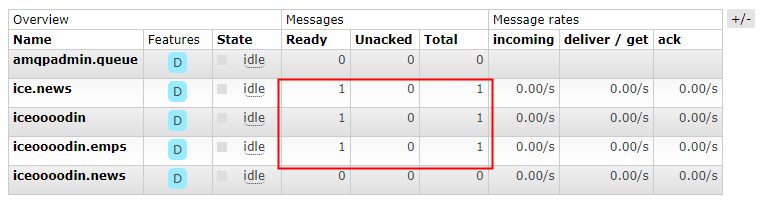
来看看我们发送的消息是否成功了:

如图,成功获取了~。
同样,使用代码来直接获取:
    @Test
    public void receive() {
        // 接受数据
        Object o = rabbitTemplate.receiveAndConvert("iceoooodin.news");
        System.out.println(o.getClass());
        System.out.println(o);
    }
另外,我们除了str类型,还是发送map、对象等等,比如:
    @Test
    public void contextLoads() {

        Map<String, Object> map = new HashMap<>();
        map.put("msg", "第一个数据");
        map.put("data", Arrays.asList("helloworld", 123, true));
        // 对象被默认JAVA序列化发送
        rabbitTemplate.convertAndSend("exchange.direct", "iceoooodin.news", map);
    }
@Test
    public void contextLoads() {

        // 对象被默认JAVA序列化发送
        rabbitTemplate.convertAndSend("exchange.direct", "iceoooodin.news", new Book("金瓶M", "em.."));
    }


public class Book {
    private String bookName;
    private String author;

    @Override
    public String toString() {
        return "Book{" +
                "bookName='" + bookName + '\'' +
                ", author='" + author + '\'' +
                '}';
    }

    public Book(String bookName, String author) {
        this.bookName = bookName;
        this.author = author;
    }

    public Book() {
    }

    public String getBookName() {
        return bookName;
    }

    public void setBookName(String bookName) {
        this.bookName = bookName;
    }

    public String getAuthor() {
        return author;
    }

    public void setAuthor(String author) {
        this.author = author;
    }
}
2)、然后我们来看广播,也就是发送一堆消息是如何处理的:
@Test
    public void sendMst() {
        rabbitTemplate.convertAndSend("exchange.fanout", "", new Book("红楼", "草 "));
    }
如果发送的是广播,可以发现,消息会被分别发送到匹配的全部消息队列中:
3)、我们学会发送和接收了,再看看如何创建Exchange或者Queue吧,我们创建和绑定写在了一起,根据需要自己拆:
    @Autowired
    AmqpAdmin amqpAdmin;  //这个amqpadmin是用来管理QP的,可以创建、删除等操作;

    @Test
    public void creatExchange() {
        // 创建Exchange
        amqpAdmin.declareExchange(new DirectExchange("amqpadmin.exchange"));
        System.out.println("创建exchange完成");
        // 创建Queue
        amqpAdmin.declareQueue(new Queue("amqpadmin.queue", true));
     System.out.println("创建Queue完成");
        // 绑定
        amqpAdmin.declareBinding(new Binding("amqpadmin.queue", Binding.DestinationType.QUEUE, "amqpadmin.exchange", "amqp.haha", null));
    }
结果就懒得写了,大家自己试验看一下就知道了,到web管理界面看看是否有正确添加和绑定~

 浙公网安备 33010602011771号