

QEMU/KVM之GPU穿透实践
1 配置
本文配置主要参考文章gpu-passthrough-tutorial,感谢原作者的经验分享。
1.1 准备工作
首先要确保操作系统开启IOMMU相关配置,在上面的文章中有详细描述,Ubuntu可以在/etc/default/grub的GRUB_CMDLINE_LINUX_DEFAULT字段添加配置(内容根据CPU平台而定)并重启系统,如:
# For Intel
GRUB_CMDLINE_LINUX_DEFAULT="... intel_iommu=on iommu=pt"
# For AMD
GRUB_CMDLINE_LINUX_DEFAULT="... amd_iommu=on iommu=pt"
准备一个脚本iommu.sh,用来检测要穿透的PCI设备是否全部分布在同一个IOMMU组中或单独成组:
#!/bin/bash
for d in /sys/kernel/iommu_groups/*/devices/*; do
  n=${d#*/iommu_groups/*}; n=${n%%/*}
  printf 'IOMMU Group %s ' "$n"
  lspci -nns "${d##*/}"
done
使用脚本检查IOMMU组,幸运的是本硬件平台的AMD GPU相关设备各自成一个IOMMU组:

同一个IOMMU组的设备要一起穿透到VM中,即PCI设备穿透以IOMMU组为单位。如果上述脚本输出结果是两个冲突的设备在同一个IOMMU组中,例如PCI网卡和GPU在同一个组中,而在穿透GPU给VM的同时想在host上使用PCI网卡,就需要先解决冲突才能进行下一步配置,具体请看这里。最后是QEMU、KVM、VM和libvirt hook helper等安装和配置,不再赘述。
1.2 VFIO驱动绑定GPU设备
通过lspci -v查看某个PCI设备正在使用的驱动,以本人服务器上的AMD GPU为例,列出与其相关的设备信息:

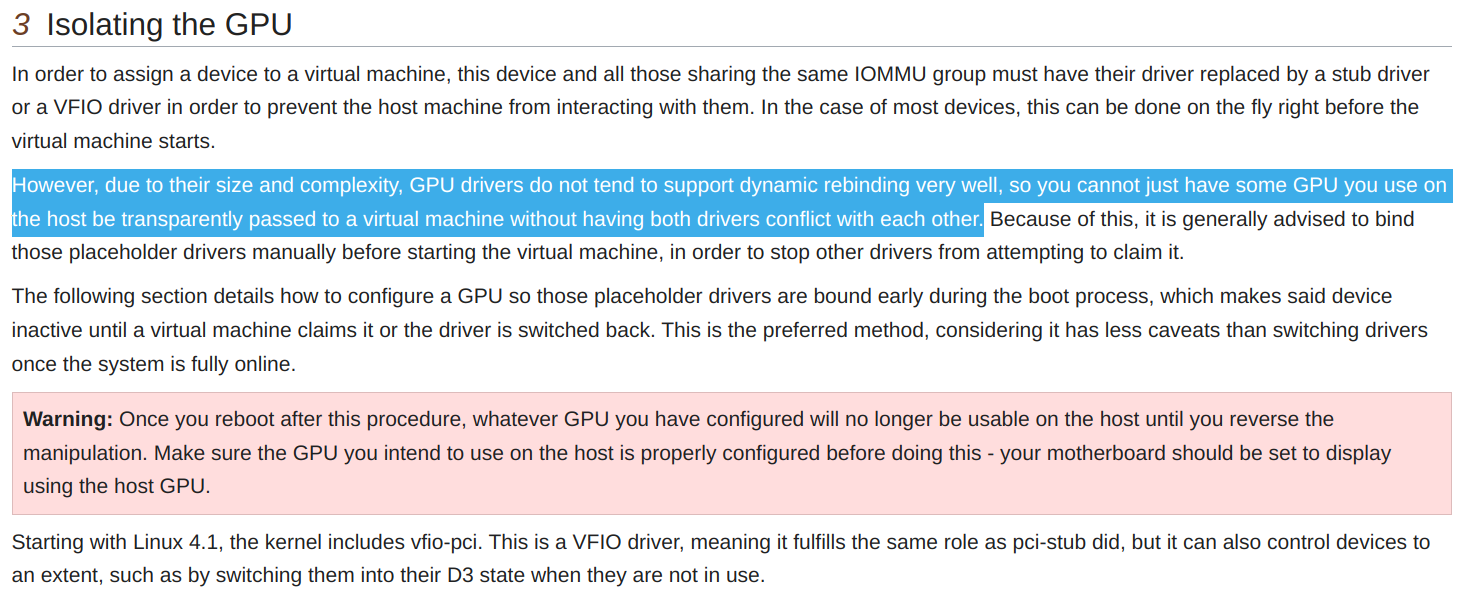
这里只关注两个设备,一是VGA compatible controller,二是Audio device,其他两个相关设备对GPU穿透的功能没有影响。定位到目标设备后,需要将其进行隔离(从host设备驱动上解绑),再绑定到一个pci-stub驱动(现在一般使用VFIO驱动),这两个操作称为PCI设备驱动的重新绑定,重新绑定后才能将设备穿透到VM使用。一般的PCI设备支持动态重新绑定,直接在VM配置中配好,VM开机时libvirt即可自动实现对目标设备的重新绑定,但根据Archwiki的描述(如下图),像GPU这样的复杂设备通常不支持动态重新绑定驱动,因此需要手动隔离并绑定至VFIO驱动。
以上述AMD GPU为例,将相关设备(0000:03:00.0和0000:03:00.1)从host驱动解除绑定,再绑定到VFIO驱动,这些操作可通过一个脚本实现,作为一个libvirt hook放在相应位置,例如/etc/libvirt/hooks/qemu.d/win10/isolate-gpu.sh:
#!/usr/bin/env bash
#
# See: https://github.com/bryansteiner/gpu-passthrough-tutorial
# Author: yjzzjy4 (https://github.com/yjzzjy4)
#
# This file bind gpu between host and vfio driver. To get it working properly,
# you may need to stop all processes occupying the target gpu first.
#

GPU_VIDEO_BUS_ID=0000:03:00.0
GPU_AUDIO_BUS_ID=0000:03:00.1
GPU_NODEDEV_VIDEO_ID=pci_$(echo $GPU_VIDEO_BUS_ID | sed s'/:\|\./_/g')
GPU_NODEDEV_AUDIO_ID=pci_$(echo $GPU_AUDIO_BUS_ID | sed s'/:\|\./_/g')
VM_ACTION="$2/$3"

if [[ "$VM_ACTION" == "prepare/begin" ]]; then
	# Load vfio.
	modprobe vfio
	modprobe vfio_iommu_type1
	modprobe vfio_pci

	# Unbind gpu related devices from host driver,
	# and bind them to vfio driver.
	virsh nodedev-detach $GPU_NODEDEV_VIDEO_ID
	virsh nodedev-detach $GPU_NODEDEV_AUDIO_ID

	# For some amd gpu, like my 6750gre, bar 2 size mustn't exceed 8MB,
	# otherwize windows vm will report code 43.
	echo $GPU_VIDEO_BUS_ID > /sys/bus/pci/drivers/vfio-pci/unbind
	echo 3 > "/sys/bus/pci/devices/${GPU_VIDEO_BUS_ID}/resource2_resize"
	echo $GPU_VIDEO_BUS_ID > /sys/bus/pci/drivers/vfio-pci/bind
elif [[ "$VM_ACTION" == "release/end" ]]; then
	# Unbind gpu related devices from vfio driver,
	# and bind them to host driver.
	virsh nodedev-reattach $GPU_NODEDEV_VIDEO_ID
	virsh nodedev-reattach $GPU_NODEDEV_AUDIO_ID

	# Unload vfio.
	modprobe -r vfio_pci
	modprobe -r vfio_iommu_type1
	modprobe -r vfio
fi
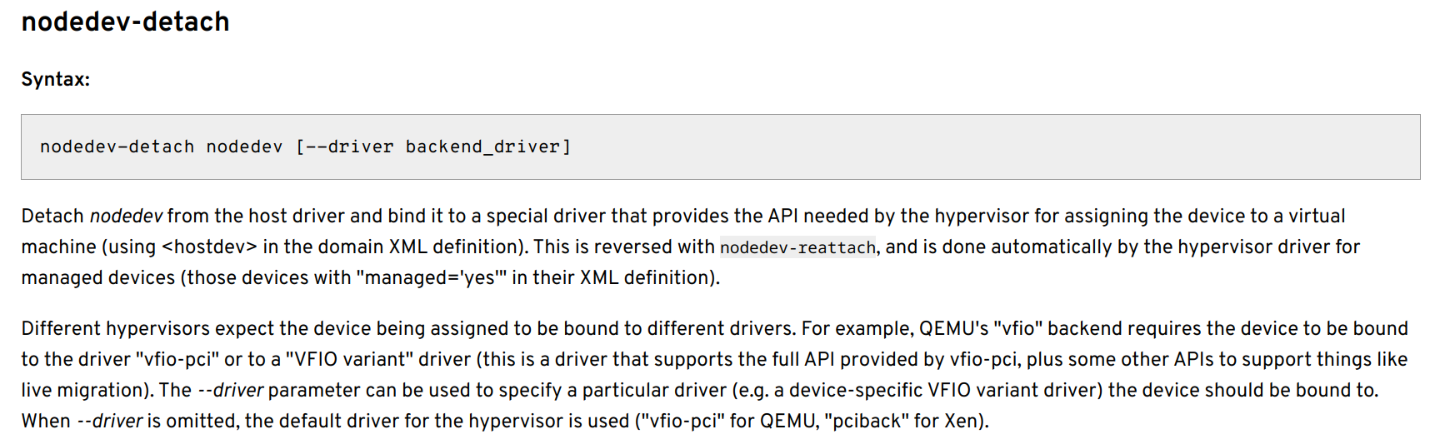
上述脚本使用virsh工具进行PCI设备的运行时重新绑定,并对AMD GPU的resizable bar大小进行设定(目的是解决code 43,详见后文)。virsh是一个管理VM的用户工具程序,提供对VM的各种管理功能,具体用法请参阅virsh文档。本文主要关注nodedev-detach和nodedev-reattach这一对命令,文档中对这一对命令的说明如下:

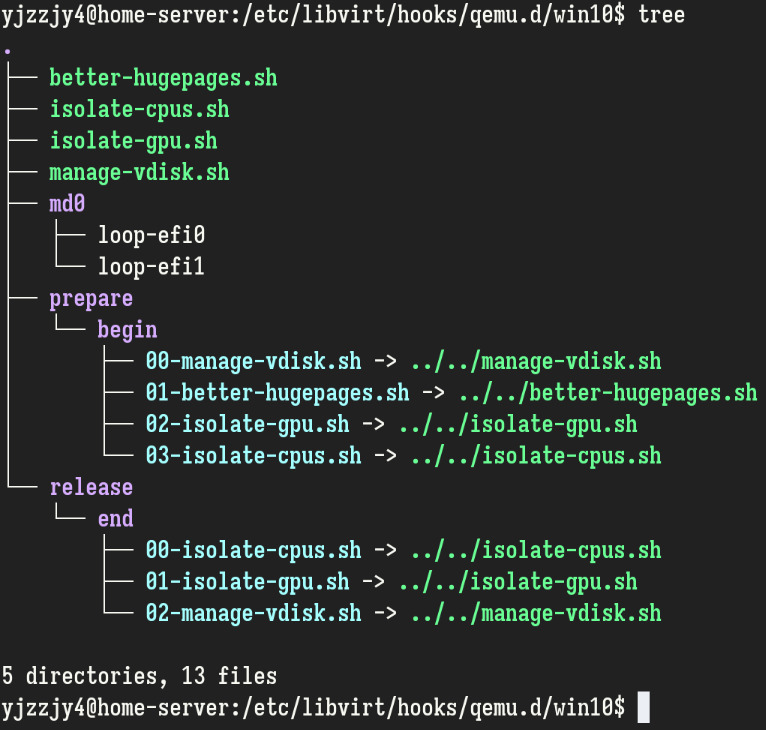
注意nodedev的设备表示方法,使用下划线而不是冒号或点分割PCI设备各个域字段。在编写好脚本后,不要忘了使用软链接指向脚本,并将链接放在正确的位置上:
1.3 操作内核绑定PCI驱动(拓展阅读)
virsh工具的nodedev-detach和nodedev-reattach命令只能在VFIO和host设备驱动中进行动态切换,这对VM场景显然够用,但当有更复杂的需求时(例如绑定到自己开发的驱动或在解绑和绑定之间需要进行一些操作的情况),可以直接使用内核对PCI设备使用的驱动进行管理。Linux通过操作/sys/bus/pci/drivers/路径下的相关文件可以对PCI设备驱动进行管理。举个例子:
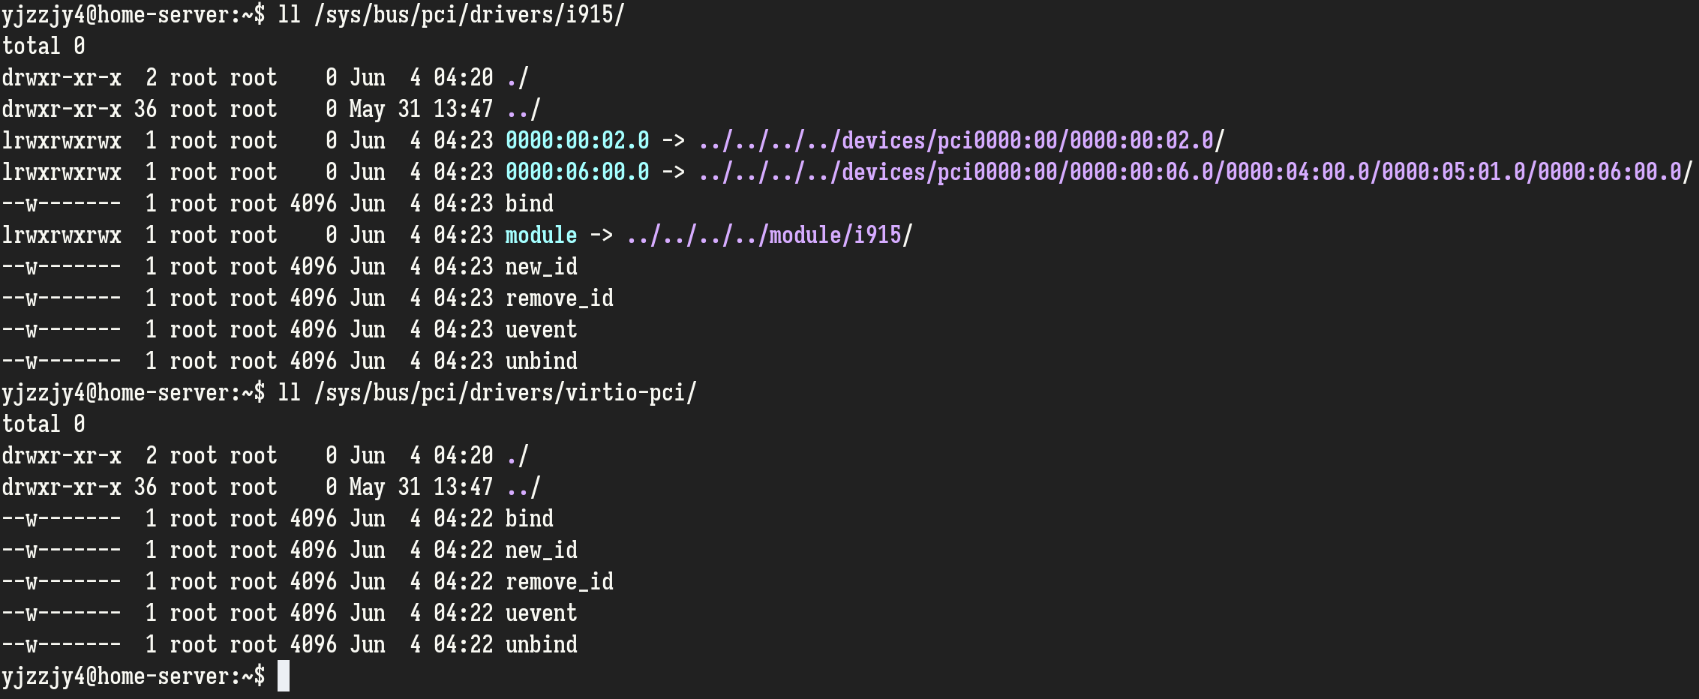
不难看出不同的驱动目录下有一些相同的文件,如new_id、remove_id、bind和unbind等,这些文件可以视为一些“操作”。通过对某个PCI驱动的相关操作写入一个设备地址,就可以执行这些操作。关于各操作的区别和用法,请参考内核文档,下面贴出部分文档内容,都有详细说明,故不做进一步解释。
What:		/sys/bus/pci/drivers/.../new_id
What:		/sys/devices/pciX/.../new_id
Date:		December 2003
Contact:	linux-pci@vger.kernel.org
Description:
		Writing a device ID to this file will attempt to
		dynamically add a new device ID to a PCI device driver.
		This may allow the driver to support more hardware than
		was included in the driver's static device ID support
		table at compile time.  The format for the device ID is:
		VVVV DDDD SVVV SDDD CCCC MMMM PPPP.  That is Vendor ID,
		Device ID, Subsystem Vendor ID, Subsystem Device ID,
		Class, Class Mask, and Private Driver Data.  The Vendor ID
		and Device ID fields are required, the rest are optional.
		Upon successfully adding an ID, the driver will probe
		for the device and attempt to bind to it.  For example::

		  # echo "8086 10f5" > /sys/bus/pci/drivers/foo/new_id

What:		/sys/bus/pci/drivers/.../remove_id
What:		/sys/devices/pciX/.../remove_id
Date:		February 2009
Contact:	Chris Wright <chrisw@sous-sol.org>
Description:
		Writing a device ID to this file will remove an ID
		that was dynamically added via the new_id sysfs entry.
		The format for the device ID is:
		VVVV DDDD SVVV SDDD CCCC MMMM.	That is Vendor ID, Device
		ID, Subsystem Vendor ID, Subsystem Device ID, Class,
		and Class Mask.  The Vendor ID and Device ID fields are
		required, the rest are optional.  After successfully
		removing an ID, the driver will no longer support the
		device.  This is useful to ensure auto probing won't
		match the driver to the device.  For example::

		  # echo "8086 10f5" > /sys/bus/pci/drivers/foo/remove_id

What:		/sys/bus/pci/drivers/.../bind
What:		/sys/devices/pciX/.../bind
Date:		December 2003
Contact:	linux-pci@vger.kernel.org
Description:
		Writing a device location to this file will cause
		the driver to attempt to bind to the device found at
		this location.	This is useful for overriding default
		bindings.  The format for the location is: DDDD:BB:DD.F.
		That is Domain:Bus:Device.Function and is the same as
		found in /sys/bus/pci/devices/.  For example::

		  # echo 0000:00:19.0 > /sys/bus/pci/drivers/foo/bind

		(Note: kernels before 2.6.28 may require echo -n).

What:		/sys/bus/pci/drivers/.../unbind
What:		/sys/devices/pciX/.../unbind
Date:		December 2003
Contact:	linux-pci@vger.kernel.org
Description:
		Writing a device location to this file will cause the
		driver to attempt to unbind from the device found at
		this location.	This may be useful when overriding default
		bindings.  The format for the location is: DDDD:BB:DD.F.
		That is Domain:Bus:Device.Function and is the same as
		found in /sys/bus/pci/devices/. For example::

		  # echo 0000:00:19.0 > /sys/bus/pci/drivers/foo/unbind

		(Note: kernels before 2.6.28 may require echo -n).
据个人测试结果,new_id操作同时会自动进行bind操作,而remove_id操作则不会自动进行unbind操作,这一点应当注意。通过上面的文档可知,要想完成对PCI驱动的运行时重新绑定,大致分为三个步骤:
- 定位到PCI设备ID及设备正在使用的目标驱动(host设备驱动,使用
lspci -v); - 将设备从原驱动解绑(
unbind操作); - 将设备绑定到其他驱动,如VFIO(视情况使用
new_id或bind操作)。
上述过程有些繁琐,特别是针对使用不同驱动的多个目标设备时,例如一些GPU的图形输出驱动和音频输出驱动并不相同,这时要完成PCI驱动的运行时重新绑定就稍显复杂。对于自动化脚本的编写,一个可行的方法是通过grep、awk和sed等工具,对lspci 命令的输出进行裁剪,从而得到各设备ID和使用的目标驱动(即完成1),然后再编写2和3操作逻辑。
不难注意到在前文的isolate-gpu.sh脚本中使用了这种方式从VFIO驱动对GPU进行了解绑和绑定,这么操作的目的是为了调整resizable bar的大小,该问题将在后文讨论。
2 Code 43
Code 43是GPU穿透到Windows VM中非常常见的问题,该问题表现为Windows识别GPU但无法使用,任务管理器中不显示,设备管理器中查看属性,会看到错误代码43,提示设备不可用。根据本人亲身经历的情况,目前成功的解决方法有两个:修改VM vendor、修改resizable bar大小。
2.1 VM Vendor
具体的讨论可以看这个帖子7900 XTX Code 43 or How to get 7900 XTX to work on VFIO,这里给出结论和操作,即修改VM配置中的vendor信息,以对应VM的xml配置演示:
<domain type="kvm">
  <name>win10</name>
  ...
  <features>
    ...
    <hyperv mode="custom">
      ...
      <vendor_id state="on" value="Linux"/>
      ...
    </hyperv>
    ...
  </features>
  ...
</domain>
vendor_id的值可以设置为任意字符串,只要有值即可。通常这样设置就可以解决code 43问题,如果没解决请考虑是否是resizable bar配置与目标GPU有冲突。
2.2 Resizable Bar
由于本人购置了一张Intel A380为服务器进行流媒体转码工作,其配置推荐在BIOS中开启resizable bar以提升性能,因此开启了该功能。但resizable bar一开,原本正常工作的AMD GPU进行穿透就会出现code 43错误,即使修改VM vendor也于事无补。从Resizable BAR on Windows guest with RDNA 3?这个帖子中了解到AMD GPU在开启resizable bar的系统中进行穿透会遇到兼容性问题,从而导致code 43。解决方法是先手动设定bar 2大小,再将GPU进行穿透,用这个方法将服务器中AMD GPU的bar 2大小设定为8MB,无需在BIOS中关闭resizable bar配置也可以完成GPU穿透,经测试一切功能正常。设定的配置已经写入到前文的isolate-gpu.sh脚本中,每次VM启动时将自动设置。这里说一点要注意的细节:
# Unbind gpu related devices from host driver,
# and bind them to vfio driver.
virsh nodedev-detach $GPU_NODEDEV_VIDEO_ID
virsh nodedev-detach $GPU_NODEDEV_AUDIO_ID

# For some amd gpu, like my 6750gre, bar 2 size mustn't exceed 8MB,
# otherwize windows vm will report code 43.
echo $GPU_VIDEO_BUS_ID > /sys/bus/pci/drivers/vfio-pci/unbind
echo 3 > "/sys/bus/pci/devices/${GPU_VIDEO_BUS_ID}/resource2_resize"
echo $GPU_VIDEO_BUS_ID > /sys/bus/pci/drivers/vfio-pci/bind
上面的片段是从isolate-gpu.sh脚本截取出来的,注意到在使用virsh nodedev-detach命令将GPU重新绑定到VFIO驱动上以后,设定bar 2大小时还将GPU从VFIO驱动中解除了绑定(只需解除图形输出设备),此时GPU处于游离状态(detached),未绑定到任何驱动上。这是一个关键点,修改resizable bar大小时,设备不能被任何驱动占用,否则会提示设备忙从而拒绝修改。修改完成后不要忘记将设备重新绑定到VFIO驱动。

 浙公网安备 33010602011771号