

测试博客
Retinaface
Created by Hanyz@2020/12/4
1、主干网络
主干网络用于提取输入图片的特征
主干网络有两种选择:
ResNet50(效果好)和MobileNetV1(速度快),采用深度可分离卷积DW,用于减少参数计算量
本文采用了MobileNetV1-0.25( alpha取0.25 ),相比MobilenetV1,通道数压缩了4倍
主干网络示意图:
对于最后三个shape输出的的特征,传输到下一部分,会进行加强特征提取
代码部分
封装模块:
def conv_bn(inp, oup, stride=1, leaky=0):
    return nn.Sequential(
        nn.Conv2d(inp,oup,3,stride,1,bias=False),
        nn.BatchNorm2d(oup),
        nn.LeakyReLU(negative_slope=leaky, inplace=True)
    )

def conv_dw(inp, oup, stride, leaky=0.1):
    return nn.Sequential(
        #dw卷积部分:
        nn.Conv2d(inp,inp,3,stride,1,groups=inp,bias=False),
		nn.BatchNorm2d(inp),
        nn.LeakyReLU(negative_slope=leaky, inplace=True)

        #1x1修改通道部分:
        nn.Conv2d(inp,oup,1,1,1,bias=False),
        nn.BatchNorm2d(oup),
        nn.LeakyReLU(negative_slope=leaky, inplace=True)
    )
定义整体网络:
class MobileNetV1(nn.Module):
    def __init__(self):
        super(MobileNetV1, self).__init__()

        # 640 x 640 x 3 -> 80 x 80 x 64
        self.stage1 = nn.Sequential(
        	conv_bn(3, 8, 2,leaky=0.1),  # 3
       		conv_dw(8, 16, 1),   # 7

        	conv_dw(16, 32, 2),  # 11
        	conv_dw(32, 32, 1),  # 19

        	conv_dw(32, 64, 2),  # 27
        	conv_dw(64, 64, 1),  # 43   --->C3
        )

        # 80 x 80 x 64 -> 40 x 40 x 128
        self.stage2 = nn.Sequential(
        	conv_dw(64, 128, 2),   # 43 + 16 = 59
        	conv_dw(128, 128, 1),  # 59 + 32 = 91
            conv_dw(128, 128, 1),  # 91 + 32 = 123
            conv_dw(128, 128, 1),  # 123 + 32 = 155
            conv_dw(128, 128, 1),  # 155 + 32 = 187
            conv_dw(128, 128, 1),  # 187 + 32 = 219   --->C4
        )

        # 40 x 40 x 128 -> 20 x 20 x 256
        self.stage3 = nn.Sequential(
        	conv_dw(128, 256, 2),  # 219 +3 2 = 241
        	conv_dw(256, 256, 1),  # 241 + 64 = 301   --->C5
        )

        self.avg = nn.AdaptiveAvgPool2d((1,1))
        self.fc = nn.Linear(256, 1000)

	def forward(self, x):
        x = self.stage1(x)
        x = self.stage2(x)
        x = self.stage3(x)
        x = self.avg(x)
        x = x.view(-1, 256)
        x = self.fc(x)
        return x
若conv_xx第三个参数stride设为2,即进行了下采样操作
2、FPN特征金字塔
主要完成的是特征融合的功能
p3,p4,p5都是64通道,代码如下:
class FPN(nn.Module):
    def __init__(self,in_channels_list,out_channels):
        super(FPN,self).__init__()
        leaky = 0
        if (out_channels <= 64):
            leaky = 0.1
        self.output1 = conv_bn1X1(in_channels_list[0], out_channels, stride = 1, leaky = leaky)
        self.output2 = conv_bn1X1(in_channels_list[1], out_channels, stride = 1, leaky = leaky)
        self.output3 = conv_bn1X1(in_channels_list[2], out_channels, stride = 1, leaky = leaky)

        self.merge1 = conv_bn(out_channels, out_channels, leaky = leaky)
        self.merge2 = conv_bn(out_channels, out_channels, leaky = leaky)

    def forward(self, inputs):

        inputs = list(inputs.values())

        output1 = self.output1(inputs[0])
        output2 = self.output2(inputs[1])
        output3 = self.output3(inputs[2])

        up3 = F.interpolate(output3, size=[output2.size(2), output2.size(3)], mode="nearest")  #上采样
        output2 = output2 + up3  #Add
        output2 = self.merge2(output2)  #特征整合,就是经过了通道数不变的卷积,BN和relu

        up2 = F.interpolate(output2, size=[output1.size(2), output1.size(3)], mode="nearest")  #上采样
        output1 = output1 + up2  #Add
        output1 = self.merge1(output1)  #特征整合,就是经过了通道数不变的卷积,BN和relu

        out = [output1, output2, output3]
        return out
另外,C1,C2,C3是由以下代码获取到的:
self.body = _utils.IntermediateLayerGetter(backbone, cfg['return_layers'])
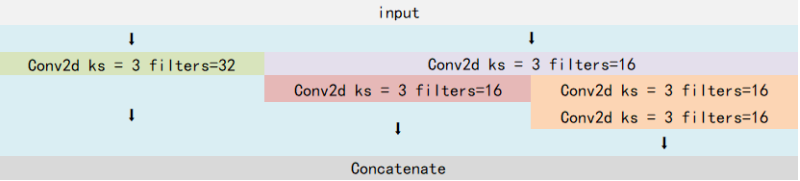
3、SSH进一步加强特征提取

SSH的思想,就是使用三个并行结构,利用3x3卷积的堆叠代替5x5和7x7的卷积。(类似Inception模块)
class SSH(nn.Module):
    def __init__(self, in_channel, out_channel):
        super(SSH, self).__init__()
        assert out_channel % 4 == 0
        leaky = 0
        if (out_channel <= 64):
            leaky = 0.1

        # in_channel = 64 , out_channel = 32 + 16 + 16 = 64
        self.conv3X3 = conv_bn_no_relu(in_channel, out_channel//2, stride=1)

        self.conv5X5_1 = conv_bn(in_channel, out_channel//4, stride=1, leaky = leaky)
        self.conv5X5_2 = conv_bn_no_relu(out_channel//4, out_channel//4, stride=1)

        self.conv7X7_2 = conv_bn(out_channel//4, out_channel//4, stride=1, leaky = leaky)
        self.conv7x7_3 = conv_bn_no_relu(out_channel//4, out_channel//4, stride=1)

    def forward(self, inputs):
        conv3X3 = self.conv3X3(inputs)

        conv5X5_1 = self.conv5X5_1(inputs)  #相当于conv7X7_1
        conv5X5 = self.conv5X5_2(conv5X5_1)

        conv7X7_2 = self.conv7X7_2(conv5X5_1)
        conv7X7 = self.conv7x7_3(conv7X7_2)

        # 进行堆叠,保证三个路径的通道数之和为out_channel
        out = torch.cat([conv3X3, conv5X5, conv7X7], dim=1)
        out = F.relu(out)
        return out
然后,对FPN获得的C1,C2,C3做3次SSH:
in_channels_stage2 = cfg['in_channel']
in_channels_list = [
    in_channels_stage2 * 2,
    in_channels_stage2 * 4,
    in_channels_stage2 * 8,
]

out_channels = cfg['out_channel']
self.fpn = FPN(in_channels_list,out_channels)

# 上面定义
self.ssh1 = SSH(out_channels, out_channels)
self.ssh2 = SSH(out_channels, out_channels)
self.ssh3 = SSH(out_channels, out_channels)

# 下面SSH实现
feature1 = self.ssh1(fpn[0])
feature2 = self.ssh2(fpn[1])
feature3 = self.ssh3(fpn[2])
features = [feature1, feature2, feature3] #获得三个有效特征层
4、从特征层预测结果
预测结构有三个:分类预测结果; 框的回归预测结果; 人脸关键点的回归预测结果
1、分类预测结果用于判断先验框内是否包含物体,本文以1x1卷积,将SSH通道数调整为num_anchors * 2;用于代表每个每个先验框包含人脸的概率
2、框的回归,用于对先验框进行调整,获取预测狂,需要4个参数来调整,可以用1x1卷积,将SHH通道调整为
num_anchors * 4;用于代表每个先验框的调整参数
3、人脸关键点回归预测,对先验框进行调整,获得人脸关键点(每个人脸5个关键点),每个人脸关键点要两个参数,利用1x1卷积,将SHH通道调整为num_anchors * 5 * 2;用于代表每个先验框每个人脸的调整
5、细节解释
5.1 整体过程:
三个最终的特征层,相当于将图片划分将输入进来的特征图,分成了不同大小的网格,每个网格上会存在着若干个先验框(默认存在两个正方形先验框),判断正方形内部是否包含物体,如果包含物体,就对正方形进行调整,获得最终的预测框。

1、Class part
num_anchors默认为2,将SSH通道数设置为num_anchors * 2,*2 的意思是,如果序号为0的内容比较大,则代表框内没有要找的物体(人脸),如果序号为1的内容比较大,则代表人脸存在的可能比较大。
代码部分:
def __init__(self,inchannels=512,num_anchors=2):
    super(ClassHead,self).__init__()
    self.num_anchors = num_anchors
    self.conv1x1 = nn.Conv2d(inchannels,self.num_anchors*2,kernel_size=(1,1),stride=1,padding=0)

def forward(self,x):
    out = self.conv1x1(x)
    out = out.permute(0,2,3,1).contiguous()  #将通道数放到最后一个维度,方便之后处理

    return out.view(out.shape[0], -1, 2) # 将中间的1,2维度reshape到一起
最后的out,第一维度为batch_size,第二维度为先验框,第三个维度就是每个先验框是否包含人脸的概率
def _make_class_head(self,fpn_num=3,inchannels=64,anchor_num=2):
	classhead = nn.ModuleList()
    for i in range(fpn_num):
    	classhead.append(ClassHead(inchannels,anchor_num))
    return classhead
2、Box part
将SSH通道数设置为num_anchors * 4,*4 的意思是先验框调整参数,分别是0,1,用于调整预测框的中心。以及2,3,用于调整预测框宽和高。
class BboxHead(nn.Module):
    def __init__(self,inchannels=512,num_anchors=2):
        super(BboxHead,self).__init__()
        self.conv1x1 = nn.Conv2d(inchannels,num_anchors*4,kernel_size=(1,1),stride=1,padding=0)

    def forward(self,x):
        out = self.conv1x1(x)
        out = out.permute(0,2,3,1).contiguous()

        return out.view(out.shape[0], -1, 4)
下方应用:
def _make_bbox_head(self,fpn_num=3,inchannels=64,anchor_num=2):
    bboxhead = nn.ModuleList()
    for i in range(fpn_num):
        bboxhead.append(BboxHead(inchannels,anchor_num))
    return bboxhead
3、Face part
将SSH通道数设置为num_anchors * 2 * 5,*5 的意思是5个人脸关键点。*2 的意思是调整参数,对先验框中心调整,获得5个人脸关键点位置。
代码:
class LandmarkHead(nn.Module):
    def __init__(self,inchannels=512,num_anchors=2):
        super(LandmarkHead,self).__init__()
        self.conv1x1 = nn.Conv2d(inchannels,num_anchors*10,kernel_size=(1,1),stride=1,padding=0)

    def forward(self,x):
        out = self.conv1x1(x)
        out = out.permute(0,2,3,1).contiguous()

        return out.view(out.shape[0], -1, 10) #第三维度,每个人脸关键点对应两个调整位置参数
应用:
def _make_landmark_head(self,fpn_num=3,inchannels=64,anchor_num=2):
    landmarkhead = nn.ModuleList()
    for i in range(fpn_num):
        landmarkhead.append(LandmarkHead(inchannels,anchor_num))
    return landmarkhead
最终,对有效特征层进行循环,利用三个Part对三个有效特征层处理,获得最终预测结果,进行堆叠:
bbox_regressions = torch.cat([self.BboxHead[i](feature)
                             for i, feature in enumerate(features)], dim=1)
classifications = torch.cat([self.ClassHead[i](feature)
                             for i, feature in enumerate(features)], dim=1)
ldm_regressions = torch.cat([self.LandmarkHead[i](feature)
                             for i, feature in enumerate(features)], dim=1)
if self.phase == 'train':
    output = (bbox_regressions, classifications, ldm_regressions)
else:
    output = (bbox_regressions, F.softmax(classifications, dim=-1), ldm_regressions)

return output
5.2 先验框的详解与可视化
class Anchors(object):
以下为Anchors类定义的内容:
def __init__(self, cfg, image_size=None, phase='train'):
    super(Anchors, self).__init__()
    self.min_sizes = cfg['min_sizes'] #先验框的基础边长
    self.steps = cfg['steps'] #长和宽压缩的倍数
    self.clip = cfg['clip'] #是否归一化
    self.image_size = image_size #图像大小
    # 循环三次,计算三个特征层各自的高和宽
    self.feature_maps = [[ceil(self.image_size[0]/step),
                          ceil(self.image_size[1]/step)] for step in self.steps]
在config.py中:
‘min_sizes’:先验框基础边长,设置为[16,32],[64,128],[256,512]三种
'steps':[8, 16, 32] ,即长和宽的压缩比,32即压缩了5倍
'clip':可以理解为归一化,选择是否将值固定在0和1之间
def get_anchors(self):
    anchors = []
    for k, f in enumerate(self.feature_maps): #对所有特征层进行循环
        min_sizes = self.min_sizes[k]
        # 每个网格点2个先验框,都是正方形
        for i, j in product(range(f[0]), range(f[1])):
            for min_size in min_sizes:  #将先验框映射到网格点上
                s_kx = min_size / self.image_size[1]
                s_ky = min_size / self.image_size[0]
                dense_cx = [x * self.steps[k] / self.image_size[1] for x in [j+ 0.5]]
                dense_cy = [y * self.steps[k] / self.image_size[0] for y in [i+ 0.5]]
                    for cy, cx in product(dense_cy, dense_cx):
                        anchors += [cx, cy, s_kx, s_ky] #添加至anchors列表中

    # 以下只是展示方便,实际使用还是按上面的anchor格式
    anchors = np.reshape(anchors,[-1,4]) #将[中/心,宽/高]的格式调整为[左上角,右下角]

    output = np.zeros_like(anchors[:,:4])
    output[:,0] = anchors[:,0] - anchors[:,2]/2
    output[:,1] = anchors[:,1] - anchors[:,3]/2
    output[:,2] = anchors[:,0] + anchors[:,2]/2
    output[:,3] = anchors[:,1] + anchors[:,3]/2

    if self.clip:
        output = np.clip(output, 0, 1)
    return output
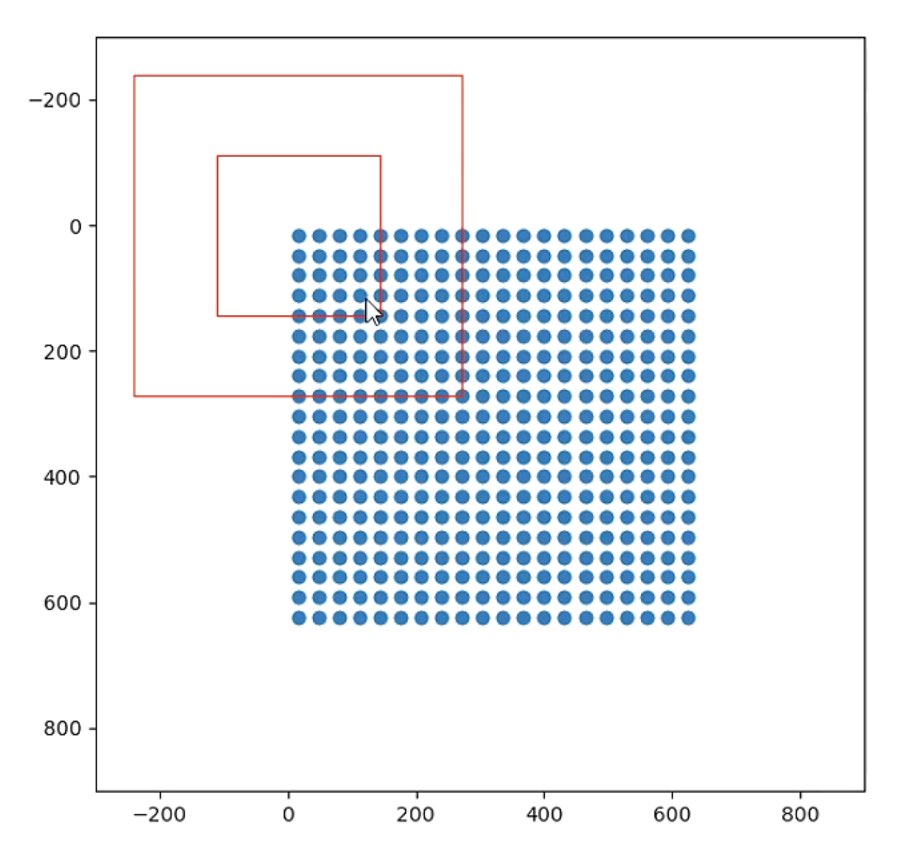
“Vision_for_anchors.py ”效果图:

绘制的为20x20的特征层,也就是最深的特征层。两个红框为左上角第一个元素的两个先验框,先验框的初始边长就是设置的'min_size',接着该算法判断框中是否包含人脸,先验框调整位置,并获得人脸关键点。
总结:先验框就是预先设定好的,在图片上的框,网络的预测结果只会对先验框判断并进行调整
5.3 先验框的调整(困难)
问题1、如何对先验框调整获得最终预测框
函数名:decode
参数列表:
‘loc’: 网络回归结果的位置,尺寸为n*4,输入为 mbox_loc = np.random.randn(800,4)
'priors':输入为 anchors(序号,中心1 中心2 宽 高),尺寸为n*4
priors[:, :2]相当于原中心,loc[:, :2] * variances[0] * priors[:, 2:]相当于偏移,两者相加获得调整的中心
其中,先获得loc中序号为0,1的内容,乘上常数variances(0.1),作标准化作用,接着乘priors
在config.py,'variances':[0.1, 0.2]作为常系数
priors[:, 2:]相当于原宽高,接着对宽高的调整,获取到loc[:, 2:]即序号为2,3,取指数后乘原宽高,得到调整宽高
最后将中心与宽高按 列 拼接,boxes的尺寸为n * 4。
def decode(loc, priors, variances):
    # 中心解码,宽高解码
    # 获得调整后的中心与宽高
    boxes = torch.cat((priors[:, :2] + loc[:, :2] * variances[0] * priors[:, 2:],
                    priors[:, 2:] * torch.exp(loc[:, 2:] * variances[1])), 1)

    # 转化为左上角位置、右下角位置的格式
    boxes[:, :2] -= boxes[:, 2:] / 2
    boxes[:, 2:] += boxes[:,  :2]
    return boxes
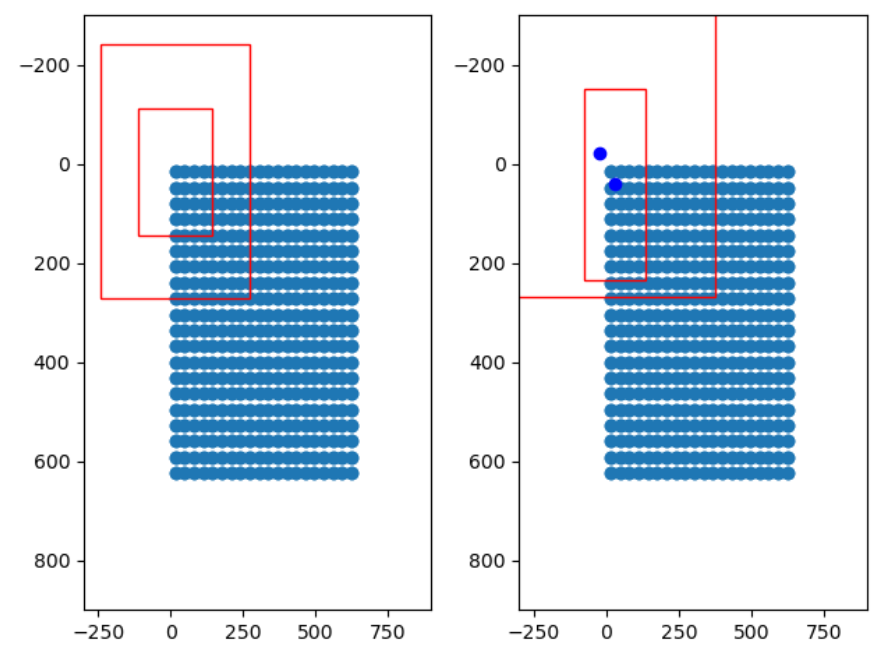
调整图示:

问题2、如何对先验框中心进行调整,获得5个人脸关键点
参数列表:
'pre':人脸预测点,pre的尺寸为n * 10,其中每个关键点有两个参数
'priors':先验框,尺寸为 n * 4,priors[:, :2]代表先验框的中心,priors[:, 2:]代表先验框的宽高
关键点的两个参数,乘以常系数0.1,再乘以先验框的长宽,加上先验框的中心,得到人脸关键点的调整中心
接着,按列拼接
def decode_landm(pre, priors, variances):
    # 关键点解码
    landms = torch.cat((priors[:, :2] + pre[:, :2] * variances[0] * priors[:, 2:],
                        priors[:, :2] + pre[:, 2:4] * variances[0] * priors[:, 2:],
                        priors[:, :2] + pre[:, 4:6] * variances[0] * priors[:, 2:],
                        priors[:, :2] + pre[:, 6:8] * variances[0] * priors[:, 2:],
                        priors[:, :2] + pre[:, 8:10] * variances[0] * priors[:, 2:],
                        ), dim=1)
    return landms
5.4 预测过程
predict.py:
retinaface = Retinaface()

while True:
    img = input('Input image filename:')

    image = cv2.imread(img)
    if image is None:
        print('Open Error! Try again!')
        continue
    else:
        image = cv2.cvtColor(image,cv2.COLOR_BGR2RGB)

        r_image = retinaface.detect_image(image)

        r_image = cv2.cvtColor(r_image,cv2.COLOR_RGB2BGR)
        cv2.imshow("after",r_image)
        cv2.waitKey(0)
detect_iamge.py:
  def detect_image(self, image):
        # 绘制人脸框
        old_image = image.copy()

        image = np.array(image,np.float32)
        im_height, im_width, _ = np.shape(image)

        # 它的作用是将归一化后的框坐标转换成原图的大小
        scale = torch.Tensor([np.shape(image)[1], np.shape(image)[0],
                              np.shape(image)[1], np.shape(image)[0]])
        scale_for_landmarks = torch.Tensor([np.shape(image)[1], np.shape(image)[0],
                                            np.shape(image)[1], np.shape(image)[0],
                                            np.shape(image)[1], np.shape(image)[0],
                                            np.shape(image)[1], np.shape(image)[0],
                                            np.shape(image)[1], np.shape(image)[0]])

        # pytorch 的预处理,将通道重新返回到图片的第一个维度
        image = preprocess_input(image).transpose(2, 0, 1)
        # 增加batch_size维度
        image = torch.from_numpy(image).unsqueeze(0)
        # 计算先验框
        anchors = Anchors(self.cfg, image_size=(im_height, im_width)).get_anchors()

        with torch.no_grad():
            if self.cuda:
                scale = scale.cuda()
                scale_for_landmarks = scale_for_landmarks.cuda()
                image = image.cuda()
                anchors = anchors.cuda()

            # 对应三个part的预测结果
            # loc为box的预测结果,conf为class的预测结果,landms为人脸特征点的预测结果
            loc, conf, landms = self.net(image)  # forward pass

            boxes = decode(loc.data.squeeze(0), anchors, self.cfg['variance'])
            boxes = boxes * scale # 转换到原图的坐标上
            boxes = boxes.cpu().numpy()

            # 提取序号为1(即[:,1:2]),是先验框为人脸的概率
            conf = conf.data.squeeze(0)[:,1:2].cpu().numpy()

            landms = decode_landm(landms.data.squeeze(0), anchors, self.cfg['variance'])
            landms = landms * scale_for_landmarks # 转换到原图的坐标上
            landms = landms.cpu().numpy()

            boxes_conf_landms = np.concatenate([boxes,conf,landms],-1) # 堆叠

            boxes_conf_landms = non_max_suppression(boxes_conf_landms, self.confidence) # 非极大值抑制,置信度默认为0.5

        for b in boxes_conf_landms:
            text = "{:.4f}".format(b[4])
            b = list(map(int, b))
            # 以下b[0/1/2/3]四个参数,是框的位置
            cv2.rectangle(old_image, (b[0], b[1]), (b[2], b[3]), (0, 0, 255), 2)
            cx = b[0]
            cy = b[1] + 12
            cv2.putText(old_image, text, (cx, cy),
                        cv2.FONT_HERSHEY_DUPLEX, 0.5, (255, 255, 255))

            # landms绘制,以下10个参数为人脸关键点位置
            cv2.circle(old_image, (b[5], b[6]), 1, (0, 0, 255), 4) #左眼
            cv2.circle(old_image, (b[7], b[8]), 1, (0, 255, 255), 4) #有眼
            cv2.circle(old_image, (b[9], b[10]), 1, (255, 0, 255), 4) #鼻子
            cv2.circle(old_image, (b[11], b[12]), 1, (0, 255, 0), 4) #左嘴角
            cv2.circle(old_image, (b[13], b[14]), 1, (255, 0, 0), 4) #右嘴角
        return old_image
NMS定义:筛选出一定区域内属于同一种类得分最大的框
NMS非极大值抑制图示:

IoU代码:
def iou(b1,b2):
    b1_x1, b1_y1, b1_x2, b1_y2 = b1[0], b1[1], b1[2], b1[3]
    b2_x1, b2_y1, b2_x2, b2_y2 = b2[:, 0], b2[:, 1], b2[:, 2], b2[:, 3]

    inter_rect_x1 = np.maximum(b1_x1, b2_x1)
    inter_rect_y1 = np.maximum(b1_y1, b2_y1)
    inter_rect_x2 = np.minimum(b1_x2, b2_x2)
    inter_rect_y2 = np.minimum(b1_y2, b2_y2)

    inter_area = np.maximum(inter_rect_x2 - inter_rect_x1, 0) * \
                 np.maximum(inter_rect_y2 - inter_rect_y1, 0)

    area_b1 = (b1_x2-b1_x1)*(b1_y2-b1_y1)
    area_b2 = (b2_x2-b2_x1)*(b2_y2-b2_y1)

    iou = inter_area/np.maximum((area_b1+area_b2-inter_area),1e-6)
    return iou
非极大值抑制代码:
def non_max_suppression(boxes, conf_thres=0.5, nms_thres=0.3):
    detection = boxes
    # 1、找出该图片中得分大于门限函数的框。在进行重合框筛选前就进行得分的筛选可以大幅度减少框的数量。
    mask = detection[:,4] >= conf_thres
    detection = detection[mask]
    if not np.shape(detection)[0]:
        return []

    best_box = []
    scores = detection[:,4]
    # 2、根据得分对框进行从大到小排序。
    arg_sort = np.argsort(scores)[::-1]
    detection = detection[arg_sort]

    while np.shape(detection)[0]>0:
        # 3、每次取出得分最大的框,计算其与其它所有预测框的重合程度,重合程度过大的则剔除。
        best_box.append(detection[0])
        if len(detection) == 1:
            break
        ious = iou(best_box[-1],detection[1:])  #计算该框与其他框的重合度IoU
        detection = detection[1:][ious<nms_thres]

    return np.array(best_box)
5.5 训练自己的人脸检测算法
本文所使用的数据集是widerface数据集
数据集目录:
data
widerface
train,val
images(文件夹)
0--Parade:存放的都是图片,每个图片里都带有人脸
1--Handshaking
...
label.txt
label.txt文件解析:

0~3:前两个数值为人脸框中心的x、y坐标,后两个数值为人脸框的宽和高;
4~19:人脸关键点的坐标,每两个为一个关键点坐标,不同的人脸关键点用1.0或0.0分隔;
-2:如果是1.0或0.0,则代表有人脸关键点 / 如果是-1,则表示无法标注人脸关键点;
-1:置信度( 待定 );
具体操作步骤:
1、配置环境:pytorch == 1.2.0
2、将数据集覆盖根目录下的data文件夹,结构如上。
3、注意backbone和权重文件的对应,修改backbone和model_path,使用mobilenet为主干特征提取网络的示例如下:
#-------------------------------#
#   主干特征提取网络的选择
#   mobilenet或者resnet50
#-------------------------------#
backbone = "mobilenet"
training_dataset_path = './data/widerface/train/label.txt'

if backbone == "mobilenet":
    cfg = cfg_mnet
elif backbone == "resnet50":
    cfg = cfg_re50
else:
    raise ValueError('Unsupported backbone - `{}`, Use mobilenet, resnet50.'.format(backbone))

...
model_path = "model_data/Retinaface_mobilenet0.25.pth"
4、根据自己需要选择从头开始训练还是在已经训练好的权重下训练,需要修改train.py文件下的代码:
------若要从头开始训练需要将pretrained设置为True,并且注释train.py里面的权值载入部分:
backbone = "mobilenet"
#-------------------------------#
#   是否使用主干特征提取网络
#   的预训练权重
#-------------------------------#
pretrained = True

model = RetinaFace(cfg=cfg, pretrained = pretrained).train()
------若要在在已经训练好的权重下训练,将pretrained设置为False:
pretrained = False

backbone = "mobilenet"
#-------------------------------------------#
#   权值文件的下载请看README
#   权值和主干特征提取网络一定要对应
#-------------------------------------------#
model = RetinaFace(cfg=cfg, pretrained = pretrained).train()

### 以下代码在pretrained设置为False时保留,为True时注释
model_path = "model_data/Retinaface_mobilenet0.25.pth"
# 加快模型训练的效率
print('Loading weights into state dict...')
device = torch.device('cuda' if torch.cuda.is_available() else 'cpu')
model_dict = model.state_dict()
pretrained_dict = torch.load(model_path, map_location=device)
pretrained_dict = {k: v for k, v in pretrained_dict.items() if np.shape(model_dict[k]) ==  np.shape(v)}
model_dict.update(pretrained_dict)
model.load_state_dict(model_dict)
print('Finished!')
最终,生成的权重文件会Save至log文件夹。
5、在retinaface.py文件里面,在如下部分修改model_path和backbone使其对应训练好的文件。
_defaults = {
    "model_path": 'model_data/Retinaface_mobilenet0.25.pth',
    "confidence": 0.5,
    "backbone": "mobilenet",
    "cuda": True #注意是否用GPU
}
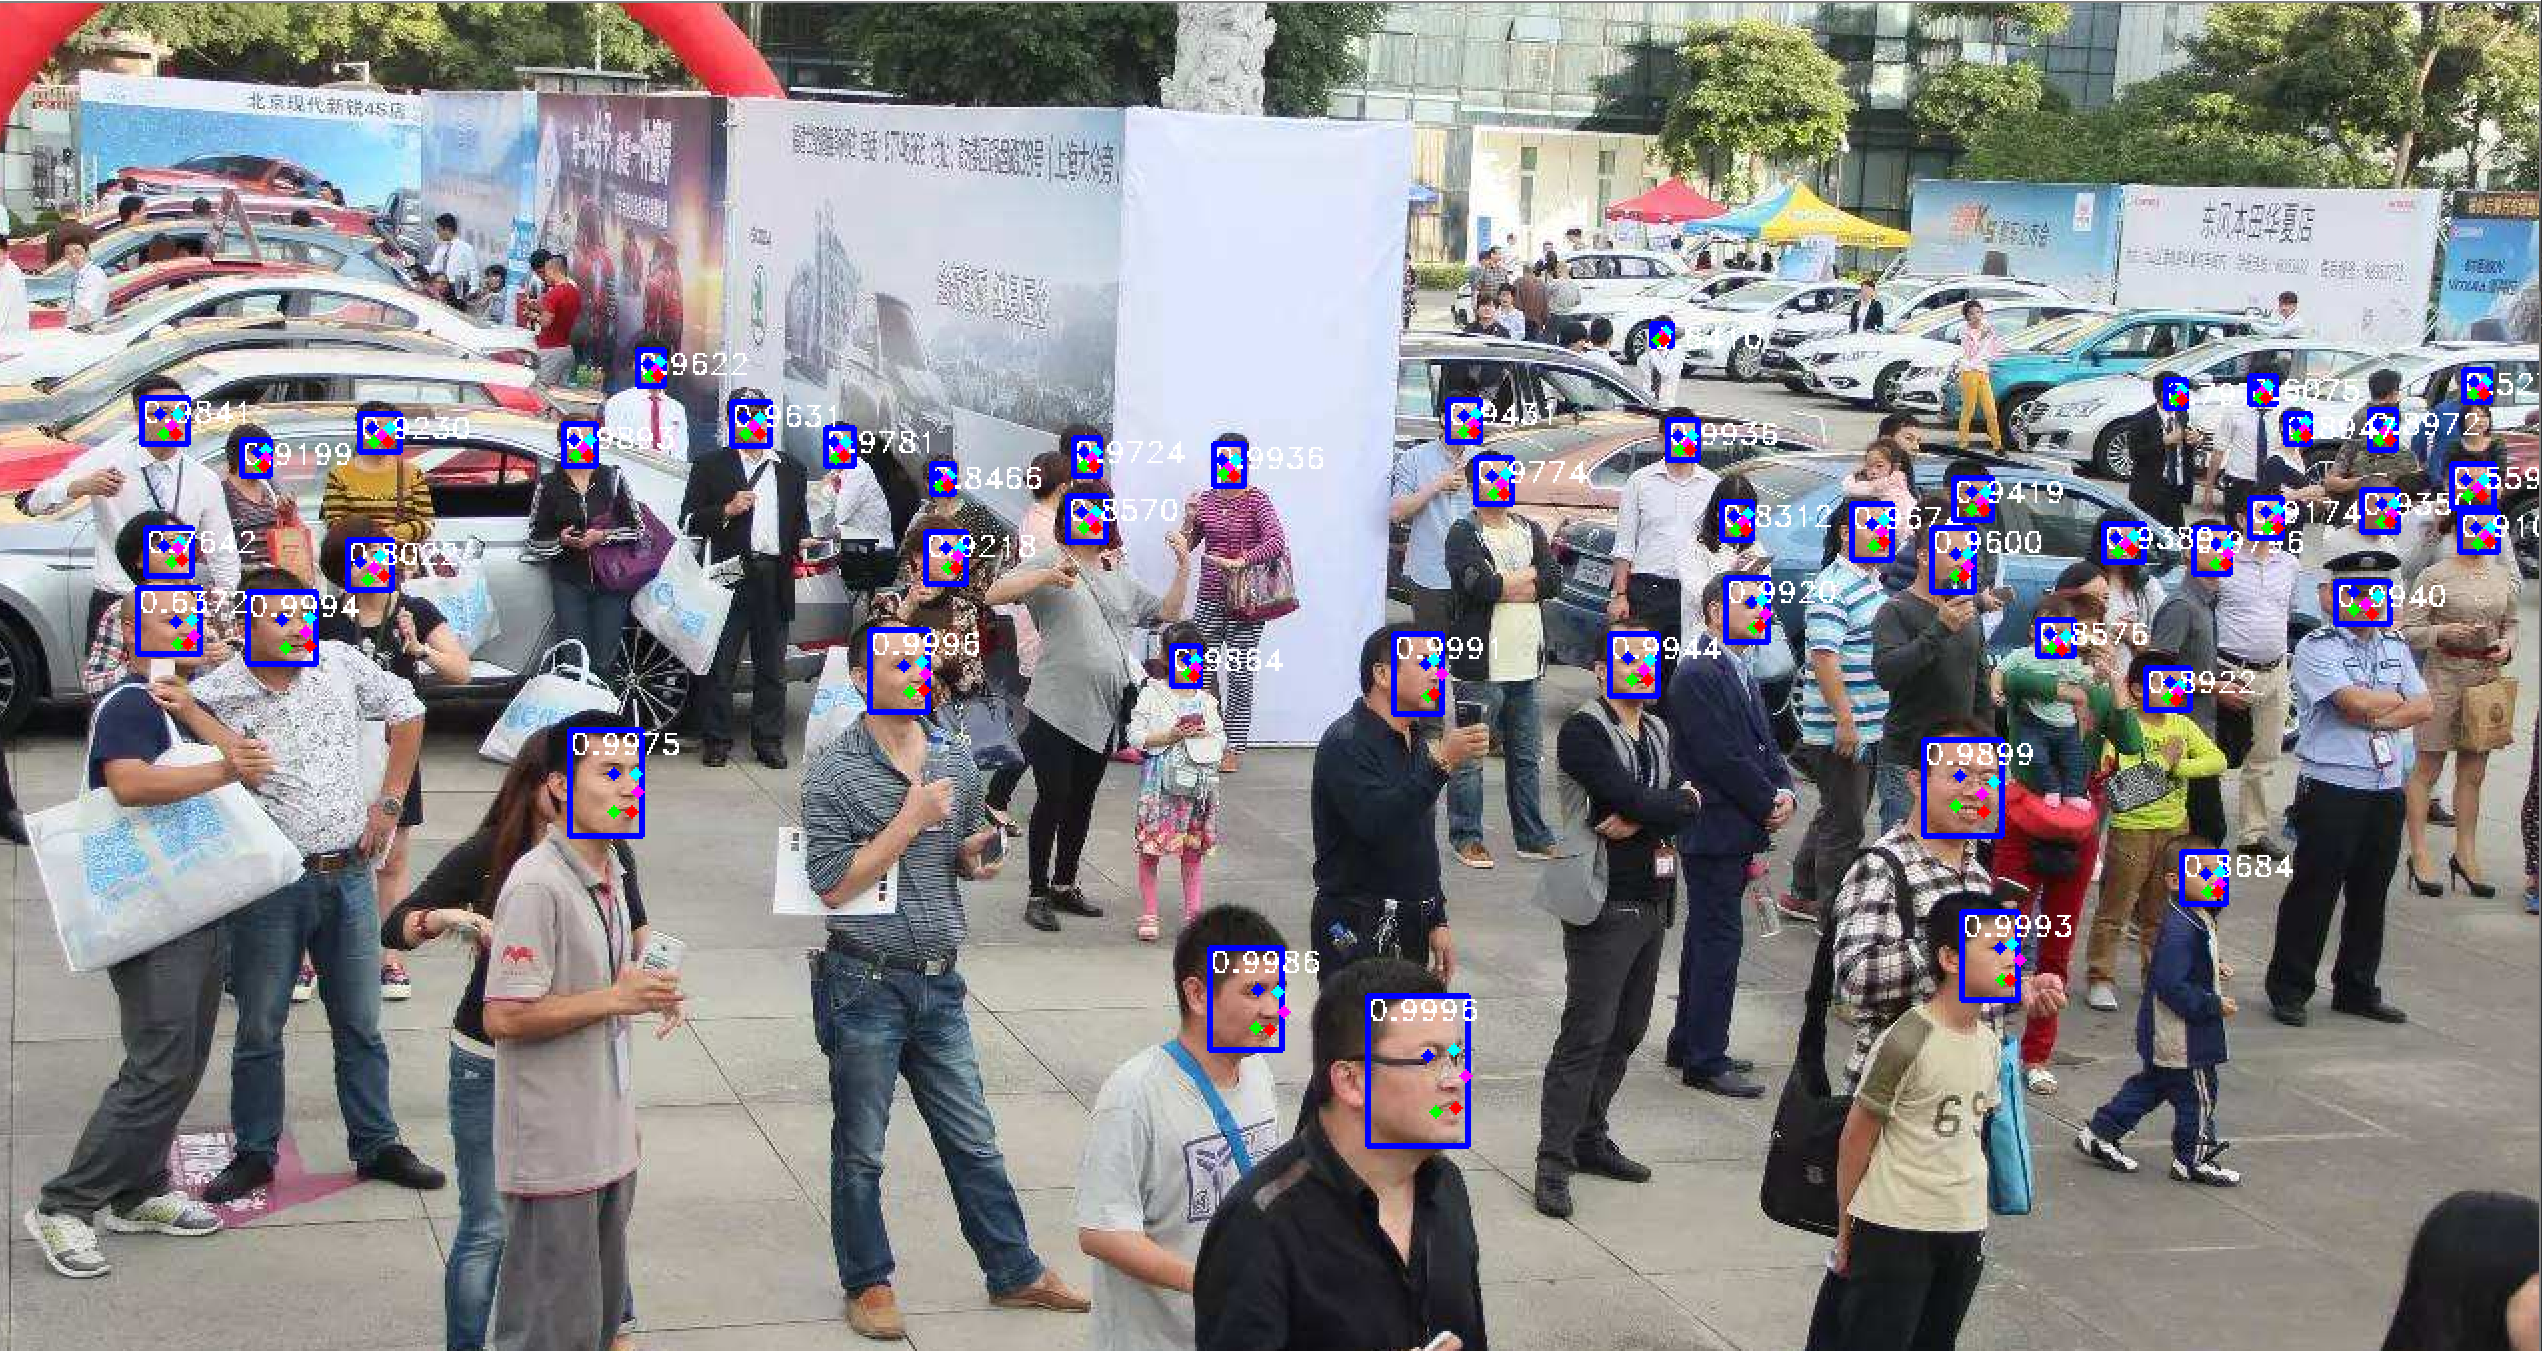
6、运行predict.py,输入img/timg.jpg;也可利用video.py可进行摄像头检测。
最终预测图效果:


 浙公网安备 33010602011771号