

详解 SpringMVC 执行过程
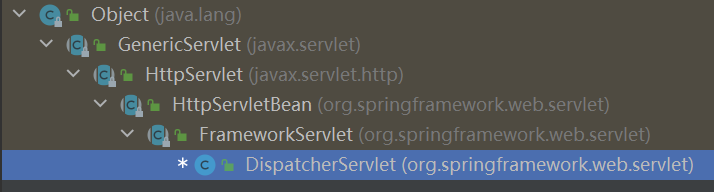
Spring MVC框架,与其他很多web的MVC框架一样:请求驱动;所有设计都围绕着一个中央Servlet(DispatcherServlet,继承了HttpServlet,如下图所示)来展开,它负责把所有请求分发到控制器,同时提供其他web应用开发所需要的功能。不过Spring的中央处理器DispatcherServlet能做的比这更多。它与Spring IoC容器做到了无缝集成,这意味着,Spring提供的任何特性,在Spring MVC中都可以使用。
1. Spring MVC 中特殊的bean类型
Spring的DispatcherServlet使用了特殊的bean来处理请求、渲染视图等,这些特定的bean是Spring MVC框架的一部分。如果你想指定使用哪个特定的bean,你可以在web应用上下文WebApplicationContext中简单地配置它们。当然这只是可选的,Spring MVC维护了一个默认的bean列表,如果你没有进行特别的配置,框架将会使用默认的bean。我们将先快速地看一下,DispatcherServlet都依赖于哪些特殊的bean来进行它的初始化。
| bean的类型 | 作用 |
|---|---|
HandlerMapping |
处理器映射器。它会根据某些规则将进入容器的请求映射到具体的处理器以及一系列前处理器和后处理器(即处理器拦截器)上。具体的规则视HandlerMapping类的实现不同而有所不同。其最常用的一个实现支持你在控制器上添加注解,配置请求路径。当然,也存在其他的实现。 |
HandlerAdapter |
处理器适配器。拿到请求所对应的处理器后,适配器将负责去调用该处理器,这使得DispatcherServlet无需关心具体的调用细节。比方说,要调用的是一个基于注解配置的控制器,那么调用前还需要从许多注解中解析出一些相应的信息。因此,HandlerAdapter的主要任务就是对DispatcherServlet屏蔽这些具体的细节。 |
HandlerExceptionResolver |
处理器异常解析器。它负责将捕获的异常映射到不同的视图上去,此外还支持更复杂的异常处理代码。 |
ViewResolver |
视图解析器。它负责将一个代表逻辑视图名的字符串(String)映射到实际的视图类型View上。 |
LocaleResolver & LocaleContextResolver |
地区解析器 和 地区上下文解析器。它们负责解析客户端所在的地区信息甚至时区信息,为国际化的视图定制提供了支持。 |
ThemeResolver |
主题解析器。它负责解析你web应用中可用的主题,比如,提供一些个性化定制的布局等。 |
MultipartResolver |
解析multi-part的传输请求,比如支持通过HTML表单进行的文件上传等。 |
FlashMapManager |
FlashMap管理器。它能够存储并取回两次请求之间的FlashMap对象。后者可用于在请求之间传递数据,通常是在请求重定向的情境下使用。 |
2. 简要分析执行过程
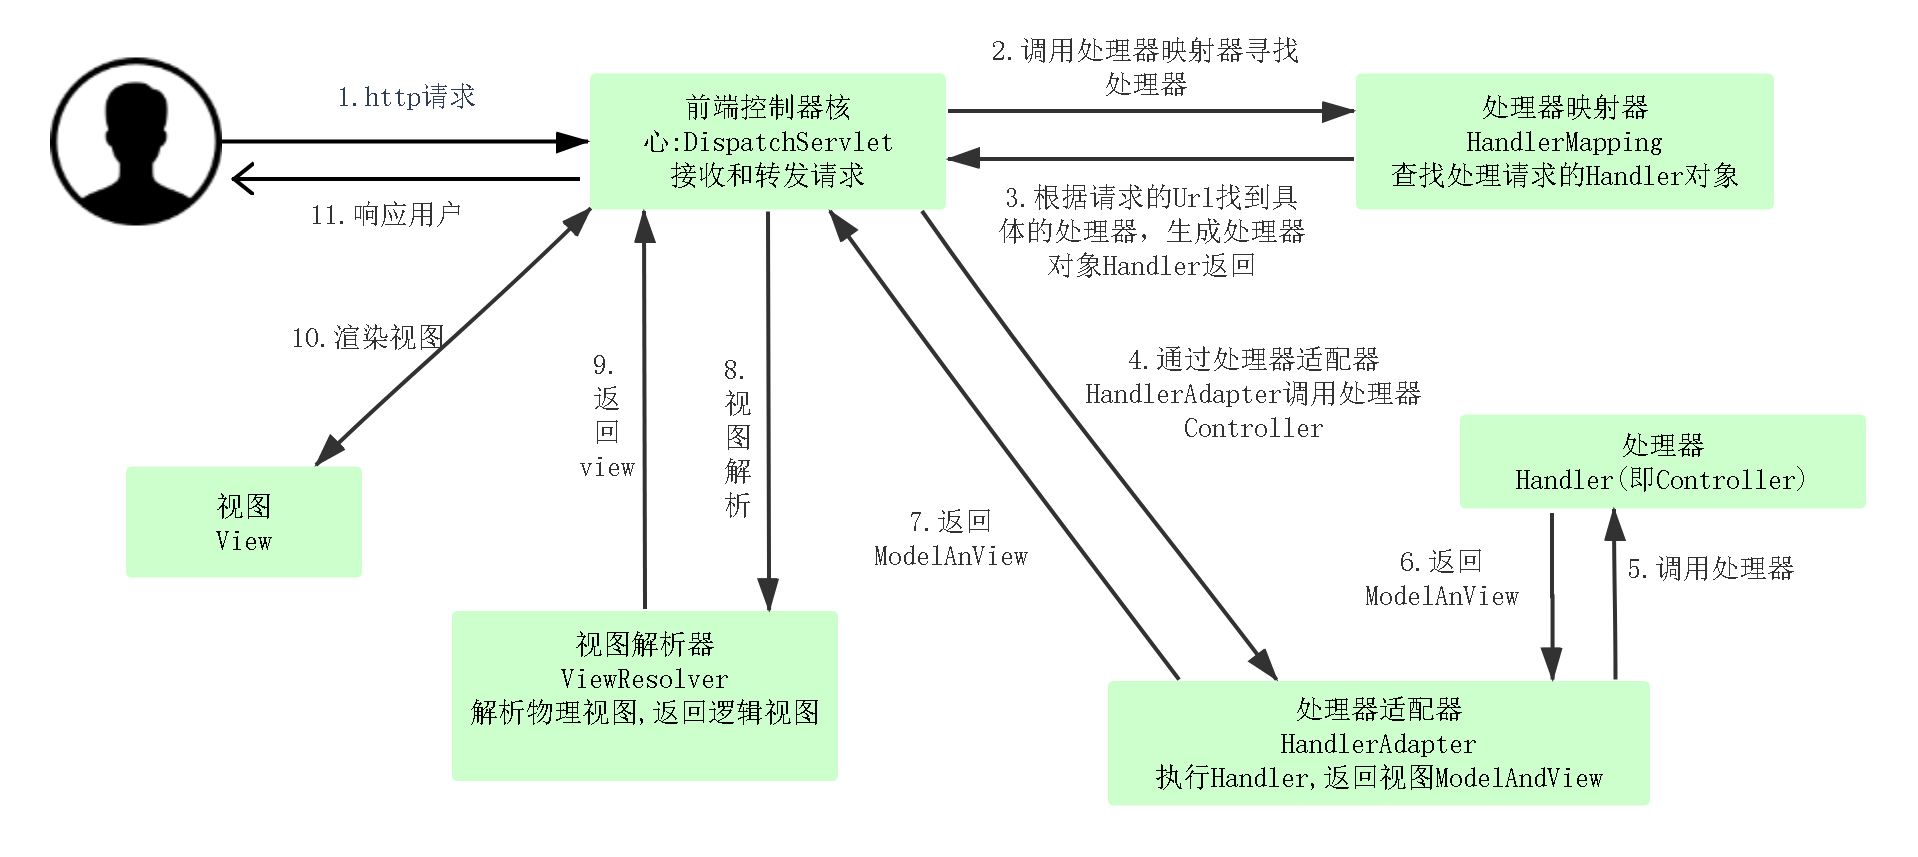
- 用户请求发送到前端控制器 DispatcherServlet。
- 前端控制器 DispatcherServlet 接收到请求后,DispatcherServlet 会使用 HandlerMapping 来处理,HandlerMapping 会查找到具体进行处理请求的 Handler 对象。
- HandlerMapping 找到对应的 Handler 之后,并不是返回一个 Handler 原始对象,而是一个 Handler 执行链(HandlerExecutionChain),在这个执行链中包括了拦截器和处理请求的 Handler。HandlerMapping 返回一个执行链给 DispatcherServlet。
- DispatcherServlet 接收到执行链之后,会调用 Handler 适配器去执行 Handler。
- Handler 适配器执行完成 Handler(也就是 Controller)之后会得到一个 ModelAndView,并返回给 DispatcherServlet。
- DispatcherServlet 接收到 HandlerAdapter 返回的 ModelAndView 之后,会根据其中的视图名调用 ViewResolver。
- ViewResolver 根据逻辑视图名解析成一个真正的 View 视图,并返回给 DispatcherServlet。
- DispatcherServlet 接收到视图之后,会根据上面的 ModelAndView 中的 model 来进行视图中数据的填充,也就是所谓的视图渲染。
- 渲染完成之后,DispatcherServlet 就可以将结果返回给用户了。
3. 创建一个简单的项目
使用Spring Boot创建一个简单项目,方便我们分析调用栈,pom文件导入以下依赖。
<dependencies>
    <dependency>
        <groupId>org.springframework.boot</groupId>
        <artifactId>spring-boot-starter-web</artifactId>
    </dependency>
    <dependency>
        <groupId>org.springframework.boot</groupId>
        <artifactId>spring-boot-starter-thymeleaf</artifactId>
    </dependency>
</dependencies>
创建控制器。
@Controller
public class HelloWorldController {

    @Value("${spring.application.name}")
    String msg;

    @RequestMapping("/hello")
    public String hello(Model model) {
        model.addAttribute("msg",msg);
        return "helloworld";
    }
}
创建helloworld.html文件
<!DOCTYPE html>
<html lang="en" xmlns:th="http://www.w3.org/1999/xhtml">
<head>
    <meta charset="UTF-8">
    <title>hello</title>
</head>
<body>
<span th:text="${msg}"></span>
</body>
</html>
创建application.properties文件
spring.thymeleaf.cache=false
spring.thymeleaf.enabled=true
spring.thymeleaf.prefix=classpath:/templates/
spring.thymeleaf.suffix=.html

spring.application.name=Hello World!
在控制器的方法体内打上断点。然后Debug。在浏览器中输入http://localhost:8080/hello,分析源码并观察调用栈。
4. 源码分析与调用栈
4.1 DispatcherServlet
首先,DispatcherServlet初始化各个组件,如下所示:
protected void initStrategies(ApplicationContext context) {
   initMultipartResolver(context);  //初始化multipartResolver
   initLocaleResolver(context);//初始化localeResolver
   initThemeResolver(context);//初始化themResolver
   initHandlerMappings(context);//初始化handerMappings
   initHandlerAdapters(context);//初始化handlerAdapters
   initHandlerExceptionResolvers(context);
   initRequestToViewNameTranslator(context);
   initViewResolvers(context);//初始化试图解析器ViewResolvers
   initFlashMapManager(context);
}
DispatcherServlet 收到请求,会调用DispatcherServlet 中的 doService方法:
protected void doService(HttpServletRequest request, HttpServletResponse response) throws Exception {
    this.logRequest(request);
    // 给 request 中的属性做一份快照,以便能够恢复原始属性
    Map<String, Object> attributesSnapshot = null;
    if (WebUtils.isIncludeRequest(request)) {
        attributesSnapshot = new HashMap();
        Enumeration attrNames = request.getAttributeNames();

        label116:
        while(true) {
            String attrName;
            do {
                if (!attrNames.hasMoreElements()) {
                    break label116;
                }

                attrName = (String)attrNames.nextElement();
            } while(!this.cleanupAfterInclude && !attrName.startsWith("org.springframework.web.servlet"));

            attributesSnapshot.put(attrName, request.getAttribute(attrName));
        }
    }
	// 如果没有配置本地化或者主题的处理器之类的,SpringMVC 会使用默认的配置文件,即 DispatcherServlet.properties
    request.setAttribute(WEB_APPLICATION_CONTEXT_ATTRIBUTE, this.getWebApplicationContext());
    request.setAttribute(LOCALE_RESOLVER_ATTRIBUTE, this.localeResolver);
    request.setAttribute(THEME_RESOLVER_ATTRIBUTE, this.themeResolver);
    request.setAttribute(THEME_SOURCE_ATTRIBUTE, this.getThemeSource());
    if (this.flashMapManager != null) {
        FlashMap inputFlashMap = this.flashMapManager.retrieveAndUpdate(request, response);
        if (inputFlashMap != null) {
            request.setAttribute(INPUT_FLASH_MAP_ATTRIBUTE, Collections.unmodifiableMap(inputFlashMap));
        }

        request.setAttribute(OUTPUT_FLASH_MAP_ATTRIBUTE, new FlashMap());
        request.setAttribute(FLASH_MAP_MANAGER_ATTRIBUTE, this.flashMapManager);
    }

    RequestPath previousRequestPath = null;
    if (this.parseRequestPath) {
        previousRequestPath = (RequestPath)request.getAttribute(ServletRequestPathUtils.PATH_ATTRIBUTE);
        ServletRequestPathUtils.parseAndCache(request);
    }

    try {
        // 开始真正的处理
        this.doDispatch(request, response);
    } finally {
        // 恢复原始属性快照
        if (!WebAsyncUtils.getAsyncManager(request).isConcurrentHandlingStarted() && attributesSnapshot != null) {
            this.restoreAttributesAfterInclude(request, attributesSnapshot);
        }

        if (this.parseRequestPath) {
            ServletRequestPathUtils.setParsedRequestPath(previousRequestPath, request);
        }

    }

}
接下来 DispatcherServlet 开始真正的处理,让我们来看下 doDispatch 方法,首先会获取当前请求的 Handler 执行链,然后找到合适的 HandlerAdapter(此处为 RequestMappingHandlerAdapter),接着调用 RequestMappingHandlerAdapter 的 handle 方法,如下为 doDispatch 方法:
protected void doDispatch(HttpServletRequest request, HttpServletResponse response) throws Exception {
    HttpServletRequest processedRequest = request;
    HandlerExecutionChain mappedHandler = null;
    boolean multipartRequestParsed = false;
    WebAsyncManager asyncManager = WebAsyncUtils.getAsyncManager(request);

    try {
        try {
            ModelAndView mv = null;
            Object dispatchException = null;

            try {
                // 先检查是不是 Multipart 类型的,比如上传等;如果是 Multipart 类型的,则转换为 MultipartHttpServletRequest 类型
                processedRequest = this.checkMultipart(request);
                multipartRequestParsed = processedRequest != request;
                // 获取当前请求的 Handler 执行链
                mappedHandler = this.getHandler(processedRequest);
                if (mappedHandler == null) {
                    this.noHandlerFound(processedRequest, response);
                    return;
                }
				// 获取当前请求的 Handler 适配器
                HandlerAdapter ha = this.getHandlerAdapter(mappedHandler.getHandler());
                // 对于 header 中 last-modified 的处理
                 String method = request.getMethod();
                 boolean isGet = HttpMethod.GET.matches(method);
                 if (isGet || HttpMethod.HEAD.matches(method)) {
                    long lastModified = ha.getLastModified(request, mappedHandler.getHandler());
                    if ((new ServletWebRequest(request, response)).checkNotModified(lastModified) && isGet) {
                        return;
                    }
                }
				// 遍历所有定义的 interceptor,执行 preHandle 方法
                if (!mappedHandler.applyPreHandle(processedRequest, response)) {
                    return;
                }
				// 实际调用 Handler 的地方
                mv = ha.handle(processedRequest, response, mappedHandler.getHandler());
                if (asyncManager.isConcurrentHandlingStarted()) {
                    return;
                }
				// 处理成默认视图名,也就是添加前缀和后缀等
                this.applyDefaultViewName(processedRequest, mv);
                // 拦截器postHandle方法进行处理
                mappedHandler.applyPostHandle(processedRequest, response, mv);
            } catch (Exception var20) {
                dispatchException = var20;
            } catch (Throwable var21) {
                dispatchException = new NestedServletException("Handler dispatch failed", var21);
            }
			// 处理最后的结果,渲染之类的都在这里
            this.processDispatchResult(processedRequest, response, mappedHandler, mv, (Exception)dispatchException);
        } catch (Exception var22) {
            this.triggerAfterCompletion(processedRequest, response, mappedHandler, var22);
        } catch (Throwable var23) {
            this.triggerAfterCompletion(processedRequest, response, mappedHandler, new NestedServletException("Handler processing failed", var23));
        }

    } finally {
        if (asyncManager.isConcurrentHandlingStarted()) {
            if (mappedHandler != null) {
                mappedHandler.applyAfterConcurrentHandlingStarted(processedRequest, response);
            }
        } else if (multipartRequestParsed) {
            this.cleanupMultipart(processedRequest);
        }

    }
}
4.2 查找对应的 Handler 对象
探索下是如何获取当前请求的 Handler 执行链,对应着这句代码 mappedHandler = getHandler(processedRequest);,看下 DispatcherServlet 具体的 getHandler 方法,该方法主要是遍历所有的 handlerMappings 进行处理,handlerMappings 是在启动的时候预先注册好的,handlerMappings 包含 RequestMappingHandlerMapping、BeanNameUrlHandlerMapping、RouterFunctionMapping、SimpleUrlHandlerMapping 以及 WelcomePageHandlerMapping,在循环中会调用 AbstractHandlerMapping 类中的 getHandler 方法来获取 Handler 执行链,若获取的 Handler 执行链不为 null,则返回当前请求的 Handler 执行链,DispatcherServlet 类的 getHandler 方法如下:
protected HandlerExecutionChain getHandler(HttpServletRequest request) throws Exception {
    if (this.handlerMappings != null) {
        Iterator var2 = this.handlerMappings.iterator();

        // 遍历所有的 handlerMappings 进行处理,handlerMappings 是在启动的时候预先注册好的
        while(var2.hasNext()) {
            HandlerMapping mapping = (HandlerMapping)var2.next();
            HandlerExecutionChain handler = mapping.getHandler(request);
            if (handler != null) {
                return handler;
            }
        }
    }

    return null;
}
在循环中,根据 mapping.getHandler(request);,继续往下看 AbstractHandlerMapping 类中的 getHandler 方法:
public final HandlerExecutionChain getHandler(HttpServletRequest request) throws Exception {
    // 根据 request 获取 handler
    Object handler = this.getHandlerInternal(request);
    if (handler == null) {
        // 如果没有找到就使用默认的 handler
        handler = this.getDefaultHandler();
    }

    if (handler == null) {
        return null;
    } else {
        // 如果 Handler 是 String,表明是一个 bean 名称,需要寻找对应 bean
        if (handler instanceof String) {
            String handlerName = (String)handler;
            handler = this.obtainApplicationContext().getBean(handlerName);
        }

        if (!ServletRequestPathUtils.hasCachedPath(request)) {
            this.initLookupPath(request);
        }

        // 封装 Handler 执行链
        HandlerExecutionChain executionChain = this.getHandlerExecutionChain(handler, request);
        if (this.logger.isTraceEnabled()) {
            this.logger.trace("Mapped to " + handler);
        } else if (this.logger.isDebugEnabled() && !DispatcherType.ASYNC.equals(request.getDispatcherType())) {
            this.logger.debug("Mapped to " + executionChain.getHandler());
        }

        if (this.hasCorsConfigurationSource(handler) || CorsUtils.isPreFlightRequest(request)) {
            CorsConfiguration config = this.getCorsConfiguration(handler, request);
            if (this.getCorsConfigurationSource() != null) {
                CorsConfiguration globalConfig = this.getCorsConfigurationSource().getCorsConfiguration(request);
                config = globalConfig != null ? globalConfig.combine(config) : config;
            }

            if (config != null) {
                config.validateAllowCredentials();
            }

            executionChain = this.getCorsHandlerExecutionChain(request, executionChain, config);
        }

        return executionChain;
    }
}
AbstractHandlerMapping 类中的 getHandler 方法中首先根据 requrst 获取 handler,主要是调用AbstractHandlerMethodMapping 类中的 getHandlerInternal 方法,该方法首先获取 request 中的 url,即 /hello,用来匹配 handler 并封装成 HandlerMethod,然后根据 handlerMethod 中的 bean 来实例化 Handler 并返回。
protected HandlerMethod getHandlerInternal(HttpServletRequest request) throws Exception {
    // 获取 request 中的 url,用来匹配 handler
    String lookupPath = this.initLookupPath(request);
    this.mappingRegistry.acquireReadLock();

    HandlerMethod var4;
    try {
        // 根据路径寻找 Handler,并封装成 HandlerMethod
        HandlerMethod handlerMethod = this.lookupHandlerMethod(lookupPath, request);
        // 根据 handlerMethod 中的 bean 来实例化 Handler,并添加进 HandlerMethod
        var4 = handlerMethod != null ? handlerMethod.createWithResolvedBean() : null;
    } finally {
        this.mappingRegistry.releaseReadLock();
    }

    return var4;
}
接下来,我们看 lookupHandlerMethod 的逻辑,主要逻辑委托给了 mappingRegistry 这个成员变量来处理:
protected HandlerMethod lookupHandlerMethod(String lookupPath, HttpServletRequest request) throws Exception {
    List<AbstractHandlerMethodMapping<T>.Match> matches = new ArrayList();
    // 通过 lookupPath 属性中查找。如果找到了,就返回对应的RequestMappingInfo
    List<T> directPathMatches = this.mappingRegistry.getMappingsByDirectPath(lookupPath);
    if (directPathMatches != null) {
        // 如果匹配到了,检查其他属性是否符合要求,如请求方法,参数,header 等
        this.addMatchingMappings(directPathMatches, matches, request);
    }

    if (matches.isEmpty()) {
        // 没有直接匹配到,则遍历所有的处理方法进行通配符匹配
        this.addMatchingMappings(this.mappingRegistry.getRegistrations().keySet(), matches, request);
    }

    if (matches.isEmpty()) {
        // 调用 RequestMappingHandlerMapping 类的 handleNoMatch 方法再匹配一次
        return this.handleNoMatch(this.mappingRegistry.getRegistrations().keySet(), lookupPath, request);
    } else {
        // 如果方法有多个匹配,不同的通配符等,则排序选择出最合适的一个
        AbstractHandlerMethodMapping<T>.Match bestMatch = (AbstractHandlerMethodMapping.Match)matches.get(0);
        // 如果有多个匹配的,会找到第二个最合适的进行比较
        if (matches.size() > 1) {
            Comparator<AbstractHandlerMethodMapping<T>.Match> comparator = new AbstractHandlerMethodMapping.MatchComparator(this.getMappingComparator(request));
            matches.sort(comparator);
            bestMatch = (AbstractHandlerMethodMapping.Match)matches.get(0);
            if (this.logger.isTraceEnabled()) {
                this.logger.trace(matches.size() + " matching mappings: " + matches);
            }

            if (CorsUtils.isPreFlightRequest(request)) {
                Iterator var7 = matches.iterator();

                while(var7.hasNext()) {
                    AbstractHandlerMethodMapping<T>.Match match = (AbstractHandlerMethodMapping.Match)var7.next();
                    if (match.hasCorsConfig()) {
                        return PREFLIGHT_AMBIGUOUS_MATCH;
                    }
                }
            } else {
                AbstractHandlerMethodMapping<T>.Match secondBestMatch = (AbstractHandlerMethodMapping.Match)matches.get(1);
                if (comparator.compare(bestMatch, secondBestMatch) == 0) {
                    Method m1 = bestMatch.getHandlerMethod().getMethod();
                    Method m2 = secondBestMatch.getHandlerMethod().getMethod();
                    String uri = request.getRequestURI();
                    // 不能有相同的最优 Match
                    throw new IllegalStateException("Ambiguous handler methods mapped for '" + uri + "': {" + m1 + ", " + m2 + "}");
                }
            }
        }

        request.setAttribute(BEST_MATCHING_HANDLER_ATTRIBUTE, bestMatch.getHandlerMethod());
        // 设置 request 参数(RequestMappingHandlerMapping 对其进行了覆写)
        this.handleMatch(bestMatch.mapping, lookupPath, request);
        // 返回匹配的 url 的处理的方法
        return bestMatch.getHandlerMethod();
    }
}
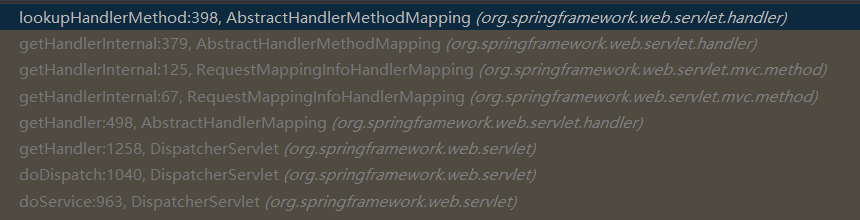
打上断点Debug,以下为该过程的调用栈。

通过上面的过程,我们就获取到了 Handler,就开始封装执行链了,就是将我们配置的拦截器加入到执行链中去,getHandlerExecutionChain 方法如下:
protected HandlerExecutionChain getHandlerExecutionChain(Object handler, HttpServletRequest request) {
    // 如果当前 Handler 不是执行链类型,就使用一个新的执行链实例封装起来
    HandlerExecutionChain chain = handler instanceof HandlerExecutionChain ? (HandlerExecutionChain)handler : new HandlerExecutionChain(handler);
    Iterator var4 = this.adaptedInterceptors.iterator();

    // 遍历拦截器,找到跟当前 url 对应的,添加进执行链中去
    while(var4.hasNext()) {
        HandlerInterceptor interceptor = (HandlerInterceptor)var4.next();
        if (interceptor instanceof MappedInterceptor) {
            MappedInterceptor mappedInterceptor = (MappedInterceptor)interceptor;
            if (mappedInterceptor.matches(request)) {
                chain.addInterceptor(mappedInterceptor.getInterceptor());
            }
        } else {
            chain.addInterceptor(interceptor);
        }
    }

    return chain;
}
此时调用栈为如下图:

到此为止,我们就获取了当前请求的 Handler 执行链,接下来看下是如何获取请求的 Handler 适配器,主要依靠 DispatcherServlet 类的 getHandlerAdapter 方法,该方法就是遍历所有的 HandlerAdapter,找到和当前 Handler 匹配的就返回,在这里匹配到的为 RequestMappingHandlerAdapter。DispatcherServlet 类的 getHandlerAdapter 方法如下:
protected HandlerAdapter getHandlerAdapter(Object handler) throws ServletException {
    if (this.handlerAdapters != null) {
        Iterator var2 = this.handlerAdapters.iterator();

        // 遍历所有的 HandlerAdapter,找到和当前 Handler 匹配的就返回
        while(var2.hasNext()) {
            HandlerAdapter adapter = (HandlerAdapter)var2.next();
            if (adapter.supports(handler)) {
                return adapter;
            }
        }
    }

    throw new ServletException("No adapter for handler [" + handler + "]: The DispatcherServlet configuration needs to include a HandlerAdapter that supports this handler");
}
此时调用栈如下图:

4.3 HandlerAdapter 执行当前的 Handler
doDispatch 方法中 handle 方法是执行当前 Handler,我们这里使用的是 RequestMappingHandlerAdapter,首先会进入 AbstractHandlerMethodAdapter 的 handle 方法:
public final ModelAndView handle(HttpServletRequest request, HttpServletResponse response, Object handler) throws Exception {
    return this.handleInternal(request, response, (HandlerMethod)handler);
}
在 AbstractHandlerMethodAdapter 的 handle 方法中又调用了 RequestMappingHandlerAdapter 类的 handleInternal 方法:
protected ModelAndView handleInternal(HttpServletRequest request, HttpServletResponse response, HandlerMethod handlerMethod) throws Exception {
    this.checkRequest(request);
    ModelAndView mav;
    if (this.synchronizeOnSession) {
        HttpSession session = request.getSession(false);
        if (session != null) {
            Object mutex = WebUtils.getSessionMutex(session);
            synchronized(mutex) {
                mav = this.invokeHandlerMethod(request, response, handlerMethod);
            }
        } else {
            mav = this.invokeHandlerMethod(request, response, handlerMethod);
        }
    } else {
        // 执行方法,封装 ModelAndView
        mav = this.invokeHandlerMethod(request, response, handlerMethod);
    }

    if (!response.containsHeader("Cache-Control")) {
        if (this.getSessionAttributesHandler(handlerMethod).hasSessionAttributes()) {
            this.applyCacheSeconds(response, this.cacheSecondsForSessionAttributeHandlers);
        } else {
            this.prepareResponse(response);
        }
    }

    return mav;
}
调用栈如下图所示:

在执行完 handle 方法后,然后调用 applyDefaultViewName 方法组装默认视图名称,将前缀和后缀名都加上,接着调用 applyPostHandle 方法执行拦截器的 preHandle 方法,也就是遍历所有定义的 interceptor,执行 postHandle 方法。
调用栈如下图所示:


4.4 处理最终结果以及渲染
最后调用 DispatcherServlet 类中的 processDispatchResult 方法,此方法是处理最终结果的,包括异常处理、渲染页面和发出完成通知触发拦截器的 afterCompletion() 方法执行等,processDispatchResult()方法代码如下:
private void processDispatchResult(HttpServletRequest request, HttpServletResponse response, @Nullable HandlerExecutionChain mappedHandler, @Nullable ModelAndView mv, @Nullable Exception exception) throws Exception {
    boolean errorView = false;
    if (exception != null) {
        if (exception instanceof ModelAndViewDefiningException) {
            this.logger.debug("ModelAndViewDefiningException encountered", exception);
            mv = ((ModelAndViewDefiningException)exception).getModelAndView();
        } else {
            Object handler = mappedHandler != null ? mappedHandler.getHandler() : null;
            mv = this.processHandlerException(request, response, handler, exception);
            errorView = mv != null;
        }
    }

    if (mv != null && !mv.wasCleared()) {
        // 渲染
        this.render(mv, request, response);
        if (errorView) {
            WebUtils.clearErrorRequestAttributes(request);
        }
    } else if (this.logger.isTraceEnabled()) {
        this.logger.trace("No view rendering, null ModelAndView returned.");
    }

    if (!WebAsyncUtils.getAsyncManager(request).isConcurrentHandlingStarted()) {
        if (mappedHandler != null) {
            mappedHandler.triggerAfterCompletion(request, response, (Exception)null);
        }

    }
}
接下来让我们看下 DispatcherServlet 类的 render 方法是如何完成渲染的,DispatcherServlet 类的 render 方法渲染过程如下:
- 判断 ModelAndView 中 view 是否为 view name:如果是根据 name,如果是则需要调用 resolveViewName 从视图解析器获取对应的视图(View)对象;否则 ModelAndView 中使用 getview 方法获取 view 对象。
- 然后调用 View 类的 render 方法。
DispatcherServlet 类的 render 方法如下:
protected void render(ModelAndView mv, HttpServletRequest request, HttpServletResponse response) throws Exception {
    // 设置本地化
    Locale locale = this.localeResolver != null ? this.localeResolver.resolveLocale(request) : request.getLocale();
    response.setLocale(locale);
    String viewName = mv.getViewName();
    View view;
    if (viewName != null) {
        // 解析视图名,得到视图
        view = this.resolveViewName(viewName, mv.getModelInternal(), locale, request);
        if (view == null) {
            throw new ServletException("Could not resolve view with name '" + mv.getViewName() + "' in servlet with name '" + this.getServletName() + "'");
        }
    } else {
        view = mv.getView();
        if (view == null) {
            throw new ServletException("ModelAndView [" + mv + "] neither contains a view name nor a View object in servlet with name '" + this.getServletName() + "'");
        }
    }

    if (this.logger.isTraceEnabled()) {
        this.logger.trace("Rendering view [" + view + "] ");
    }

    try {
        if (mv.getStatus() != null) {
            response.setStatus(mv.getStatus().value());
        }

        // 委托给视图进行渲染
        view.render(mv.getModelInternal(), request, response);
    } catch (Exception var8) {
        if (this.logger.isDebugEnabled()) {
            this.logger.debug("Error rendering view [" + view + "]", var8);
        }

        throw var8;
    }
}
因为我们用的是 Thymeleaf 模版引擎,所以 view.render 找到对应的视图 ThymeleafView 的 render 方法进行渲染。
public void render(Map<String, ?> model, HttpServletRequest request, HttpServletResponse response) throws Exception {
    this.renderFragment(this.markupSelectors, model, request, response);
}
调用栈如下图所示:
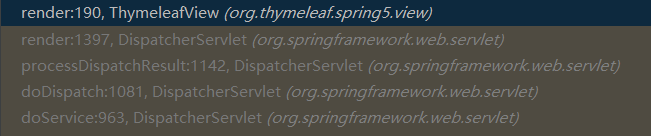
ThymeleafView 的 render 方法又调用 renderFragment 方法进行视图渲染,渲染完成之后,DispatcherServlet 就可以将结果返回给我们了。
参考:
https://docs.spring.io/spring-framework/docs/current/reference/html/web.html#spring-web
https://segmentfault.com/a/1190000021848063?utm_source=sf-similar-article

 浙公网安备 33010602011771号