

对SpringMVC架构进行工程拆分遇到的问题总结
经过一个月的开发,一个单一的SpringMVC教育类创业项目正式上线,随着时间的推移,业务流量逐渐增大,最近对这个单一的工程从零进行SOA分布式改造,改造包括dubbo改造,集成化部署、高可用集群,负载均衡。
刚开始不打算把各个业务模块进行全部拆分,拆分计划如下:
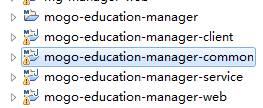
总工程名字为 mogo-education-manager、拆分为 common\client\service\web 四个子工程, 后面如果负载仍然比较大,那么考虑把每个模块独立出来,成为单独的client 和 service、即 mogo-education-manager-common、mogo-education-manager-client、mogo-education-manager-service、mogo-education-manager-web。
拆分后的工程结构如下:
拆分的大体流程,具体的dubbo拆分网上一搜一大堆,我这边记录大体流程和我在拆分中遇到的各种坑:
1、父工程的pom文件中需要制定所有子工程的所有版本,便于统一管理:
父工程pom.xml
<modelVersion>4.0.0</modelVersion>

    <groupId>com.mogo</groupId>
    <artifactId>mogo-education-manager</artifactId>
    <packaging>pom</packaging>
    <version>1.0.0-SNAPSHOT</version>

    <properties>
        <mogo.education.client.version>1.0.0-SNAPSHOT</mogo.education.client.version>
        <mogo.education.service.version>1.0.0-SNAPSHOT</mogo.education.service.version>
        <mogo.education.common.version>1.0.0-SNAPSHOT</mogo.education.common.version>
        <mogo.education.web.version>1.0.0-SNAPSHOT</mogo.education.web.version>
        <!-- spring版本号 -->
        <spring.version>4.1.5.RELEASE</spring.version>
        <!-- log4j日志文件管理包版本 -->
        <slf4j.version>1.6.6</slf4j.version>
        <!-- <logback.version>1.2.3</logback.version> <logback.ext.version>0.1.5</logback.ext.version> -->
        <log4j.version>1.2.12</log4j.version>
        <!-- junit版本号 -->
        <junit.version>4.10</junit.version>
        <!-- mybatis版本号 -->
        <mybatis.version>3.2.1</mybatis.version>
        <!-- jackson版本号 -->
        <com.fasterxml.jackson.core.version>2.8.5</com.fasterxml.jackson.core.version>
    </properties>

    <modules>
        <module>common</module>
        <module>client</module>
        <module>service</module>
        <module>web</module>
    </modules>
子工程pom.xml
<parent>
        <artifactId>mogo-education-manager</artifactId>
        <groupId>com.mogo</groupId>
        <version>1.0.0-SNAPSHOT</version>
    </parent>
    <modelVersion>4.0.0</modelVersion>

    <artifactId>mogo-education-manager-service</artifactId>
    <version>${mogo.education.service.version}</version>

    <dependencies>
        <dependency>
            <groupId>com.mogo</groupId>
            <artifactId>mogo-education-manager-client</artifactId>
            <version>${mogo.education.client.version}</version>
        </dependency>
        <dependency>
            <groupId>com.mogo</groupId>
            <artifactId>mogo-education-manager-common</artifactId>
            <version>${mogo.education.common.version}</version>
        </dependency>
   </dependencies>
2、client 和 common 中是没有引入resource 文件。 在service的resource下引入了jdbc、mapper、application等配置文件,至于redis等配置后续添加。
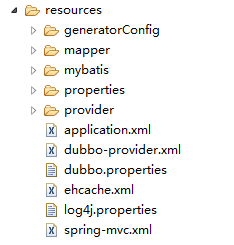
新加 dubbo-provider.xml 配置,用来注册服务。样例如下。
    <dubbo:service interface="com.mogo.education.api.service.agent.AgentPolicyService" ref="agentPolicyService"/>
    <dubbo:service interface="com.mogo.education.api.service.agent.AgentReportsDailyService" ref="agentReportsDailyService"/>
    <dubbo:service interface="com.mogo.education.api.service.agent.AgentReportsDetailService" ref="agentReportsDetailService"/>
    <dubbo:service interface="com.mogo.education.api.service.agent.AgentReportsSchoolService" ref="agentReportsSchoolService"/>
    <dubbo:service interface="com.mogo.education.api.service.agent.AgentReportsService" ref="agentReportsService"/>

    <bean id="agentPolicyService" class="com.mogo.education.biz.agent.service.impl.AgentPolicyServiceImpl"/>
    <bean id="agentReportsDailyService" class="com.mogo.education.biz.agent.service.impl.AgentReportsDailyServiceImpl"/>
    <bean id="agentReportsDetailService" class="com.mogo.education.biz.agent.service.impl.AgentReportsDetailServiceImpl"/>
    <bean id="agentReportsSchoolService" class="com.mogo.education.biz.agent.service.impl.AgentReportsSchoolServiceImpl"/>
    <bean id="agentReportsService" class="com.mogo.education.biz.agent.service.impl.AgentReportsServiceImpl"/>
新加 dubbo.properties 对dubbo进行配置,样例如下:
dubbo.container=log4j,spring
dubbo.application.name=mogo-education-service
dubbo.application.logger=slf4j
dubbo.spring.config=classpath*:application.xml
dubbo.registry.address=zookeeper://主机名(或主机IP):2182
dubbo.protocol.name=dubbo
dubbo.protocol.port=20880
然后将dubbo-provider.xml 的引用加入到application.xml中,如下:
<import resource="classpath:dubbo-provider.xml" />
dubbo工程需要引入的包如下:
         <!-- dubbo 用到的包 -->
        <dependency>
            <groupId>com.alibaba</groupId>
            <artifactId>dubbo</artifactId>
        </dependency>
        <dependency>
            <groupId>org.apache.zookeeper</groupId>
            <artifactId>zookeeper</artifactId>
            <type>pom</type>
        </dependency>
        <dependency>
            <groupId>com.101tec</groupId>
            <artifactId>zkclient</artifactId>
        </dependency>
        <dependency>
            <groupId>org.jboss.netty</groupId>
            <artifactId>netty</artifactId>
        </dependency>
        <dependency>
            <groupId>org.apache.curator</groupId>
            <artifactId>curator-recipes</artifactId>
        </dependency>
3、web 工程当做消费者,进行配置,简单版配置目录结构如下:
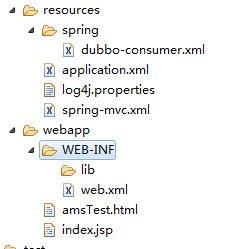
新增 dubbo-consumer.xml 进行配置消费者,内容样例如下:
    <dubbo:application name="mogo-education-web"/>

    <!-- use multicast registry center to discover service -->
    <dubbo:registry protocol="zookeeper" address="主机名(或IP):2182"/>

    <!-- 消费者需要引用的服务-->
    <dubbo:reference check="false" interface="com.mogo.education.api.service.res.ResSchoolService" id="resSchoolService"/>
    <dubbo:reference check="false" interface="com.mogo.education.api.service.res.ResStudentService" id="resStudentService"/>
    <dubbo:reference check="false" interface="com.mogo.education.api.service.res.ResSchoolApplyService" id="resSchoolApplyService"/>
    <dubbo:reference check="false" interface="com.mogo.education.api.service.res.ResCompanyService" id="resCompanyService"/>
    <dubbo:reference check="false" interface="com.mogo.education.api.service.res.ResClassService" id="resClassService"/>
application.xml 中 基本不需要特殊配置:
   <context:annotation-config/>

   <!--  加载Spring上下文 -->
   <bean id="springContextUtil" class="com.mogo.education.common.util.SpringContextUtil"></bean>

   <import resource="classpath:spring/dubbo-consumer.xml" />
web.xml 基本不需要修改。
ok ,基本搭建完成。至于zookeeper的搭建和安装,请自行查看我的<a href="https://www.cnblogs.com/huxipeng/p/8455950.html">zookeeper相关博客</a>
接下来,我将介绍,我在整个搭建过程中遇到的各种吐血的坑。
4、因为子工程要引用父工程的jar的maven配置,但是子工程是去掉<version>标签的,那么需要在父工程的pom.xml 的 <dependencies>标签外面套一层 <dependencyManagement> 标签,这样子工程才能引到。
5、安装zookeeper后,记得开启相应的防火墙端口。 后面出现了 dubbo 去注册中心注册时候,连接超时,发现zookeeper 连接的是内网,这个需要配置zookeeper机器的 etc/hosts 文件,配置格式如下 IP 主机名
例如 192.168.2.104 izwz90gbaaaq67071xh11 至于怎么看主机名, 就看 etc/hostname 文件,也可以直接修改主机名。
后面基本上就是在解决 web 工程启动报错的问题了。
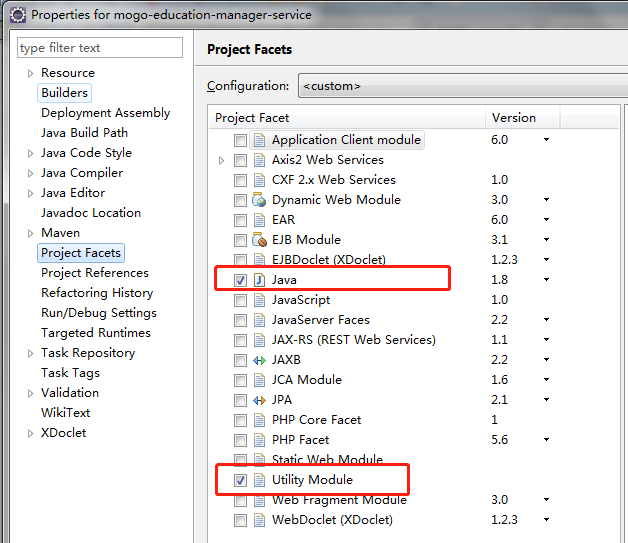
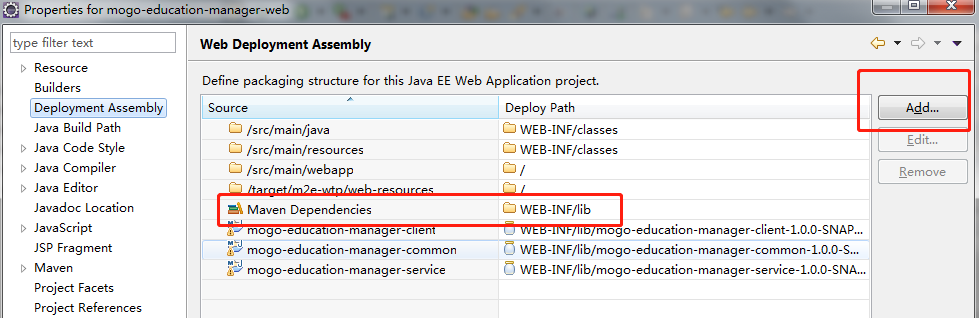
6、发现web 启动后 service 生成的对应的jar 不是一个 jar 而是一个文件夹,这个需要在 service 工程上右键-属性
7、tomcat 需要做如下改动,要不然tomcat 启动没有报错,那么也会无法访问。

如果发现无法改变,那么移除工程,clean 当前server。
8、后来发现在web 使用tomcat 启动的时候,一直报 apache的common-log包找不到,后来发现是maven编译的所有的jar 并没有加载到tomcat中,需要在工程右键-属性:
9、现在jar 包是加载成功了,但是发现maven 并没有编译,生成对应的web-resources。然后在pom.xml中加入build 块。
    <build>
        <plugins>
            <plugin>
                <groupId>org.apache.maven.plugins</groupId>
                <artifactId>maven-compiler-plugin</artifactId>
                <version>3.6.0</version>
                <configuration>
                    <source>1.8</source>
                    <target>1.8</target>
                    <encoding>utf-8</encoding>
                    <compilerArguments>
                        <extdirs>${basedir}/lib</extdirs>
                    </compilerArguments>
                </configuration>
            </plugin>
            <!-- maven打包 -->
            <plugin>
                <groupId>org.apache.maven.plugins</groupId>
                <artifactId>maven-war-plugin</artifactId>
                <version>2.3</version>
                <configuration>
                    <webResources>
                        <resource>
                            <directory>${basedir}/lib</directory>
                            <targetPath>WEB-INF/lib</targetPath>
                        </resource>
                    </webResources>
                </configuration>
            </plugin>
            <!-- 打包跳过测试 -->
            <plugin>
                <groupId>org.apache.maven.plugins</groupId>
                <artifactId>maven-surefire-plugin</artifactId>
                <configuration>
                    <skip>true</skip>
                </configuration>
            </plugin>
        </plugins>
    </build>
10、ok,到现在启动终于出现了业务类型的错误,发现是 各种服务无法注入的错误,这个是因为所有web工程中用到的服务,必须全部配置成消费者,也就是全部需要在consumer.xml中配成如下的形式。
<dubbo:reference check="false" interface="com.mogo.education.api.service.res.ResSchoolService" id="resSchoolService"/>
11、到目前为止,web工程成功启动。
现在我们创建main方法 使用 com.alibaba.dubbo.container.Main.main(args) 来启动 服务提供者。 不建议使用加载上下文的方式启动,dubbo 提供的这种方式,可以实现优雅关机(不会马上停掉正在处理业务的服务)。

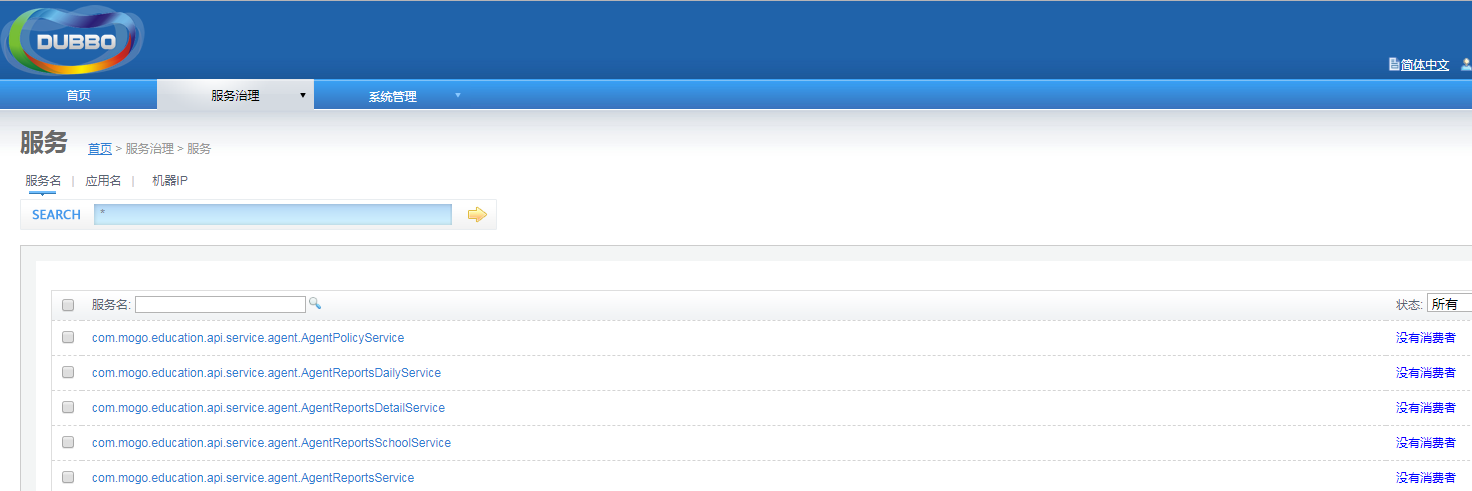
12、打开dubbo 服务管控台,发现所有服务全部注册,待消费者接入。dubbo-admin的工程代码,我回头会上传到git上供大家下载,具体的搭建方式,自行百度。
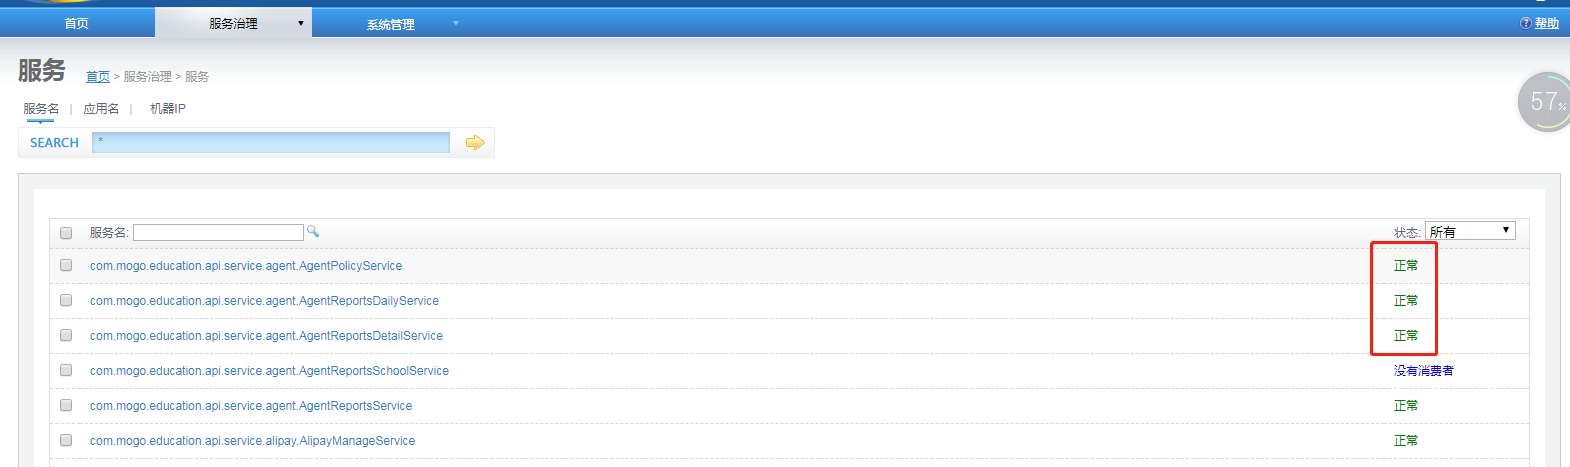
接下来启动web 工程,充当消费者。
至此搭建完毕,下篇将进行工程的打包部署。

 浙公网安备 33010602011771号