
PyQt5播放实时视频流或本地视频文件
编辑UI
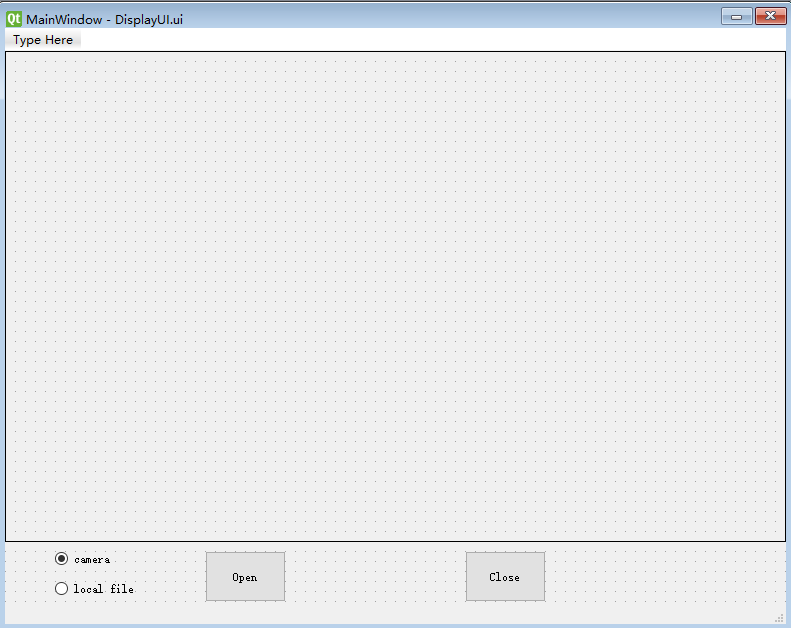
编辑UI如下图所示:
新建视频播放类Display
定义如下初始化函数
def __init__(self, ui, mainWnd):
    self.ui = ui
    self.mainWnd = mainWnd

    # 默认视频源为相机
    self.ui.radioButtonCam.setChecked(True)
    self.isCamera = True

    # 信号槽设置
    ui.Open.clicked.connect(self.Open)
    ui.Close.clicked.connect(self.Close)
    ui.radioButtonCam.clicked.connect(self.radioButtonCam)
    ui.radioButtonFile.clicked.connect(self.radioButtonFile)

    # 创建一个关闭事件并设为未触发
    self.stopEvent = threading.Event()
    self.stopEvent.clear()
打开相机
防止UI卡死,需要单独用一个线程去显示视频,可以选中打开相机还是打开本机mp4文件。
    def Open(self):
        if not self.isCamera:
            self.fileName, self.fileType = QFileDialog.getOpenFileName(self.mainWnd, 'Choose file', '', '*.mp4')
            self.cap = cv2.VideoCapture(self.fileName)
            self.frameRate = self.cap.get(cv2.CAP_PROP_FPS)
        else:
            # 下面两种rtsp格式都是支持的
            # cap = cv2.VideoCapture("rtsp://admin:Supcon1304@172.20.1.126/main/Channels/1")
            self.cap = cv2.VideoCapture("rtsp://admin:Supcon1304@172.20.1.126:554/h264/ch1/main/av_stream")

        # 创建视频显示线程
        th = threading.Thread(target=self.Display)
        th.start()
关闭相机
启动线程可以直接调用start(),但是结束线程并没有现成的接口可以调用。
添加一个事件用来判断是否需要关闭相机
def Close():
    # 关闭事件设为触发,关闭视频播放
    stopEvent.set()
显示视频画面
注意:
- OpenCV获得的图像帧数据是RGB格式,QImage是BGR格式,所以需要进行格式转换;
- 每次显示完成后都去判断是否点击了关闭按钮。
    def Display(self):
        self.ui.Open.setEnabled(False)
        self.ui.Close.setEnabled(True)

        while self.cap.isOpened():
            success, frame = self.cap.read()
            # RGB转BGR
            frame = cv2.cvtColor(frame, cv2.COLOR_RGB2BGR)
            img = QImage(frame.data, frame.shape[1], frame.shape[0], QImage.Format_RGB888)
            self.ui.DispalyLabel.setPixmap(QPixmap.fromImage(img))

            if self.isCamera:
                cv2.waitKey(1)
            else:
                cv2.waitKey(int(1000 / self.frameRate))

            # 判断关闭事件是否已触发
            if True == self.stopEvent.is_set():
                # 关闭事件置为未触发,清空显示label
                self.stopEvent.clear()
                self.ui.DispalyLabel.clear()
                self.ui.Close.setEnabled(False)
                self.ui.Open.setEnabled(True)
                break
完整源代码
文件VideoDisplay.py
import cv2
import threading
from PyQt5.QtCore import QFile
from PyQt5.QtWidgets import QFileDialog, QMessageBox
from PyQt5.QtGui import QImage, QPixmap

class Display:
    def __init__(self, ui, mainWnd):
        self.ui = ui
        self.mainWnd = mainWnd

        # 默认视频源为相机
        self.ui.radioButtonCam.setChecked(True)
        self.isCamera = True

        # 信号槽设置
        ui.Open.clicked.connect(self.Open)
        ui.Close.clicked.connect(self.Close)
        ui.radioButtonCam.clicked.connect(self.radioButtonCam)
        ui.radioButtonFile.clicked.connect(self.radioButtonFile)

        # 创建一个关闭事件并设为未触发
        self.stopEvent = threading.Event()
        self.stopEvent.clear()

    def radioButtonCam(self):
        self.isCamera = True

    def radioButtonFile(self):
        self.isCamera = False

    def Open(self):
        if not self.isCamera:
            self.fileName, self.fileType = QFileDialog.getOpenFileName(self.mainWnd, 'Choose file', '', '*.mp4')
            self.cap = cv2.VideoCapture(self.fileName)
            self.frameRate = self.cap.get(cv2.CAP_PROP_FPS)
        else:
            # 下面两种rtsp格式都是支持的
            # cap = cv2.VideoCapture("rtsp://admin:Supcon1304@172.20.1.126/main/Channels/1")
            self.cap = cv2.VideoCapture("rtsp://admin:Supcon1304@172.20.1.126:554/h264/ch1/main/av_stream")

        # 创建视频显示线程
        th = threading.Thread(target=self.Display)
        th.start()

    def Close(self):
        # 关闭事件设为触发,关闭视频播放
        self.stopEvent.set()

    def Display(self):
        self.ui.Open.setEnabled(False)
        self.ui.Close.setEnabled(True)

        while self.cap.isOpened():
            success, frame = self.cap.read()
            # RGB转BGR
            frame = cv2.cvtColor(frame, cv2.COLOR_RGB2BGR)
            img = QImage(frame.data, frame.shape[1], frame.shape[0], QImage.Format_RGB888)
            self.ui.DispalyLabel.setPixmap(QPixmap.fromImage(img))

            if self.isCamera:
                cv2.waitKey(1)
            else:
                cv2.waitKey(int(1000 / self.frameRate))

            # 判断关闭事件是否已触发
            if True == self.stopEvent.is_set():
                # 关闭事件置为未触发,清空显示label
                self.stopEvent.clear()
                self.ui.DispalyLabel.clear()
                self.ui.Close.setEnabled(False)
                self.ui.Open.setEnabled(True)
                break
文件main.py
import sys
import DisplayUI
from PyQt5.QtWidgets import QApplication, QMainWindow
from VideoDisplay import Display

if __name__ == '__main__':
    app = QApplication(sys.argv)
    mainWnd = QMainWindow()
    ui = DisplayUI.Ui_MainWindow()

    # 可以理解成将创建的 ui 绑定到新建的 mainWnd 上
    ui.setupUi(mainWnd)

    display = Display(ui, mainWnd)

    mainWnd.show()

    sys.exit(app.exec_())
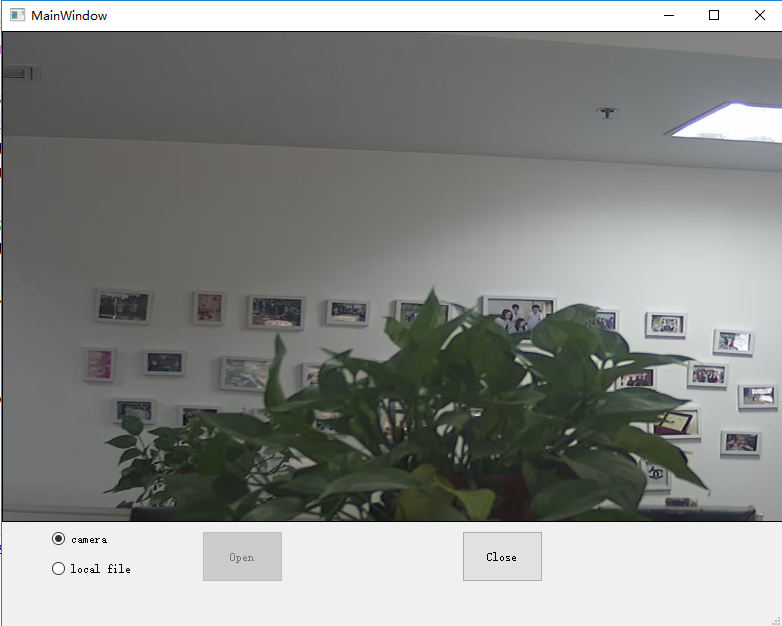
效果图

 浙公网安备 33010602011771号