rockylinux8.9安装显卡驱动、CUDA及容器使用GPU
前言
本文安装过程已写成脚本,包括所有安装包及软件。
链接: https://pan.baidu.com/s/1V1ttNag82ihi83CjZKAeOw
+QQ获取提取码:470033365
文件目录:博客园文章共享目录 / GPU相关类 / rockylinux8.9-nvidia-cuda-docker.tar.zip.001 、博客园文章共享目录 / GPU相关类 / rockylinux8.9-nvidia-cuda-docker.tar.zip.002
环境介绍
操作系统:
> cat /etc/redhat-release
Rocky Linux release 8.9 (Green Obsidian)

显卡型号:
> lspci | egrep -i nvidia
00:08.0 Audio device: NVIDIA Corporation AD102 High Definition Audio Controller (rev a1)
00:09.0 VGA compatible controller: NVIDIA Corporation AD102 [GeForce RTX 4090] (rev a1)
GPU显卡安装过程
系统初始化
初始化步骤
1.关闭selinux和firewalld
> sed -i 's@SELINUX=enforcing@SELINUX=disabled@g' /etc/selinux/config
> systemctl disable firewalld

2.修改源为阿里云源
> sed -e 's|^mirrorlist=|#mirrorlist=|g' \
    -e 's|^#baseurl=http://dl.rockylinux.org/$contentdir|baseurl=https://mirrors.aliyun.com/rockylinux|g' \
    -i.bak \
    /etc/yum.repos.d/[Rr]ocky-*.repo

3.校对系统时间
> curl -fsSL "https://sh.wlnmp.com/wlnmp.sh" | bash
> dnf install wntp -y
> ntpdate -s ntp1.aliyun.com
> clock -w
驱动下载
通过显卡型号下载对应的显卡驱动:https://www.nvidia.cn/drivers/lookup/ 我这里是 GeForce RTX 4090
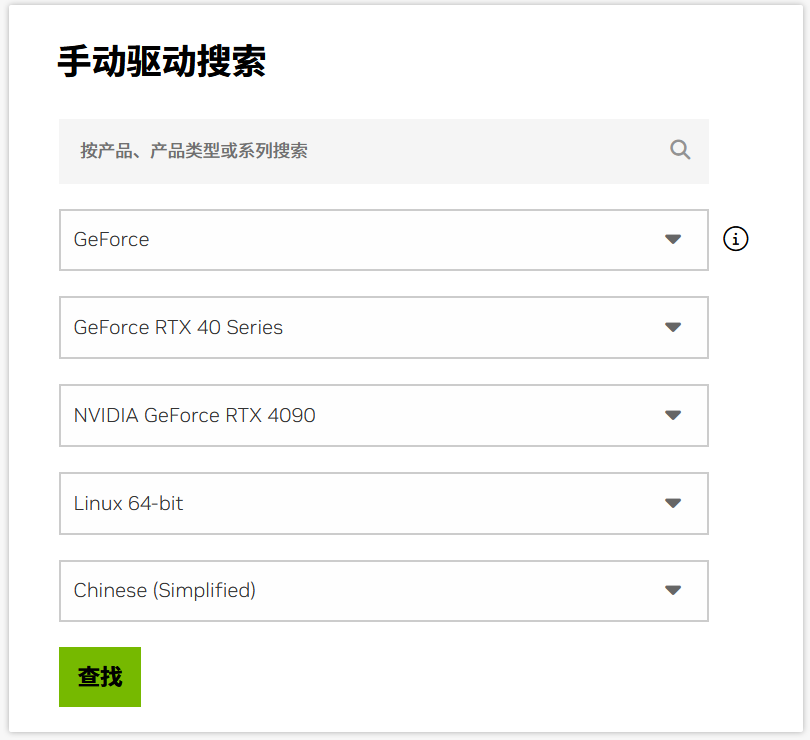
点击查找,下载最新的显卡驱动
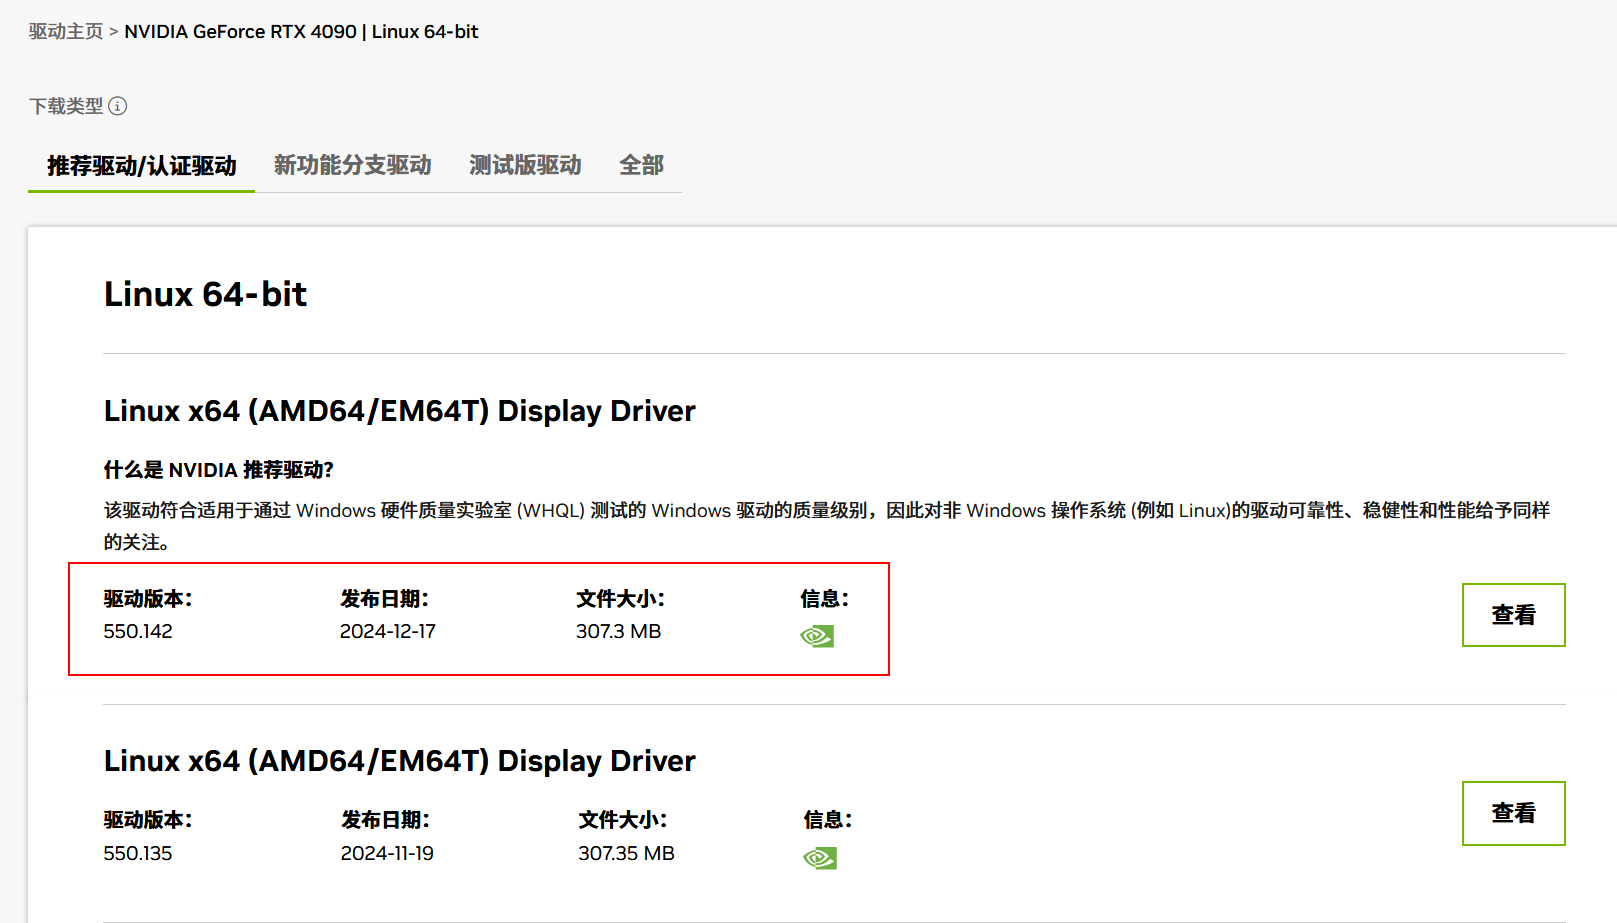
点击查看,即可下载。
安装驱动
将下载后的驱动上传到服务器。
> chmod +x NVIDIA-Linux-x86_64-550.142.run
> ./NVIDIA-Linux-x86_64-550.142.run

警告:您似乎没有安装NVIDIA Linux图形驱动程序支持的NVIDIA GPU。有关详细信息,请参阅附录中支持的NVIDIA图形芯片
README可以在www.nvidia.com的Linux驱动程序下载页面上获得。
直接回车。

错误:无法在路径中找到开发工具“cc”;请确保你已经安装了“gcc”包。如果您的系统上安装了gcc,那么请检查“cc”是否在您的PATH中。
安装gcc
> dnf install -y gcc
> ./NVIDIA-Linux-x86_64-550.142.run

安装make
> dnf install -y make
> ./NVIDIA-Linux-x86_64-550.142.run

错误:无法找到当前运行内核的内核源代码树。请确保您已经为您的内核安装了内核源文件,并正确配置了它们;在Red Hat Linux上
例如,请确保安装了“kernel-source”或“kernel-devel”RPM。如果您知道安装了正确的内核源文件,则可以使用
——kernel-source-path命令行选项。
这里需要安装 kernel-source或kernel-devel
安装kernel-devel
注意:这里需要非常注意,kernel-devel版本必须和现系统的kernel版本完全一致!
查看当前系统内核版本:
> uname -r
4.18.0-513.5.1.el8_9.x86_64
为了版本一致性,通过安装系统的镜像文件挂载到系统,而后进行安装 kernel-devel
> mkdir /mnt/iso
> mount /mnt/Rocky-8.9-x86_64-minimal.iso /mnt/iso
> dnf localinstall -y /mnt/iso/BaseOS/Packages/k/kernel-devel-4.18.0-513.5.1.el8_9.x86_64.rpm
安装完成后,再次确认版本的一致性:
> rpm -qa | egrep kernel
kernel-modules-4.18.0-513.5.1.el8_9.x86_64
kernel-4.18.0-513.5.1.el8_9.x86_64
kernel-headers-4.18.0-553.34.1.el8_10.x86_64
kernel-core-4.18.0-513.5.1.el8_9.x86_64
kernel-tools-4.18.0-513.5.1.el8_9.x86_64
kernel-tools-libs-4.18.0-513.5.1.el8_9.x86_64
kernel-devel-4.18.0-513.5.1.el8_9.x86_64
注意看小版本号:4.18.0-513.5.1.el8_9
再次执行安装驱动
> ./NVIDIA-Linux-x86_64-550.142.run

出现上面的错误,直接查看日志文件:/var/log/nvidia-installer.log 日志如下:
...
make[1]: Entering directory '/usr/src/kernels/4.18.0-513.5.1.el8_9.x86_64'
make[2]: Entering directory '/usr/src/kernels/4.18.0-513.5.1.el8_9.x86_64'
#这里是重点。
/usr/src/kernels/4.18.0-513.5.1.el8_9.x86_64/Makefile:1006: *** "Cannot generate ORC metadata for CONFIG_UNWINDER_ORC=y, please install libelf-dev, libelf-devel or elfutils-libelf-devel".  Stop.
make[2]: Leaving directory '/usr/src/kernels/4.18.0-513.5.1.el8_9.x86_64'
make[1]: *** [Makefile:158: sub-make] Error 2
make[1]: Target 'modules' not remade because of errors.
make[1]: Leaving directory '/usr/src/kernels/4.18.0-513.5.1.el8_9.x86_64'
make: *** [Makefile:115: modules] Error 2
ERROR: The nvidia kernel module was not created.
ERROR: Installation has failed.  Please see the file '/var/log/nvidia-installer.log' for details.  You may find suggestions on fixing installation problems in the README available on the Linux driver download page at www.n
vidia.com.
安装 elfutils-libelf-devel
> dnf install -y elfutils-libelf-devel
> ./NVIDIA-Linux-x86_64-550.142.run

如果这个进度条在走,说明大概率是没有问题了。

告警信息,直接忽略,按回车。

是否兼容32位的库文件,直接回车。

直接回车。

到这里,已经在解压显卡驱动文件。

安装完成。
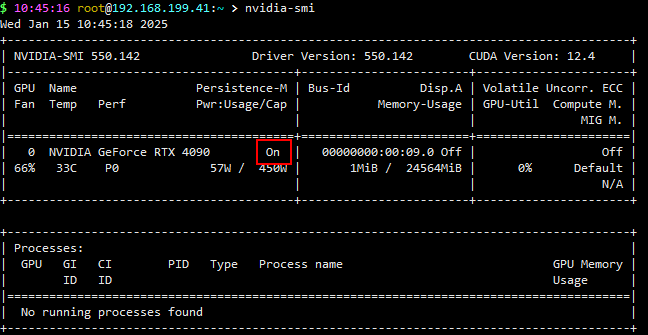
验证
> nvidia-smi
Wed Jan 15 10:38:19 2025
+-----------------------------------------------------------------------------------------+
| NVIDIA-SMI 550.142                Driver Version: 550.142        CUDA Version: 12.4     |
|-----------------------------------------+------------------------+----------------------+
| GPU  Name                 Persistence-M | Bus-Id          Disp.A | Volatile Uncorr. ECC |
| Fan  Temp   Perf          Pwr:Usage/Cap |           Memory-Usage | GPU-Util  Compute M. |
|                                         |                        |               MIG M. |
|=========================================+========================+======================|
|   0  NVIDIA GeForce RTX 4090        Off |   00000000:00:09.0 Off |                  Off |
| 39%   32C    P0             47W /  450W |       1MiB /  24564MiB |      6%      Default |
|                                         |                        |                  N/A |
+-----------------------------------------+------------------------+----------------------+

+-----------------------------------------------------------------------------------------+
| Processes:                                                                              |
|  GPU   GI   CI        PID   Type   Process name                              GPU Memory |
|        ID   ID                                                               Usage      |
|=========================================================================================|
|  No running processes found                                                             |
+-----------------------------------------------------------------------------------------+
当能够使用 nvidia-smi查看显卡时,则表明显卡驱动已经安装成功,这里开启显卡持久模式:
> nvidia-smi -pm 1
> echo "nvidia-smi -pm 1" >> /etc/rc.local
> chmod +x /etc/rc.local
启动成功。
CUDA安装过程
CUDA(Compute Unified Device Architecture)是由NVIDIA开发的一个并行计算平台和编程模型。它允许软件开发人员和研究人员利用NVIDIA的GPU(图形处理单元)进行高性能计算。CUDA提供了一系列API和工具,使得开发者能够编写和优化在GPU上运行的计算密集型任务。
简单来说,CUDA就像是GPU的语言翻译器。程序员用一种语言写代码,CUDA把它翻译成GPU能理解的语言。
下载CUDA
注意:CUDA并不是任何版本都行! 需要根据安装的显卡驱动来下载对应的版本。
通过显卡驱动查看需要安装的cuda版本
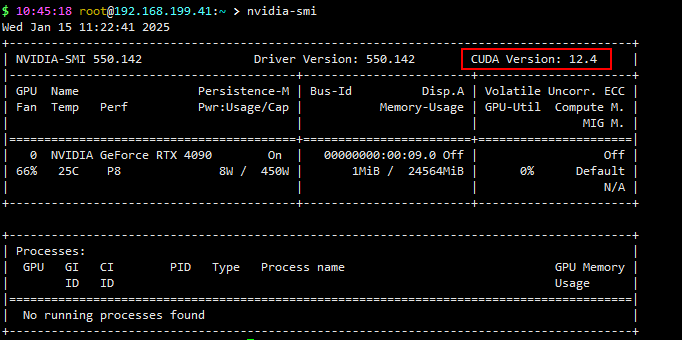
显卡驱动给出的版本是:12.4
CUDA下载链接:https://developer.nvidia.com/cuda-toolkit-archive 选择对应的版本进行下载
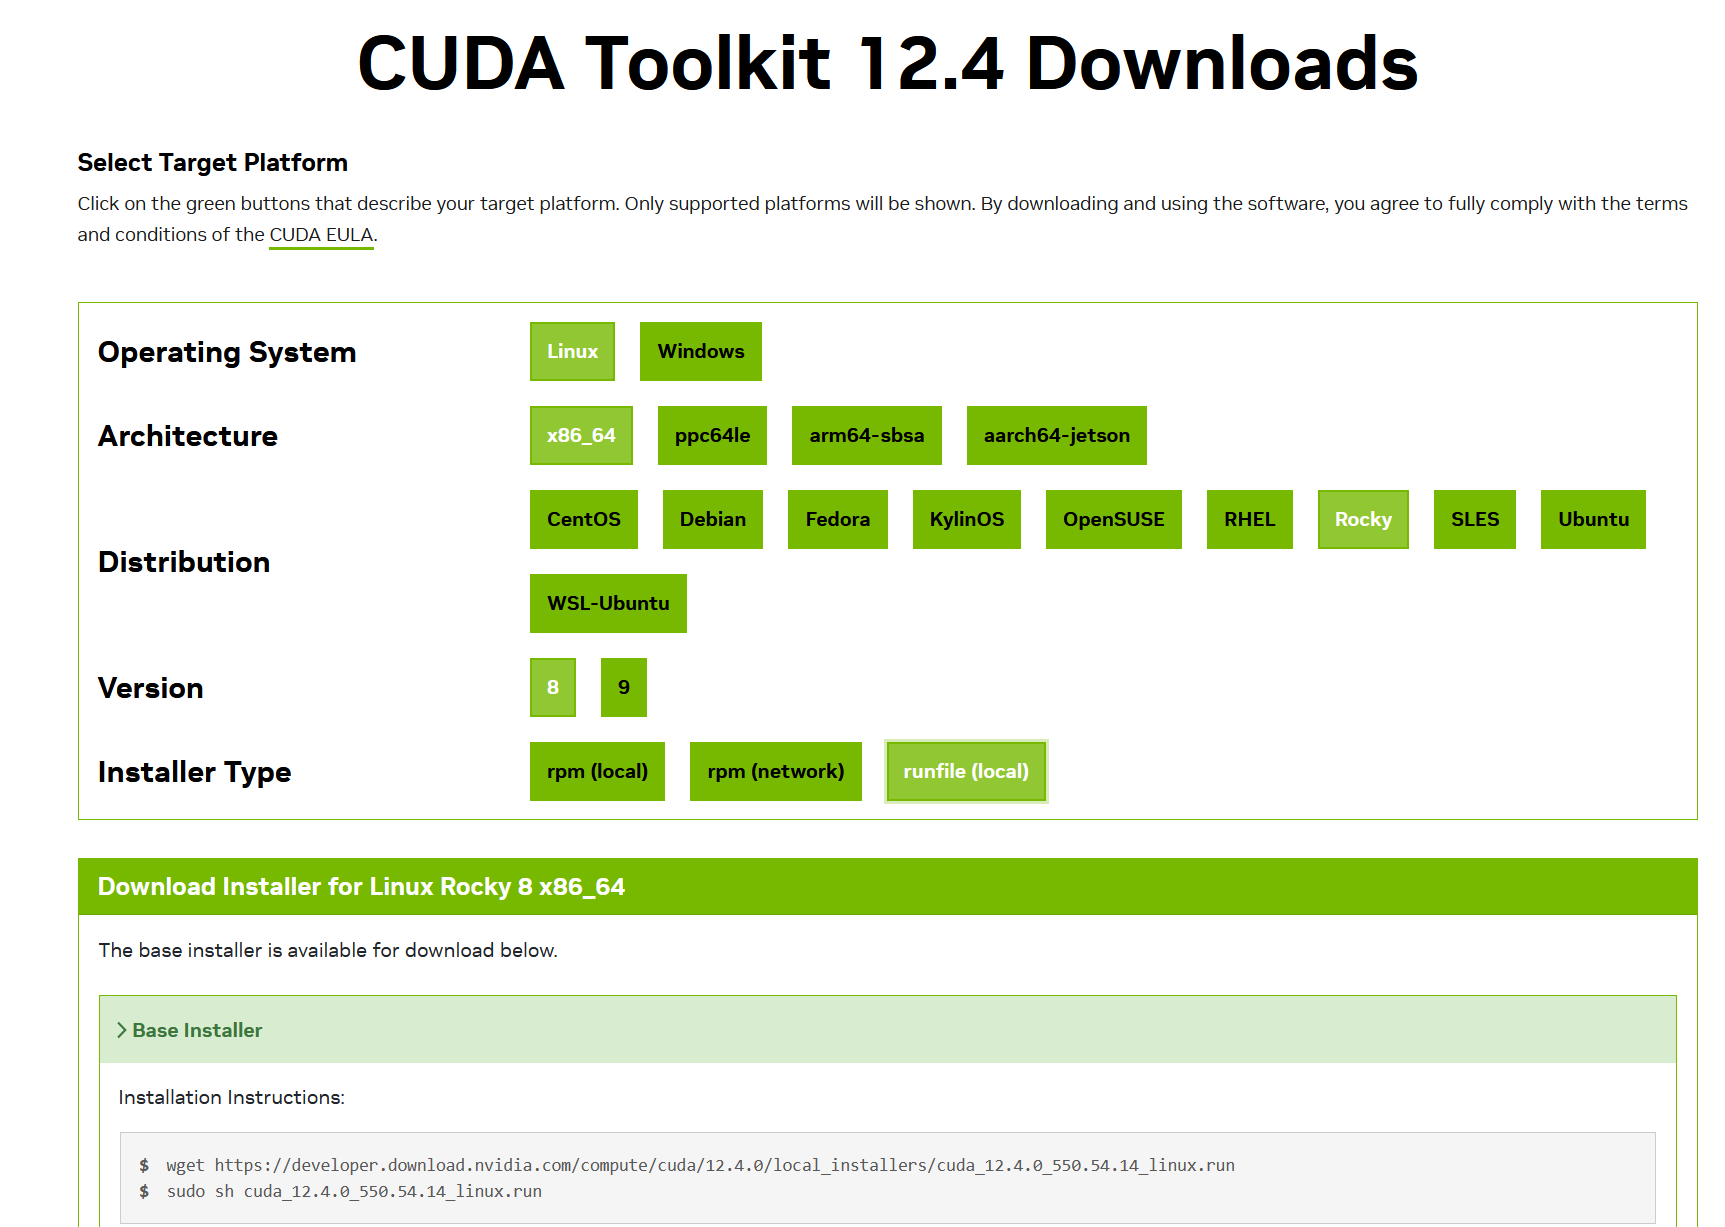
建议使用 .run 文件进行安装。
安装CUDA
将下载后的文件上传到服务器。
> chmod +x cuda_12.4.0_550.54.14_linux.run
> ./cuda_12.4.0_550.54.14_linux.run
等待一会,会弹出如下提示:
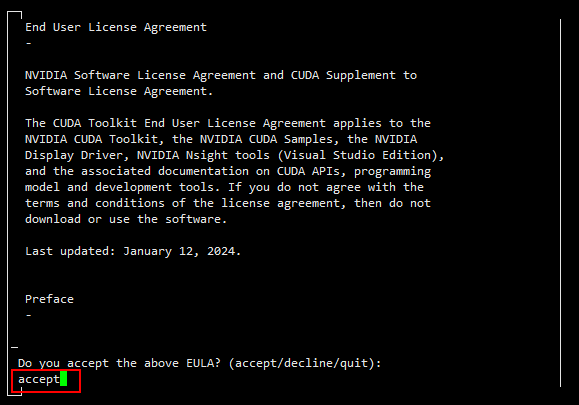
这里输入 accept 回车。
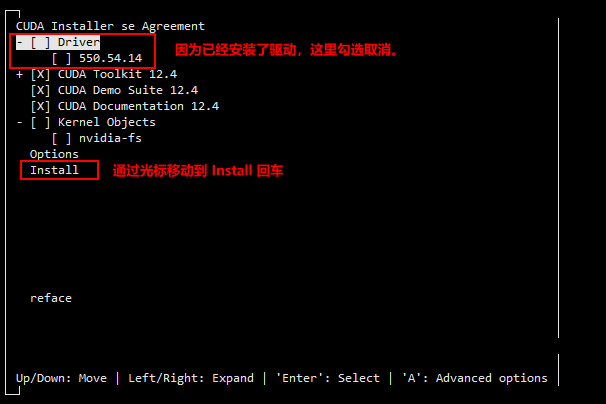
安装完成后,会输出如下信息:
===========
= Summary =
===========

Driver:   Not Selected
Toolkit:  Installed in /usr/local/cuda-12.4/

Please make sure that
 -   PATH includes /usr/local/cuda-12.4/bin
 -   LD_LIBRARY_PATH includes /usr/local/cuda-12.4/lib64, or, add /usr/local/cuda-12.4/lib64 to /etc/ld.so.conf and run ldconfig as root

To uninstall the CUDA Toolkit, run cuda-uninstaller in /usr/local/cuda-12.4/bin
***WARNING: Incomplete installation! This installation did not install the CUDA Driver. A driver of version at least 550.00 is required for CUDA 12.4 functionality to work.
To install the driver using this installer, run the following command, replacing <CudaInstaller> with the name of this run file:
    sudo <CudaInstaller>.run --silent --driver

Logfile is /var/log/cuda-installer.log
配置环境变量
> echo 'PATH=$PATH:/usr/local/cuda-12.4/bin' >> /etc/profile.d/cuda.sh
> echo 'LD_LIBRARY_PATH=/usr/local/cuda-12.4/lib64' >> /etc/profile.d/cuda.sh
> echo '/usr/local/cuda-12.4/lib64' >> /etc/ld.so.conf.d/cuda-12-4.conf
> source /etc/profile.d/cuda.sh
> ldconfig
验证
> nvcc -V
nvcc: NVIDIA (R) Cuda compiler driver
Copyright (c) 2005-2024 NVIDIA Corporation
Built on Tue_Feb_27_16:19:38_PST_2024
Cuda compilation tools, release 12.4, V12.4.99
Build cuda_12.4.r12.4/compiler.33961263_0
docker容器内使用GPU
安装docker
#安装docker
> curl http://mirrors.aliyun.com/docker-ce/linux/centos/docker-ce.repo -o /etc/yum.repos.d/docker-ce.repo
> dnf install -y docker-ce

#启动docker
> systemctl enable --now docker

#使用docker拉取一个python镜像
> docker pull python:3.13
在使用 docker 运行 容器时,会出现如下报错:
> docker run -it --gpus all python:3.13 bash
docker: Error response from daemon: could not select device driver "" with capabilities: [[gpu]].
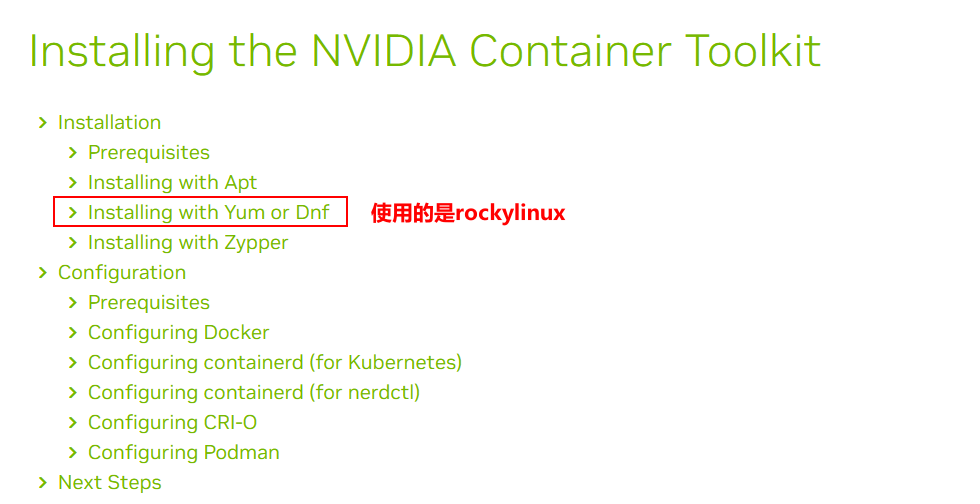
因为如果容器要调用gpu,则需要为容器安装NVIDIA容器运行时。
本部分直接查看 NVIDIA 官方文档。
参考链接:https://docs.nvidia.com/datacenter/cloud-native/container-toolkit/latest/install-guide.html
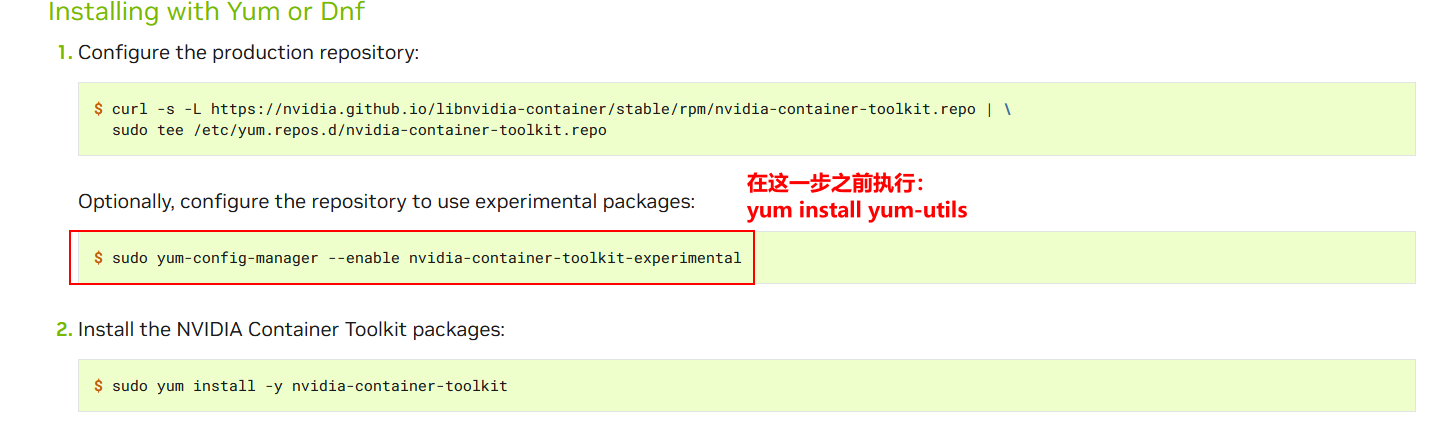
curl -s -L https://nvidia.github.io/libnvidia-container/stable/rpm/nvidia-container-toolkit.repo | \
  sudo tee /etc/yum.repos.d/nvidia-container-toolkit.repo

yum install -y yum-utils

sudo yum-config-manager --enable nvidia-container-toolkit-experimental

sudo yum install -y nvidia-container-toolkit
安装完成后,直接重启docker
> systemctl restart docker
再次启动容器
> docker run -it --gpus all python:3.13 bash
# nvidia-smi
Wed Jan 15 04:00:28 2025
+-----------------------------------------------------------------------------------------+
| NVIDIA-SMI 550.142                Driver Version: 550.142        CUDA Version: 12.4     |
|-----------------------------------------+------------------------+----------------------+
| GPU  Name                 Persistence-M | Bus-Id          Disp.A | Volatile Uncorr. ECC |
| Fan  Temp   Perf          Pwr:Usage/Cap |           Memory-Usage | GPU-Util  Compute M. |
|                                         |                        |               MIG M. |
|=========================================+========================+======================|
|   0  NVIDIA GeForce RTX 4090        On  |   00000000:00:09.0 Off |                  Off |
| 66%   25C    P8              8W /  450W |       1MiB /  24564MiB |      0%      Default |
|                                         |                        |                  N/A |
+-----------------------------------------+------------------------+----------------------+

+-----------------------------------------------------------------------------------------+
| Processes:                                                                              |
|  GPU   GI   CI        PID   Type   Process name                              GPU Memory |
|        ID   ID                                                               Usage      |
|=========================================================================================|
|  No running processes found                                                             |
+-----------------------------------------------------------------------------------------+
到此,容器内已经可以使用gpu资源了。

 浙公网安备 33010602011771号