ELK - logstash 多个配置文件及模板的使用
目录
- 前言
- 多配置文件的实现方式
- 为logstash 增加模板
- 将 logstash 作为服务启动
1. 前言
在使用 logstash 编写多个配置文件,写入到 elasticsearch 时,会出现数据写入混乱的问题,举例来说:
多个配置文件中规则如下:
A -> es-logstash-A
B -> es-logstash-B

A 写入到 es-logstash-A 索引中
B 写入到 es-logstash-B 索引中
然而当 logstash 服务运行起来的时候并不是这样的,可能出现如下想象:
A-> es-logstash-A
B-> es-logstash-A
究其原因,是因为 logstash 运行起来的时候,会将所有的配置文件合并执行。因此,每个 input 的数据都必须有一个唯一的标识,在 filter 和 output 时,通过这个唯一标识来实现过滤或者存储到不同的索引。
2. 多配置文件的实现方式
如上所说,写入需要唯一标识,在logstash 中唯一标识推荐使用 type 或 tags 字段,然后通过 if 条件判断来实现。
首先来看下面一个示例:
在 /etc/logstash/conf.d 目录下有这样两个配置文件 [1.conf a.conf ]
[root@192.168.118.14 /etc/logstash/conf.d]#ls
1.conf  a.conf


1.conf
input {
    file {
        path => "/data/log/1.log"
        start_position => "beginning"
        sincedb_path => "/tmp/1_progress"
    }
}

output {
    elasticsearch {
        hosts => ["192.168.118.14"]
        index => "1-log-%{+YYYY.MM.dd}"
    }
}


a.conf
input {
    file {
        path => "/data/log/a.log"
        start_position => "beginning"
        sincedb_path => "/tmp/a_progress"
    }
}

output {
    elasticsearch {
        hosts => ["192.168.118.14"]
        index => "a-log-%{+YYYY.MM.dd}"
    }
}

/data/log/a.log
[root@192.168.118.14 ~]#cat /data/log/a.log
a

/data/log/1.log
[root@192.168.118.14 ~]#cat /data/log/1.log
1
这两个配置很简单,规则:
- 1.conf 读取 /data/log/1.log 写入到 1-log-[date] 索引
- a.conf 读取 /data/log/a.log 写入到 a-log-[date] 索引
两个日志文件,都只有 1 行日志记录。
正确的结果是 生成两个索引,每个索引里只有一条记录。
接下来启动服务查看,多配置文件 命令启动方式如下:
正确的启动方式:
[root@192.168.118.14 ~]#logstash -f /etc/logstash/conf.d/
错误的启动方式:
[root@192.168.118.14 ~]#logstash -f /etc/logstash/conf.d/*
启动成功后,通过 elasticsearch-head 查看 索引及数据
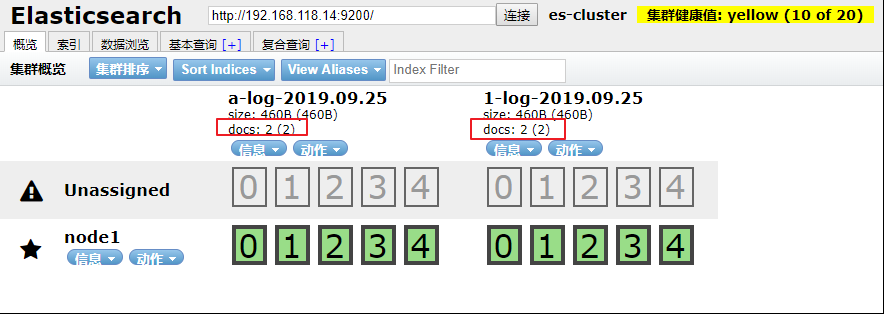
发现每个 索引里却有 2 条记录,这不符合正常的逻辑,查看数据发现,每个索引里都是 1.log 和 a.log 的数据总和。
这也证明了 logstash 在写入数据的时候,是将所有的配置文件合并在一起的,运行起来数据写入就会混乱。要解决这种混乱就需要通过唯一标识和if 判断,logstash配置文件调整如下:
1.conf
input {
    file {
        path => "/data/log/1.log"
        start_position => "beginning"
        sincedb_path => "/tmp/1_progress"
        type => "1-log"
    }
}

output {
    if [type] == "1-log" {
        elasticsearch {
            hosts => ["192.168.118.14"]
            index => "1-log-%{+YYYY.MM.dd}"
        }
    }
}

a.conf
input {
    file {
        path => "/data/log/a.log"
        start_position => "beginning"
        sincedb_path => "/tmp/a_progress"
        type => "a-log"
    }
}

output {
    if [type] == "a-log" {
        elasticsearch {
            hosts => ["192.168.118.14"]
            index => "a-log-%{+YYYY.MM.dd}"
        }
    }
}
上面修改的部分, input 里 增加了 type 字段,定义了唯一标识而在 output 中 通过if判断唯一标识来做响应的写入操作。
启动服务:
[root@192.168.118.14 ~]#logstash -f /etc/logstash/conf.d/
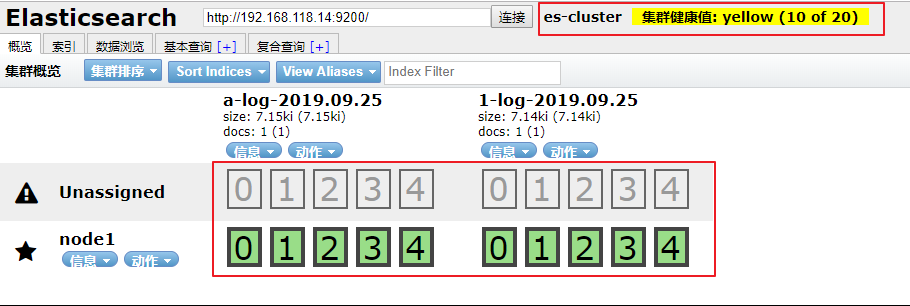
通过 elasticsearch-head 查看:

这次就完全符合预期的标准了。
3. 为logstash 增加模板
通过 elasticsearch-head 查看到 elasticsearch 默认是通过分片入库的,而且默认是 5 个主分片,5 个备份分片。 当作为日志存储时,数据可能没那么重要,不需要做 elasticsearch 的集群,但是也不想看到这些告警信息,这时候就需要 模板 了。
这里直接提供一个模板样本,可以直接使用。


{
    "template" : "*", "version" : 60001,
    "settings" : {
        "index.refresh_interval" : "5s",
        "number_of_shards": 3,
        "number_of_replicas": 0
    },
    "mappings" : {
        "_default_" : {
            "dynamic_templates" : [{
                "message_field" : {
                    "path_match" : "message", "match_mapping_type" : "string", "mapping" : {
                        "type" : "text", "norms" : false
                    }
                }
            }, {
                "string_fields" : {
                    "match" : "*", "match_mapping_type" : "string", "mapping" : {
                        "type" : "text", "norms" : false, "fields" : {
                            "keyword" : {
                                "type" : "keyword", "ignore_above" : 256
                            }
                        }
                    }
                }
            }],
            "properties" : {
                "@timestamp" : {
                    "type" : "date"
                }, "@version" : {
                    "type" : "keyword"
                }, "geoip" : {
                    "dynamic" : true, "properties" : {
                        "ip" : {
                            "type" : "ip"
                        }, "location" : {
                            "type" : "geo_point"
                        }, "latitude" : {
                            "type" : "half_float"
                        }, "longitude" : {
                            "type" : "half_float"
                        }
                    }
                }
            }
        }
    }
}
放置在这里目录里:
[root@192.168.118.14 ~]#ls /etc/logstash/template/template.json
"number_of_shards": 3,
"number_of_replicas": 0
这一部分就是定义 主分片 和 复制分片的,可以适当的调整。
            "properties" : {
                "@timestamp" : {
                    "type" : "date"
                }, "@version" : {
                    "type" : "keyword"
                }, "geoip" : {
                    "dynamic" : true, "properties" : {
                        "ip" : {
                            "type" : "ip"
                        }, "location" : {
                            "type" : "geo_point"
                        }, "latitude" : {
                            "type" : "half_float"
                        }, "longitude" : {
                            "type" : "half_float"
                        }
                    }
                }
            }
当要使用地图定位客户端位置的时候,这一段就必须加上, location 的type 的必须是 geo_point
为 logstash 配置文件添加模板配置,如下:
a.conf
input {
    file {
        path => "/data/log/a.log"
        start_position => "beginning"
        sincedb_path => "/tmp/a_progress"
        type => "a-log"
    }
}

output {
    if [type] == "a-log" {
        elasticsearch {
            hosts => ["192.168.118.14"]
            index => "a-log-%{+YYYY.MM.dd}"
            template => "/etc/logstash/template/template.json"
            template_overwrite => "true"
        }
    }
}


1.conf
input {
    file {
        path => "/data/log/1.log"
        start_position => "beginning"
        sincedb_path => "/tmp/1_progress"
        type => "1-log"
    }
}

output {
    if [type] == "1-log" {
        elasticsearch {
            hosts => ["192.168.118.14"]
            index => "1-log-%{+YYYY.MM.dd}"
            template => "/etc/logstash/template/template.json"
            template_overwrite => "true"
        }
    }
}
启动服务
[root@192.168.118.14 ~]#logstash -f /etc/logstash/conf.d/
通过 elasticsearch-head 查看集群状态及索引分片:
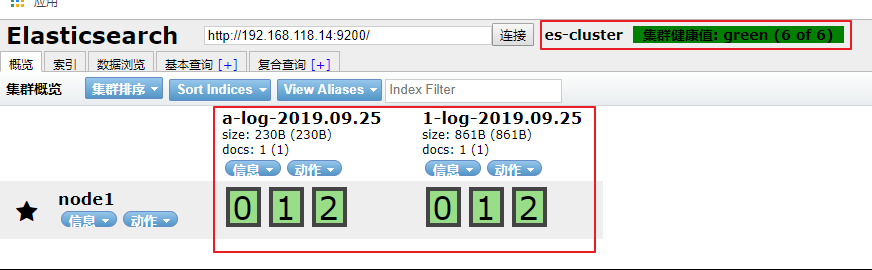
ok,新增的模板已经生效。尝试为不同的索引添加不同的模板结果出现各种问题,因此创建一个通用的模板。
4. 将 logstash 作为服务启动
在上面的启动中,都是直接通过命令 logstash 来启动的,其实可以通过修改 logstash.service 启动脚本来启动服务。
修改如下:
[root@192.168.118.14 ~]#vim /etc/systemd/system/logstash.service
…
ExecStart=/usr/share/logstash/bin/logstash "--path.settings" "/etc/logstash" "-f" "/etc/logstash/conf.d"
…
启动服务:
[root@192.168.118.14 ~]#systemctl daemon-reload
[root@192.168.118.14 ~]#systemctl start logstash

 浙公网安备 33010602011771号