
nginx教程八,Nginx架构基础
Nginx进程结构
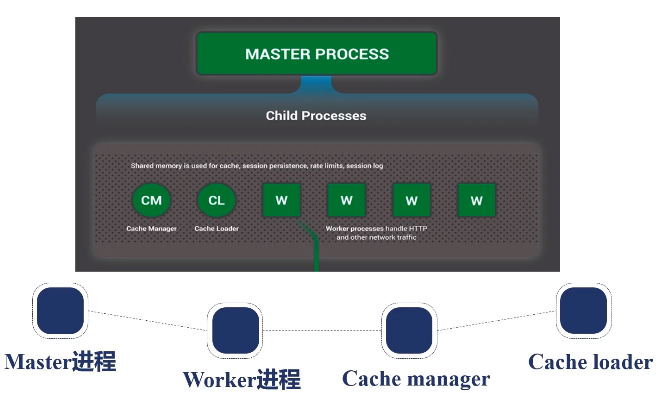
1. 一个master进程下面再创建出两类子进程,一类叫work进程、一类是Cahce相关进程,其中work的进程数一般和计算机核数一致;
2.Nginx采用多进程结构是因为Nginx要保证高可用性和高可靠性,如其中一个进程由于系统应用或第三方模块问题挂掉后,不会影响其他进程;
3.Nginx采用事件驱动模型,每个work进程可以和计算机的每个CPU核绑定,以便使用CPU中高速缓存
4.nginx进程间是通过信号来交互的。Master进程可以通过发送信号来管理work子进程,注意观察work进程ID变化。
一般只对master进程发送信号指令,来管理work进程。work进程也可以接收TERM,INT,QUIT,USR1和WINCH信号。
nginx命令方式操作其实也是对master进程发送信号,其master进程ID一般在nginx安装目录的logs文件夹下的nginx.pid文件中,注意nginx必须是启动中的
- 修改nginx.conf文件,配置2个work进程,重启Nginx
user  root;
worker_processes  2;
- 查看当前nginx下进程,有一个master进程和两个work进程,其中work进程为master进程的子进程。没有cache相关进程,是因为此nginx没有开启缓存
[root@localhost ~]# ps -ef | grep nginx
root      1608     1  0 18:39 ?        00:00:00 nginx: master process nginx/sbin/nginx
root      1616  1608  0 18:42 ?        00:00:00 nginx: worker process
root      1617  1608  0 18:42 ?        00:00:00 nginx: worker process
- 对nginx使用reload命令后,nginx会通过master进程重新创建work子进程
[root@localhost ~]# nginx/sbin/nginx -s reload
[root@localhost ~]# ps -ef | grep nginx
root      1608     1  0 18:39 ?        00:00:00 nginx: master process nginx/sbin/nginx
root      1621  1608  0 18:43 ?        00:00:00 nginx: worker process
root      1622  1608  0 18:43 ?        00:00:00 nginx: worker process
- nginx的reload命令与向nginx的master进程发送SIGHUP信号指令一样
[root@localhost ~]# kill -SIGHUP 1608
[root@localhost ~]# ps -ef | grep nginx
root      1608     1  0 18:39 ?        00:00:00 nginx: master process nginx/sbin/nginx
root      1627  1608  0 18:59 ?        00:00:00 nginx: worker process
root      1628  1608  0 18:59 ?        00:00:00 nginx: worker process
- 当对work进程发送SIGTERM信号时,work进程会退出,master进程会收到SIGCHLD信号,然后master进程就会重新启动一个work进程
[root@localhost ~]# kill -SIGTERM 1627
[root@localhost ~]# ps -ef | grep nginx
root      1608     1  0 18:39 ?        00:00:00 nginx: master process nginx/sbin/nginx
root      1628  1608  0 18:59 ?        00:00:00 nginx: worker process
root      1648  1608  0 19:09 ?        00:00:00 nginx: worker process
- CHLD信号:用于监控work进程,当work进程退出后,master进程会收到CHLD信号
- TERM或INT信号:相当于nginx的stop命令,这个是强制停止
- QUIT:相当于nginx的quit命令,用于优雅的停止nginx,就是先关闭端口,停止接受新的连接,等处理完所有连接后再退出进程
- HUB:相当于nginx的reload命令
- USR1:相当于nginxreopen命令
- USR2:用于nginx版本升级中,对master进程发出版本更新指令,配合WINCH信号使用
- WINCH:优雅关闭老版本
5.nginx命令reload重载配置文件本质:在不关闭修改之前配置启动的work进程下,新启动同等数量的新配置的work进程,然后关闭旧work进程的端口监听句柄,以便让新的请求连接到新的work进程上,等在旧work进程上的连接处理完毕后再关闭旧work进程。所以有时执行reload命令后会发现work进程变多。对于由于长时间无法返回请求导致旧work进程无法关闭的情况,新版本nginx会通过配置work_shutdown_timeout,当发起优雅关闭work进程后,会检查超时配置,如果超时还有未关闭连接则强行关闭。reload执行流程如下:
- 向master进程发送HUP信号
- master进程校验配置语法是否正确
- master进程打开新的监听端口(配置文件中新增加的端口)
- master进程用新配置启动新的work子进程
- master进程向老work子进程发送QUIT信号
- 老work子进程关闭监听句柄,处理完当前连接后结束进程
6.如果想使用nginx新版本特性,那就要升级nginx。nginx版本热升级流程,包含nginx版本回滚
注意第5步,并没有如前面讲的nginx热部署一样使用WINCH信号,而是使用的QUIT信号。WINCH信号只是会优雅关闭master下的work进程,并不会关闭master进程,而QUIT信号会先优雅关闭work进程,然后关闭master进程。第6步回滚使用QUIT信号,关闭新master时也会关闭work进程
- 1. 将旧nginx二进制文件换成新的nginx二进制文件,注意备份nginx二进制文件
- 2. 向master进程发送USR2信号,告诉master进程要进行nginx版本更新
- 3. master进程修改pid文件名,加上后缀.oldbin
- 4. master进程用新的nginx二进制文件启动新master进程,当然也同时会生成pid文件
- 5. 向老master进程发送QUIT信号,关闭老master进程。老master进程ID如果ps -ef不好查找,可以通过查看后缀为.oldbin的pid文件。
- 6. 回滚:向老master进程发送HUP信号,向新master进程发送QUIT信号
7.nginx是事件驱动的框架,nginx每个连接对应读和写两个网络事件
8.nginx事件分发机制:当启动nginx后,打开的80或443端口会等待新的事件进来,如浏览器对nginx发起的连接事件,此刻的nginx的work进程是处于sleep状态;当操作系统处理完TCP握手事件后会通知并唤醒nginx的work进程,操作系统会将处理完的事件放到事件队列中,nginx就会从事件队列中获取要处理的连接进行处理,处理事件过程中如果生成新的事件,就会放到新的事件队列中,等待下次处理。
9.nginx使用epoll从操作系统内核中获取事件,相比select和poll优势是,epoll只从活跃连接中查找要处理的事件,而select会将操作系统中接收到的所有连接遍历查找对应事件
10.nginx处理多个请求,完成请求切换方式不同于apache、tomcat等传统的服务器组件,传统服务器处理请求方式是对每一个请求都开启一个线程,这样的话,对于操作系统(CPU)处理多线程时,就会发生线程切换,造成资源消耗;而nginx是用一个线程处理多个连接,如当一个连接不满足处理条件时,会直接在用户态空间处理下一个请求,这样不会出现线程切换;除非当前work线程使用的时间片到了,才会切换到其他进程或线程,所以一般要调高nginx的work进程优先级配置
11.同步与异步是业务上的差别,而阻塞与非阻塞是系统内处理线程上的区别,当阻塞时,当前线程还没有用完CPU分配的时间片就会释放CPU使用权限,而非阻塞不会在没有用完时间片时释放CPU使用权,而是直接返回,让调用者决定如何处理
12.nginx多个work进程是通过共享内存来进行数据通讯的,nginx中使用共享内存的模块及其对应的数据结构如下图

13.openresty是通过lua_shared_dict指令设置共享内存,共享内存使用策略是LRU淘汰策略
- nginx.conf配置文件在http模块下配置lua_shared_dict指令如下
lua_shared_dict dogs 10m;
- 在server模块下添加两个location如下
        location /set {
            content_by_lua_block {
                local dogs=ngx.shared.dogs
                dogs:set("jim",8)
                ngx.say("STORED")
            }
        }

        location /get {
            content_by_lua_block {
                local dogs=ngx.shared.dogs
                ngx.say(dogs:get("jim"))
            }
        }
- 重启openresty,访问测试如下
[root@localhost ~]# curl http://192.168.2.141/set
STORED
[root@localhost ~]# curl http://192.168.2.141/get
8
14.nginx共享内存管理工具使用的是Slab管理器,在tengine中有查看Slab管理器分配内存块的工具,可以添加到nginx模块中
- 下载并解压tengine
 wget http://tengine.taobao.org/download/tengine-2.3.2.tar.gz
 tar -zxvf tengine-2.3.2.tar.gz
- 找到slab_stat模块工具位置,进入解压后的openresty目录,重新编译openresty并添加新的module
./configure --prefix=/root/openresty --add-module=/root/tengine-2.3.2/modules/ngx_slab_stat/
make - 备份openresty下nginx二进制文件,并将新编译好的nginx二进制文件复制到openresty对应的nginx二进制目录下
[root@localhost ~]# ll openresty/bin/
total 164
-rwxr-xr-x. 1 root root 19185 Feb 28 07:59 md2pod.pl
-rwxr-xr-x. 1 root root 15994 Feb 28 07:59 nginx-xml2pod
lrwxrwxrwx. 1 root root    32 Feb 28 07:59 openresty -> /root/openresty/nginx/sbin/nginx
[root@localhost ~]# mv /root/openresty/nginx/sbin/nginx /root/openresty/nginx/sbin/nginx.old
[root@localhost openresty-1.19.3.1]# cp build/nginx-1.19.3/objs/nginx /root/openresty/nginx/sbin/
- 热部署openrety
[root@localhost ~]# ps -ef | grep nginx
root       725     1  0 08:00 ?        00:00:00 nginx: master process openresty/bin/openresty
root      1678   725  0 08:19 ?        00:00:00 nginx: worker process
root      1679   725  0 08:19 ?        00:00:00 nginx: worker process
root     11853 18394  0 08:48 pts/0    00:00:00 grep --color=auto nginx
[root@localhost ~]# kill -USR2 725
[root@localhost ~]# ps -ef | grep nginx
root       725     1  0 08:00 ?        00:00:00 nginx: master process openresty/bin/openresty
root      1678   725  0 08:19 ?        00:00:00 nginx: worker process
root      1679   725  0 08:19 ?        00:00:00 nginx: worker process
root     11864   725  0 08:48 ?        00:00:00 nginx: master process openresty/bin/openresty
root     11865 11864  0 08:48 ?        00:00:00 nginx: worker process
root     11866 11864  0 08:48 ?        00:00:00 nginx: worker process
root     11874 18394  0 08:48 pts/0    00:00:00 grep --color=auto nginx
[root@localhost ~]# kill -QUIT 725
[root@localhost ~]# ps -ef | grep nginx
root     11864     1  0 08:48 ?        00:00:00 nginx: master process openresty/bin/openresty
root     11865 11864  0 08:48 ?        00:00:00 nginx: worker process
root     11866 11864  0 08:48 ?        00:00:00 nginx: worker process
root     11898 18394  0 08:49 pts/0    00:00:00 grep --color=auto nginx
- 修改nginx.conf,添加访问Slab管理器的location。注意location使用=,表示精确匹配,如访问/slab_stat或/slab_stat?param=abc可以,访问/slab_stat/或/slab_stat/abc就不可以
location = /slab_stat { slab_stat; } - 访问Slab_stat工具如下
[root@localhost openresty]#  curl http://192.168.2.141/slab_stat
* shared memory: dogs
total:       10240(KB) free:       10168(KB) size:           4(KB)
pages:       10168(KB) start:00007FB8821D4000 end:00007FB882BC4000
slot:           8(Bytes) total:           0 used:           0 reqs:           0 fails:           0
slot:          16(Bytes) total:           0 used:           0 reqs:           0 fails:           0
slot:          32(Bytes) total:         127 used:           1 reqs:           1 fails:           0
slot:          64(Bytes) total:           0 used:           0 reqs:           0 fails:           0
slot:         128(Bytes) total:          32 used:           2 reqs:           2 fails:           0
slot:         256(Bytes) total:           0 used:           0 reqs:           0 fails:           0
slot:         512(Bytes) total:           0 used:           0 reqs:           0 fails:           0
slot:        1024(Bytes) total:           0 used:           0 reqs:           0 fails:           0
slot:        2048(Bytes) total:           0 used:           0 reqs:           0 fails:           0
15.nginx使用动态模块来提升运维效率
- nginx中静态库是将模块编译进二进制执行文件中
- nginx中动态库是将动态库位置编译进二进制执行文件中,使用的时候是通过nginx到指定路径下调用动态库,如果想升级动态库,则无需重新编译生成nginx二进制文件,而是将重新编译生成好的动态库进行替换后重启(reload)nginx即可
- 使用动态模块有两个前提,1、必须支持动态库的模块;2、编译nginx时指定模块为动态模块
- 执行./configure --help命令,可查看支持动态模块的模块
![]()
- 下面以image_filter_module为例,编译生成nginx以支持动态库。如果编译报错requires the GD library,需要执行yum -y install gd-devel
[root@localhost nginx-1.14.2]# ./configure --prefix=/root/nginx --with-http_image_filter_module=dynamic
[root@localhost nginx-1.14.2]# make
[root@localhost nginx-1.14.2]# make install
- 查看安装目录,会发现多了一个modules文件夹,里面有个ngx_http_image_filter_module.so动态库文件,在Linux系统中动态库以so结尾,Window中以dll结尾
[root@localhost ~]# cd nginx
[root@localhost nginx]# ll
total 4
drwxr-xr-x. 2 root root 4096 Feb 28 09:24 conf
drwxr-xr-x. 2 root root   40 Feb 28 09:24 html
drwxr-xr-x. 2 root root    6 Feb 28 09:24 logs
drwxr-xr-x. 2 root root   45 Feb 28 09:24 modules
drwxr-xr-x. 2 root root   19 Feb 28 09:24 sbin
[root@localhost nginx]# ll modules/
total 96
-rwxr-xr-x. 1 root root 98296 Feb 28 09:24 ngx_http_image_filter_module.so
- 配置nginx.conf后启动访问,添加location如下,注意访问图片的location要加上图片格式,否则浏览器不显示而是下载了
        location /lantern.jpg {
            alias /root/images/lantern.jpg;
        }
- 上步骤访问没问题后,修改nginx.conf配置使用ngx_http_image_filter_module.so动态库,实现裁切图片效果。
先在配置文件最开始配置load_module
load_module modules/ngx_http_image_filter_module.so;
user  root;
worker_processes  1;
然后对location配置image_filter如下,重启nginx,访问图片,可以对比之前访问。注意浏览器缓存
        location /lantern.jpg {
            alias /root/images/lantern.jpg;
            image_filter resize 50 50;
        }


 浙公网安备 33010602011771号