RecyclerView 源码分析(一) —— 绘制流程解析
概述
对于 RecyclerView 是那么熟悉又那么陌生。熟悉是因为作为一名 Android 开发者,RecyclerView 是经常会在项目里面用到的,陌生是因为只是知道怎么用,但是却不知道 RecyclerView 的内部实现机制。
但凡是一位有所追求的开发者,都不会只让自己停留在只会使用上,而是会研读相关源码,知其然知其所以然。
对于 RecyclerView 的源码解析一篇文章肯定是不够的,后续有时间会继续更新。每一篇都会有自己的主题。RecyclerView 的使用,本文也就不讲了,具体可以查看之前的文章:RecyclerView 使用指南。
对于用过 RecyclerView 的开发者来说,这个 View 的功能确实强大,可以在日常开发的很多场景都可以使用。在讲解 RecyclerView 绘制源码的时候,我希望大家去思考一些问题:
-
如果是你,你会怎么来设计 RecyclerView 的绘制过程,和普通的 View 一样?
-
RecyclerView 可以支持不同的流式布局,一列,多列,所以里面的绘制逻辑它是如何设计的?
-
分割线是可以定制的,那我要如何设计这块的代码?
其实也还有其他的问题,但是本文只讲绘制流程,因此,其他问题就在其他模块去思考。要是在以前呢,我也是为了分析源码而分析源码,然后把文章发出去。很少去思考源码背后的一些东西。直到最近自己需要去重构一个模块的时候,发现设计一个技术方案是多么的难。
本文源码版本:androidx.recyclerView:1.1.0
measure 测量
对于 view 来说,必有的三大流程:测量,布局,绘制。因此 RecyclerView 也是一样。如果你现在还是对 View 的绘制流程,不了解可以推荐看文章:
下面进入正题,首先来看下 RecyclerView 类的定义:
public class RecyclerView extends ViewGroup implements ScrollingView,
        NestedScrollingChild2, NestedScrollingChild3 {
     // ......
}
可以看到 RecyclerView 是一个 ViewGroup,也就是说,RecyclerView 本质是一个自定义 view,需要自己去管理绘制流程。对于了解自定义 View 来说,其实就是需要重写 onMeasure 方法。
在 Android 自定义 View 详解 一文中总结了 onMeausre 的具体逻辑,到这里,依然可以做个参考:
-
super.onMeasure 会先计算自定义 view 的大小;
- 调用 measureChild 对子 View 进行测量;
-
自定义 view 设置的宽高参数不是 MeasureSpec.EXACTLY 的话,对于子 View 是 match_parent 需要额外处理,同时也需要对 MeasureSpec.AT_MOST 情况进行额外处理。
-
当自定义View 的大小确定后,在对子 View 是 match_parent 重新测量;
下面来看下 RecyclerView 的 onMeausre 代码:
    protected void onMeasure(int widthSpec, int heightSpec) {
        if (mLayout == null) {
            // 第一种情况
        }
        if (mLayout.isAutoMeasureEnabled()) {
            // 第二种情况
        } else {
            // 第三种情况
        }
    }
onMeasure方法还是有点长,这里我将它分为3种情况,我将简单解释这三种情况:
-
mLayout即LayoutManager的对象。我们知道,当RecyclerView的LayoutManager为空时,RecyclerView不能显示任何的数据,在这里我们找到答案。 -
LayoutManager开启了自动测量时,这是一种情况。在这种情况下,有可能会测量两次。 -
第三种情况就是没有开启自动测量的情况,这种情况比较少,因为
RecyclerView 为了支持warp_content属性,系统提供的LayoutManager都开启自动测量的,不过还是要分析的。
首先我们来第一种情况。
1、LayoutManager == null
这种情况下比较简单,我们来看看源码:
        if (mLayout == null) {
            defaultOnMeasure(widthSpec, heightSpec);
            return;
        }
这里是调用了 defaultOnMeasure 方法,
    void defaultOnMeasure(int widthSpec, int heightSpec) {
        // calling LayoutManager here is not pretty but that API is already public and it is better
        // than creating another method since this is internal.
        final int width = LayoutManager.chooseSize(widthSpec,
                getPaddingLeft() + getPaddingRight(),
                ViewCompat.getMinimumWidth(this));
        final int height = LayoutManager.chooseSize(heightSpec,
                getPaddingTop() + getPaddingBottom(),
                ViewCompat.getMinimumHeight(this));

        setMeasuredDimension(width, height);
    }
在 defaultOnMeasure 方法里面,主要是通过 LayoutManager 的 chooseSize 方法来计算宽高,最后调用 setMeasuredDimension 方法来设置宽高。下面来看下 chooseSize 的具体逻辑:
        public static int chooseSize(int spec, int desired, int min) {
            final int mode = View.MeasureSpec.getMode(spec);
            final int size = View.MeasureSpec.getSize(spec);
            switch (mode) {
                case View.MeasureSpec.EXACTLY:
                    return size;
                case View.MeasureSpec.AT_MOST:
                    return Math.min(size, Math.max(desired, min));
                case View.MeasureSpec.UNSPECIFIED:
                default:
                    return Math.max(desired, min);
            }
        }
这里主要是根据不同的设置,来返回最终的大小。这块逻辑不是很懂的读者可以阅读前面提到的文章,里面详细解读了。但是这里有个问题需要指出来的就是没有测量子 view 的大小,这也是白屏的原因。因为 RecyclerView 的绘制其实是委托给 LayoutManager 来管理呢,LayoutManager = null 的情况下测量子 view 没有任何的意义。
2、LayoutManager 开启了自动测量
在分析这种情况之前,我们先对了解几个东西。
RecyclerView 的测量分为两步,分别调用 dispatchLayoutStep1 和 dispatchLayoutStep2。同时,了解过 RecyclerView 源码的同学应该知道在 RecyclerView 的源码里面还一个dispatchLayoutStep3 方法。这三个方法的方法名比较接近,所以容易让人搞混淆。本文会详细的讲解这三个方法的作用。
由于在这种情况下,只会调用 dispatchLayoutStep1 和 dispatchLayoutStep2 这两个方法,所以这里会重点的讲解这两个方法。而 dispatchLayoutStep3 方法的调用在RecyclerView 的 onLayout 方法里面,所以在后面分析 onLayout 方法时再来看 dispatchLayoutStep3 方法。
我们在分析之前,先来看一个东西 —— mState.mLayoutStep。这个变量有几个取值情况。我们分别来看看:
| 取值 | 含义 |
|---|---|
|
State.STEP_START |
|
|
State.STEP_LAYOUT |
当 |
|
State.STEP_ANIMATIONS |
当 |
从上表中,我们了解到 mState.mLayoutStep 的三个状态对应着不同的 dispatchLayoutStep 方法。这一点,我们必须清楚,否则接下来的代码将难以理解。
        if (mLayout.isAutoMeasureEnabled()) {
            final int widthMode = MeasureSpec.getMode(widthSpec);
            final int heightMode = MeasureSpec.getMode(heightSpec);

            /**
             * This specific call should be considered deprecated and replaced with
             * {@link #defaultOnMeasure(int, int)}. It can't actually be replaced as it could
             * break existing third party code but all documentation directs developers to not
             * override {@link LayoutManager#onMeasure(int, int)} when
             * {@link LayoutManager#isAutoMeasureEnabled()} returns true.
             */
            mLayout.onMeasure(mRecycler, mState, widthSpec, heightSpec);

            final boolean measureSpecModeIsExactly =
                    widthMode == MeasureSpec.EXACTLY && heightMode == MeasureSpec.EXACTLY;
            if (measureSpecModeIsExactly || mAdapter == null) {
                return;
            }
       // 开始测量
            if (mState.mLayoutStep == State.STEP_START) {
                dispatchLayoutStep1();
            }
            // set dimensions in 2nd step. Pre-layout should happen with old dimensions for
            // consistency
            mLayout.setMeasureSpecs(widthSpec, heightSpec);
            mState.mIsMeasuring = true;
       // 第二次
            dispatchLayoutStep2();

            // now we can get the width and height from the children.
            mLayout.setMeasuredDimensionFromChildren(widthSpec, heightSpec);

            // if RecyclerView has non-exact width and height and if there is at least one child
            // which also has non-exact width & height, we have to re-measure.
            if (mLayout.shouldMeasureTwice()) {
                mLayout.setMeasureSpecs(
                        MeasureSpec.makeMeasureSpec(getMeasuredWidth(), MeasureSpec.EXACTLY),
                        MeasureSpec.makeMeasureSpec(getMeasuredHeight(), MeasureSpec.EXACTLY));
                mState.mIsMeasuring = true;
                dispatchLayoutStep2();
                // now we can get the width and height from the children.
                mLayout.setMeasuredDimensionFromChildren(widthSpec, heightSpec);
            }
        }
首先,我们来看看 onMeasure 方法。
        public void onMeasure(@NonNull Recycler recycler, @NonNull State state, int widthSpec,
                int heightSpec) {
            mRecyclerView.defaultOnMeasure(widthSpec, heightSpec);
        }
RecyclerView 的 defaultOnMeasure 方法,其实就是前面我们介绍过的自定义 View 的三个步骤:先是测量自己本身的大小。dispatchLayoutStep1
 /**
     * The first step of a layout where we;
     * - process adapter updates
     * - decide which animation should run
     * - save information about current views
     * - If necessary, run predictive layout and save its information
     */
    private void dispatchLayoutStep1() {
     // 这里还用到了断言
        mState.assertLayoutStep(State.STEP_START);
        fillRemainingScrollValues(mState);
        mState.mIsMeasuring = false;
        startInterceptRequestLayout();
        mViewInfoStore.clear();
        onEnterLayoutOrScroll();
     // 处理 adapter 更新
        processAdapterUpdatesAndSetAnimationFlags();
        saveFocusInfo();
        mState.mTrackOldChangeHolders = mState.mRunSimpleAnimations && mItemsChanged;
        mItemsAddedOrRemoved = mItemsChanged = false;
        mState.mInPreLayout = mState.mRunPredictiveAnimations;
        mState.mItemCount = mAdapter.getItemCount();
        findMinMaxChildLayoutPositions(mMinMaxLayoutPositions);
     // 是否要运行动画
        if (mState.mRunSimpleAnimations) {
            // Step 0: Find out where all non-removed items are, pre-layout
            int count = mChildHelper.getChildCount();
            for (int i = 0; i < count; ++i) {
                final ViewHolder holder = getChildViewHolderInt(mChildHelper.getChildAt(i));
                if (holder.shouldIgnore() || (holder.isInvalid() && !mAdapter.hasStableIds())) {
                    continue;
                }
                final ItemHolderInfo animationInfo = mItemAnimator
                        .recordPreLayoutInformation(mState, holder,
                                ItemAnimator.buildAdapterChangeFlagsForAnimations(holder),
                                holder.getUnmodifiedPayloads());
                mViewInfoStore.addToPreLayout(holder, animationInfo);
                if (mState.mTrackOldChangeHolders && holder.isUpdated() && !holder.isRemoved()
                        && !holder.shouldIgnore() && !holder.isInvalid()) {
                    long key = getChangedHolderKey(holder);
                    // This is NOT the only place where a ViewHolder is added to old change holders
                    // list. There is another case where:
                    //    * A VH is currently hidden but not deleted
                    //    * The hidden item is changed in the adapter
                    //    * Layout manager decides to layout the item in the pre-Layout pass (step1)
                    // When this case is detected, RV will un-hide that view and add to the old
                    // change holders list.
                    mViewInfoStore.addToOldChangeHolders(key, holder);
                }
            }
        }
        if (mState.mRunPredictiveAnimations) {
            // Step 1: run prelayout: This will use the old positions of items. The layout manager
            // is expected to layout everything, even removed items (though not to add removed
            // items back to the container). This gives the pre-layout position of APPEARING views
            // which come into existence as part of the real layout.

            // Save old positions so that LayoutManager can run its mapping logic.
            saveOldPositions();
            final boolean didStructureChange = mState.mStructureChanged;
            mState.mStructureChanged = false;
            // temporarily disable flag because we are asking for previous layout
            mLayout.onLayoutChildren(mRecycler, mState);
            mState.mStructureChanged = didStructureChange;

            for (int i = 0; i < mChildHelper.getChildCount(); ++i) {
                final View child = mChildHelper.getChildAt(i);
                final ViewHolder viewHolder = getChildViewHolderInt(child);
                if (viewHolder.shouldIgnore()) {
                    continue;
                }
                if (!mViewInfoStore.isInPreLayout(viewHolder)) {
                    int flags = ItemAnimator.buildAdapterChangeFlagsForAnimations(viewHolder);
                    boolean wasHidden = viewHolder
                            .hasAnyOfTheFlags(ViewHolder.FLAG_BOUNCED_FROM_HIDDEN_LIST);
                    if (!wasHidden) {
                        flags |= ItemAnimator.FLAG_APPEARED_IN_PRE_LAYOUT;
                    }
                    final ItemHolderInfo animationInfo = mItemAnimator.recordPreLayoutInformation(
                            mState, viewHolder, flags, viewHolder.getUnmodifiedPayloads());
                    if (wasHidden) {
                        recordAnimationInfoIfBouncedHiddenView(viewHolder, animationInfo);
                    } else {
                        mViewInfoStore.addToAppearedInPreLayoutHolders(viewHolder, animationInfo);
                    }
                }
            }
            // we don't process disappearing list because they may re-appear in post layout pass.
            clearOldPositions();
        } else {
            clearOldPositions();
        }
        onExitLayoutOrScroll();
        stopInterceptRequestLayout(false);
     // 上面的执行完以后,改变状态
        mState.mLayoutStep = State.STEP_LAYOUT;
    }
其实最上面的方法注释,已经把这个方法所做的事情都总结好了,该方法主要工作如下:
-
处理
Adapter更新; -
决定执行哪一种动画
-
保存每个
ItemView的信息 -
有必要的话,会进行预布局,并把相关信息保存下来。
可以看到整个方法内部调用的方法还是很多,导致你会觉得这个方法的逻辑很复杂。不过既然是源码阅读,咱们只关注一些重要的点,在众多被调用的方法中 processAdapterUpdatesAndSetAnimationFlags 是需要点进去看看里面的逻辑的,后续的 if else 逻辑其实都是在该方法里面决定的。
    /**
     * Consumes adapter updates and calculates which type of animations we want to run.
     * Called in onMeasure and dispatchLayout.
     * <p>
     * This method may process only the pre-layout state of updates or all of them.
     */
    private void processAdapterUpdatesAndSetAnimationFlags() {
        if (mDataSetHasChangedAfterLayout) {
            // Processing these items have no value since data set changed unexpectedly.
            // Instead, we just reset it.
            mAdapterHelper.reset();
            if (mDispatchItemsChangedEvent) {
                mLayout.onItemsChanged(this);
            }
        }
        // simple animations are a subset of advanced animations (which will cause a
        // pre-layout step)
        // If layout supports predictive animations, pre-process to decide if we want to run them
        if (predictiveItemAnimationsEnabled()) {
            mAdapterHelper.preProcess();
        } else {
            mAdapterHelper.consumeUpdatesInOnePass();
        }
        boolean animationTypeSupported = mItemsAddedOrRemoved || mItemsChanged;
        mState.mRunSimpleAnimations = mFirstLayoutComplete
                && mItemAnimator != null
                && (mDataSetHasChangedAfterLayout
                || animationTypeSupported
                || mLayout.mRequestedSimpleAnimations)
                && (!mDataSetHasChangedAfterLayout
                || mAdapter.hasStableIds());
        mState.mRunPredictiveAnimations = mState.mRunSimpleAnimations
                && animationTypeSupported
                && !mDataSetHasChangedAfterLayout
                && predictiveItemAnimationsEnabled();
    }
mFirstLayoutComplete 变量里面,我们发现 mRunSimpleAnimations 的值与mFirstLayoutComplete有关,mRunPredictiveAnimations同时跟mRunSimpleAnimations有关。所以这里我们可以得出一个结论,当RecyclerView第一次加载数据时,是不会执行的动画?那到底会不会呢,这里先卖个关子。dispatchLayoutStep2
dispatchLayoutStep2 方法,这个方法是真正布局 children。上代码:/** * The second layout step where we do the actual layout of the views for the final state. * This step might be run multiple times if necessary (e.g. measure). */ private void dispatchLayoutStep2() { startInterceptRequestLayout(); onEnterLayoutOrScroll(); mState.assertLayoutStep(State.STEP_LAYOUT | State.STEP_ANIMATIONS); mAdapterHelper.consumeUpdatesInOnePass(); mState.mItemCount = mAdapter.getItemCount(); mState.mDeletedInvisibleItemCountSincePreviousLayout = 0; // Step 2: Run layout mState.mInPreLayout = false; mLayout.onLayoutChildren(mRecycler, mState); mState.mStructureChanged = false; mPendingSavedState = null; // onLayoutChildren may have caused client code to disable item animations; re-check mState.mRunSimpleAnimations = mState.mRunSimpleAnimations && mItemAnimator != null; mState.mLayoutStep = State.STEP_ANIMATIONS; onExitLayoutOrScroll(); stopInterceptRequestLayout(false); }
可以看到的是,这里的逻辑似乎简单很多,那是因为这里把对子 view 的绘制逻辑放到 LayoutManager 中去了。到这里,state 的状态已经改变了,变成了 State.STEP_LAYOUT | State.STEP_ANIMATIONS。
系统的 LayoutManager 的 onLayoutChildren 方法是一个空方法,所以需要 LayoutManager 的子类自己来实现。
这里先不做过多介绍,不同的 LayoutManager 有不同的实现。
3、没有开启自动测量
还是先来看看这一块的代码:
 {
            if (mHasFixedSize) {
                mLayout.onMeasure(mRecycler, mState, widthSpec, heightSpec);
                return;
            }
            // custom onMeasure
            if (mAdapterUpdateDuringMeasure) {
                startInterceptRequestLayout();
                onEnterLayoutOrScroll();
                processAdapterUpdatesAndSetAnimationFlags();
                onExitLayoutOrScroll();

                if (mState.mRunPredictiveAnimations) {
                    mState.mInPreLayout = true;
                } else {
                    // consume remaining updates to provide a consistent state with the layout pass.
                    mAdapterHelper.consumeUpdatesInOnePass();
                    mState.mInPreLayout = false;
                }
                mAdapterUpdateDuringMeasure = false;
                stopInterceptRequestLayout(false);
            } else if (mState.mRunPredictiveAnimations) {
                // If mAdapterUpdateDuringMeasure is false and mRunPredictiveAnimations is true:
                // this means there is already an onMeasure() call performed to handle the pending
                // adapter change, two onMeasure() calls can happen if RV is a child of LinearLayout
                // with layout_width=MATCH_PARENT. RV cannot call LM.onMeasure() second time
                // because getViewForPosition() will crash when LM uses a child to measure.
                setMeasuredDimension(getMeasuredWidth(), getMeasuredHeight());
                return;
            }

            if (mAdapter != null) {
                mState.mItemCount = mAdapter.getItemCount();
            } else {
                mState.mItemCount = 0;
            }
            startInterceptRequestLayout();
            mLayout.onMeasure(mRecycler, mState, widthSpec, heightSpec);
            stopInterceptRequestLayout(false);
            mState.mInPreLayout = false; // clear
        }
这里主要做了两件事,其实跟第二个步骤很像,最终都会调用 LayoutManager 的 onMeasure 方法来进行测量。
-
如果
mHasFixedSize为true(也就是调用了setHasFixedSize方法),将直接调用LayoutManager的onMeasure方法进行测量。 -
如果
mHasFixedSize为false,同时此时如果有数据更新,先处理数据更新的事务,然后调用LayoutManager的onMeasure方法进行测量
onLayout 布局
到这里,关于测量的逻辑就讲完了,接下去开始看 layout 逻辑:
    @Override
    protected void onLayout(boolean changed, int l, int t, int r, int b) {
        TraceCompat.beginSection(TRACE_ON_LAYOUT_TAG);
        dispatchLayout();
        TraceCompat.endSection();
        mFirstLayoutComplete = true;
    }
首先会调用 dispatchLayout 进行 layout 操作,可以看到前面关注过的一个变量 mFirstLayoutComplete 赋值变为 true 。
下面主要看 dispatchLayout 方法:
    void dispatchLayout() {
        if (mAdapter == null) {
            Log.e(TAG, "No adapter attached; skipping layout");
            // leave the state in START
            return;
        }
        if (mLayout == null) {
            Log.e(TAG, "No layout manager attached; skipping layout");
            // leave the state in START
            return;
        }
        mState.mIsMeasuring = false;
        if (mState.mLayoutStep == State.STEP_START) {
            dispatchLayoutStep1();
            mLayout.setExactMeasureSpecsFrom(this);
            dispatchLayoutStep2();
        } else if (mAdapterHelper.hasUpdates() || mLayout.getWidth() != getWidth()
                || mLayout.getHeight() != getHeight()) {
            // First 2 steps are done in onMeasure but looks like we have to run again due to
            // changed size.
            mLayout.setExactMeasureSpecsFrom(this);
            dispatchLayoutStep2();
        } else {
            // always make sure we sync them (to ensure mode is exact)
            mLayout.setExactMeasureSpecsFrom(this);
        }
        dispatchLayoutStep3();
    }
dispatchLayout 方法也是非常的简单,这个方法保证 RecyclerView 必须经历三个过程 —— dispatchLayoutStep1、dispatchLayoutStep2、dispatchLayoutStep3。同时,如果在这时候,发现子 view 宽高参数发生变化后,会再次调用 dispatchLayoutStep2() 方法。
最后,来看下千呼万唤使出来的 dispatchLayoutStep3 方法:
    /**
     * The final step of the layout where we save the information about views for animations,
     * trigger animations and do any necessary cleanup.
     */
    private void dispatchLayoutStep3() {
     // 动画
        mState.assertLayoutStep(State.STEP_ANIMATIONS);
        startInterceptRequestLayout();
        onEnterLayoutOrScroll();
     // 标记进行复位
        mState.mLayoutStep = State.STEP_START;
        if (mState.mRunSimpleAnimations) {
            // Step 3: Find out where things are now, and process change animations.
            // traverse list in reverse because we may call animateChange in the loop which may
            // remove the target view holder.
            for (int i = mChildHelper.getChildCount() - 1; i >= 0; i--) {
                ViewHolder holder = getChildViewHolderInt(mChildHelper.getChildAt(i));
                if (holder.shouldIgnore()) {
                    continue;
                }
                long key = getChangedHolderKey(holder);
                final ItemHolderInfo animationInfo = mItemAnimator
                        .recordPostLayoutInformation(mState, holder);
                ViewHolder oldChangeViewHolder = mViewInfoStore.getFromOldChangeHolders(key);
                if (oldChangeViewHolder != null && !oldChangeViewHolder.shouldIgnore()) {
                    // run a change animation

                    // If an Item is CHANGED but the updated version is disappearing, it creates
                    // a conflicting case.
                    // Since a view that is marked as disappearing is likely to be going out of
                    // bounds, we run a change animation. Both views will be cleaned automatically
                    // once their animations finish.
                    // On the other hand, if it is the same view holder instance, we run a
                    // disappearing animation instead because we are not going to rebind the updated
                    // VH unless it is enforced by the layout manager.
                    final boolean oldDisappearing = mViewInfoStore.isDisappearing(
                            oldChangeViewHolder);
                    final boolean newDisappearing = mViewInfoStore.isDisappearing(holder);
                    if (oldDisappearing && oldChangeViewHolder == holder) {
                        // run disappear animation instead of change
                        mViewInfoStore.addToPostLayout(holder, animationInfo);
                    } else {
                        final ItemHolderInfo preInfo = mViewInfoStore.popFromPreLayout(
                                oldChangeViewHolder);
                        // we add and remove so that any post info is merged.
                        mViewInfoStore.addToPostLayout(holder, animationInfo);
                        ItemHolderInfo postInfo = mViewInfoStore.popFromPostLayout(holder);
                        if (preInfo == null) {
                            handleMissingPreInfoForChangeError(key, holder, oldChangeViewHolder);
                        } else {
                            animateChange(oldChangeViewHolder, holder, preInfo, postInfo,
                                    oldDisappearing, newDisappearing);
                        }
                    }
                } else {
                    mViewInfoStore.addToPostLayout(holder, animationInfo);
                }
            }

            // Step 4: Process view info lists and trigger animations 做动画
            mViewInfoStore.process(mViewInfoProcessCallback);
        }

        mLayout.removeAndRecycleScrapInt(mRecycler);
     // 记录数据,并把之前用到一些标志位复位
        mState.mPreviousLayoutItemCount = mState.mItemCount;
        mDataSetHasChangedAfterLayout = false;
        mDispatchItemsChangedEvent = false;
        mState.mRunSimpleAnimations = false;

        mState.mRunPredictiveAnimations = false;
        mLayout.mRequestedSimpleAnimations = false;
        if (mRecycler.mChangedScrap != null) {
            mRecycler.mChangedScrap.clear();
        }
        if (mLayout.mPrefetchMaxObservedInInitialPrefetch) {
            // Initial prefetch has expanded cache, so reset until next prefetch.
            // This prevents initial prefetches from expanding the cache permanently.
            mLayout.mPrefetchMaxCountObserved = 0;
            mLayout.mPrefetchMaxObservedInInitialPrefetch = false;
            mRecycler.updateViewCacheSize();
        }

        mLayout.onLayoutCompleted(mState);
        onExitLayoutOrScroll();
        stopInterceptRequestLayout(false);
        mViewInfoStore.clear();
        //
        if (didChildRangeChange(mMinMaxLayoutPositions[0], mMinMaxLayoutPositions[1])) {
            dispatchOnScrolled(0, 0);
        }
        recoverFocusFromState();
        resetFocusInfo();
    }
从上面的逻辑可以看出 dispatchLayoutStep3 主要是做 Item 的动画,本文不对动画进行展开,所以先省略动画部分。然后就是对一些标志位复位。清除一些状态。
小结
这里对这三个方法做一个小结,方便大家记住这几个方法的作用:
| 方法名 | 作用 |
|---|---|
| dispatchLayoutStep1 |
本方法的作用主要有三点:
|
| dispatchLayoutStep2 | 在这个方法里面,真正进行 children 的测量和布局。 |
| dispatchLayoutStep3 | 这个方法的作用执行在 dispatchLayoutStep1 方法里面保存的动画信息。本方法不是本文的介绍重点 |
3、Draw 绘制
接下来,我们来分析三大流程的最后一个阶段 —— draw。
下面来看看 RecyclerView 的 draw() 和 onDraw() 方法:
    public void draw(Canvas c) {
        super.draw(c);

        final int count = mItemDecorations.size();
        for (int i = 0; i < count; i++) {
            mItemDecorations.get(i).onDrawOver(c, this, mState);
        }
        // ......
}
真是考虑周到啊。
    @Override
    public void onDraw(Canvas c) {
        super.onDraw(c);

        final int count = mItemDecorations.size();
        for (int i = 0; i < count; i++) {
            mItemDecorations.get(i).onDraw(c, this, mState);
        }
    }
发现这里并没有做太多,只是调用 ItemDecoration 的 onDraw 和 onDrawOver 方法。这样就将分割线添加到其中。
4、 LinearLayoutManager
dispatchLayoutStep2 方法时,只是简单的介绍了,RecyclerView 通过调用 LayoutManager 的 onLayoutChildren 方法。LayoutManager 本身对这个方法没有进行实现,所以必须得看看它的子类,这里以 LinearLayoutManager 来举例说明:onLayoutChildren
    @Override
    public void onLayoutChildren(RecyclerView.Recycler recycler, RecyclerView.State state) {
        // ......

        ensureLayoutState();
        mLayoutState.mRecycle = false;
        // resolve layout direction
        resolveShouldLayoutReverse();
     // ......
     // calculate anchor position and coordinate
     updateAnchorInfoForLayout(recycler, state, mAnchorInfo);
     mAnchorInfo.mValid = true;
     // ...
     detachAndScrapAttachedViews(recycler);  // 这个方法会在缓存那一篇文章进行讲解。
     // ...
// noRecycleSpace not needed: recycling doesn't happen in below's fill
        // invocations because mScrollingOffset is set to SCROLLING_OFFSET_NaN
        mLayoutState.mNoRecycleSpace = 0;
        if (mAnchorInfo.mLayoutFromEnd) {
            // fill towards start
            updateLayoutStateToFillStart(mAnchorInfo);
            mLayoutState.mExtraFillSpace = extraForStart;
            fill(recycler, mLayoutState, state, false);
            startOffset = mLayoutState.mOffset;
            final int firstElement = mLayoutState.mCurrentPosition;
            if (mLayoutState.mAvailable > 0) {
                extraForEnd += mLayoutState.mAvailable;
            }
            // fill towards end
            updateLayoutStateToFillEnd(mAnchorInfo);
            mLayoutState.mExtraFillSpace = extraForEnd;
            mLayoutState.mCurrentPosition += mLayoutState.mItemDirection;
            fill(recycler, mLayoutState, state, false);
            endOffset = mLayoutState.mOffset;

            if (mLayoutState.mAvailable > 0) {
                // end could not consume all. add more items towards start
                extraForStart = mLayoutState.mAvailable;
                updateLayoutStateToFillStart(firstElement, startOffset);
                mLayoutState.mExtraFillSpace = extraForStart;
                fill(recycler, mLayoutState, state, false);
                startOffset = mLayoutState.mOffset;
            }
        } else {
            // fill towards end
            updateLayoutStateToFillEnd(mAnchorInfo);
            mLayoutState.mExtraFillSpace = extraForEnd;
            fill(recycler, mLayoutState, state, false);
            endOffset = mLayoutState.mOffset;
            final int lastElement = mLayoutState.mCurrentPosition;
            if (mLayoutState.mAvailable > 0) {
                extraForStart += mLayoutState.mAvailable;
            }
            // fill towards start
            updateLayoutStateToFillStart(mAnchorInfo);
            mLayoutState.mExtraFillSpace = extraForStart;
            mLayoutState.mCurrentPosition += mLayoutState.mItemDirection;
            fill(recycler, mLayoutState, state, false);
            startOffset = mLayoutState.mOffset;

            if (mLayoutState.mAvailable > 0) {
                extraForEnd = mLayoutState.mAvailable;
                // start could not consume all it should. add more items towards end
                updateLayoutStateToFillEnd(lastElement, endOffset);
                mLayoutState.mExtraFillSpace = extraForEnd;
                fill(recycler, mLayoutState, state, false);
                endOffset = mLayoutState.mOffset;
            }
        }


        layoutForPredictiveAnimations(recycler, state, startOffset, endOffset);
        if (!state.isPreLayout()) {
            mOrientationHelper.onLayoutComplete();
        } else {
            mAnchorInfo.reset();
        }
        mLastStackFromEnd = mStackFromEnd;
        if (DEBUG) {
            validateChildOrder();
        }
    }
onLayoutChildren 方法很长,因此省略一些无关的代码。其实主要是做两件事确定锚点的信息,这里面的信息包括:
-
Children的布局方向,有 start 和 end 两个方向; -
mPosition和mCoordinate,分别表示Children开始填充的 position 和坐标。
根据锚点信息,调用 fill 方法进行 Children 的填充。这个过程中根据锚点信息的不同,可能会调用两次 fill 方法。
updateAnchorInfoForLayout
要想看锚点信息的计算过程,我们可以从 updateAnchorInfoForLayout 方法里面来找出答案,我们来看看 updateAnchorInfoForLayout 方法:
    private void updateAnchorInfoForLayout(RecyclerView.Recycler recycler, RecyclerView.State state,
            AnchorInfo anchorInfo) {
        if (updateAnchorFromPendingData(state, anchorInfo)) {
            if (DEBUG) {
                Log.d(TAG, "updated anchor info from pending information");
            }
            return;
        }

        if (updateAnchorFromChildren(recycler, state, anchorInfo)) {
            if (DEBUG) {
                Log.d(TAG, "updated anchor info from existing children");
            }
            return;
        }
        if (DEBUG) {
            Log.d(TAG, "deciding anchor info for fresh state");
        }
        anchorInfo.assignCoordinateFromPadding();
        anchorInfo.mPosition = mStackFromEnd ? state.getItemCount() - 1 : 0;
    }
我相信通过上面的代码注释,大家都能明白 updateAnchorInfoForLayout 方法到底干了嘛,这里我简单分析一下这三种确定所做的含义,具体是怎么做的,这里就不讨论。
-
第一种计算方式,表示含义有两种:1.
RecyclerView被重建,期间回调了onSaveInstanceState方法,所以目的是为了恢复上次的布局;2.RecyclerView调用了scrollToPosition之类的方法,所以目的是让RecyclerView滚到准确的位置上去。所以,锚点的信息根据上面的两种情况来计算。 -
第二种计算方法,从
Children上面来计算锚点信息。这种计算方式也有两种情况:1. 如果当前有拥有焦点的Child,那么有当前有焦点的 Child 的位置来计算锚点;2. 如果没有 child 拥有焦点,那么根据布局方向(此时布局方向由mLayoutFromEnd来决定)获取可见的第一个ItemView或者最后一个ItemView。 -
如果前面两种方式都计算失败了,那么采用第三种计算方式,也就是默认的计算方式。
fill 填充布局
然后就是调用 fill 方法来填充 Children。在正式分析填充过程时,我们先来看一张图片:
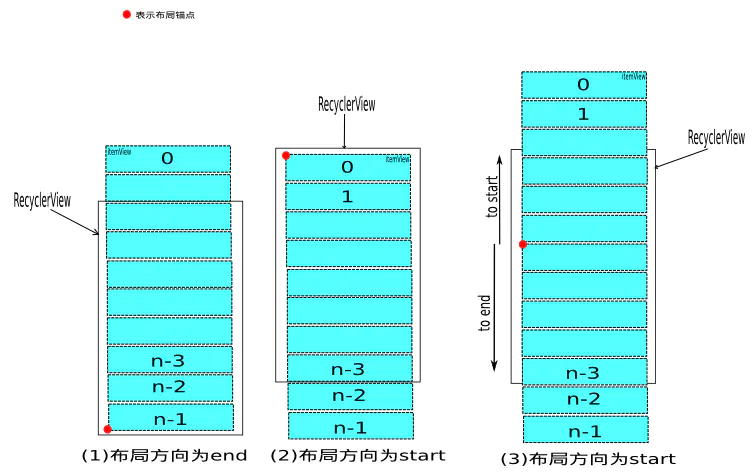
上图形象的展现出三种 fill 的情况。其中,我们可以看到第三种情况,fill 方法被调用了两次。
我们看看 fill 方法:
    int fill(RecyclerView.Recycler recycler, LayoutState layoutState,
            RecyclerView.State state, boolean stopOnFocusable) {
        // ······
        while ((layoutState.mInfinite || remainingSpace > 0) && layoutState.hasMore(state)) {
            // ······
            layoutChunk(recycler, state, layoutState, layoutChunkResult);

        }
         // ······
    }
fill 方法的代码比较长,所以省略了很多无关的代码。首先可以看到有个 while 方法,这个方法其实就是用来不断向 RecyclerView 中添加子 View 的,直到没有空间为止。填充的方式就是根据剩余空间来进行添加,而填充 Child 的地方是 layoutChunk 方法。
layoutChunk
我们来看看 layoutChunk 方法。
void layoutChunk(RecyclerView.Recycler recycler, RecyclerView.State state,
        LayoutState layoutState, LayoutChunkResult result) {
    View view = layoutState.next(recycler);
    ...
    if (layoutState.mScrapList == null) {
        if (mShouldReverseLayout == (layoutState.mLayoutDirection
                == LayoutState.LAYOUT_START)) {
            addView(view);
        } else {
            addView(view, 0);
        }
    }
    // ...
    measureChildWithMargins(view, 0, 0);  // 在子view 添加后,同时对其进行测量
    // ...
    // We calculate everything with View's bounding box (which includes decor and margins)
    // To calculate correct layout position, we subtract margins.
    layoutDecorated(view, left + params.leftMargin, top + params.topMargin,
            right - params.rightMargin, bottom - params.bottomMargin);
    ...
}
提醒下别小看这个 next 方法,RecyclerView 缓存机制的起点就是从这个方法开始,可想而知,这个方法到底为我们做了多少事情。
这里的 addView() 方法,其实就是 ViewGroup 的 addView() 方法;measureChildWithMargins() 方法看名字就知道是用于测量子控件大小的,不了解这个方法的,可以去看我开头给出的关于 View 的绘制文章。目前就简单地理解为测量子控件大小就好了。下面是 layoutDecoreated() 方法:
        public void layoutDecorated(@NonNull View child, int left, int top, int right, int bottom) {
       // 将分割线考虑进去
            final Rect insets = ((LayoutParams) child.getLayoutParams()).mDecorInsets;
            child.layout(left + insets.left, top + insets.top, right - insets.right,
                    bottom - insets.bottom);
        }
总结上面代码,在 RecyclerView 的 measure 及 layout 阶段,填充 ItemView 的算法为:向父容器增加子控件,测量子控件大小,布局子控件,布局锚点向当前布局方向平移子控件大小,重复上诉步骤至 RecyclerView 可绘制空间消耗完毕或子控件已全部填充。
这样所有的子控件的 measure 及 layout 过程就完成了。回到 RecyclerView 的 onMeasure 方法,执行 mLayout.setMeasuredDimensionFromChildren(widthSpec, heightSpec) 这行代码的作用就是根据子控件的大小,设置 RecyclerView 的大小。至此,RecyclerView 的 measure 和 layout 实际上已经完成了。
但是,你有可能已经发现上面过程中的问题了:如何确定 RecyclerView 的可绘制空间?不过,如果你熟悉 android 控件的绘制机制的话,这就不是问题。其实,这里的可绘制空间,可以简单地理解为父容器的大小;更准确的描述是,父容器对 RecyclerView 的布局大小的要求,可以通过 MeasureSpec.getSize() 方法获得。
总结
到这里,关于 RecyclerView 的绘制流程就讲完了,由于主打绘制流程,没有分析其他,可能会导致整个逻辑有些跳跃,但不妨碍理解整个绘制过程。
最后回到文章前面的问题上,可以发现 RecyclerView 将绘制过程其实是委托给 layoutManager 来操作,这和普通自定义 view 是很不一样的。这样的灵活操作,可以让使用者自定义各种样式,使得 RecyclerView 使用场景变得更加丰富。
其次在于分割线的处理上,它并不把分割线当做是子 view 来处理,而是在布局子 view 的时候,将分割线考虑进去给留下间隙。

 浙公网安备 33010602011771号