

nginx1.14的安装
编译安装nginx1.14.2
#拷贝指定文件到当前目录下
[root@localhost ~]# find /usr/share -iname "*.jpg" -exec cp {} ./ \;
1、运行环境包
yum -y install gcc gcc-c++ make libtool zlib zlib-devel openssl openssl-devel pcre pcre-devel lua-devel perl


yum groupinstall "Development Tools" "Server Platform Development"
2、额外的软件包
LuaJit: http://luajit.org/download.html
ningx:  https://nginx.org/download/nginx-1.14.2.tar.gz
pcre:    https://ftp.pcre.org/pub/pcre/pcre-8.42.zip
ngx_devel_kit:    https://github.com/simplresty/ngx_devel_kit/tags

lua-nginx-module    https://github.com/openresty/lua-nginx-module/tags
wget https://github.com/openresty/lua-nginx-module/archive/v0.10.14rc3.tar.gz --no-check-certificate

wget http://ftp.17gogoing.com:8852/pub/nginx/nginx_upstream_check_module-master.tar.gz   —— 检查后端服务器的状态
nginx_goodies: https://bitbucket.org/nginx-goodies/nginx-sticky-module-ng/downloads/?tab=downloads   下载地址 —— 后端做负载均衡解决session sticky问题
注释:所有的软件包均下载到/usr/local/src目录下
百度云链接地址:
3、安装编译
cd /usr/local/src/nginx-1.14.2

patch -p1 < /usr/local/src/nginx_upstream_check_module-master/check_1.12.1+.patch

#编译参数如下:
./configure \
--user=nginx \
--group=nginx \
--prefix=/usr/local/nginx \
--sbin-path=/usr/sbin/nginx \
--conf-path=/etc/nginx/nginx.conf \
--error-log-path=/var/log/nginx/error.log \
--pid-path=/var/log/nginx/nginx.pid \
--lock-path=/usr/local/nginx/lock/nginx.lock \
--http-log-path=/var/log/nginx/access.log \
--with-openssl=/usr/local/src/openssl-1.0.2k \
--with-http_ssl_module \
--with-http_flv_module \
--with-http_mp4_module \
--http-proxy-temp-path=/usr/local/nginx/proxy_tmp \
--with-http_stub_status_module \
--with-http_gzip_static_module \
--with-pcre=/usr/local/src/pcre-8.42 \
--add-module=/usr/local/src/ngx_devel_kit-0.3.0 \
--add-module=/usr/local/src/lua-nginx-module-master \
--add-module=/usr/local/src/nginx_upstream_check_module-master


make -j 4 && make install
4、其他操作(压力测试)
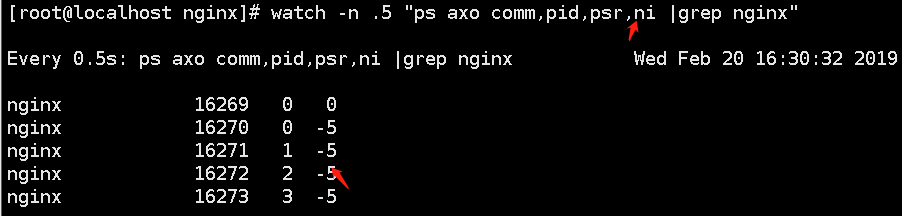
1、nginx绑定cpu(纯nginx服务时才能进行绑定)
在没有绑定cpu的情况下,nginx会动态调用cpu,降低缓存命中率;
#动态每5秒刷新一次
[root@localhost nginx]# watch -n .5 "ps axo comm,pid,psr |grep nginx"
nginx            13340   3
nginx            13341   0
nginx            13342   1
nginx            13343   3
nginx            13344   1

#进行压力测试
[root@localhost ~]# yum -y install httpd-tools
#一次10万并发,连接100次
[root@localhost ~]# ab -n 100000 -c 100 http://11.11.11.2/index.html

#在链接的过程中会发现nginx调用的cpu是不固定的;

如果只绑定3个的话,优先不使用第一个cpu;

2、指定worker进程的nice值(运行优先级 -20~20之间)
worker_priority -5;
3、指定某些IP地址不能访问,其他可以正常访问
server {
      listen 80;
      server_name www.yanqi.org;
      root /www/nginx/html;

      location ~* \.(jpg|png)$ {
               deny 11.11.11.3;
               allow all;
}
}
location / {
    satisfy any;

    allow 192.168.1.0/32;
    deny  all;

    auth_basic           "closed site";
    auth_basic_user_file conf/htpasswd;
}
4、location配置说明
4.1、配置文件位置说明(优选级说明)

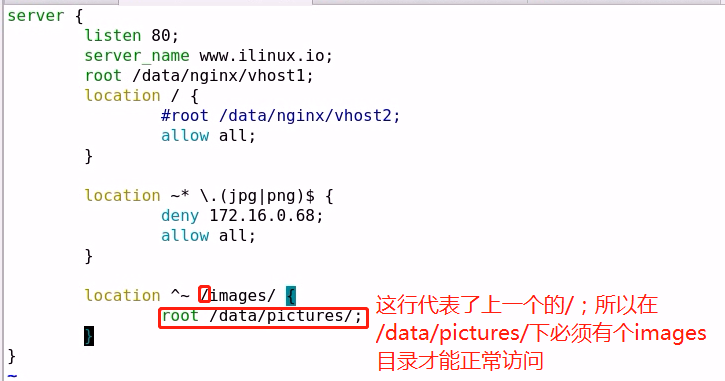
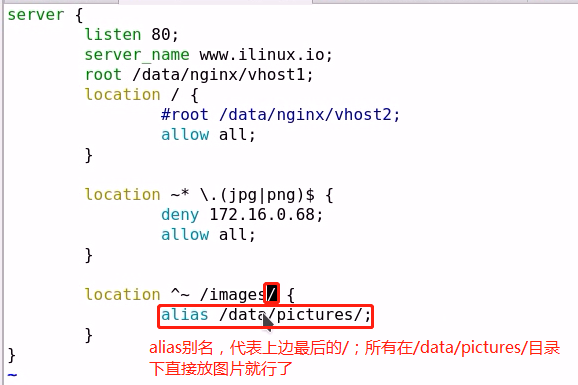
4.2、配置路径说明(定义文件位置 根/别名)
5、定义错误页面
server {
        listen 80;
        server_name www.yanqi.org;
        root /data/nginx/vhost;

        location / {
             #root /data/nginx/vhost2;
             allow all;
        }

        error_page 404 = 200 /404.html
         location = /404.html {
             root /data/nginx/error_pages;
         }

        error_page 500 502 503 504 /50x.html;
            location = /50x.html {
        }
}

说明:
如果访问404页面:会到 /data/nginx/error_pages 目录下找 404.html 文件;   注释:=200 是定义响应码,就算是访问是吧,返回的状态码也是200
如果访问50x页面:会到 /data/nginx/vhost 目录下找50x.html;
6、定义客户端请求的相关配置
只要记住前两个的使用即可

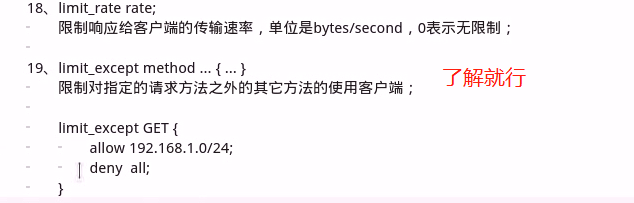
7、对客户端进行限制的相关配置
8、文件操作优化配置

9、模块的说明介绍
9.1、ngx_http_access_module (基于IP地址的访问控制模块)
http://nginx.org/en/docs/http/ngx_http_access_module.html
location / {
    deny  192.168.1.1;
    allow 192.168.1.0/24;
    allow 10.1.1.0/16;
    allow 2001:0db8::/32;
    deny  all;
}
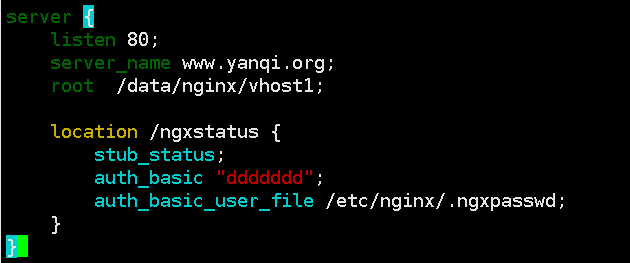
9.2、ngx_http_auth_basic_module(网页密码登陆验证)
http://nginx.org/en/docs/http/ngx_http_auth_basic_module.html
location / {
    auth_basic           "closed site";
    auth_basic_user_file conf/htpasswd;
}


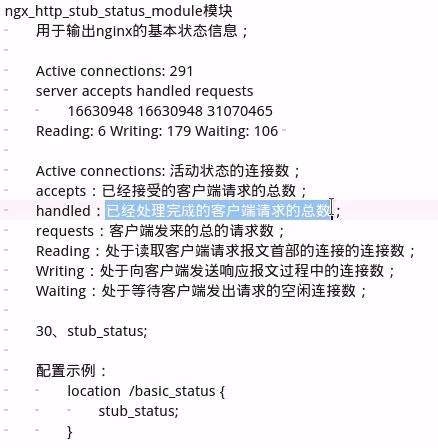
9.3、nginx连接状态

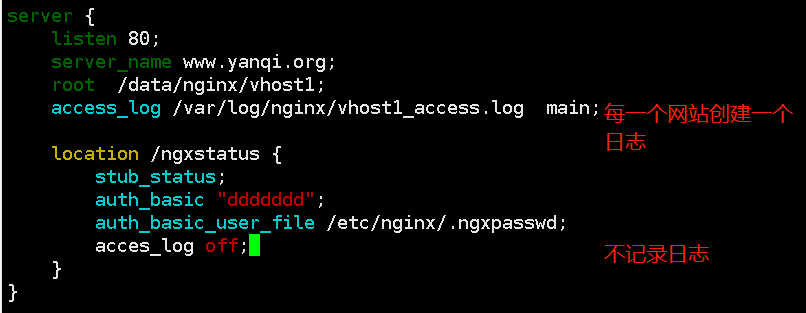
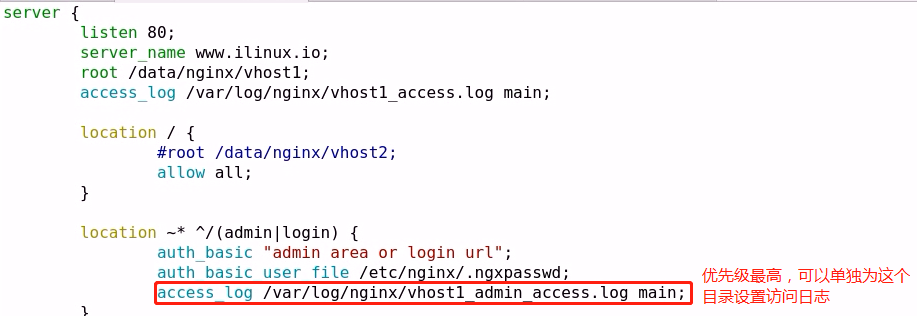
9.4、nginx的访问日志
http://nginx.org/en/docs/http/ngx_http_log_module.html
9.5、传输压缩
http://nginx.org/en/docs/http/ngx_http_gzip_module.html
gzip on | off;    开启压缩
gzip_comp_level 6;  压缩级别
gzip_buffers 32 4k|16 8k;  压缩缓冲  16段 每段8k   默认值
gzip_min_length 20;   低于20字节的内容不压缩   默认值
gzip_types text/html text/css application/javascript;   指定压缩目标  #这个可以在/etc/nginx/mime.types 中查看
 前段有代理不开启,默认配置
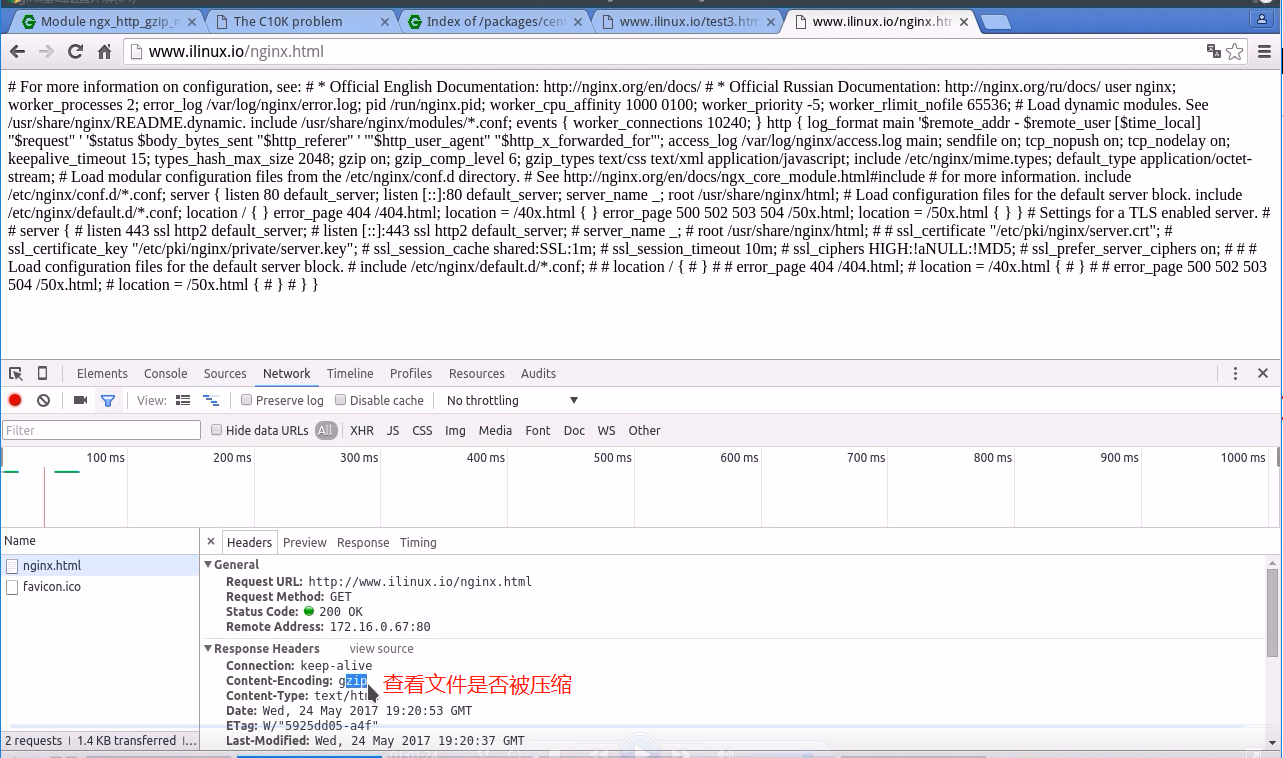
9.5、 ngx_http_ssl_module(http server)
http://nginx.org/en/docs/http/ngx_http_ssl_module.html
http {

    ...

    server {
        listen              443 ssl;
        keepalive_timeout   70;

        ssl_protocols       TLSv1 TLSv1.1 TLSv1.2;
        ssl_ciphers         AES128-SHA:AES256-SHA:RC4-SHA:DES-CBC3-SHA:RC4-MD5;
        ssl_certificate     /usr/local/nginx/conf/cert.pem;
        ssl_certificate_key /usr/local/nginx/conf/cert.key;
        ssl_session_cache   shared:SSL:10m;
        ssl_session_timeout 10m;

        ...
    }
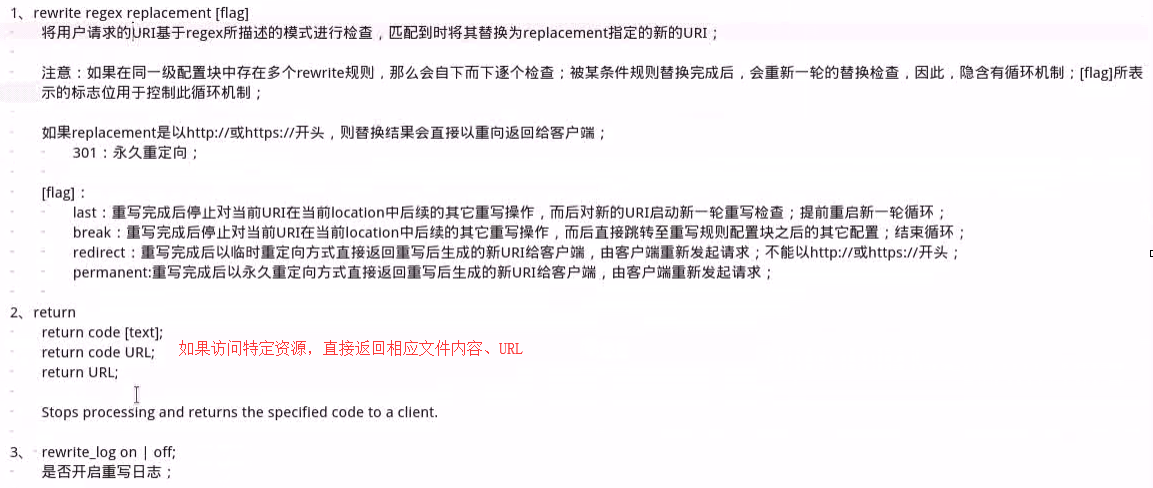
9.6、ngx_http_rewrite_module(重定向)
http://nginx.org/en/docs/http/ngx_http_rewrite_module.html
问题:
http://www.yanqi.org/bbs/    --> http://bbs.yanqi.org
http://www.yanqi.org/media/audio/a.wmv  --> http://www.yanqi.org/media/mp3/a.mp3
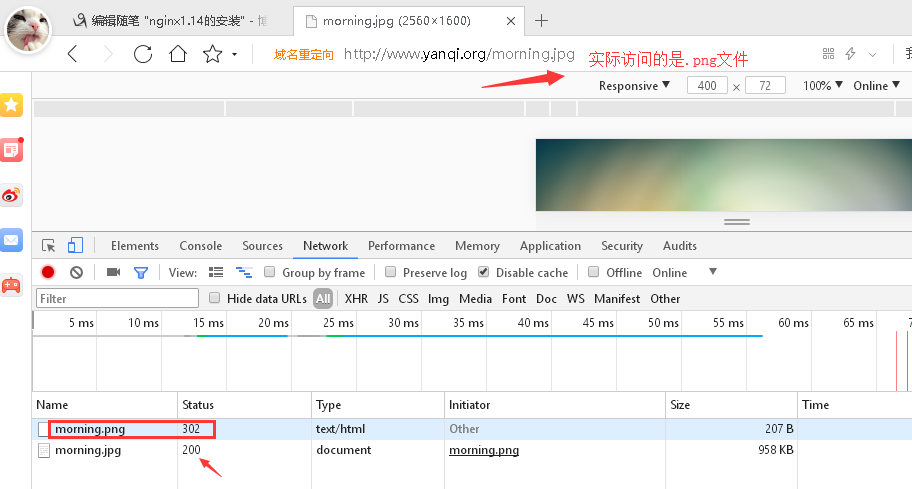
1、只要访问资源为.png结尾的,全部定义成.jpg
注释:图片资源之前是.png文件格式,后来全部转换成了.jpg;返还的状态仍是200
server {
listen 80;
server_name www.yanqi.org;
root /data/nginx/vhost1;
rewrite /(.*)\.png$ /$1.jpg;
}
2、域名跳转

[root@nginx conf.d]# cat vhost1.conf
server {
  listen 443 ssl;
  server_name cahost.zzidc.com;
  root /data/nginx/vhost1;
  access_log /var/log/nginx/vhost1_ssl_access.log main;

  ssl on;
  ssl_certificate /etc/nginx/ssl/nginx.crt;
  ssl_certificate_key /etc/nginx/ssl/nginx.key;
  ssl_protocols sslv3 TLSv1 TLSv1.1 TLSv1.2;
  ssl_session_cache   shared:SSL:10m;
  ssl_session_timeout 10m;
}

server {
   listen 80;
   server_name www.yanqi.org;
   root /data/nginx/vhost1;
   #rewrite /(.*)\.png$ /$1.jpg;   #只要是以.png结尾的uri统一转成访问同名下格式为.jpg
   #rewrite /(.*)$ https://cahost.zzidc.com/$1;   #不管你访问什么,最终都跳转到后边的域名,默认301永久
   #rewrite /(.*).png$ /$1.jpg;   #服务端自行转换,返回给用户的响应码仍然是200
   rewrite /(.*).png$ /$1.jpg redirect;   #返回给客户一个新的URL,客户端再去访问新的URL  302 临时重定向
   rewrite /(.*).png$ /$1.jpg redirect;   #同样需要客户端重新请求,  301 永久重定向
注释:
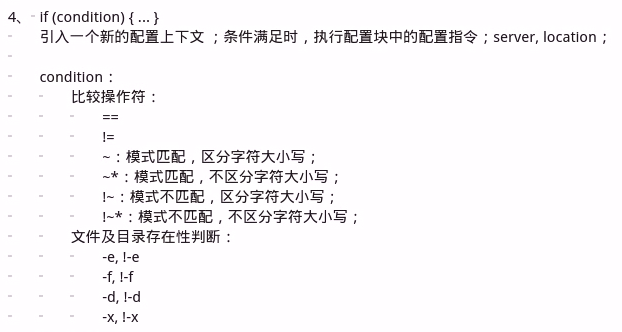
3、if 判断
if ($http_user_agent ~ MSIE) {          #如果浏览器是IE的话,所有请求跳转到/msie/下,然后跳出本次循环
    rewrite ^(.*)$ /msie/$1 break;
}

if ($http_cookie ~* "id=([^;]+)(?:;|$)") {
    set $id $1;
}

if ($request_method = POST) {     #如果客户端请求方法为post的话,直接返回405
    return 405;
}

if ($slow) {
    limit_rate 10k;
}

if ($invalid_referer) {    #防盗链,在定义中没有配置的,直接返回403;这个内容后续有写明。
    return 403;
}
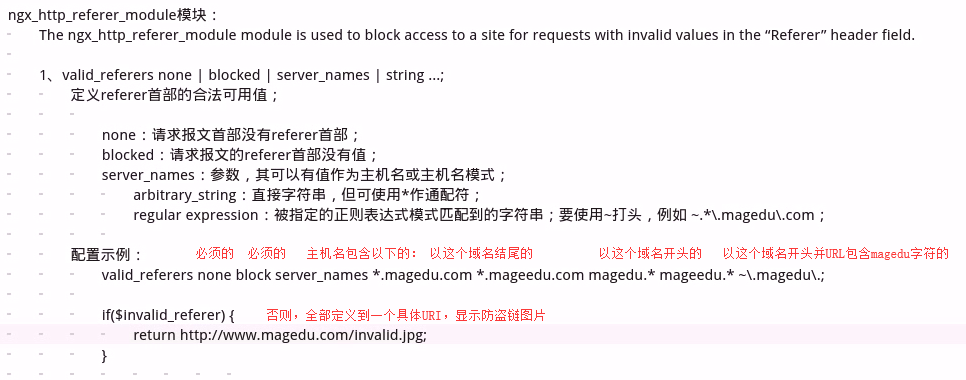
4、ngx_http_referer_module (防盗链)
http://nginx.org/en/docs/http/ngx_http_referer_module.html
python3

 浙公网安备 33010602011771号