
《c#10 in a nutshell》--- 读书随记(10)
Chaptor 15. Streams and I/O
内容来自书籍《C# 10 in a Nutshell》
Author:Joseph Albahari
需要该电子书的小伙伴,可以留下邮箱,有空看到就会发送的
Stream Architecture
NET Stream体系结构集中在三个概念上:支持存储器(backing stores)、装饰器(decorators)和适配器(adapters)
backing store是使输入和输出有用的端点,例如文件或网络连接。准确地说,是以下两者中的一个或两个
- 可以从中顺序读取字节的源
- 可以顺序写入字节的目标
不过,除非暴露在程序员面前,否则 backing store 是没有用的。Stream类就是为了这个目的。它公开了一组用于读取、写入和定位的标准方法。数组的所有备份数据都同时存在于内存中,与数组不同的是,数据流是串行处理数据的ーー要么一次处理一个字节,要么以可管理大小的块的形式处理。因此,流可以使用少量的固定内存,而不用考虑其 backing store 的大小
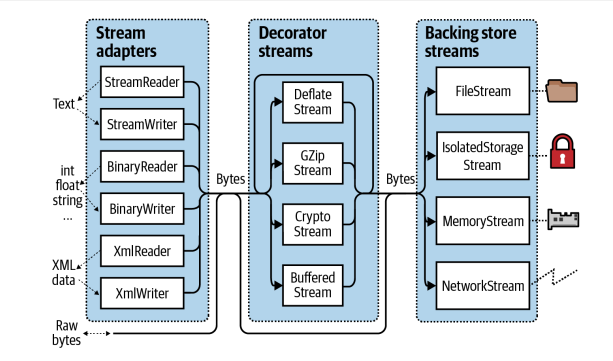
Streams 分为两类:
- Backing store streams: 它们被固定在一种特殊的 backing store 上,比如FileStream,NetworkStream
- Decorator streams: 它们以另一个流为基础,以某种方式转换数据,比如DeflateStream,CryptoStream
Decorator streams有以下架构上的好处:
- 它们将 backing store 流从实现压缩和加密等特性的需要中解放出来
- 在修饰时,流不会受到接口更改的影响
- 在运行时连接装饰器
- 你可以把装饰器连在一起
Backing store 和 decorator 流都只处理字节。虽然这是灵活和有效的,但应用程序通常在更高的级别上工作,如文本或 XML。适配器通过使用类型化为特定格式的专门方法封装类中的流来弥补这一差距。
适配器像 decorator 一样包装流。然而,与 decorator 不同的是,适配器本身并不是一个流,它通常完全隐藏了面向字节的方法
总之,backing store 流提供原始数据,decorator 流提供透明的二进制转换(如加密) ,适配器提供类型化的方法来处理更高级别的类型(如字符串和 XML)。
Using Streams
abstract Stream 类是所有流的基础。它为三个基本操作定义了方法和属性: 读取、写入和查找,以及管理任务(如关闭、刷新和配置超时)

还有读取和写入方法的异步版本,它们都返回 Tasks 并有可选地接受cancellation token,以及使用 Span < T > 和 Memory < T > 类型的重载方法
using (Stream s = new FileStream ("test.txt", FileMode.Create))
{
    Console.WriteLine (s.CanRead);      // True
    Console.WriteLine (s.CanWrite);     // True
    Console.WriteLine (s.CanSeek);      // True

    s.WriteByte (101);
    s.WriteByte (102);
    byte[] block = { 1, 2, 3, 4, 5 };
    s.Write (block, 0, block.Length);// Write block of 5 bytes
    Console.WriteLine (s.Length);// 7
    Console.WriteLine (s.Position);// 7
    s.Position = 0;         // Move back to the start

    Console.WriteLine (s.ReadByte());   // 101
    Console.WriteLine (s.ReadByte());   // 102

    // Read from the stream back into the block array:
    Console.WriteLine (s.Read (block, 0, block.Length));// 5

    // Assuming the last Read returned 5, we'll be at
    // the end of the file, so Read will now return 0:
    Console.WriteLine (s.Read (block, 0, block.Length));// 0
}
Reading and Writing
读取从流中接收数据块到数组中。它返回接收到的字节数,这个数字总是小于或等于 count 参数。如果小于 count,则意味着要么已经到达流的末尾,要么流以较小的块提供数据(网络流通常是这种情况)。在这两种情况下,数组中的字节余额将保持不写,它们以前的值保持不变。
使用 Read,只有当方法返回0时,才能确定已经到达流的末尾。因此,如果您有一个1000字节的流,以下代码可能无法将其全部读入内存:
byte[] data = new byte [1000];
s.Read (data, 0, data.Length);
Read 方法可以读取1到1,000个字节之间的任何位置,而不读取流的余额。
正确的做法是:
byte[] data = new byte [1000];

int bytesRead = 0;
int chunkSize = 1;
while (bytesRead < data.Length && chunkSize > 0)
    bytesRead +=
        chunkSize = s.Read (data, bytesRead, data.Length - bytesRead);
幸运的是,BinaryReader 类型提供了一种更简单的方法来实现同样的结果:
byte[] data = new BinaryReader(s).ReadBytes(1000);
如果流长度小于1,000字节,则返回的字节数组反映实际流大小。如果流是可查找的,则可以通过将1000替换为(int) s.Llength 来读取其全部内容。
ReadByte 方法更简单: 它只读取一个字节,返回 -1表示流的结束。ReadByte 实际上返回的是 int 而不是 byte,因为后者不能返回 -1。
在 Read 和 Write 方法中,offset 参数指的是缓冲区数组中开始读写的索引,而不是流中的位置。
Seeking
如果 CanSeek 返回 true,则可以查找流。使用可查找流(比如文件流) ,您可以查询或修改其长度(通过调用 SetLlength) ,并在任何时候更改您正在读取或写入的位置。Position 属性相对于流的开始; 但是,Seek 方法允许您相对于流的当前位置或结束移动
更改 FileStream 上的位置通常需要几微秒。如果您在一个循环中执行此操作数百万次,那么 MemoryMappedFile 类可能是比 FileStream 更好的选择
对于不可寻的流(例如加密流) ,确定其长度的唯一方法是完全通读。此外,如果需要重读前一节,则必须关闭流并重新开始新的流
Closing and Flushing
流在使用后必须释放,以释放基础资源,如文件和套接字句柄。保证这一点的一个简单方法是在 using 块中实例化流。一般来说,数据流遵循标准的销毁语义
- 销毁和关闭在功能上是相同的
- 重复销毁或关闭数据流不会导致错误
关闭 decorator 流会关闭 decorator 和 backing store 流。通过装饰器链,关闭最外面的 decorator (在链条的顶端)就可以关闭整个链。一些数据流在内部缓冲 backing store 之间的数据,以减少往返,从而提高性能(文件流就是一个很好的例子)。这意味着写入流的数据可能不会立即到达 backing store,而是会在缓冲区填满时被延迟。Flush 方法强制立即写入任何内部缓冲数据。当流关闭时会自动调用刷新,因此您永远不需要执行以下操作s.Flush(); s.Close();
Timeouts
如果 CanTimeout 返回 true,则流支持读写超时。网络流支持超时,而文件和内存流不支持。对于支持超时的流,ReadTimeout 和 WriteTimeout 属性以毫秒为单位确定所需的超时,其中0表示没有超时。读取和写入方法通过引发异常指示超时已发生。
异步 ReadAsync/WriteAsync 方法不支持超时; 相反,您可以将cancellation token传递给这些方法。
Thread Safety
一般来说,流不是线程安全的,这意味着两个线程不能并发地读或写同一个流,否则可能出现错误。Stream 类通过静态 Synchronized 方法提供了一个简单的解决方案。此方法接受任何类型的流并返回线程安全的包装器。包装器通过围绕每个读、写或查找获得一个独占锁,确保一次只有一个线程可以执行这样的操作。在实践中,这允许多个线程同时将数据附加到同一个流——其他类型的活动(如并发读取)需要额外的锁定,以确保每个线程访问流的所需部分。
从 .Net 6 开始,可以使用 RandomAccess 类执行高性能的线程安全文件 I/O 操作。RandomAccess 还允许您传入多个缓冲区以提高性能
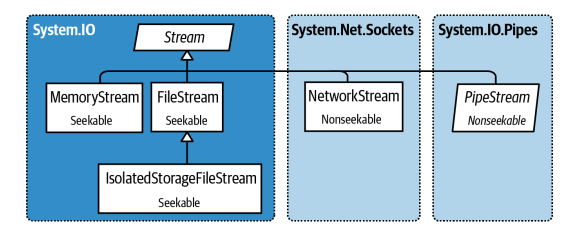
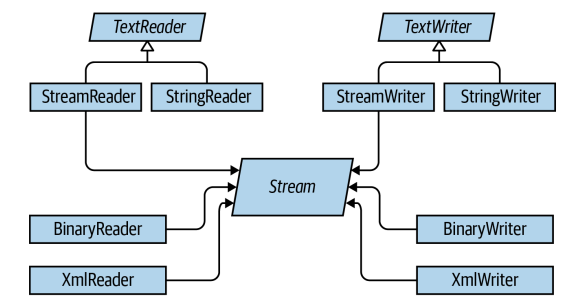
Backing Store Streams
下图展示了.NET 提供的主要的Stream。“Null Stream”也可以通过 Stream 的静态 Null 字段获得,在编写单元测试时,null流可能很有用
FileStream
前面展示了文件流的一些读写操作,现在看看它的特性
Constructing a FileStream
创建文件流最简单的方法是用它的静态方法
FileStream fs1 = File.OpenRead ("readme.bin");          // Read-only
FileStream fs2 = File.OpenWrite ("writeme.tmp");        // Write-only
FileStream fs3 = File.Create("readwrite.tmp");          // Read/write
如果文件已经存在,OpenWrite 和 Create 的行为会有所不同。Create 删除任何现有内容; OpenWrite 保持现有内容完整,流定位为零。如果您在文件中写入的字节比以前少,那么 OpenWrite 将为您留下新旧内容的混合体
还可以直接实例化 FileStream。它的构造函数提供对每个特性的访问,允许您指定文件名或低级文件句柄、文件创建和访问模式以及共享、缓冲和安全选项。以下命令将打开一个现有文件以进行读/写访问,而不会覆盖该文件
using var fs = new FileStream ("readwrite.tmp", FileMode.Open);
Specifying a filename
文件名可以是绝对路径或者相对路径,可以通过修改环境变量Environment.CurrentDirectory来修改当前文件夹位置
当程序启动时,工作目录可能与程序的可执行文件一致,也可能不一致。出于这个原因,你永远不应该依赖工作目录来定位与可执行文件一起打包的其他运行时文件。
AppDomain.CurrentDomain.BaseDirectory返回的是应用当前的位置,在正常情况下,该目录是包含程序可执行文件的文件夹
若要指定相对于此目录的文件名,可以调用 Path.Combine
string baseFolder = AppDomain.CurrentDomain.BaseDirectory;
string logoPath = Path.Combine (baseFolder, "logo.jpg");
Console.WriteLine (File.Exists (logoPath));
文件类的快捷方法
一次性读取整个文件到内存
- File.ReadAllText (returns a string)
- File.ReadAllLines (returns an array of strings)
- File.ReadAllBytes (returns a byte array)
一次性写入整个文件
- File.WriteAllText
- File.WriteAllLines
- File.WriteAllBytes
- File.AppendAllText (great for appending to a log file)
还有一个静态方法 File.ReadLines: 这类似于 ReadAllLines,只不过它返回一个延迟计算的 IEnumable < string > 。这样效率更高,因为它不会立即将整个文件加载到内存中。LINQ 是消费结果的理想选择
Specifying a FileMode
所有接受文件名的 FileStream 构造函数也需要 FileMode 枚举参数。下图显示了如何选择 FileMode,这些选择产生的结果类似于调用 File 类上的静态方法。
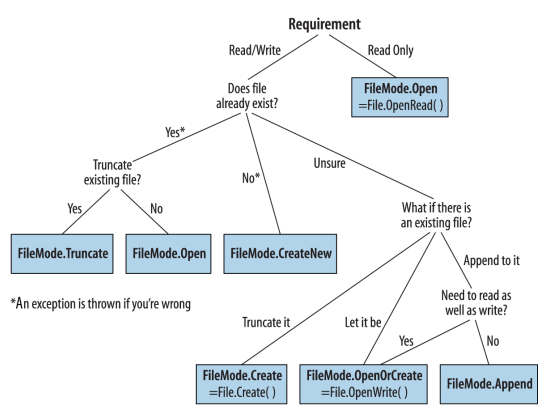
只使用文件名和 FileMode 构造 FileStream 将为您(只有一个例外)提供一个可读/可写的流。如果还提供了 FileAccess 参数,则可以请求降级
[Flags]
public enum FileAccess { Read = 1, Write = 2, ReadWrite = 3 }

// returns a read-only stream, equivalent to calling File.OpenRead
using var fs = new FileStream ("x.bin", FileMode.Open, FileAccess.Read);
Advanced FileStream features
在构造文件流的时候,还有其他的参数可以添加
- 一个 FileShare 枚举,描述在您完成之前有多少访问权限可以授予其他想要访问同一个文件的进程(None, Read [default], ReadWrite, or Write)
- 内部缓冲区的大小(以字节为单位)(默认值为4KB)
- 一个标志,指示是否遵从操作系统的异步 I/O
- FileOptions 将枚举标记为请求操作系统加密(Encrypted)、临时文件关闭时自动删除(DeleteOnClose)和优化提示(RandomAccess 和 SequentialScan)。还有一个 WriteThrough 标志,请求操作系统禁用 write-behind caching; 这是针对事务性文件或日志的。基础操作系统不支持的标志将被静默地忽略
使用 FileShare.ReadWrite 打开文件允许其他进程或用户同时读写同一个文件。为了避免混乱,您可以同意在读或写之前锁定文件的指定部分,使用这些方法
// Defined on the FileStream class:
public virtual void Lock(long position, long length);
public virtual void Unlock (long position, long length);
如果请求的文件节的部分或全部已被锁定,Lock 将引发异常
MemoryStream
MemoryStream 使用一个数组作为 backing store。这在一定程度上违背了使用流的目的,因为整个 backing store 必须同时驻留在内存中。当您需要随机访问不可查找的流时,memyStream 仍然很有用。如果您知道源流的
大小是可管理的,那么您可以将它复制到 MemoryStream 中,如下所示
var ms = new MemoryStream();
sourceStream.CopyTo (ms);
可以通过调用 ToArray 将 MemoryStream 转换为字节数组。GetBuffer 方法通过返回对底层存储数组的直接引用来更有效地完成同样的工作; 不幸的是,这个数组通常比流的实际长度要长
关闭和刷新内存流是可选的。如果关闭了 MemoryStream,则不能再对其进行读写操作,但仍然允许调用 ToArray 以获取基础数据。刷新在内存流上完全不起作用。
PipeStream
PipeStream 提供了一种简单的方法,通过这种方法,一个进程可以通过操作系统的管道协议与另一个进程进行通信
这里有两种管道:
- Anonymous pipe (faster)
允许在同一台计算机上的父进程和子进程之间进行单向通信 - Named pipe (more flexible)
允许在同一台计算机或网络上不同计算机上的任意进程之间进行双向通信
管道适用于单台计算机上的进程间通信(IPC) ,它不依赖于网络传输,这意味着没有网络协定开销,也没有防火墙问题
管道是基于流的,因此一个进程等待接收一系列字节,而另一个进程发送这些字节。另一种方法是让进程通过共享内存块进行通信
PipeStream 是一个具有四个具体子类型的抽象类。两个用于匿名管道,另外两个用于命名管道
Anonymous pipes
AnonymousPipeServerStreamAnonymousPipeClientStream
Named pipesNamedPipeServerStreamNamedPipeClientStream
Named pipes
有了 named pipes,双方就可以通过同名管道进行交流。该协议定义了两个不同的角色: 客户机和服务器。客户机和服务器之间的通信发生如下
- 服务器实例化 NamedPipeServerStream,然后调用 WaitForConnection
- 客户端实例化 NamedPipeClientStream,然后调用 Connect
然后双方读写流以进行通信
using var s = new NamedPipeServerStream ("pipedream");
s.WaitForConnection();
s.WriteByte (100);      // Send the value 100.
Console.WriteLine (s.ReadByte());
using var s = new NamedPipeClientStream ("pipedream");
s.Connect();
Console.WriteLine (s.ReadByte());
s.WriteByte (200);      // Send the value 200 back.
默认情况下,命名管道流是双向的,因此任何一方都可以读写它们的流。这意味着客户端和服务器必须就某个协议达成一致,以协调它们的行动,这样双方就不会立即发送或接收。
还需要就每次传输的长度达成一致。在这方面,我们的示例是微不足道的,因为我们在每个方向上只反弹一个字节。为了帮助处理超过一个字节的消息,管道提供了消息传输模式(仅适用于 Windows)。如果启用了此选项,则调用 Read 的一方可以通过检查 IsMessageComplete 属性来知道消息何时完成。为了演示,我们首先编写一个 helper 方法,该方法从支持消息的 PipeStream 中读取整个消息ーー换句话说,读取直到 IsMessageComplete 为 true
static byte[] ReadMessage (PipeStream s)
{
    MemoryStream ms = new MemoryStream();
    byte[] buffer = new byte [0x1000];      // Read in 4 KB blocks
    do
    {
        ms.Write (buffer, 0, s.Read (buffer, 0, buffer.Length));
    }
    while (!s.IsMessageComplete);

    return ms.ToArray();
}
您不能仅仅通过等待 Read 返回0来确定 PipeStream 是否已经完成了对消息的读取。这是因为,与大多数其他流类型不同,管道流和网络流没有确定的终点。相反,它们在信息传输之间暂时“干涸”。
现在我们可以激活信息传输模式。在服务器上,这是通过指定 PipeTransmission 模式来完成的。构造流时的消息
using var s = new NamedPipeServerStream ("pipedream", PipeDirection.InOut, 1, PipeTransmissionMode.Message);

s.WaitForConnection();
byte[] msg = Encoding.UTF8.GetBytes ("Hello");
s.Write (msg, 0, msg.Length);
Console.WriteLine (Encoding.UTF8.GetString (ReadMessage (s)));
using var s = new NamedPipeClientStream ("pipedream");
s.Connect();
s.ReadMode = PipeTransmissionMode.Message;
Console.WriteLine (Encoding.UTF8.GetString (ReadMessage (s)));
byte[] msg = Encoding.UTF8.GetBytes ("Hello right back!");
s.Write (msg, 0, msg.Length);
Anonymous pipes
匿名管道在父进程和子进程之间提供单向通信流。Anonymous pipes 不使用系统范围的名称,而是通过一个私有句柄进行调优。与 named pipes 一样,客户端和服务器角色也是截然不同的。然而,通信系统略有不同,它的运行方式如下
- 服务器实例化一个 AnonymousPipeServerStream,提交到 In 或 Out 的 PipeDirectionofIn。
- 服务器调用 GetClientHandleAsString 获取管道的标识符,然后将其传递给客户端(通常在启动子进程时作为参数)
- 子进程实例化一个 AnonymousPipeClientStream,指定相反的 PipeDirect。
- 服务器通过调用 DispoLocalCopyOfClientHandle 释放在步骤2中生成的本地句柄。
- 父进程和子进程通过读/写流进行通信。
由于 Anonymous pipes 是单向的,因此服务器必须创建两个通信管道。下面的控制台程序创建两个管道(输入和输出) ,然后启动一个子进程。然后,它向子进程发送一个字节,并接收一个字节作为回报:
using System.Diagnostics;
using System.IO.Pipes;
using System.Reflection;

if (args.Length == 0)
// No arguments signals server mode
    AnonymousPipeServer();
else
// We pass in the pipe handle IDs as arguments to signal client mode
    AnonymousPipeClient (args [0], args [1]);

static void AnonymousPipeServer()
{
    using var tx = new AnonymousPipeServerStream(
        PipeDirection.Out, HandleInheritability.Inheritable);
    using var rx = new AnonymousPipeServerStream(
        PipeDirection.In, HandleInheritability.Inheritable);

    string txID = tx.GetClientHandleAsString();
    string rxID = rx.GetClientHandleAsString();

    // Create and start up a child process.
    // We'll use the same Console executable, but pass in arguments:
    string thisAssembly = Assembly.GetEntryAssembly().Location;
    string thisExe = Path.ChangeExtension(thisAssembly, ".exe");
    var args = $"{txID} {rxID}";
    var startInfo = new ProcessStartInfo(thisExe, args);
    startInfo.UseShellExecute = false;
    Process p = Process.Start(startInfo); // Required for child process
    tx.DisposeLocalCopyOfClientHandle();
    rx.DisposeLocalCopyOfClientHandle(); // Release unmanaged
    // handle resources.
    tx.WriteByte(100);
    // Send a byte to the child process
    Console.WriteLine("Server received: " + rx.ReadByte());
    p.WaitForExit();
}

static void AnonymousPipeClient(string rxID, string txID)
{
    using (var rx = new AnonymousPipeClientStream(PipeDirection.In, rxID))
    using (var tx = new AnonymousPipeClientStream(PipeDirection.Out, txID))
    {
        Console.WriteLine("Client received: " + rx.ReadByte());
        tx.WriteByte(200);
    }
}
与 named pipes 一样,客户端和服务器必须协调它们的发送和接收,并就每次传输的长度达成一致。遗憾的是,Anonymous pipes 不支持消息模式,因此必须实现自己的消息长度协议协议。一种解决方案是在每次传输的前四个字节中发送一个整数值,该整数值定义要跟随的消息的长度。BitConverter 类提供了在整数和四字节数组之间进行转换的方法。
BufferedStream
BufferedStream 用于装饰或包装另一个具有缓冲功能的流
缓冲通过减少到 backing store 的往返次数来提高性能。下面是我们如何在20KB 的 BufferedStream 中包装 FileStream
// Write 100K to a file:
File.WriteAllBytes ("myFile.bin", new byte [100000]);
using FileStream fs = File.OpenRead ("myFile.bin");
using BufferedStream bs = new BufferedStream (fs, 20000);   //20K buffer
bs.ReadByte();
Console.WriteLine (fs.Position);    // 20000
在这个示例中,由于预读缓冲,底层流在读取一个字节后将前进20,000字节。我们可以再调用 ReadByte 19,999次,然后文件流才会再次读取。
如本例所示,将 BufferedStream 耦合到 FileStream 的价值有限,因为 FileStream 已经具有内置的缓冲。它的唯一用途可能是在已经构建的 FileStream 上扩大缓冲区
Stream Adapters
Stream 只处理字节; 要读写字符串、整数或 XML 元素等数据类型,必须插入适配器。
- TextReader
- TextWriter
- StreamReader
- StreamWriter
- StringReader
- StringWriter
- BinaryReader
- BinaryWriter
- XmlReader
- XmlWriter
Text Adapters
TextReader 和 TextWriter 是专门处理字符和字符串的适配器的抽象基类,每种都有两个通用的实现
- StreamReader/StreamWriter
使用 Stream 作为其原始数据存储区,将流的字节转换为字符或字符串 - StringReader/StringWriter
使用内存字符串实现 TextReader/TextWriter
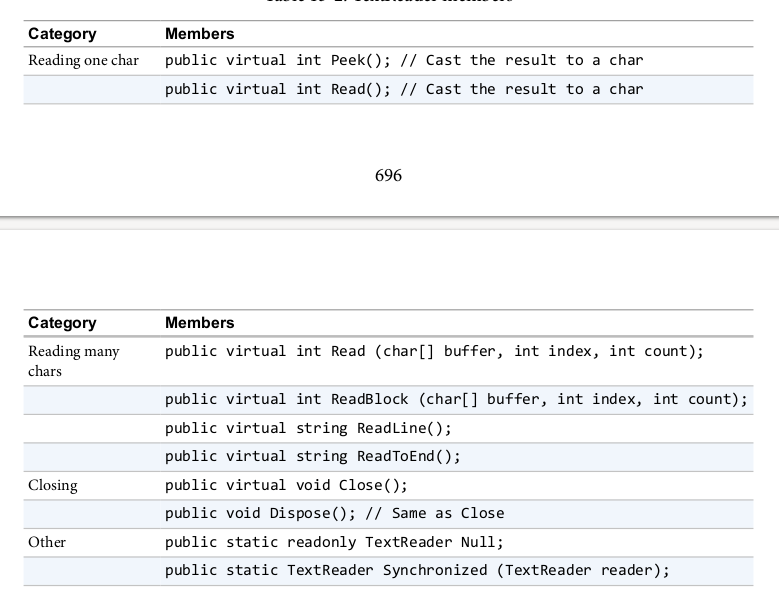
TextReader的API,按类别分列的 TextReader 成员。Peek 返回流中的下一个字符,但是标记读取位置的参数不会推进。Peek 和 Read-1的零参数版本如果在流的末尾,则返回 -1; 否则,它们返回一个可以直接强制转换为 char 的整数。接受 char [] buffer 的 Read 的重载在功能上与 ReadBlock 方法相同。ReadLine 一直读取,直到达到 CR (字符13)或 LF (字符10)或 CR + LF 对。然后返回一个字符串,丢弃 CR/LF 字符。
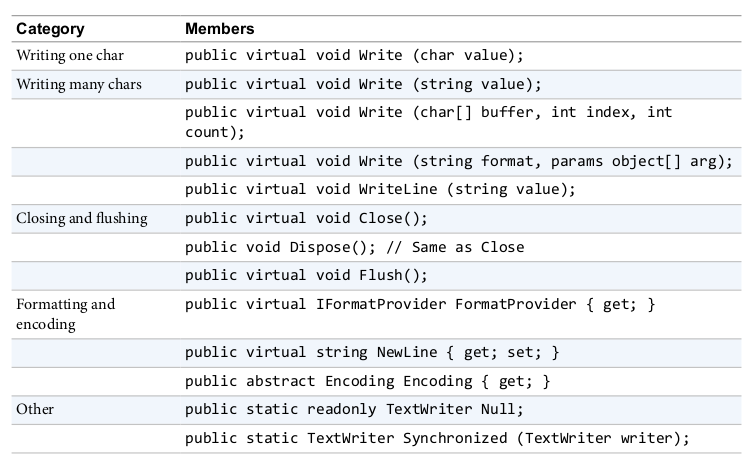
另外重载 Write 和 WriteLine 方法以接受每个基元类型以及对象类型。这些方法只是对传入的任何内容调用 ToString 方法(可选地通过在调用该方法或构造 TextWriter 时指定的 IFormatProvider)。
StreamReader and StreamWriter
using (FileStream fs = File.Create("test.txt"))
using (TextWriter writer = new StreamWriter(fs))
{
    writer.WriteLine("Line1");
    writer.WriteLine("Line2");
}

using (FileStream fs = File.OpenRead("test.txt"))
using (TextReader reader = new StreamReader(fs))
{
    Console.WriteLine(reader.ReadLine());   // Line1
    Console.WriteLine(reader.ReadLine());   // Line2
}
因为这种方法太常用了,所以File类提供快捷方式区创建
using (TextWriter writer = File.CreateText("test.txt"))
{
    writer.WriteLine("Line1");
    writer.WriteLine("Line2");
}

using (TextWriter writer = File.AppendText("test.txt"))
    writer.WriteLine("Line3");

using (TextReader reader = File.OpenText("test.txt"))
    while (reader.Peek() > -1)
        Console.WriteLine(reader.ReadLine());
Character encodings
TextReader 和 textWriter 本身只是没有连接到流或 backing store 的抽象类。但是,StreamReader 和 StreamWriter 类型连接到基础面向字节的流,因此它们必须在字符和字节之间进行转换。它们通过来自 System.Text 名称空间的 Encoding 类来完成,您可以在构造 StreamReader 或 StreamWriter 时选择该名称空间。如果选择“无”,则使用默认的 UTF-8编码。
如果显式指定编码,默认情况下,StreamWriter 将在流的开始处写入前缀以标识编码。这通常是不可取的,你可以通过构造如下的编码来防止它:
var encoding = new UTF8Encoding(encoderShouldEmitUTF8Identifier:false,throwOnInvalidBytes:true);
第二个参数告诉 StreamWriter (或 StreamReader) ,如果遇到编码没有有效字符串转换的字节,则抛出一个异常,如果不指定编码,则该字节将匹配其默认行为。
最简单的编码是 ASCII,因为每个字符由一个字节表示。ASCII 编码将 Unicode 的前127个字符映射到它的单个字节中,覆盖了您在美式键盘上看到的内容。大多数其他字符,包括专用符号和非英语字符,不能表示,而是转换为□字符。默认的 UTF-8编码可以映射所有分配的 Unicode 字符,但是它更复杂。为了与 ASCII 兼容,前127个字符编码为一个字节; 其余字符编码为一个可变的字节数(通常为两个或三个)。
using (TextWriter w = File.CreateText("but.txt"))   // Use default UTF-8
    w.WriteLine("but-");    // encoding.

using (Stream s = File.OpenRead("but.txt"))
    for (int b; (b = s.ReadByte()) > -1;)
        Console.WriteLine(b);

// 98 b
// 117 u
// 116 t
// 226 em dash byte 1
// 128 em dash byte 2
// 148 em dash byte 3
// 13 <CR>
// 10 <LF>
因为 em 破折号在 Unicode 集的前127个字符之外,所以用 UTF-8编码需要不止一个字节(在本例中是三个字节)。UTF-8对于西方字母来说非常有效,因为大多数流行字符只消耗一个字节。它也很容易降级到 ASCII,只要忽略127以上的所有字节。它的缺点是在流中查找是麻烦的,因为字符的位置与它在流中的字节位置不对应。另一种选择是 UTF-16
从技术上讲,UTF-16每个字符使用2或4个字节(分配或保留的 Unicode 字符接近100万个,因此两个字节并不总是足够)。但是,因为 C # char 类型本身只有16位宽,所以 UTF-16编码每个 .Net char 总是使用两个字节。这使得跳转到流中的特定字符索引变得很容易。
UTF-16使用两字节前缀来识别字节对是按“ little-endian”还是“ big-endian”顺序写入(先写最低有效字节还是先写最高有效字节)。默认的 little-endian 顺序是基于 Windows 系统的标准顺序。
StringReader and StringWriter
StringReader 和 StringWriter 适配器根本不包装流; 相反,它们使用字符串或 StringBuilder 作为底层数据源。这意味着不需要进行字节转换ーー实际上,这些类所做的一切都是通过字符串或 StringBuilder 加上索引变量可以轻松实现的。但是,它们的优势在于它们与 StreamReader/StreamWriter 共享一个基类。例如,假设我们有一个包含 XML 的字符串,并希望使用 XmlReader 解析它。
XmlReader.Create 方法可以接收下面的参数:
- URI
- Stream
- TextReader
那么,我们如何对字符串进行 XML 解析呢?因为 StringReader 是 TextReader 的一个子类,所以我们很幸运。我们可以像下面这样实例化和传递一个 StringReader
XmlReader r = XmlReader.Create (new StringReader (myString));
Binary Adapters
BinaryReader 和 BinaryWriter 读写本机数据类型: bool, byte, char, decimal, float, double, short, int, long, sbyte, ushort, uint, and ulong 以及基本数据类型的字符串和数组。
与 StreamReader 和 StreamWriter 不同,binary adapters 有效地存储基本数据类型,因为它们在内存中表示。因此,int 使用4个字节; double 使用8个字节。字符串是通过文本编码写入的(与 StreamReader 和 StreamWriter 一样) ,但是带有长度前缀,因此无需特殊分隔符就可以读回一系列字符串。
public class Person
{
    public string Name;

    public int Age;

    public double Height;

    public void SaveData(Stream s)
    {
        var w = new BinaryWriter(s);
        w.Write(Name);
        w.Write(Age);
        w.Write(Height);
        w.Flush();
    }

    public void LoadData(Stream s)
    {
        var r = new BinaryReader(s);
        Name = r.ReadString();
        Age = r.ReadInt32();
        Height = r.ReadDouble();
    }
}
BinaryReader 也可以读入字节数组。下面是可查找流的全部内容, 这比直接从流中读取更方便,因为它不需要循环来确保所有数据都已读取。
byte[] data = new BinaryReader (s).ReadBytes ((int) s.Length);
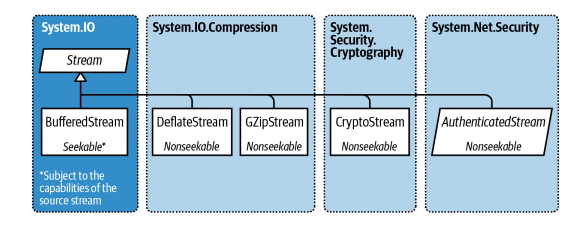
Compression Streams
在 System.IO.Compress 名称空间中提供了两个通用的压缩流: DeflateStream 和 GZipStream。两者都使用类似于 ZIP 格式的流行压缩算法。它们的不同之处在于,GZipStream 在开始和结束时都编写了一个附加协议,包括一个用于检测错误的 CRC。GZipStream 也符合其他软件认可的标准。
.Net 还包括实现 Brotli 压缩算法的 BrotliStream。BrotliStream 的速度是 DeflateStream 和 gzipStream 的10倍多,但压缩比更好。(性能下降只适用于压缩ーー解压缩性能非常好。)
DeflateStream, GZipStream, 和 BrotliStream 都是 decorators。它们压缩或解压缩来自您在构建中提供的另一个流的数据
using (Stream s = File.Create("compressed.bin"))
using (Stream ds = new DeflateStream(s, CompressionMode.Compress))
    for (byte i = 0; i < 100; i++)
        ds.WriteByte(i);

using (Stream s = File.OpenRead("compressed.bin"))
using (Stream ds = new DeflateStream(s, CompressionMode.Decompress))
    for (byte i = 0; i < 100; i++)
        Console.WriteLine(ds.ReadByte());
使用 DeflateStream 时,压缩文件为102字节; 略大于原始文件(BrotliStream 将其压缩为73字节)。对于“密集的”、不重复的二进制数据,压缩效果很差(对于加密数据,压缩效果最差,因为加密数据缺乏规律性)。它适用于大多数文本文件
在下一个例子中,我们使用 Brotli 算法压缩和解压缩由从一个小句子中随机选择的1,000个单词组成的文本流。这也演示了链接一个 backing store 流、一个 decorator 流和一个适配器,以及异步方法的使用
string[] words = "The quick brown fox jumps over the lazy dog".Split();
Random rand = new Random (0);

// Give it a seed for consistency
using (Stream s = File.Create ("compressed.bin"))
using (Stream ds = new BrotliStream (s, CompressionMode.Compress))
using (TextWriter w = new StreamWriter (ds))
    for (int i = 0; i < 1000; i++)
        await w.WriteAsync (words [rand.Next (words.Length)] + " ");
Console.WriteLine (new FileInfo ("compressed.bin").Length); // 808

using (Stream s = File.OpenRead ("compressed.bin"))
using (Stream ds = new BrotliStream (s, CompressionMode.Decompress))
using (TextReader r = new StreamReader (ds))
    Console.Write (await r.ReadToEndAsync());
在这种情况下,BrotliStream 可以有效地压缩到808字节,平均一个单词不足1byte
Compressing in Memory
有时候,你需要在内存中将它整个压缩了,下面介绍如何使用内存流实现此目的
byte[] data = new byte[1000];

var ms = new MemoryStream();
using (Stream ds = new DeflateStream(ms, CompressionMode.Compress))
    ds.Write(data, 0, data.Length);

byte[] compressed = ms.ToArray();
Console.WriteLine(compressed.Length);   // 11

// Decompress back to the data array:
ms = new MemoryStream(compressed);
using (Stream ds = new DeflateStream(ms, CompressionMode.Decompress))
    for (int i = 0; i < 1000; i += ds.Read(data, i, 1000 - i));
围绕 DeflateStream 的 using 语句以教科书式的方式关闭它,在过程中flush任何未写入的缓冲。这也关闭了它包装的 Memory Stream ーー这意味着我们必须调用 ToArray 来提取它的数据
Unix gzip File Compression
GZipStream 的压缩算法作为文件压缩格式在 Unix 系统上很流行。每个源文件都被压缩到一个扩展名为.gz。
async Task GZip(string sourcefile, bool deleteSource = true)
{
    var gzipfile = $"{sourcefile}.gz";
    if (File.Exists(gzipfile))
        throw new Exception("Gzip file already exists");

    // Compress
    using (FileStream inStream = File.Open(sourcefile, FileMode.Open))
    using (FileStream outStream = new FileStream(gzipfile, FileMode.CreateNew))
    using (GZipStream gzipStream = new GZipStream(outStream, CompressionMode.Compress))
        await inStream.CopyToAsync(gzipStream);
    if (deleteSource) File.Delete(sourcefile);
}

async Task GUnzip(string gzipfile, bool deleteGzip = true)
{
    if (Path.GetExtension(gzipfile) != ".gz")
        throw new Exception("Not a gzip file");

    var uncompressedFile = gzipfile.Substring(0, gzipfile.Length - 3);
    if (File.Exists(uncompressedFile))
        throw new Exception("Destination file already exists");

    // Uncompress
    using (FileStream uncompressToStream = File.Open(uncompressedFile, FileMode.Create))
    using (FileStream zipfileStream = File.Open(gzipfile, FileMode.Open))
    using (var unzipStream = new GZipStream(zipfileStream, CompressionMode.Decompress))
        await unzipStream.CopyToAsync(uncompressToStream);

    if (deleteGzip) File.Delete(gzipfile);
}
Working with ZIP Files
System.IO.Compression 中的 ZipArchive 和 ZipFile 类支持 ZIP 压缩格式。与 deflateStream 和 gzipStream 相比,ZIP 格式的优势在于它可以作为多个文件的容器,并且与用文件资源管理器创建的 ZIP 文件兼容。
ZipArchive 和 ZipFile 在 Windows 和 Unix 中都可以工作; 但是,这种格式在 Windows 中最流行。在 Unix 中,tar 格式作为多个文件的容器更为流行。您可以使用第三方库(如 SharpZipLib)读/写 tar 文件。
ZipArchive 处理流,而 ZipFile 处理更常见的处理文件的场景。(ZipFile 是 ZipArchive 的静态助手类。)
ZipFile 的 CreateFromDirectory 方法将指定文件夹下的所有文件都添加到ZIP文件中:
ZipFile.CreateFromDirectory (@"d:\MyFolder", @"d:\archive.zip");
ExtractToDirectory 方法是上面方法的反向操作:
ZipFile.ExtractToDirectory (@"d:\archive.zip", @"d:\MyFolder");
压缩时,可以指定是否优化文件大小或速度,以及是否在归档文件中包含源目录的名称。在我们的示例中启用后一个选项将在存档中创建一个名为 MyFolder 的子目录,压缩文件将进入该目录。
ZipFile 有一个 Open 方法用于读写单个条目。这将返回一个 ZipArchive 对象(您也可以通过使用 Stream 对象实例化 ZipArchive 来获得该对象)。调用 Open 时,必须指定一个文件名,并指示是要读取、创建还是更新归档文件。然后可以通过 Entry 属性枚举现有条目,或通过调用 GetEntry 查找特定文件
using (ZipArchive zip = ZipFile.Open(@"d:\zz.zip", ZipArchiveMode.Read))
    foreach (ZipArchiveEntry entry in zip.Entries)
        Console.WriteLine(entry.FullName + " " + entry.Length);
File and Directory Operations
System.IO 命名空间提供了一组用于执行“实用”文件和目录操作的类型,例如复制和移动、创建目录以及设置文件属性和权限。对于大多数特性,您可以选择两个类中的任何一个,一个提供静态方法,另一个提供实例方法
- Static classes
File 和 Directory - Instance-method classes
FileInfo 和 DirectoryInfo
此外,还有一个名为 Path 的静态类。这对文件或目录没有任何作用; 相反,它为文件名和目录路径提供了字符串操作方法。Path 还辅助使用临时文件。
The File Class
bool Exists (string path);  // Returns true if the file is present
void Delete (string path);
void Copy(string sourceFileName, string destFileName);
void Move(string sourceFileName, string destFileName);
void Replace (string sourceFileName, string destinationFileName,
                                    string destinationBackupFileName);

FileAttributes GetAttributes (string path);
void SetAttributes(string path, FileAttributes fileAttributes);
void Decrypt (string path);
void Encrypt (string path);
DateTime GetCreationTime(string path);  // UTC versions are
DateTime GetLastAccessTime (string path);
DateTime GetLastWriteTime (string path);

void SetCreationTime(string path, DateTime creationTime);
void SetLastAccessTime (string path, DateTime lastAccessTime);
void SetLastWriteTime (string path, DateTime lastWriteTime);
FileSecurity GetAccessControl (string path);
FileSecurity GetAccessControl (string path, AccessControlSections includeSections);
void SetAccessControl (string path, FileSecurity fileSecurity);
Move 会抛出错误当文件在des中存在的时候,而Replace不会。
如果文件是只读,Delete会抛出错误UnauthorizedAccessException
在FileAttribute中可以看到,GetAttributes获取所有属性
Archive, Compressed, Device, Directory, Encrypted,Hidden, IntegritySystem, Normal, NoScrubData, NotContentIndexed,Offline, ReadOnly, ReparsePoint, SparseFile, System, Temporary
此枚举中的成员是可组合的。下面介绍如何在不影响其余属性的情况下切换单个文件属性
string filePath = "test.txt";
FileAttributes fa = File.GetAttributes(filePath);
if ((fa & FileAttributes.ReadOnly) != 0)
{
    // Use the exclusive-or operator (^) to toggle the ReadOnly flag
    fa ^= FileAttributes.ReadOnly;
    File.SetAttributes(filePath, fa);
}

// Now we can delete the file, for instance:
File.Delete(filePath);
FileInfo提供了更加简单的方法 new FileInfo ("test.txt").IsReadOnly = false;
The Directory Class
静态 Directory 类提供了一组类似于 File 类的方法ーー用于检查目录是否存在(存在)、移动目录(移动)、删除目录(删除)、获取/设置创建或最后访问的时间以及获取/设置安全权限
string GetCurrentDirectory ();
void SetCurrentDirectory (string path);
DirectoryInfo CreateDirectory (string path);
DirectoryInfo GetParent (string path);
string GetDirectoryRoot (string path);
string[] GetLogicalDrives(); // Gets mount points on Unix

// The following methods all return full paths:
string[] GetFiles (string path);
string[] GetDirectories (string path);
string[] GetFileSystemEntries (string path);
IEnumerable<string> EnumerateFiles (string path);
IEnumerable<string> EnumerateDirectories (string path);
IEnumerable<string> EnumerateFileSystemEntries (string path);
FileInfo and DirectoryInfo
文件和目录上的静态方法便于执行单个文件或目录操作。如果需要调用一行中的一系列方法,FileInfo 和 DirectoryInfo 类提供了一个对象模型,使得这项工作更加容易。
static string TestDirectory =>
RuntimeInformation.IsOSPlatform(OSPlatform.Windows)
    ? @"C:\Temp"
    : "/tmp";

Directory.CreateDirectory(TestDirectory);
FileInfo fi = new FileInfo(Path.Combine(TestDirectory, "FileInfo.txt"));
Console.WriteLine(fi.Exists);   // false
using (TextWriter w = fi.CreateText())
    w.Write("Some text");
Console.WriteLine(fi.Exists);   // false (still)
fi.Refresh();
Console.WriteLine(fi.Exists);   // true

Console.WriteLine(fi.Name);     // FileInfo.txt
Console.WriteLine(fi.FullName); // c:\temp\FileInfo.txt (Windows)
                                // /tmp/FileInfo.txt (Unix)

Console.WriteLine(fi.DirectoryName); // c:\temp (Windows)   // /tmp (Unix)

Console.WriteLine(fi.Directory.Name); // temp
Console.WriteLine(fi.Extension);    // .txt

Console.WriteLine(fi.Length);       // 9

fi.Encrypt();
fi.Attributes ^= FileAttributes.Hidden;     // (Toggle hidden flag)
fi.IsReadOnly = true;
Console.WriteLine(fi.Attributes);       // ReadOnly,Archive,Hidden,Encrypted
Console.WriteLine(fi.CreationTime);     // 3/09/2019 1:24:05 PM

fi.MoveTo(Path.Combine(TestDirectory, "FileInfoX.txt"));
DirectoryInfo di = fi.Directory;
Console.WriteLine(di.Name);             // temp or tmp
Console.WriteLine(di.FullName);         // c:\temp or /tmp
Console.WriteLine(di.Parent.FullName);  // c:\ or /
di.CreateSubdirectory("SubFolder");
Path
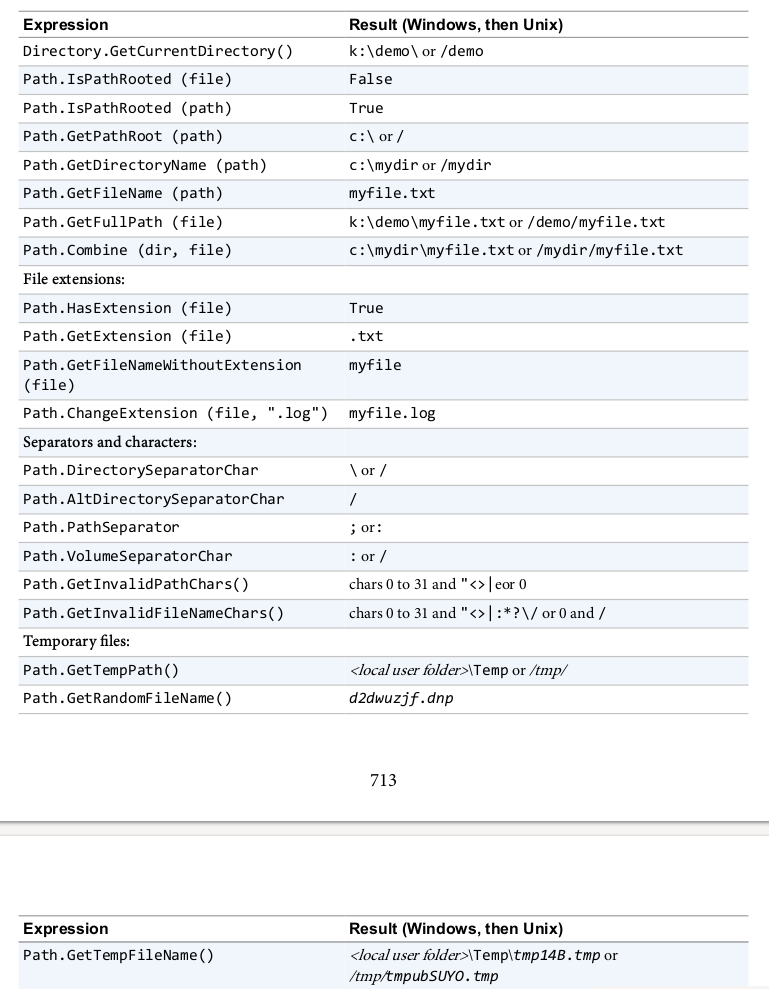
Combine 特别有用: 它允许您组合一个目录和文件名ーー或两个目录ーー而无需首先检查是否存在尾随路径分隔符,并且它自动为操作系统使用正确的路径分隔符。它提供了最多可以接受四个目录和/或文件名的重载。
Querying Volume Information
使用 DriveInfo 类型 完成对挂载的文件系统进行查询
DriveInfo c = new DriveInfo("C"); // Query the C: drive.
                                  // On Unix: /

long totalSize = c.TotalSize;           // Size in bytes.
long freeBytes = c.TotalFreeSpace;      // Ignores disk quotas.
long freeToMe = c.AvailableFreeSpace;   // Takes quotas into account.

foreach (DriveInfo d in DriveInfo.GetDrives())  // All defined drives.
                                                // On Unix: mount points
{
    Console.WriteLine(d.Name);              // C:\
    Console.WriteLine(d.DriveType);         // Fixed
    Console.WriteLine(d.RootDirectory);     // C:\
    if (d.IsReady)          // If the drive is not ready, the following two
                            // properties will throw exceptions:
    {
        Console.WriteLine(d.VolumeLabel);       // The Sea Drive
        Console.WriteLine(d.DriveFormat);       // NTFS
    }
}
Catching Filesystem Events
FileSystemWatcher 类允许您监视活动的目录(以及可选的子目录)。FileSystemWatcher 具有在创建、修改、重命名和删除文件或子目录以及它们的属性更改时触发的事件。无论用户或进程是否执行更改,这些事件都会触发
Watch(GetTestDirectory(), "*.txt", true);

void Watch(string path, string filter, bool includeSubDirs)
{
    using (var watcher = new FileSystemWatcher(path, filter))
    {
        watcher.Created += FileCreatedChangedDeleted;
        watcher.Changed += FileCreatedChangedDeleted;
        watcher.Deleted += FileCreatedChangedDeleted;
        watcher.Renamed += FileRenamed;
        watcher.Error += FileError;
        watcher.IncludeSubdirectories = includeSubDirs;
        watcher.EnableRaisingEvents = true;
        Console.WriteLine("Listening for events - press <enter> to end");
        Console.ReadLine();
    }
}

// Disposing the FileSystemWatcher stops further events from firing.
void FileCreatedChangedDeleted(object o, FileSystemEventArgs e)
    => Console.WriteLine("File {0} has been {1}", e.FullPath, e.ChangeType);

void FileRenamed(object o, RenamedEventArgs e)
    => Console.WriteLine("Renamed: {0}->{1}", e.OldFullPath, e.FullPath);

void FileError(object o, ErrorEventArgs e)
    => Console.WriteLine("Error: " + e.GetException().Message);

string GetTestDirectory() =>
    RuntimeInformation.IsOSPlatform(OSPlatform.Windows)
        ? @"C:\Temp"
        : "/tmp";
Error 事件不会通知您文件系统错误; 相反,它指示 FileSystemWatcher 的事件缓冲区溢出,因为它被 Changed、 Created、 Delete 或 Rename 事件淹没。可以通过 InternalBufferSize 属性更改缓冲区大小
Memory-Mapped Files
内存映射文件提供了两个关键特性:
- 对文件数据的高效随机访问
- 在同一台计算机上不同进程之间共享内存的能力
memory-mapped files 在System.IO.MemoryMappedFiles命名空间中,在内部,它们通过为内存映射文件封装操作系统的 API 来工作。
Memory-Mapped Files and Random File I/O
虽然普通的 FileStream 允许随机文件 I/O (通过设置流的 Position 属性) ,但它针对顺序 I/O 进行了优化。根据经验法则
- 对于顺序 I/O,FileStreams 的速度大约是内存映射文件的10倍。
- 对于随机 I/O,内存映射文件的速度大约是 FileStreams 的10倍。
更改 FileStream 的位置可能需要几微秒的时间ーー如果在循环中完成,这个时间会增加。FileStream 也不适合多线程访问ーー因为它的位置在读或写时会发生变化。
创建一个内存映射文件:
- 像平常一样获取文件流
- 实例化 MemoryMappedFile,传入文件流
- 在内存映射文件对象上调用 CreateViewAccessor。
最后一步为您提供了一个 MemoryMappedViewAccessor 对象,该对象提供了随机读取和写入简单类型、结构和数组的方法
下面创建一个100万字节的文件,然后使用内存映射文件 API 读写位置为500,000的字节
File.WriteAllBytes ("long.bin", new byte [1000000]);
using MemoryMappedFile mmf = MemoryMappedFile.CreateFromFile ("long.bin");
using MemoryMappedViewAccessor accessor = mmf.CreateViewAccessor();
accessor.Write (500000, (byte) 77);
Console.WriteLine (accessor.ReadByte (500000)); // 77
Memory-Mapped Files and Shared Memory (Windows)
在 Windows 下,还可以使用内存映射文件作为在同一计算机上的进程之间共享内存的方法。一个进程通过调用 MemoryMappedFile.CreateNew 创建一个共享内存块,然后其他进程通过调用具有相同名称的 MemoryMappedFile.OpenExisting 订阅同一内存块。虽然它仍然被称为内存映射的“文件”,但它完全位于内存中,没有磁盘。
Cross-Platform Interprocess Shared Memory
Windows 和 Unix 都允许多个进程对同一个文件进行内存映射。您必须小心确保适当的文件共享设置
static void Writer()
{
    var file = Path.Combine(TestDirectory, "interprocess.bin");
    File.WriteAllBytes(file, new byte [100]);
    using FileStream fs = new FileStream(file, FileMode.Open, FileAccess.ReadWrite,
        FileShare.ReadWrite);
    using MemoryMappedFile mmf = MemoryMappedFile
        .CreateFromFile(fs, null, fs.Length, MemoryMappedFileAccess.ReadWrite, HandleInheritability.None, true);
    using MemoryMappedViewAccessor accessor = mmf.CreateViewAccessor();
    accessor.Write(0, 12345);
    Console.ReadLine(); // Keep shared memory alive until user hits Enter.

    File.Delete(file);
}

static void Reader()
{
// This can run in a separate executable:
    var file = Path.Combine(TestDirectory, "interprocess.bin");
    using FileStream fs =
        new FileStream(file, FileMode.Open, FileAccess.ReadWrite,
            FileShare.ReadWrite);
    using MemoryMappedFile mmf = MemoryMappedFile
        .CreateFromFile(fs, null, fs.Length, MemoryMappedFileAccess.ReadWrite,
            HandleInheritability.None, true);
    using MemoryMappedViewAccessor accessor = mmf.CreateViewAccessor();

    Console.WriteLine(accessor.ReadInt32(0)); // 12345
}

static string TestDirectory =>
RuntimeInformation.IsOSPlatform(OSPlatform.Windows)
    ? @"C:\Test"
    : "/tmp";

 浙公网安备 33010602011771号