
SpringCloud实战4-Hystrix线程隔离&请求缓存&请求合并
接着上一篇的Hystrix进行进一步了解。
当系统用户不断增长时,每个微服务需要承受的并发压力也越来越大,在分布式环境中,通常压力来自对依赖服务的调用,因为亲戚依赖服务的资源需要通过通信来实现,这样的依赖方式比起进程内的调用方式会引起一部分的性能损失,
在高并发的场景下,Hystrix 提供了请求缓存的功能,我们可以方便的开启和使用请求缓存来优化系统,达到减轻高并发时的请求线程消耗、降低请求响应时间的效果
Hystrix的缓存,这个功能是有点鸡肋的,因为这个缓存是基于request的,为什么这么说呢?因为每次请求来之前都必须HystrixRequestContext.initializeContext();进行初始化,每请求一次controller就会走一次filter,上下文又会初始化一次,前面缓存的就失效了,又得重新来。
所以你要是想测试缓存,你得在一次controller请求中多次调用那个加了缓存的service或HystrixCommand命令。Hystrix的书上写的是:在同一用户请求的上下文中,相同依赖服务的返回数据始终保持一致。在当次请求内对同一个依赖进行重复调用,只会真实调用一次。在当次请求内数据可以保证一致性。
因此。希望大家在这里不要理解错了。
请求缓存图,如下:
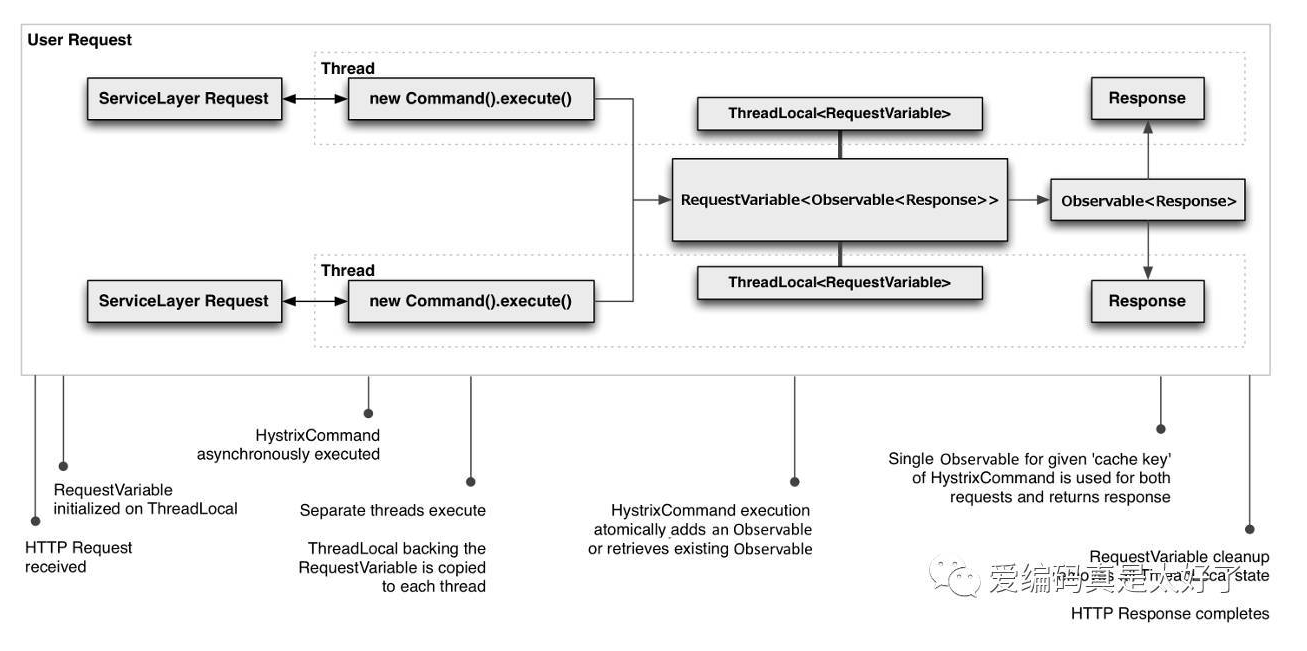
假设两个线程发起相同的HTTP请求,Hystrix会把请求参数初始化到ThreadLocal中,两个Command异步执行,每个Command会把请求参数从ThreadLocal中拷贝到Command所在自身的线程中,Command在执行的时候会通过CacheKey优先从缓存中尝试获取是否已有缓存结果,
如果命中,直接从HystrixRequestCache返回,如果没有命中,那么需要进行一次真实调用,然后把结果回写到缓存中,在请求范围内共享响应结果。
RequestCache主要有三个优点:
-
在当次请求内对同一个依赖进行重复调用,只会真实调用一次。
-
在当次请求内数据可以保证一致性。
-
可以减少不必要的线程开销。
例子还是接着上篇的HelloServiceCommand来进行演示,我们只需要实现HystrixCommand的一个缓存方法名为getCacheKey()即可
代码如下:
/**
 * Created by cong on 2018/5/9.
 */
public class HelloServiceCommand extends HystrixCommand<String> {

    private RestTemplate restTemplate;

    protected HelloServiceCommand(String commandGroupKey,RestTemplate restTemplate) {
    //根据commandGroupKey进行线程隔离的
        super(HystrixCommandGroupKey.Factory.asKey(commandGroupKey));
        this.restTemplate = restTemplate;
    }

    @Override
    protected String run() throws Exception {
        System.out.println(Thread.currentThread().getName());
        return restTemplate.getForEntity("http://HELLO-SERVICE/hello",String.class).getBody();
    }


    @Override
    protected String getFallback() {
        return "error";
    }


    //Hystrix的缓存
    @Override
    protected String getCacheKey() {
        //一般动态的取缓存Key,比如userId,这里为了做实验写死了,写为hello
        return "hello";
    }
}
Controller代码如下:
/**
 * Created by cong on 2018/5/8.
 */
@RestController
public class ConsumerController {


    @Autowired
    private  RestTemplate restTemplate;

    @RequestMapping("/consumer")
    public String helloConsumer() throws ExecutionException, InterruptedException {

        //Hystrix的缓存实现,这功能有点鸡肋。
        HystrixRequestContext.initializeContext();
        HelloServiceCommand command = new HelloServiceCommand("hello",restTemplate);
        String execute = command.execute();//清理缓存
//       HystrixRequestCache.getInstance("hello").clear();
        return null;


    }

}
在原来的两个provider模块都增加增加一条输出语句,如下:
provider1模块:
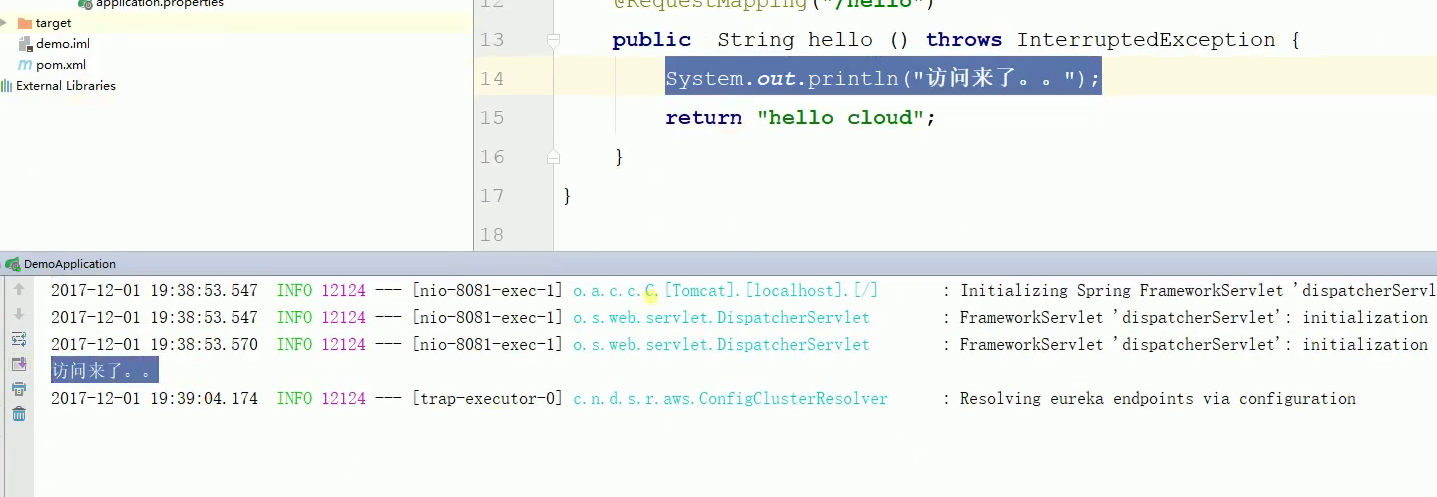
/**
 * Created by cong on 2018/5/8.
 */
@RestController
public class HelloController {

    @RequestMapping("/hello")
    public String hello(){
        System.out.println("访问来1了......");
        return "hello1";
    }


}
provider2模块:
/**
 * Created by cong on 2018/5/8.
 */
@RestController
public class HelloController {

    @RequestMapping("/hello")
    public String hello(){
        System.out.println("访问来2了......");
        return "hello1";
    }


}
浏览器输入localhost:8082/consumer
运行结果如下:
可以看到你刷新一次请求,上下文又会初始化一次,前面缓存的就失效了,又得重新来,这时候根本就没有缓存了。因此,你无论刷新多少次请求都是出现“访问来了”,缓存都是失效的。如果是从缓存来的话,根本就不会输出“访问来了”。
但是,你如你在一起请求多次调用同一个业务,这时就是从缓存里面取的数据。不理解可以看一下Hystrix的缓存解释:在同一用户请求的上下文中,相同依赖服务的返回数据始终保持一致。在当次请求内对同一个依赖进行重复调用,只会真实调用一次。在当次请求内数据可以保证一致性。
Controller代码修改如下:
/**
 * Created by cong on 2018/5/8.
 */
@RestController
public class ConsumerController {


    @Autowired
    private  RestTemplate restTemplate;

    @RequestMapping("/consumer")
    public String helloConsumer() throws ExecutionException, InterruptedException {

        //Hystrix的缓存实现,这功能有点鸡肋。
        HystrixRequestContext.initializeContext();
        HelloServiceCommand command = new HelloServiceCommand("hello",restTemplate);
        String execute = command.execute();
      HelloServiceCommand command1 = new HelloServiceCommand("hello",restTemplate);
String execute1 = command1.execute();
  //清理缓存
  // HystrixRequestCache.getInstance("hello").clear();

   return null;
}
接着运行,运行结果如下:
可以看到只有一个”访问来了“,并没有出现两个”访问来了“。
之所以没出现第二个,是因为是从缓存中取了。
删除缓存 例如删除key名为hello的缓存:
HystrixRequestCache.getInstance("hello").clear();
你要写操作的时候,你把一条数据给给删除了,这时候你就必须把缓存清空了。
下面进行请求的合并。
为什么要进行请求合并?举个例子,有个矿山,每过一段时间都会生产一批矿产出来(质量为卡车载重量的1/100),卡车可以一等到矿产生产出来就马上运走矿产,也可以等到卡车装满再运走矿产,
前者一次生产对应卡车一次往返,卡车需要往返100次,而后者只需要往返一次,可以大大减少卡车往返次数。显而易见,利用请求合并可以减少线程和网络连接,开发人员不必单独提供一个批量请求接口就可以完成批量请求。
在Hystrix中进行请求合并也是要付出一定代价的,请求合并会导致依赖服务的请求延迟增高,延迟的最大值是合并时间窗口的大小,默认为10ms,当然我们也可以通过hystrix.collapser.default.timerDelayInMilliseconds属性进行修改,
如果请求一次依赖服务的平均响应时间是20ms,那么最坏情况下(合并窗口开始是请求加入等待队列)这次请求响应时间就会变成30ms。在Hystrix中对请求进行合并是否值得主要取决于Command本身,高并发度的接口通过请求合并可以极大提高系统吞吐量,
从而基本可以忽略合并时间窗口的开销,反之,并发量较低,对延迟敏感的接口不建议使用请求合并。
请求合并的流程图如下:

可以看出Hystrix会把多个Command放入Request队列中,一旦满足合并时间窗口周期大小,Hystrix会进行一次批量提交,进行一次依赖服务的调用,通过充写HystrixCollapser父类的mapResponseToRequests方法,将批量返回的请求分发到具体的每次请求中。
例子如下:
首先我们先自定义一个BatchCommand类来继承Hystrix给我们提供的HystrixCollapser类,代码如下:
/**
 * Created by cong on 2018/5/13.
 */
public class HjcBatchCommand extends HystrixCollapser<List<String>,String,Long> {

    private Long id;

    private RestTemplate restTemplate;
  //在200毫秒内进行请求合并,不在的话,放到下一个200毫秒
    public HjcBatchCommand(RestTemplate restTemplate,Long id) {
        super(Setter.withCollapserKey(HystrixCollapserKey.Factory.asKey("hjcbatch"))
                .andCollapserPropertiesDefaults(HystrixCollapserProperties.Setter()
                        .withTimerDelayInMilliseconds(200)));
        this.id = id;
        this.restTemplate = restTemplate;
    }

    //获取每一个请求的请求参数
    @Override
    public Long getRequestArgument() {
        return id;
    }

    //创建命令请求合并
    @Override
    protected HystrixCommand<List<String>> createCommand(Collection<CollapsedRequest<String, Long>> collection) {
        List<Long> ids = new ArrayList<>(collection.size());
        ids.addAll(collection.stream().map(CollapsedRequest::getArgument).collect(Collectors.toList()));
        HjcCommand command = new HjcCommand("hjc",restTemplate,ids);
        return command;
    }

    //合并请求拿到了结果,将请求结果按请求顺序分发给各个请求
    @Override
    protected void mapResponseToRequests(List<String> results, Collection<CollapsedRequest<String, Long>> collection) {
        System.out.println("分配批量请求结果。。。。");

        int count = 0;
        for (CollapsedRequest<String,Long> collapsedRequest : collection){
            String result = results.get(count++);
            collapsedRequest.setResponse(result);
        }
    }
}
接着用自定义个HjcCommand来继承Hystrix提供的HystrixCommand来进行服务请求
/**
 * Created by cong on 2018/5/13.
 */
public class HjcCommand extends HystrixCommand<List<String>> {

    private RestTemplate restTemplate;
    private List<Long> ids;


    public HjcCommand(String commandGroupKey, RestTemplate restTemplate,List<Long> ids) {
      //根据commandGroupKey进行线程隔离
        super(HystrixCommandGroupKey.Factory.asKey(commandGroupKey));
        this.restTemplate = restTemplate;
        this.ids = ids;
    }

    @Override
    protected List<String> run() throws Exception {
        System.out.println("发送请求。。。参数为:"+ids.toString()+Thread.currentThread().getName());
        String[] result = restTemplate.getForEntity("http://HELLO-SERVICE/hjcs?ids={1}",String[].class, StringUtils.join(ids,",")).getBody();
        return Arrays.asList(result);
    }
}
但是注意一点:你请求合并必须要异步,因为你如果用同步,是一个请求完成后,另外的请求才能继续执行,所以必须要异步才能请求合并。
所以Controller层代码如下:
@RestController
public class ConsumerController {


    @Autowired
    private  RestTemplate restTemplate;

    @RequestMapping("/consumer")
    public String helloConsumer() throws ExecutionException, InterruptedException {


        //请求合并
        HystrixRequestContext context = HystrixRequestContext.initializeContext();
        HjcBatchCommand command = new HjcBatchCommand(restTemplate,1L);
        HjcBatchCommand command1 = new HjcBatchCommand(restTemplate,2L);
        HjcBatchCommand command2 = new HjcBatchCommand(restTemplate,3L);

        //这里你必须要异步,因为同步是一个请求完成后,另外的请求才能继续执行,所以必须要异步才能请求合并
        Future<String> future = command.queue();
        Future<String> future1 = command1.queue();

        String r = future.get();
        String r1 = future1.get();

        Thread.sleep(2000);
        //可以看到前面两条命令会合并,最后一条会单独,因为睡了2000毫秒,而你请求设置要求在200毫秒内才合并的。
        Future<String> future2 = command2.queue();
        String r2 = future2.get();

        System.out.println(r);
        System.out.println(r1);
        System.out.println(r2);

        context.close();

        return null;

    }

}
两个服务提供者provider1,provider2新增加一个方法来模拟数据库数据,代码如下:
/**
 * Created by cong on 2018/5/8.
 */
@RestController
public class HelloController {

    @RequestMapping("/hello")
    public String hello(){
        System.out.println("访问来2了......");
        return "hello2";
    }

    @RequestMapping("/hjcs")
    public List<String> laowangs(String ids){
        List<String> list = new ArrayList<>();
        list.add("laowang1");
        list.add("laowang2");
        list.add("laowang3");
        return list;
    }

}
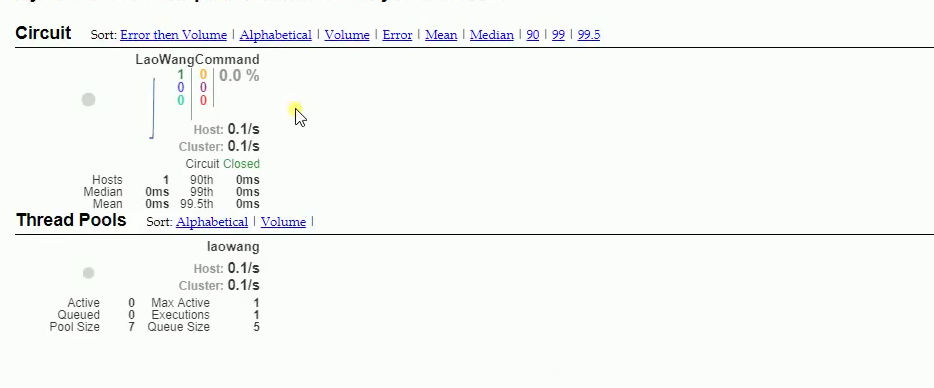
启动Ribbon模块,运行结果如下:
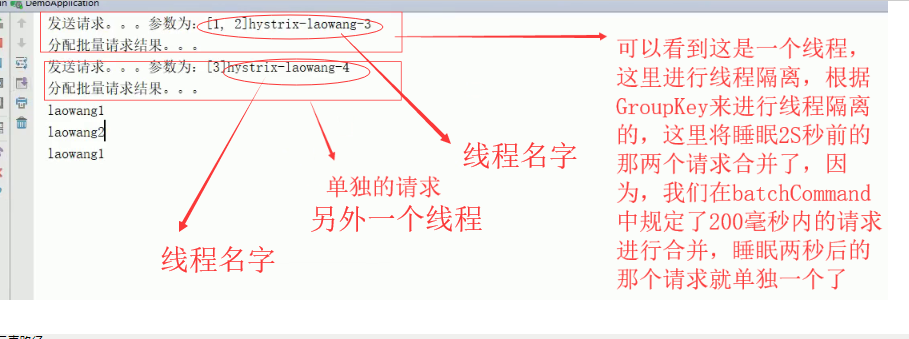
可以看到上图的两个线程是隔离的。
当请求非常多的时候,你合并请求就变得非常重要了,如果你不合并,一个请求都1 到2秒,这明显不能忍的,会造成效率缓慢,如果你合并后,这时就可以并行处理,降低延迟,但是如果请求不多的时候,只有单个请求,这时候合并也会出现
效率缓慢的,因为如果请求一次依赖服务的平均响应时间是200ms,那么最坏情况下(合并窗口开始是请求加入等待队列)这次请求响应时间就会变成300ms。所以说要看场合而定的。
下面用注解的代码来实现请求合并。代码如下:‘
/**
 * Created by cong on 2018/5/15.
 */
@Service
public class HjcService {

    @Autowired
    private RestTemplate restTemplate;

    @HystrixCollapser(batchMethod = "getLaoWang",collapserProperties = {@HystrixProperty(name = "timerDelayInMilliseconds",value = "200")})
    public Future<String> batchGetHjc(long id){
        return null;
    }

    @HystrixCommand
    public List<String> getLaoWang(List<Long> ids){
        System.out.println("发送请求。。。参数为:"+ids.toString()+Thread.currentThread().getName());
        String[] result = restTemplate.getForEntity("http://HELLO-SERVICE/hjcs?ids={1}",String[].class, StringUtils.join(ids,",")).getBody();
        return Arrays.asList(result);
    }

}
如果我们还要进行服务的监控的话,那么我们需要在Ribbon模块,和两个服务提供者模块提供如下依赖:
Ribbon模块依赖如下:
    <!--仪表盘-->
        <dependency>
            <groupId>org.springframework.cloud</groupId>
            <artifactId>spring-cloud-starter-hystrix-dashboard</artifactId>
            <version>1.4.0.RELEASE</version>
        </dependency>

        <!--监控-->
        <dependency>
            <groupId>org.springframework.boot</groupId>
            <artifactId>spring-boot-actuator</artifactId>
        </dependency>
两个provider模块依赖如下:
    <!--监控-->
        <dependency>
            <groupId>org.springframework.boot</groupId>
            <artifactId>spring-boot-actuator</artifactId>
        </dependency>
接着在Ribbon启动类打上@EnableHystrixDashboard注解,然后启动,localhost:8082/hystrix,如下图:
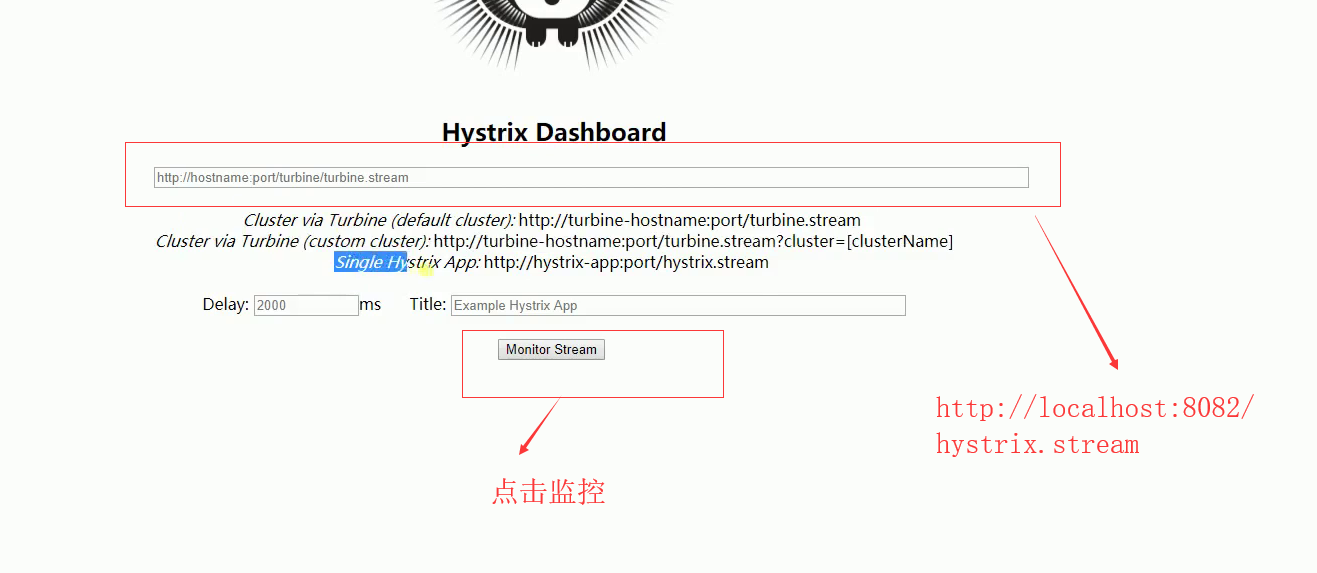
每次访问都有记录:如下:
接下来我们看一下常用的Hystrix属性:
hystrix.command.default和hystrix.threadpool.default中的default为默认CommandKey
Command Properties:
1.Execution相关的属性的配置:
-
hystrix.command.default.execution.isolation.strategy 隔离策略,默认是Thread, 可选Thread|Semaphore
-
hystrix.command.default.execution.isolation.thread.timeoutInMilliseconds 命令执行超时时间,默认1000ms
- hystrix.command.default.execution.timeout.enabled 执行是否启用超时,默认启用true
- hystrix.command.default.execution.isolation.thread.interruptOnTimeout 发生超时是是否中断,默认true
- hystrix.command.default.execution.isolation.semaphore.maxConcurrentRequests 最大并发请求数,默认10,该参数当使用ExecutionIsolationStrategy.SEMAPHORE策略时才有效。如果达到最大并发请求数,请求会被拒绝。理论上选择semaphore size的原则和选择thread size一致,但选用semaphore时每次执行的单元要比较小且执行速度快(ms级别),否则的话应该用thread。
semaphore应该占整个容器(tomcat)的线程池的一小部分。
2.Fallback相关的属性
这些参数可以应用于Hystrix的THREAD和SEMAPHORE策略
- hystrix.command.default.fallback.isolation.semaphore.maxConcurrentRequests 如果并发数达到该设置值,请求会被拒绝和抛出异常并且fallback不会被调用。默认10
- hystrix.command.default.fallback.enabled 当执行失败或者请求被拒绝,是否会尝试调用hystrixCommand.getFallback() 。默认true
3.Circuit Breaker相关的属性
- hystrix.command.default.circuitBreaker.enabled 用来跟踪circuit的健康性,如果未达标则让request短路。默认true
- hystrix.command.default.circuitBreaker.requestVolumeThreshold 一个rolling window内最小的请求数。如果设为20,那么当一个rolling window的时间内(比如说1个rolling window是10秒)收到19个请求,即使19个请求都失败,也不会触发circuit break。默认20
- hystrix.command.default.circuitBreaker.sleepWindowInMilliseconds 触发短路的时间值,当该值设为5000时,则当触发circuit break后的5000毫秒内都会拒绝request,也就是5000毫秒后才会关闭circuit。默认5000
- hystrix.command.default.circuitBreaker.errorThresholdPercentage错误比率阀值,如果错误率>=该值,circuit会被打开,并短路所有请求触发fallback。默认50
- hystrix.command.default.circuitBreaker.forceOpen 强制打开熔断器,如果打开这个开关,那么拒绝所有request,默认false
- hystrix.command.default.circuitBreaker.forceClosed 强制关闭熔断器 如果这个开关打开,circuit将一直关闭且忽略circuitBreaker.errorThresholdPercentage
4.Metrics相关参数
- hystrix.command.default.metrics.rollingStats.timeInMilliseconds 设置统计的时间窗口值的,毫秒值,circuit break 的打开会根据1个rolling window的统计来计算。若rolling window被设为10000毫秒,则rolling window会被分成n个buckets,每个bucket包含success,failure,timeout,rejection的次数的统计信息。默认10000
- hystrix.command.default.metrics.rollingStats.numBuckets 设置一个rolling window被划分的数量,若numBuckets=10,rolling window=10000,那么一个bucket的时间即1秒。必须符合rolling window % numberBuckets == 0。默认10
- hystrix.command.default.metrics.rollingPercentile.enabled 执行时是否enable指标的计算和跟踪,默认true
- hystrix.command.default.metrics.rollingPercentile.timeInMilliseconds 设置rolling percentile window的时间,默认60000
- hystrix.command.default.metrics.rollingPercentile.numBuckets 设置rolling percentile window的numberBuckets。逻辑同上。默认6
- hystrix.command.default.metrics.rollingPercentile.bucketSize 如果bucket size=100,window=10s,若这10s里有500次执行,只有最后100次执行会被统计到bucket里去。增加该值会增加内存开销以及排序的开销。默认100
- hystrix.command.default.metrics.healthSnapshot.intervalInMilliseconds 记录health 快照(用来统计成功和错误绿)的间隔,默认500ms
5.Request Context 相关参数
hystrix.command.default.requestCache.enabled 默认true,需要重载getCacheKey(),返回null时不缓存
hystrix.command.default.requestLog.enabled 记录日志到HystrixRequestLog,默认true
6.Collapser Properties 相关参数
hystrix.collapser.default.maxRequestsInBatch 单次批处理的最大请求数,达到该数量触发批处理,默认Integer.MAX_VALUE
hystrix.collapser.default.timerDelayInMilliseconds 触发批处理的延迟,也可以为创建批处理的时间+该值,默认10
hystrix.collapser.default.requestCache.enabled 是否对HystrixCollapser.execute() and HystrixCollapser.queue()的cache,默认true
7.ThreadPool 相关参数
线程数默认值10适用于大部分情况(有时可以设置得更小),如果需要设置得更大,那有个基本得公式可以follow:
requests per second at peak when healthy × 99th percentile latency in seconds + some breathing room
每秒最大支撑的请求数 (99%平均响应时间 + 缓存值)
比如:每秒能处理1000个请求,99%的请求响应时间是60ms,那么公式是:
1000 (0.060+0.012)
基本得原则时保持线程池尽可能小,他主要是为了释放压力,防止资源被阻塞。
当一切都是正常的时候,线程池一般仅会有1到2个线程激活来提供服务
- hystrix.threadpool.default.coreSize 并发执行的最大线程数,默认10
- hystrix.threadpool.default.maxQueueSize BlockingQueue的最大队列数,当设为-1,会使用SynchronousQueue,值为正时使用LinkedBlcokingQueue。该设置只会在初始化时有效,之后不能修改threadpool的queue size,除非reinitialising thread executor。默认-1。
- hystrix.threadpool.default.queueSizeRejectionThreshold 即使maxQueueSize没有达到,达到queueSizeRejectionThreshold该值后,请求也会被拒绝。因为maxQueueSize不能被动态修改,这个参数将允许我们动态设置该值。if maxQueueSize == -1,该字段将不起作用
- hystrix.threadpool.default.keepAliveTimeMinutes 如果corePoolSize和maxPoolSize设成一样(默认实现)该设置无效。如果通过plugin(https://github.com/Netflix/Hystrix/wiki/Plugins)使用自定义实现,该设置才有用,默认1.
- hystrix.threadpool.default.metrics.rollingStats.timeInMilliseconds 线程池统计指标的时间,默认10000
- hystrix.threadpool.default.metrics.rollingStats.numBuckets 将rolling window划分为n个buckets,默认10

 浙公网安备 33010602011771号