
一、RDD四种依赖关系
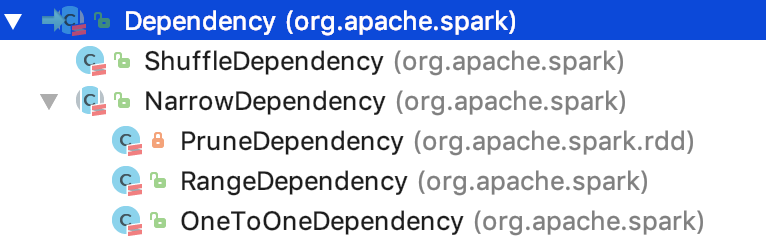
RDD四种依赖关系,分别是 ShuffleDependency、PrunDependency、RangeDependency和OneToOneDependency四种依赖关系。如下图所示:org.apache.spark.Dependency有两个一级子类,分别是 ShuffleDependency 和 NarrowDependency。其中,NarrowDependency 是一个抽象类,它有三个实现类,分别是OneToOneDependency、RangeDependency和 PruneDependency。
二、RDD的窄依赖
我们先来看窄RDD是如何确定依赖的父RDD的分区的呢?NarrowDependency 定义了一个抽象方法,如下:
/**
   * Get the parent partitions for a child partition.
   * @param partitionId a partition of the child RDD
   * @return the partitions of the parent RDD that the child partition depends upon
   */
  def getParents(partitionId: Int): Seq[Int]
其输入参数是子RDD 的 分区Id,输出是子RDD 分区依赖的父RDD 的 partition 的 id 序列。
下面,分别看三种子类的实现:
OneToOneDependency
首先,OneToOneDependency的getParent实现如下:
override def getParents(partitionId: Int): List[Int] = List(partitionId)
就一行代码,实现比较简单,子RDD对应的partition index 跟父 RDD 的partition 的 index 一样。相当于父RDD 的 每一个partition 复制到 子RDD 的对应分区中,分区的关系是一对一的。RDD的关系也是一对一的。
其次,RangeDependency的 getParent 实现如下:
/**
* :: DeveloperApi ::
* Represents a one-to-one dependency between ranges of partitions in the parent and child RDDs.
* @param rdd the parent RDD
* @param inStart the start of the range in the parent RDD
* @param outStart the start of the range in the child RDD
* @param length the length of the range
*/
首先解释三个变量:inStart:父RDD range 的起始位置;outStart:子RDD range 的起始位置;length:range 的长度。
获取 父RDD 的partition index 的规则是:如果子RDD 的 partition index 在父RDD 的range 内,则返回的 父RDD partition是 子RDD partition index - 父 RDD 分区range 起始 + 子RDD 分区range 起始。其中,(- 父 RDD 分区range 起始 + 子RDD 分区range 起始)即 子RDD 的分区的 range 起始位置和 父RDD 的分区的 range 的起始位置 的相对距离。子RDD 的 parttion index 加上这个相对距离就是 对应父的RDD partition。否则是无依赖的父 RDD 的partition index。父子RDD的分区关系是一对一的。RDD 的关系可能是一对一(length 是1 ,就是特殊的 OneToOneDependency),也可能是多对一,也可能是一对多。
PruneDependency
最后,PruneDependency的 getParent 实现如下:
/**
* Represents a dependency between the PartitionPruningRDD and its parent. In this
* case, the child RDD contains a subset of partitions of the parents'.
*/
private[spark] class PruneDependency[T](rdd: RDD[T], partitionFilterFunc: Int => Boolean)
extends NarrowDependency[T](rdd) {
首先,解释三个变量: rdd 是指向父RDD 的实例引用;partitionFilterFunc 是一个回调函数,作用是过滤出符合条件的父 RDD 的 partition 集合;PartitionPruningRDDPartition类声明如下:
private[spark] class PartitionPruningRDDPartition(idx: Int, val parentSplit: Partition)
  extends Partition {
  override val index = idx
}
partitions的生成过程如下: 先根据父RDD 引用获取父RDD 对应的 partition集合,然后根据过滤函数和partition index ,过滤出想要的父RDD 的 partition 集合并且从0 开始编号,最后,根据父RDD 的 partition 和 新编号实例化新的PartitionPruningRDDPartition实例,并放入到 partitions 集合中,相当于是先对parent RDD 的分区做Filter 剪枝操作。
在getParent 方法中, 先根据子RDD 的 partition index 获取 到对应的 parent RDD 的对应分区,然后获取Partition 的成员函数 index,该index 就是 父RDD 的 partition 在父RDD 的所有分区中的 index。 子RDD partition 和 父RDD partition的关系是 一对一的, 父RDD 和子RDD 的关系是 多对一,也可能是一对多,也可能是一对一。
简言之,在窄依赖中,子RDD 的partition 和 父RDD 的 partition 的关系是 一对一的。
三、RDD的宽依赖
下面重点看 ShuffleDependency,ShuffleDependency代表的是 一个 shuffle stage 的输出。先来看其构造方法,即其依赖的变量或实例:
其中,_rdd 代指父RDD实例;partitioner是用于给shuffle的输出分区的分区器;serializer,主要用于序列化,默认是org.apache.spark.serializer.JavaSerializer,可以通过spark.serializer 参数指定;keyOrdering RDD shuffle的key 的顺序。aggregator,map或reduce 端用于RDD shuffle的combine聚合器;mapSideCombine 是否执行部分的聚合(即 map端的预聚合,可以提高网络传输效率和reduce 端的执行效率),默认是false。因为并不是所有的都适合这样做。比如求全局平均值,均值,平方差等,但像全局最大值,最小值等是适合用mapSideCombine 的。注意,当mapSideCombine 为 true时, 必须设置combine聚合器,因为 shuffle 前需要使用聚合器做 map-combine 操作。
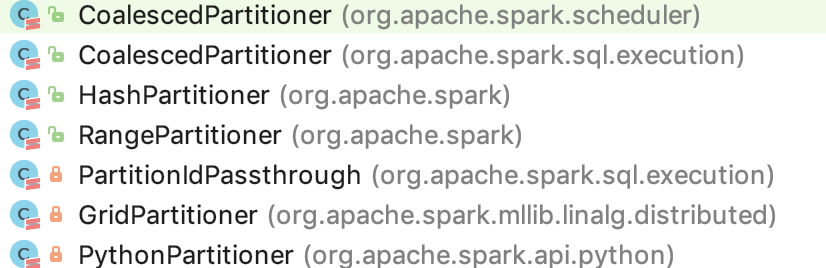
partitioner的7种实现
partitioner 定义了 RDD 里的key-value 对 是如何按 key 来分区的。映射每一个 key 到一个分区 id,从 0 到 分区数 - 1; 注意,分区器必须是确定性的,即给定同一个 key,必须返回同一个分区,便于任务失败时,追溯分区数据,确保了每一个要参与计算的分区数据的一致性。即 partition 确定了 shuffle 过程中 数据是要流向哪个具体的分区的。
org.apache.spark.Partition的 7 个实现类如下:
我们先来看Partitioner 的方法定义:
 abstract class Partitioner extends Serializable {
   def numPartitions: Int
   def getPartition(key: Any): Int
 }
其中,numPartitions 是返回 子RDD 的 partition 数量;getPartition 会根据指定的 key 返回 子RDD 的 partition index。
HashPartitioner 的 getPartition 的 实现如下,思路是 key.hashcode() mod 子RDD的 partition 数量:
 def getPartition(key: Any): Int = key match {
     case null => 0
     case _ => Utils.nonNegativeMod(key.hashCode, numPartitions)
   }
RangePartitioner 的 getPartition 的实现如下:
  def getPartition(key: Any): Int = {
     val k = key.asInstanceOf[K]
     var partition = 0
     if (rangeBounds.length <= 128) { // 不大于 128 分区
       // If we have less than 128 partitions naive search
       while (partition < rangeBounds.length && ordering.gt(k, rangeBounds(partition))) {
         partition += 1
       }
     } else { // 大于 128 个分区数量
       // Determine which binary search method to use only once.
       partition = binarySearch(rangeBounds, k) // 二分查找
       // binarySearch either returns the match location or -[insertion point]-1
       if (partition < 0) {
         partition = -partition-1
       }
       if (partition > rangeBounds.length) {
         partition = rangeBounds.length
       }
     }
     if (ascending) {
       partition
     } else {
       rangeBounds.length - partition
     }
   }
PythonPartitioner 的 getPartition 如下,跟hash 很相似:
 override def getPartition(key: Any): Int = key match {
     case null => 0
     // we don't trust the Python partition function to return valid partition ID's so
     // let's do a modulo numPartitions in any case
     case key: Long => Utils.nonNegativeMod(key.toInt, numPartitions)
     case _ => Utils.nonNegativeMod(key.hashCode(), numPartitions)
   }
PartitionIdPassthrough 的 getPartition 如下:
override def getPartition(key: Any): Int = key.asInstanceOf[Int]
GridPartitioner 的 getPartition 如下,思想,二元组定位到网格的partition:
 override val numPartitions: Int = rowPartitions * colPartitions

   /**
    * Returns the index of the partition the input coordinate belongs to.
    *
    * @param key The partition id i (calculated through this method for coordinate (i, j) in
    *            `simulateMultiply`, the coordinate (i, j) or a tuple (i, j, k), where k is
    *            the inner index used in multiplication. k is ignored in computing partitions.
    * @return The index of the partition, which the coordinate belongs to.
    */
   override def getPartition(key: Any): Int = {
     key match {
       case i: Int => i
       case (i: Int, j: Int) =>
         getPartitionId(i, j)
       case (i: Int, j: Int, _: Int) =>
         getPartitionId(i, j)
       case _ =>
         throw new IllegalArgumentException(s"Unrecognized key: $key.")
     }
   }

   /** Partitions sub-matrices as blocks with neighboring sub-matrices. */
   private def getPartitionId(i: Int, j: Int): Int = {
     require(0 <= i && i < rows, s"Row index $i out of range [0, $rows).")
     require(0 <= j && j < cols, s"Column index $j out of range [0, $cols).")
     i / rowsPerPart + j / colsPerPart * rowPartitions
   }
包括匿名类,还有好多种,就不一一介绍了。总而言之,宽依赖是根据partitioner 确定 分区内的数据具体到哪个分区。
至此,RDD 的窄依赖和宽依赖都介绍清楚了。
第二章、spark源码分析之 SparkContext 的初始化过程
一、创建或使用现有session
从Spark 2.0 开始,引入了 SparkSession的概念,创建或使用已有的session 代码如下:
 val spark = SparkSession
   .builder
  .appName("SparkTC")
   .getOrCreate()
首先,使用了 builder 模式来创建或使用已存在的SparkSession,org.apache.spark.sql.SparkSession.Builder#getOrCreate 代码如下:
  def getOrCreate(): SparkSession = synchronized {
   assertOnDriver() // 注意,spark session只能在 driver端创建并访问
   // Get the session from current thread's active session.
 // activeThreadSession 是一个InheritableThreadLocal(继承自ThreadLocal)方法。因为数据在 ThreadLocal中存放着,所以不需要加锁
   var session = activeThreadSession.get()
 // 如果session不为空,且session对应的sparkContext已经停止了,可以使用现有的session
   if ((session ne null) && !session.sparkContext.isStopped) {
     options.foreach { case (k, v) => session.sessionState.conf.setConfString(k, v) }
     if (options.nonEmpty) {
       logWarning("Using an existing SparkSession; some configuration may not take effect.")
     }
     return session
   }

   // 给SparkSession 对象加锁,防止重复初始化 session
 SparkSession.synchronized {
     // If the current thread does not have an active session, get it from the global session.
 // 如果默认session 中有session存在,切其sparkContext 已经停止,也可以使用
     session = defaultSession.get()
     if ((session ne null) && !session.sparkContext.isStopped) {
       options.foreach { case (k, v) => session.sessionState.conf.setConfString(k, v) }
       if (options.nonEmpty) {
         logWarning("Using an existing SparkSession; some configuration may not take effect.")
       }
       return session
     }

     // 创建session
     val sparkContext = userSuppliedContext.getOrElse { // 默认userSuppliedContext肯定没有SparkSession对象
       val sparkConf = new SparkConf()
       options.foreach { case (k, v) => sparkConf.set(k, v) }

       // set a random app name if not given.
       if (!sparkConf.contains("spark.app.name")) {
         sparkConf.setAppName(java.util.UUID.randomUUID().toString)
       }

       SparkContext.getOrCreate(sparkConf)
       // Do not update `SparkConf` for existing `SparkContext`, as it's shared by all sessions.
     }

     // Initialize extensions if the user has defined a configurator class.
     val extensionConfOption = sparkContext.conf.get(StaticSQLConf.SPARK_SESSION_EXTENSIONS)
     if (extensionConfOption.isDefined) {
       val extensionConfClassName = extensionConfOption.get
       try {
         val extensionConfClass = Utils.classForName(extensionConfClassName)
         val extensionConf = extensionConfClass.newInstance()
           .asInstanceOf[SparkSessionExtensions => Unit]
         extensionConf(extensions)
       } catch {
         // Ignore the error if we cannot find the class or when the class has the wrong type.
         case e @ (_: ClassCastException |
                   _: ClassNotFoundException |
                   _: NoClassDefFoundError) =>
           logWarning(s"Cannot use $extensionConfClassName to configure session extensions.", e)
       }
     }
    // 初始化 SparkSession,并把刚初始化的 SparkContext 传递给它
     session = new SparkSession(sparkContext, None, None, extensions)
     options.foreach { case (k, v) => session.initialSessionOptions.put(k, v) }
 // 设置 default session
     setDefaultSession(session)
 // 设置 active session
 setActiveSession(session)

     // Register a successfully instantiated context to the singleton. This should be at the
     // end of the class definition so that the singleton is updated only if there is no
     // exception in the construction of the instance.
     // 设置 apark listener ,当application 结束时,default session 重置
 sparkContext.addSparkListener(new SparkListener {
       override def onApplicationEnd(applicationEnd: SparkListenerApplicationEnd): Unit = {
         defaultSession.set(null)
       }
     })
   }

   return session
 }
org.apache.spark.SparkContext#getOrCreate方法如下:
  def getOrCreate(config: SparkConf): SparkContext = {
   // Synchronize to ensure that multiple create requests don't trigger an exception
   // from assertNoOtherContextIsRunning within setActiveContext
 // 使用Object 对象锁
   SPARK_CONTEXT_CONSTRUCTOR_LOCK.synchronized {
 // activeContext是一个AtomicReference 实例,它的数据set或update都是原子性的
     if (activeContext.get() == null) {
 // 一个session 只有一个 SparkContext 上下文对象
       setActiveContext(new SparkContext(config), allowMultipleContexts = false)
     } else {
       if (config.getAll.nonEmpty) {
         logWarning("Using an existing SparkContext; some configuration may not take effect.")
       }
     }
     activeContext.get()
   }
 }
二、Spark Context 初始化
SparkContext 代表到 spark 集群的连接,它可以用来在spark集群上创建 RDD,accumulator和broadcast 变量。一个JVM 只能有一个活动的 SparkContext 对象,当创建一个新的时候,必须调用stop 方法停止活动的 SparkContext。 当调用了构造方法后,会初始化类的成员变量,然后进入初始化过程。由 try catch 块包围,这个 try catch 块是在执行构造函数时执行的
这块孤立的代码块如下:
   try {
   // 1. 初始化 configuration
   _conf = config.clone()
   _conf.validateSettings()

   if (!_conf.contains("spark.master")) {
     throw new SparkException("A master URL must be set in your configuration")
   }
   if (!_conf.contains("spark.app.name")) {
     throw new SparkException("An application name must be set in your configuration")
   }

   // log out spark.app.name in the Spark driver logs
   logInfo(s"Submitted application: $appName")

   // System property spark.yarn.app.id must be set if user code ran by AM on a YARN cluster
   if (master == "yarn" && deployMode == "cluster" && !_conf.contains("spark.yarn.app.id")) {
     throw new SparkException("Detected yarn cluster mode, but isn't running on a cluster. " +
       "Deployment to YARN is not supported directly by SparkContext. Please use spark-submit.")
   }

   if (_conf.getBoolean("spark.logConf", false)) {
     logInfo("Spark configuration:\n" + _conf.toDebugString)
   }

   // Set Spark driver host and port system properties. This explicitly sets the configuration
   // instead of relying on the default value of the config constant.
   _conf.set(DRIVER_HOST_ADDRESS, _conf.get(DRIVER_HOST_ADDRESS))
   _conf.setIfMissing("spark.driver.port", "0")

   _conf.set("spark.executor.id", SparkContext.DRIVER_IDENTIFIER)

   _jars = Utils.getUserJars(_conf)
   _files = _conf.getOption("spark.files").map(_.split(",")).map(_.filter(_.nonEmpty))
     .toSeq.flatten
   // 2. 初始化日志目录并设置压缩类
   _eventLogDir =
     if (isEventLogEnabled) {
       val unresolvedDir = conf.get("spark.eventLog.dir", EventLoggingListener.DEFAULT_LOG_DIR)
         .stripSuffix("/")
       Some(Utils.resolveURI(unresolvedDir))
     } else {
       None
     }

   _eventLogCodec = {
     val compress = _conf.getBoolean("spark.eventLog.compress", false)
     if (compress && isEventLogEnabled) {
       Some(CompressionCodec.getCodecName(_conf)).map(CompressionCodec.getShortName)
     } else {
       None
     }
   }
   // 3. LiveListenerBus负责将SparkListenerEvent异步地传递给对应注册的SparkListener.
   _listenerBus = new LiveListenerBus(_conf)

   // Initialize the app status store and listener before SparkEnv is created so that it gets
   // all events.
   // 4. 给 app 提供一个 kv store(in-memory)
   _statusStore = AppStatusStore.createLiveStore(conf)
   // 5. 注册 AppStatusListener 到 LiveListenerBus 中
   listenerBus.addToStatusQueue(_statusStore.listener.get)

   // Create the Spark execution environment (cache, map output tracker, etc)
   // 6. 创建 driver端的 env
   // 包含所有的spark 实例运行时对象(master 或 worker),包含了序列化器,RPCEnv,block manager, map out tracker等等。
   // 当前的spark 通过一个全局的变量代码找到 SparkEnv,所有的线程可以访问同一个SparkEnv,
   // 创建SparkContext之后,可以通过 SparkEnv.get方法来访问它。
   _env = createSparkEnv(_conf, isLocal, listenerBus)
   SparkEnv.set(_env)

   // If running the REPL, register the repl's output dir with the file server.
   _conf.getOption("spark.repl.class.outputDir").foreach { path =>
     val replUri = _env.rpcEnv.fileServer.addDirectory("/classes", new File(path))
     _conf.set("spark.repl.class.uri", replUri)
   }
   // 7. 从底层监控 spark job 和 stage 的状态并汇报的 API
   _statusTracker = new SparkStatusTracker(this, _statusStore)

   // 8. console 进度条
   _progressBar =
     if (_conf.get(UI_SHOW_CONSOLE_PROGRESS) && !log.isInfoEnabled) {
       Some(new ConsoleProgressBar(this))
     } else {
       None
     }

   // 9. spark ui, 使用jetty 实现
   _ui =
     if (conf.getBoolean("spark.ui.enabled", true)) {
       Some(SparkUI.create(Some(this), _statusStore, _conf, _env.securityManager, appName, "",
         startTime))
     } else {
       // For tests, do not enable the UI
       None
     }
   // Bind the UI before starting the task scheduler to communicate
   // the bound port to the cluster manager properly
   _ui.foreach(_.bind())

   // 10. 创建 hadoop configuration
   _hadoopConfiguration = SparkHadoopUtil.get.newConfiguration(_conf)

   // 11. Add each JAR given through the constructor
   if (jars != null) {
     jars.foreach(addJar)
   }

   if (files != null) {
     files.foreach(addFile)
   }
   // 12. 计算 executor 的内存
   _executorMemory = _conf.getOption("spark.executor.memory")
     .orElse(Option(System.getenv("SPARK_EXECUTOR_MEMORY")))
     .orElse(Option(System.getenv("SPARK_MEM"))
     .map(warnSparkMem))
     .map(Utils.memoryStringToMb)
     .getOrElse(1024)

   // Convert java options to env vars as a work around
   // since we can't set env vars directly in sbt.
   for { (envKey, propKey) <- Seq(("SPARK_TESTING", "spark.testing"))
     value <- Option(System.getenv(envKey)).orElse(Option(System.getProperty(propKey)))} {
     executorEnvs(envKey) = value
   }
   Option(System.getenv("SPARK_PREPEND_CLASSES")).foreach { v =>
     executorEnvs("SPARK_PREPEND_CLASSES") = v
   }
   // The Mesos scheduler backend relies on this environment variable to set executor memory.
   // TODO: Set this only in the Mesos scheduler.
   executorEnvs("SPARK_EXECUTOR_MEMORY") = executorMemory + "m"
   executorEnvs ++= _conf.getExecutorEnv
   executorEnvs("SPARK_USER") = sparkUser

   // We need to register "HeartbeatReceiver" before "createTaskScheduler" because Executor will
   // retrieve "HeartbeatReceiver" in the constructor. (SPARK-6640)
   // 13. 创建 HeartbeatReceiver endpoint
   _heartbeatReceiver = env.rpcEnv.setupEndpoint(
     HeartbeatReceiver.ENDPOINT_NAME, new HeartbeatReceiver(this))

   // Create and start the scheduler
   // 14. 创建 task scheduler 和 scheduler backend
   val (sched, ts) = SparkContext.createTaskScheduler(this, master, deployMode)
   _schedulerBackend = sched
   _taskScheduler = ts
   // 15. 创建DAGScheduler实例
   _dagScheduler = new DAGScheduler(this)
   _heartbeatReceiver.ask[Boolean](TaskSchedulerIsSet)

   // start TaskScheduler after taskScheduler sets DAGScheduler reference in DAGScheduler's
   // constructor
   // 16. 启动 task scheduler
   _taskScheduler.start()

   // 17. 从task scheduler 获取 application ID
   _applicationId = _taskScheduler.applicationId()
   // 18. 从 task scheduler 获取 application attempt id
   _applicationAttemptId = taskScheduler.applicationAttemptId()
   _conf.set("spark.app.id", _applicationId)
   if (_conf.getBoolean("spark.ui.reverseProxy", false)) {
     System.setProperty("spark.ui.proxyBase", "/proxy/" + _applicationId)
   }
   // 19. 为ui 设置 application id
   _ui.foreach(_.setAppId(_applicationId))
   // 20. 初始化 block manager
   _env.blockManager.initialize(_applicationId)

   // The metrics system for Driver need to be set spark.app.id to app ID.
   // So it should start after we get app ID from the task scheduler and set spark.app.id.
   // 21. 启动 metricsSystem
   _env.metricsSystem.start()
   // Attach the driver metrics servlet handler to the web ui after the metrics system is started.
   // 22. 将 metricSystem 的 servlet handler 给 ui 用
   _env.metricsSystem.getServletHandlers.foreach(handler => ui.foreach(_.attachHandler(handler)))

   // 23. 初始化 event logger listener
   _eventLogger =
     if (isEventLogEnabled) {
       val logger =
         new EventLoggingListener(_applicationId, _applicationAttemptId, _eventLogDir.get,
           _conf, _hadoopConfiguration)
       logger.start()
       listenerBus.addToEventLogQueue(logger)
       Some(logger)
     } else {
       None
     }

   // Optionally scale number of executors dynamically based on workload. Exposed for testing.
   // 24. 如果启用了动态分配 executor, 需要实例化 executorAllocationManager 并启动之
   val dynamicAllocationEnabled = Utils.isDynamicAllocationEnabled(_conf)
   _executorAllocationManager =
     if (dynamicAllocationEnabled) {
       schedulerBackend match {
         case b: ExecutorAllocationClient =>
           Some(new ExecutorAllocationManager(
             schedulerBackend.asInstanceOf[ExecutorAllocationClient], listenerBus, _conf,
             _env.blockManager.master))
         case _ =>
           None
       }
     } else {
       None
     }
   _executorAllocationManager.foreach(_.start())

   // 25. 初始化 ContextCleaner,并启动之
   _cleaner =
     if (_conf.getBoolean("spark.cleaner.referenceTracking", true)) {
       Some(new ContextCleaner(this))
     } else {
       None
     }
   _cleaner.foreach(_.start())
   // 26. 建立并启动 listener bus
   setupAndStartListenerBus()
   // 27.  task scheduler 已就绪,发送环境已更新请求
   postEnvironmentUpdate()
   // 28.  发送 application start 请求事件
   postApplicationStart()

   // Post init
   // 29.等待 直至task scheduler backend 准备好了
   _taskScheduler.postStartHook()
   // 30. 注册 dagScheduler metricsSource
   _env.metricsSystem.registerSource(_dagScheduler.metricsSource)
   // 31. 注册 metric source
   _env.metricsSystem.registerSource(new BlockManagerSource(_env.blockManager))
   //32. 注册 metric source
   _executorAllocationManager.foreach { e =>
     _env.metricsSystem.registerSource(e.executorAllocationManagerSource)
   }

   // Make sure the context is stopped if the user forgets about it. This avoids leaving
   // unfinished event logs around after the JVM exits cleanly. It doesn't help if the JVM
   // is killed, though.
   logDebug("Adding shutdown hook") // force eager creation of logger
   // 33. 设置 shutdown hook, 在spark context 关闭时,要做的回调操作
   _shutdownHookRef = ShutdownHookManager.addShutdownHook(
     ShutdownHookManager.SPARK_CONTEXT_SHUTDOWN_PRIORITY) { () =>
     logInfo("Invoking stop() from shutdown hook")
     try {
       stop()
     } catch {
       case e: Throwable =>
         logWarning("Ignoring Exception while stopping SparkContext from shutdown hook", e)
     }
   }
 } catch {
   case NonFatal(e) =>
     logError("Error initializing SparkContext.", e)
     try {
       stop()
     } catch {
       case NonFatal(inner) =>
         logError("Error stopping SparkContext after init error.", inner)
     } finally {
       throw e
     }
 }
从上面可以看出,spark context 的初始化是非常复杂的,涉及的spark 组件很多,包括 异步事务总线系统LiveListenerBus、SparkEnv、SparkUI、DAGScheduler、metrics监测系统、EventLoggingListener、TaskScheduler、ExecutorAllocationManager、ContextCleaner等等。先暂且当作是总述,后面对部分组件会有比较全面的剖析。
第三章、spark源码分析之LiveListenerBus介绍
一、LiveListenerBus
官方说明如下:
Asynchronously passes SparkListenerEvents to registered SparkListeners.
即它的功能是异步地将SparkListenerEvent传递给已经注册的SparkListener,这种异步的机制是通过生产消费者模型来实现的。
首先,它定义了 4 个 消息堵塞队列,队列的名字分别为shared、appStatus、executorManagement、eventLog。队列的类型是 org.apache.spark.scheduler.AsyncEventQueue#AsyncEventQueue,保存在 queues 变量中。每一个队列上都可以注册监听器,如果队列没有监听器,则会被移除。
它有启动和stop和start两个标志位来指示 监听总线的的启动停止状态。 如果总线没有启动,有事件过来,先放到 一个待添加的可变数组中,否则直接将事件 post 到每一个队列中。
其直接依赖类是 AsyncEventQueue, 相当于 LiveListenerBus 的多事件队列是对 AsyncEventQueue 进一步的封装。
二、AsyncEventQueue
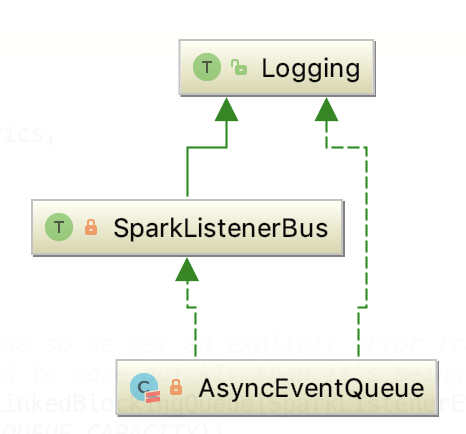
其继承关系如下:
它有启动和stop和start两个标志位来指示 监听总线的的启动停止状态。
其内部维护了listenersPlusTimers 主要就是用来保存注册到这个总线上的监听器对象的。
post 操作将事件放入内部的 LinkedBlockingQueue中,默认大小是 10000。
有一个事件分发器,它不停地从 LinkedBlockingQueue 执行 take 操作,获取事件,并将事件进一步分发给所有的监听器,由org.apache.spark.scheduler.SparkListenerBus#doPostEvent 方法实现事件转发,具体代码如下:
  protected override def doPostEvent(
       listener: SparkListenerInterface,
       event: SparkListenerEvent): Unit = {
     event match {
       case stageSubmitted: SparkListenerStageSubmitted =>
         listener.onStageSubmitted(stageSubmitted)
       case stageCompleted: SparkListenerStageCompleted =>
         listener.onStageCompleted(stageCompleted)
       case jobStart: SparkListenerJobStart =>
         listener.onJobStart(jobStart)
       case jobEnd: SparkListenerJobEnd =>
         listener.onJobEnd(jobEnd)
       case taskStart: SparkListenerTaskStart =>
         listener.onTaskStart(taskStart)
       case taskGettingResult: SparkListenerTaskGettingResult =>
         listener.onTaskGettingResult(taskGettingResult)
       case taskEnd: SparkListenerTaskEnd =>
         listener.onTaskEnd(taskEnd)
       case environmentUpdate: SparkListenerEnvironmentUpdate =>
         listener.onEnvironmentUpdate(environmentUpdate)
       case blockManagerAdded: SparkListenerBlockManagerAdded =>
         listener.onBlockManagerAdded(blockManagerAdded)
       case blockManagerRemoved: SparkListenerBlockManagerRemoved =>
         listener.onBlockManagerRemoved(blockManagerRemoved)
       case unpersistRDD: SparkListenerUnpersistRDD =>
         listener.onUnpersistRDD(unpersistRDD)
       case applicationStart: SparkListenerApplicationStart =>
         listener.onApplicationStart(applicationStart)
       case applicationEnd: SparkListenerApplicationEnd =>
         listener.onApplicationEnd(applicationEnd)
       case metricsUpdate: SparkListenerExecutorMetricsUpdate =>
         listener.onExecutorMetricsUpdate(metricsUpdate)
       case executorAdded: SparkListenerExecutorAdded =>
         listener.onExecutorAdded(executorAdded)
       case executorRemoved: SparkListenerExecutorRemoved =>
         listener.onExecutorRemoved(executorRemoved)
       case executorBlacklistedForStage: SparkListenerExecutorBlacklistedForStage =>
         listener.onExecutorBlacklistedForStage(executorBlacklistedForStage)
       case nodeBlacklistedForStage: SparkListenerNodeBlacklistedForStage =>
         listener.onNodeBlacklistedForStage(nodeBlacklistedForStage)
       case executorBlacklisted: SparkListenerExecutorBlacklisted =>
         listener.onExecutorBlacklisted(executorBlacklisted)
       case executorUnblacklisted: SparkListenerExecutorUnblacklisted =>
         listener.onExecutorUnblacklisted(executorUnblacklisted)
       case nodeBlacklisted: SparkListenerNodeBlacklisted =>
         listener.onNodeBlacklisted(nodeBlacklisted)
       case nodeUnblacklisted: SparkListenerNodeUnblacklisted =>
         listener.onNodeUnblacklisted(nodeUnblacklisted)
       case blockUpdated: SparkListenerBlockUpdated =>
         listener.onBlockUpdated(blockUpdated)
       case speculativeTaskSubmitted: SparkListenerSpeculativeTaskSubmitted =>
         listener.onSpeculativeTaskSubmitted(speculativeTaskSubmitted)
       case _ => listener.onOtherEvent(event)
     }
   }
然后去调用 listener 的相对应的方法。
就这样,事件总线上的消息事件被监听器消费了。
第四章、spark源码分析之TaskScheduler的创建和启动过程
一、TaskScheduler的实例化
val (sched, ts) = SparkContext.createTaskScheduler(this, master, deployMode)
其调用了org.apache.spark.SparkContext#createTaskScheduler , 源码如下:
 /**
    * Create a task scheduler based on a given master URL.
    * Return a 2-tuple of the scheduler backend and the task scheduler.
    */
   private def createTaskScheduler(
       sc: SparkContext,
       master: String,
       deployMode: String): (SchedulerBackend, TaskScheduler) = {
     import SparkMasterRegex._

     // When running locally, don't try to re-execute tasks on failure.
     val MAX_LOCAL_TASK_FAILURES = 1

     master match {
       case "local" =>
         val scheduler = new TaskSchedulerImpl(sc, MAX_LOCAL_TASK_FAILURES, isLocal = true)
         val backend = new LocalSchedulerBackend(sc.getConf, scheduler, 1)
         scheduler.initialize(backend)
         (backend, scheduler)

       case LOCAL_N_REGEX(threads) =>
         def localCpuCount: Int = Runtime.getRuntime.availableProcessors()
         // local[*] estimates the number of cores on the machine; local[N] uses exactly N threads.
         val threadCount = if (threads == "*") localCpuCount else threads.toInt
         if (threadCount <= 0) {
           throw new SparkException(s"Asked to run locally with $threadCount threads")
         }
         val scheduler = new TaskSchedulerImpl(sc, MAX_LOCAL_TASK_FAILURES, isLocal = true)
         val backend = new LocalSchedulerBackend(sc.getConf, scheduler, threadCount)
         scheduler.initialize(backend)
         (backend, scheduler)

       case LOCAL_N_FAILURES_REGEX(threads, maxFailures) =>
         def localCpuCount: Int = Runtime.getRuntime.availableProcessors()
         // local[*, M] means the number of cores on the computer with M failures
         // local[N, M] means exactly N threads with M failures
         val threadCount = if (threads == "*") localCpuCount else threads.toInt
         val scheduler = new TaskSchedulerImpl(sc, maxFailures.toInt, isLocal = true)
         val backend = new LocalSchedulerBackend(sc.getConf, scheduler, threadCount)
         scheduler.initialize(backend)
         (backend, scheduler)

       case SPARK_REGEX(sparkUrl) =>
         val scheduler = new TaskSchedulerImpl(sc)
         val masterUrls = sparkUrl.split(",").map("spark://" + _)
         val backend = new StandaloneSchedulerBackend(scheduler, sc, masterUrls)
         scheduler.initialize(backend)
         (backend, scheduler)

       case LOCAL_CLUSTER_REGEX(numSlaves, coresPerSlave, memoryPerSlave) =>
         // Check to make sure memory requested <= memoryPerSlave. Otherwise Spark will just hang.
         val memoryPerSlaveInt = memoryPerSlave.toInt
         if (sc.executorMemory > memoryPerSlaveInt) {
           throw new SparkException(
             "Asked to launch cluster with %d MB RAM / worker but requested %d MB/worker".format(
               memoryPerSlaveInt, sc.executorMemory))
         }

         val scheduler = new TaskSchedulerImpl(sc)
         val localCluster = new LocalSparkCluster(
           numSlaves.toInt, coresPerSlave.toInt, memoryPerSlaveInt, sc.conf)
         val masterUrls = localCluster.start()
         val backend = new StandaloneSchedulerBackend(scheduler, sc, masterUrls)
         scheduler.initialize(backend)
         backend.shutdownCallback = (backend: StandaloneSchedulerBackend) => {
           localCluster.stop()
         }
         (backend, scheduler)

       case masterUrl =>
         val cm = getClusterManager(masterUrl) match {
           case Some(clusterMgr) => clusterMgr
           case None => throw new SparkException("Could not parse Master URL: '" + master + "'")
         }
         try {
           val scheduler = cm.createTaskScheduler(sc, masterUrl)
           val backend = cm.createSchedulerBackend(sc, masterUrl, scheduler)
           cm.initialize(scheduler, backend)
           (backend, scheduler)
         } catch {
           case se: SparkException => throw se
           case NonFatal(e) =>
             throw new SparkException("External scheduler cannot be instantiated", e)
         }
     }
   }
不同的实现如下:

实例化部分剖析完毕,下半部分重点剖析yarn-client mode 下 TaskScheduler 的启动过程
二、yarn-client模式TaskScheduler 启动过程
初始化调度池
在org.apache.spark.SparkContext#createTaskScheduler 方法中,有如下调用:
  case masterUrl =>
         val cm = getClusterManager(masterUrl) match {
           case Some(clusterMgr) => clusterMgr
           case None => throw new SparkException("Could not parse Master URL: '" + master + "'")
         }
         try {
           val scheduler = cm.createTaskScheduler(sc, masterUrl)
           val backend = cm.createSchedulerBackend(sc, masterUrl, scheduler)
           cm.initialize(scheduler, backend)
           (backend, scheduler)
         } catch {
           case se: SparkException => throw se
           case NonFatal(e) =>
             throw new SparkException("External scheduler cannot be instantiated", e)
         }
其中的,cm.initialize(scheduler, backend)中的cm 是org.apache.spark.scheduler.cluster.YarnClusterManager,TaskScheduler的实现是 org.apache.spark.scheduler.cluster.YarnScheduler, TaskSchedulerBackend的实现是org.apache.spark.scheduler.cluster.YarnClientSchedulerBackend。YarnClusterManager 的 initialize 方法实现如下:
   override def initialize(scheduler: TaskScheduler, backend: SchedulerBackend): Unit = {
    scheduler.asInstanceOf[TaskSchedulerImpl].initialize(backend)
  }
其并没有实现 initialize, 父类TaskSchedulerImpl 的实现如下:
 def initialize(backend: SchedulerBackend) {
     this.backend = backend
     schedulableBuilder = {
       schedulingMode match {
         case SchedulingMode.FIFO =>
           new FIFOSchedulableBuilder(rootPool)
         case SchedulingMode.FAIR =>
           new FairSchedulableBuilder(rootPool, conf)
         case _ =>
           throw new IllegalArgumentException(s"Unsupported $SCHEDULER_MODE_PROPERTY: " +
           s"$schedulingMode")
       }
     }
     schedulableBuilder.buildPools()
   }
可以看出,其重要作用就是设置 TaskScheduler 的 TaskSchedulerBackend 引用。
调度模式主要有FIFO和FAIR两种模式。默认是FIFO模式,可以使用spark.scheduler.mode 参数来设定。使用建造者模式来创建 Pool 对象。
其中,org.apache.spark.scheduler.FIFOSchedulableBuilder#buildPools是一个空实现,即没有做任何的操作;而 org.apache.spark.scheduler.FairSchedulableBuilder#buildPools会加载 相应调度分配策略文件;策略文件可以使用 spark.scheduler.allocation.file 参数来设定,如果没有设定会进一步加载默认的 fairscheduler.xml 文件,如果还没有,则不加载。如果有调度池的配置,则根据配置配置调度pool并将其加入到 root 池中。最后初始化 default 池并将其加入到 root 池中。
在HeartBeatReceiver 中设定 taskscheduler 变量
_heartbeatReceiver.ask[Boolean](TaskSchedulerIsSet)
首先,_heartbeatReceiver 是一个 RpcEndPointRef 对象,其请求最终会被 HeartbeatReceiver(Endpoint)接收并处理。即org.apache.spark.HeartbeatReceiver#receiveAndReply方法:
 case TaskSchedulerIsSet =>
       scheduler = sc.taskScheduler
       context.reply(true)
具体的关于RPC的相关解释,会在后面有专门的文章篇幅介绍。在这里就不做过多解释。 // TODO
启动TaskScheduler
org.apache.spark.SparkContext 的初始化方法有如下代码启动 TaskScheduler:
_taskScheduler.start()
yarn-client模式下,运行中调用了 org.apache.spark.scheduler.cluster.YarnScheduler 的 start 方法,它沿用了父类 TaskSchedulerImpl 的实现:
  override def start() {
     // 1. 启动 task scheduler backend
     backend.start()
     // 2. 设定 speculationScheduler 定时任务
     if (!isLocal && conf.getBoolean("spark.speculation", false)) {
       logInfo("Starting speculative execution thread")
       speculationScheduler.scheduleWithFixedDelay(new Runnable {
         override def run(): Unit = Utils.tryOrStopSparkContext(sc) {
           checkSpeculatableTasks()
         }
       }, SPECULATION_INTERVAL_MS, SPECULATION_INTERVAL_MS, TimeUnit.MILLISECONDS)
     }
   }
第1步:task scheduler backend 的启动:org.apache.spark.scheduler.cluster.YarnClientSchedulerBackend#start的方法如下:
  /**
   * Create a Yarn client to submit an application to the ResourceManager.
   * This waits until the application is running.
   */
  override def start() {
    // 1. 获取driver 的 host 和 port
    val driverHost = conf.get("spark.driver.host")
    val driverPort = conf.get("spark.driver.port")
    val hostport = driverHost + ":" + driverPort
    // 2. 设定 driver 的 web UI 地址
    sc.ui.foreach { ui => conf.set("spark.driver.appUIAddress", ui.webUrl) }

    val argsArrayBuf = new ArrayBuffer[String]()
    argsArrayBuf += ("--arg", hostport)

    logDebug("ClientArguments called with: " + argsArrayBuf.mkString(" "))
    val args = new ClientArguments(argsArrayBuf.toArray)
    totalExpectedExecutors = SchedulerBackendUtils.getInitialTargetExecutorNumber(conf)
    // 3. 启动 deploy client,并切初始化 driverClient 的 Rpc environment,并在该RPC 环境中初始化master 和 driver 的rpc endpoint
    client = new Client(args, conf)
    // 4. 将 application id 绑定到 yarn 上
    bindToYarn(client.submitApplication(), None)

    // SPARK-8687: Ensure all necessary properties have already been set before
    // we initialize our driver scheduler backend, which serves these properties
    // to the executors
    super.start()
   // 5. 检查 yarn application的状态,不能为 kill, finished等等
    waitForApplication()
   // 6. 监控线程
    monitorThread = asyncMonitorApplication()
    monitorThread.start()
  }
重点解释一下第三步,涉及的源码步如下:
 object Client {
   def main(args: Array[String]) {
     // scalastyle:off println
     if (!sys.props.contains("SPARK_SUBMIT")) {
       println("WARNING: This client is deprecated and will be removed in a future version of Spark")
       println("Use ./bin/spark-submit with \"--master spark://host:port\"")
     }
     // scalastyle:on println
     new ClientApp().start(args, new SparkConf())
   }
 }

 private[spark] class ClientApp extends SparkApplication {

   override def start(args: Array[String], conf: SparkConf): Unit = {
     val driverArgs = new ClientArguments(args)

     if (!conf.contains("spark.rpc.askTimeout")) {
       conf.set("spark.rpc.askTimeout", "10s")
     }
     Logger.getRootLogger.setLevel(driverArgs.logLevel)

     val rpcEnv =
       RpcEnv.create("driverClient", Utils.localHostName(), 0, conf, new SecurityManager(conf))

     val masterEndpoints = driverArgs.masters.map(RpcAddress.fromSparkURL).
       map(rpcEnv.setupEndpointRef(_, Master.ENDPOINT_NAME))
     rpcEnv.setupEndpoint("client", new ClientEndpoint(rpcEnv, driverArgs, masterEndpoints, conf))

     rpcEnv.awaitTermination()
   }

 }
可以看到,在Client 的main方法中,初始化了ClientApp 对象,并调用了其 start 方法,在start 方法中, 首先解析了 driver的 参数。然后创建了 driver 端的 RPC environment,然后 根据解析的 master 的信息,初始化 master 的endpointref,并且建立了 client endpoint 并返回 client endpoint ref。
三、定时执行推测任务
下面继续看 org.apache.spark.scheduler.cluster.YarnScheduler 的 start 方法 的 第二步方法,首先 spark 推测任务 feature 默认是关闭的,原因如果有很多任务都延迟了,那么它会再启动一个相同的任务,这样可能会消耗掉所有的资源,对集群资源和提交到集群上的任务造成不可控的影响。启动了一个延迟定时器,定时地执行 checkSpeculatableTasks 方法,如下:
 // Check for speculatable tasks in all our active jobs.
   def checkSpeculatableTasks() {
     var shouldRevive = false
     synchronized {
       shouldRevive = rootPool.checkSpeculatableTasks(MIN_TIME_TO_SPECULATION) // 1. 推测是否应该跑一个新任务
     }
     if (shouldRevive) {
       backend.reviveOffers() // 2. 跑一个新任务
     }
   }
其中,第一步推断任务,有两个实现一个是Pool 的实现,一个是TaskSetManager 的实现,Pool 会递归调用子Pool来获取 speculatable tasks。如果需要推测,则运行task scheduler backend 的 reviveOffers方法,大致思路如下,首先获取 executor 上的空闲资源,然后将这些资源分配给 推测的 task,供其使用。
总结,本篇源码剖析了在Spark Context 启动过程中, 以 yarn-client 模式为例,剖析了task scheduler 是如何启动的。
其中关于RpcEnv的介绍直接略过了,下一篇会专门讲解Spark 中内置的Rpc 机制的整体架构以及其是如何运行的。
第五章、spark源码分析之RPC
一、Spark RPC创建NettyRpcEnv
1、Spark Rpc使用示例
我们以 org.apache.spark.deploy.ClientApp#start 方法中的调用API创建 RPC 的过程入口。
// 1. 创建 RPC Environment
val rpcEnv = RpcEnv.create("driverClient", Utils.localHostName(), 0, conf, new SecurityManager(conf))
2、创建NettyRpcEnv
如下是创建NettyRpcEnv的时序图(画的不好看,见谅):

RpcEnv是scala 的object伴生对象(本质上是一个java 单例对象),去调用NettyRpcEnvFactory去创建 NettyRpcEnv 对象,序列化使用的是java序列化内建的方式,然后调用Utils 类重试启动Server。启动成功后返回给用户。
org.apache.spark.rpc.netty.NettyRpcEnv#startServer 代码如下:
  def startServer(bindAddress: String, port: Int): Unit = {
     val bootstraps: java.util.List[TransportServerBootstrap] =
       if (securityManager.isAuthenticationEnabled()) {
         java.util.Arrays.asList(new AuthServerBootstrap(transportConf, securityManager))
       } else {
         java.util.Collections.emptyList()
       }
     server = transportContext.createServer(bindAddress, port, bootstraps)
     dispatcher.registerRpcEndpoint(
       RpcEndpointVerifier.NAME, new RpcEndpointVerifier(this, dispatcher))
   }
在TransportServer构造过程中调用了init方法。org.apache.spark.network.server.TransportServer#init 源码如下:
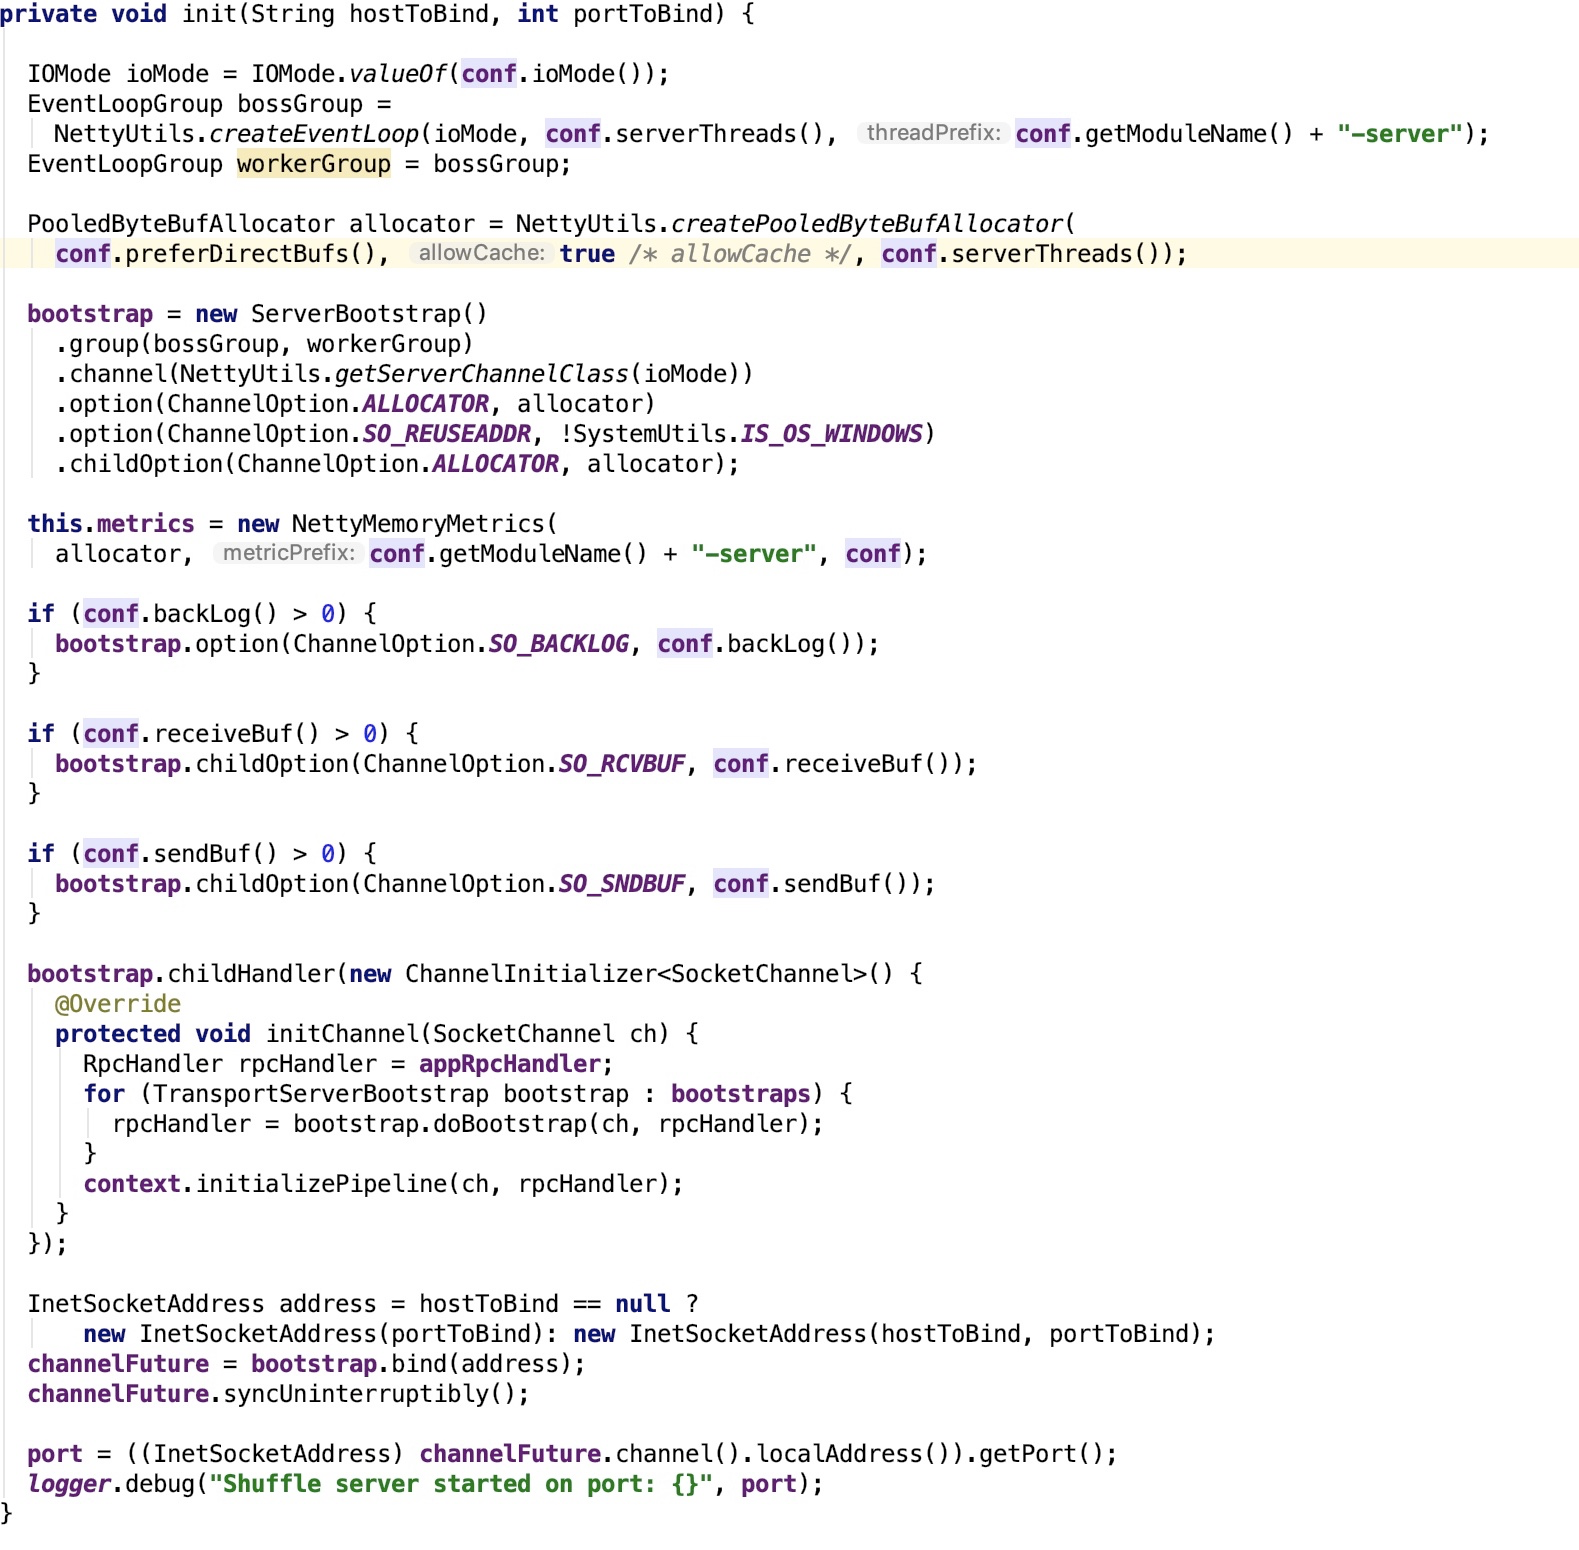
 private void init(String hostToBind, int portToBind) {

   IOMode ioMode = IOMode.valueOf(conf.ioMode());
   EventLoopGroup bossGroup =
     NettyUtils.createEventLoop(ioMode, conf.serverThreads(), conf.getModuleName() + "-server");
   EventLoopGroup workerGroup = bossGroup;

   PooledByteBufAllocator allocator = NettyUtils.createPooledByteBufAllocator(
     conf.preferDirectBufs(), true /* allowCache */, conf.serverThreads());

   bootstrap = new ServerBootstrap()
     .group(bossGroup, workerGroup)
     .channel(NettyUtils.getServerChannelClass(ioMode))
     .option(ChannelOption.ALLOCATOR, allocator)
     .option(ChannelOption.SO_REUSEADDR, !SystemUtils.IS_OS_WINDOWS)
     .childOption(ChannelOption.ALLOCATOR, allocator);

   this.metrics = new NettyMemoryMetrics(
     allocator, conf.getModuleName() + "-server", conf);

   if (conf.backLog() > 0) {
     bootstrap.option(ChannelOption.SO_BACKLOG, conf.backLog());
   }

   if (conf.receiveBuf() > 0) {
     bootstrap.childOption(ChannelOption.SO_RCVBUF, conf.receiveBuf());
   }

   if (conf.sendBuf() > 0) {
     bootstrap.childOption(ChannelOption.SO_SNDBUF, conf.sendBuf());
   }

   bootstrap.childHandler(new ChannelInitializer<SocketChannel>() {
     @Override
     protected void initChannel(SocketChannel ch) {
       RpcHandler rpcHandler = appRpcHandler;
       for (TransportServerBootstrap bootstrap : bootstraps) {
         rpcHandler = bootstrap.doBootstrap(ch, rpcHandler);
       }
       context.initializePipeline(ch, rpcHandler);
     }
   });

   InetSocketAddress address = hostToBind == null ?
       new InetSocketAddress(portToBind): new InetSocketAddress(hostToBind, portToBind);
   channelFuture = bootstrap.bind(address);
   channelFuture.syncUninterruptibly();

   port = ((InetSocketAddress) channelFuture.channel().localAddress()).getPort();
   logger.debug("Shuffle server started on port: {}", port);
 }
主要功能是:调用netty API 初始化 nettyServer。
org.apache.spark.rpc.netty.Dispatcher#registerRpcEndpoint的源码如下:
  def registerRpcEndpoint(name: String, endpoint: RpcEndpoint): NettyRpcEndpointRef = {
   val addr = RpcEndpointAddress(nettyEnv.address, name)
   val endpointRef = new NettyRpcEndpointRef(nettyEnv.conf, addr, nettyEnv)
   synchronized {
     if (stopped) {
       throw new IllegalStateException("RpcEnv has been stopped")
     }
     if (endpoints.putIfAbsent(name, new EndpointData(name, endpoint, endpointRef)) != null) {
       throw new IllegalArgumentException(s"There is already an RpcEndpoint called $name")
     }
     val data = endpoints.get(name)
     endpointRefs.put(data.endpoint, data.ref)
     receivers.offer(data)  // for the OnStart message
   }
   endpointRef
 }
EndpointData 在初始化过程中会放入 OnStart 消息。 在 Inbox 的 process 中,有如下代码:
 case OnStart =>
   endpoint.onStart()
   if (!endpoint.isInstanceOf[ThreadSafeRpcEndpoint]) {
     inbox.synchronized {
       if (!stopped) {
         enableConcurrent = true
       }
     }
   }
调用 endpoint 的 onStart 方法和 初始化 是否支持并发处理模式。endpoint 指的是 RpcEndpointVerifier, 其 onStart 方法如下:
 /**
    * Invoked before [[RpcEndpoint]] starts to handle any message.
    */
   def onStart(): Unit = {
    // By default, do nothing.
  }
即不做任何事情,直接返回,至此初始化NettyRPCEnv 流程就剖析完。伴生对象RpcEnv调用netty rpc 工厂创建NettyRpcEnv 对象,然后使用重试机制启动TransportServer,然后NettyRpcEnv注册RpcEndpointVerifier
到Dispatcher。最终返回 NettyRpcEnv 给API调用端,NettyRpcEnv 创建成功。在这里,Dispatcher 和 TransportServer 等组件暂不做深入了解,后续会一一剖析。
Dispatcher 是消息的分发器,负责将消息分发给适合的 endpoint
其实这个类还是比较简单的,先来看它的类图:
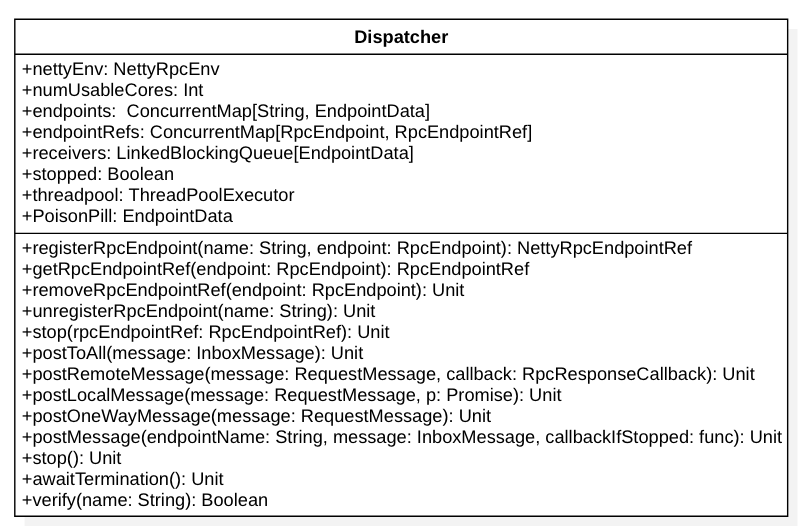
我们从成员变量入手分析整个类的内部构造和机理:
-
endpoints是一个 ConcurrentMap[String, EndpointData], 负责存储 endpoint name 和 EndpointData 的映射关系。其中,EndpointData又包含了 endpoint name, RpcEndpoint 以及 NettyRpcEndpointRef 的引用以及Inbox 对象(包含了RpcEndpoint 以及 NettyRpcEndpointRef 的引用)。
-
endpointRefs: ConcurrentMap[RpcEndpoint, RpcEndpointRef] 包含了 RpcEndpoint 和 RpcEndpointRef 的映射关系。
-
receivers 是一个 LinkedBlockingQueue[EndpointData] 消息阻塞队列,用于存放 EndpointData 对象。它主要用于追踪 那些可能会包含需要处理消息receiver(即EndpointData)。在post消息到Dispatcher 时,一般会先post 到 EndpointData 的 Inbox 中, 然后,再将 EndpointData对象放入 receivers 中,源码如下:
// Posts a message to a specific endpoint.
private def postMessage(
      endpointName: String,
      message: InboxMessage,
      callbackIfStopped: (Exception) => Unit): Unit = {
    val error = synchronized {
      // 1. 先根据endpoint name从路由中找到data
      val data = endpoints.get(endpointName)
      if (stopped) {
        Some(new RpcEnvStoppedException())
      } else if (data == null) {
        Some(new SparkException(s"Could not find $endpointName."))
      } else {
        // 2. 将待消费的消息发送到 inbox中
        data.inbox.post(message)
        // 3. 将 data 放到待消费的receiver 中
        receivers.offer(data)
        None
      }
    }
    // We don't need to call `onStop` in the `synchronized` block
    error.foreach(callbackIfStopped)
  }
-
stopped 标志 Dispatcher 是否已经停止了
-
threadpool 是 ThreadPoolExecutor 对象, 其中的 线程的 core 数量的计算如下: val availableCores = if (numUsableCores > 0) numUsableCores else Runtime.getRuntime.availableProcessors() val numThreads = nettyEnv.conf.getInt("spark.rpc.netty.dispatcher.numThreads", math.max(2, availableCores)) 获取到线程数之后, 会初始化 一个固定的线程池,用来执行 MessageLoop 任务,MessageLoop 是一个Runnable 对象。它会不停地从 receiver 堵塞队列中, 把放入的 EndpointData对象取出来,并且去调用其inbox成员变量的 process 方法。
-
PoisonPill 是一个空的EndpointData对象,起了一个标志位的作用,如果想要停止 Diapatcher ,会把PoisonPill 喂给 receiver 吃,当threadpool 执行 MessageLoop 任务时, 吃到了毒药,马上退出,线程也就死掉了。PoisonPill命名很形象,关闭线程池的方式也是优雅的,是值得我们在工作中去学习和应用的。
从上面的成员变量分析部分可以知道,数据通过 postMessage 方法将 InboxMessage 数据 post 到 EndpointData的Inbox对象中,并将待处理的EndpointData 对象放入到 receivers 中,线程池会不断从这个队列中拿数据,分发数据。
二、剖析Dispatcher和Inbox、OOutbox
列中拿数据,分发数据。
1、引出Inbox
其实,data 就包含了 RpcEndpoint 和 RpcEndpointRef 对象,本可以在Dispatcher 中就可以调用 endpoint 的方法去处理。为什么还要设计出来一个 Inbox 层次的抽象呢? 下面我们就趁热剖析一下 Inbox 这个对象。
2、Inbox剖析
Inbox 的官方解释: An inbox that stores messages for an RpcEndpoint and posts messages to it thread-safely. 其实就是它为RpcEndpoint 对象保存了消息,并且将消息 post给 RpcEndpoint,同时保证了线程的安全性。
类图如下:

跟 put 和 get 语义相似的有两个方法, 分别是post 和 process。其实这两个方法都是给 Dispatcher 对象调用的。post 将数据 存放到 堵塞消息队列队尾, pocess 则堵塞式 从消息队列中取出数据来,并处理之。
这两个关键方法源码如下:
  def post(message: InboxMessage): Unit = inbox.synchronized {
     if (stopped) {
       // We already put "OnStop" into "messages", so we should drop further messages
       onDrop(message)
     } else {
       messages.add(message)
       false
     }
 }


 /**
    * Calls action closure, and calls the endpoint's onError function in the case of exceptions.
    */
   private def safelyCall(endpoint: RpcEndpoint)(action: => Unit): Unit = {
     try action catch {
       case NonFatal(e) =>
         try endpoint.onError(e) catch {
           case NonFatal(ee) =>
             if (stopped) {
               logDebug("Ignoring error", ee)
             } else {
               logError("Ignoring error", ee)
             }
         }
     }
 }

 /**
    * Process stored messages.
    */
   def process(dispatcher: Dispatcher): Unit = {
     var message: InboxMessage = null
     inbox.synchronized {
       if (!enableConcurrent && numActiveThreads != 0) {
         return
       }
       message = messages.poll()
       if (message != null) {
         numActiveThreads += 1
       } else {
         return
       }
     }
     while (true) {
       safelyCall(endpoint) {
         message match {
           case RpcMessage(_sender, content, context) =>
             try {
               endpoint.receiveAndReply(context).applyOrElse[Any, Unit](content, { msg =>
                 throw new SparkException(s"Unsupported message $message from ${_sender}")
               })
             } catch {
               case e: Throwable =>
                 context.sendFailure(e)
                 // Throw the exception -- this exception will be caught by the safelyCall function.
                 // The endpoint's onError function will be called.
                 throw e
             }

           case OneWayMessage(_sender, content) =>
             endpoint.receive.applyOrElse[Any, Unit](content, { msg =>
               throw new SparkException(s"Unsupported message $message from ${_sender}")
             })

           case OnStart =>
             endpoint.onStart()
             if (!endpoint.isInstanceOf[ThreadSafeRpcEndpoint]) {
               inbox.synchronized {
                 if (!stopped) {
                   enableConcurrent = true
                 }
               }
             }

           case OnStop =>
             val activeThreads = inbox.synchronized { inbox.numActiveThreads }
             assert(activeThreads == 1,
               s"There should be only a single active thread but found $activeThreads threads.")
             dispatcher.removeRpcEndpointRef(endpoint)
             endpoint.onStop()
             assert(isEmpty, "OnStop should be the last message")

           case RemoteProcessConnected(remoteAddress) =>
             endpoint.onConnected(remoteAddress)

           case RemoteProcessDisconnected(remoteAddress) =>
             endpoint.onDisconnected(remoteAddress)

           case RemoteProcessConnectionError(cause, remoteAddress) =>
             endpoint.onNetworkError(cause, remoteAddress)
         }
       }

       inbox.synchronized {
         // "enableConcurrent" will be set to false after `onStop` is called, so we should check it
         // every time.
         if (!enableConcurrent && numActiveThreads != 1) {
           // If we are not the only one worker, exit
           numActiveThreads -= 1
           return
         }
         message = messages.poll()
         if (message == null) {
           numActiveThreads -= 1
           return
         }
       }
     }
 }
其中,InboxMessage 继承关系如下:

这些InboxMessage子类型在process 方法源码中有体现。其中OneWayMessage和RpcMessage 都是自带消息content 的,其他的几种都是消息事件,本身不带任何除事件类型信息之外的信息。
在process 处理过程中,考虑到了 一次性批量处理消息问题、多线程安全问题、异常抛出问题,多消息分支处理问题等等。
此时可以回答上面我们的疑问了,抽象出来 Inbox 的原因在于,Diapatcher 的职责变得单一,只需要把数据分发就可以了。具体分发数据要如何处理的问题留给了 Inbox,Inbox 把关注点放在了 如何处理这些消息上。考虑并解决了 一次性批量处理消息问题、多线程安全问题、异常抛出问题,多消息分支处理问题等等问题。
3、Outbox
下面看一下Outbox, 它的内部构造和Inbox很类似,不再剖析。
OutboxMessage的继承关系如下:

其中,OneWayOutboxMessage 的行为是特定的。源码如下:

它没有回调方法。
RpcOutboxMessage 的回调则是通过构造方法传进来的。其源码如下:

RpcOutboxMessage 是有回调的,回调方法通过构造方法指定,内部onFailure和onSuccess是模板方法。
三、RpcEndPoint和RpcEndPointRef剖析
1、RpcEndPoint
文档对RpcEndpoint的解释: An end point for the RPC that defines what functions to trigger given a message. It is guaranteed that onStart, receive and onStop will be called in sequence. The life-cycle of an endpoint is: constructor -> onStart -> receive* -> onStop Note: receive can be called concurrently. If you want receive to be thread-safe, please use ThreadSafeRpcEndpoint If any error is thrown from one of RpcEndpoint methods except onError, onError will be invoked with the cause. If onError throws an error, RpcEnv will ignore it.
其子类继承关系如下:

其下面还有一个抽象子接口:ThreadSafeRpcEndpoint
文档对ThreadSafeRpcEndpoint的解释如下: 需要RpcEnv线程安全地向其发送消息的trait。线程安全意味着在通过相同的ThreadSafeRpcEndpoint处理一条消息完成后再处理下一个消息。换句话说,在处理下一条消息时,可以看到对ThreadSafeRpcEndpoint的内部字段的更改,并且ThreadSafeRpcEndpoint中的字段不需要是volatile或等效的。但是,不能保证同一个线程将为不同的消息执行相同的ThreadSafeRpcEndpoint。 即顺序处理消息,不能同时并发处理。traint RpcEndpoint的方法如下:
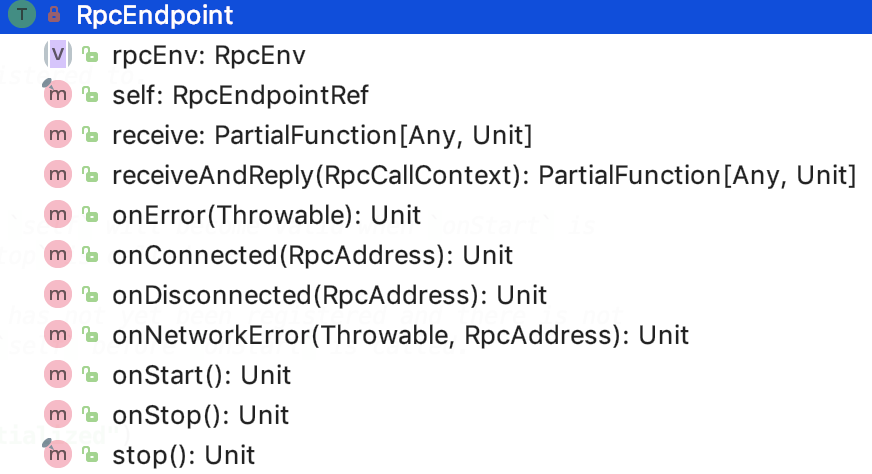
对其变量和方法解释如下:
-
rpcEnv:RpcEndpoint 注册的那个 RpcEnv 对象
-
self : RpcEndpoint 对应的 RpcEndpointRef。onStart 方法被调用的时候,RpcEndpointRef有效,onStop 调用后,self会是null,注意由于在onStart之前,RpcEndpoint 还没有被注册,还没有有效的RpcEndpointRef,所以不要在onStart之前调用 self 方法
-
receive :处理从RpcEndpointRef.send 或 RpcCallContext.reply 过来的消息,如果接收到一个未匹配的消息,会抛出 SparkException 并且发送给onError 方法
-
receiveAndReply:处理从RpcEndpointRef.ask发过来的消息,如果接收到一个未匹配的消息,会抛出 SparkException 并且发送给onError 方法
-
onError: 在消息处理过程中,如果有异常都会调用此方法\6. onConnected:当remoteAddress 连接上当前节点时被调用
-
onDisconnected: 当当前节点丢失掉 remoteAddress 后被调用
-
onNetworkError:当连接当前节点和remoteAddress时,有网络错误发生时被调用
-
onStart:在RpcEndpoint开始处理其他消息之前被调用
-
onStop:当RpcEndpoint停止时被调用,self 将会是null,不能用于发送消息
-
stop: 停止RpcEndpoint
2、RpcEndPointRef
RpcEndPointRef:远程的RpcEndpoint引用,RpcEndpointRef是线程安全的。
有一个跟RpcEndPoint 很像的类 -- RpcEndPointRef。先来看 RpcEndpointRef抽象类。下面我们重点来看一下它内部构造。
首先看它的继承结构:

它的父类是 RpcEndpointRef。先来剖析它的内部变量和方法的解释:

有三个成员变量:
-
maxRetries: 最大尝试连接次数。可以通过 spark.rpc.numRetries 参数来指定,默认是 3 次。 该变量暂时没有使用。
-
retryWaitMs:每次尝试连接最大等待毫秒值。可以通过 spark.rpc.retry.wait 参数来指定,默认是 3s。该变量暂时没有使用。
-
defaultAskTimeout: spark 默认 ask 请求操作超时时间。 可以通过 spark.rpc.askTimeout 或 spark.network.timeout参数来指定,默认是120s。
成员方法:
-
address : 抽象方法,返回 RpcEndpointRef的RpcAddress
-
name:抽象方法,返回 endpoint 的name
-
send: 抽象方法,Sends a one-way asynchronous message. Fire-and-forget semantics. 发送单向的异步消息,满足 即发即忘 语义。
-
ask:抽象方法。发送消息到相应的 RpcEndpoint.receiveAndReply , 并返回 Future 以在默认超时内接收返回值。它有两个重载方法:其中没有RpcTimeOut 的ask方法添加一个 defaultAskTimeout 参数继续调用 有RpcTimeOut 的ask方法。
-
askSync:调用抽象方法ask。跟ask类似,有两个重载方法:其中没有RpcTimeOut 的askSync方法添加一个 defaultAskTimeout 参数继续调用 有RpcTimeOut 的askSync方法。有RpcTimeOut 的askSync方法 会调用 ask 方法生成一个Future 对象,然后等待任务执行完毕后返回。 注意,这里面其实就涉及到了模板方法模式。ask跟askSync都是设定好了,ask 要返回一个Future 对象,askSync则是 调用 ask 返回的Future 对象,然后等待 future 的 result 方法返回。
下面看RpcEndpointRef 的唯一实现类 - NettyRpcEndpointRef
RpcEndpointRef的NettyRpcEnv版本。此类的行为取决于它的创建位置。在“拥有”RpcEndpoint的节点上,它是RpcEndpointAddress实例的简单包装器。在接收序列化版本引用的其他计算机上,行为会发生变化。实例将跟踪发送引用的TransportClient,以便通过客户端连接发送到端点的消息,而不需要打开新连接。此ref的RpcAddress可以为null;这意味着ref只能通过客户端连接使用,因为托管端点的进程不会侦听传入连接。不应与第三方共享这些引用,因为它们将无法向端点发送消息。
先来看 成员变量:
-
conf : 是一个SparkConf 实例
-
endpointAddress:是一个RpcEndpointAddress 实例,主要包含了 RpcAddress (host和port) 和 rpc endpoint name的信息
-
nettyEnv:是一个NettyRpcEnv实例
-
client: 是一个TransportClient实例,这个client 是不参与序列化的。
成员方法:
-
实现并重写了继承自超类的ask方法, 如下:

-
实现并重写了继承自超类的send方法,如下:

-
关于序列化和反序列化的两个方法:writeObject(序列化方法)和 readObject(反序列化方法),如下:

3、RequestMessage
顺便,我们来看RequestMessage对象,代码如下:
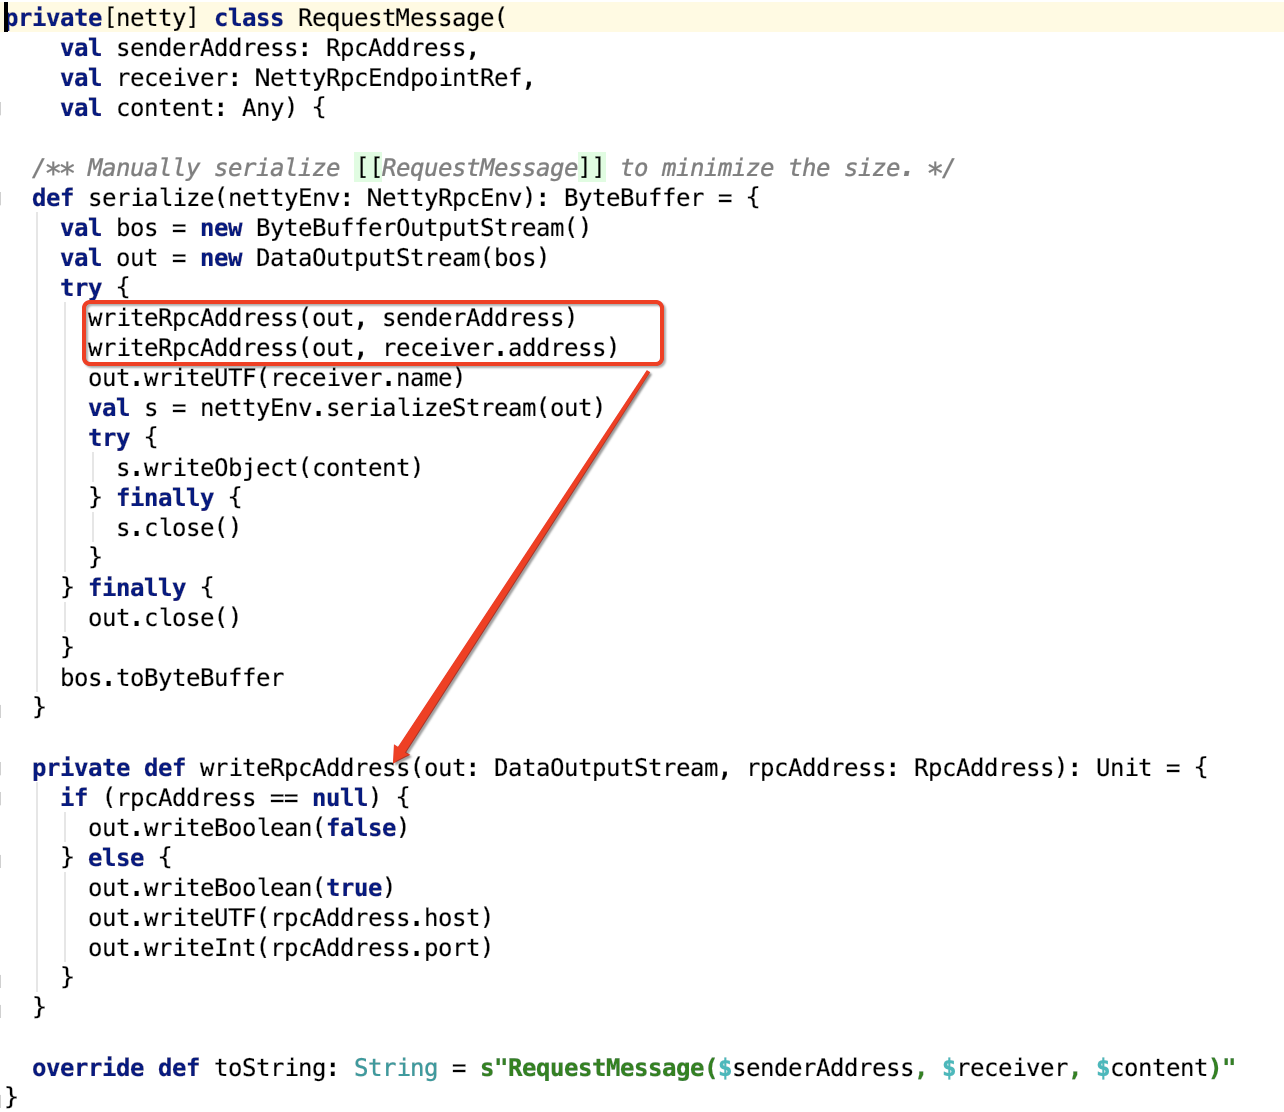
RequestMessage里面的消息是sender 发给 receiver 的,RequestMessage主要负责sender RpcAddress, receiver RpcAddress,receiver rpcendpoint name以及 消息 content 的序列化。
总结: 本文主要剖析了 RpcEndpoint和RpcEntpointRef两个类,顺便,也介绍了支持序列化的 RequestMessage 类。
四、 TransportContext和TransportClientFactory剖析
1、 TransportContext
首先官方文档对TransportContext的说明如下:
Contains the context to create a TransportServer, TransportClientFactory, and to setup Netty Channel pipelines with a TransportChannelHandler. There are two communication protocols that the TransportClient provides, control-plane RPCs and data-plane "chunk fetching". The handling of the RPCs is performed outside of the scope of the TransportContext (i.e., by a user-provided handler), and it is responsible for setting up streams which can be streamed through the data plane in chunks using zero-copy IO. The TransportServer and TransportClientFactory both create a TransportChannelHandler for each channel. As each TransportChannelHandler contains a TransportClient, this enables server processes to send messages back to the client on an existing channel.
首先这个上下文对象是一个创建TransportServer, TransportClientFactory,使用TransportChannelHandler建立netty channel pipeline的上下文,这也是它的三个主要功能。
TransportClient 提供了两种通信协议:控制层面的RPC以及数据层面的 "chunk抓取"。
用户通过构造方法传入的 rpcHandler 负责处理RPC 请求。并且 rpcHandler 负责设置流,这些流可以使用零拷贝IO以数据块的形式流式传输。
TransportServer 和 TransportClientFactory 都为每一个channel创建一个 TransportChannelHandler对象。每一个TransportChannelHandler 包含一个 TransportClient,这使服务器进程能够在现有通道上将消息发送回客户端。
成员变量:
-
logger: 负责打印日志的对象
-
conf:TransportConf对象
-
rpcHandler:RPCHandler的实例
-
closeIdleConnections:空闲时是否关闭连接
-
ENCODER: 网络层数据的加密,MessageEncoder实例
-
DECODER:网络层数据的解密,MessageDecoder实例
三类方法:
-
创建TransportClientFactory,两个方法如下:
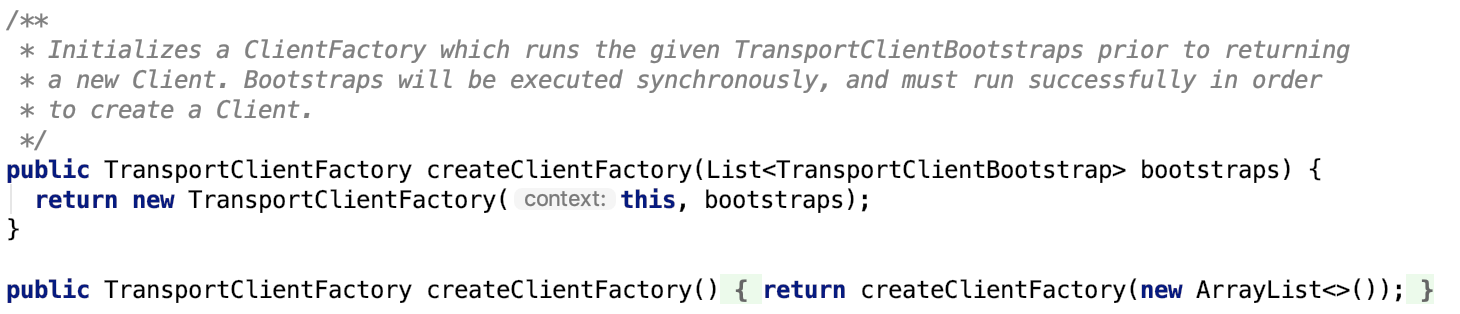
-
创建TransportServer,四个方法如下:
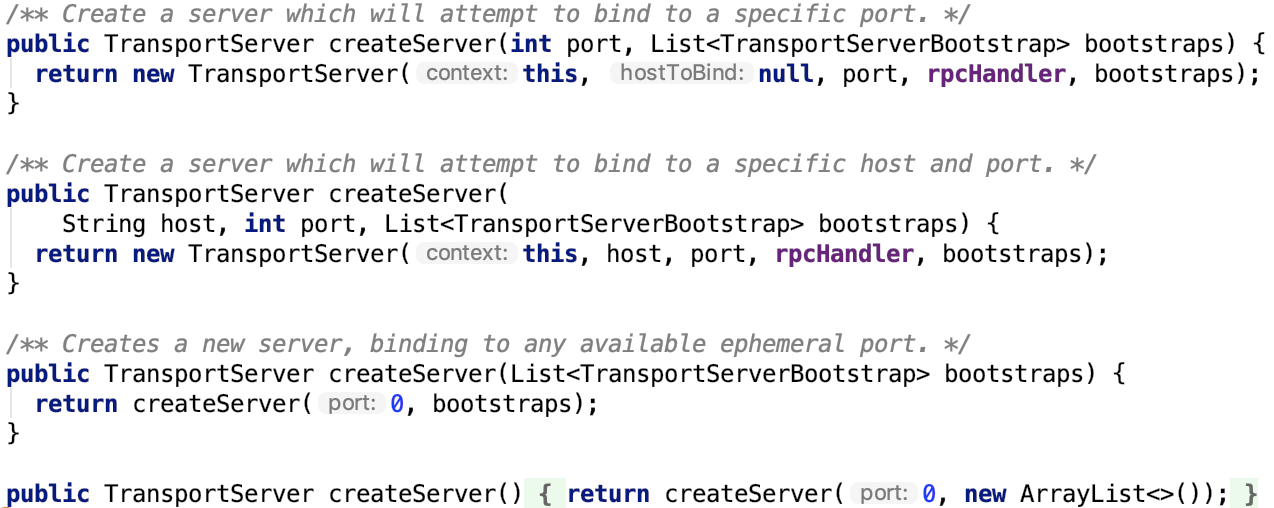
-
建立netty channel pipeline,涉及方法以及调用关系如下:
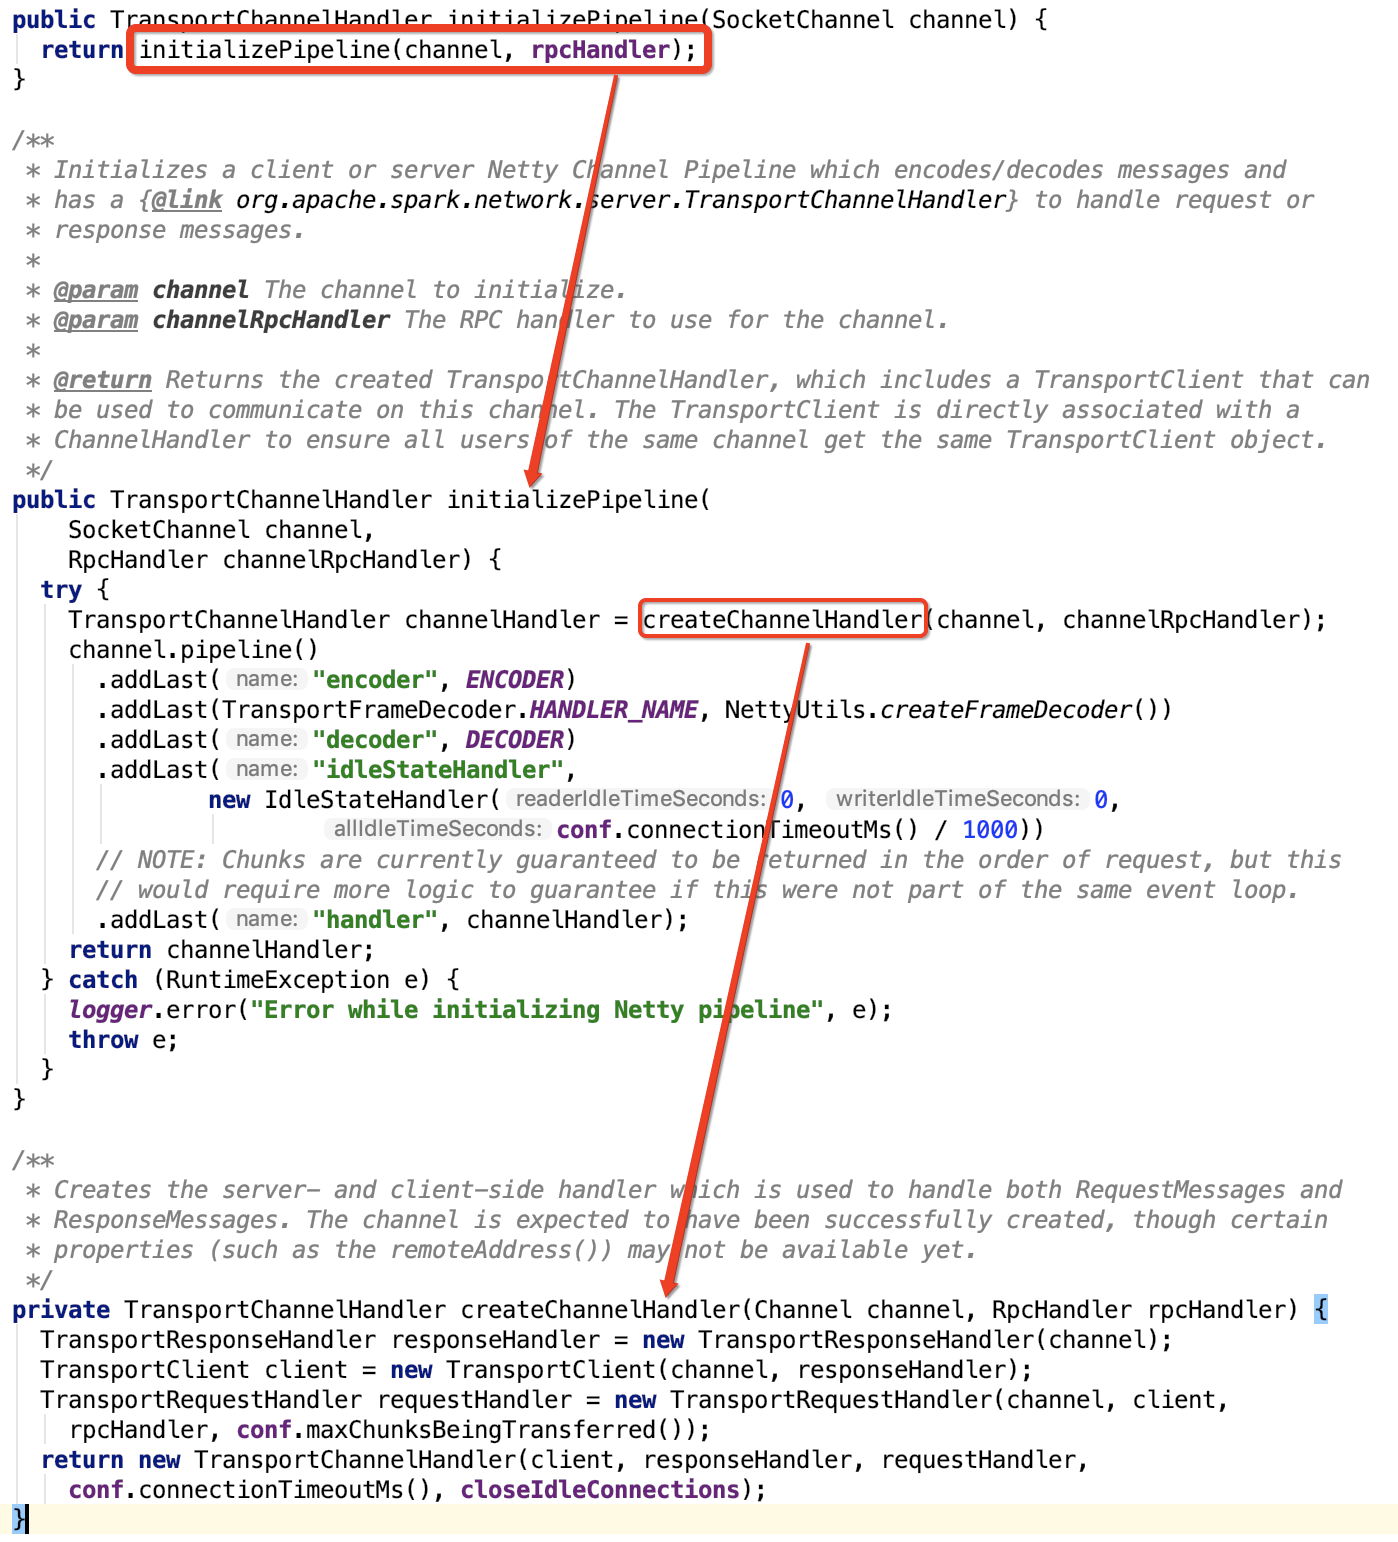
注意:TransportClient就是在 建立netty channel pipeline时候被调用的。整个rpc模块,只有这个方法可以实例化TransportClient对象。
2、TransportClientFactory
TransportClientFactory
使用 TransportClientFactory 的 createClient 方法创建 TransportClient。这个factory维护到其他主机的连接池,并应为同一远程主机返回相同的TransportClient。所有TransportClients共享一个工作线程池,TransportClients将尽可能重用。
在完成新TransportClient的创建之前,将运行所有给定的TransportClientBootstraps。
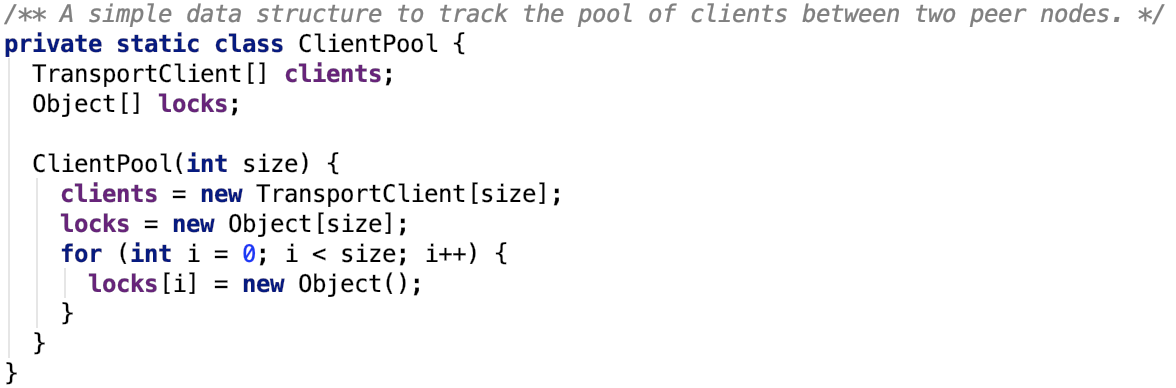
其内部维护了一个连接池,如下:
TransportClientFactory 类图如下:
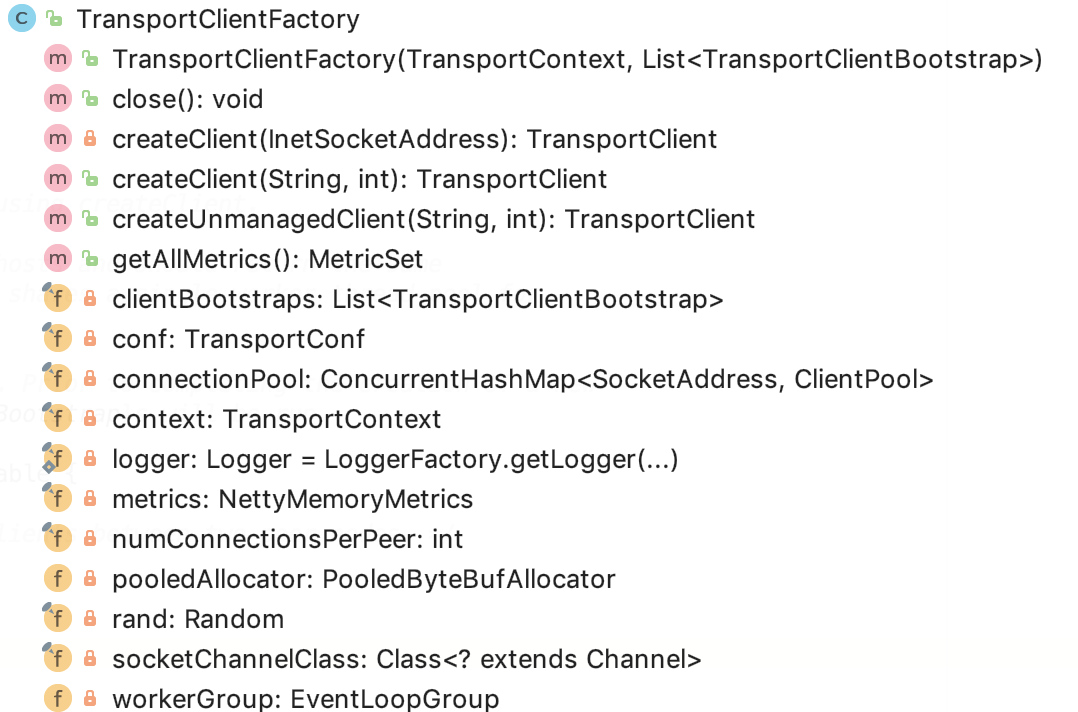
TransportClientFactory成员变量如下:
-
logger 日志类
-
context 是 TransportContext 实例
-
conf 是 TransportConf 实例
-
clientBootstraps是一个 List<TransportClientBootstrap>实例
-
connectionPool 是一个 ConcurrentHashMap<SocketAddress, ClientPool>实例,维护了 SocketAddress和ClientPool的映射关系,即连接到某台机器某个端口的信息被封装到
-
rand是一个Random 随机器,主要用于在ClientPool中选择TransportClient 实例
-
numConnectionsPerPeer 表示到一个rpcAddress 的连接数
-
socketChannelClass 是一个 Channel 的Class 对象
-
workerGroup 是一个EventLoopGroup 主要是为了注册channel 对象
-
pooledAllocator是一个 PooledByteBufAllocator 对象,负责分配buffer 的 11.metrics是一个 NettyMemoryMetrics对象,主要负责从 PooledByteBufAllocator 中收集内存使用metric 信息
其成员方法比较简单,简言之就是几个创建TransportClient的几个方法。
创建受管理的TransportClient,所谓的受管理,其实指的是创建的对象被放入到了connectionPool中:
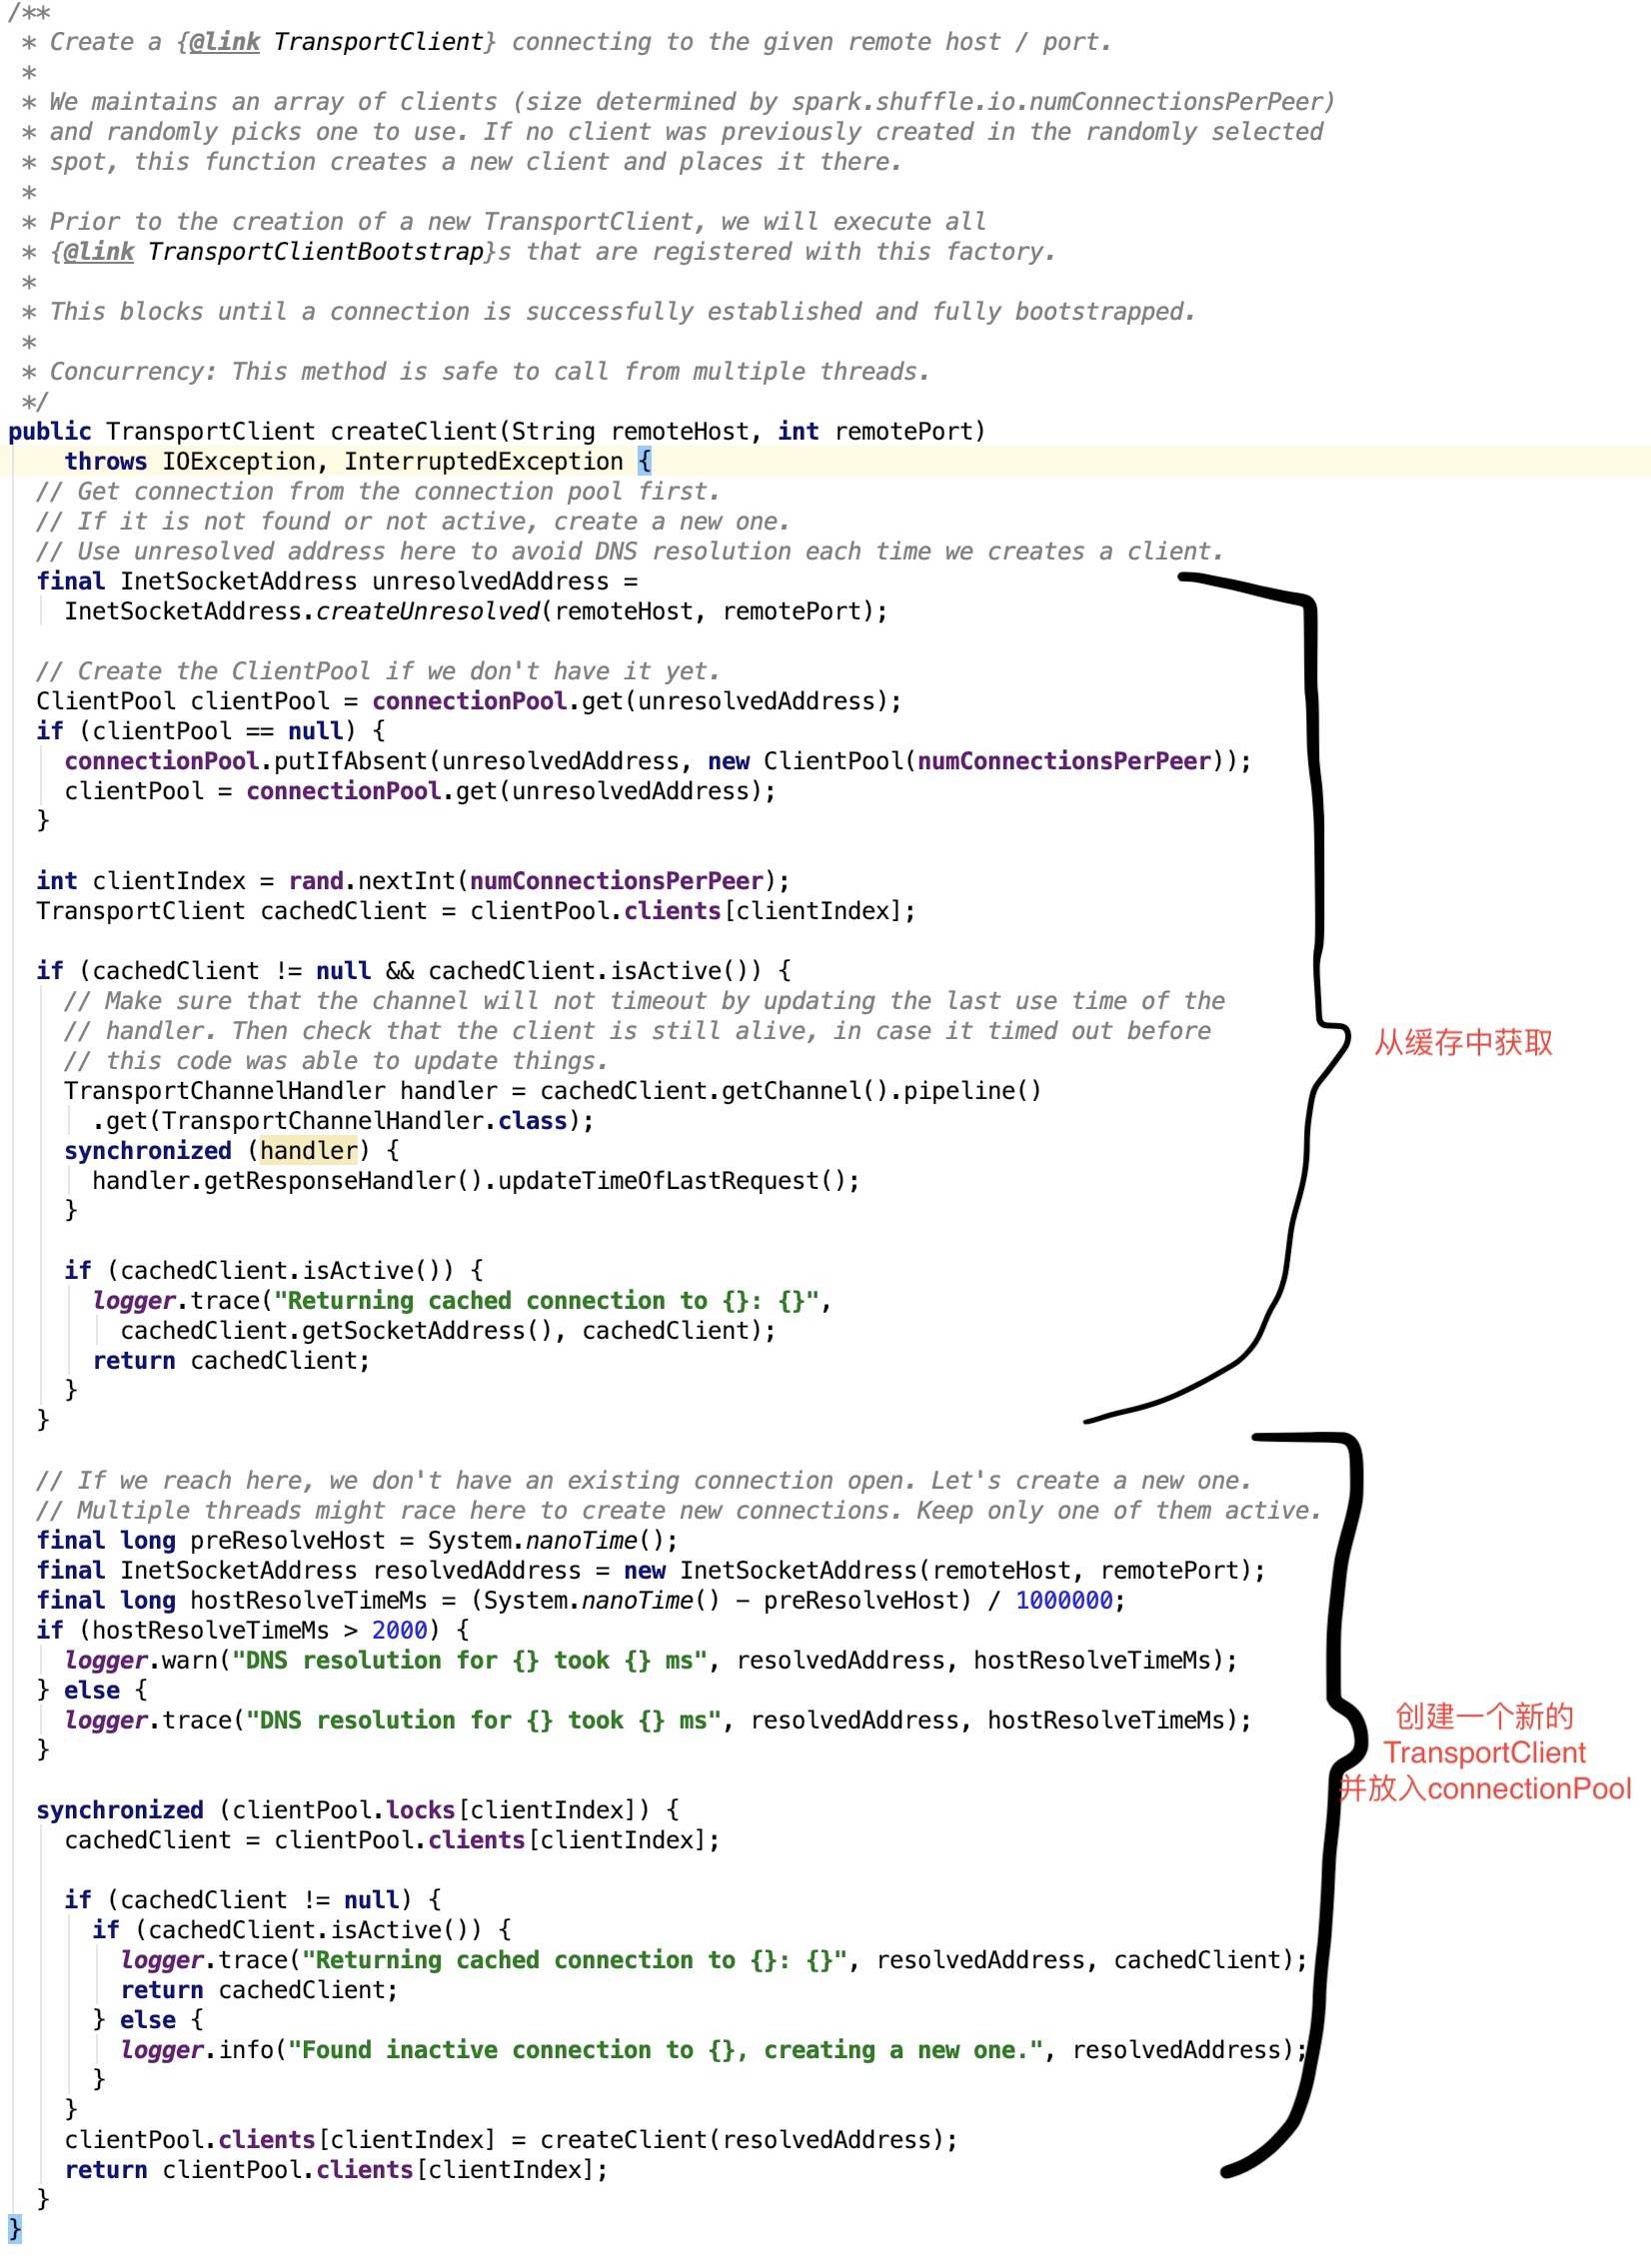
创建不受管理的TransportClient,新对象创建后不需要放入connectionPool中:
上面的两个方法都调用了核心方法 createClient 方法,其源码如下:

其中Bootstrap类目的是为了让client 更加容易地创建channel。Bootstrap可以认为就是builder模式中的builder。
将复杂的channel初始化过程隐藏在Bootstrap类内部。
五、TransportResponseHandler、TransportRequestHandler和TransportChannelHandler剖析
1、TransportChannelHandler剖析
先来看类说明:
Handler that processes server responses, in response to requests issued from a [[TransportClient]]. It works by tracking the list of outstanding requests (and their callbacks). Concurrency: thread safe and can be called from multiple threads.
即处理服务器响应的处理程序,以响应TransportClient发出的请求。它的工作原理是跟踪未完成的请求(及其回调)列表。它是线程安全的。
其关键的成员字段作如下说明:
-
channel:与之绑定的SocketChannel对象
-
outstandingFetches:是一个ConcurrentHashMap,主要保存StreamChunkId和ChunkReceivedCallback的映射关系。
-
outstandingRpcs:是一个ConcurrentHashMap,主要保存 request id 和RpcResponseCallback的映射关系。
-
streamCallbacks 是一个ConcurrentLinkedQueue队列,保存了Pair<String, StreamCallback>,其中String是stream id
-
timeOfLastRequestNs:记录了上次rpc 请求或 chunk fetching 的系统时间,以纳秒计算
其关键方法 handle 如下:
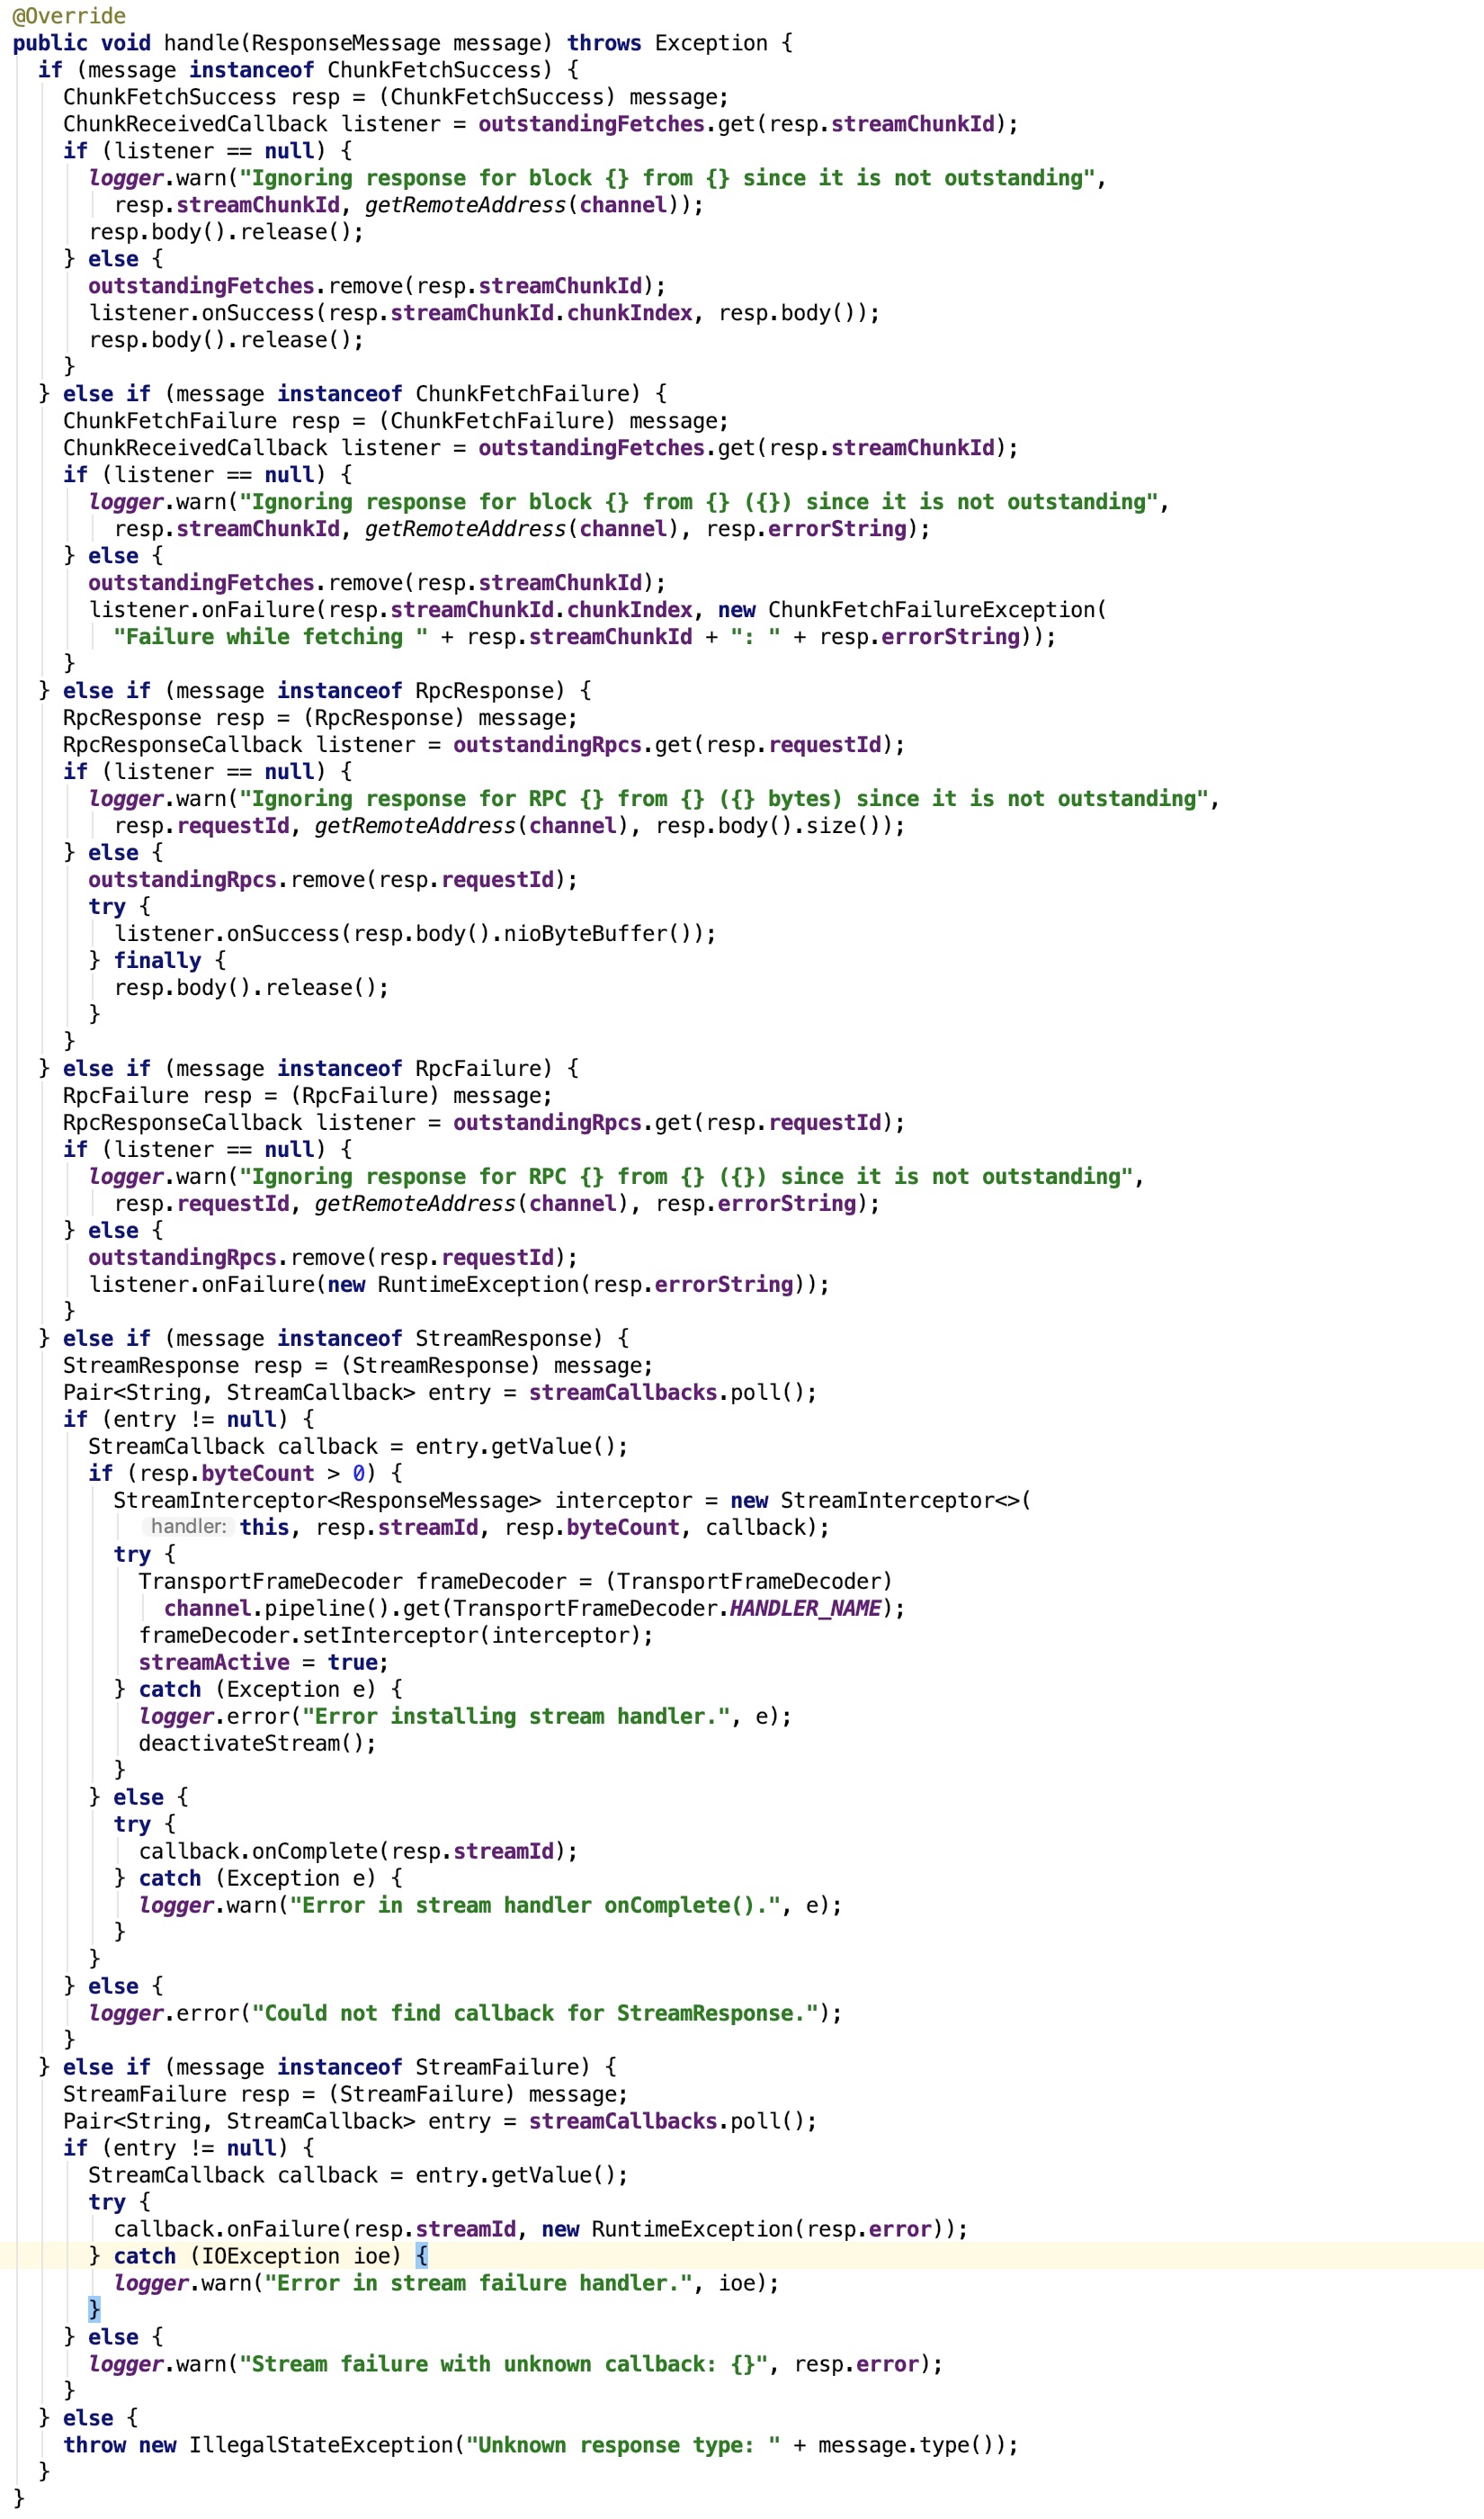
2、TransportRequestHandler分析
类说明如下:
A handler that processes requests from clients and writes chunk data back. Each handler is attached to a single Netty channel, and keeps track of which streams have been fetched via this channel, in order to clean them up if the channel is terminated (see #channelUnregistered). The messages should have been processed by the pipeline setup by TransportServer.
它是一个handler,处理来自于client 的 请求,返回chunk 给 client。每一个handler与一个netty channel 关联,并追踪那个chunk 已经被chennel获取到了。其中消息应该已经被TransportServer建立起来的管道处理过了。
其成员变量说明如下:
-
channel: 是Channel对象,与之关联的SocketChannel对象
-
reverseClient:是TransportClient对象,同一个channel 上的client,这样,就可以给消息的请求者通信了
-
rpcHandler:是一个RpcHandler对象,处理所有的 RPC 消息
-
streamManager: 是一个StreamManager对象,返回一个流的 任意一部分chunk
-
maxChunksBeingTransferred: 正在传输的流的chunk 下标
其关键方法 handle 如下:
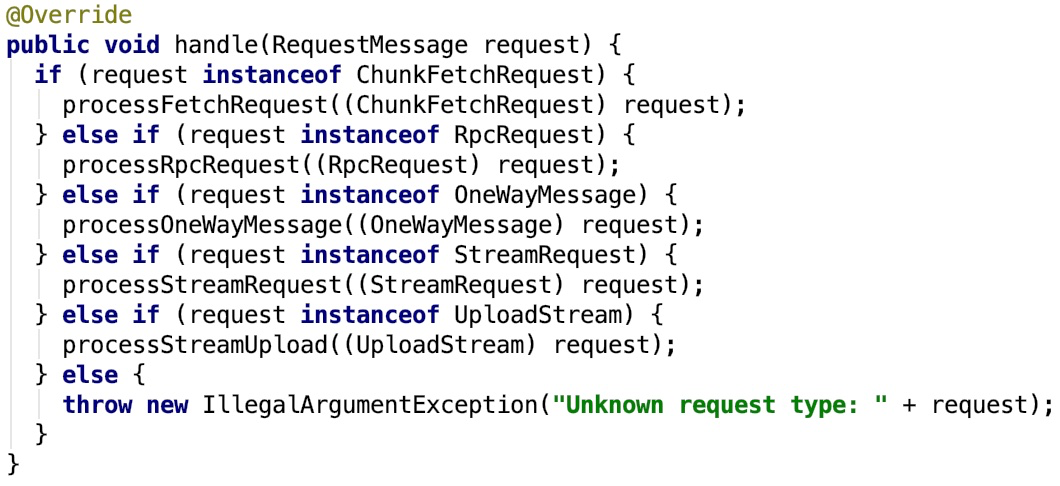
我们只看一个分支作为示例:
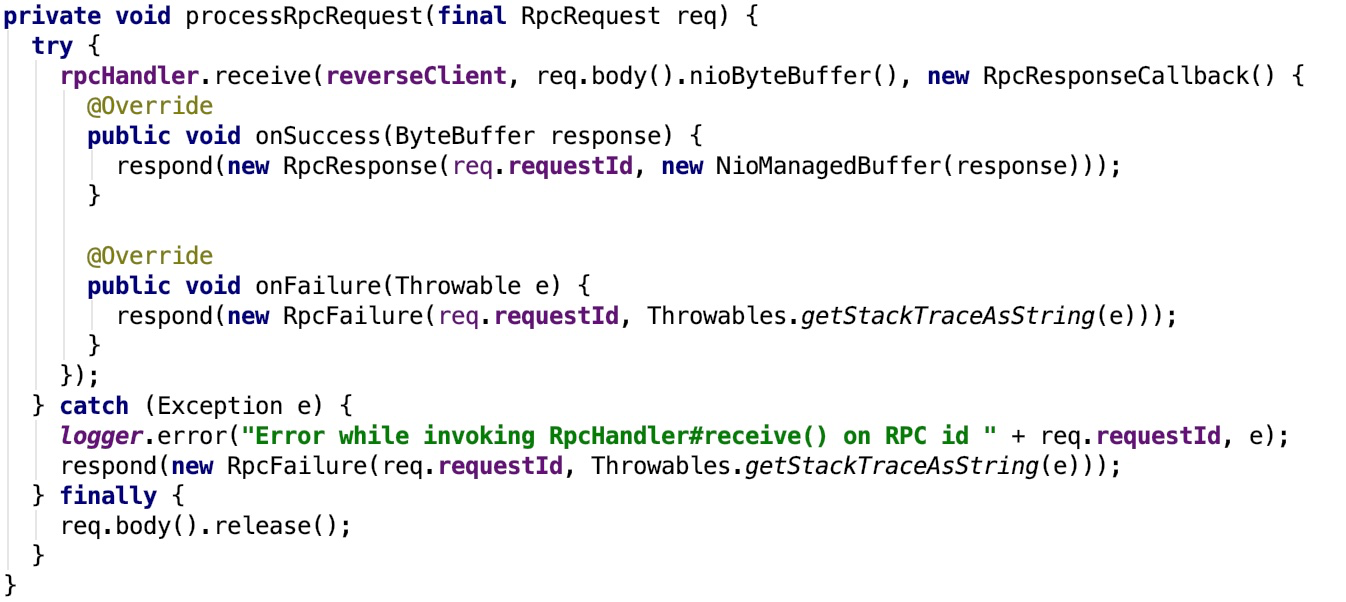
其调用了rpcHandler 的 receive 方法,该方法处理完毕后返回,如果成功,则返回RpcResponse对象,否则返回RpcResponse对象,由于这个返回可能是需要跨网络传输的,所以,有进一步封装了response 方法,如下:
即通过response 方法将server 端的请求结果返回给客户端。
3、TransportChannelHandler分析
类说明如下:
The single Transport-level Channel handler which is used for delegating requests to the TransportRequestHandler and responses to the TransportResponseHandler. All channels created in the transport layer are bidirectional. When the Client initiates a Netty Channel with a RequestMessage (which gets handled by the Server's RequestHandler), the Server will produce a ResponseMessage (handled by the Client's ResponseHandler). However, the Server also gets a handle on the same Channel, so it may then begin to send RequestMessages to the Client. This means that the Client also needs a RequestHandler and the Server needs a ResponseHandler, for the Client's responses to the Server's requests. This class also handles timeouts from a io.netty.handler.timeout.IdleStateHandler. We consider a connection timed out if there are outstanding fetch or RPC requests but no traffic on the channel for at least requestTimeoutMs. Note that this is duplex traffic; we will not timeout if the client is continuously sending but getting no responses, for simplicity.
传输层的handler,负责委托请求给TransportRequestHandler,委托响应给TransportResponseHandler。
在传输层中创建的所有通道都是双向的。当客户端使用RequestMessage启动Netty通道(由服务器的RequestHandler处理)时,服务器将生成ResponseMessage(由客户端的ResponseHandler处理)。但是,服务器也会在同一个Channel上获取句柄,因此它可能会开始向客户端发送RequestMessages。这意味着客户端还需要一个RequestHandler,而Server需要一个ResponseHandler,用于客户端对服务器请求的响应。此类还处理来自io.netty.handler.timeout.IdleStateHandler的超时。如果存在未完成的提取或RPC请求但是至少在“requestTimeoutMs”上没有通道上的流量,我们认为连接超时。请注意,这是双工流量;如果客户端不断发送但是没有响应,我们将不会超时。
关键方法channelRead如下:
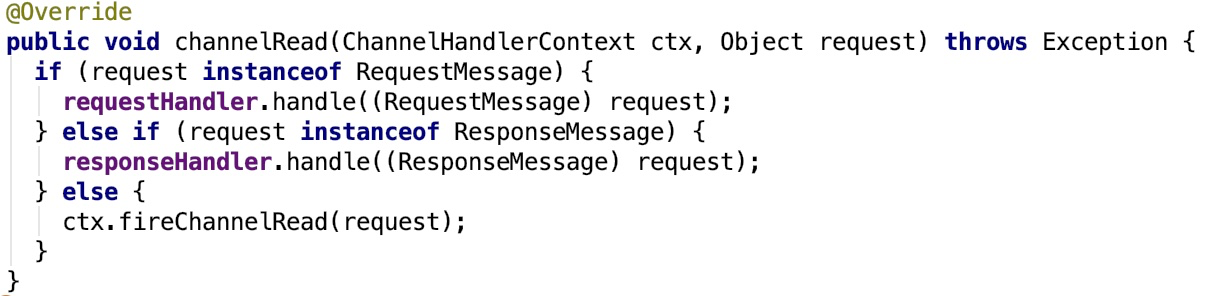
该方法,负责将请求委托给TransportRequestHandler,将响应委托给TransportResponseHandler。
因为这个channel最终被添加到了channel上,所以消息从channel中传输(流出或流入)都会触发这个方法,进而调用响应的方法。
即Spark RPC通过netty的channel发送请求,获取响应。
六、TransportClient、TransportServer剖析
1、TransportClient类说明
先来看,官方文档给出的说明:
Client for fetching consecutive chunks of a pre-negotiated stream. This API is intended to allow efficient transfer of a large amount of data, broken up into chunks with size ranging from hundreds of KB to a few MB. Note that while this client deals with the fetching of chunks from a stream (i.e., data plane), the actual setup of the streams is done outside the scope of the transport layer. The convenience method "sendRPC" is provided to enable control plane communication between the client and server to perform this setup. For example, a typical workflow might be: client.sendRPC(new OpenFile("/foo")) --> returns StreamId = 100 client.fetchChunk(streamId = 100, chunkIndex = 0, callback) client.fetchChunk(streamId = 100, chunkIndex = 1, callback) ... client.sendRPC(new CloseStream(100)) Construct an instance of TransportClient using TransportClientFactory. A single TransportClient may be used for multiple streams, but any given stream must be restricted to a single client, in order to avoid out-of-order responses. NB: This class is used to make requests to the server, while TransportResponseHandler is responsible for handling responses from the server. Concurrency: thread safe and can be called from multiple threads.
用于获取预先协商的流的连续块的客户端。此API允许有效传输大量数据,分解为大小从几百KB到几MB的chunk。 注意,虽然该客户端处理从流(即,数据平面)获取chunk,但是流的实际设置在传输层的范围之外完成。提供便利方法“sendRPC”以使客户端和服务器之间的控制平面通信能够执行该设置。 例如,典型的工作流程可能是:
// 打开远程文件 client.sendRPC(new OpenFile(“/ foo”)) - >返回StreamId = 100
// 打开获取远程文件chunk-0 client.fetchChunk(streamId = 100,chunkIndex = 0,callback)
// 打开获取远程文件chunk-1 client.fetchChunk(streamId = 100,chunkIndex = 1,callback) .. .
// 关闭远程文件 client.sendRPC(new CloseStream(100)) 使用TransportClientFactory构造TransportClient的实例。
单个TransportClient可以用于多个流,但是任何给定的流必须限制在单个客户端,以避免无序响应。 注意:此类用于向服务器发出请求,而TransportResponseHandler负责处理来自服务器的响应。并发:线程安全,可以从多个线程调用。
简言之,可以认为TransportClient就是Spark Rpc 最底层的基础客户端类。主要用于向server端发送rpc 请求和从server 端获取流的chunk块。
下面看一下类的结构:
它有两个内部类:RpcChannelListener和StdChannelListener,这两个类的继承关系如下:
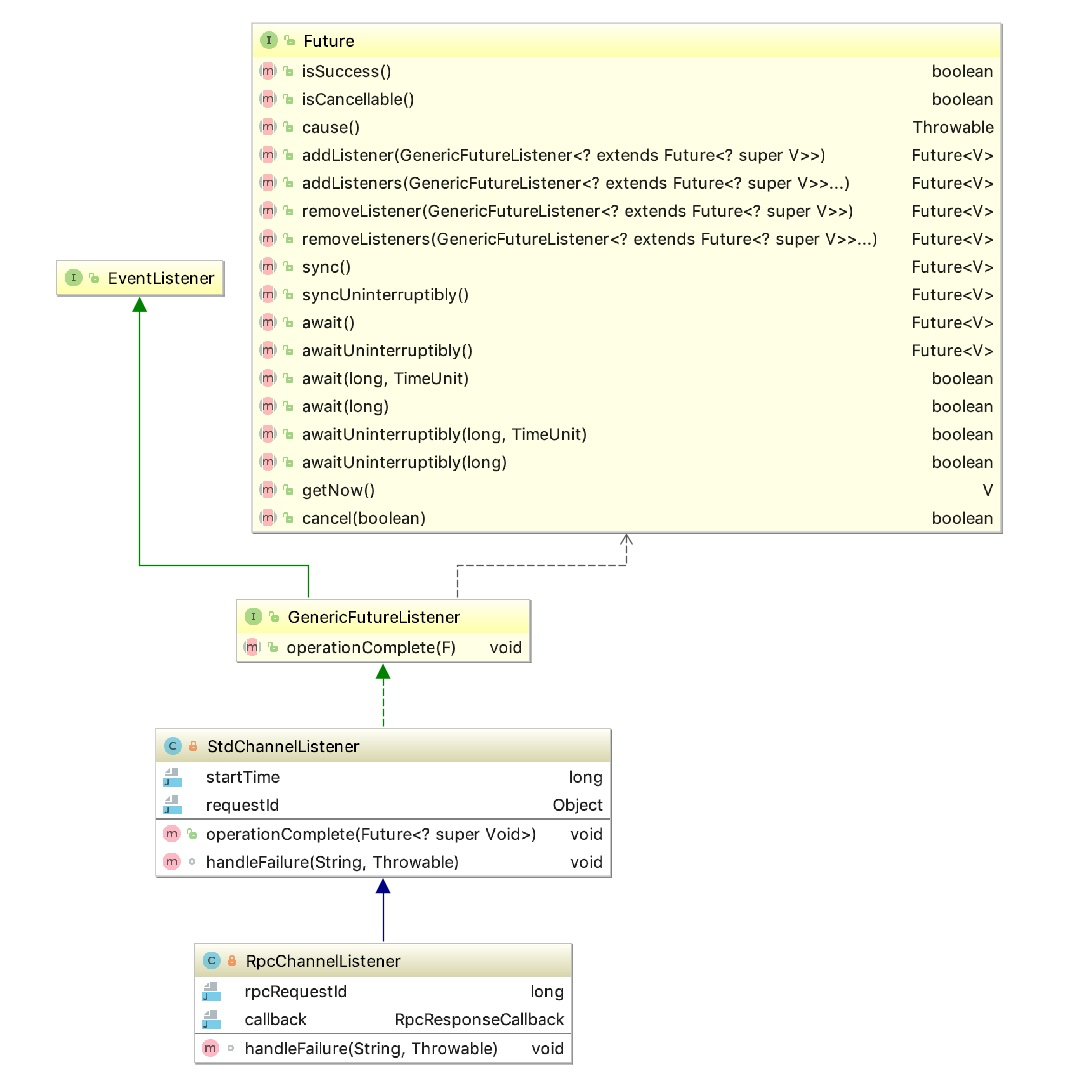
其公共父类GenericFutureListener 官方说明如下:
Listens to the result of a Future. The result of the asynchronous operation is notified once this listener is added by calling Future.addListener(GenericFutureListener).
即,监听一个Future 对象的执行结果,通过Future.addListener(GenericFutureListener)的方法,添加监听器来监听这个异步任务的最终结果。当异步任务执行成功之后,会调用监听器的 operationComplete 方法。在StdChannelListener 中,其operationComplete 方法其实就是添加了日志打印运行轨迹的作用,添加了异常的处理方法 handleFailure,它是一个空实现,如下:
其子类RpcChannelListener的handleFailure实现如下:
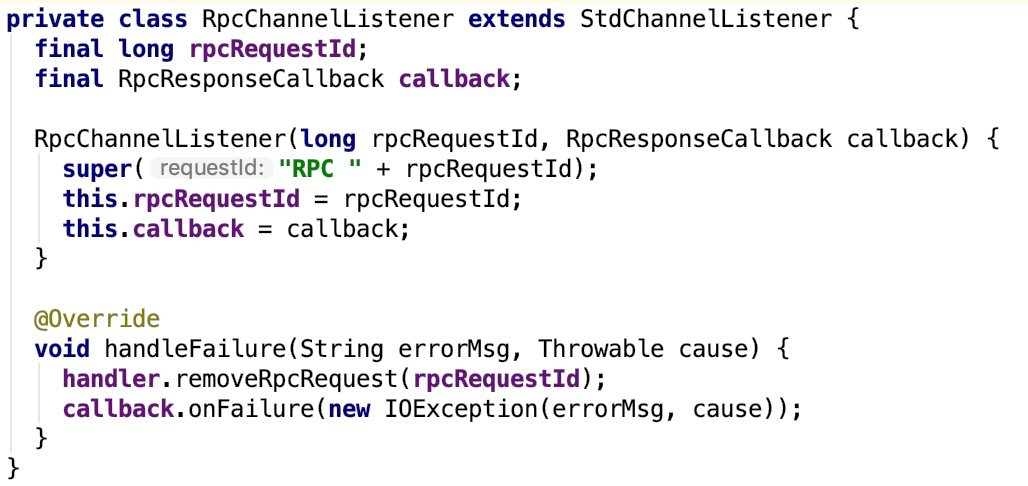
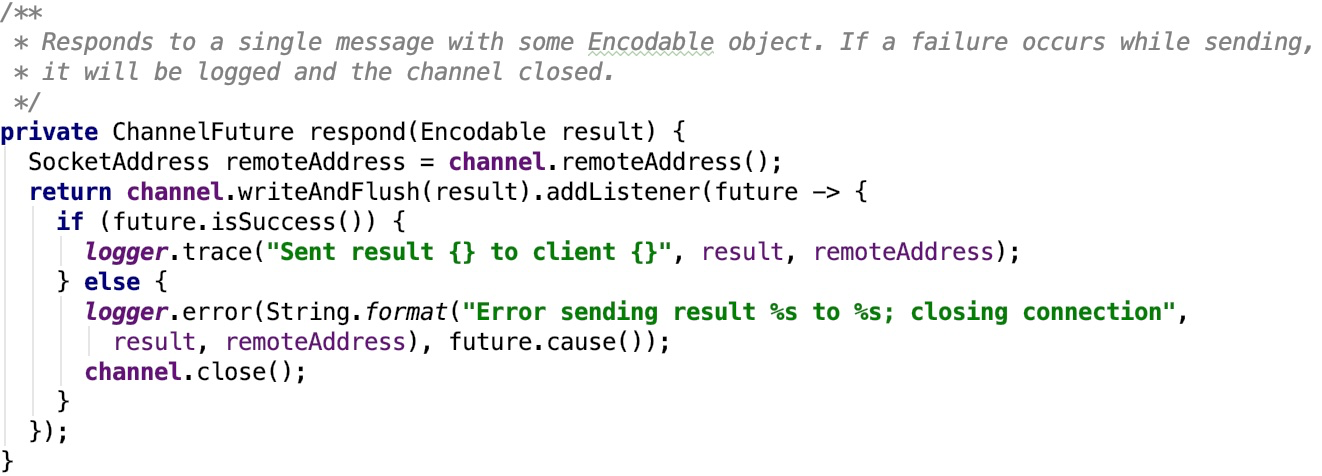
这个handleFailure 方法充当着失败处理转发的作用。其调用了 RpcResponseCallback (通过构造方法传入)的 onFailure 方法。
再来看一下TransportClient 的主要方法解释:
-
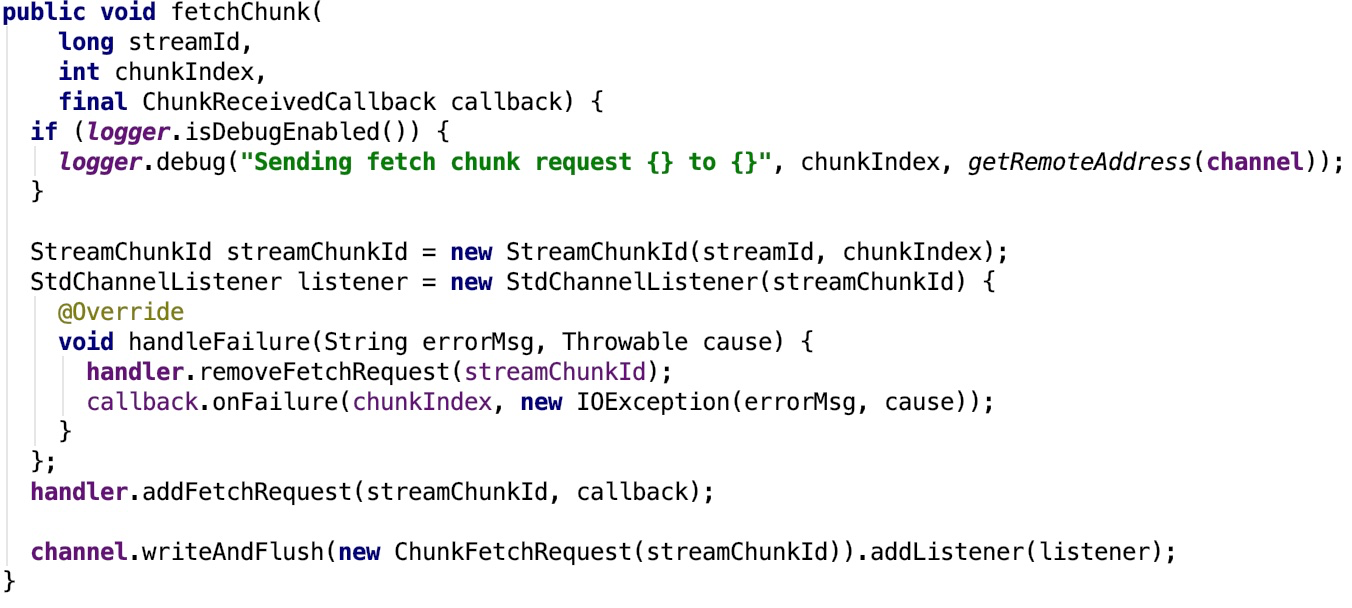
fetchChunk : Requests a single chunk from the remote side, from the pre-negotiated streamId. Chunk indices go from 0 onwards. It is valid to request the same chunk multiple times, though some streams may not support this. Multiple fetchChunk requests may be outstanding simultaneously, and the chunks are guaranteed to be returned in the same order that they were requested, assuming only a single TransportClient is used to fetch the chunks.其源码如下:
-
stream:Request to stream the data with the given stream ID from the remote end.其源码如下:

-
sendRpc:Sends an opaque message to the RpcHandler on the server-side. The callback will be invoked with the server's response or upon any failure.

-
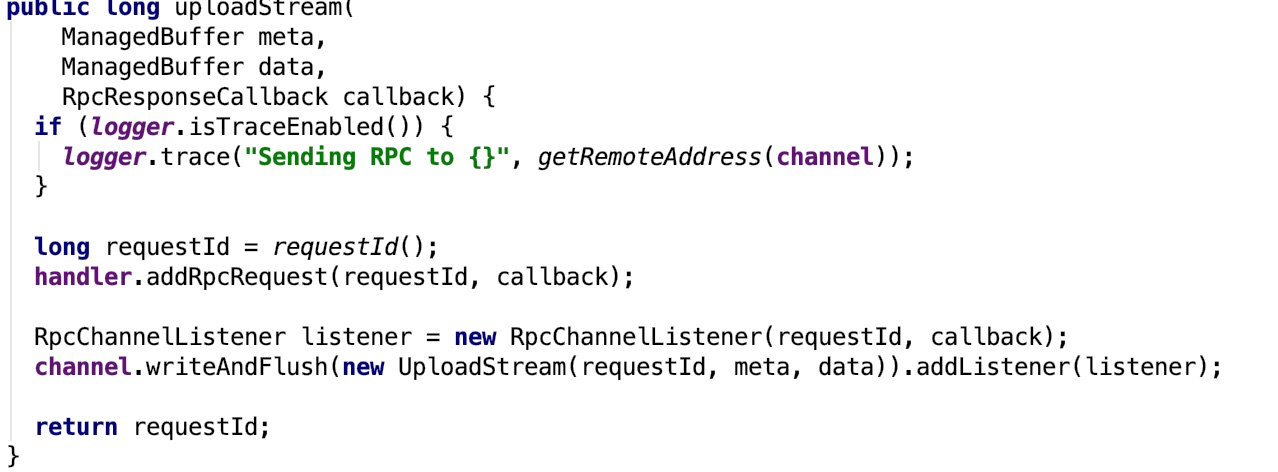
uploadStream:Send data to the remote end as a stream. This differs from stream() in that this is a request to send data to the remote end, not to receive it from the remote.
-
sendRpcSync:Synchronously sends an opaque message to the RpcHandler on the server-side, waiting for up to a specified timeout for a response.

-
send:Sends an opaque message to the RpcHandler on the server-side. No reply is expected for the message, and no delivery guarantees are made.
-
removeRpcRequest:Removes any state associated with the given RPC.主要是从handler 中把监听的rpcRequest移除。
-
close:close the channel
-
timeOut: Mark this channel as having timed out.
可以看出,其主要是一个比较底层的客户端,主要用于发送底层数据的request,主要是数据层面的流中的chunk请求或者是控制层面的rpc请求,发送数据请求的方法中都有一个回调方法,回调方法是用于处理请求返回的结果。
2、TransportClient初始化
它是由TransportClientFactory 创建的。看TransportClientFactory 的核心方法: createClient(java.net.InetSocketAddress)的关键代码如下:
  // 1. 添加一个 ChannelInitializer 的 handler
 bootstrap.handler(new ChannelInitializer<SocketChannel>() {
   @Override
   public void initChannel(SocketChannel ch) {
     TransportChannelHandler clientHandler = context.initializePipeline(ch);
     clientRef.set(clientHandler.getClient());
     channelRef.set(ch);
   }
 });

 // Connect to the remote server
 long preConnect = System.nanoTime();
 // 2. 连接到远程的服务端,返回一个ChannelFuture 对象,调用其 await 方法等待其结果返回。
 ChannelFuture cf = bootstrap.connect(address);
 // 3. 等待channelFuture 对象其结果返回。
 if (!cf.await(conf.connectionTimeoutMs())) {
   throw new IOException(
     String.format("Connecting to %s timed out (%s ms)", address, conf.connectionTimeoutMs()));
 } else if (cf.cause() != null) {
   throw new IOException(String.format("Failed to connect to %s", address), cf.cause());
 }
在connect 方法中,初始化了handler。handler 被添加到ChannelPipiline之后,使用线程池来处理初始化操作,其调用了 DefaultChannelPipeline的callHandlerAdded0 方法,callHandlerAdded0调用了handler 的 handlerAdded 方法,handlerAdded内部调用了 initChannel 私有方法,initChannel又调用了保护抽象方法 initChannel,其会调用 ChannelInitializer自定义匿名子类的initChannel 方法。在这个 initChannel 方法中调用了TransportContext 的initializePipeline方法,在这个方法中实例化了 TransportClient对象。
我们再来看一下TransportContext 的initializePipeline方法的核心方法createChannelHandler:

再来看 NettyRpcEnv 是如何初始化transportContext 的:

从上面可以看到 rpcHandler 是NettyRpcHandler, 其依赖三个对象,Dispatcher 对象,nettyEnv 对象以及StreamManager 对象。
3、TransportServer
官方说明:
Server for the efficient, low-level streaming service.
即:用于高效,低级别流媒体服务的服务器。
使用TransportContext createServer方法创建:

其构造方法源码如下:

重点看其init方法:
ServerBootstrap是用于初始化Server的。跟TransportClientFactory创建TransportClient类似,也有ChannelInitializer的回调,跟Bootstrap类似。参照上面的剖析。
至此,TransClient和TransServer的剖析完毕。
七、spark RPC总结
spark rpc 整体架构图如下:
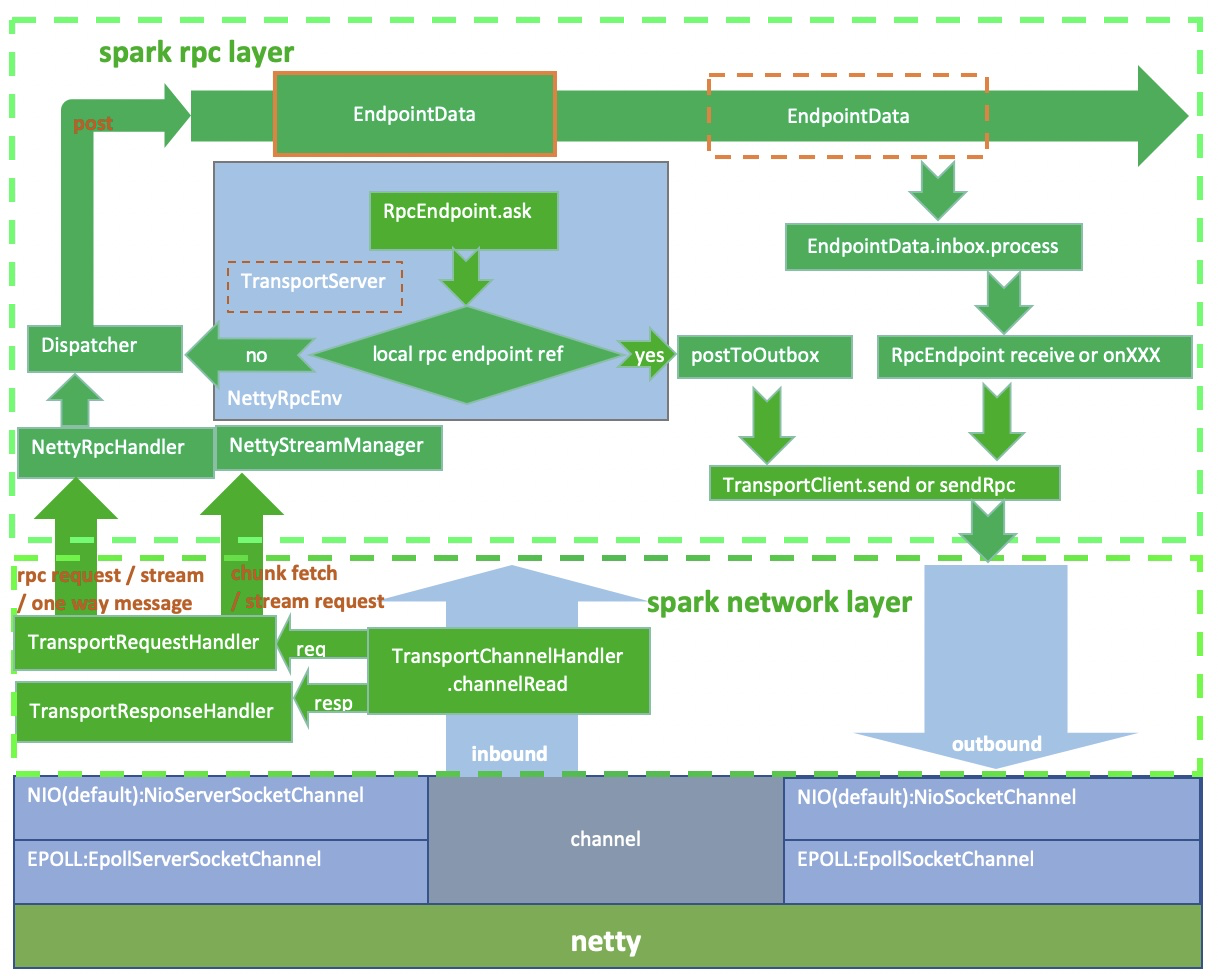
作如下说明:
-
spark 网络层是直接依赖于netty 框架的,它的适配器直接绑定到netty 的channel 上。
-
图中的channel 的encoder 和 decoder 等等netty 相关的组件没有体现出来。
-
channel 是全双工的,所以NettyRpcEnv既有TransportClient 也有TransportServer。
-
请求包括数据层面的chunk请求和控制层面的rpc请求。chunk请求会被StreamManager处理,rpc 请求会进一步通过Dispatcher分发给合适的endpoint。返回结果通过channel 返回给发送端。
-
RpcEndpointRef可以是本地的RpcEndpoint的简单包装也可以是远程RpcEndpoint 的代表。当RpcEndpoint 发送给 RpcEndpointRef 时,如果这个 RpcEndpointRef 是本地 RpcEndpointRef,则事件消息会被Dispatcher做进一步分发。如果是远程消息,则事件会被进一步封装成OutboxMessage,进而通过本地TransportClient将这个消息通过channel 发送给远程的 RpcEndpoint。
至此,spark rpc全部分析完毕。
第六章、spark源码分析之存储
一、 SerializerManager剖析
对SerializerManager的说明:
它是为各种Spark组件配置序列化,压缩和加密的组件,包括自动选择用于shuffle的Serializer。spark中的数据在network IO 或 local disk IO传输过程中。都需要序列化。其默认的 Serializer 是 org.apache.spark.serializer.JavaSerializer,在一定条件下,可以使用kryo,即org.apache.spark.serializer.KryoSerializer。
1、支持的两种序列化方式
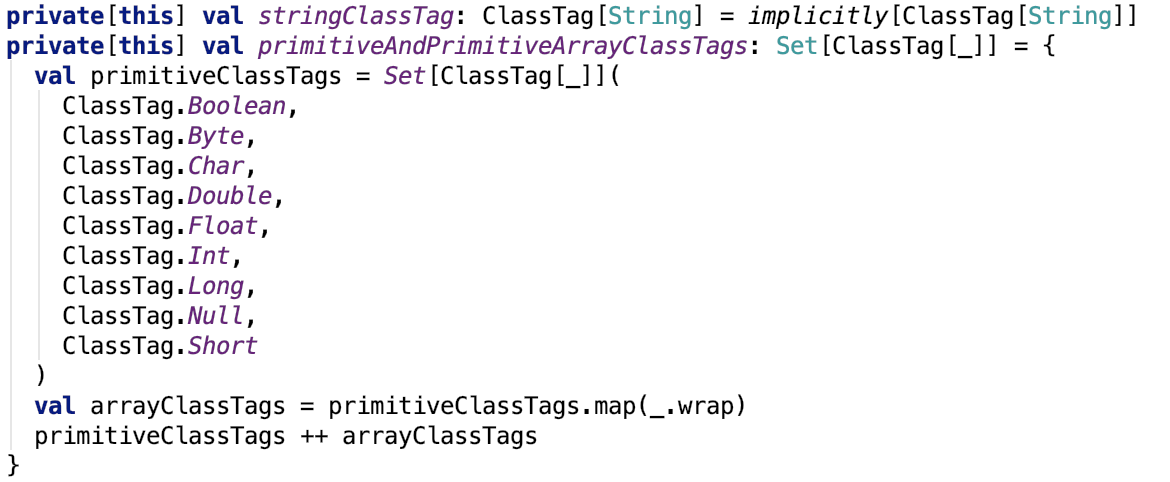
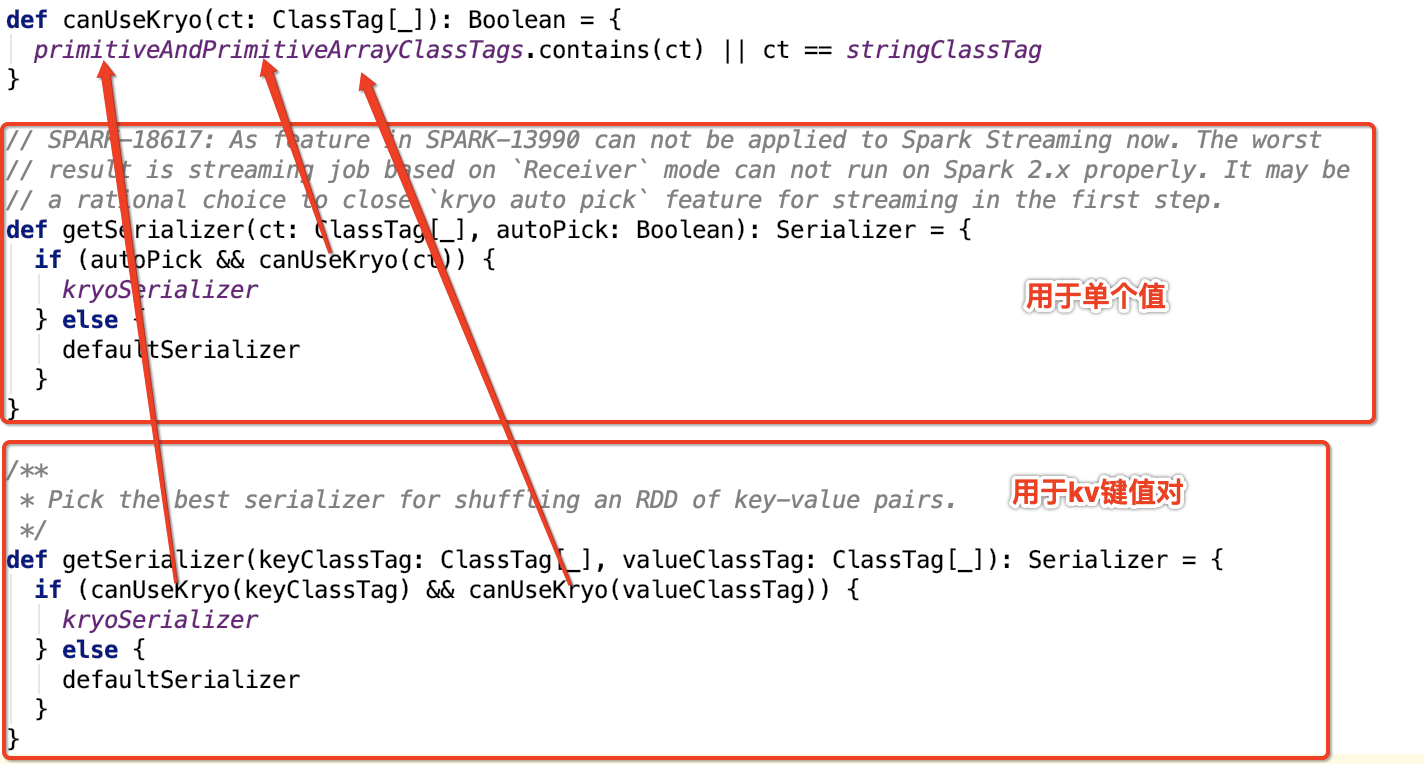
即值的类型是八种基本类型中一种或null或String,都会使用kryo,否则使用默认序列化方式,即java序列化方式。
它还负责读写Block流是否使用压缩:
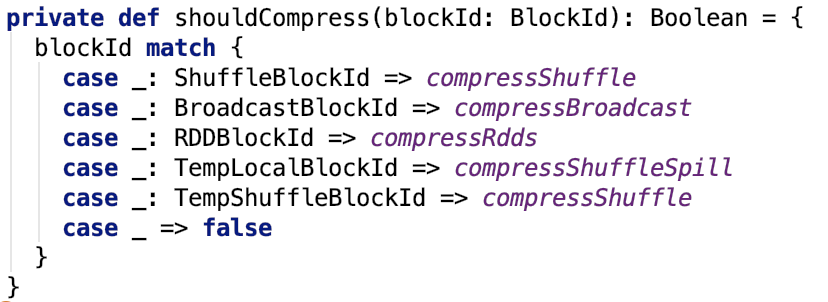
2、数据流是否支持压缩
默认情况下:

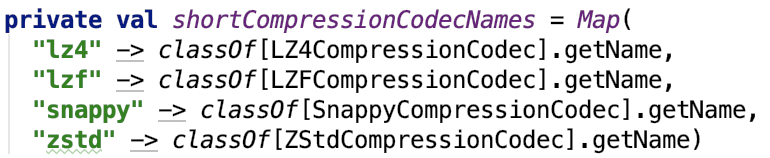
其中,如果使用压缩,默认的压缩是 lz4, 可以通过参数 spark.io.compression.codec 来配置。它支持的所有压缩类型如下:
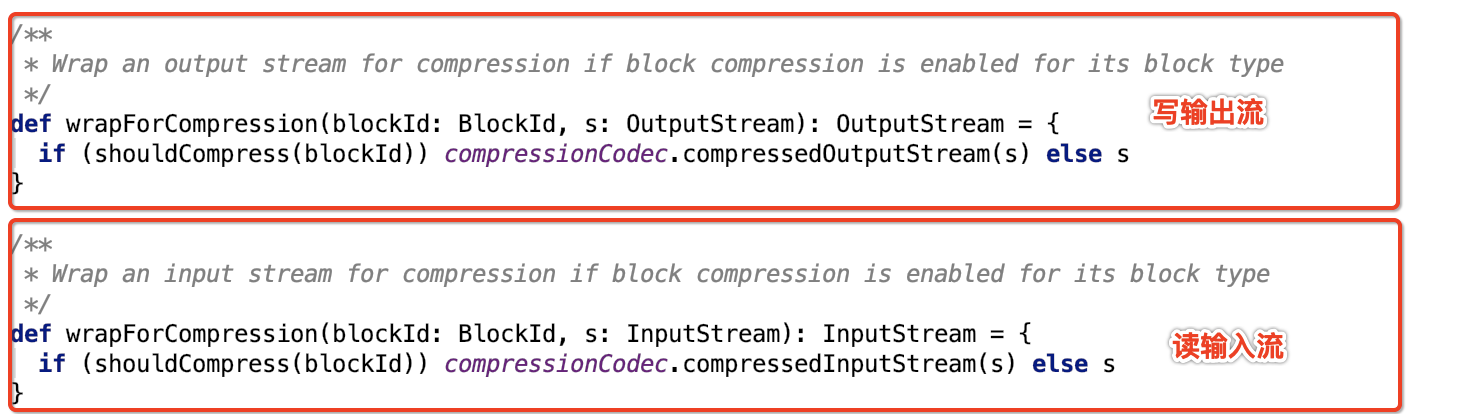
3、读写数据流如何支持压缩
其中,支持压缩的InputStream和OutputStream是对原来的InputStream和OutputStream做了包装。我们以LZ4BlockOutputStream为例说明。
调用如下函数返回支持压缩的OutputStream:

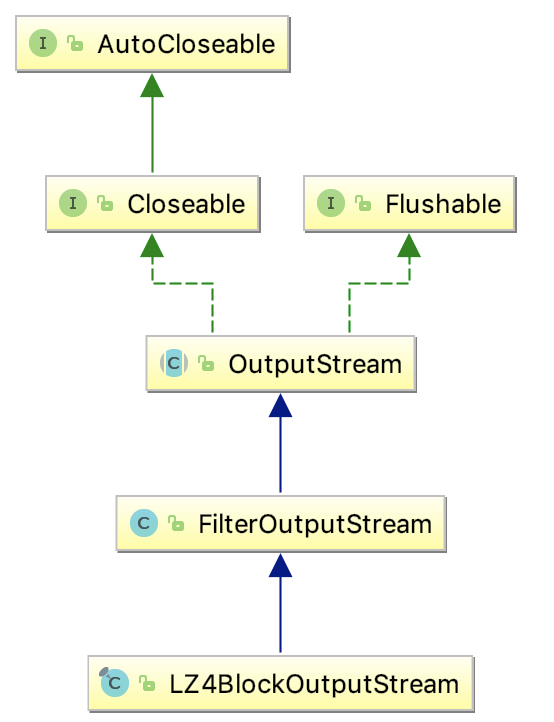
首先,LZ4BlockOutputStream的继承关系如下:
被包装的类被放到了FilterOutputStream类的out 字段中,如下:

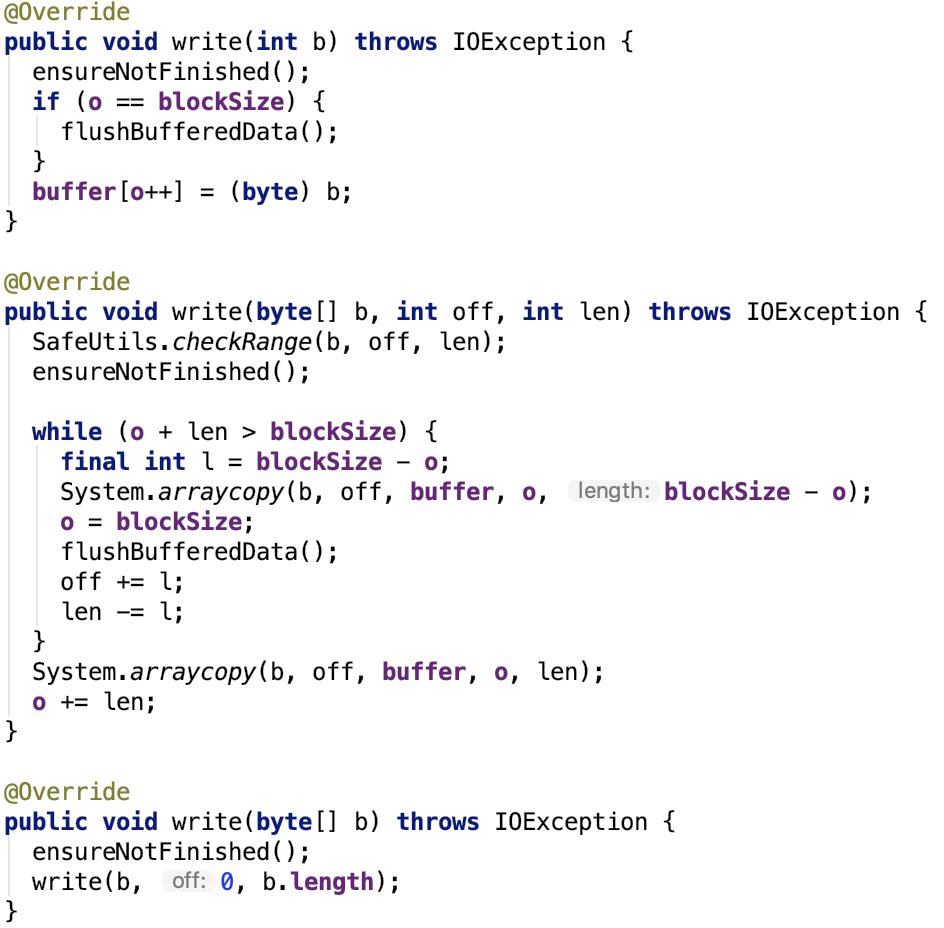
outputStream核心方法就是write。直接来看LZ4BlockOutputStream的write方法:
其中buffer是一个byte 数组,默认是 32k,可以通过spark.io.compression.lz4.blockSize 参数来指定,在LZ4BlockOutputStream类中用blockSize保存。
重点看flushBufferedData方法:
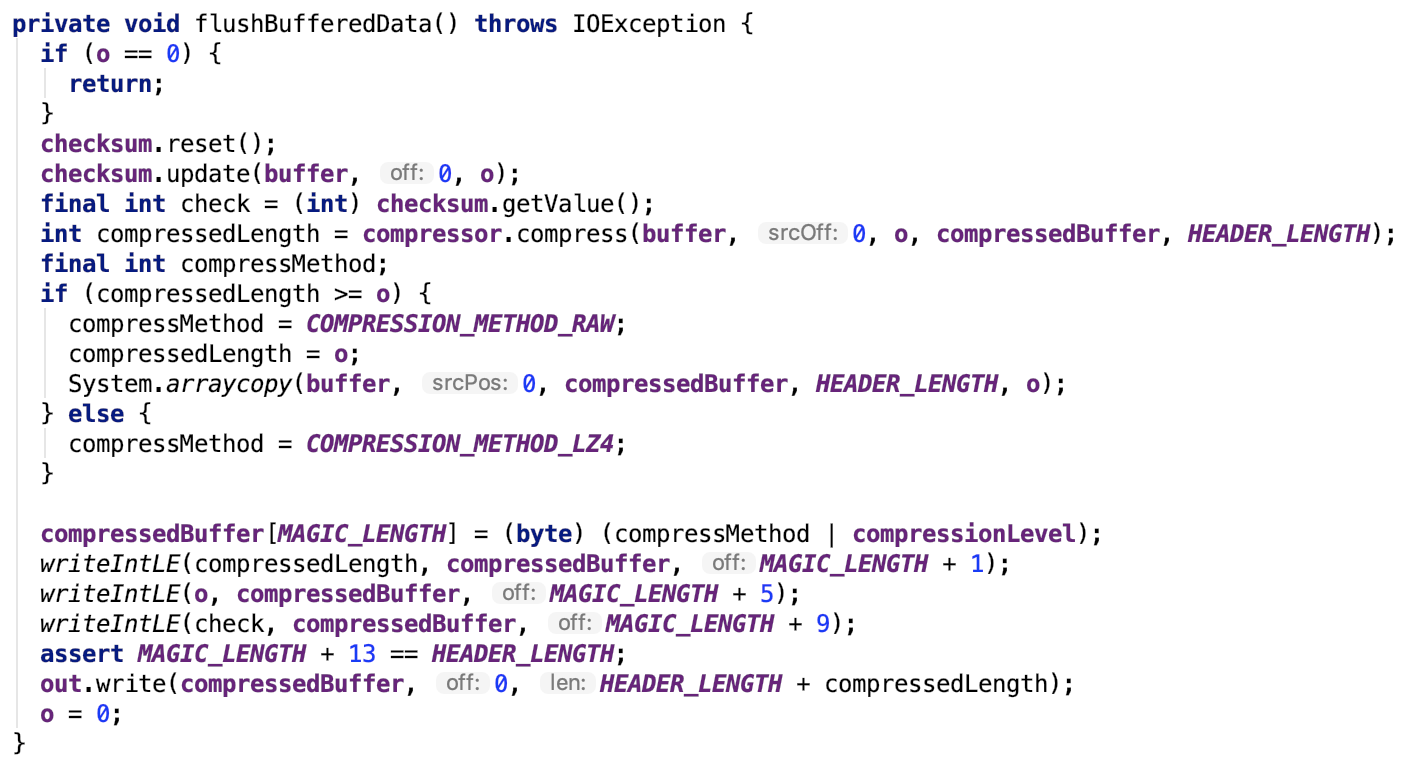
方法内部实现思路如下:
外部写入到buffer中的数据经过compressor压缩到compressorBuffer中,然后再写入一些magic,最终将压缩的buffer写入到out中,write操作结束。
可见,数据的压缩是由 LZ4BlockOutputStream 负责的,压缩之后的数据被写入到目标outputStream中。
二、 broadcast 是如何实现的?
1、BroadcastManager初始化
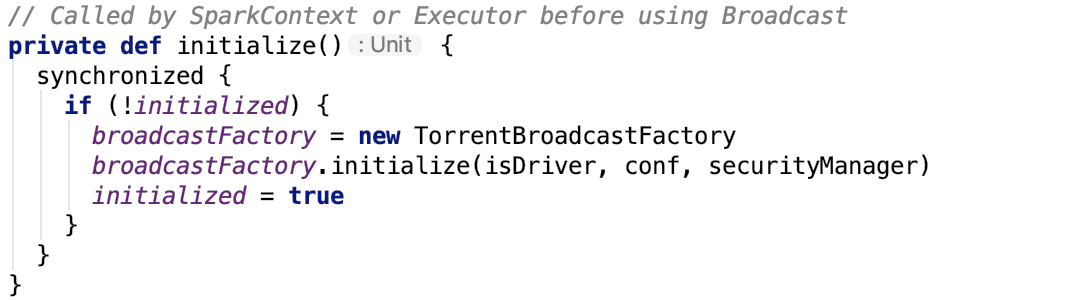
BroadcastManager初始化方法源码如下:
TorrentBroadcastFactory的继承关系如下:

2、BroadcastFactory
An interface for all the broadcast implementations in Spark (to allow multiple broadcast implementations). SparkContext uses a BroadcastFactory implementation to instantiate a particular broadcast for the entire Spark job.
即它是Spark中broadcast中所有实现的接口。SparkContext使用BroadcastFactory实现来为整个Spark job实例化特定的broadcast。它有唯一子类 -- TorrentBroadcastFactory。
它有两个比较重要的方法:
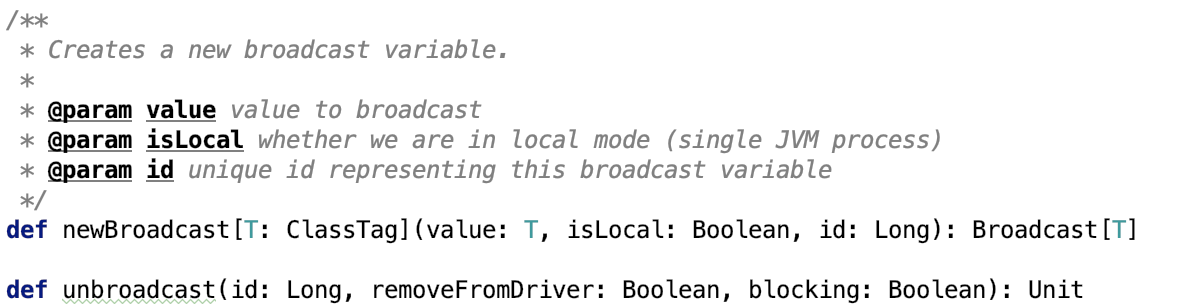
newBroadcast 方法负责创建一个broadcast变量。
3、TorrentBroadcastFactory
其主要方法如下:
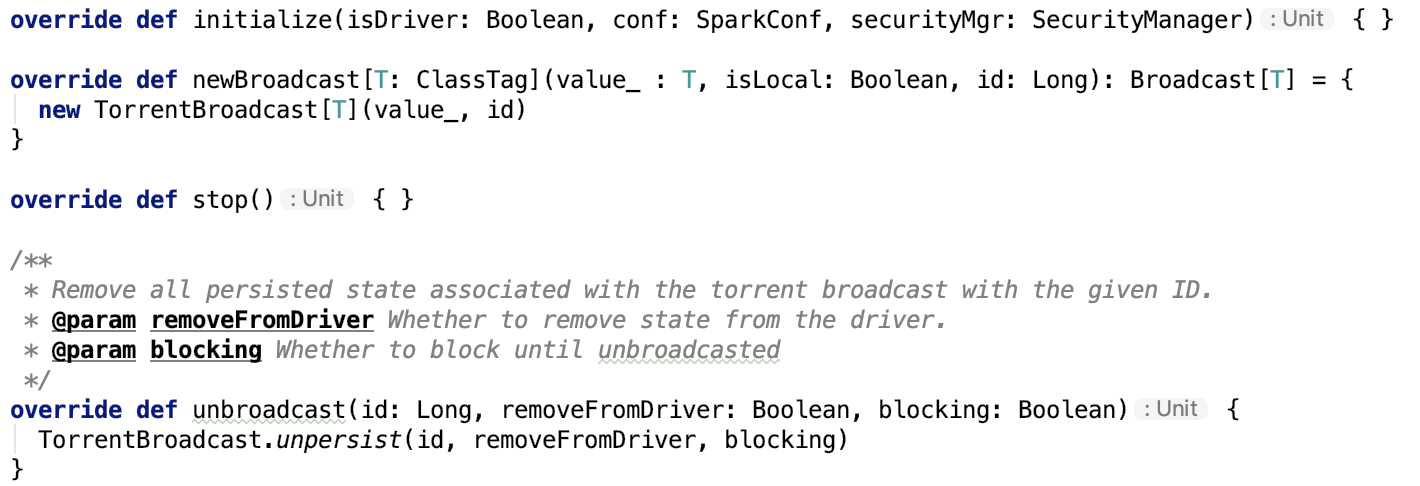
newBroadcast其实例化TorrentBroadcast类。
unbroadcast方法调用了TorrentBroadcast 类的 unpersist方法。
4、TorrentBroadcast父类Broadcast
官方说明如下:
A broadcast variable. Broadcast variables allow the programmer to keep a read-only variable cached on each machine rather than shipping a copy of it with tasks. They can be used, for example, to give every node a copy of a large input dataset in an efficient manner. Spark also attempts to distribute broadcast variables using efficient broadcast algorithms to reduce communication cost. Broadcast variables are created from a variable v by calling org.apache.spark.SparkContext.broadcast. The broadcast variable is a wrapper around v, and its value can be accessed by calling the value method. The interpreter session below shows this:

scala> val broadcastVar = sc.broadcast(Array(1, 2, 3))
broadcastVar: org.apache.spark.broadcast.Broadcast[Array[Int]] = Broadcast(0)

scala> broadcastVar.value
res0: Array[Int] = Array(1, 2, 3)

After the broadcast variable is created, it should be used instead of the value v in any functions run on the cluster so that v is not shipped to the nodes more than once. In addition, the object v should not be modified after it is broadcast in order to ensure that all nodes get the same value of the broadcast variable (e.g. if the variable is shipped to a new node later).
即广播变量允许编程者将一个只读变量缓存到每一个机器上,而不是随任务一起发送它的副本。它们可以被用来用一种高效的方式拷贝输入的大数据集。Spark也尝试使用高效的广播算法来减少交互代价。它通过调用SparkContext的broadcast 方法创建,broadcast变量是对真实变量的包装,它可以通过broadcast对象的value方法返回真实对象。一旦真实对象被广播了,要确保对象不会被改变,以确保该数据在所有节点上都是一致的。
TorrentBroadcast继承关系如下:

TorrentBroadcast 是 Broadcast 的唯一子类。
5、TorrentBroadcast
其说明如下:
A BitTorrent-like implementation of org.apache.spark.broadcast.Broadcast. The mechanism is as follows: The driver divides the serialized object into small chunks and stores those chunks in the BlockManager of the driver. On each executor, the executor first attempts to fetch the object from its BlockManager. If it does not exist, it then uses remote fetches to fetch the small chunks from the driver and/or other executors if available. Once it gets the chunks, it puts the chunks in its own BlockManager, ready for other executors to fetch from. This prevents the driver from being the bottleneck in sending out multiple copies of the broadcast data (one per executor). When initialized, TorrentBroadcast objects read SparkEnv.get.conf.
实现机制:
driver 将数据拆分成多个小的chunk并将这些小的chunk保存在driver的BlockManager中。在每一个executor节点上,executor首先先从它自己的blockmanager获取数据,如果不存在,它使用远程抓取,从driver或者是其他的executor中抓取数据。一旦它获取到chunk,就将其放入到自己的BlockManager中,准备被其他的节点请求获取。这使得driver发送多个副本到多个executor节点的瓶颈不复存在。
6、driver 端写数据

广播数据的保存有两种形式:
-
数据保存在memstore中一份,需要反序列化后存入;保存在磁盘中一份,磁盘中的那一份先使用 SerializerManager序列化为字节数组,然后保存到磁盘中。
-
将对象根据blockSize(默认为4m,可以通过spark.broadcast.blockSize 参数指定),compressCodec(默认是启用的,可以通过 spark.broadcast.compress参数禁用。压缩算法默认是lz4,可以通过 spark.io.compression.codec 参数指定)将数据写入到outputStream中,进而拆分为几个小的chunk,最终将数据持久化到blockManager中,也是memstore一份,不需要反序列化;磁盘一份。
其中,TorrentBroadcast 的 blockifyObject 方法如下:

压缩的Outputstream对 ChunkedByteBufferOutputStream 做了装饰。
7、driver或executor读数据
broadcast 方法调用 value 方法时, 会调用 TorrentBroadcast 的 getValue 方法,如下:

_value 字段声明如下:
private lazy val _value: T = readBroadcastBlock()
接下来看一下 readBroadcastBlock 这个方法:
  private def readBroadcastBlock(): T = Utils.tryOrIOException {
  TorrentBroadcast.synchronized {
    val broadcastCache = SparkEnv.get.broadcastManager.cachedValues

    Option(broadcastCache.get(broadcastId)).map(_.asInstanceOf[T]).getOrElse {
      setConf(SparkEnv.get.conf)
      val blockManager = SparkEnv.get.blockManager
      blockManager.getLocalValues(broadcastId) match {
        case Some(blockResult) =>
          if (blockResult.data.hasNext) {
            val x = blockResult.data.next().asInstanceOf[T]
            releaseLock(broadcastId)

            if (x != null) {
              broadcastCache.put(broadcastId, x)
            }

            x
          } else {
            throw new SparkException(s"Failed to get locally stored broadcast data: $broadcastId")
          }
        case None =>
          logInfo("Started reading broadcast variable " + id)
          val startTimeMs = System.currentTimeMillis()
          val blocks = readBlocks()
          logInfo("Reading broadcast variable " + id + " took" + Utils.getUsedTimeMs(startTimeMs))

          try {
            val obj = TorrentBroadcast.unBlockifyObject[T](
              blocks.map(_.toInputStream()), SparkEnv.get.serializer, compressionCodec)
            // Store the merged copy in BlockManager so other tasks on this executor don't
            // need to re-fetch it.
            val storageLevel = StorageLevel.MEMORY_AND_DISK
            if (!blockManager.putSingle(broadcastId, obj, storageLevel, tellMaster = false)) {
              throw new SparkException(s"Failed to store $broadcastId in BlockManager")
            }

            if (obj != null) {
              broadcastCache.put(broadcastId, obj)
            }

            obj
          } finally {
            blocks.foreach(_.dispose())
          }
      }
    }
  }
}
对源码作如下解释:
第3行:broadcastManager.cachedValues 保存着所有的 broadcast 的值,它是一个Map结构的,key是强引用,value是虚引用(在垃圾回收时会被清理掉)。
第4行:根据 broadcastId 从cachedValues 中取数据。如果没有,则执行getOrElse里的 default 方法。
第8行:从BlockManager的本地获取broadcast的值(从memstore或diskstore中,获取的数据是完整的数据,不是切分之后的小chunk),若有,则释放BlockManager的锁,并将获取的值存入cachedValues中;若没有,则调用readBlocks将chunk 数据读取到并将数据转换为 broadcast 的value对象,并将该对象放入cachedValues中。
其中, readBlocks 方法如下:
  /** Fetch torrent blocks from the driver and/or other executors. */
private def readBlocks(): Array[BlockData] = {
  // Fetch chunks of data. Note that all these chunks are stored in the BlockManager and reported
  // to the driver, so other executors can pull these chunks from this executor as well.
  val blocks = new Array[BlockData](numBlocks)
  val bm = SparkEnv.get.blockManager

  for (pid <- Random.shuffle(Seq.range(0, numBlocks))) {
    val pieceId = BroadcastBlockId(id, "piece" + pid)
    logDebug(s"Reading piece $pieceId of $broadcastId")
    // First try getLocalBytes because there is a chance that previous attempts to fetch the
    // broadcast blocks have already fetched some of the blocks. In that case, some blocks
    // would be available locally (on this executor).
    bm.getLocalBytes(pieceId) match {
      case Some(block) =>
        blocks(pid) = block
        releaseLock(pieceId)
      case None =>
        bm.getRemoteBytes(pieceId) match {
          case Some(b) =>
            if (checksumEnabled) {
              val sum = calcChecksum(b.chunks(0))
              if (sum != checksums(pid)) {
                throw new SparkException(s"corrupt remote block $pieceId of $broadcastId:" +
                  s" $sum != ${checksums(pid)}")
              }
            }
            // We found the block from remote executors/driver's BlockManager, so put the block
            // in this executor's BlockManager.
            if (!bm.putBytes(pieceId, b, StorageLevel.MEMORY_AND_DISK_SER, tellMaster = true)) {
              throw new SparkException(
                s"Failed to store $pieceId of $broadcastId in local BlockManager")
            }
            blocks(pid) = new ByteBufferBlockData(b, true)
          case None =>
            throw new SparkException(s"Failed to get $pieceId of $broadcastId")
        }
    }
  }
  blocks
}
源码解释如下:
第14行:根据pieceid从本地BlockManager 中获取到 chunk
第15行:如果获取到了chunk,则释放锁。
第18行:如果没有获取到chunk,则从远程根据pieceid获取远程获取chunk,获取到chunk后做checksum校验,之后将chunk存入到本地BlockManager中。
三、Spark内存管理剖析
1、整体介绍
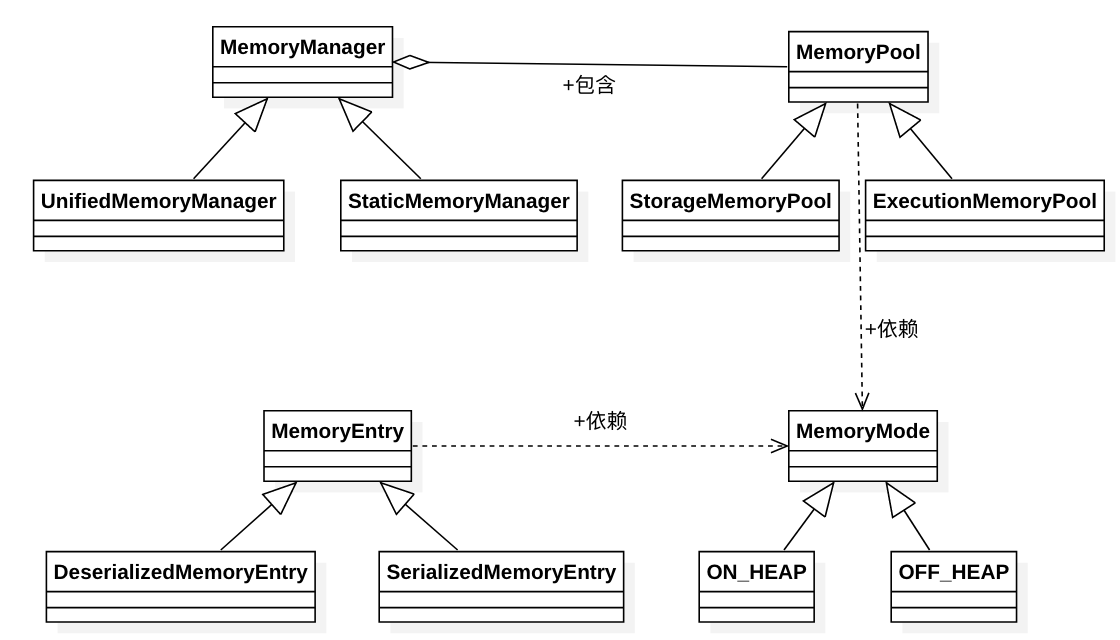
Spark内存管理相关类都在 spark core 模块的 org.apache.spark.memory 包下。
文档对这个包的解释和说明如下:
This package implements Spark's memory management system. This system consists of two main components, a JVM-wide memory manager and a per-task manager:

- org.apache.spark.memory.MemoryManager manages Spark's overall memory usage within a JVM. This component implements the policies for dividing the available memory across tasks and for allocating memory between storage (memory used caching and data transfer) and execution (memory used by computations, such as shuffles, joins, sorts, and aggregations).
- org.apache.spark.memory.TaskMemoryManager manages the memory allocated by individual tasks. Tasks interact with TaskMemoryManager and never directly interact with the JVM-wide MemoryManager. Internally, each of these components have additional abstractions for memory bookkeeping:

- org.apache.spark.memory.MemoryConsumers are clients of the TaskMemoryManager and correspond to individual operators and data structures within a task. The TaskMemoryManager receives memory allocation requests from MemoryConsumers and issues callbacks to consumers in order to trigger spilling when running low on memory.

- org.apache.spark.memory.MemoryPools are a bookkeeping abstraction used by the MemoryManager to track the division of memory between storage and execution.
即内存管理主要涉及了两个组件:JVM 范围的内存管理和单个任务的内存管理。
-
MemoryManager管理Spark在JVM中的总体内存使用情况。该组件实现了跨任务划分可用内存以及在存储(内存使用缓存和数据传输)和执行(计算使用的内存,如shuffle,连接,排序和聚合)之间分配内存的策略。
-
TaskMemoryManager管理由各个任务分配的内存。任务与TaskMemoryManager交互,永远不会直接与JVM范围的MemoryManager交互。
在TaskMemoryManager内部,每个组件都有额外的记忆簿来记录内存使用情况:
-
MemoryConsumers是TaskMemoryManager的客户端,对应于任务中的各个运算符和数据结构。TaskMemoryManager接收来自MemoryConsumers的内存分配请求,并向消费者发出回调,以便在内存不足时触发溢出。
-
MemoryPools是MemoryManager用来跟踪存储和执行之间内存划分的薄记抽象。
如图:
MemoryManager的两种实现:
There are two implementations of org.apache.spark.memory.MemoryManager which vary in how they handle the sizing of their memory pools: - org.apache.spark.memory.UnifiedMemoryManager, the default in Spark 1.6+, enforces soft boundaries between storage and execution memory, allowing requests for memory in one region to be fulfilled by borrowing memory from the other. - org.apache.spark.memory.StaticMemoryManager enforces hard boundaries between storage and execution memory by statically partitioning Spark's memory and preventing storage and execution from borrowing memory from each other. This mode is retained only for legacy compatibility purposes.
org.apache.spark.memory.MemoryManager有两种实现,它们在处理内存池大小方面有所不同:
-
org.apache.spark.memory.UnifiedMemoryManager,Spark 1.6+中的默认值,强制存储内存和执行内存之间的软边界,允许通过从另一个区域借用内存来满足一个区域中的内存请求。
-
org.apache.spark.memory.StaticMemoryManager 通过静态分区Spark的内存,强制存储内存和执行内存之间的硬边界并防止存储和执行从彼此借用内存。 仅为了传统兼容性目的而保留此模式。
先来一张自己画的类图,对涉及类之间的关系有一个比较直接的认识:
下面我们逐一对涉及的类做说明。
2、MemoryMode
内存模式:主要分堆内内存和堆外内存,MemoryMode是一个枚举类,从本质上来说,ON_HEAP和OFF_HEAP都是MemoryMode的子类。
3、MemoryPool
文档说明如下:
`Manages bookkeeping ``for` `an adjustable-sized region of memory. This ``class` `is internal to the MemoryManager. `
即它负责管理可调大小的内存区域的簿记工作。可以这样理解,内存就是一个金库,它是一个负责记账的管家,主要负责记录内存的借出归还。这个类专门为MempryManager而设计。
给内存记账,其实从本质上来说,它不是Spark内存管理部分的核心功能,但是又很重要,它的核心方法都是被MemoryManager来调用的。
理解了这个类,其子类就比较好理解了。记账的管家有两种实现,分别是StorageMemoryPool和ExecutionMemoryPool。
3.1、StorageMemoryPool
文档解释:
Performs bookkeeping for managing an adjustable-size pool of memory that is used for storage (caching).
说白了,它就是专门给负责存储或缓存的内存区域记账的。
其类结构如下:
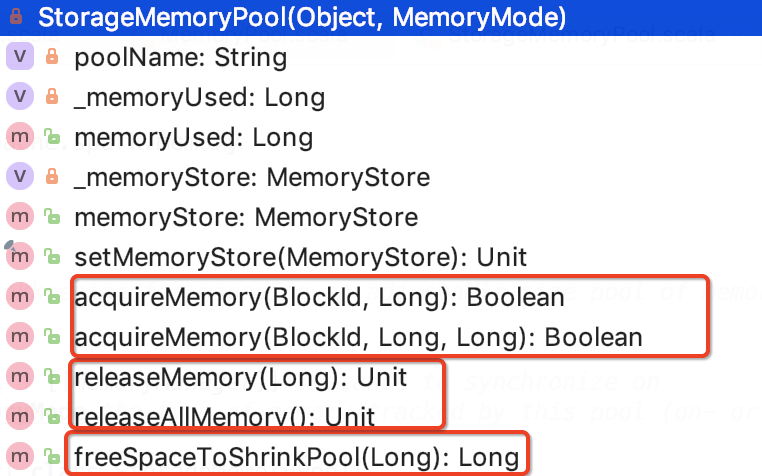
它有三种方法:
-
acquireMemory:获取N个字节的内存给指定的block,如果有必要,即内存不够用了,可以将其他的从内存中驱除。源码如下:

图中标记的逻辑,参照下文MemoryStore的剖析。
-
releaseMemory:释放内存。源码如下:
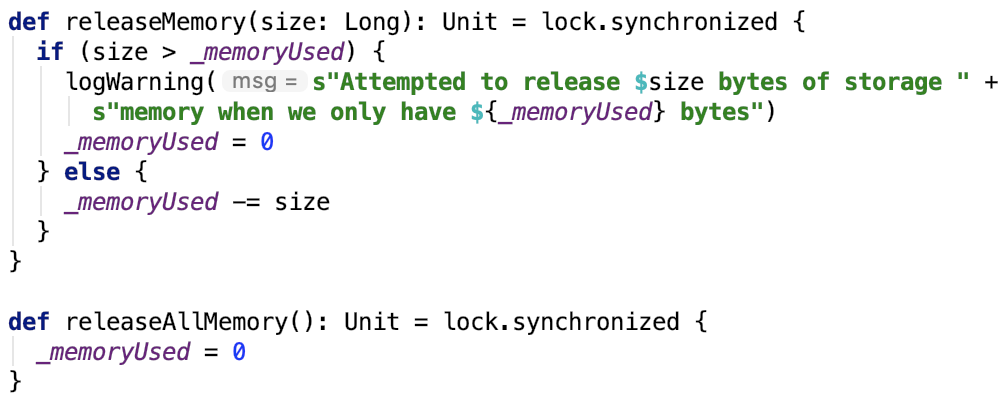
很简单,就只是在统计值_memoryUsed 上面做减法。
-
freeSpaceToShrinkPool:可用空间通过
spaceToFree字节缩小此存储内存池的大小。源码如下:
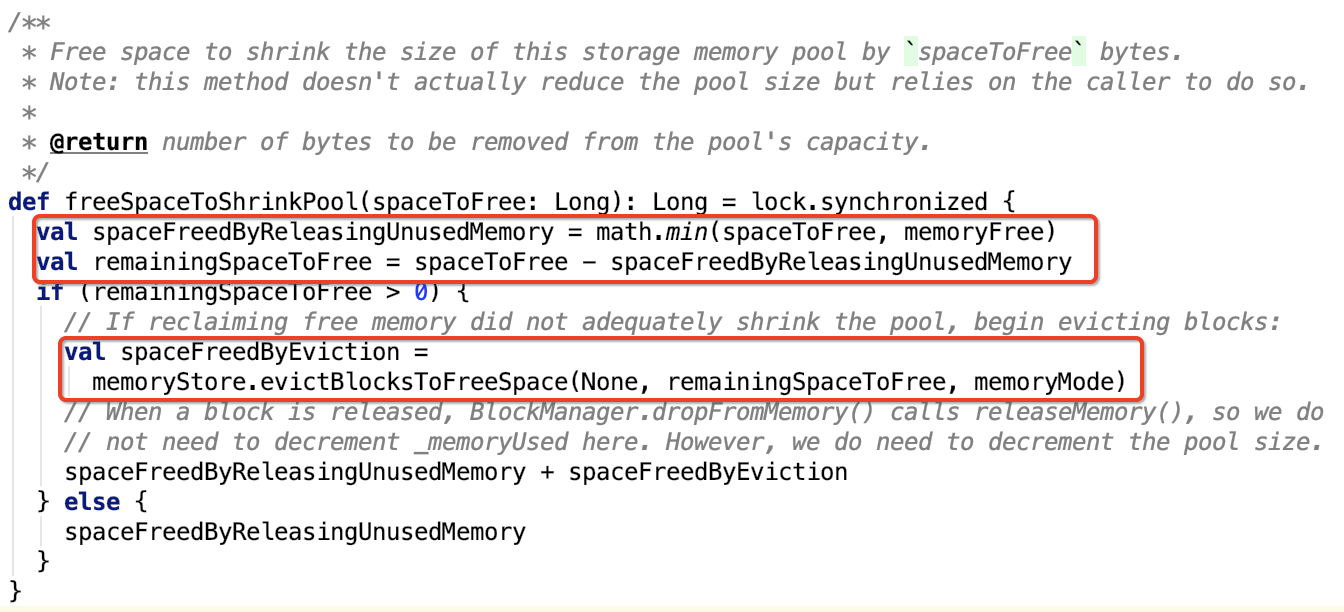
简单地可以看出,这个方法是在收缩存储内存池之前调用的,因为这个方法返回值是要收缩的值。
收缩存储内存池是为了扩大执行内存池,即这个方法是在收缩存储内存,扩大执行内存时用的,这个方法只是为了缩小存储内存池作准备的,并没有真正的缩小存储内存池。
实现思路,首先先计算需要驱逐的内存大小,如果需要驱逐内存,则跟 acquireMemory 方法类似,调用MemoryStore 的 evictBlocksToFreeSpace方法,否则直接返回。
总结:这个类是给存储内存池记账的,也负责不够时或内存池不满足缩小条件时,通知MemoryStore驱逐内存。
3.2、ExecutionMemoryPool
文档解释:
Implements policies and bookkeeping for sharing an adjustable-sized pool of memory between tasks. Tries to ensure that each task gets a reasonable share of memory, instead of some task ramping up to a large amount first and then causing others to spill to disk repeatedly. If there are N tasks, it ensures that each task can acquire at least 1 / 2N of the memory before it has to spill, and at most 1 / N. Because N varies dynamically, we keep track of the set of active tasks and redo the calculations of 1 / 2N and 1 / N in waiting tasks whenever this set changes. This is all done by synchronizing access to mutable state and using wait() and notifyAll() to signal changes to callers. Prior to Spark 1.6, this arbitration of memory across tasks was performed by the ShuffleMemoryManager.
实现策略和簿记,以便在任务之间共享可调大小的内存池。 尝试确保每个任务获得合理的内存份额,而不是首先增加大量任务然后导致其他任务重复溢出到磁盘。
如果有N个任务,它确保每个任务在溢出之前至少可以获取1 / 2N的内存,最多1 / N.
由于N动态变化,我们会跟踪活动任务的集合并在每当任务集合改变时重做等待任务中的1 / 2N和1 / N的计算。
这一切都是通过同步对可变状态的访问并使用 wait() 和 notifyAll() 来通知对调用者的更改来完成的。 在Spark 1.6之前,跨任务的内存仲裁由ShuffleMemoryManager执行。
类内部结构如下:
memoryForTask声明如下:
 @GuardedBy("lock")
 private val memoryForTask = new mutable.HashMap[Long, Long]()
其中,key 指的是 taskAttemptId, value 是内存使用情况(以byte计算)。它用来记录每一个任务内存使用情况。
它也有三类方法:
-
获取总的或每一个任务的内存使用大小,源码如下:

memoryForTask 记录了每一个task使用的内存大小。
-
给一个任务分配内存,源码如下:
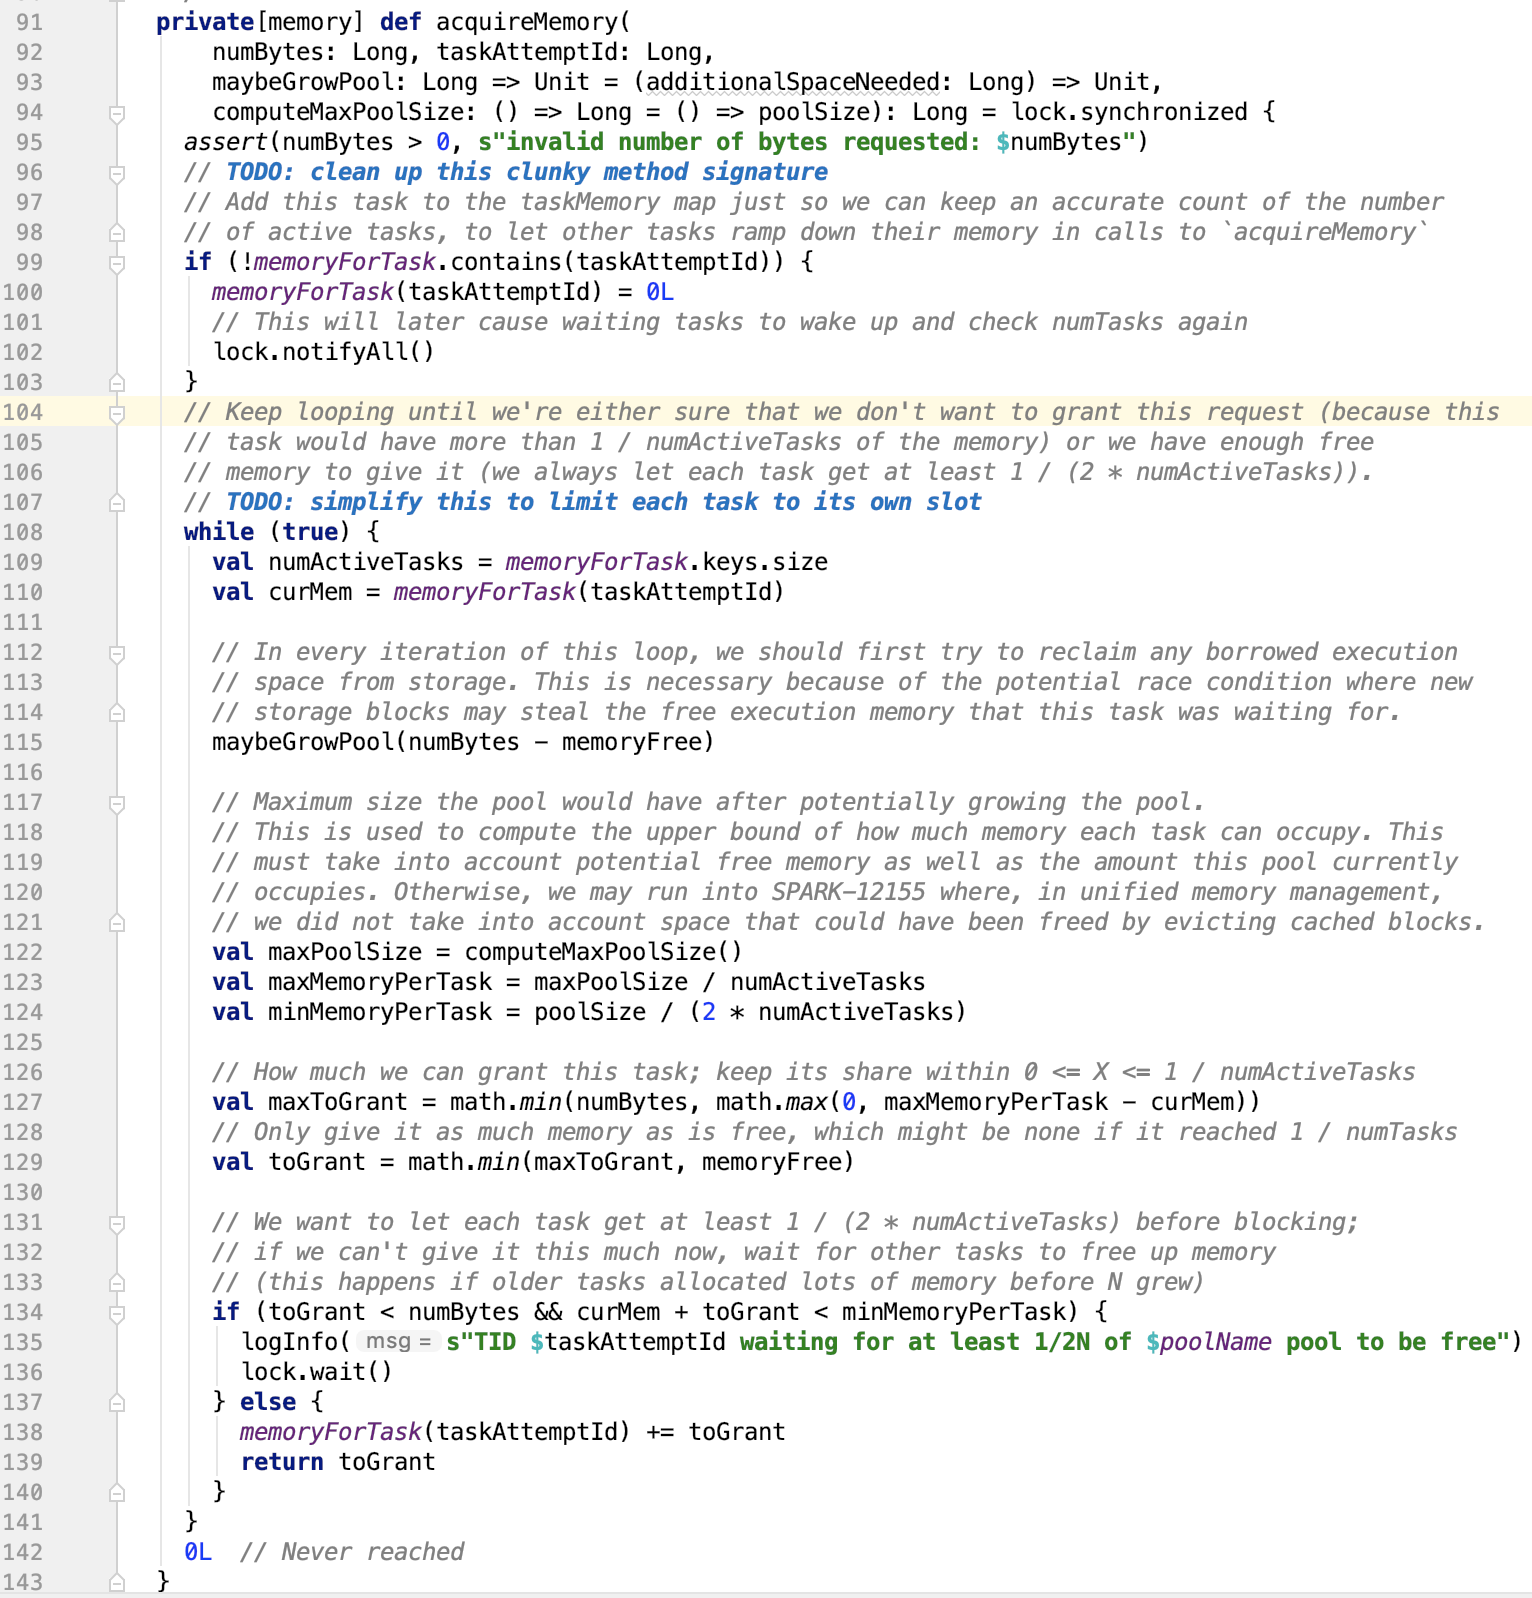
numBytes表示申请的内存大小(in byte),taskAttemptId 表示申请内存的 task id,maybeGrowPool 表示一个可能会增加执行池大小的回调。 它接受一个参数(Long),表示应该扩展此池的所需内存量。computeMaxPoolSize 表示在此给定时刻返回此池的最大允许大小的回调。这不是字段,因为在某些情况下最大池大小是可变的。 例如,在统一内存管理中,可以通过驱逐缓存块来扩展执行池,从而缩小存储池。
如果之前该任务没有申请过,则将(taskAttemptId <- 0) 放入到 memoryForTask map 中, 然后释放锁并唤醒lock锁等待区的线程。
被唤醒的因为synchronized实现的是一个互斥锁,所以当前仅当只有一个线程执行while循环。
首先根据 (需要的内存大小 - 池总空闲内存大小)来确认是否需要扩大池,由于存储池可能会偷执行池的内存,所以需要执行 maybeGrowPool 方法。
computeMaxPoolSize计算出此时该池允许的最大内存大小。然后分别算出每个任务最大分配内存和最小分配内存。进而计算出分配给该任务的最大分配大小(maxToGrant)和实际分配大小(toGrant)。
如果实际分配大小 小于需要分配的内存大小 并且 当前任务占有内存 + 实际分配内存 < 每个任务最小分配内存,则该线程进入锁wait区等待,等待内存可用时唤醒,否则将内存分配给任务。
可以看到这个方法中的wait和notify方法并不是成对的,因为新添加的taskAttemptId不能满足内存可用的条件。因为这个锁是从外部传过来的,即MemoryManager也可能对其做了操作,使内存空余下来,可供任务分配。
-
释放task内存,源码如下:
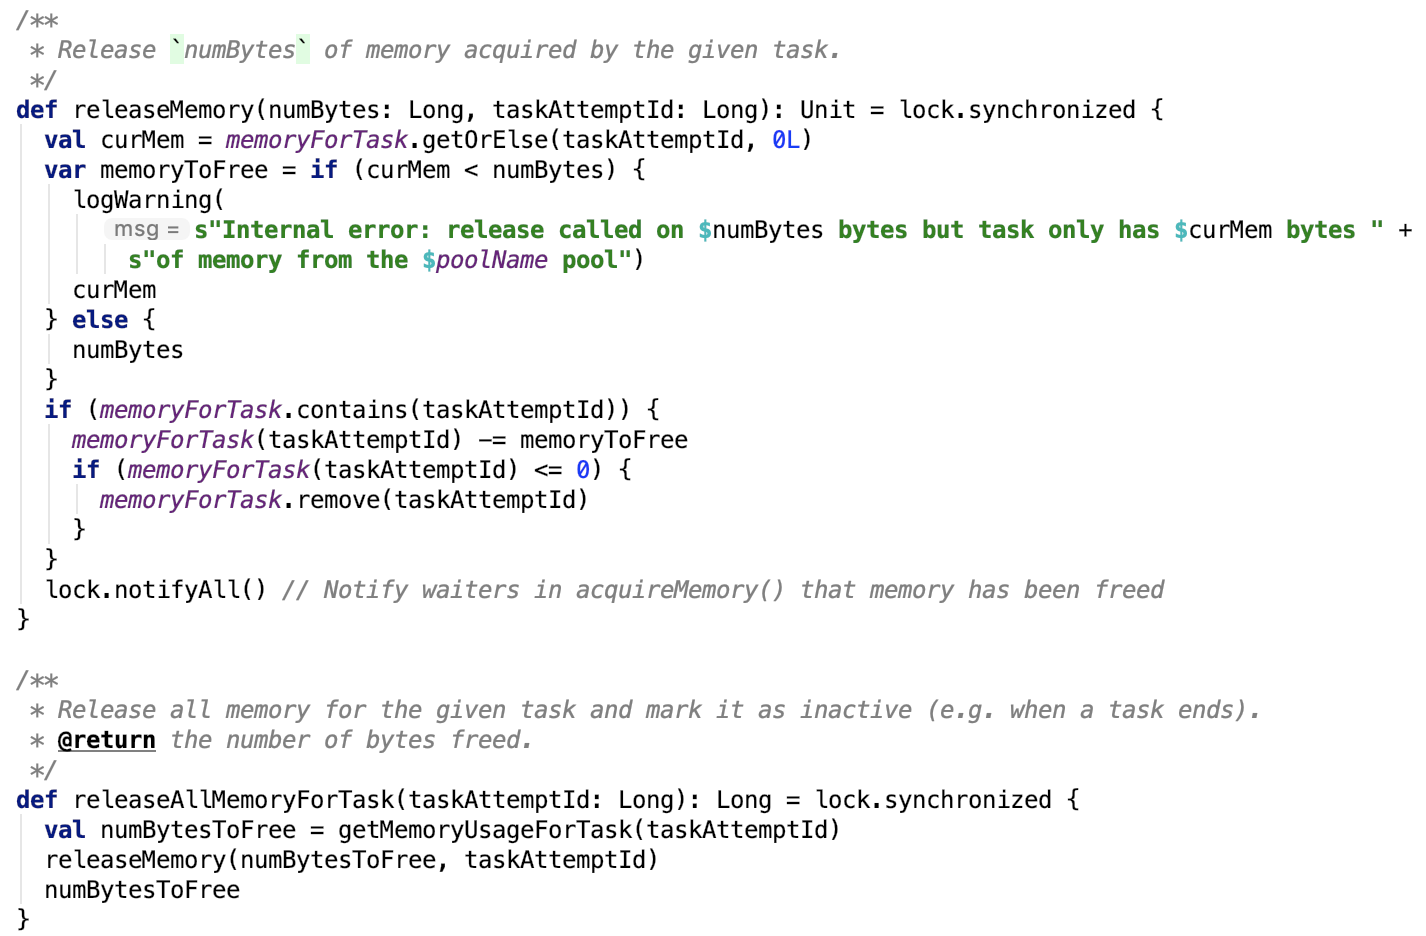
它有两个方法,分别是释放当前任务已经使用的所有内存空间 releaseAllMemoryForTask 和释放当前任务的指定大小的内存空间 releaseMemory。
思路:
releaseAllMemoryForTask 先计算好当前任务使用的全部内存,然后调用 releaseMemory 方法释放内存。
releaseMemory 方法则会比对当前使用内存和要释放的内存,如果要释放的内存大小小于 当前使用的 ,做减法即可。释放之后的任务内存如果小于等于0,则移除task即可,最后通知lock锁等待区的对象,让其重新分配内存。
在这个记账的实现里,每一个来的task不一定是可以分配到内存的,所以,锁在其中起了很大的资源协调的作用,也防止了内存的溢出。
4、MemoryManager
文档说明:
An abstract memory manager that enforces how memory is shared between execution and storage. In this context, execution memory refers to that used for computation in shuffles, joins, sorts and aggregations, while storage memory refers to that used for caching and propagating internal data across the cluster. There exists one MemoryManager per JVM.
一种抽象内存管理器,用于强制执行和存储之间共享内存的方式。在这个上下文下,执行内存是指用于在shuffle,join,sort和aggregation中进行计算的内存,而存储内存是指用于在群集中缓存和传播内部数据的内存。 每个JVM都有一个MemoryManager。
先来说一下其依赖的MemoryPool,源码如下:
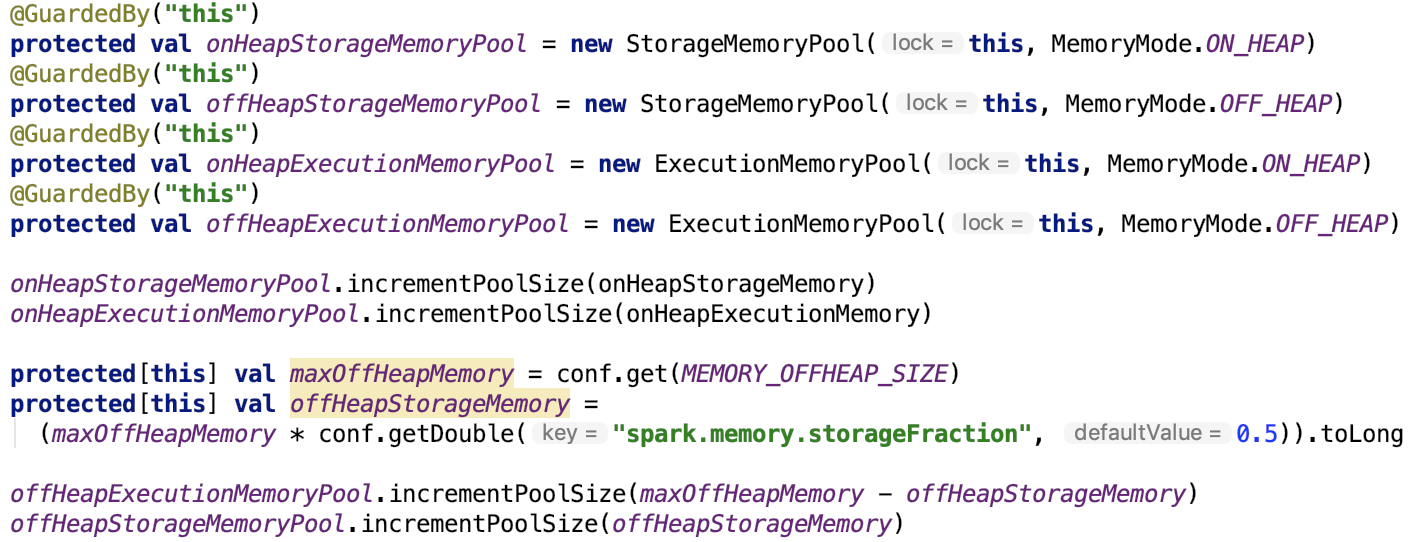
MemoryPool中的lock对象就是MemoryManager对象
存储内存池和执行内存池分别有两个:堆内和堆外。
onHeapStorageMemory和onHeapExecutionMemory 是从构造方法传过来的,先不予考虑。
maxOffHeapMemory 默认是 0, 可以根据 spark.memory.offHeap.size 参数设置,文档对这个参数的说明如下:
The absolute amount of memory in bytes which can be used for off-heap allocation.
This setting has no impact on heap memory usage, so if your executors' total memory consumption must fit within some hard limit
then be sure to shrink your JVM heap size  accordingly. This must be set to a positive value when spark.memory.offHeap.enabled=true.
存储堆外内存 = 最大堆外内存(offHeapStorageMemory) X 堆外存储内存占比,这个占比默认是0.5,可以根据 spark.memory.storageFraction 来调节
执行堆外内存 = 最大堆外内存 - 存储堆外内存
还有跟 Tungsten 管理内存有关的常量:
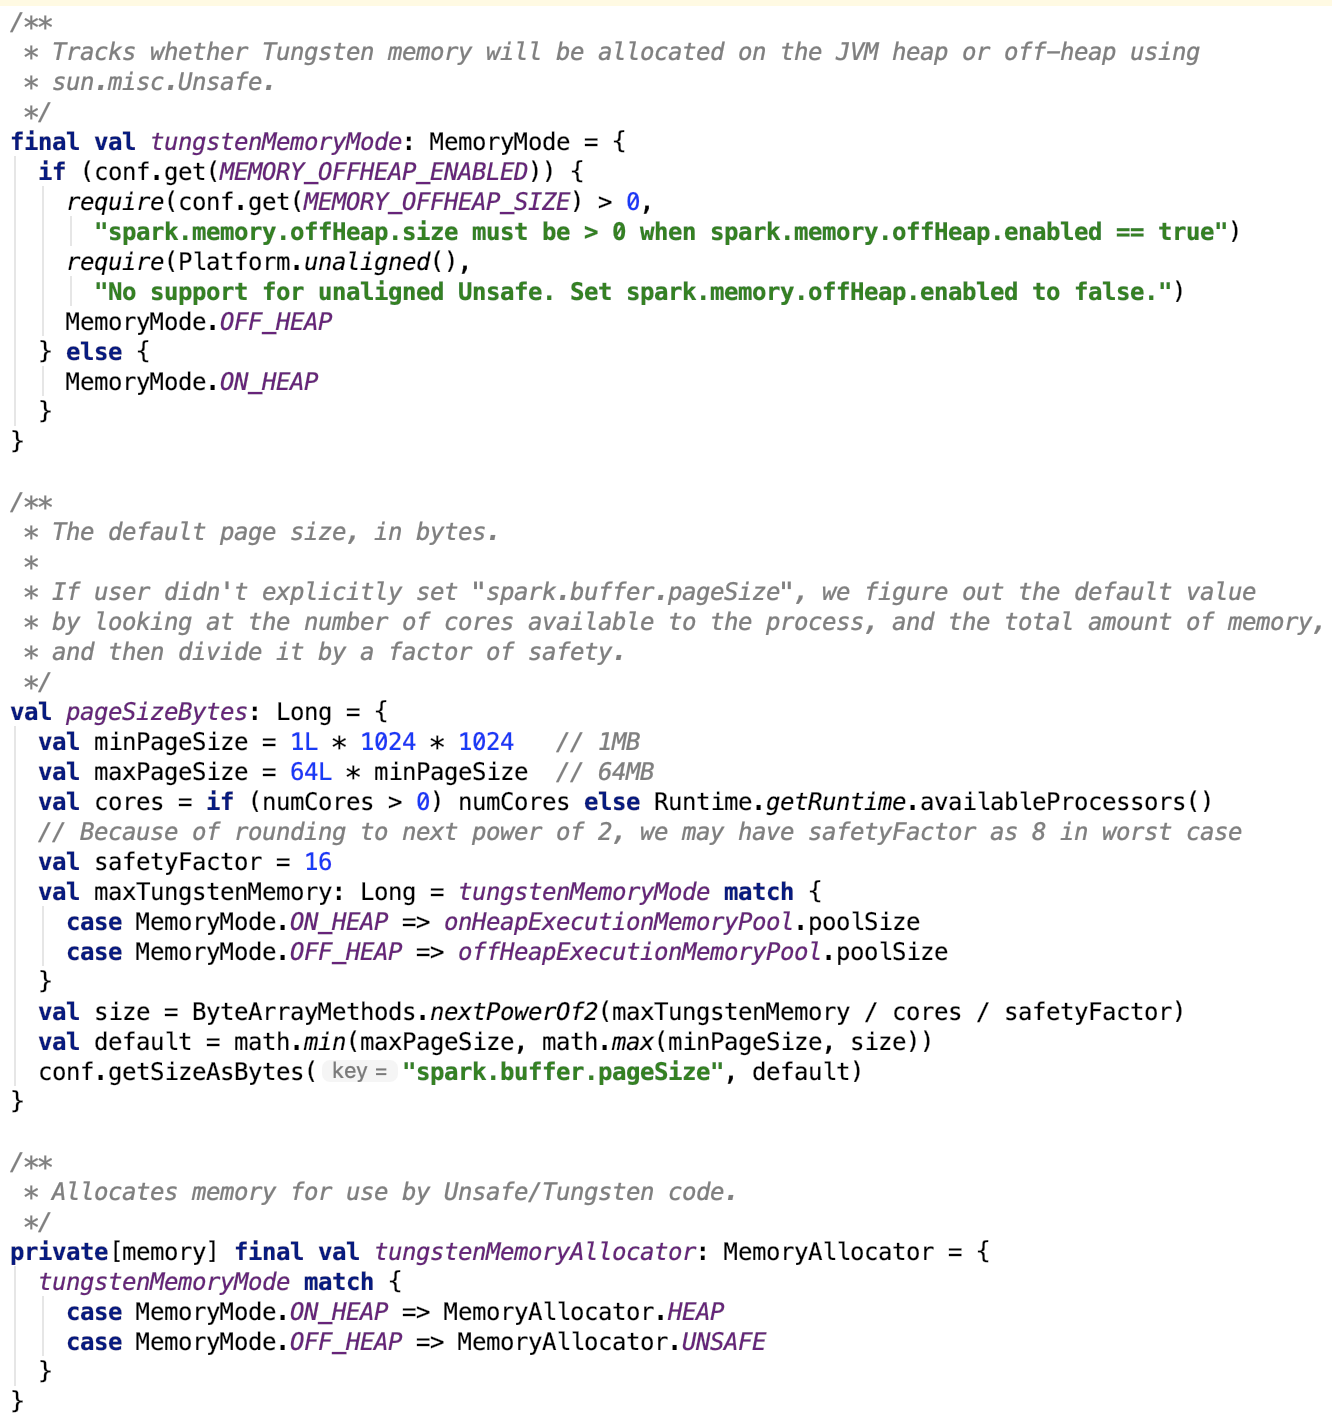
这三个常量分别定义了tungsten的内存形式、内存页大小和内存分配器。
其方法解释如下:
-
获取存储池最大使用内存,抽象方法,待子类实现。
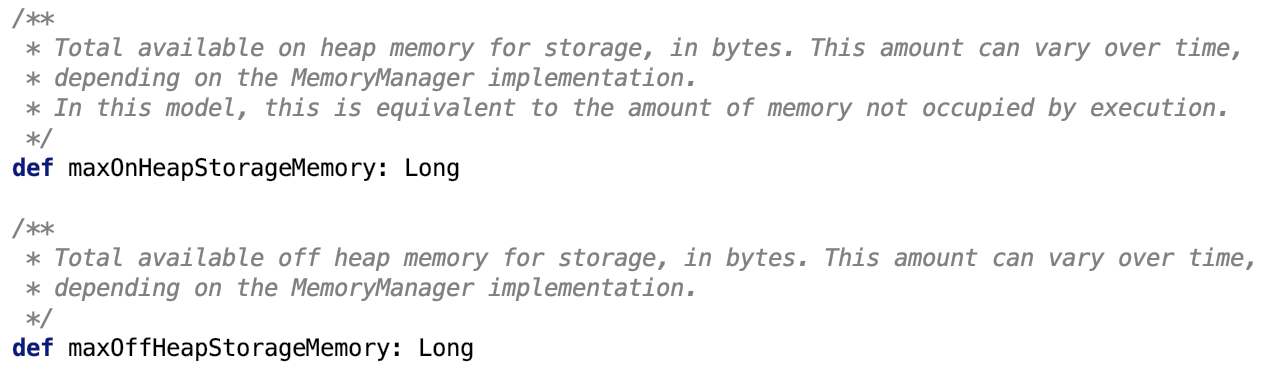
-
获取已使用内存
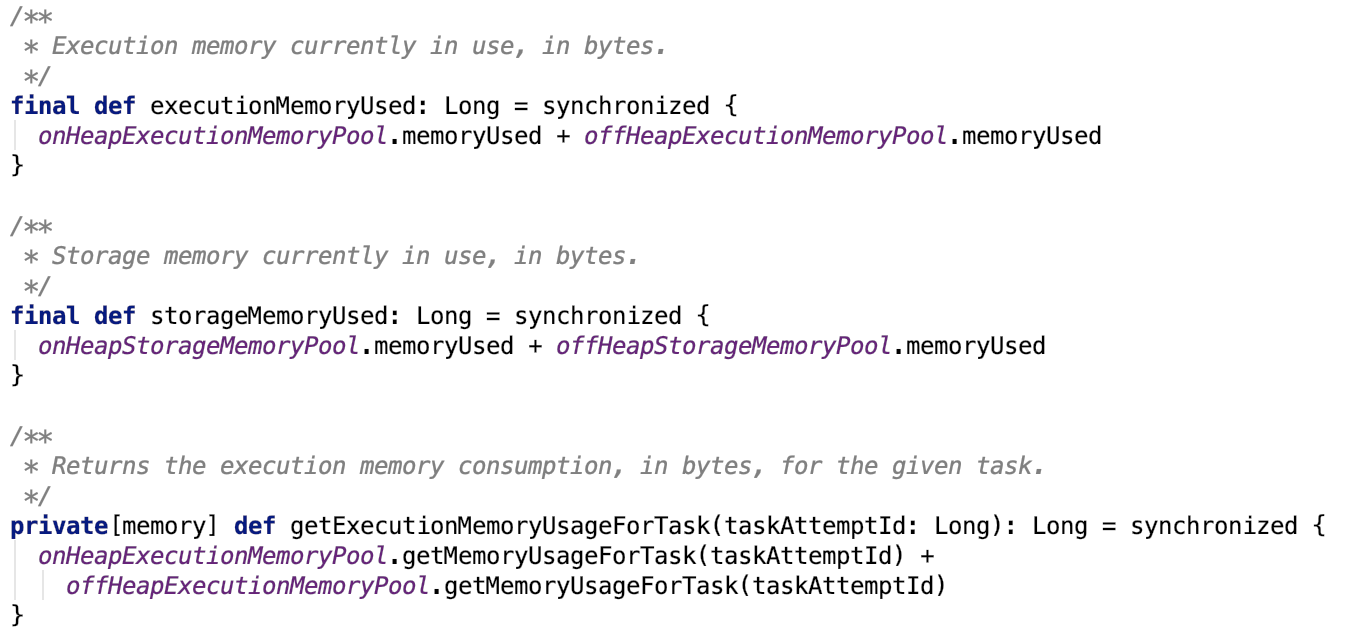
-
获取内存,这也是抽象方法,待子类实现
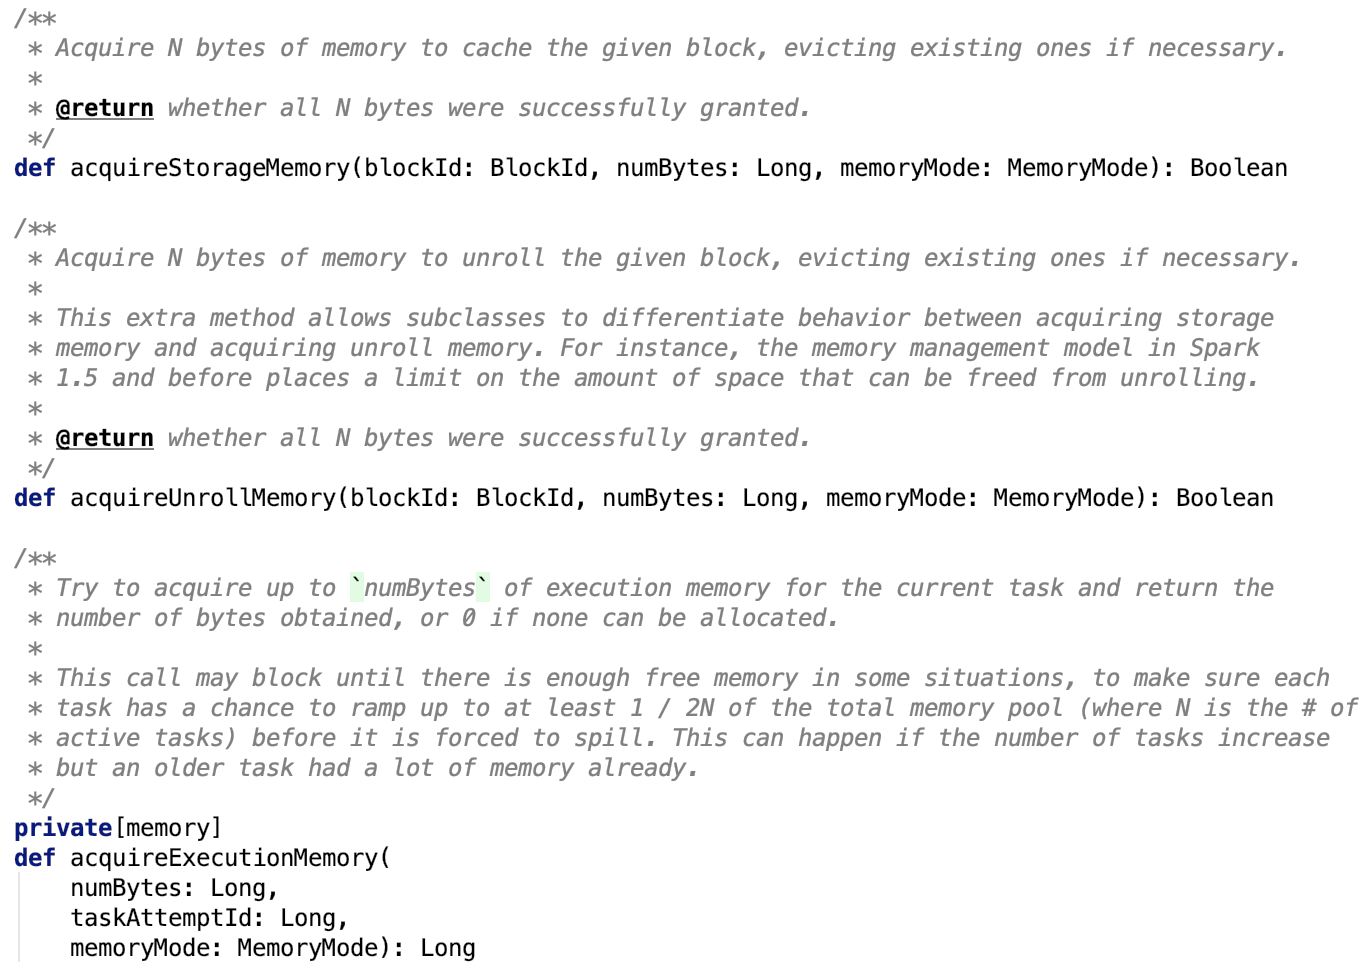
-
释放内存
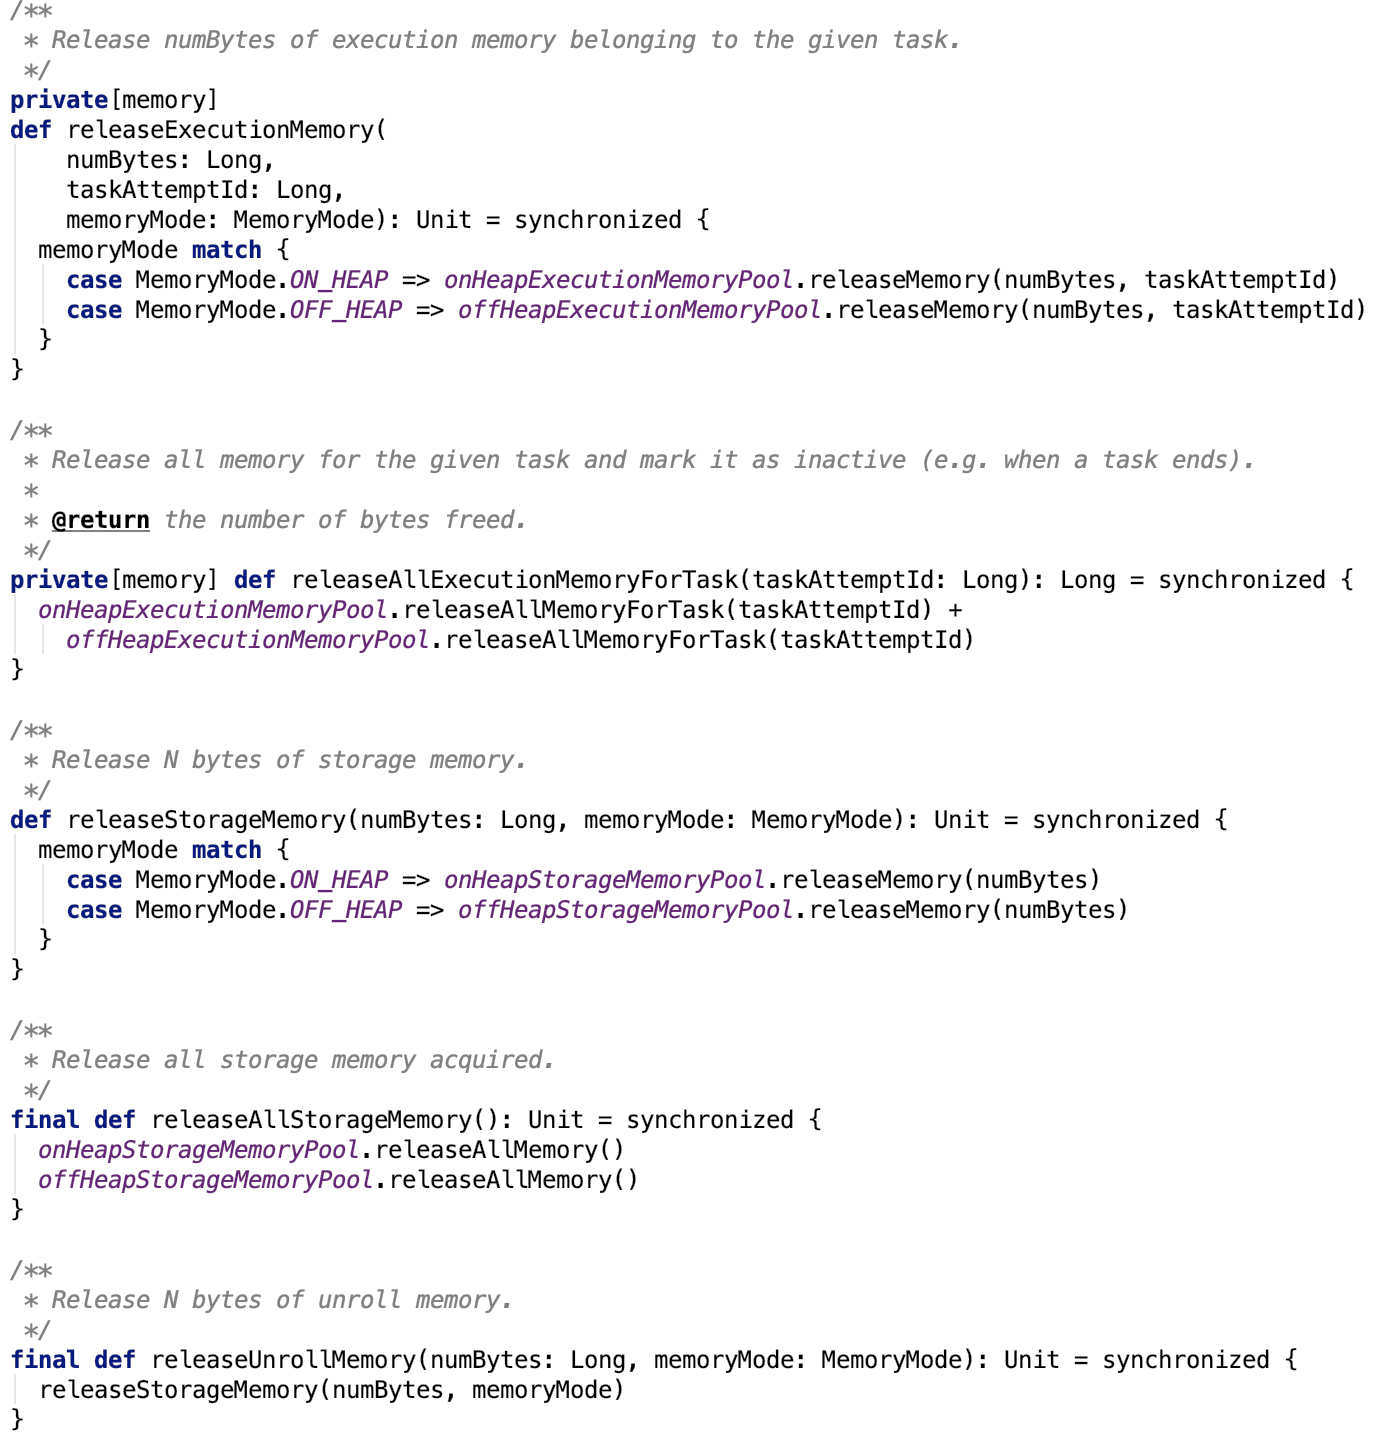
这些请求都委托给对应的MemoryPool来做了
1.6 之前 使用MemoryManager子类 StaticMemoryManager 来做内存管理。
5、StaticMemoryManager
这个静态内存管理中的执行池和存储池之间有严格的界限,两个池的大小永不改变。
注意:如果想使用这个内存管理方式,设置 spark.memory.useLegacyMode 为 true即可(默认是false)
下面我们重点看1.6 之后的默认使用的MemoryManager子类 -- UnifiedMemoryManager
6、UnifiedMemoryManager
先来看文档说明:
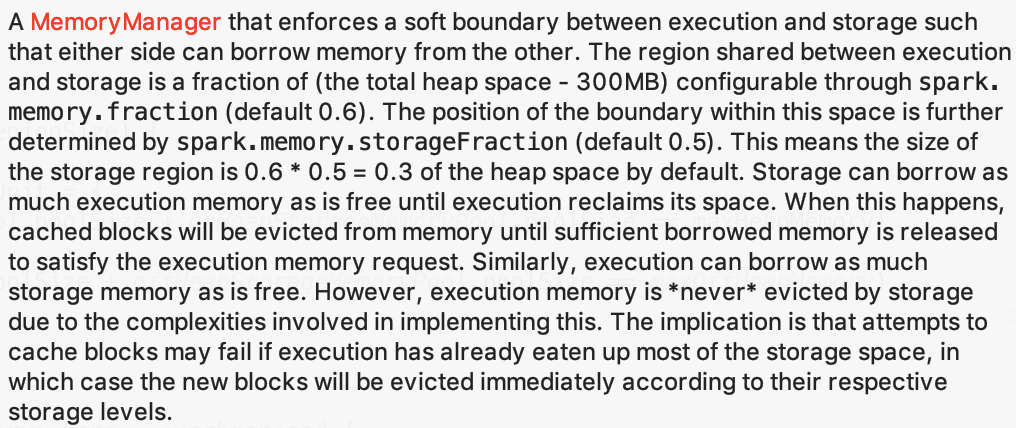
这个MemoryManager保证了存储池和执行池之间的软边界,即可以互相借用内存来满足彼此动态的内存需求变化。执行和存储的占比由 spark.memory.storageFraction 配置,默认是0.6,即偏向于存储池。其中存储池的默认占比是由 spark.memory.storageFraction 参数决定,默认是 0.5 ,即 存储池默认占比 = 0.6 * 0.5 = 0.3 ,即存储池默认占比为0.3。存储池可以尽可能多的向执行池借用空闲内存。但是当执行池需要它的内存的时候,会把一部分内存池的内存对象从内存中驱逐出,直到满足执行池的内存需求。类似地,执行池也可以尽可能地借用存储池中的空闲内存,不同的是,执行内存不会被存储池驱逐出内存,也就是说,缓存block时可能会因为执行池占用了大量的内存池不能释放导致缓存block失败,在这种情况下,新的block会根据StorageLevel做相应处理。
我们主要来看其实现的父类MemoryManager 的方法:
-
获取存储池最大使用内存:
其中,maxHeapMemory 是从构造方法传进来的成员变量,maxOffHeapMemory 是根据参数 spark.memory.offHeap.size 配置生成的。
可以看出,存储池的允许的最大使用内存是实时变化的,因为总内存不变,执行池内存使用情况随任务执行情况变化而变化。
-
获取内存,逐一来看:

实现思路:先根据存储方式(堆内还是堆外)确定存储池,执行池,存储区域内存大小和最大总内存。
然后调用执行池的 acquireMemory 方法申请内存,computeMaxExecutionPoolSize是随存储的实时变化而变化的,增大ExecutionPool的回调也被调用来确保有足够空间可供执行池分配。
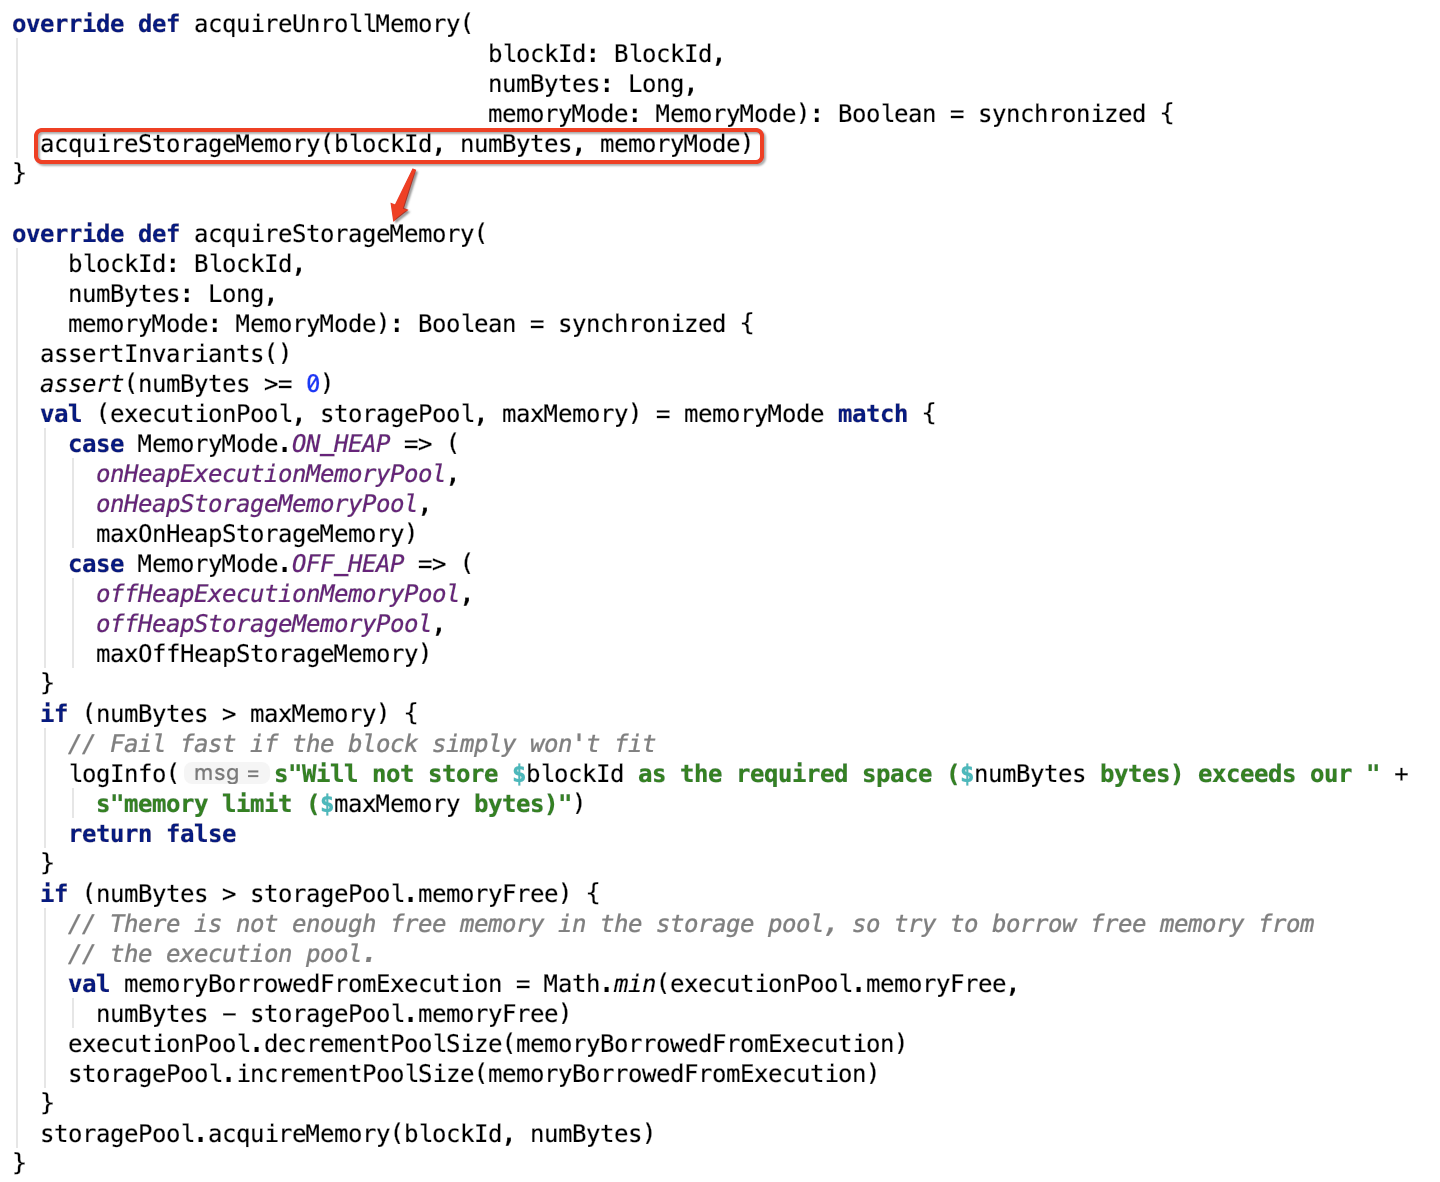
acquireUnrollMemory 直接调用 acquireStorageMemory 方法。
acquireStorageMemory实现思路:先根据存储方式(堆内还是堆外)确定存储池,执行池,存储区域内存大小和最大总内存。
存储内存如果大于最大内存,直接存储失败,否则,继续查看所需内存大小是否大于内存池最大空闲内存,如果大于,则从执行池中申请足够的空闲空间,注意,真正申请的空间大小在0 和numBytes - storagePool.memoryFree 之间,继续调用storagePool的acquireMemory 方法去申请内存,如果不够申请,则会驱逐出旧或空的block块。
最后,我们来看一下其伴生对象:
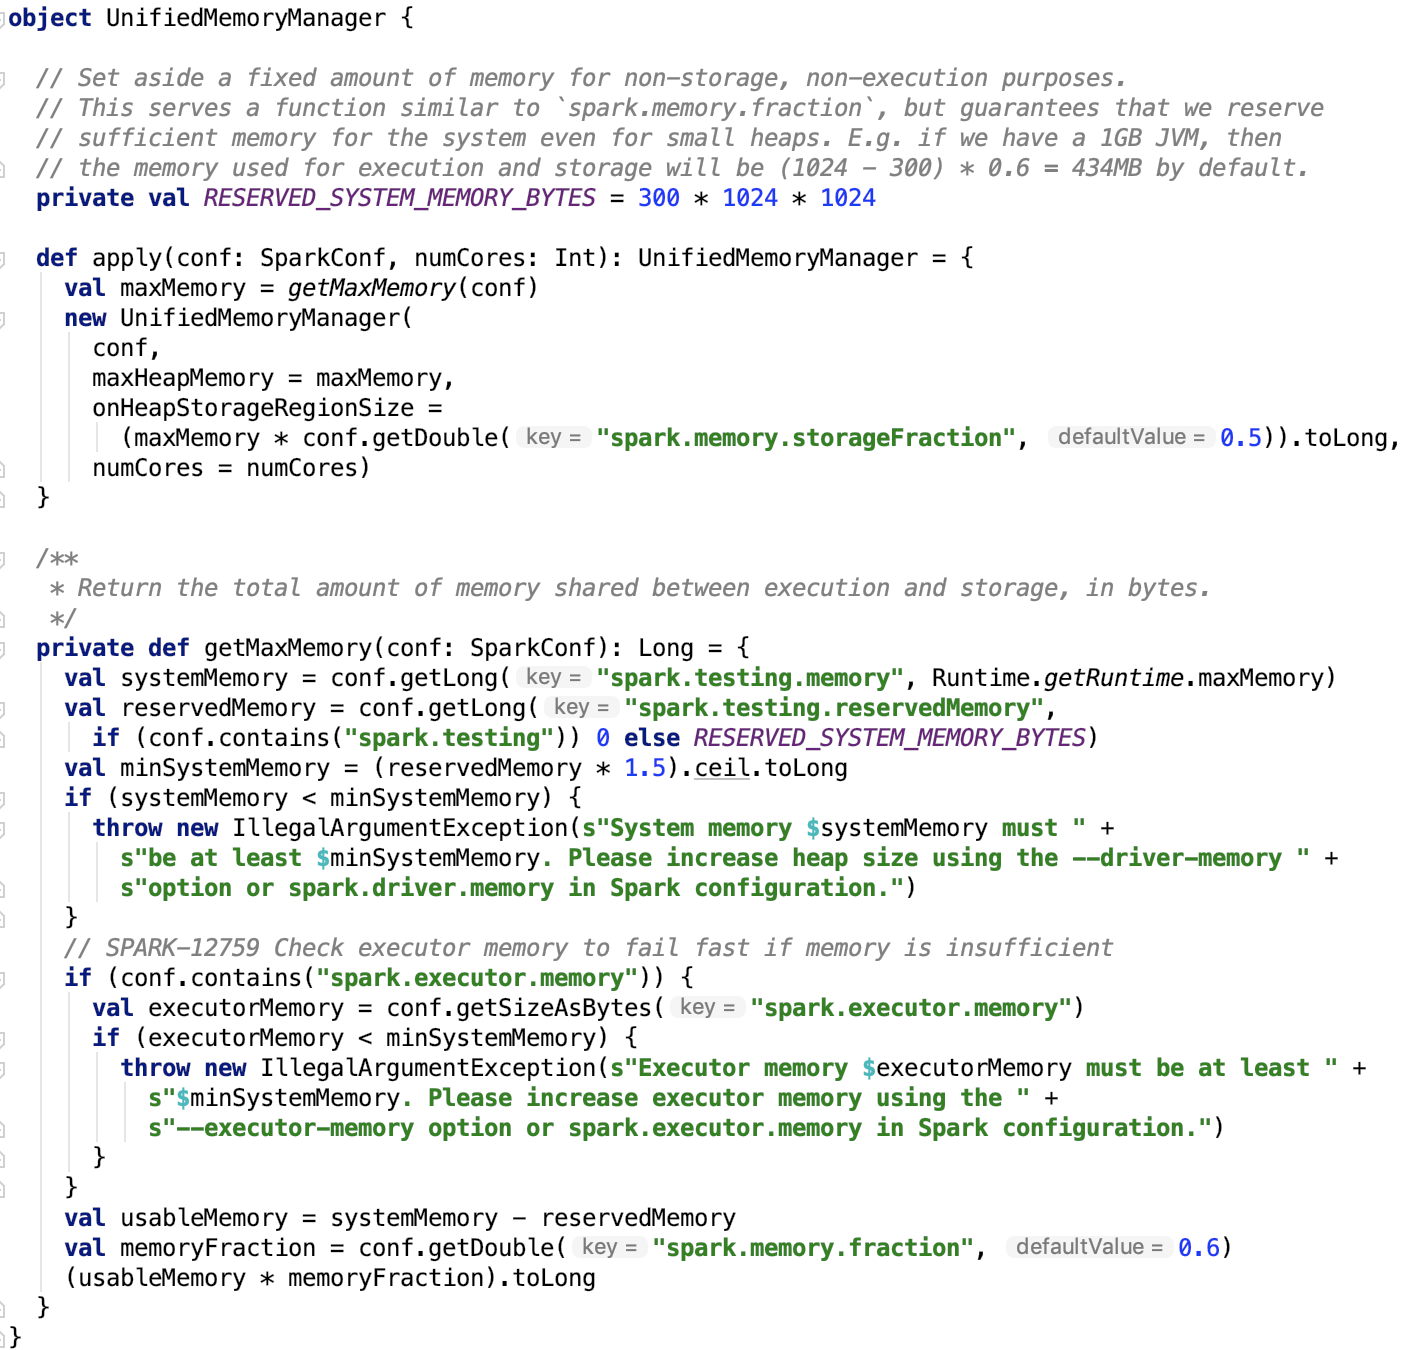
首先 apply 方法就类似于工厂方法的创造方法。我们对比下面的一张图,来说明一下Spark内存结构:
系统内存:可以根据 spark.testing.memory 参数来配置(主要用于测试),默认是JVM 的可以使用的最大内存。
保留内存:可以根据 spark.testing.reservedMemory 参数来配置(主要用于测试), 默认是 300M
最小系统内存:保留内存 * 1.5 后,再向下取整
系统内存的约束:系统内存必须大于最小保留内存,即 系统可用内存必须大于 450M, 可以通过 --driver-memory 或 spark.driver.memory 或 --executor-memory 或spark.executor.memory 来调节
可用内存 = 系统内存 - 保留内存
堆内内存占比默认是0.6, 可以根据 spark.memory.fraction 参数来调节
最大堆内内存 = 堆内可用内存 * 堆内内存占比
堆内内存存储池占比默认是 0.5 ,可以根据spark.memory.storageFraction 来调节。
默认堆内存储内存大小 = 最大堆内内存 * 堆内内存存储池占比。即堆内存储池内存大小默认是 (系统JVM最大可用内存 - 300M)* 0.6 * 0.5, 即约等于JVM最大可用内存的三分之一。
注意: 下图中的spark.memory.fraction是0.75,是Spark 1.6 的默认配置。在Spark 2.4.3 中默认是0.6。
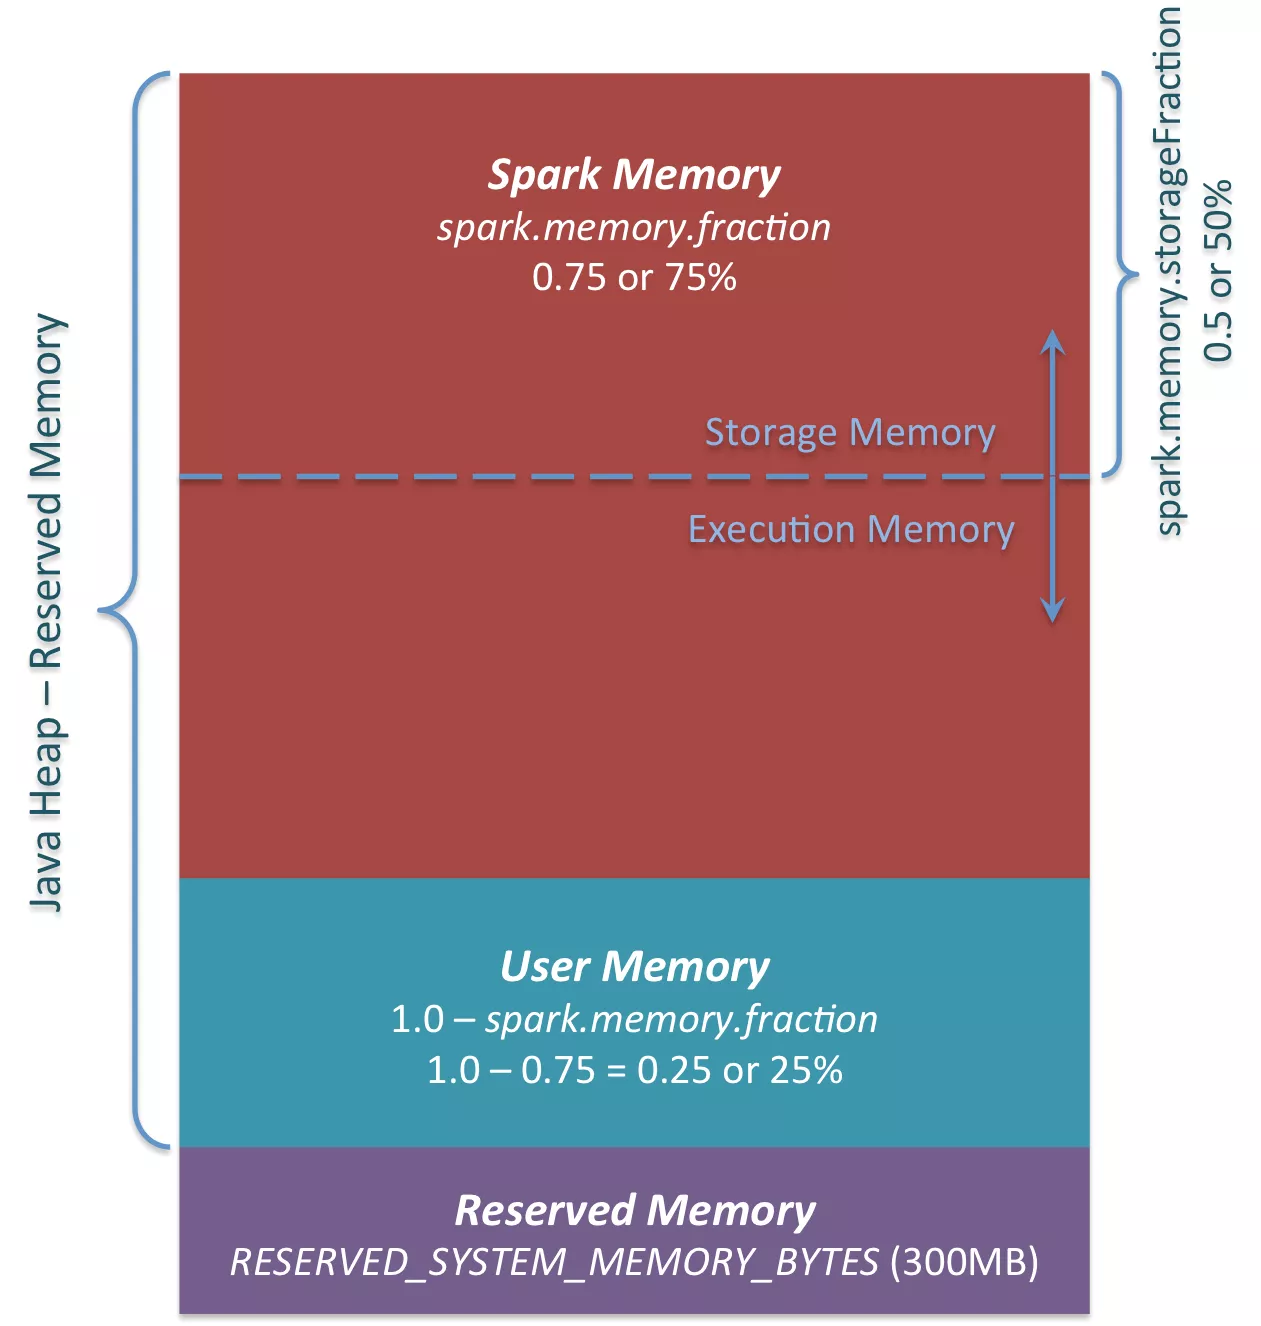
至此,Saprk 的内存管理模块基本上剖析完毕。
总结:先介绍了内存的管理池,即MemoryPool的实现,然后重点分析了Spark 1.6 以后的内存管理机制,着重说明Spark内部的内存是如何划分以及如何动态调整内存的。
四、spark内存存储剖析
1、总述
跟内存存储的相关类的关系如下:
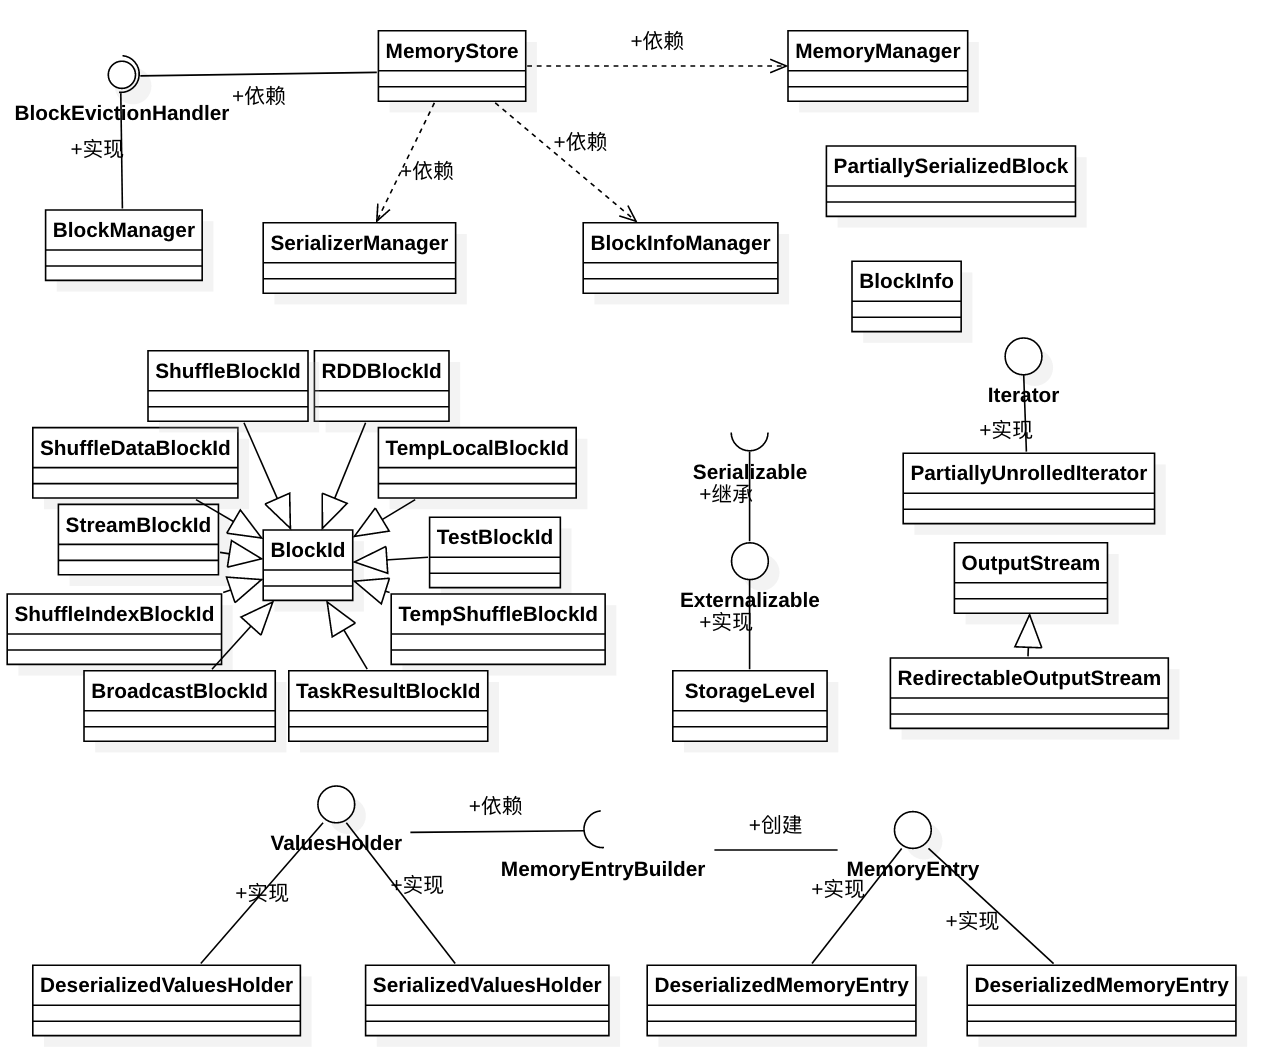
MemoryStore是负责内存存储的类,其依赖于BlockManager、SerializerManager、BlockInfoManager、MemoryManager。
BlockManager是BlockEvictionHandler的实现类,负责实现dropFromMemory方法,必要时从内存中把block丢掉,可能会转储到磁盘上。
BlockInfoManager是一个实现了对block读写时的一个锁机制,具体可以看下文。
MemoryManager 是一个内存管理器,从Spark 1.6 以后,其存储内存池大小和执行内存池大小是可以动态扩展的。即存储内存和执行内存必要时可以从对方内存池借用空闲内存来满足自己的使用需求。
BlockInfo 保存了跟block相关的信息。
BlockId的name不同的类型有不同的格式,代表不同的block类型。
StorageLevel 表示block的存储级别,它本身是支持序列化的。
当存储一个集合为序列化字节数组时,失败的结果由 PartiallySerializedBlock 返回。
当存储一个集合为Java对象数组时,失败的结果由 PartiallyUnrolledIterator 返回。
RedirectableOutputStream 是对另一个outputstream的包装outputstream,负责直接将数据中转到另一个outputstream中。
ValueHolder是一个内存中转站,其有一个getBuilder方法可以获取到MemoryEntryBuilder对象,该对象会负责将中转站的数据转换为对应的可以保存到MemStore中的MemoryEntry。
我们逐个来分析其源码:
2、BlockInfo
它记录了block 的相关信息。
level: StorageLevel 类型,代表block的存储级别
classTag:block的对应类,用于选择序列化类
tellMaster:block 的变化是否告知master。大部分情况下都是需要告知的,除了广播的block。
size: block的大小(in byte)
readerCount:block 读的次数
writerTask:当前持有该block写锁的taskAttemptId,其中 BlockInfo.NON_TASK_WRITER 表示非 task任务 持有锁,比如driver线程,BlockInfo.NO_WRITER 表示没有任何代码持有写锁。
3、BlockId
A Block can be uniquely identified by its filename, but each type of Block has a different set of keys which produce its unique name. If your BlockId should be serializable, be sure to add it to the BlockId.apply() method.
其子类,在上图中已经标明。
4、BlockInfoManager
文档介绍如下:
Component of the BlockManager which tracks metadata for blocks and manages block locking. The locking interface exposed by this class is readers-writer lock. Every lock acquisition is automatically associated with a running task and locks are automatically released upon task completion or failure. This class is thread-safe.
它有三个成员变量,如下:
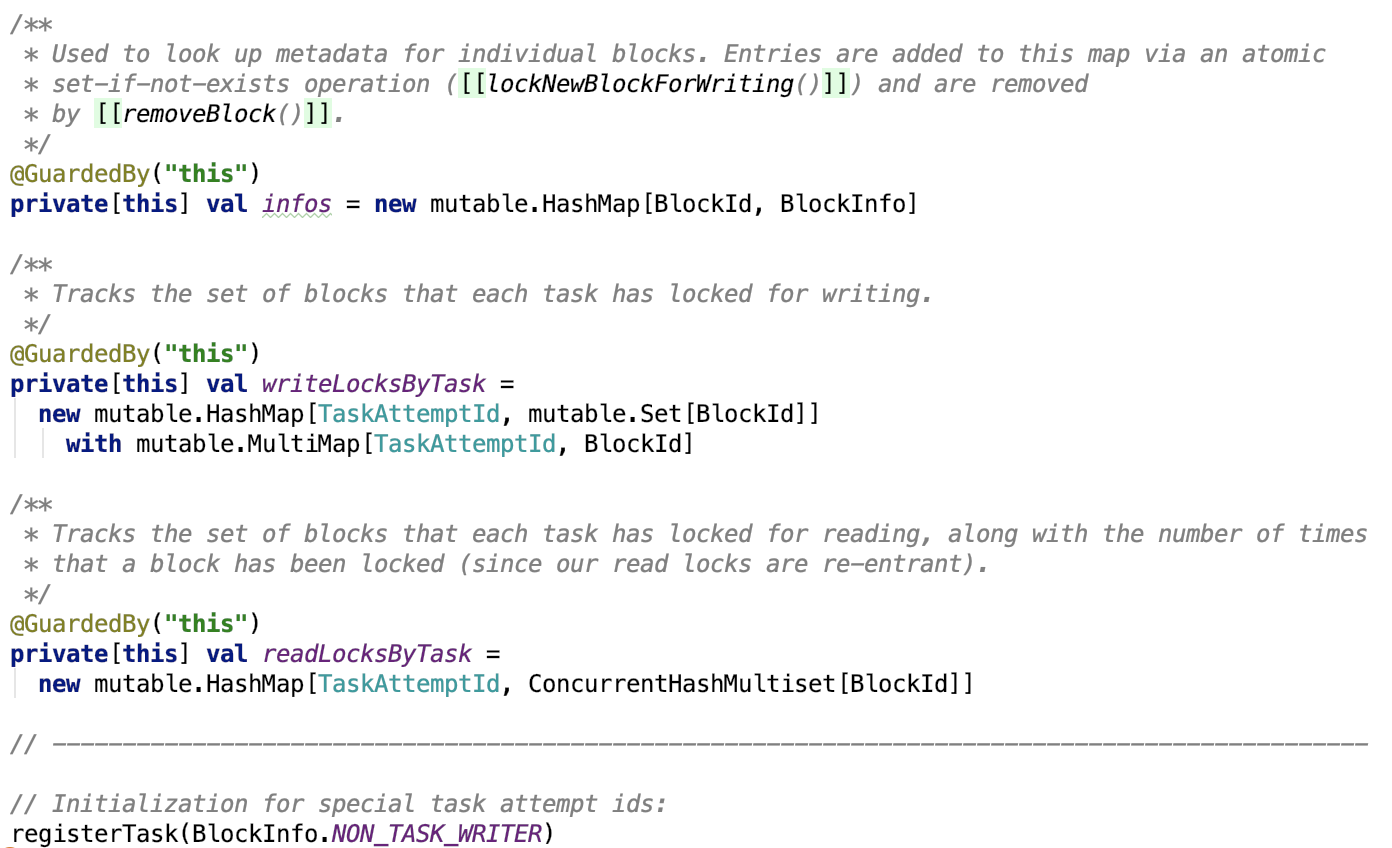
infos 保存了 Block-id 和 block信息的对应关系。
writeLocksByTask 保存了每一个任务和任务持有写锁的block-id
readLockByTasks 保存了每一个任务和任务持有读锁的block-id,因为读锁是可重入的,所以 ConcurrentHashMultiset 是支持多个重复值的。
方法如下:

-
注册task
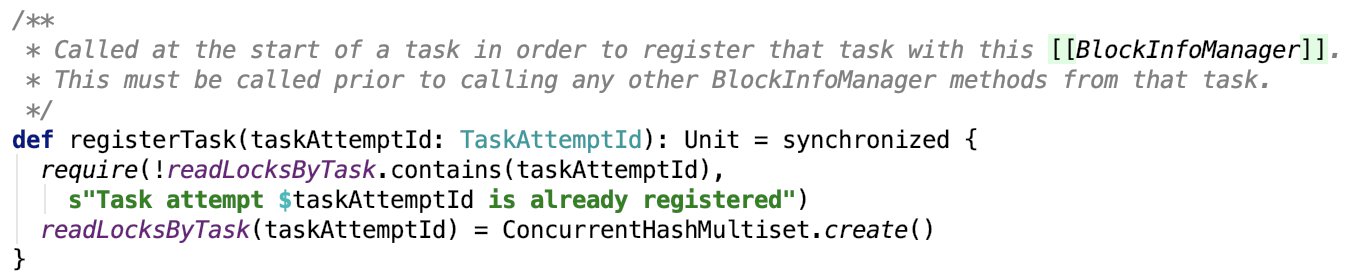
-
获取当前task

-
获取读锁

思路:如果block存在,并且没有task在写,则直接读即可,否则进入锁等待区等待。
-
获取写锁
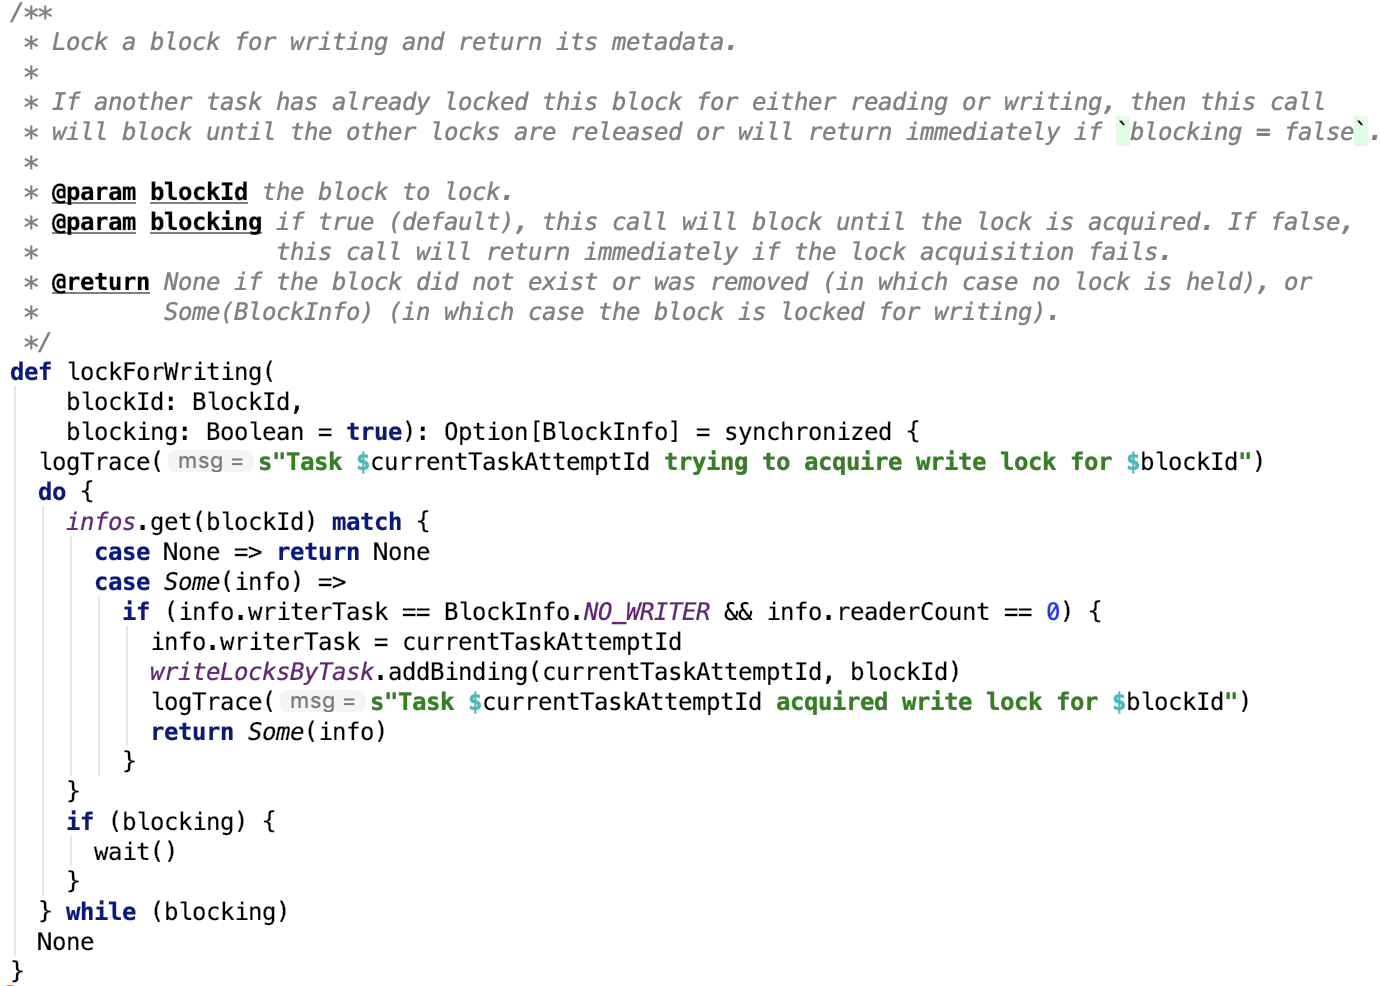
思路:如果block存在,且没有task在读,也没有task在写,则在写锁map上记录task,表示已获取写锁,否则进入等待区等待
-
断言有task持有写锁写block
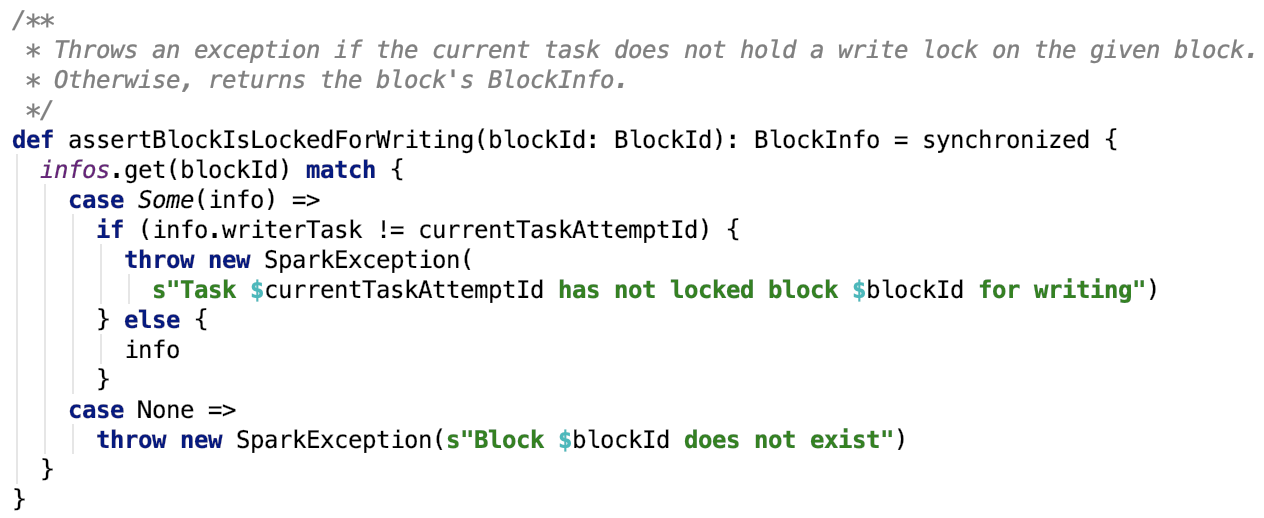
-
写锁降级

思路:首先把和block绑定的task取出并和当前task比较,若是同一个task,则调用unlock方法
-
释放锁:
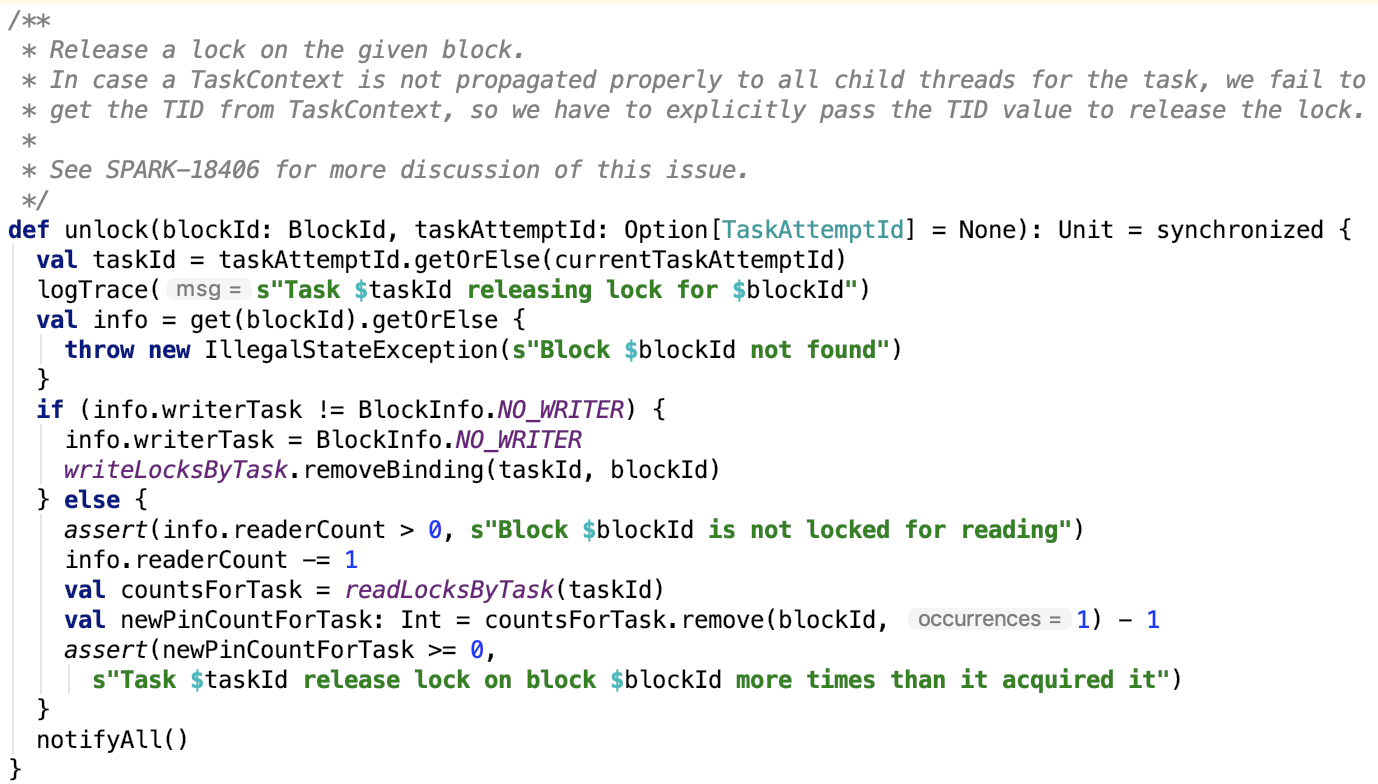
思路:若当前任务持有写锁,则直接释放,否则读取次数减1,并且从读锁记录中删除一条读锁记录。最后唤醒在锁等待区等待的task。
-
获取为写一个新的block获取写锁
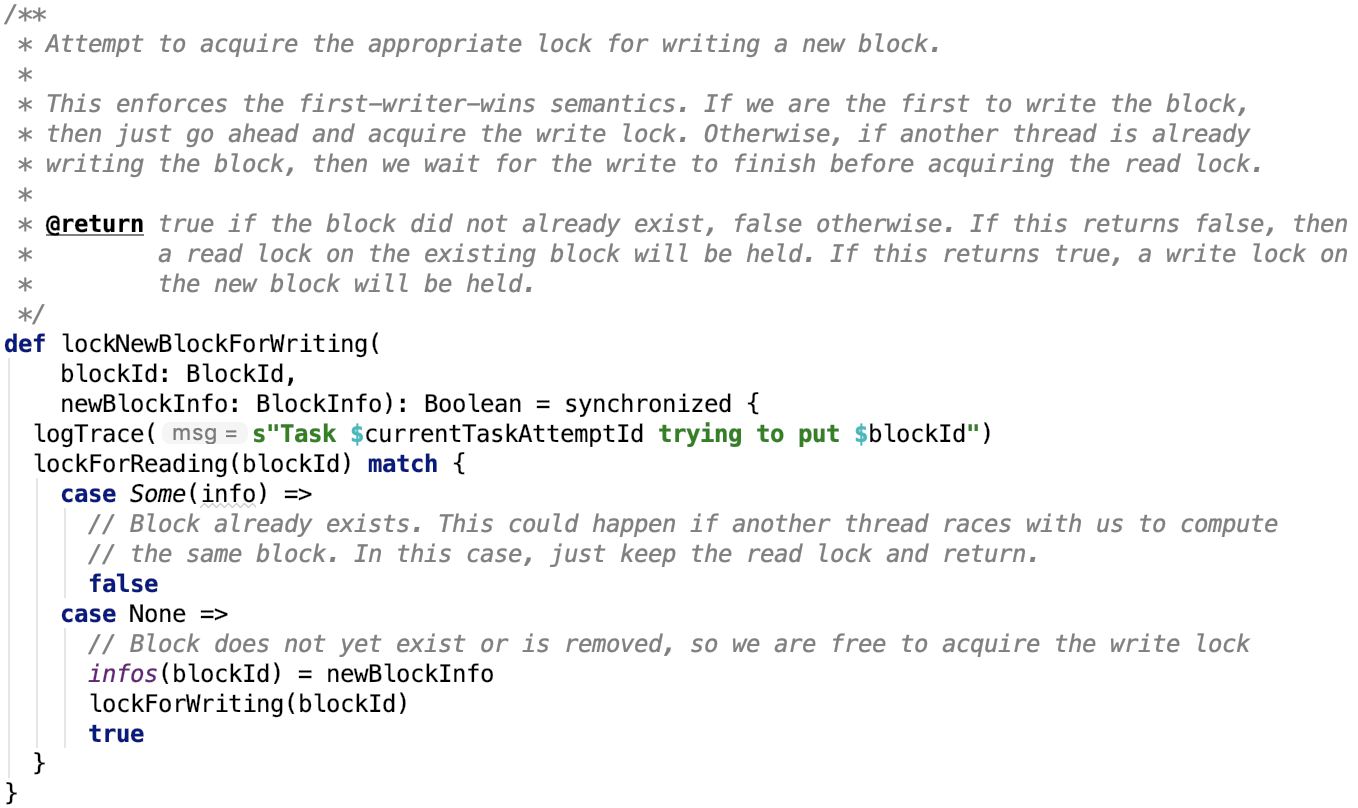
-
释放掉指定task的所有锁
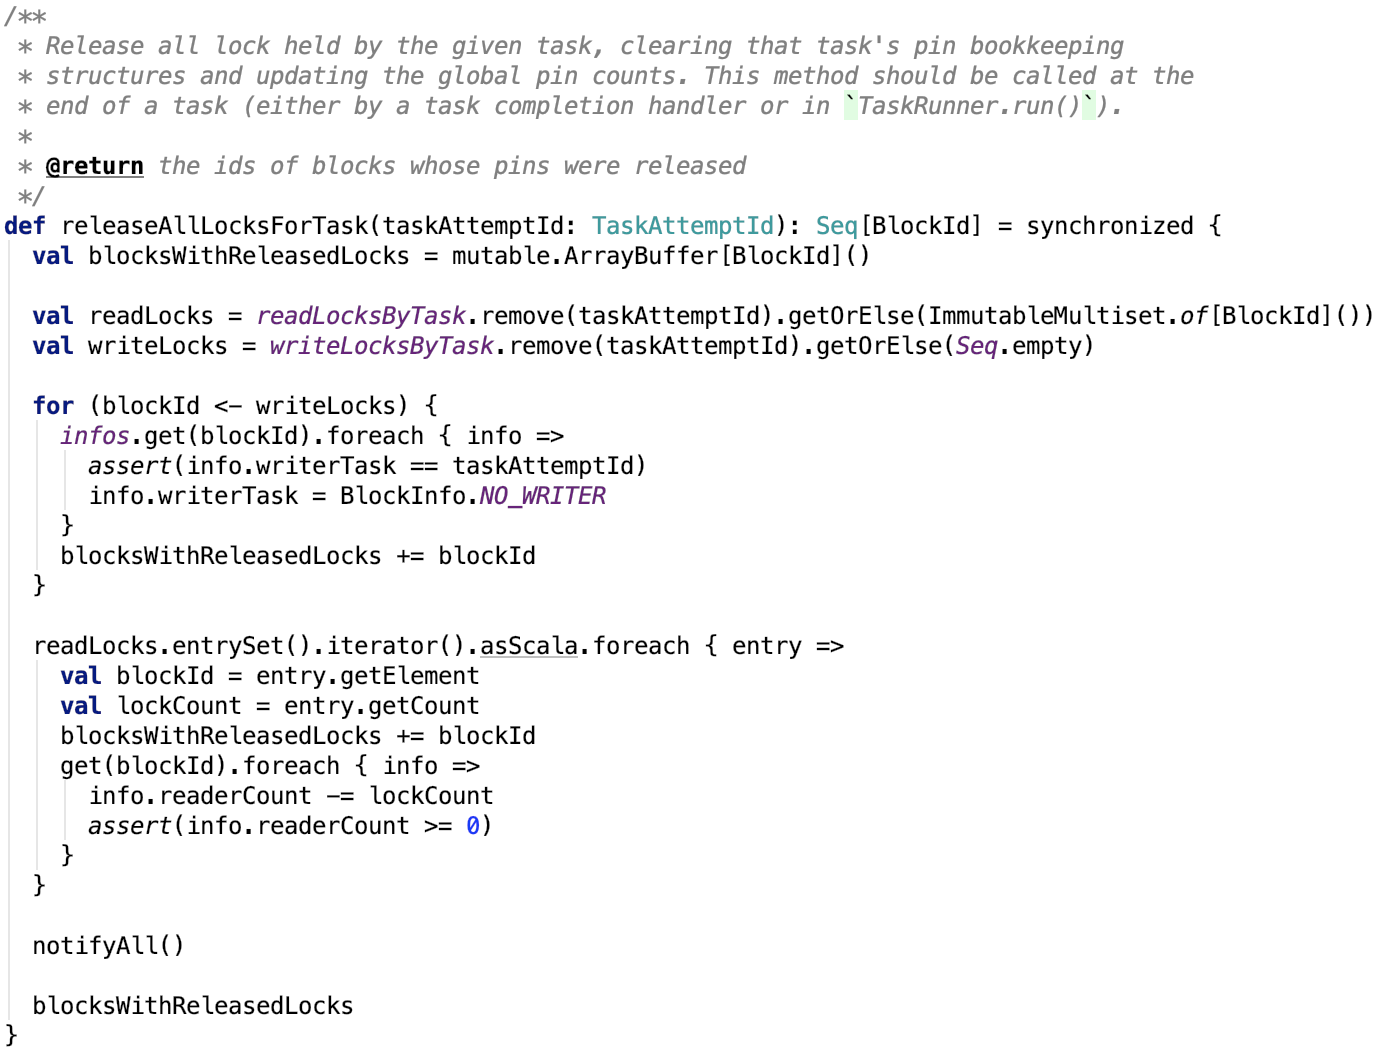
思路:先获取该task的读写锁记录,然后移除写锁记录集中的每一条记录,移除读锁记录集中的每一条读锁记录。
-
移除并释放写锁
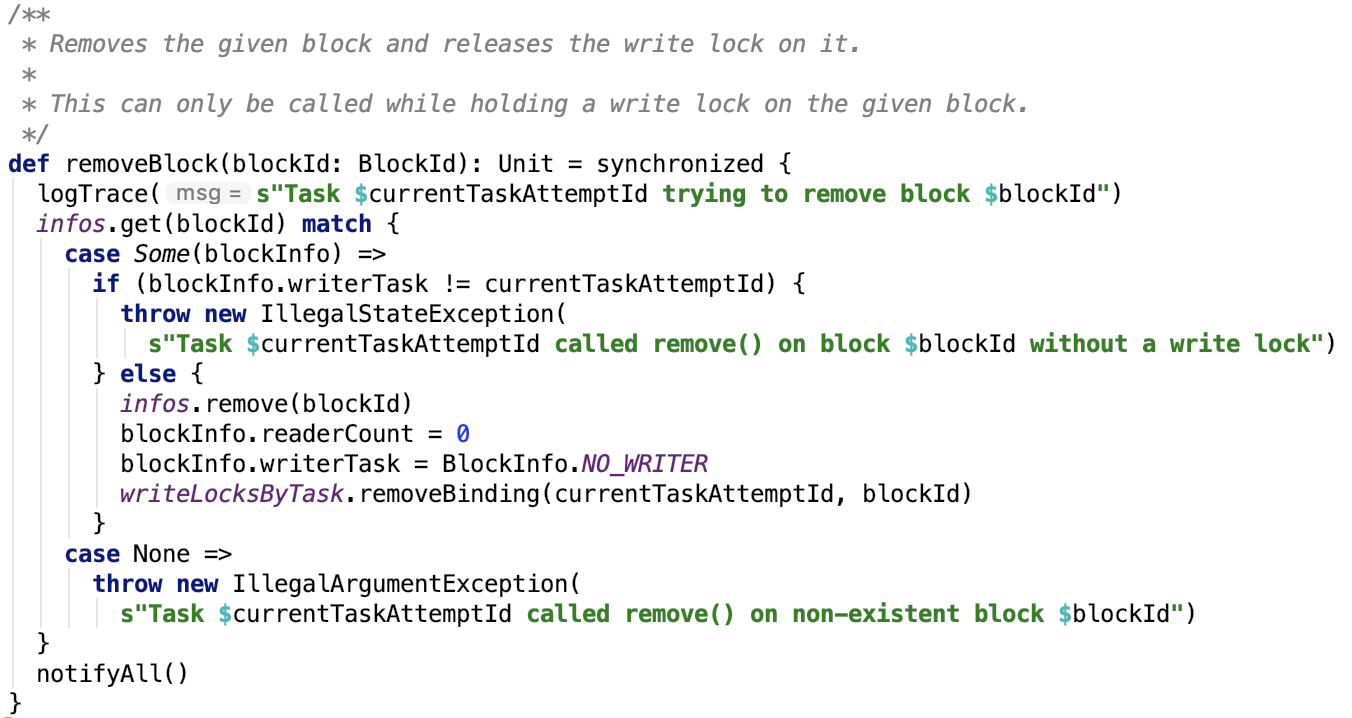
读写锁记录清零,解除block-id和block信息的绑定。
还有一些查询方法,不再做详细说明。
简单总结一下:
读锁支持可重入,即可以重复获取读锁。可以获取读锁的条件是:没有task在写该block,对有没有task在读block没有要求。
写锁当且仅当一个task获取,可以获取写锁的条件是:没有task在读block,没有task在写block。
注意,这种设计可以用在一个block的读的次数远大于写的次数的情况下。我们可以来做个假设:假设一个block写的次数远超过读的次数,同时多个task写同一个block的操作就变成了串行的,写的效率,因为只有一个BlockInfoManager对象,即一个锁,即所有在锁等待区等待的writer们都在竞争一个锁。对于读的次数远超过写的次数情况下,reader们可以肆无忌惮地读取数据数据,基本处于无锁情况下,几乎没有了锁切换带来的开销,并且可以允许不同task同时读取同一个block的数据,读的吞吐量也提高了。
总之,BlockInfoManager自己实现了block的一套读写锁机制,这种读写锁的设计思路是非常经典和值得学习的。
5、RedirectableOutputStream
文档说明:
A wrapper which allows an open [[OutputStream]] to be redirected to a different sink.
即这个类可以将outputstream重定向到另一个outputstream。
源码也很简单:
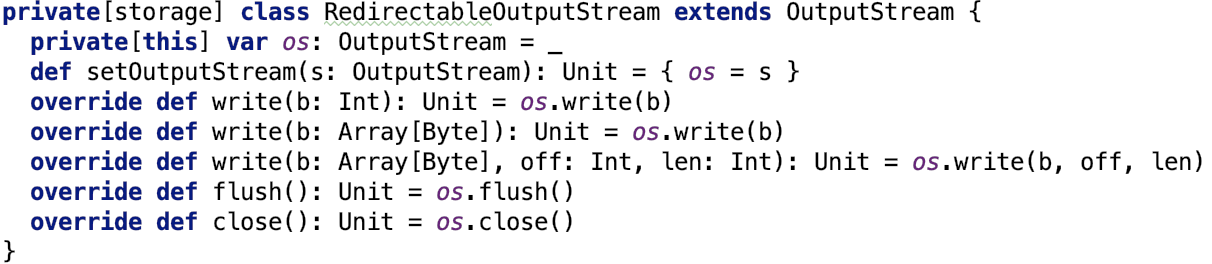
os成员变量就是重定向的目标outputstream
6、MemoryEntry
memoryEntry本质上就是内存中一个block,指向了存储在内存中的真实数据。
如上图,它有两个子类:
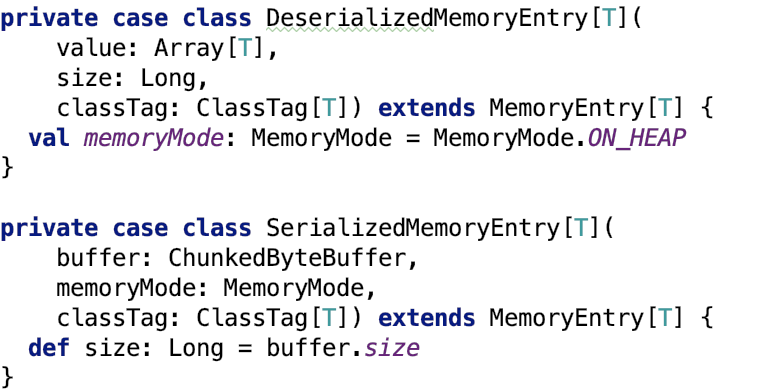
其中,DeserializedMemoryEntry 是用来保存反序列化之后的java对象数组的,value是一个数据,保存着真实的反序列化数据,size表示,classTag记录着数组中被擦除的数据的Class类型,这种数据只能保存在堆内内存中。
SerializedMemoryEntry 是用来保存序列化之后的ByteBuffer数组的,buffer中记录的是真实的Array[ByteBuffer]数据。memoryMode表示数据存储的内存区域,堆外内存还是堆内内存,classTag记录着序列化前被擦除的数据的Class类型,size表示字节数据大小。
7、MemoryEntryBuilder
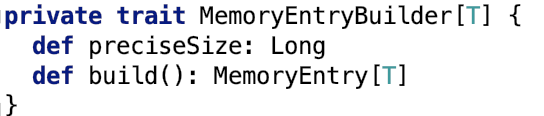
build方法将内存数据构建到MemoryEntry中
8、ValuesHolder
本质上来说,就是一个内存中转站。数据被临时写入到这个中转站,然后调用其getBuilder方法获取 MemoryEntryBuilder 对象,这个对象用于构建MemoryEntry 对象。
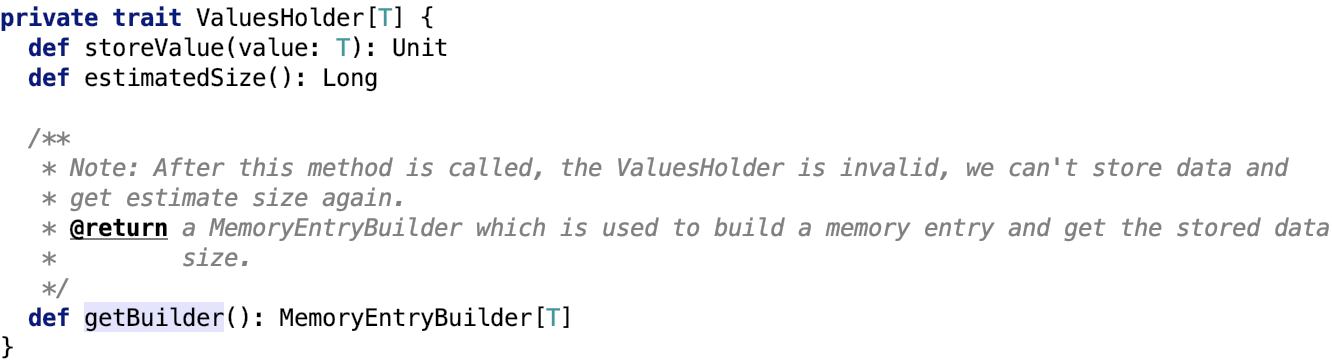
storeValues用于写入数据,estimateSize用于评估holder中内存的大小。调用getBuilder之后会返回 MemoryEntryBuilder对象,后续可以拿这个builder创建MemoryEntry
调用getBuilder之后,会关闭流,禁止数据写入。
它有两个子类:用于中转Java对象的DeserializedValuesHolder和用于中转字节数据的SerializedValuesHolder。
其实现类具体如下:
1、DeserializedValuesHolder
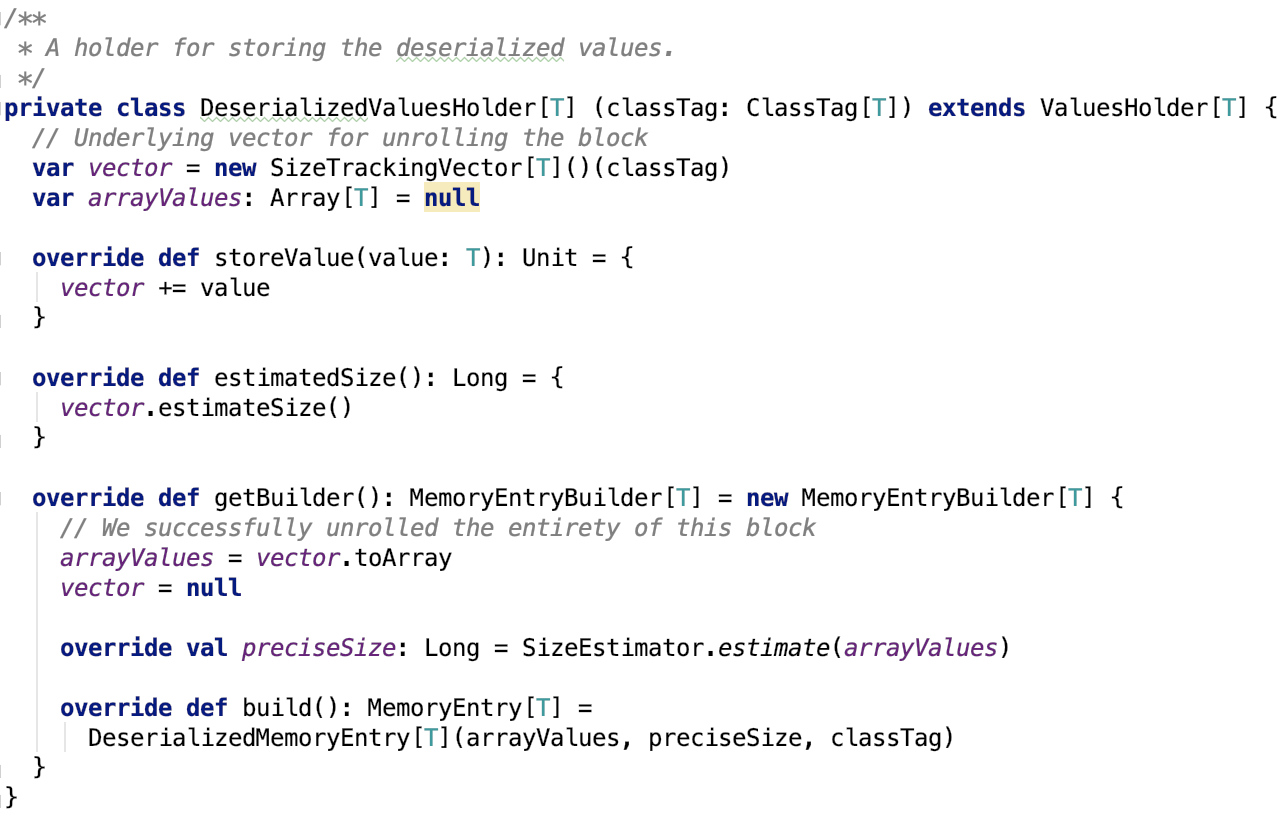
2. SerializedValuesHolder
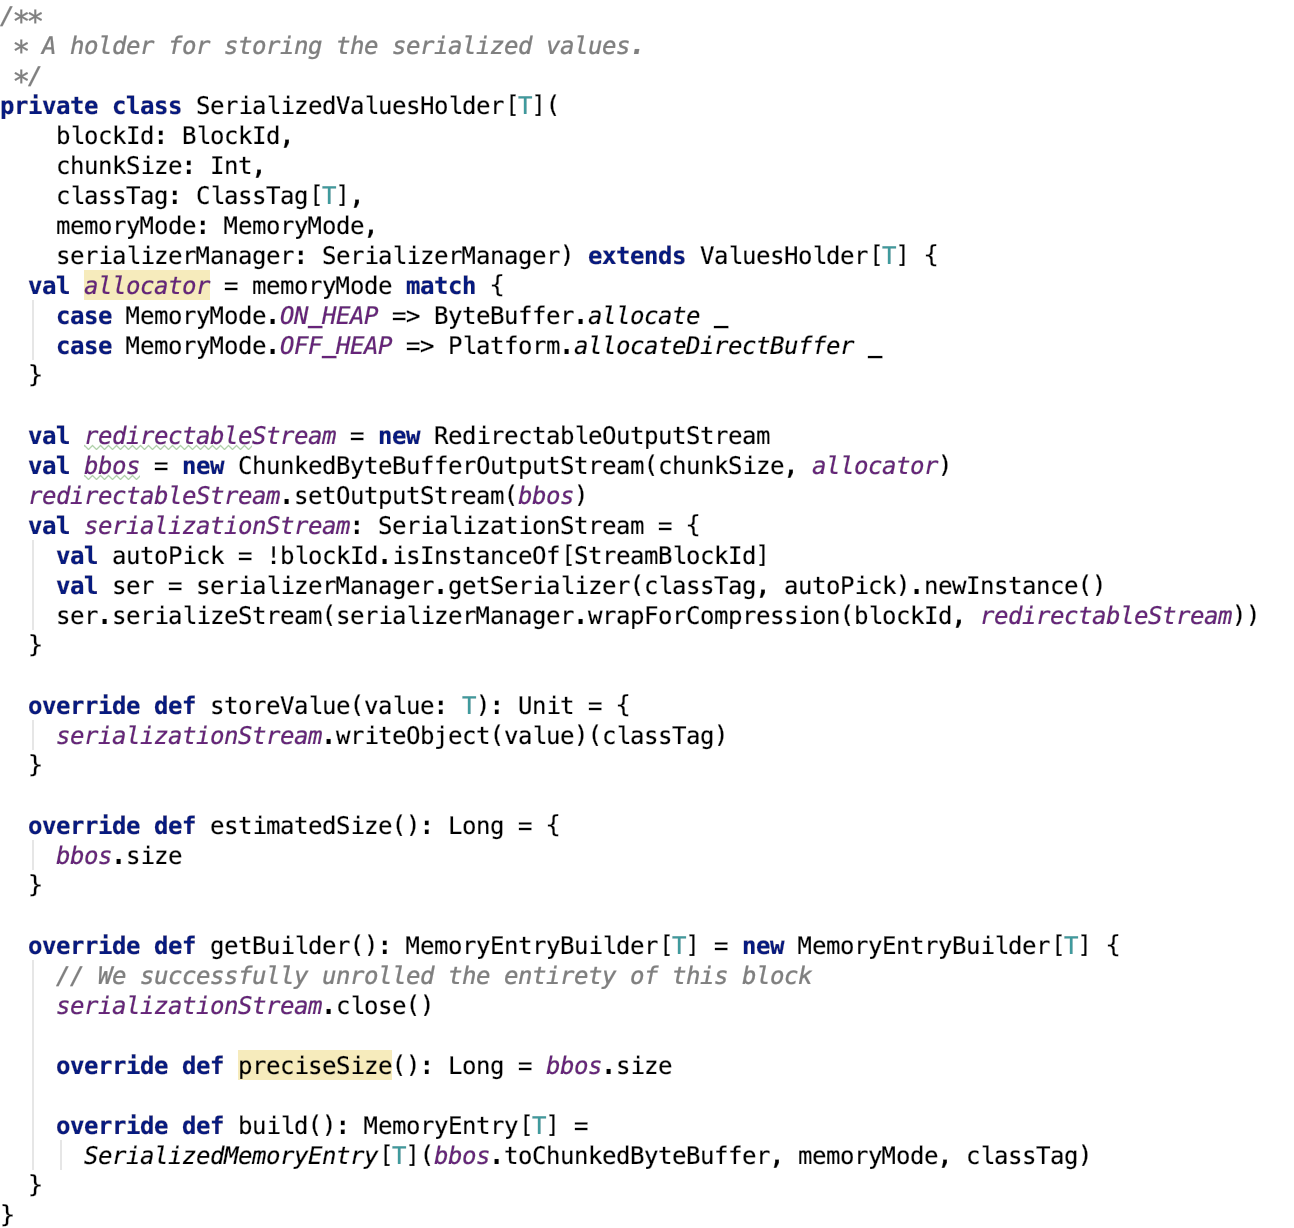
接下来,我们看一下Spark内存存储中的重头戏 -- MemoryStore
9、MemoryStore
文档说明:
Stores blocks in memory, either as Arrays of deserialized Java objects or as serialized ByteBuffers.
类内部结构如下:
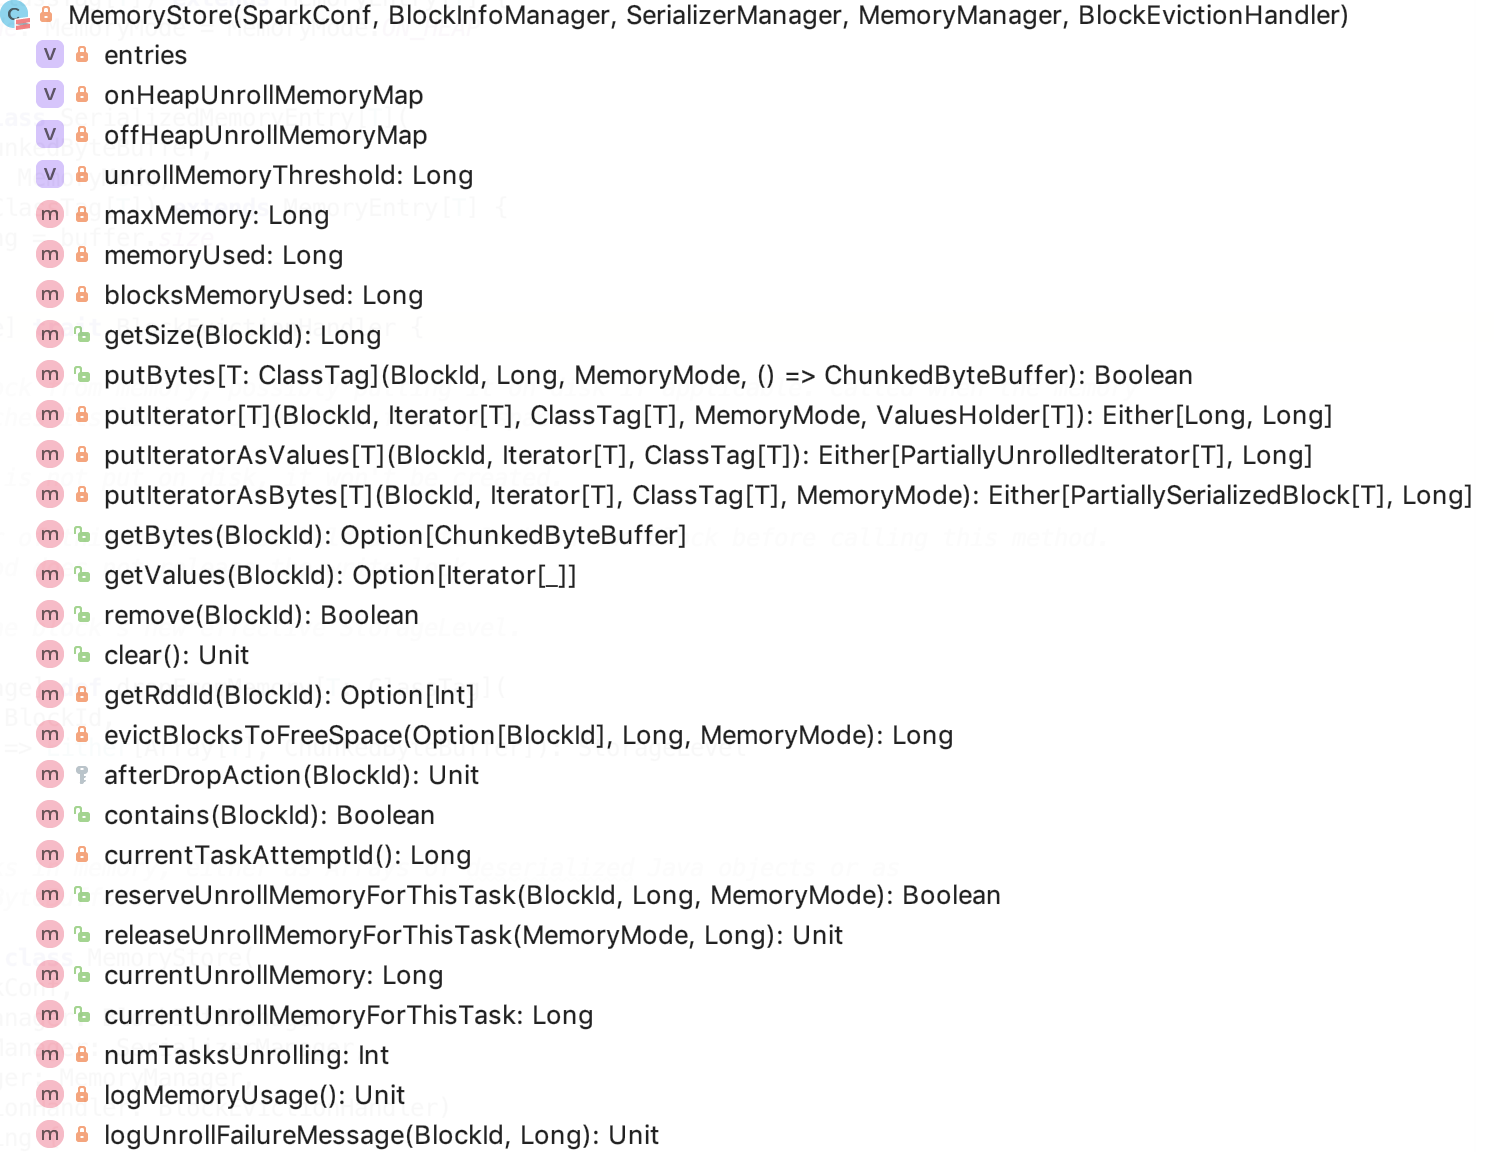
对成员变量的说明:

entries 本质上就是在内存中保存blockId和block内容的一个map,它的 accessOrder为true,即最近访问的会被移动到链表尾部。
onHeapUnrollMemoryMap 记录了taskAttemptId和需要摊开一个block需要的堆内内存大小的关系
offHeapUnrollMemoryMap 记录了taskAttemptId和需要摊开一个block需要的堆外内存大小的关系
unrollMemoryThreshold 表示在摊开一个block 之前给request分配的初始内存,可以通过 spark.storage.unrollMemoryThreshold 来调整,默认是 1MB
下面,开门见山,直接剖析比较重要的方法:
-
putBytes:这个方法只被BlockManager调用,其中_bytes回调用于生成直接被缓存的ChunkedByteBuffer:
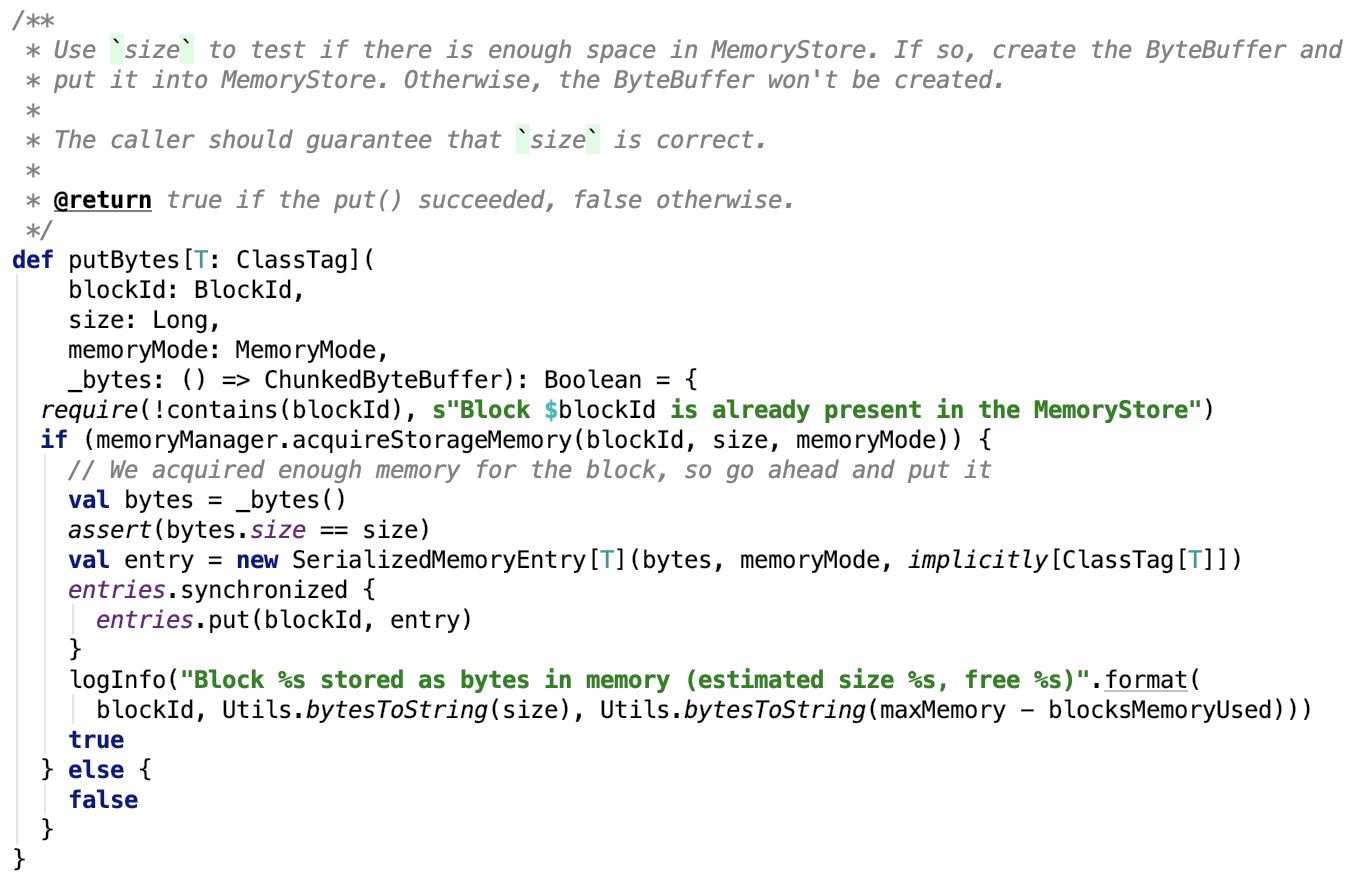
思路:先从MemoryManager中申请内存,如果申请成功,则调用回调方法 _bytes 获取ChunkedByteBuffer数据,然后封装成 SerializedMemoryEntry对象 ,最后将封装好的SerializedMemoryEntry对象缓存到 entries中。
-
把迭代器中值保存为内存中的Java对象
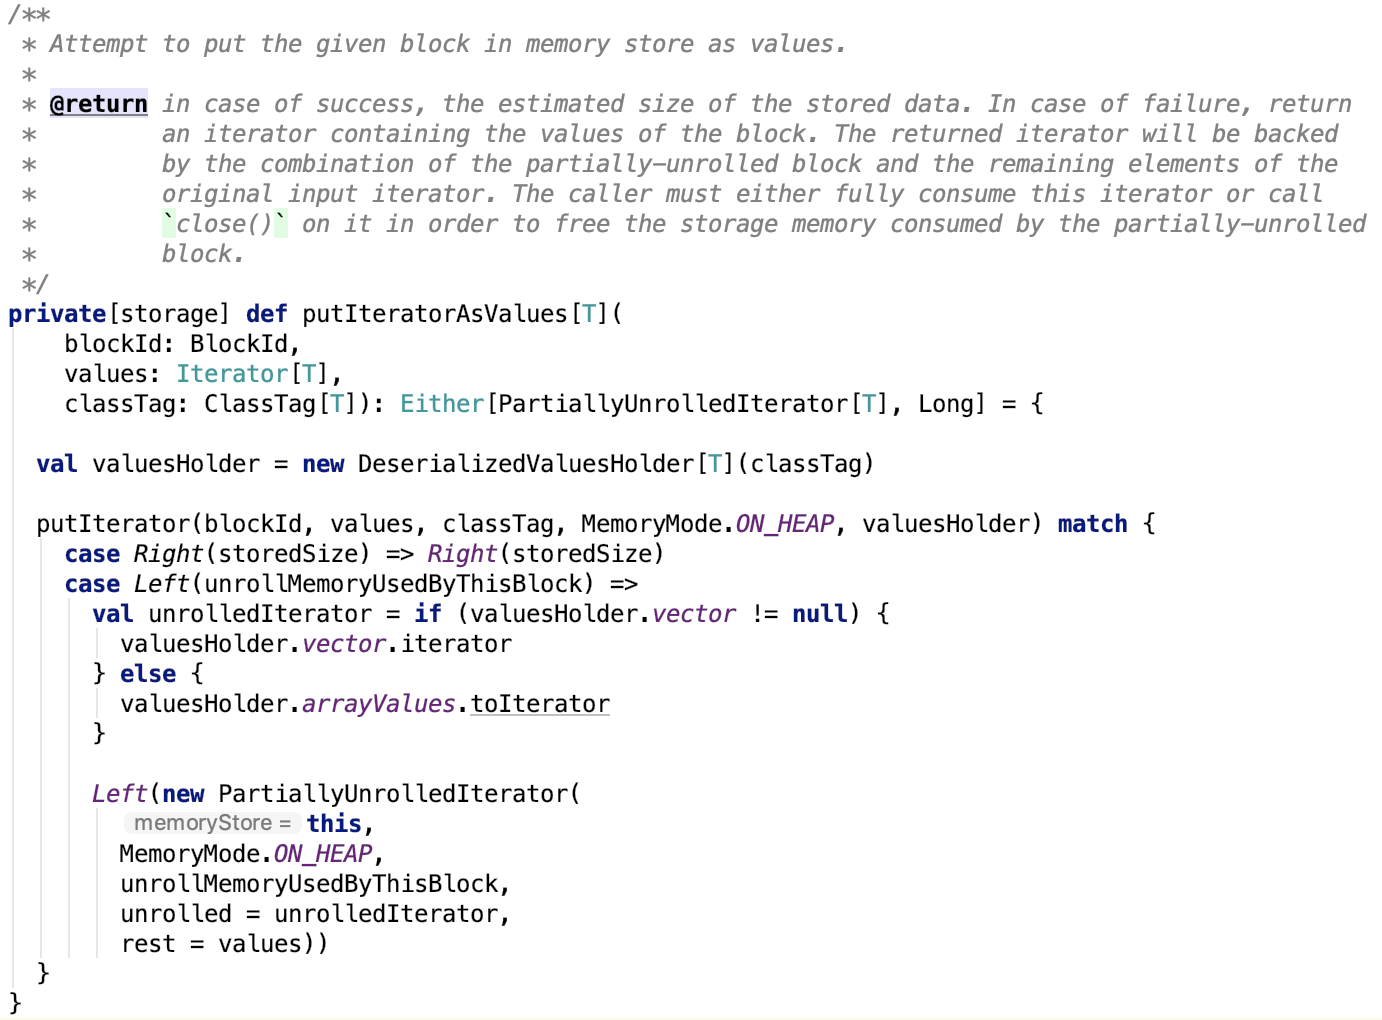
思路:转换为DeserializedValueHolder对象,进而调用putIterator方法,ValueHolder就是一个抽象,使得putIterator既可以缓存序列化的字节数据又可以缓存Java对象数组。
-
把迭代器中值保存为内存中的序列化字节数据
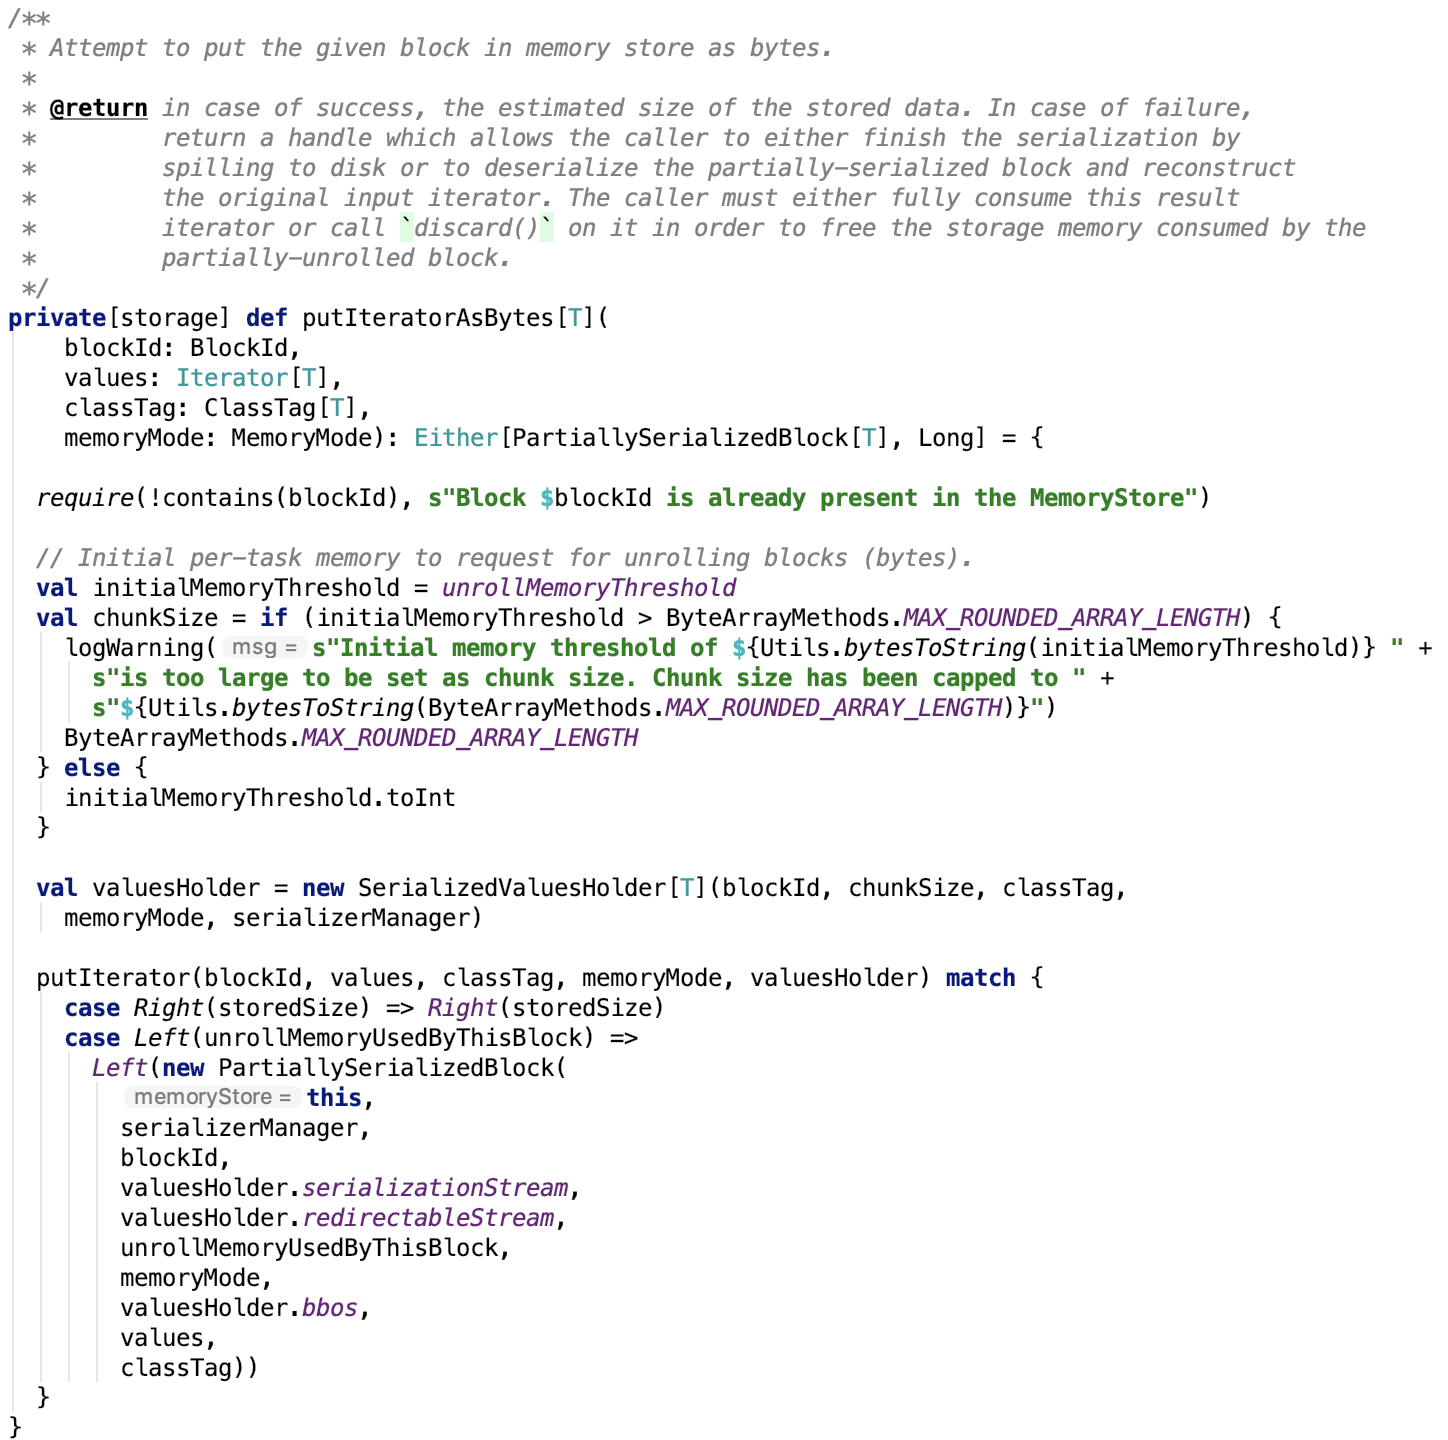
思路:转换为 SerializedValueHolder 对象,进而调用putIterator方法。
MAX_ROUND_ARRARY_LENGTH和unrollMemoryThreshold的定义如下:
1 public static int MAX_ROUNDED_ARRAY_LENGTH = Integer.MAX_VALUE - 15;
2 private val unrollMemoryThreshold: Long = conf.getLong("spark.storage.unrollMemoryThreshold", 1024 * 1024)
unrollMemoryThreshold 默认是 1MB,可以通过 spark.storage.unrollMemoryThreshold 参数调整大小。
-
putIterator方法由参数ValueHolder,使得缓存字节数据和Java对象可以放到一个方法来。 方法2跟3 都调用了 putIterator 方法,如下:

思路:
第一步:定义摊开内存初始化大小,摊开内存增长率,摊开内存检查频率等变量。
第二步:向MemoryManager请求申请摊开初始内存,若成功,则记录这笔摊开内存。
第三步:然后进入223~240行的while循环,在这个循环里:
-
循环条件:如果还有值需要摊开并且上次内存申请是成功的,则继续进行该次循环
-
不断想ValueHolder中add数据。如果摊开的元素个数不是UNROLL_MEMORY_CHECK_PERIOD的整数倍,则摊开个数加1;否则,查看ValueHolder中的内存是否大于了已分配内存,若大于,则请求MemoryManager分配内存,并将分配的内存累加到已分配内存中。
第四步:
若上一次向MemoryManager申请内存成功,则从ValueHolder中获取builder,并且计算准确内存开销。查看准确内存是否大于了已分配内存,若大于,则请求MemoryManager分配内存,并将分配的内存累加到已分配内存中。
否则,否则打印内存使用情况,返回为摊开该block申请的内存
第五步:
若上一次向MemoryManager申请内存成功,首先调用MemoryEntryBuilder的build方法构建出可以直接存入内存的MemoryEntry,并向MemoryManager请求释放摊开内存,申请存储内存,并确保存储内存申请成功。最后将数据存入内存的entries中。
否则打印内存使用情况,返回为摊开该block申请的内存
其实之前不是很理解unroll这个词在这里的含义,一直译作摊开,它其实指的就是集合的数据转储到中转站这个操作,摊开内存指这个操作需要的内存。
下面来看一下这个方法里面依赖的常量和方法:
-
1 unrollMemoryThreshold 在上一个方法已做说明。UNROLL_MEMORY_CHECK_PERIOD 和 UNROLL_MEMORY_GROWTH_FACTOR 常量定义如下:

即,UNROLL_MEMORY_CHECK_PERIOD默认是16,UNROLL_MEMORY_GROWTH_FACTOR 默认是 1.5
4.2 reserveUnrollMemoryForThisTask方法源码如下,思路大致上是先从MemoryManager 申请摊开内存,若成功,则根据memoryMode在堆内或堆外记录摊开内存的map上记录新分配的内存。

4.3 releaseUnrollMemoryForThisTask方法如下,实现思路:先根据memoryMode获取到对应记录堆内或堆外内存的使用情况的map,然后在该task的摊开内存上减去这笔内存开销,如果减完之后,task使用内存为0,则直接从map中移除对该task的内存记录。
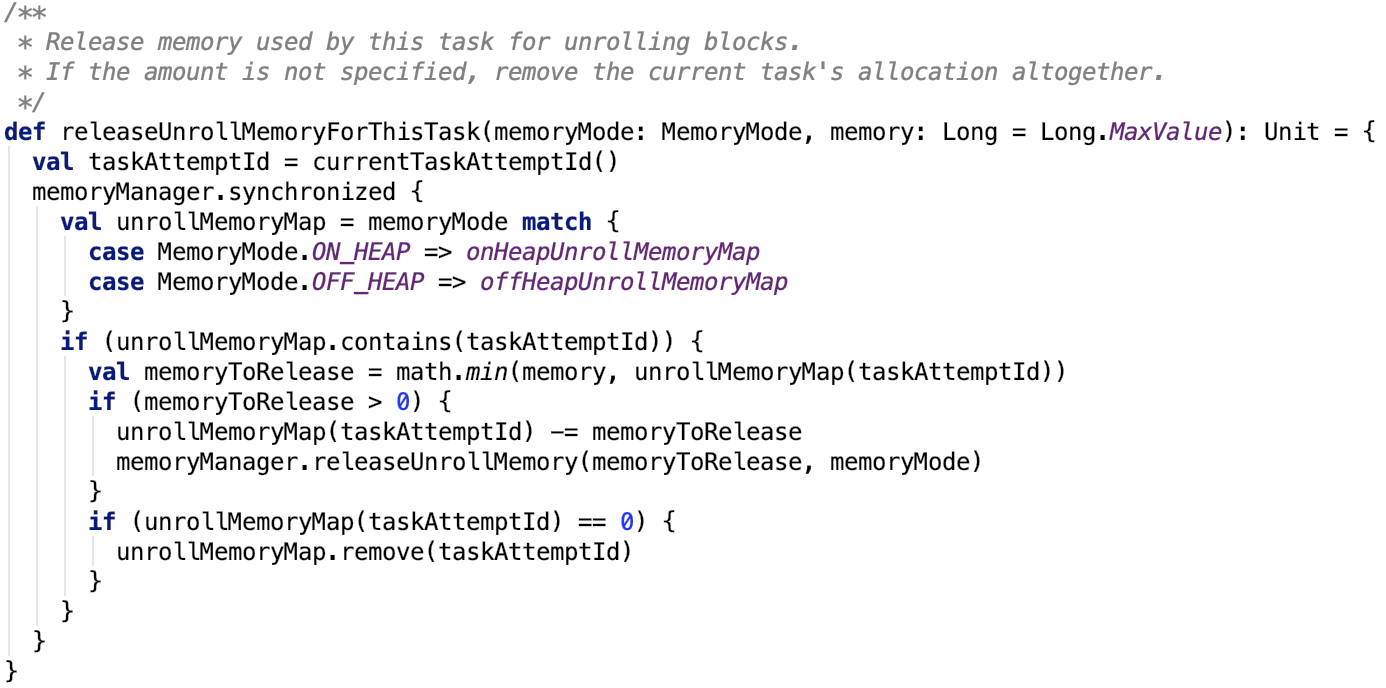
4.4 日志打印block摊开内存和当前内存使用情况

-
获取缓存的值:

思路:直接根据blockId从entries中取出MemoryEntry数据,然后根据MemoryEntry类型取出数据即可。
-
移除Block或清除缓存,比较简单,不做过多说明:
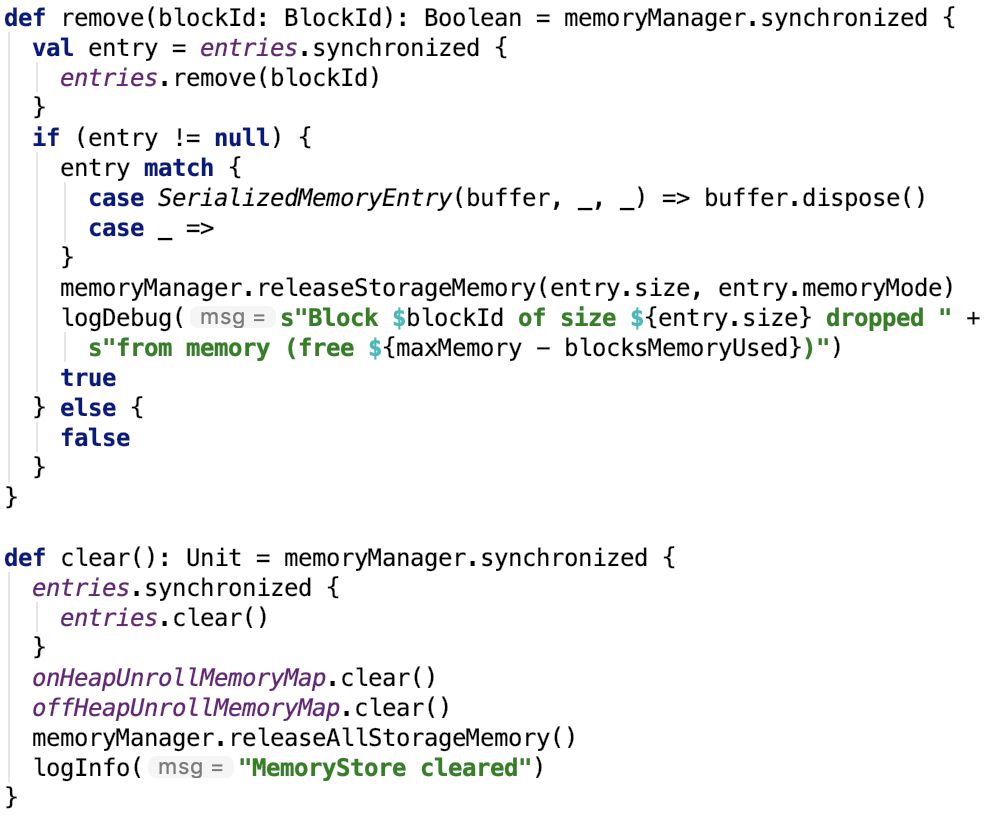
-
尝试驱逐block来释放指定大小的内存空间来存储给定的block,代码如下:

该方法有三个参数:要分配内存的blockId,block大小,内存类型(堆内还是堆外)。
第 469~485 行:dropBlock 方法思路: 先从MemoryEntry中获取data,再调用 BlockManager从内存中驱逐出该block,如果该block 的StorageLevel允许落地到磁盘,则先落到磁盘,再从内存中删除之,最后更新该block的StorageLevel,最后检查新的StorageLevel,若该block还在内存或磁盘中,则释放锁,否则,直接从BlockInfoManager中删除之。
第 443 行: 找到block对应的rdd。
第451~467 行:先给entries上锁,然后遍历entries集合,检查block 是否可以从内存中驱逐,若可以则把它加入到selectedBlocks集合中,并把该block大小累加到freedMemory中。
461行的 lockForWriting 方法,不堵塞,即如果第一次拿不到写锁,则一直不停地轮询,直到可以拿到写锁为止。那么问题来了,为什么要先获取写锁呢?因为写锁具有排他性并且不具备可重入性,一旦拿到写锁,其他锁就不能再访问该block了。
487行~ 528 行:若计划要释放的内存小于存储新block需要的内存大小,则直接释放写锁,不从内存中驱逐之前选择的block,直接返回。
若计划要释放的内存不小于存储新block需要的内存大小,则遍历之前选择的每一个block,获取entry,并调用dropMemory方法,返回释放的内存大小。finally 代码块是防止在dropMemory过程中,该线程被中断,其余block写锁不能被释放的情况。
其依赖的方法如下:

存储内存失败之后,会返回 PartiallySerializedBlock 或者 PartiallyUnrolledIterator。
PartiallyUnrolledIterator 是一个Iterator,可以用来遍历block数据,同时负责释放摊开内存。
PartiallySerializedBlock 它可以将失败的block转化成 PartiallyUnrolledIterator 用来遍历,可以直接丢弃失败的block,也可以把数据转储到给定的可以落地的outputstream中,同时释放摊开内存。
总结:
本篇文章主要讲解了Spark的内存存储相关的内容,重点讲解了BlockInfoManager实现的锁机制、跟ValuesHolder中转站相关的MemoryEntry、EmmoryEntryBuilder等相关内容以及内存存储中的重头戏 -- MemStore相关的Block存储、Block释放、为新Block驱逐内存等等功能。
五、spark磁盘存储剖析
1、总述
磁盘存储相对比较简单,相关的类关系图如下:
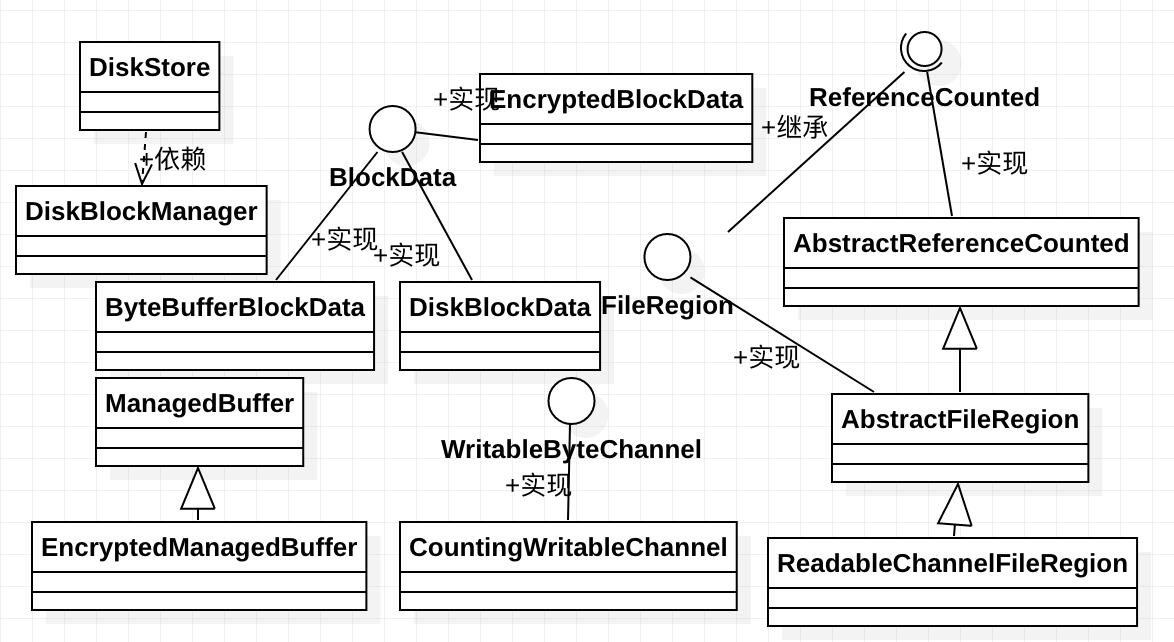
我们先从依赖类 DiskBlockManager 剖析。
2、DiskBlockManager
文档说明如下:
Creates and maintains the logical mapping between logical blocks and physical on-disk locations. One block is mapped to one file with a name given by its BlockId. Block files are hashed among the directories listed in spark.local.dir (or in SPARK_LOCAL_DIRS, if it's set).
创建并维护逻辑block和block落地的物理文件的映射关系。一个逻辑block通过它的BlockId的name属性映射到具体的文件。
1、类结构
其类结构如下:
可以看出,这个类主要用于创建并维护逻辑block和block落地文件的映射关系。保存映射关系,有两个解决方案:一者是使用Map存储每一条具体的映射键值对,二者是指定映射函数像分区函数等等,给定的key通过映射函数映射到具体的value。
2、成员变量
成员变量如下:
subDirsPerLocalDir:这个变量表示本地文件下有几个文件,默认为64,根据参数 spark.diskStore.subDirectories 来调节。
subDirs:是一个二维数组表示本地目录和子目录名称的组合关系,即 ${本地目录1 ... 本地目录n}/${子目录1 ... 子目录64}
localDirs:表示block落地本地文件根目录,通过 createLocalDirs 方法获取,方法如下:

思路:它先调用调用Utils的 getConfiguredLocalDirs 方法,获取到配置的目录集合,然后map每一个父目录,调用Utils的createDirectory方法,在每一个子目录下创建一个 以blockmgr 为前缀的目录。其依赖方法 createDirectory 如下:

这个方法允许重试次数为10,目的是为了防止创建的目录跟已存在的目录重名。
getConfiguredLocalDirs 方法如下:
大多数生产情况下,都是使用yarn,我们直接看一下spark on yarn 环境下,目录到底在哪里。直接来看getYarnLocalDirs方法:

LOCAL_DIRS的定义是什么?
任务是跑在yarn 上的,下面就去定位一下hadoop yarn container的相关源码。
3、定位LOCAL_DIRS环境变量
在ContainerLaunch类的 sanitizeEnv 方法中,找到了如下语句:

addToMap 方法如下:
即,数据被添加到了envirment map变量和 nmVars set集合中了。
在ContainerLaunch 的 call 方法中调用了 sanitizeEnv 方法:
appDirs变量定义如下:

即每一个 appDir格式如下:${localDir}/usercache/${user}/appcache/${application-id}/
localDirs 定义如下:

dirHandler是一个 LocalDirsHandlerService 类型变量,这是一个服务,在其serviceInit方法中,实例化了 MonitoringTimerTask对象:
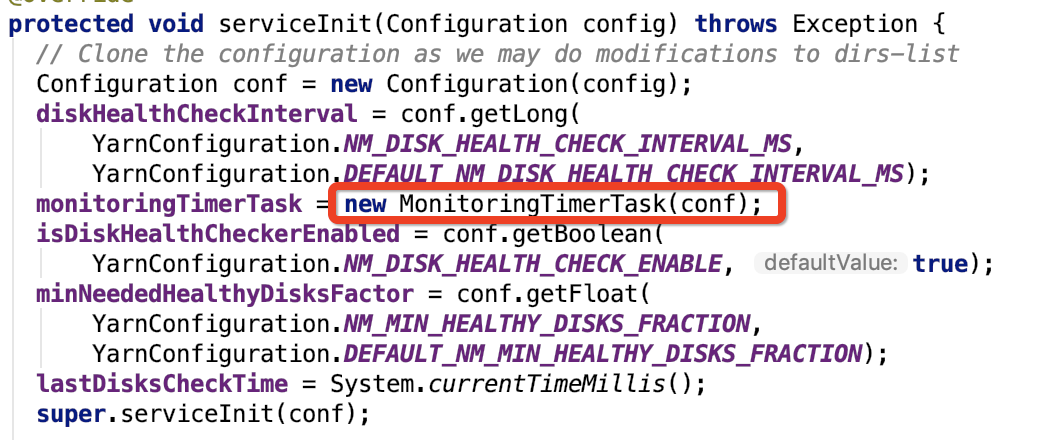
在 MonitoringTimerTask 构造方法中,发现了:

NM_LOCAL_DIRS 常量定义如下:

即:yarn.nodemanager.local-dirs 参数,该参数定义在yarn-default.xml下。
即localDir如下:
${yarn.nodemanager.local-dirs}/usercache/${user}/appcache/${application-id}/
再结合createDirectory方法,磁盘存储的本地目录是:
${yarn.nodemanager.local-dirs}/usercache/${user}/appcache/${application-id}/blockmgr-随机的uuid/
4、核心方法
根据文件内容创建File对象,如下:

思路:先根据filename即blockId的name字段生成正的hashcode(abs(hashcode))
dirId 是指的第几个父目录(从0开始数),subDirId是指的父目录下的第几个子目录(从0开始数)。最后拼接父子目录为一个新的父目录subDir。
然后以subDir为父目录,创建File对象,并返回之。
跟getFile 方法相关的方法如下:
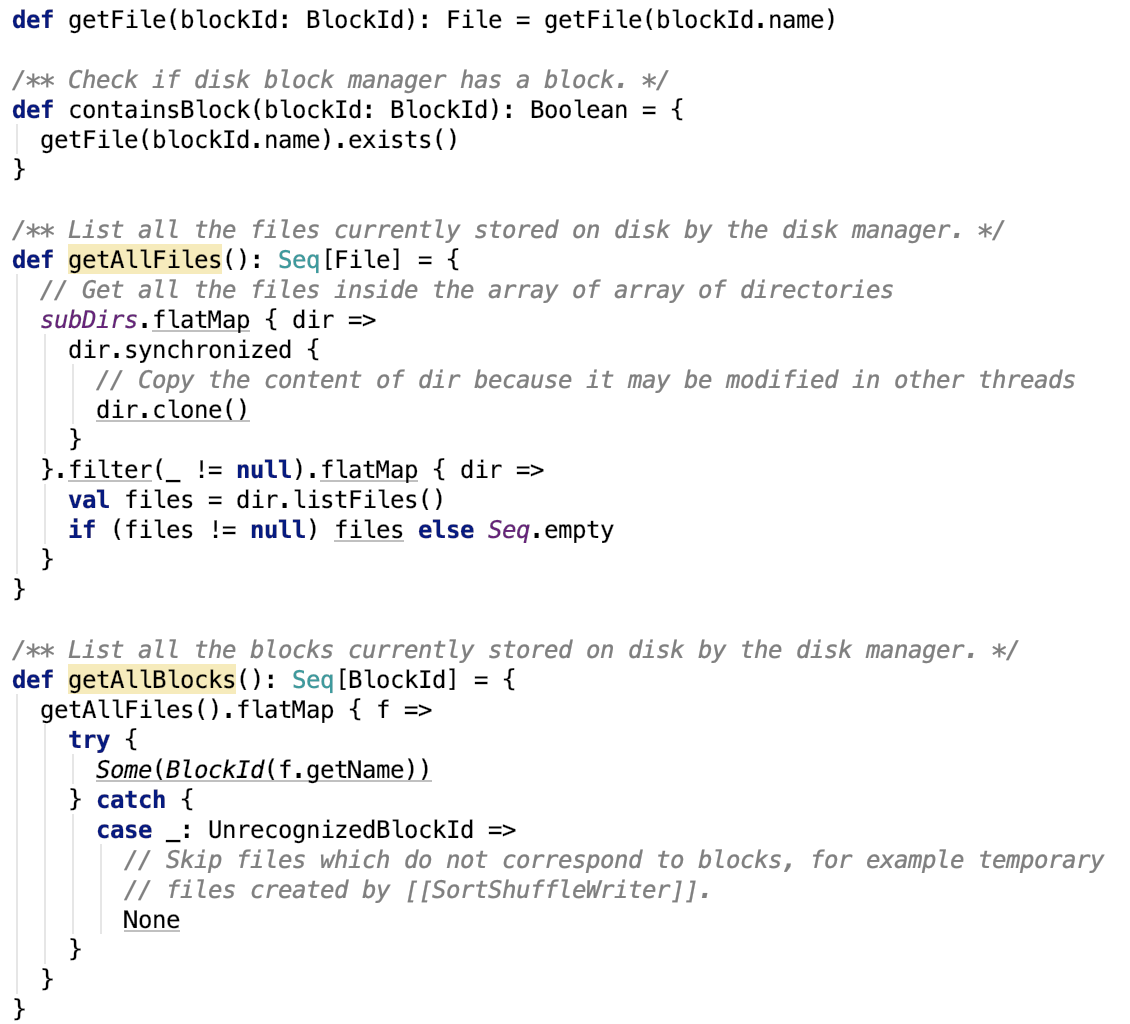
比较简单,不做过多说明。
创建一个临时Block,包括临时本地block 或 shuffle block,如下:
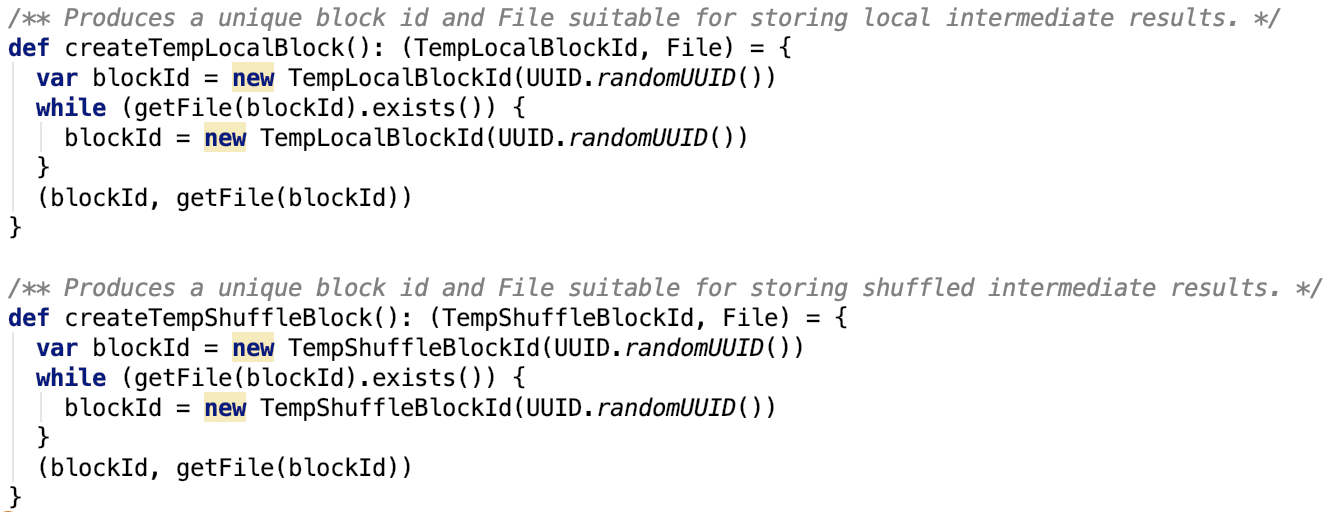
还有一个方法,是停止 DiskBlockManager之后的回调方法:

若deleteFilesOnStop 为 true,即DiskBlockManager停止时,是否需要清除本地存储的block文件。
在 BlockManager 中初始化DiskBlockManager时,deleteFilesOnStop 通过构造方法传入

总结:DiskBlockManager 是用来创建并维护逻辑block和落地后的block文件的映射关系的,它还负责创建用于shuffle或本地的临时文件。
下面看一下在DiskStore中可能会用到的类以及其相关类的说明。
3、CountingWritableChannel
它主要对sink做了包装,在写入sink的同时,还记录向sink写的数据的总量。源码如下:
代码比较简单,不做过多说明。
4、ManagedBuffer
类说明如下:
This interface provides an immutable view for data in the form of bytes. The implementation should specify how the data is provided: - FileSegmentManagedBuffer: data backed by part of a file - NioManagedBuffer: data backed by a NIO ByteBuffer - NettyManagedBuffer: data backed by a Netty ByteBuf The concrete buffer implementation might be managed outside the JVM garbage collector. For example, in the case of NettyManagedBuffer, the buffers are reference counted. In that case, if the buffer is going to be passed around to a different thread, retain/release should be called.
类结构如下:

5、EncryptedManagedBuffer
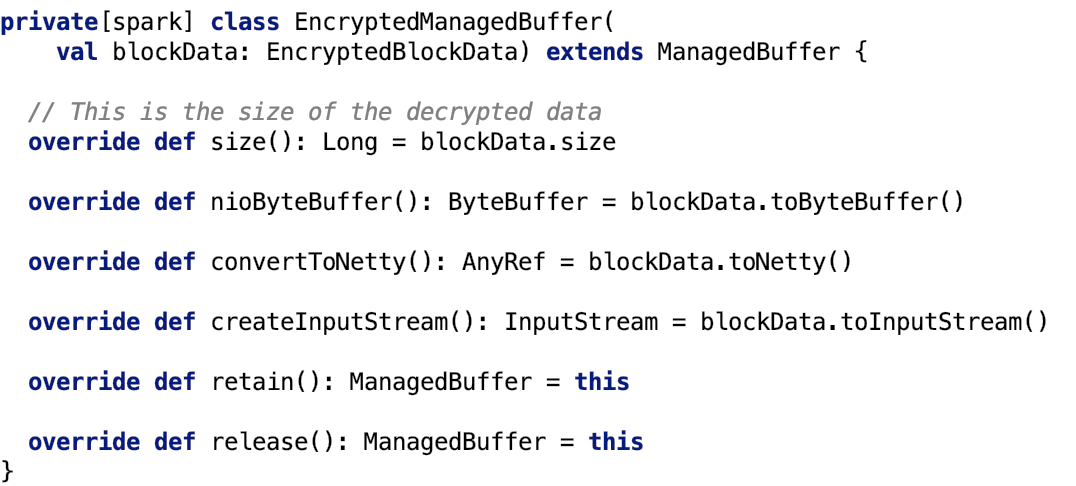
它是一个适配器,它将几乎所以转换的请求委托给了 blockData,下面来看一下这个类相关的剖析。
首先先看一下它的父类 -- BlockData
6、BlockData
接口说明如下:
它是一个接口,它定义了存储方式以及如何提供不同的方式来读去底层的block 数据。
定义方法如下:
方法说明如下:
toInputStream用于返回用于读取该文件的输入流。
toNetty用于返回netty对block数据的包装类,方便netty包来读取数据。
toChunkedByteBuffer用于将block包装成ChunkedByteBuffer。
toByteBuffer 用于将block数据转换为内存中直接读取的 ByteBuffer 对象。
当对该block的操作执行完毕后,需要调用dispose来做后续的收尾工作。
size表示block文件的大小。
它有三个子类:DiskBlockData、EncryptedBlockData和ByteBufferBlockData。
即block的三种存在形式:磁盘、加密后的block和内存中的ByteBuffer
分别介绍如下:
7、DiskBlockData
该类主要用于将磁盘中的block文件转换为指定的流或对象。
先来看其简单的方法实现:
构造方法:
相关字段说明如下:
minMemoryMapBytes表示 磁盘block映射到内存块中最小大小,默认为2MB,可以通过 spark.storage.memoryMapThreshold 进行调整。
maxMemoryMapBytes表示 磁盘block映射到内存块中最大大小,默认为(Integer.MAX_VALUE - 15)B,可以通过 spark.storage.memoryMapLimitForTests 进行调整。
对应源码如下:

比较简单的方法如下:

size方法直接返回block文件的大小。
dispose空实现。
open是一个私有方法,主要用于获取读取该block文件的FileChannel对象。
toByteBuffer方法实现如下:
Utils的tryWithResource方法如下,它先执行createResource方法,然后执行Function对象的apply方法,最终释放资源,思路就是 创建资源 --使用资源-- 释放资源三步曲:

即先获取读取block文件的FileChannel对象,若blockSize 小于 最小的内存映射字节大小,则将channel的数据读取到buffer中,返回的是HeapByteBuffer对象,即数据被写入到了堆里,即它是non-direct buffer,相当于数据被读取到中间临时内存中,否则使用FileChannelImpl的map方法返回 MappedByteBuffer 对象。
MappedByteBuffer文档说明如下:
A direct byte buffer whose content is a memory-mapped region of a file.
Mapped byte buffers are created via the FileChannel.map method. This class extends the ByteBuffer class with operations that are specific to memory-mapped file regions.
A mapped byte buffer and the file mapping that it represents remain valid until the buffer itself is garbage-collected.
The content of a mapped byte buffer can change at any time, for example if the content of the corresponding region of the mapped file is changed by this program or another. Whether or not such changes occur, and when they occur, is operating-system dependent and therefore unspecified.
All or part of a mapped byte buffer may become inaccessible at any time, for example if the mapped file is truncated. An attempt to access an inaccessible region of a mapped byte buffer will not change the buffer's content and will cause an unspecified exception to be thrown either at the time of the access or at some later time. It is therefore strongly recommended that appropriate precautions be taken to avoid the manipulation of a mapped file by this program, or by a concurrently running program, except to read or write the file's content.
Mapped byte buffers otherwise behave no differently than ordinary direct byte buffers.
它是direct buffer,即直接从磁盘读数据,不经过中间临时内存,可以参照ByteBuffer的文档对Direct vs. non-direct buffers 的说明如下:
Direct vs. non-direct buffers
A byte buffer is either direct or non-direct. Given a direct byte buffer, the Java virtual machine will make a best effort to perform native I/O operations directly upon it. That is, it will attempt to avoid copying the buffer's content to (or from) an intermediate buffer before (or after) each invocation of one of the underlying operating system's native I/O operations.
A direct byte buffer may be created by invoking the allocateDirect factory method of this class. The buffers returned by this method typically have somewhat higher allocation and deallocation costs than non-direct buffers. The contents of direct buffers may reside outside of the normal garbage-collected heap, and so their impact upon the memory footprint of an application might not be obvious. It is therefore recommended that direct buffers be allocated primarily for large, long-lived buffers that are subject to the underlying system's native I/O operations. In general it is best to allocate direct buffers only when they yield a measureable gain in program performance.
A direct byte buffer may also be created by mapping a region of a file directly into memory. An implementation of the Java platform may optionally support the creation of direct byte buffers from native code via JNI. If an instance of one of these kinds of buffers refers to an inaccessible region of memory then an attempt to access that region will not change the buffer's content and will cause an unspecified exception to be thrown either at the time of the access or at some later time.
Whether a byte buffer is direct or non-direct may be determined by invoking its isDirect method. This method is provided so that explicit buffer management can be done in performance-critical code.
toChunkedByteBuffer 方法如下:
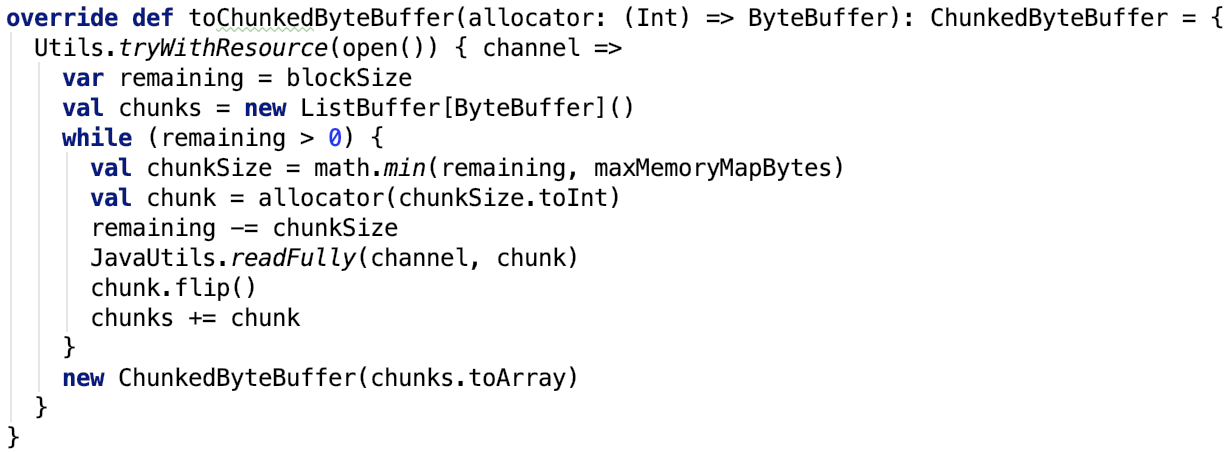
首先,ChunkedByteBuffer对象里包含的是数据分成多个小的chunk,而不是连续的数组。
先把文件读到内存中的 HeapByteBuffer 对象中即单个chunk,然后放入存放chunk的ListBuffer中,最终转换为Array存入到ChunkedByteBuffer 对象中。
toNetty实现如下:

DefaultFileRegion说明请继续向下看,先不做过多说明。
8、EncryptedBlockData
这个类主要是用于加密的block磁盘文件转换为特定的流或对象。
构造方法如下:

file指block文件,blockSize指block文件大小,key是用于加密的密钥。
先来看三个比较简单的方法:
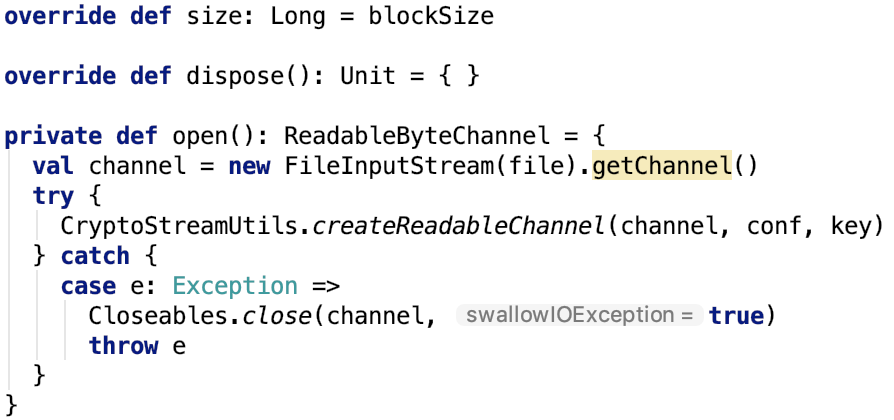
open方法不再直接根据FileInputStream获取其 FileChannelImpl 对象了,而是获取 FileChannelImpl 之后,再调用了 CryptoStreamUtils 的 createReadableChannel 方法,如下:

进一步将channel 对象封装为 CryptoInputStream 对象,对ErrorHandlingReadableChannel的读操作,实际上是读的 CryptoInputStream,这个流内部有一个根据key来初始化的加密器,这个加密器负责对数据的解密操作。
toByteBuffer方法如下:
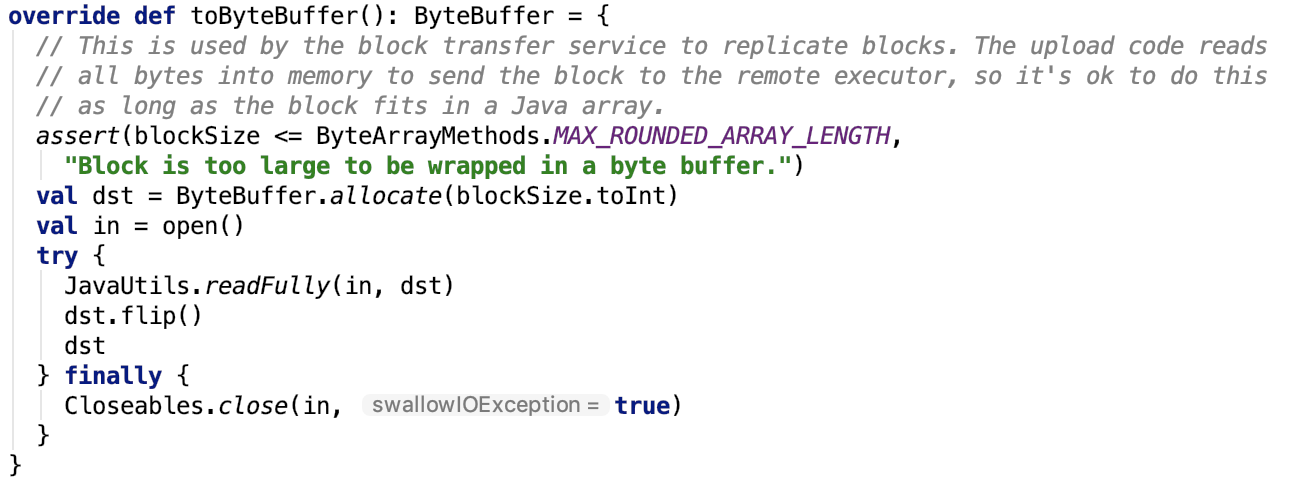
思路:如果block数据大小在整数范围内,则直接将加密的block解密之后存放在内存中。
toChunkedByteBuffer方法除了解密操作外,跟DiskBlockData 中toChunkedByteBuffer方法无异,不做过多说明,代码如下:
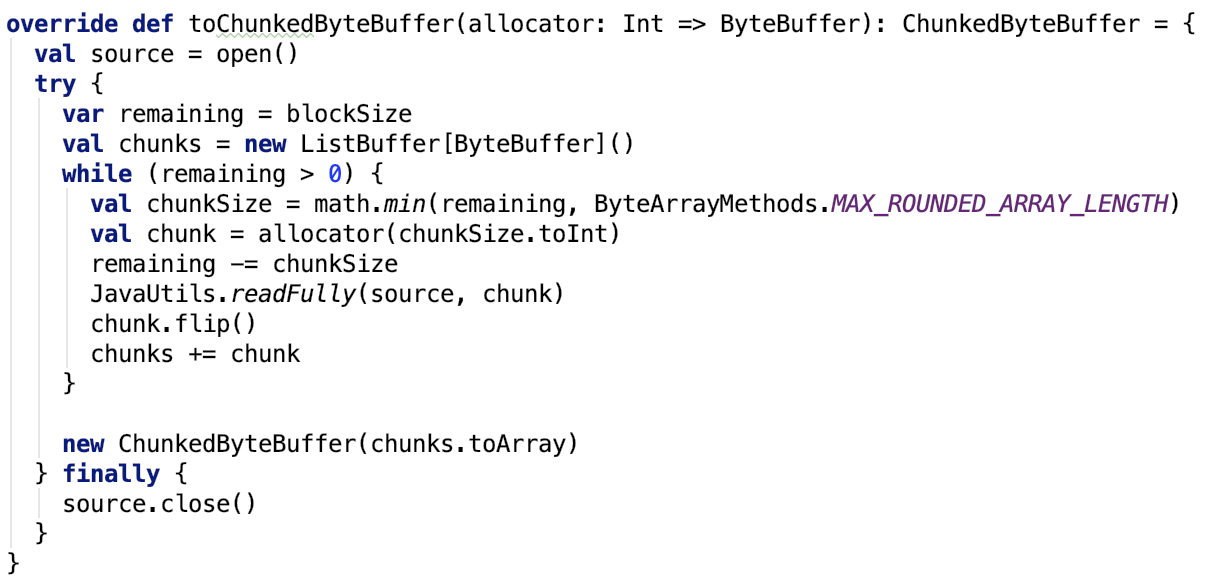
toNetty 方法,源码如下:

ReadableChannelFileRegion类在下文介绍,先不做过多说明。
toInputStream方法,源码如下:

思路:这个就不能直接open方法返回的获取inputStream,因为 CryptoInputStream 是没有获取inputStream的接口的,Channels.newInputStream返回的是ChannelInputStream,ChannelInputStream对channel做了装饰。
9、ByteBufferBlockData
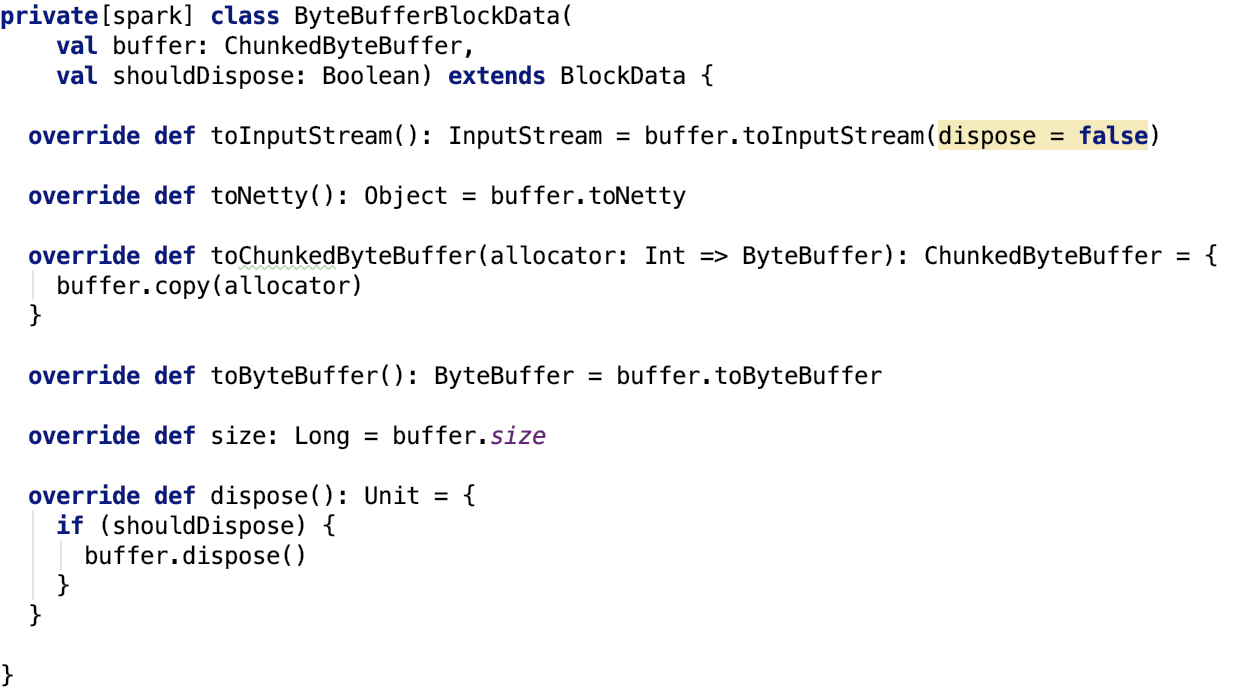
整体比较简单,主要来看一下dispose方法,ChunkedByteBuffer 方法的 dispose 如下:

即使用StorageUtils的dispose 方法去清理每一个chunk,StorageUtils的dispose 方法如下:
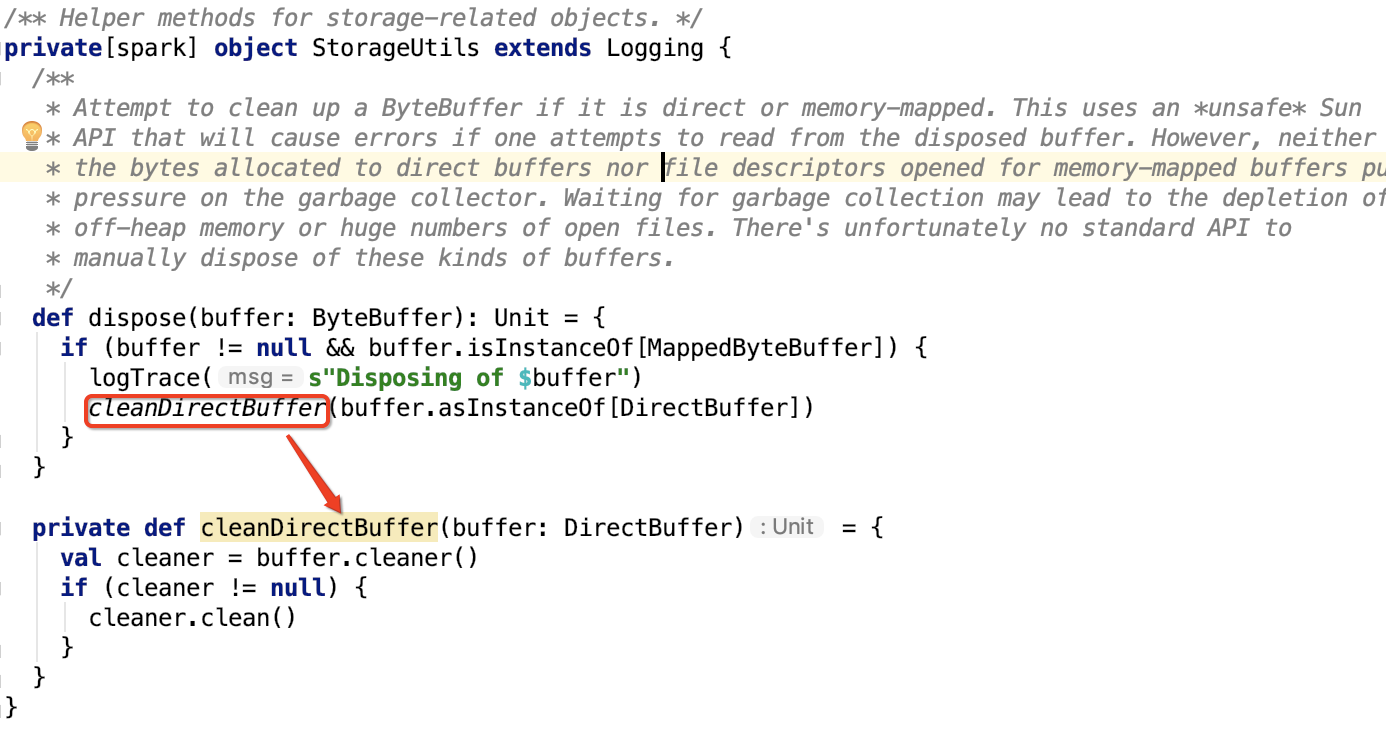
即获取它的cleaner,然后调用cleaner的clean方法。我们以 DirectByteBufferR 为例,做进一步说明:
在其构造方法中初始化Cleaner,如下:
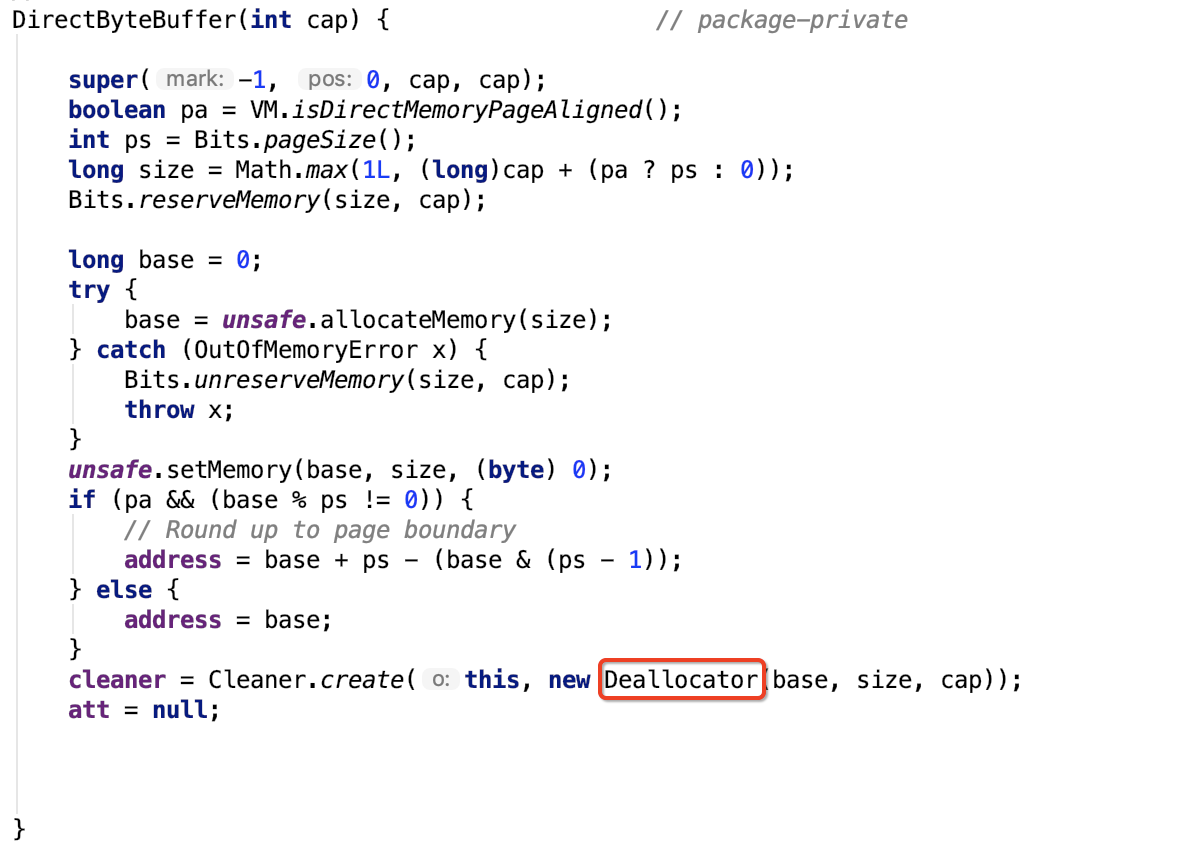
base是调用unsafe类的静态方法allocateMemory分配指定大小内存后返回的内存地址,size是内存大小。
类声明:

没错它是一个虚引用,随时会被垃圾回收。
Cleaner的构造方法如下:

var1 是待清理的对象,var2 是执行清理任务的Runnable对象。
再看它的成员变量:

没错,它自己本身就是双向链表上的一个节点,也是双向链表。
其create 方法如下:


思路:创建cleanr并把它加入到双向链表中。
Cleaner的 clean方法如下:
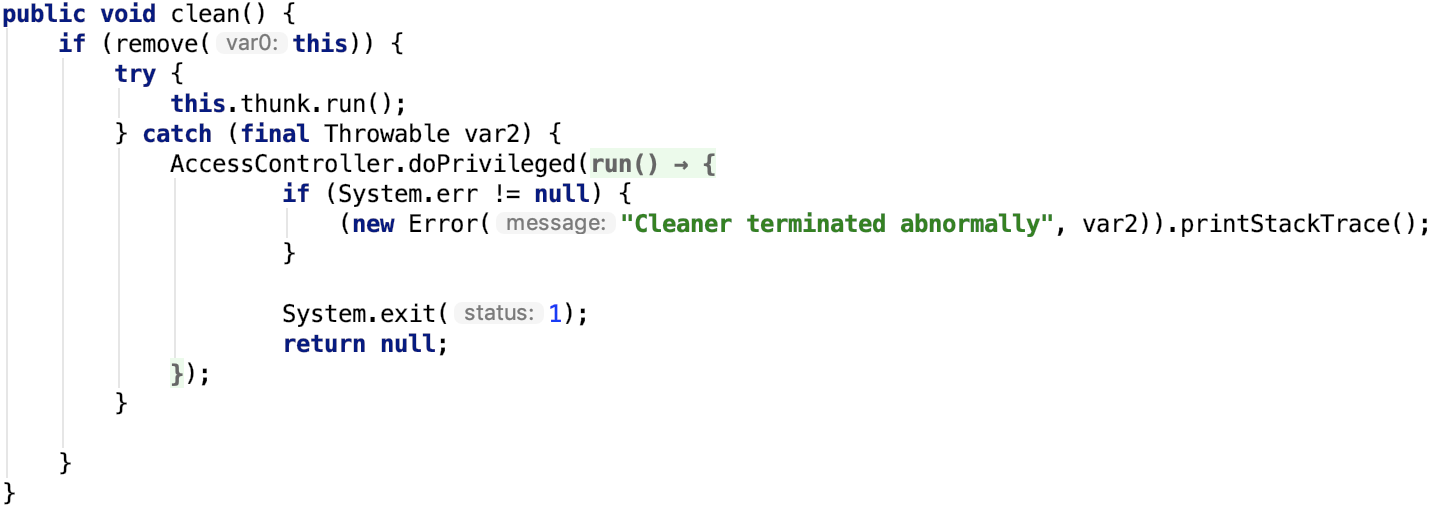
它会先调用remove 方法,调用成功则执行内存清理任务,注意这里没有异步任务同步调用Runnable的run方法。
remove 方法如下:

思路:从双向链表中移除指定的cleaner。
Deallocator 类如下:
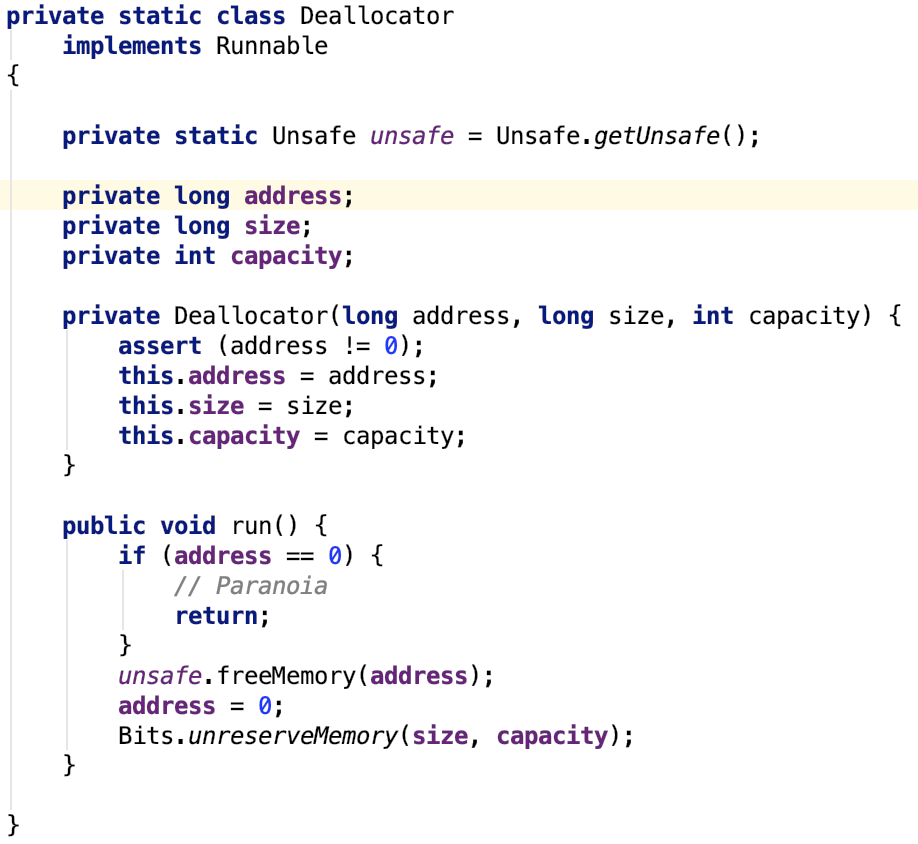
unsafe的allocateMemory方法使用了off-heap memory,这种方式的内存分配不是在堆里,不受GC的管理,使用Unsafe.freeMemory()来释放它。
先调用 unsafe释放内存,然后调用Bits的 unreserveMemory 方法:
至此,dispose 方法结束。
下面看一下,ReadableChannelFileRegion的继承关系:
我们按继承关系来看类: ReferenceCounted --> FileRegion --> AbstractReferenceCounted --> AbstractFileRegion --> ReadableChannelFileRegion。
10、ReferenceCounted
类说明如下:
`A reference-counted object that requires explicit deallocation.``When a new ReferenceCounted is instantiated, it starts with the reference count of 1. <``br``>retain() increases the reference count, and release() decreases the reference count. <``br``>If the reference count is decreased to 0, the object will be deallocated explicitly, <``br``>and accessing the deallocated object will usually result in an access violation.``If an object that implements ReferenceCounted is a container of other objects that implement ReferenceCounted, <``br``>the contained objects will also be released via release() when the container's reference count becomes 0.`
这是netty包下的一个接口。
它是一个引用计数对象,需要显示调用deallocation。
ReferenceCounted对象实例化时,引用计数设为1,调用retain方法增加引用计数,release方法则释放引用计数。
如果引用计数减少至0,对象会被显示deallocation,访问已经deallocation的对象会造成访问问题。
如果一个对象实现了ReferenceCounted接口的容器包含了其他实现了ReferenceCounted接口的对象,当容器的引用减少为0时,被包含的对象也需要通过 release 方法释放之,即引用减1。
主要有三类核心方法:
retain:Increases the reference count by 1 or the specified increment.
touch:Records the current access location of this object for debugging purposes. If this object is determined to be leaked, the information recorded by this operation will be provided to you via ResourceLeakDetector. This method is a shortcut to touch(null).
release:Decreases the reference count by 1 and deallocates this object if the reference count reaches at 0. Returns true if and only if the reference count became 0 and this object has been deallocated
refCnt:Returns the reference count of this object. If 0, it means this object has been deallocated.
11、FileRegion
它也是netty下的一个包,FileRegion数据通过支持零拷贝的channel将数据传输到目标channel。
A region of a file that is sent via a Channel which supports zero-copy file transfer .
注意:文件零拷贝传输对JDK版本和操作系统是有要求的:
FileChannel.transferTo(long, long, WritableByteChannel) has at least four known bugs in the old versions of Sun JDK and perhaps its derived ones. Please upgrade your JDK to 1.6.0_18 or later version if you are going to use zero-copy file transfer.
If your operating system (or JDK / JRE) does not support zero-copy file transfer, sending a file with FileRegion might fail or yield worse performance. For example, sending a large file doesn't work well in Windows.
Not all transports support it
接口结构如下:
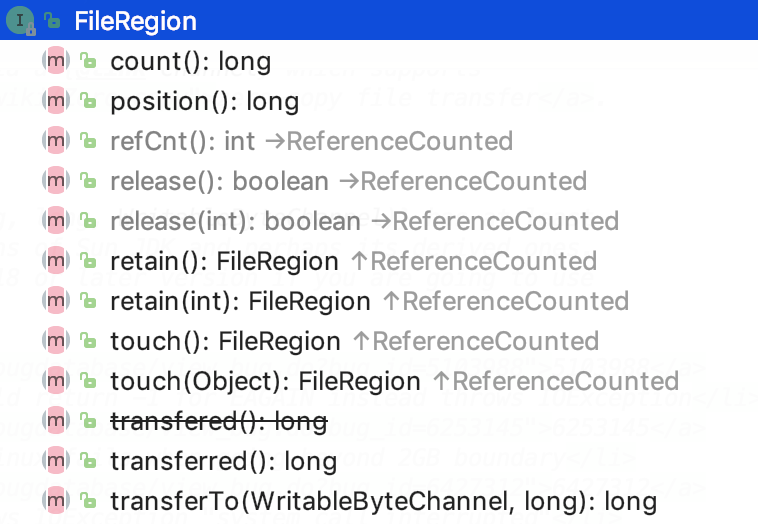
下面对新增方法的解释:
count:Returns the number of bytes to transfer.
position:Returns the offset in the file where the transfer began.
transferred:Returns the bytes which was transfered already.
transferTo:Transfers the content of this file region to the specified channel.
12、AbstractReferenceCounted
这个类是通过一个变量来记录引用的增加或减少情况。
类结构如下:
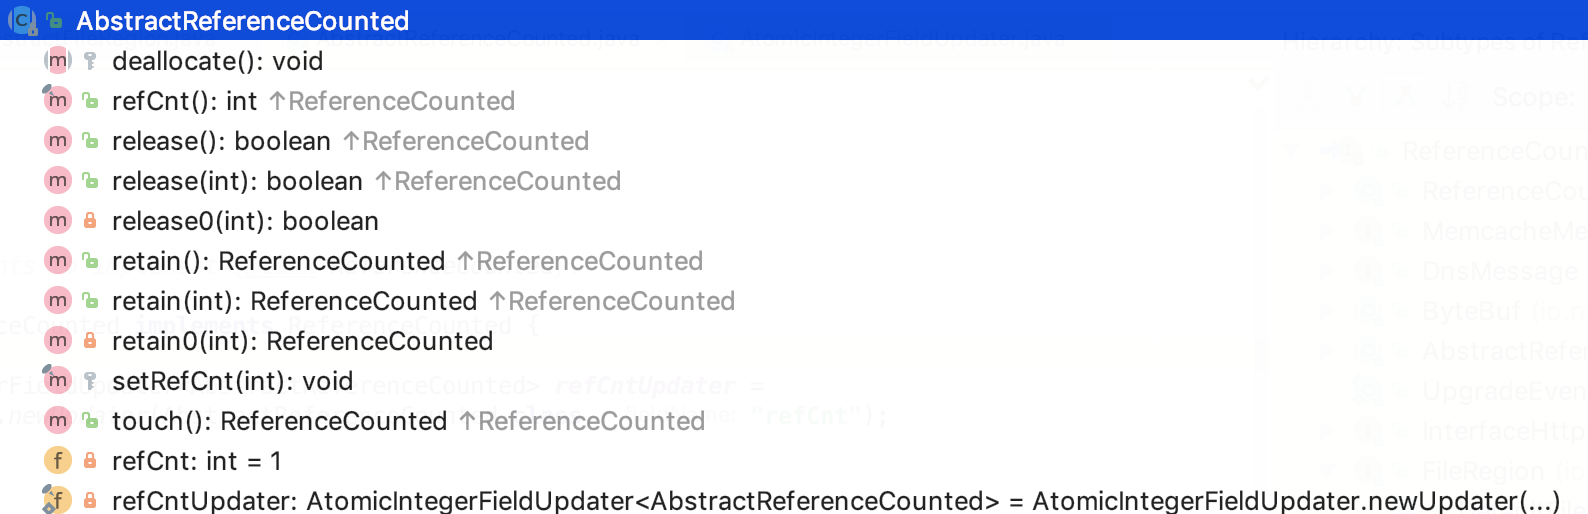
先来看成员变量:

refCnt就是内部记录引用数的一个volatile类型的变量,refCntUpdater是一个 AtomicIntegerFieldUpdater 类型常量,AtomicIntegerFieldUpdater 基于反射原子性更新某个类的 volatile 类型成员变量。
A reflection-based utility that enables atomic updates to designated volatile int fields of designated classes. This class is designed for use in atomic data structures in which several fields of the same node are independently subject to atomic updates.
Note that the guarantees of the compareAndSet method in this class are weaker than in other atomic classes. Because this class cannot ensure that all uses of the field are appropriate for purposes of atomic access, it can guarantee atomicity only with respect to other invocations of compareAndSet and set on the same updater.
方法如下:
-
设置或获取 refCnt 变量

-
增加引用:
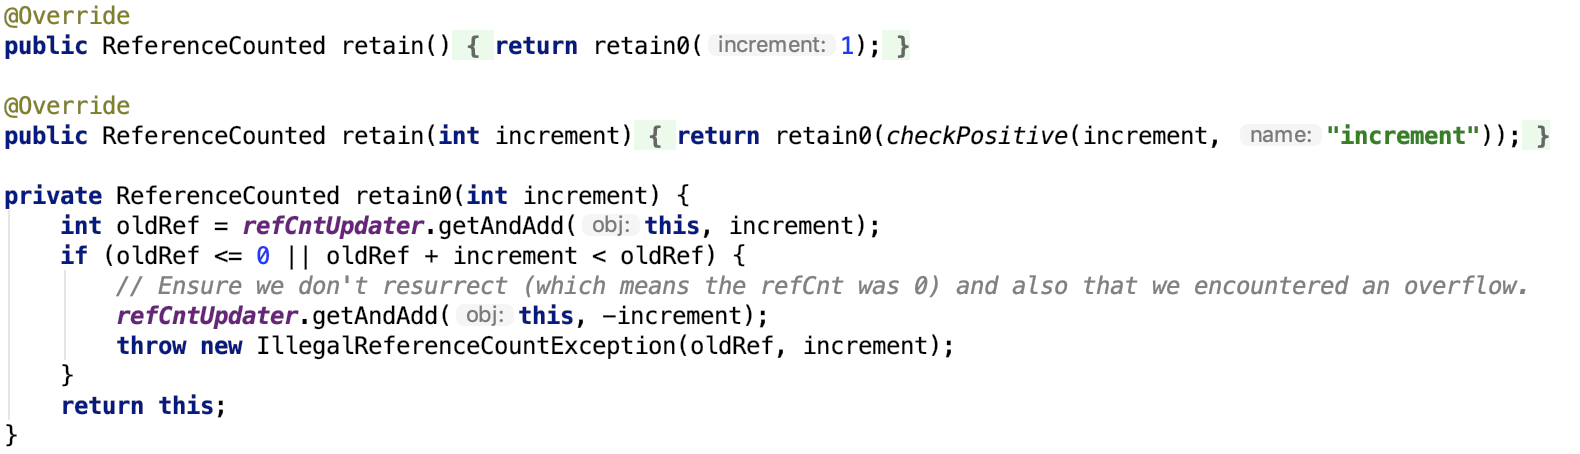
-
减少引用:
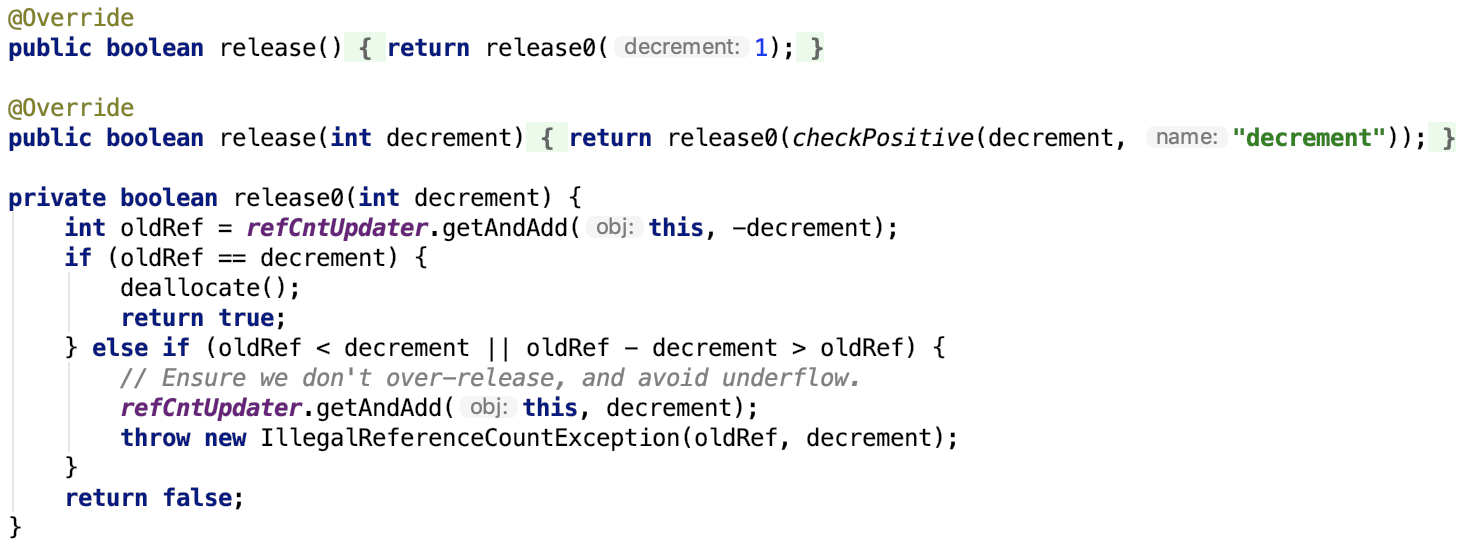
13、AbstractFileRegion
AbstractFileRegion 继承了AbstractReferenceCounted, 但他还是一个抽象类,只是实现了部分的功能,如下:
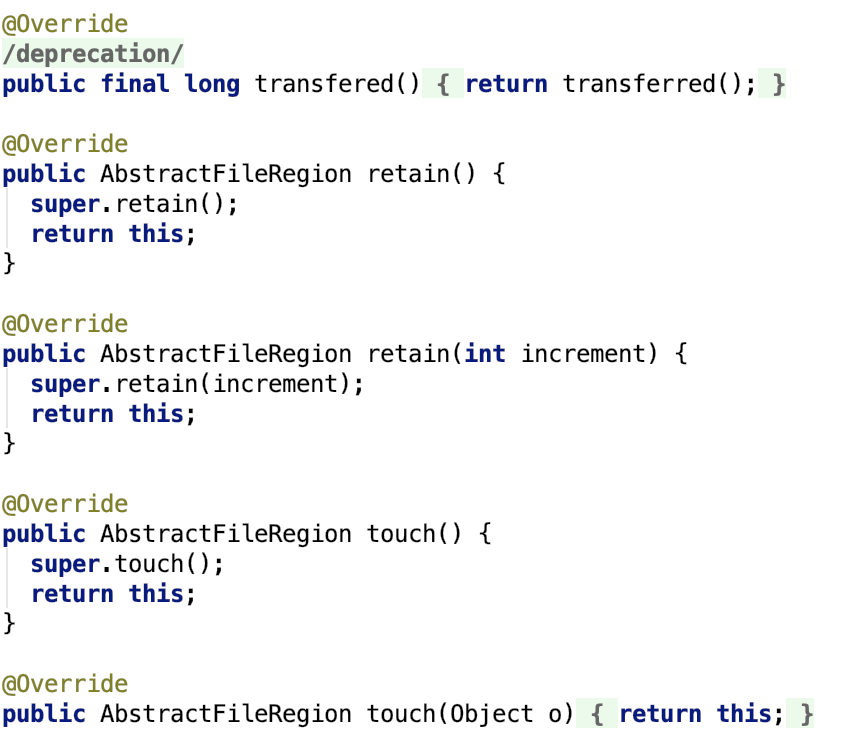
14、DefaultFileRegion
文档说明如下:
Default FileRegion implementation which transfer data from a FileChannel or File. Be aware that the FileChannel will be automatically closed once refCnt() returns 0.
先来看一下它主要的成员变量:
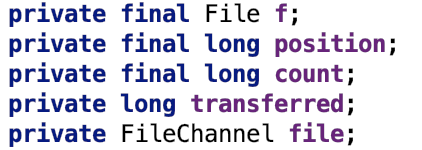
f:是指要传输的源文件。
file:是指要传输的源FileChannel
position:传输开始的字节位置
count:总共需要传输的字节数量
transferred:指已经传输的字节数量
关键方法 transferTo 的源码如下:

思路:先计算出剩余需要传输的字节的总大小。然后从 position 的相对位置开始传输到指定的target sink。
注意:position是指相对于position最初开始位置的大小,绝对位置为 this.position + position。
其中,open 方法如下,它返回一个随机读取文件的 FileChannel 对象。
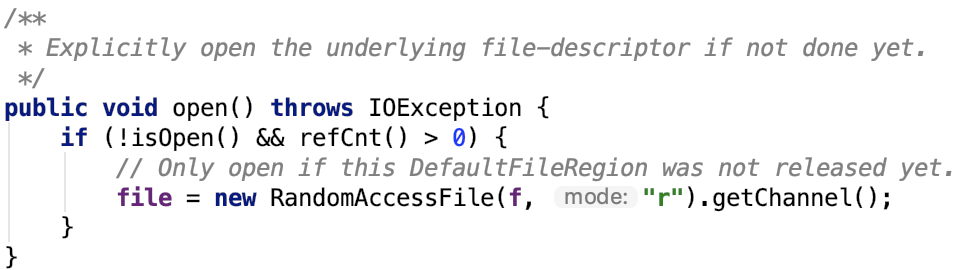
其deallocate 方法如下:
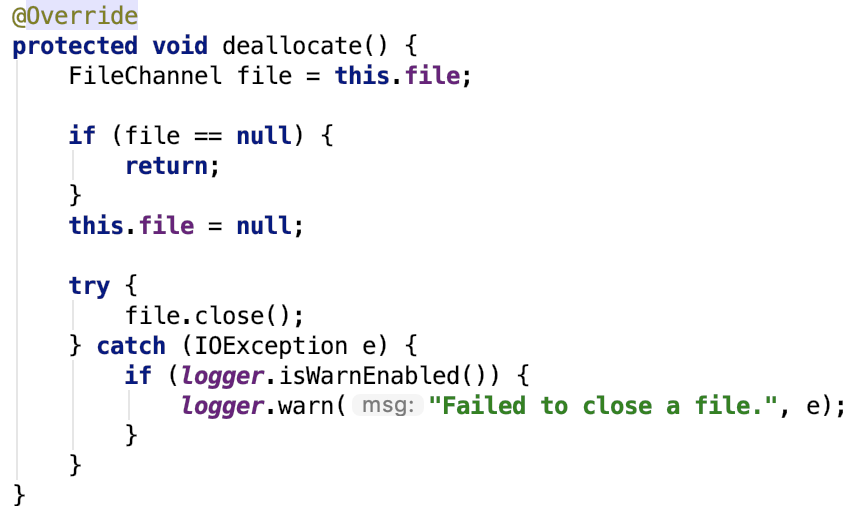
思路:直接关闭,取消成员变量对于FileChannel的引用,便于垃圾回收时可以回收FileChannel,然后关闭FileChannel即可。
总结:它通过 RandomeAccessFile 获取 可以支持随机访问 FileChannelImpl 的FileChannel,然后根据相对位置计算出绝对位置以及需要传输的字节总大小,最后将数据传输到target。
其引用计数的处理调用其父类 AbstractReferenceCounted的对应方法。
15、ReadableChannelFileRegion
其源码如下:
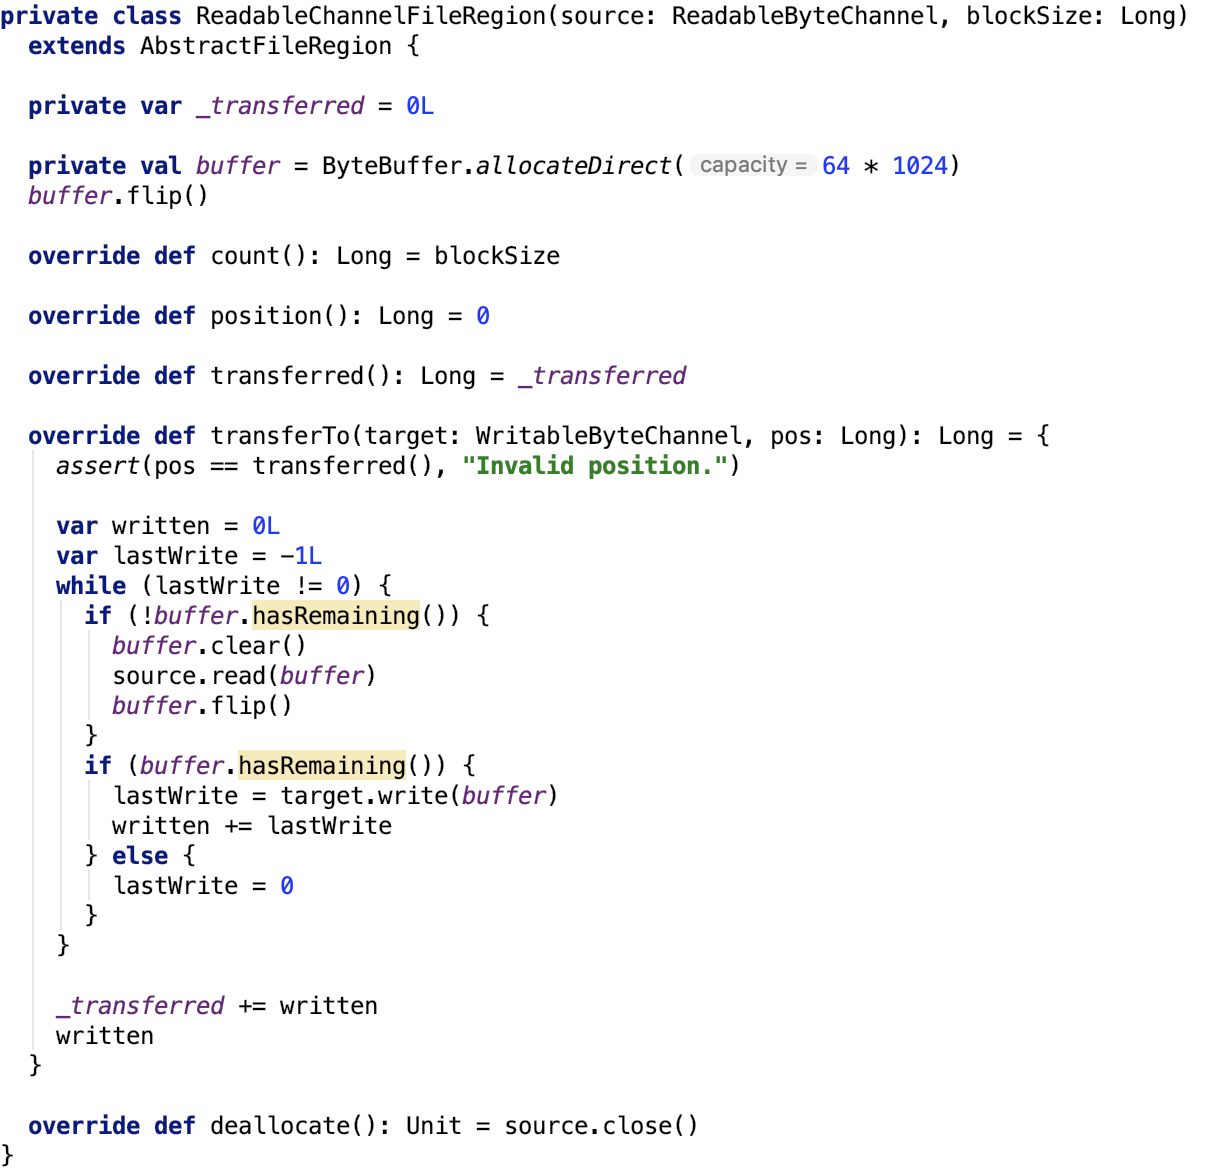
其内部的buffer 的大小时 64KB,_traferred 变量记录了已经传输的字节数量。ReadableByteChannel 是按顺序读的,所以pos参数没有用。
下面,重点对DiskStore做一下剖析。
16、DiskStore
它就是用来保存block 到磁盘的。
构造方法如下:

它有三个成员变量:

blockSizes 记录了每一个block 的blockId 和其大小的关系。可以通过get 方法获取指定blockId 的block大小。如下:

putBytes方法如下:

putBytes将数据写入到磁盘中;getBytes获取的是BlockData数据,注意现在只是返回文件的引用,文件的内容并没有返回,使得上文所讲的多种多样的BlockData转换操作直接对接FileChannel,即本地文件,可以充分发挥零拷贝等特性,数据传输效率会更高。
其中put 方法如下:

思路很简单,先根据diskManager获取到block在磁盘中的文件的抽象 -- File对象,然后获取到filechannel,调用回调函数将数据写入到本地block文件中,最后记录block和其block大小,最后关闭out channel。如果中途抛出异常,则格式化已写入的数据,确保数据的写入是原子化操作(要么全成功,要么全失败)。
put方法依赖的方法如下:
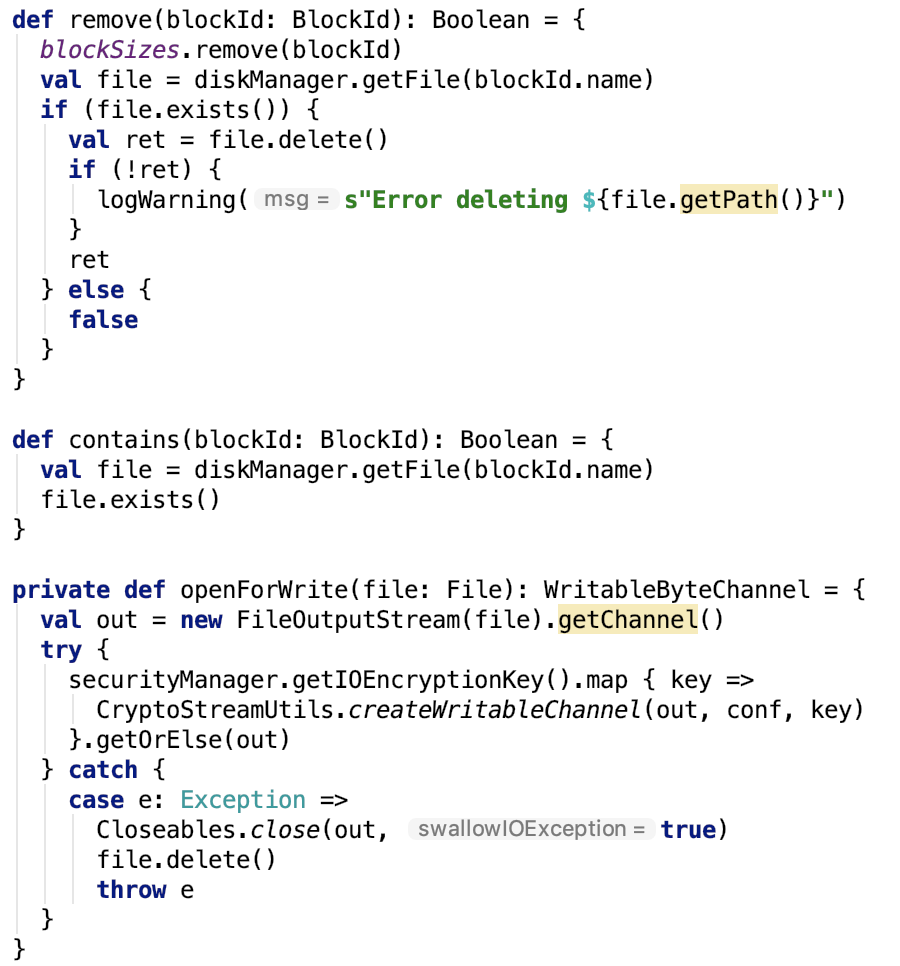
openForWrite方法,先获取filechannel,然后如果数据有加密,在创建加密的channel用来处理加密的数据
总结:本篇文章介绍了维护blockId和block物理文件的映射关系的DiskBlockManager;Hadoop yarn定位LOCAL_DIRS环境变量是如何定义的;定义了block的存储方式以及转换成流或channel或其他对象的BlockData接口以及它的三个具体的实现,顺便介绍了directByteBuffer内存清理机制--Cleaner以及相关类的解释;用作数据传输的DefaultFileRegion和ReadableChannelFileRegion类以及其相关类;最后介绍了磁盘存储里的重头戏--DiskStore,并重点介绍了其用于存储数据和删除数据的方法。
不足之处:本篇文章对磁盘IO中的nio以及netty中的相关类介绍的不是很详细,可以阅读相关文档做进一步理解。毕竟如何高效地和磁盘打交道也是比较重要的技能。后面有机会可能会对java的集合io多线程jdk部分的源码做一次彻底剖析,但那是后话了。目前打算先把spark中认为自己比较重要的梳理一遍。
六、spark存储体系剖析
1、总述
先看 BlockManager相关类之间的关系如下:

我们从NettyRpcEnv 开始,做一下简单说明。
SecurityManager 主要负责底层通信的安全认证。
BlockManagerMaster 主要负责在executor端和driver的通信,封装了 driver的RpcEndpointRef。
NettyBlockTransferService 使用netty来获取一组数据块。
MapOutputTracker 是一个跟踪 stage 的map 输出位置的类,driver 和 executor 有对应的实现,分别是 MapOutputTrackerMaster 和 MapOutputTrackerWorker。
ShuffleManager在SparkEnv中初始化,它在driver端和executor端都有,负责driver端生成shuffle以及executor的数据读写。
BlockManager 是Spark存储体系里面的核心类,它运行在每一个节点上(drievr或executor),提供写或读本地或远程的block到各种各样的存储介质中,包括磁盘、堆内内存、堆外内存。
下面我们剖析一下之前没有剖析过,图中有的类:
2、SecurityManager
1、概述
Spark class responsible for security. In general this class should be instantiated by the SparkEnv and most components should access it from that. There are some cases where the SparkEnv hasn't been initialized yet and this class must be instantiated directly. This class implements all of the configuration related to security features described in the "Security" document. Please refer to that document for specific features implemented here.
这个类主要就是负责Spark的安全的。它是由SparkEnv初始化的。
2、类结构
其结构如下:
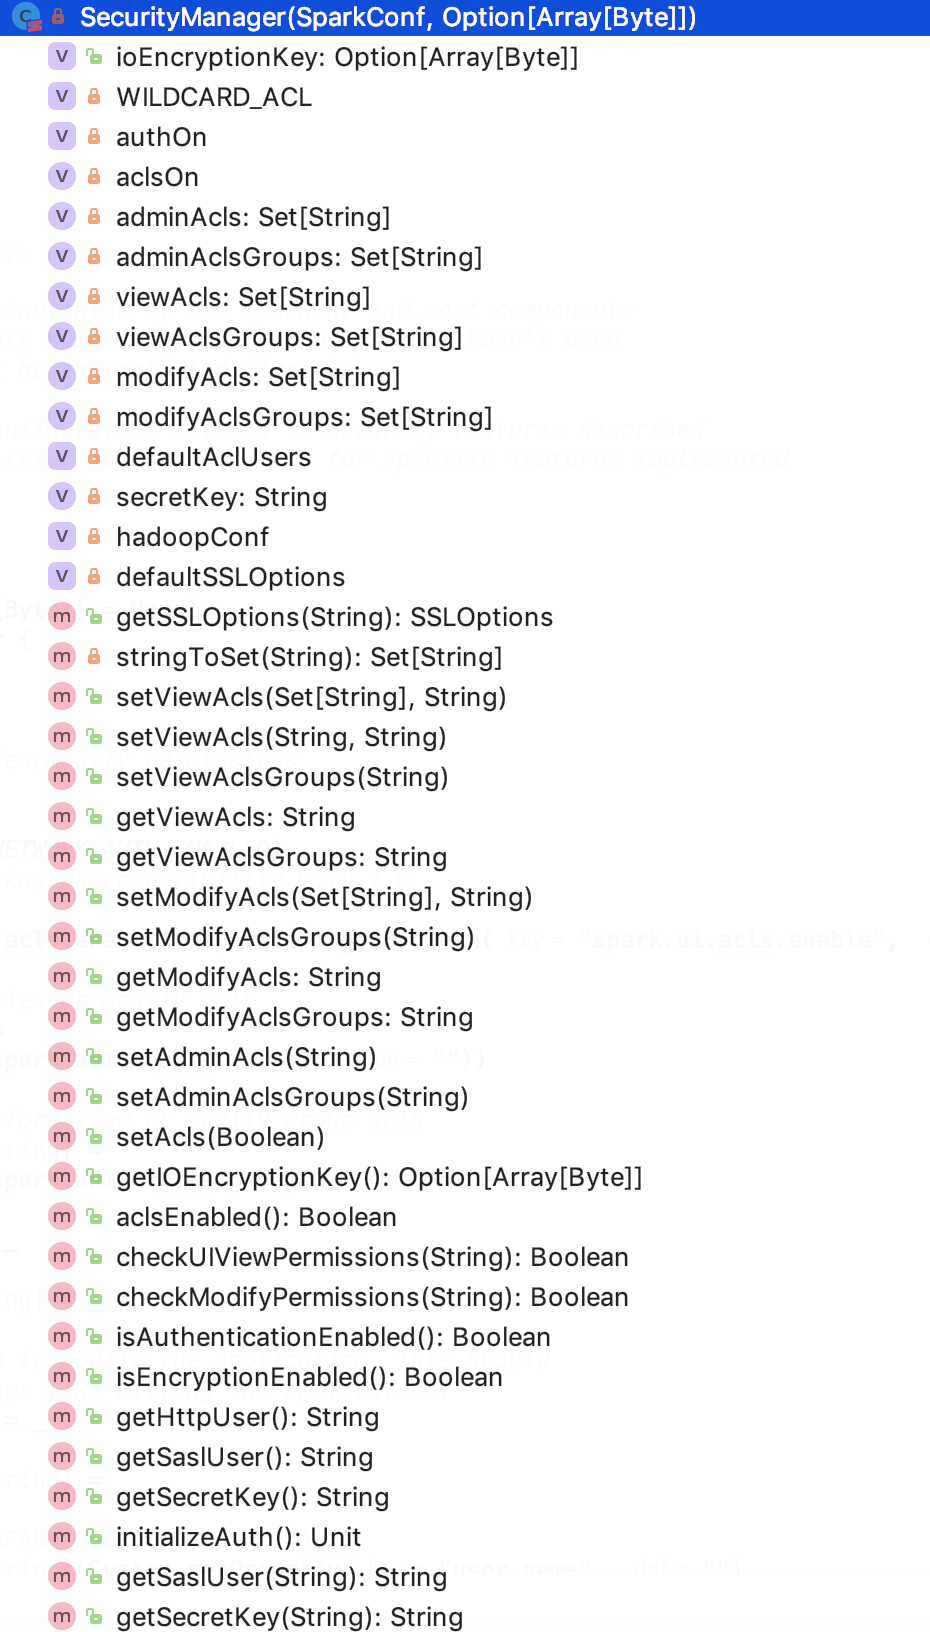
3、成员变量
WILDCARD_ACL:常量为*,表示允许所有的组或用户拥有查看或修改的权限。
authOn:表示网络传输是否启用安全,由参数 spark.authenticate控制,默认为 false。
aclsOn:表示,由参数 spark.acls.enable 或 spark.ui.acls.enable 控制,默认为 false。
adminAcls:管理员权限,由 spark.admin.acls 参数控制,默认为空字符串。
adminAclsGroups:管理员所在组权限,由 spark.admin.acls.groups 参数控制,默认为空字符串。
viewAcls:查看控制访问列表用户。
viewAclsGroups:查看控制访问列表用户组。
modifyAcls:修改控制访问列表用户。
modifyAclsGroups:修改控制访问列表用户组。
defaultAclUsers:默认控制访问列表用户。由user.name 参数和 SPARK_USER环境变量一起设置。
secretKey:安全密钥。
hadoopConf:hadoop的配置对象。
defaultSSLOptions:默认安全选项,如下:

其中SSLOption的parse 方法如下,主要用于一些安全配置的加载:
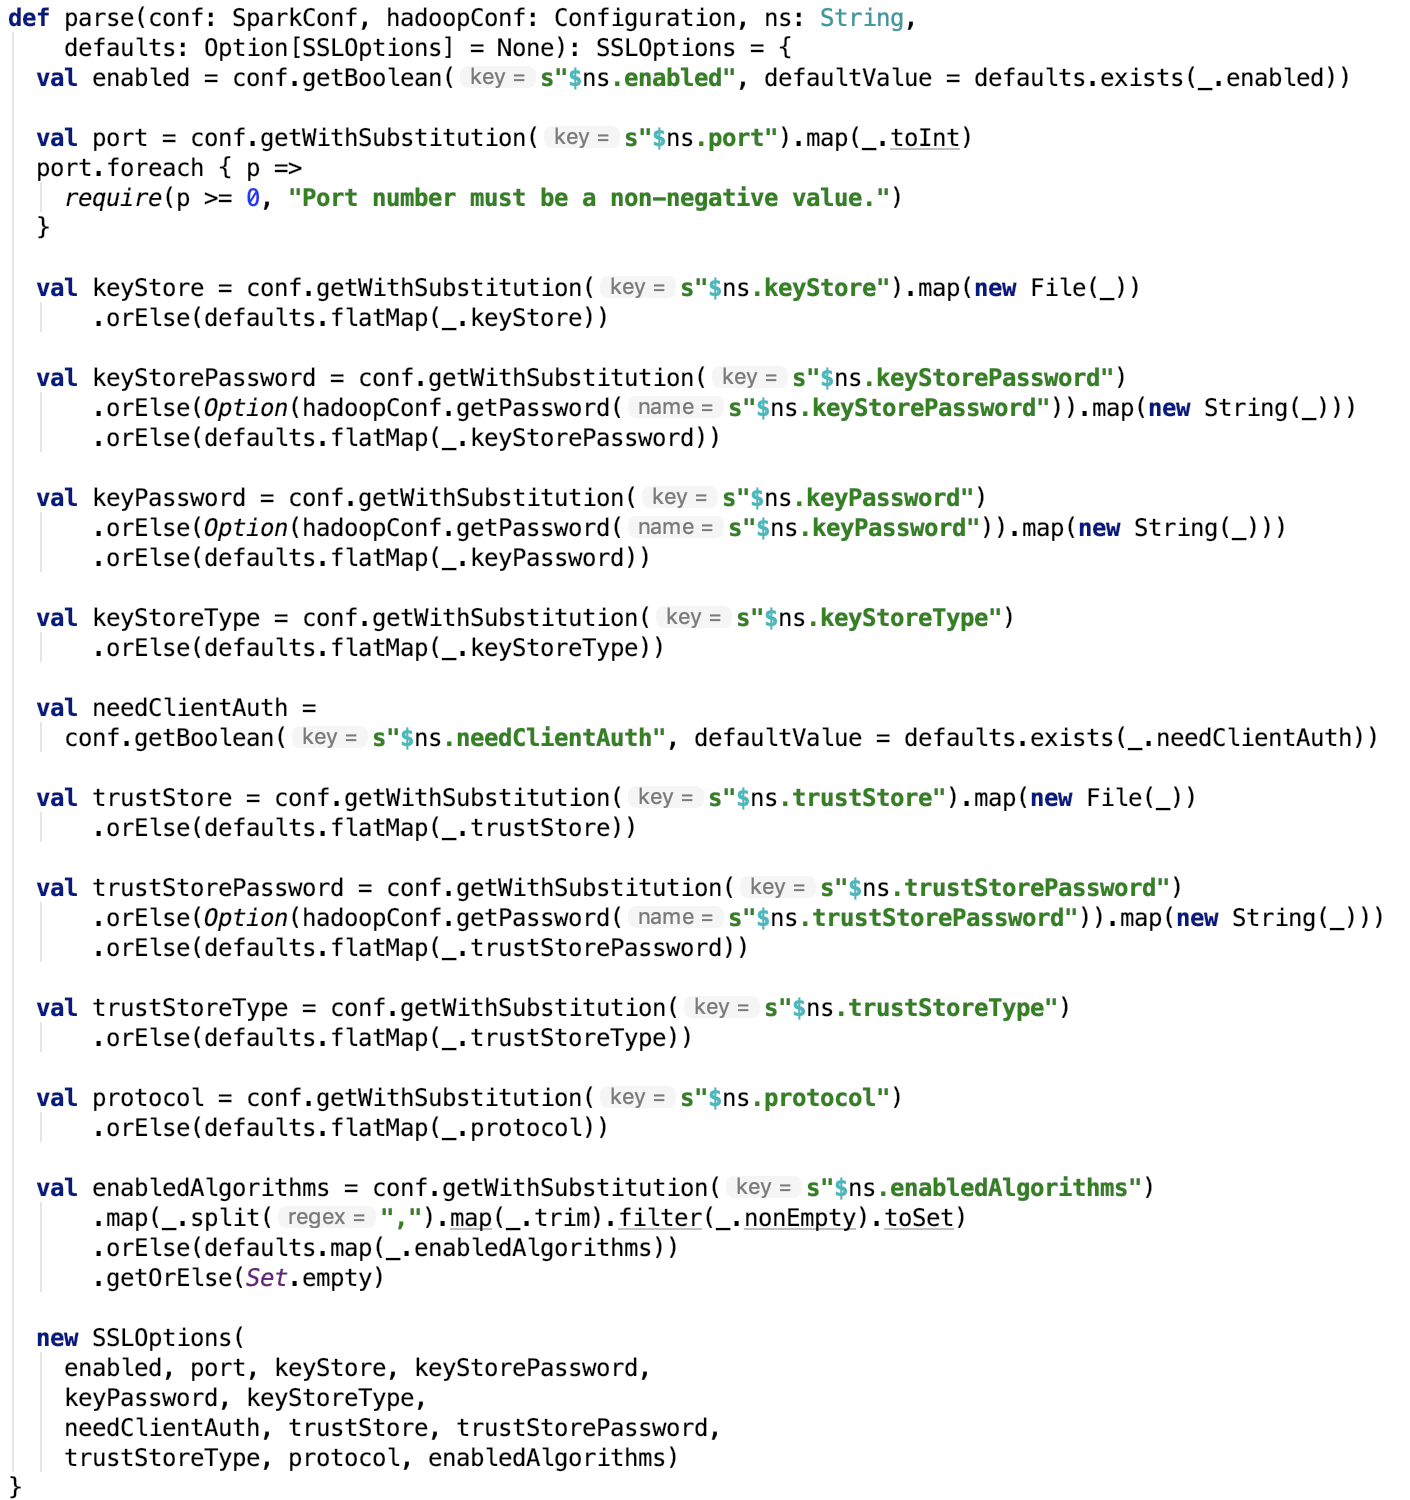
defaultSSLOptions跟getSSLOptions方法搭配使用:

4、核心方法
-
设置获取 adminAcls、viewAclsGroups、modifyAcls、modifyAclsGroups变量的方法,比较简单,不再说明。
-
检查UI查看的权限以及修改权限:

-
获取安全密钥:

-
获取安全用户:
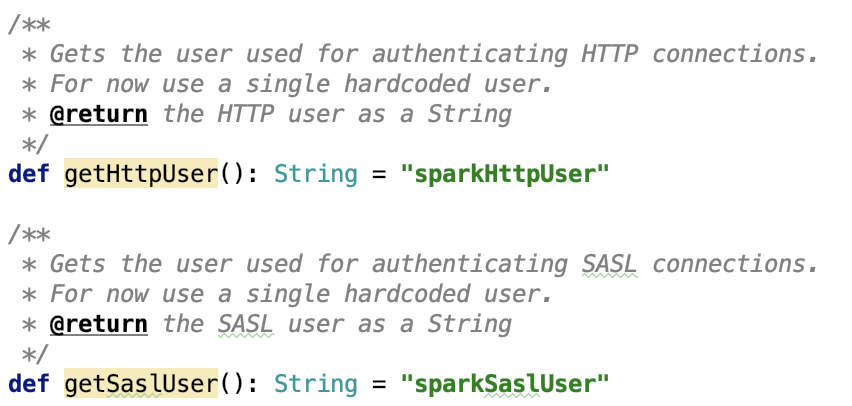
-
初始化安全:
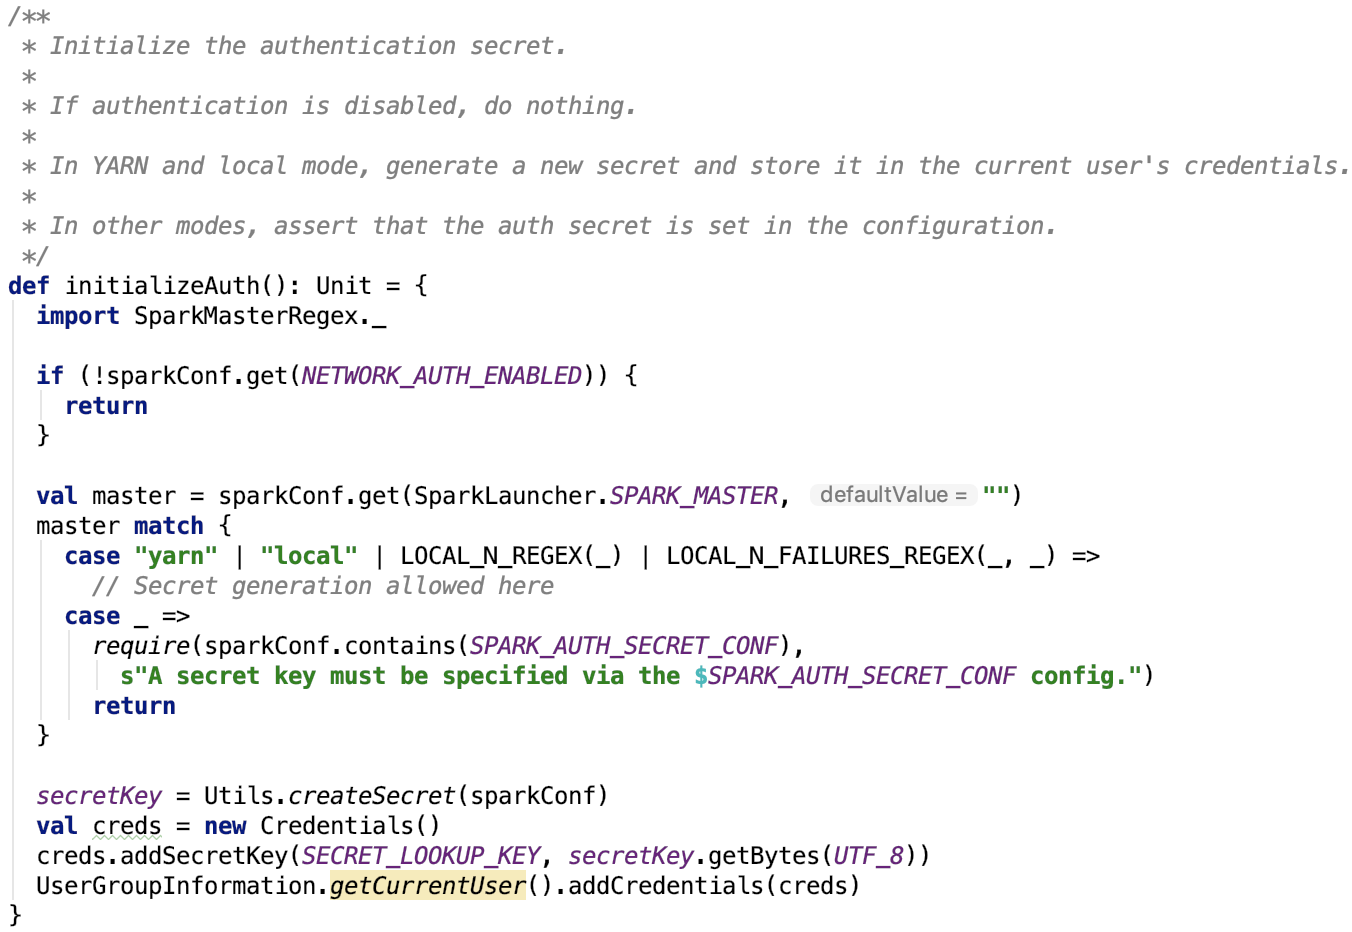
5、总结
这个类主要是用于Spark安全的,主要包含了权限的设置和获取的方法,密钥的获取、安全用户的获取、权限验证等功能。
下面来看一下BlockManagerMaster类。
3、BlockManagerMaster
1、概述和类结构
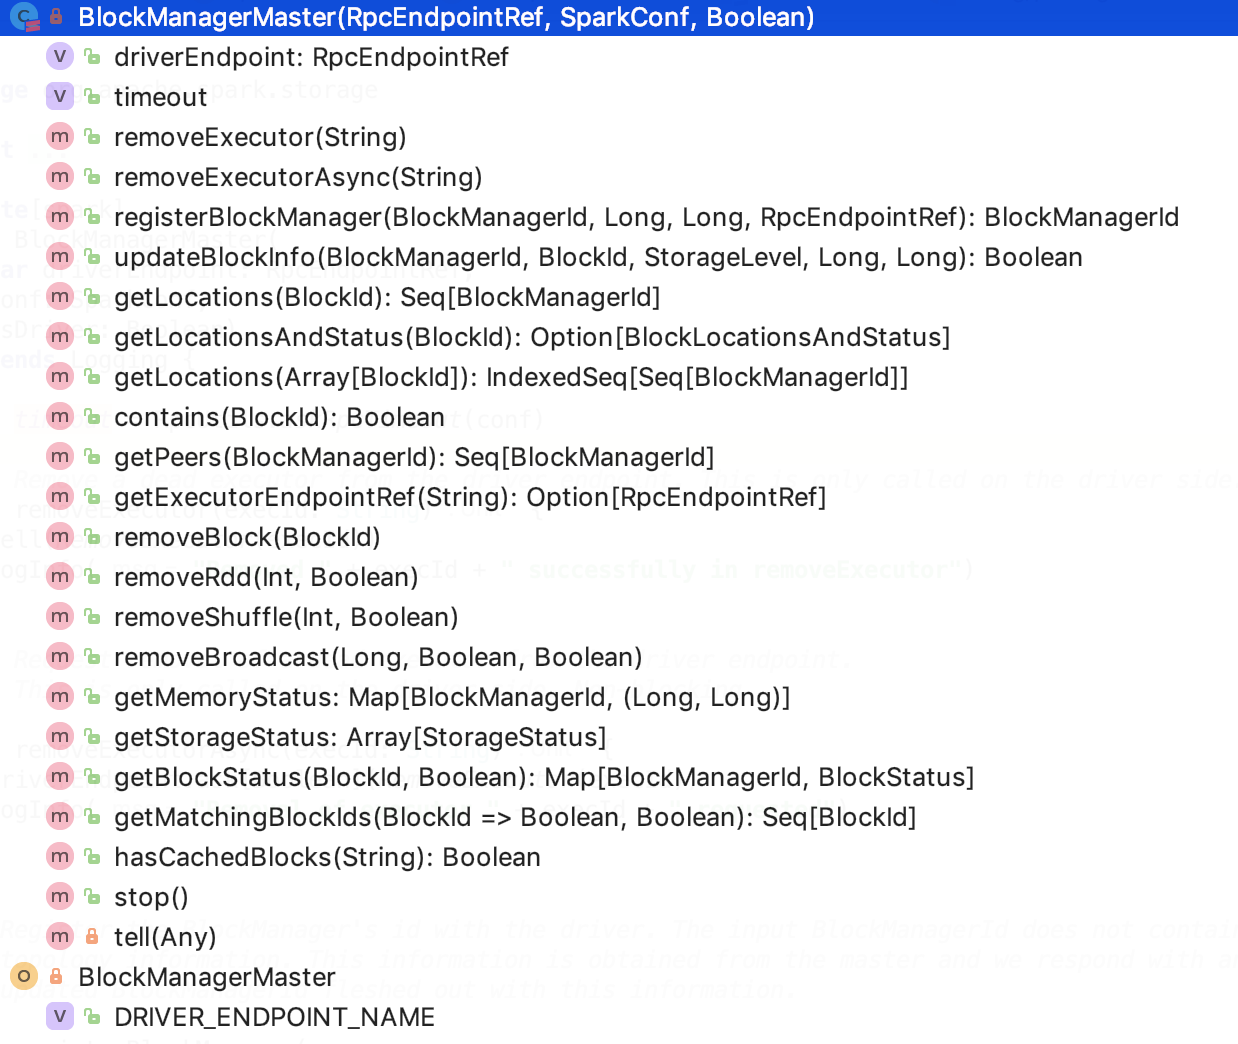
主要是一些通过driver获取的节点或block、或BlockManager信息的功能函数。
2、成员变量
driverEndpoint是一个EndpointRef 对象,可以指本地的driver 的endpoint 或者是远程的 endpoint引用,通过它既可以和本地的driver进行通信,也可以和远程的driver endpoint 进行通信。
timeout 是指的 Spark RPC 超时时间,默认为 120s,可以通过spark.rpc.askTimeout 或 spark.network.timeout 参数来设置。
核心方法:
-
移除executor,有同步和异步两种方案,这两个方法只会在driver端使用。如下:

-
向driver注册blockmanager
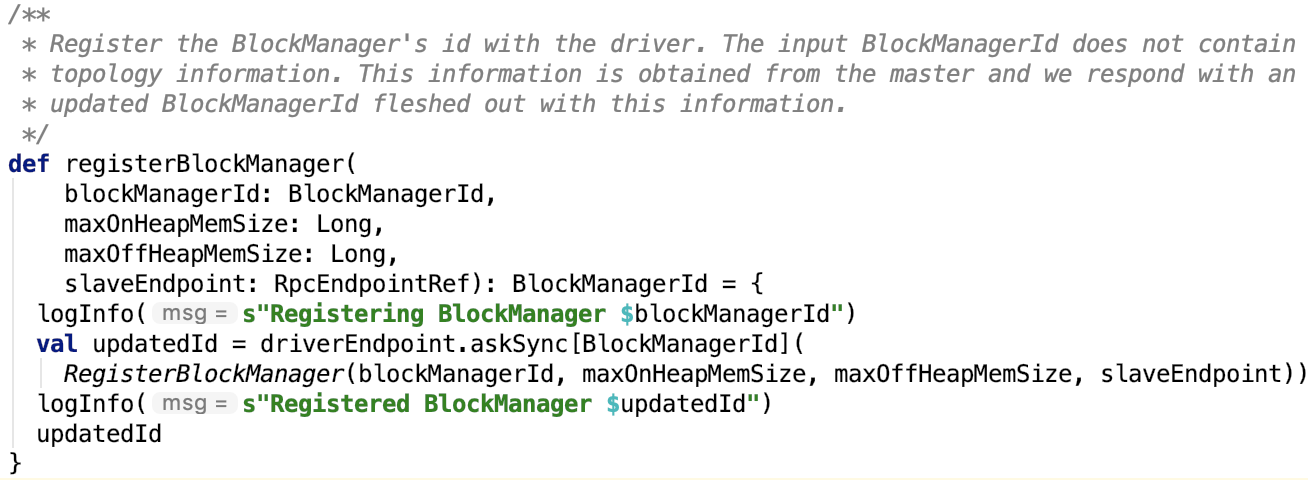
-
更新block信息

-
向driver请求获取block对应的 location信息
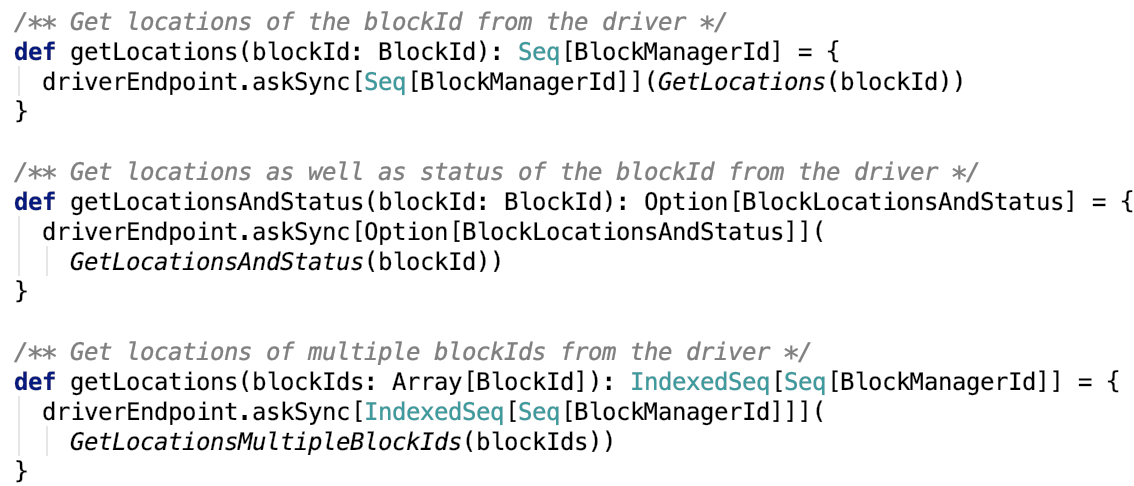
-
向driver 请求获得集群中所有的 blockManager的信息

-
向driver 请求executor endpoint ref 对象

-
移除block、RDD、shuffle、broadcast
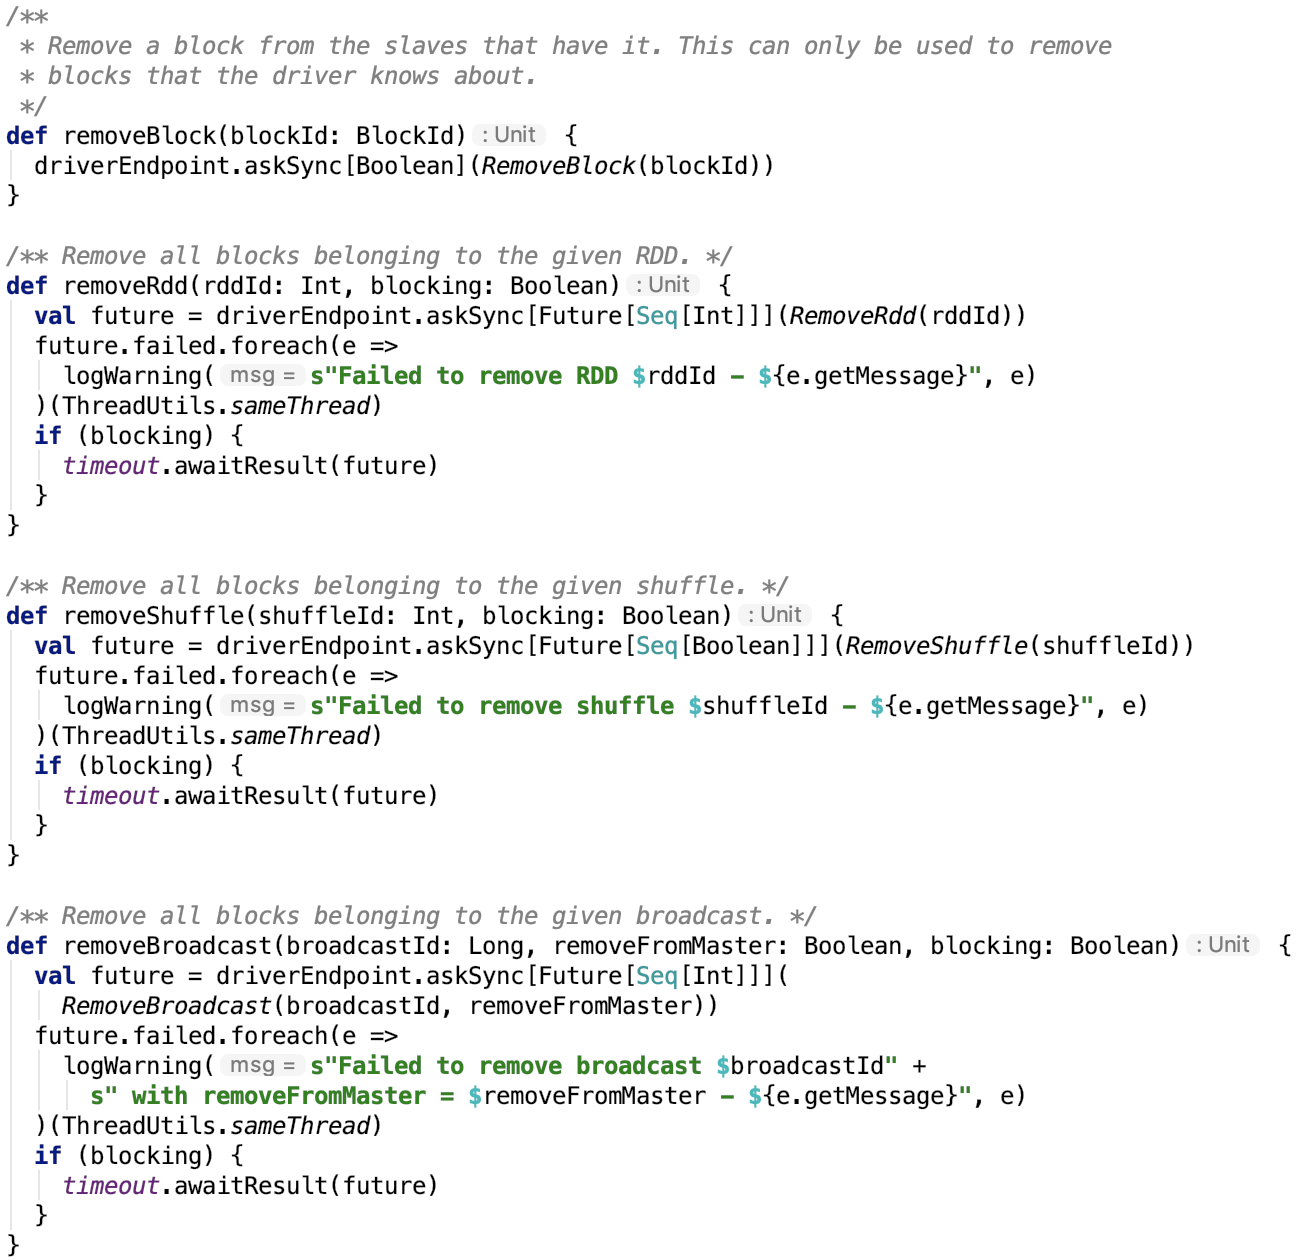
-
向driver 请求获取每一个BlockManager内存状态

-
向driver请求获取磁盘状态

-
向driver请求获取block状态

-
是否有匹配的block
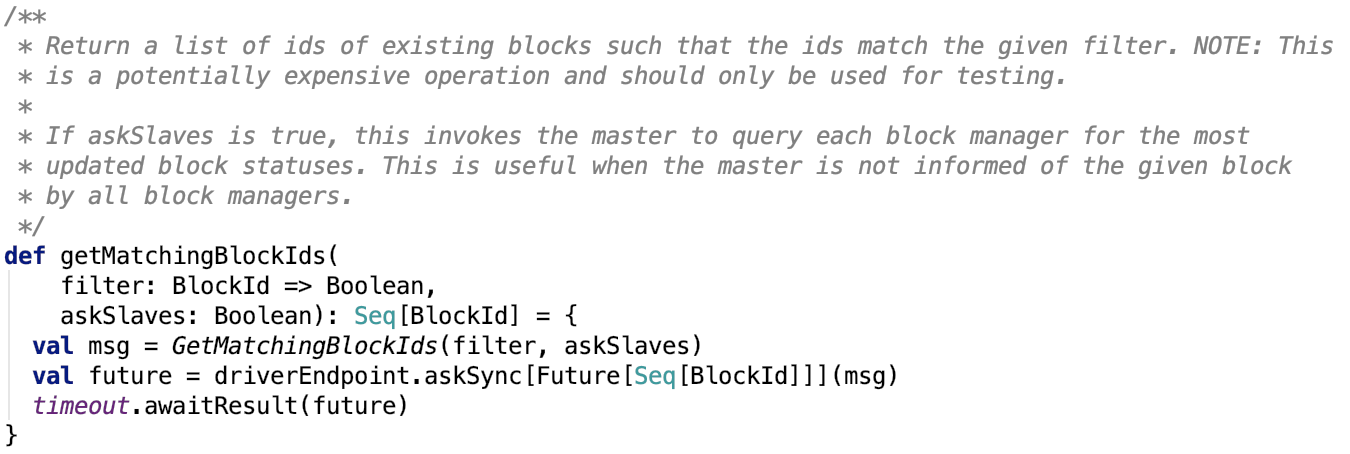
10.检查是否缓存了block

其依赖方法tell 方法如下:

总结
BlockManagerMaster 主要负责和driver的交互,来获取跟底层存储相关的信息。
4、ShuffleClient
1、类说明

2、核心方法
-
init方法用于初始化ShuffleClient,需要指定executor 的appId
-
fetchBlocks 用于异步从另一个节点请求获取blocks,参数解释如下:
host – the host of the remote node. port – the port of the remote node. execId – the executor id. blockIds – block ids to fetch. listener – the listener to receive block fetching status. downloadFileManager – DownloadFileManager to create and clean temp files. If it's not null, the remote blocks will be streamed into temp shuffle files to reduce the memory usage, otherwise, they will be kept in memory.
-
shuffleMetrics 用于记录shuffle相关的metrics信息
5、BlockTransferService
1、类说明

2、核心方法
init 方法,它额外提供了使用BlockDataManager初始化的方法,方便从本地获取block或者将block存入本地。
close:关闭ShuffleClient
port:服务正在监听的端口
hostname:服务正在监听的hostname
fetchBlocks 跟继承类一样,没有实现,由于继承关系可以不写。
uploadBlocks:上传block到远程节点,返回一个future对象
fetchBlockSync:同步抓取远程节点的block,直到block数据获取成功才返回,如下:

它定义了block 抓取后,对返回结果处理的基本框架。
uploadBlockSync 方法:同步上传信息,直到上传成功才结束。如下:
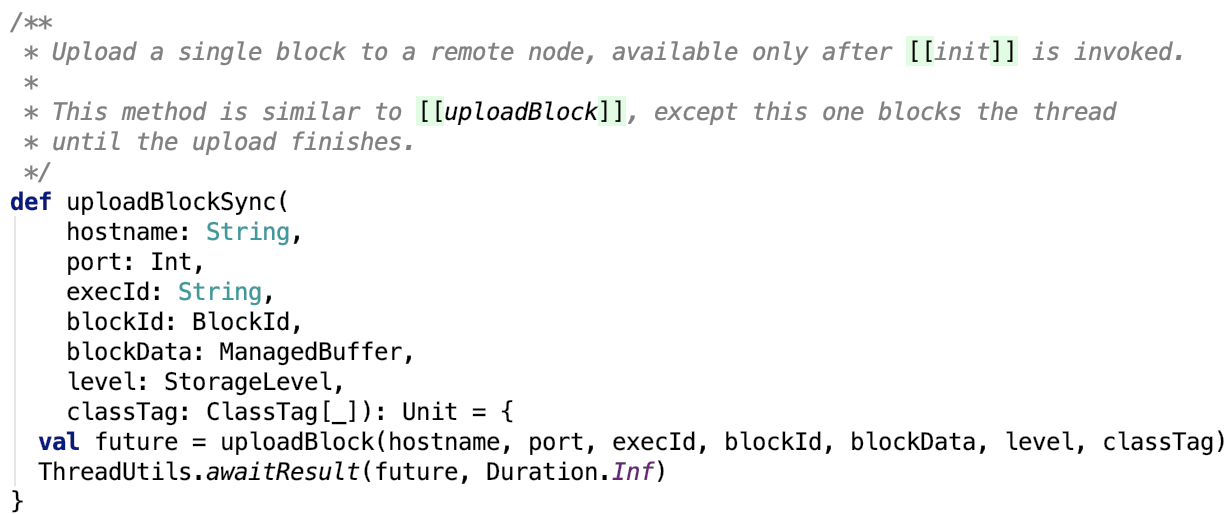
3、ManagedBuffer的三个子类
下面看一下ManagedBuffler的三个子类:FileSegmentManagedBuffer、EncryptedManagedBuffer、NioManagedBuffer
FileSegmentManagedBuffer:由文件中的段支持的ManagedBuffer。
EncryptedManagedBuffer:由加密文件中的段支持的ManagedBuffer。
NioManagedBuffer:由ByteBuffer支持的ManagedBuffer。
6、NettyBlockTransferService
类说明:
它是BlockTransferService,使用netty来一次性获取shuffle的block数据。
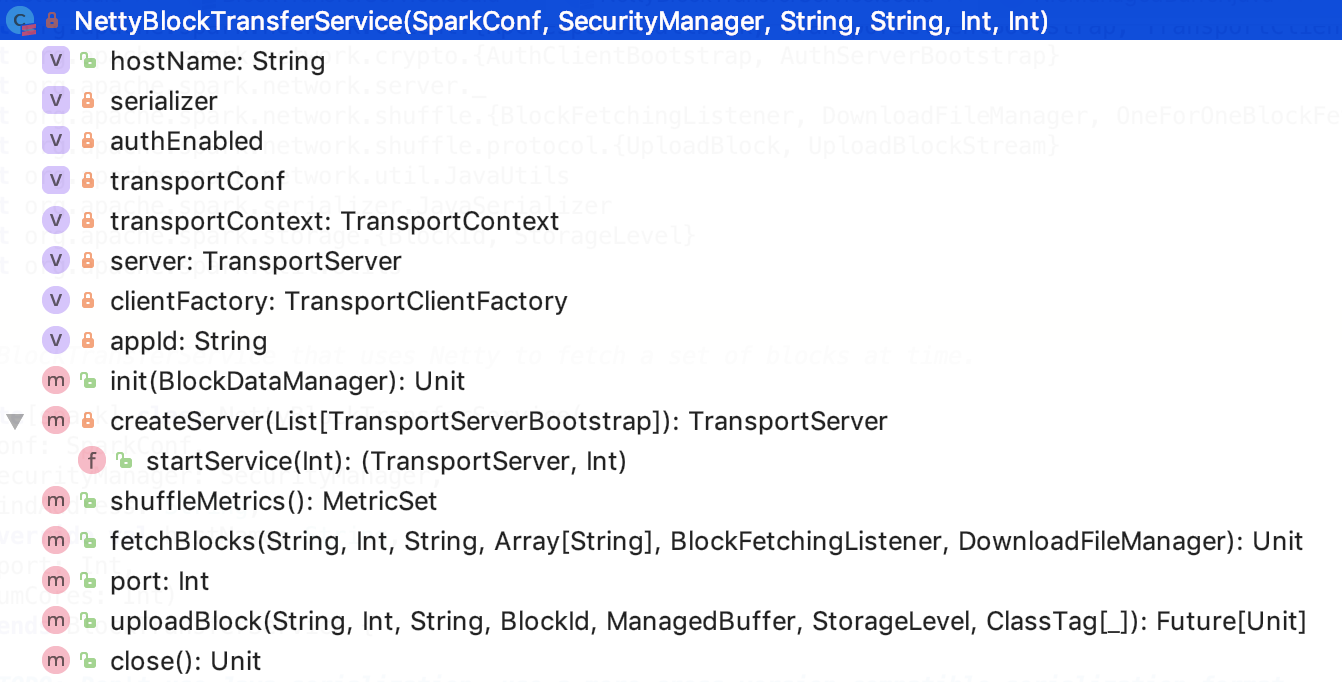
1、成员变量
hostname:TransportServer 监听的hostname
serializer:JavaSerializer 实例,用于序列化反序列化java对象。
authEnabled:是否启用安全
transportConf:TransportConf 对象,主要是用于初始化shuffle的线程数等配置。,spark.shuffle.io.serverThreads 和 spark.shuffle.io.clientThreads,默认是线程数在 [1,8] 个,这跟可用core的数量和指定core数量有关。 这两个参数决定了底层netty server端和client 端的线程数。
transportContext:TransportContext 用于创建TransportServer和TransportClient的上下文。
server:TransportServer对象,是Netty的server端线程。
clientFactory:TransportClientFactory 用于创建TransportClient
appId:application id,由 spark.app.id 参数指定
核心方法
-
init 方法主要用于初始化底层netty的server和client,如下:
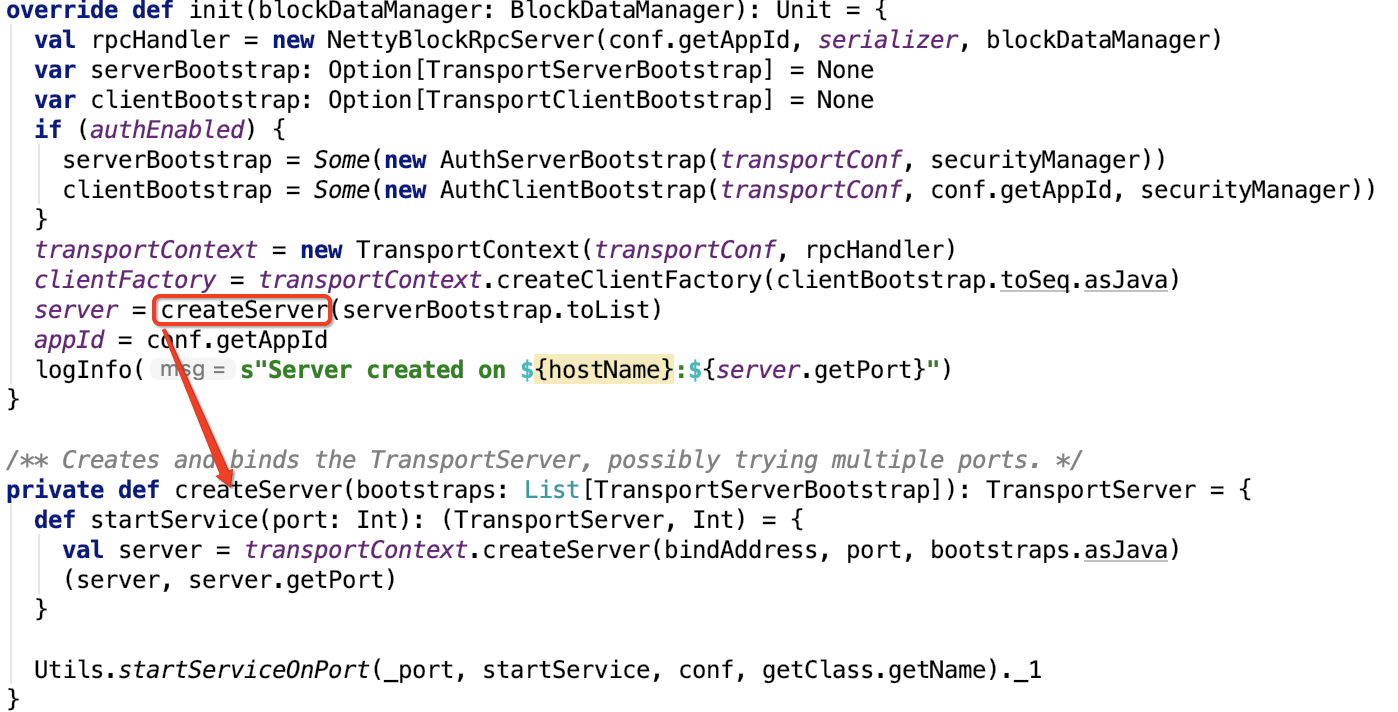
-
关闭ShuffleClient:

-
上传数据:

config.MAX_REMOTE_BLOCK_SIZE_FETCH_TO_MEM 是由spark.maxRemoteBlockSizeFetchToMem参数决定的,默认是 整数最大值 - 512.
所以整数范围内的block数据,是由 netty RPC来处理的,128MB显然是在整数范围内的,所以hdfs上的block 数据spark都是通过netty rpc来通信传输的。
-
从远程节点获取block数据,源码如下:
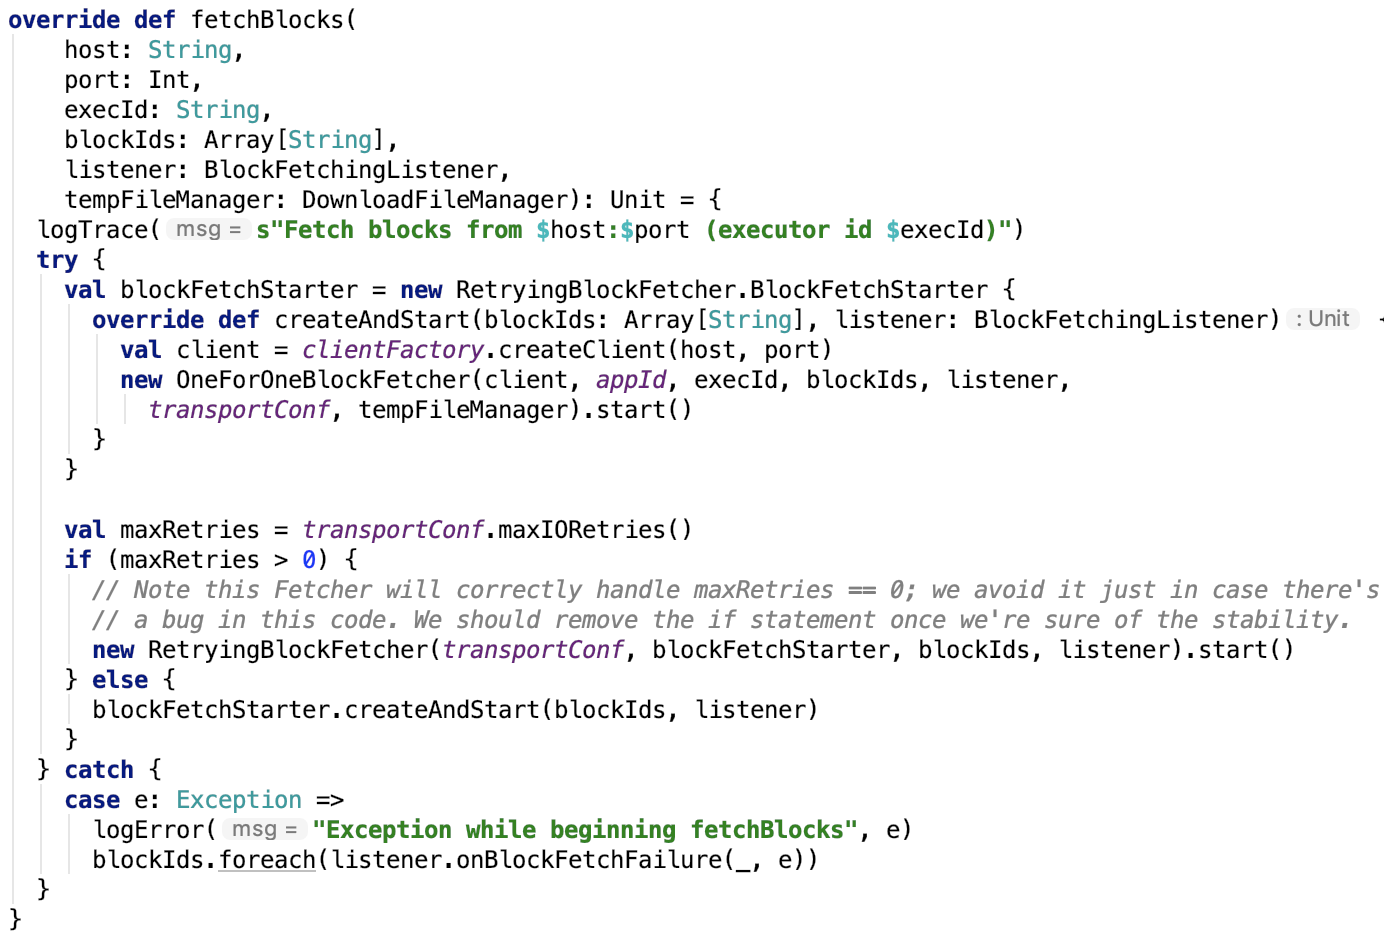
首先数据抓取是可以支持重试的,重试次数默认是3次,可以由参数 spark.shuffle.io.maxRetries 指定,实际上是由OneForOneBlockFetcher来远程抓取数据的。
2、重试抓取远程block机制的设计
当重试次数不大于0时,直接使用的是BlockFetchStarter来生成 OneForOneBlockFetcher 抓取数据。
当次数大于0 时,则使用 RetryingBlockFetcher 来重试式抓取数据。
先来看一下其成员变量:
executorService: 用于等待执行重试任务的共享线程池
fetchStarter:初始化 OneForOneBlockFetcher 对象
listener:监听抓取block成功或失败的listener
maxRetries;最大重试次数。
retryWaitTime:下一次重试间隔时间。可以通过 spark.shuffle.io.retryWait参数设置,默认是 5s。
retryCount:已重试次数。
outstandingBlocksIds:剩余需要抓取的blockId集合。
currentListener:它只监听当前fetcher的返回。
核心方法:
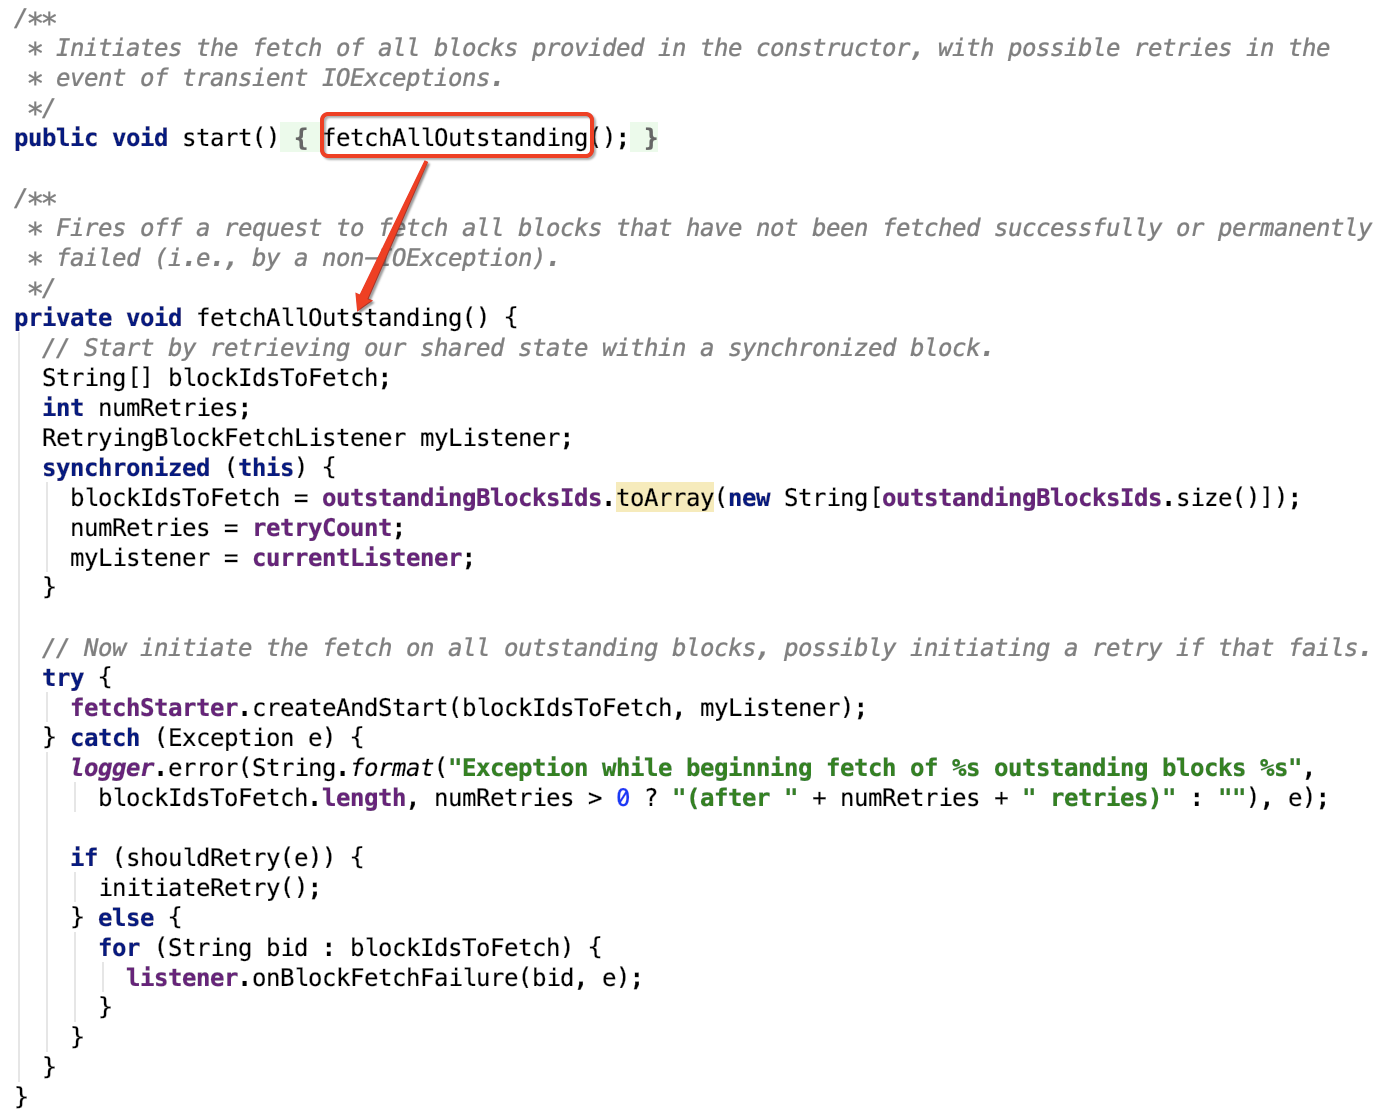
思路:首先,初始化需要抓取的blockId列表,已重试次数,以及currentListener。然后去调用fetcherStarter开始抓取任务,每一个block抓取成功后,都会调用currentListener对应成功方法,失败则会调用 currentListener 失败方法。在fetch过程中数据有异常出现,则先判断是否需要重试,若需重试,则初始化重试,将wait和fetch任务放到共享线程池中去执行。
下面看一下,相关方法和类:
-
RetryingBlockFetchListener 类。它有两个方法,一个是抓取成功的回调,一个是抓取失败的回调。
在抓取成功回调中,会先判断当前的currentListener是否是它本身,并且返回的blockId在需要抓取的blockId列表中,若两个条件都满足,则会从需要抓取的blockId列表中把该blockId移除并且去调用listener相对应的抓取成功方法。
在抓取失败回调中,会先判断当前的currentListener是否是它本身,并且返回的blockId在需要抓取的blockId列表中,若两个条件都满足,再判断是否需要重试,如需重试则重置重试机制,否则直接调用listener的抓取失败方法。
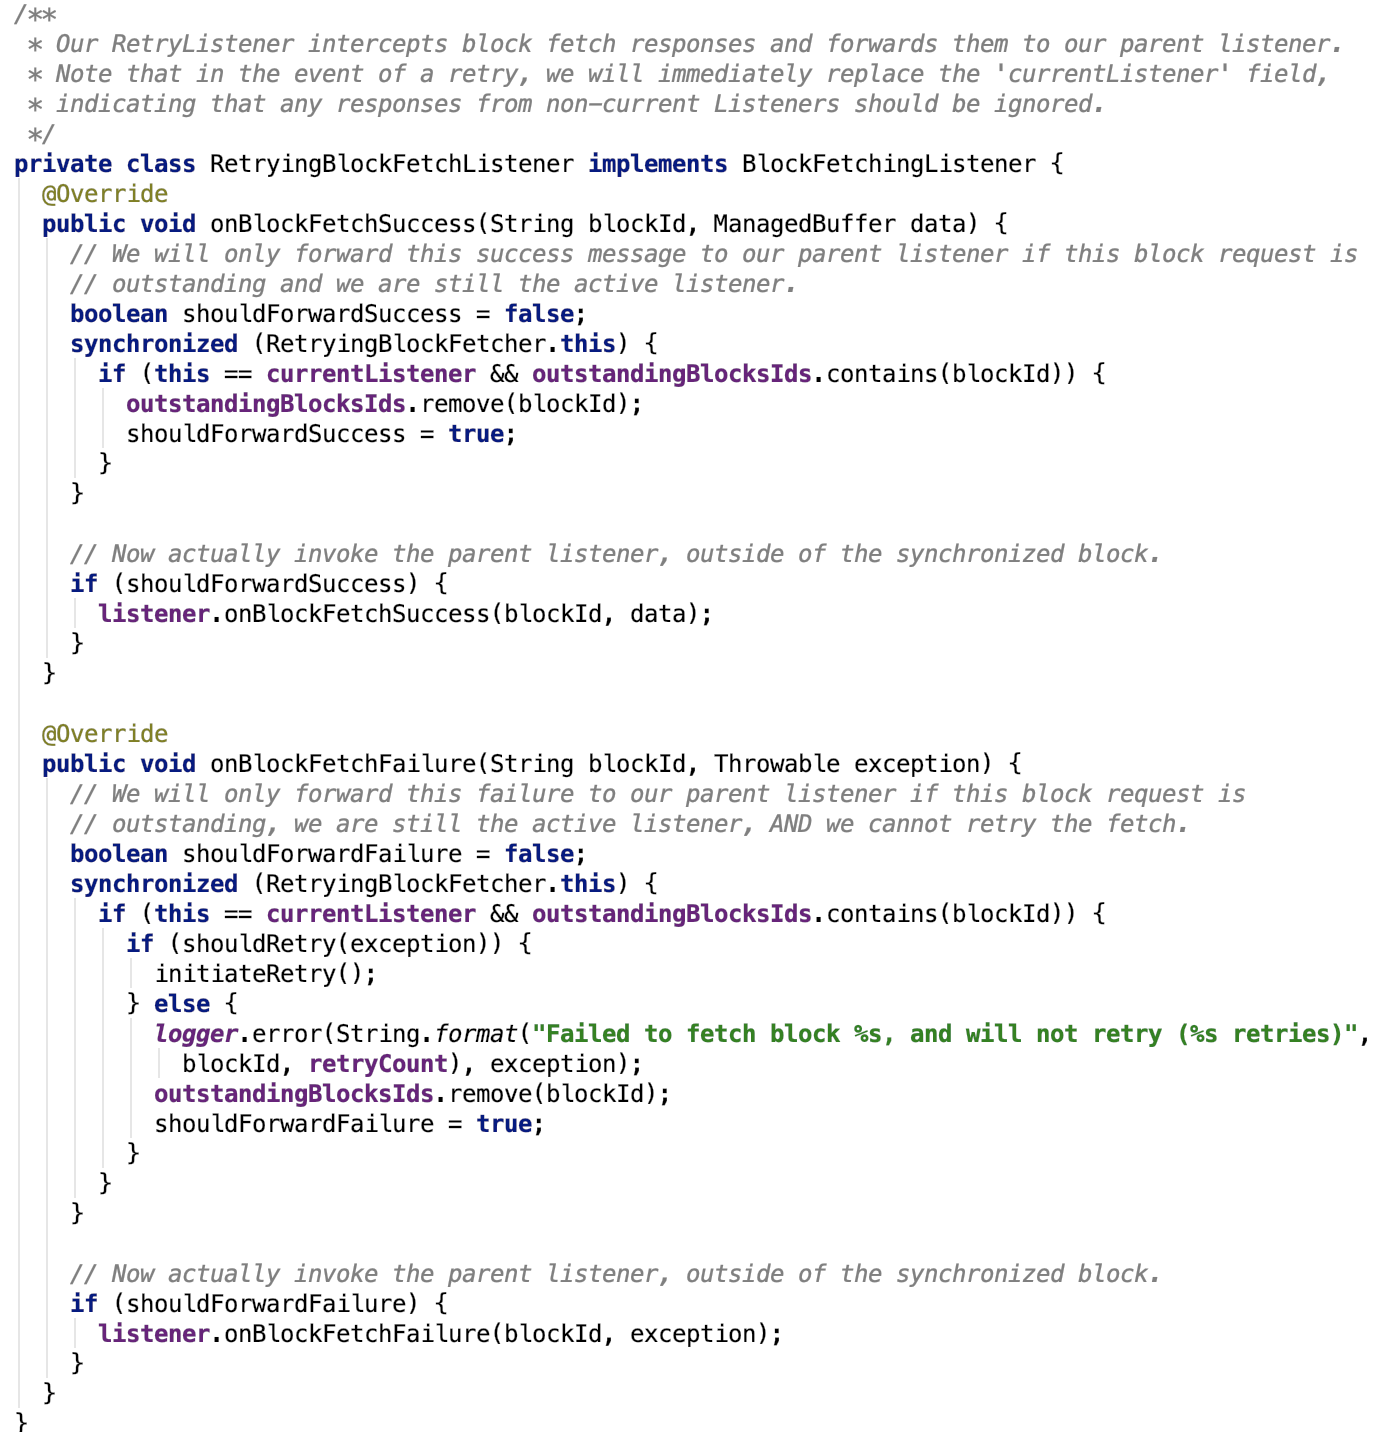
-
是否需要重试:
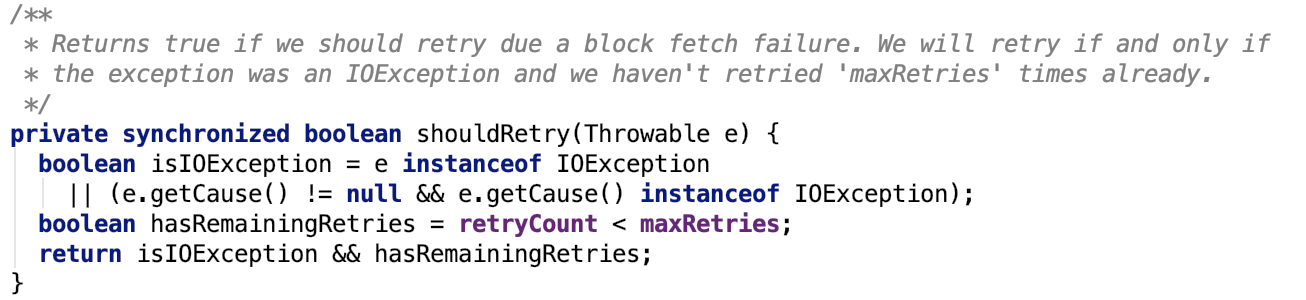
思路:如果是IO 异常并且还有剩余重试次数,则重试。
-
初始化重试:
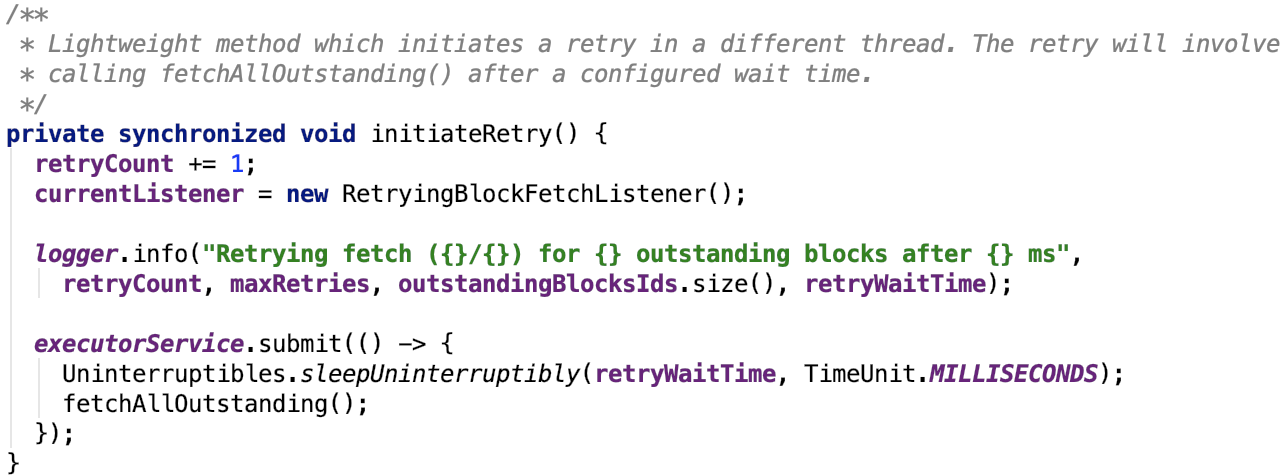
总结:该重试的blockFetcher 引入了中间层,即自定义的RetryingBlockFetchListener 监听器,来完成重试或事件的传播机制(即调用原来的监听器的抓取失败成功对应方法)以及需要抓取的blockId列表的更新,重试次数的更新等操作。
7、MapOutputTracker
1、类说明
其类结构如下:

2、成员变量
trackerEndpoint:它是一个EndpointRef对象,是driver端 MapOutputTrackerMasterEndpoint 的在executor的代理对象。
epoch:The driver-side counter is incremented every time that a map output is lost. This value is sent to executors as part of tasks, where executors compare the new epoch number to the highest epoch number that they received in the past. If the new epoch number is higher then executors will clear their local caches of map output statuses and will re-fetch (possibly updated) statuses from the driver.
eposhLock: 一个锁对象
3、核心方法
-
向driver端trackerEndpoint 发送消息

-
excutor 获取每一个shuffle中task 需要读取的范围的 block信息,partition范围包头不包尾。
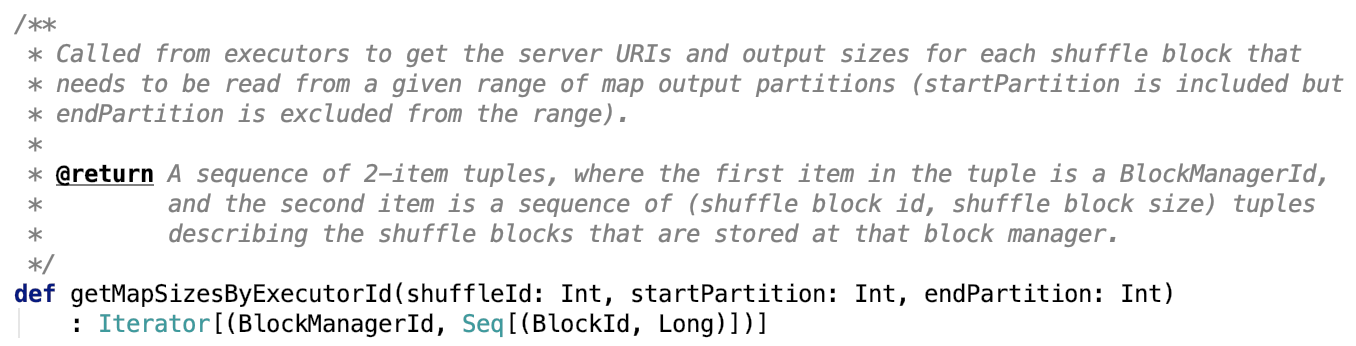
-
删除指定的shuffle的状态信息

-
停止服务

其子类MapOutputTrackerMaster 和 MapOutputTrackerWorker在后续shuffle 剖许再作进一步说明。
8、ShuffleManager
1、类说明
类结构

-
registerShuffle:Register a shuffle with the manager and obtain a handle for it to pass to tasks.
-
getWriter:Get a writer for a given partition. Called on executors by map tasks.
-
getReader:Get a reader for a range of reduce partitions (startPartition to endPartition-1, inclusive). Called on executors by reduce tasks.
-
unregisterShuffle:Remove a shuffle's metadata from the ShuffleManager.
-
shuffleBlockResolver:Return a resolver capable of retrieving shuffle block data based on block coordinates.
-
stop:Shut down this ShuffleManager.
其有唯一子类 SortShuffleManager,我们在剖析spark shuffle 过程时,再做进一步说明。
下面,我们来看Spark存储体系里面的重头戏 -- BlockManager
9、BlockManager
1、类说明
它运行在每一个节点上(drievr或executor),提供写或读本地或远程的block到各种各样的存储介质中,包括磁盘、堆内内存、堆外内存。
2、构造方法

其中涉及的变量,之前基本上都已作说明,不再说明。
这个类结构非常庞大,不再展示类结构图。下面分别对其成员变量和比较重要的方法做一下说明。
3、成员变量

externalShuffleServiceEnabled: 是否启用外部shuffle 服务,通过spark.shuffle.service.enabled 参数配置,默认是false
remoteReadNioBufferConversion:是否 xxxxx, 通过 spark.network.remoteReadNioBufferConversion 参数配置,默认是 false
diskBlockManager:DiskBlockManager对象,用于管理block和物理block文件的映射关系的
blockInfoManager:BlockInfoManager对象,Block读写锁
futureExecutionContext:ExecutionContextExecutorService 内部封装了一个线程池,线程前缀为 block-manager-future,最大线程数是 128
memoryStore:MemoryStore 对象,用于内存存储。
diskStore:DiskStore对象,用于磁盘存储。
maxOnHeapMemory:最大堆内内存
maxOffHeapMemory:最大堆外内存
externalShuffleServicePort: 外部shuffle 服务端口,通过 spark.shuffle.service.port 参数设置,默认为 7337
blockManagerId:BlockManagerId 对象是blockManager的唯一标识
shuffleServerId:BlockManagerId 对象,提供shuffle服务的BlockManager的唯一标识
shuffleClient:如果启用了外部存储,即externalShuffleServiceEnabled为true,使用ExternalShuffleClient,否则使用通过构造参数传过来的 blockTransferService 对象。
maxFailuresBeforeLocationRefresh:下次从driver刷新block location时需要重试的最大次数。通过spark.block.failures.beforeLocationRefresh 参数来设置,默认时 5
slaveEndpoint:BlockManagerSlaveEndpoint的ref对象,负责监听处理master的请求。
asyncReregisterTask:异步注册任务
asyncReregisterLock:锁对象
cachedPeers:Spark集群中所有的BlockManager
peerFetchLock:锁对象,用于获取spark 集群中所有的blockManager时用
lastPeerFetchTime:最近获取spark 集群中所有blockManager的时间
blockReplicationPolicy:BlockReplicationPolicy 对象,它有两个子类 BasicBlockReplicationPolicy 和 RandomBlockReplicationPolicy。
remoteBlockTempFileManager:RemoteBlockDownloadFileManager 对象
maxRemoteBlockToMem:通过 spark.maxRemoteBlockSizeFetchToMem 参数控制,默认为整数最大值 - 512
4、核心方法[简版]
注:未做过多的分析,大部分内容在之前内存存储和磁盘存储中都已涉及。
-
初始化方法
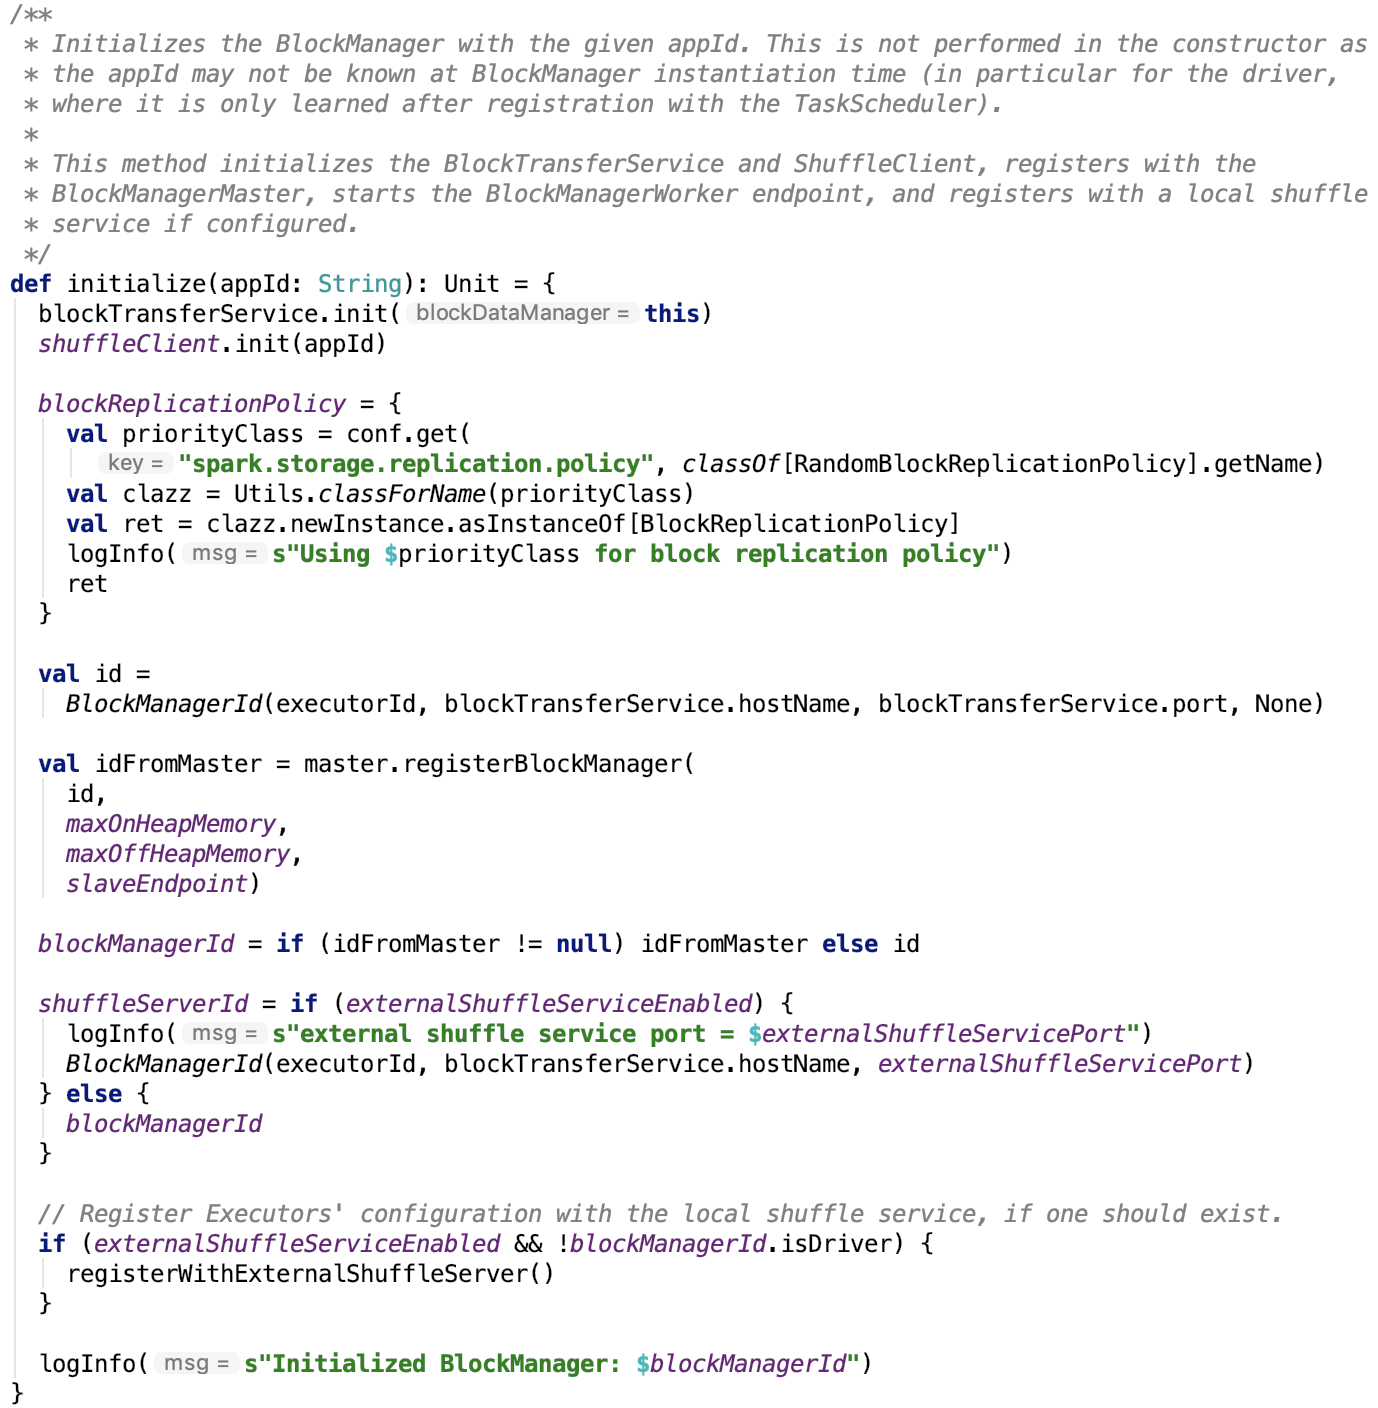
思路:初始化 blockReplicationPolicy, 可以通过参数 spark.storage.replication.policy 来指定,默认为 RandomBlockReplicationPolicy;初始化BlockManagerId并想driver注册该BlockManager;初始化shuffleServerId
-
重新想driver注册blockManager方法:

思路: 通过 BlockManagerMaster 想driver 注册 BlockManager
-
获取block数据,如下:
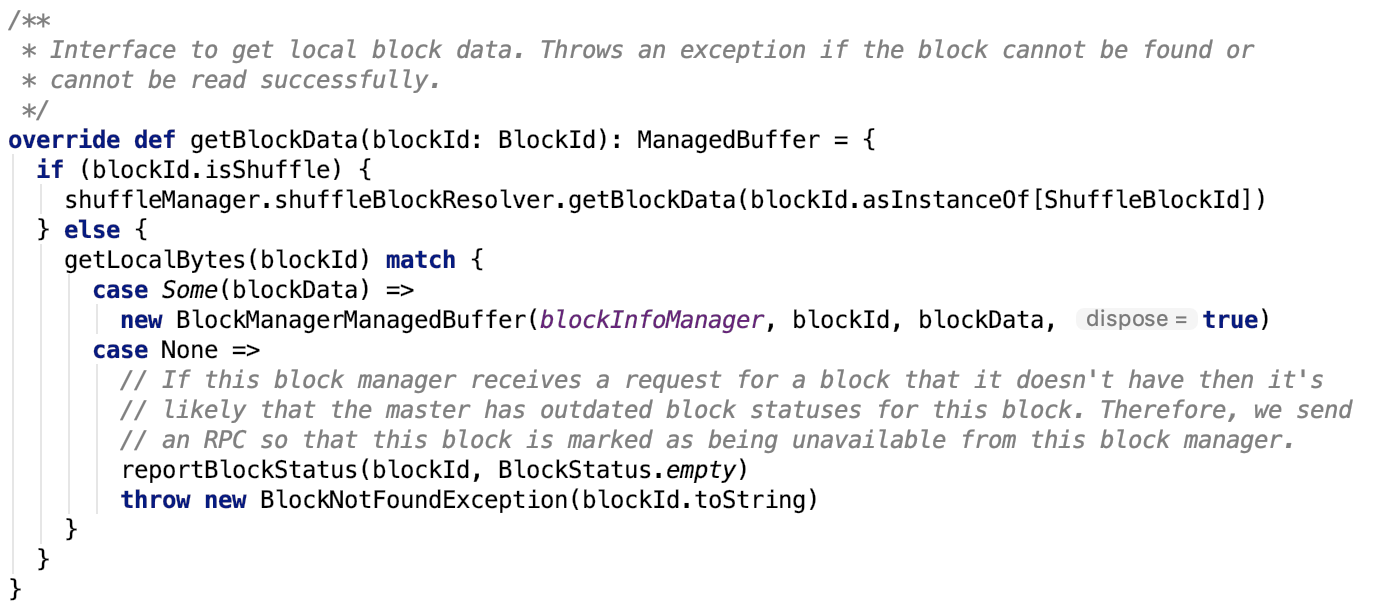
其依赖方法 getLocalBytes 如下,思路:如果是shuffle的数据,则通过shuffleBlockResolver获取block信息,否则使用BlockInfoManager加读锁后,获取数据。
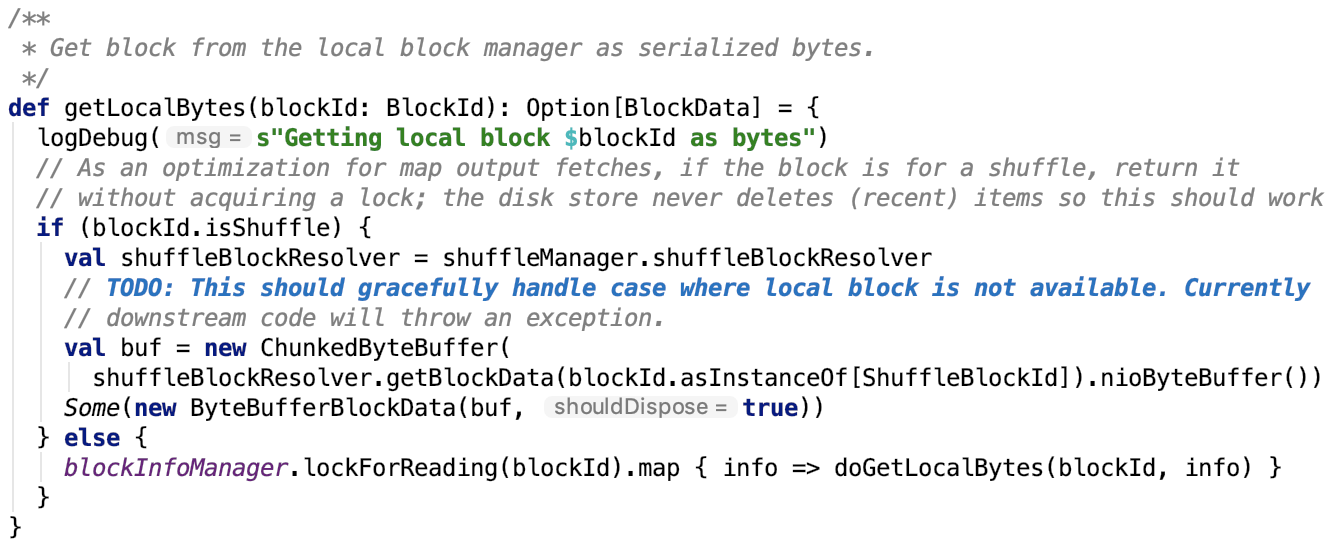
doGetLocalBytes 方法如下,思路:按照是否需要反序列化、是否保存在磁盘中,做相应处理,操作直接依赖与MemoryStore和DiskStore。
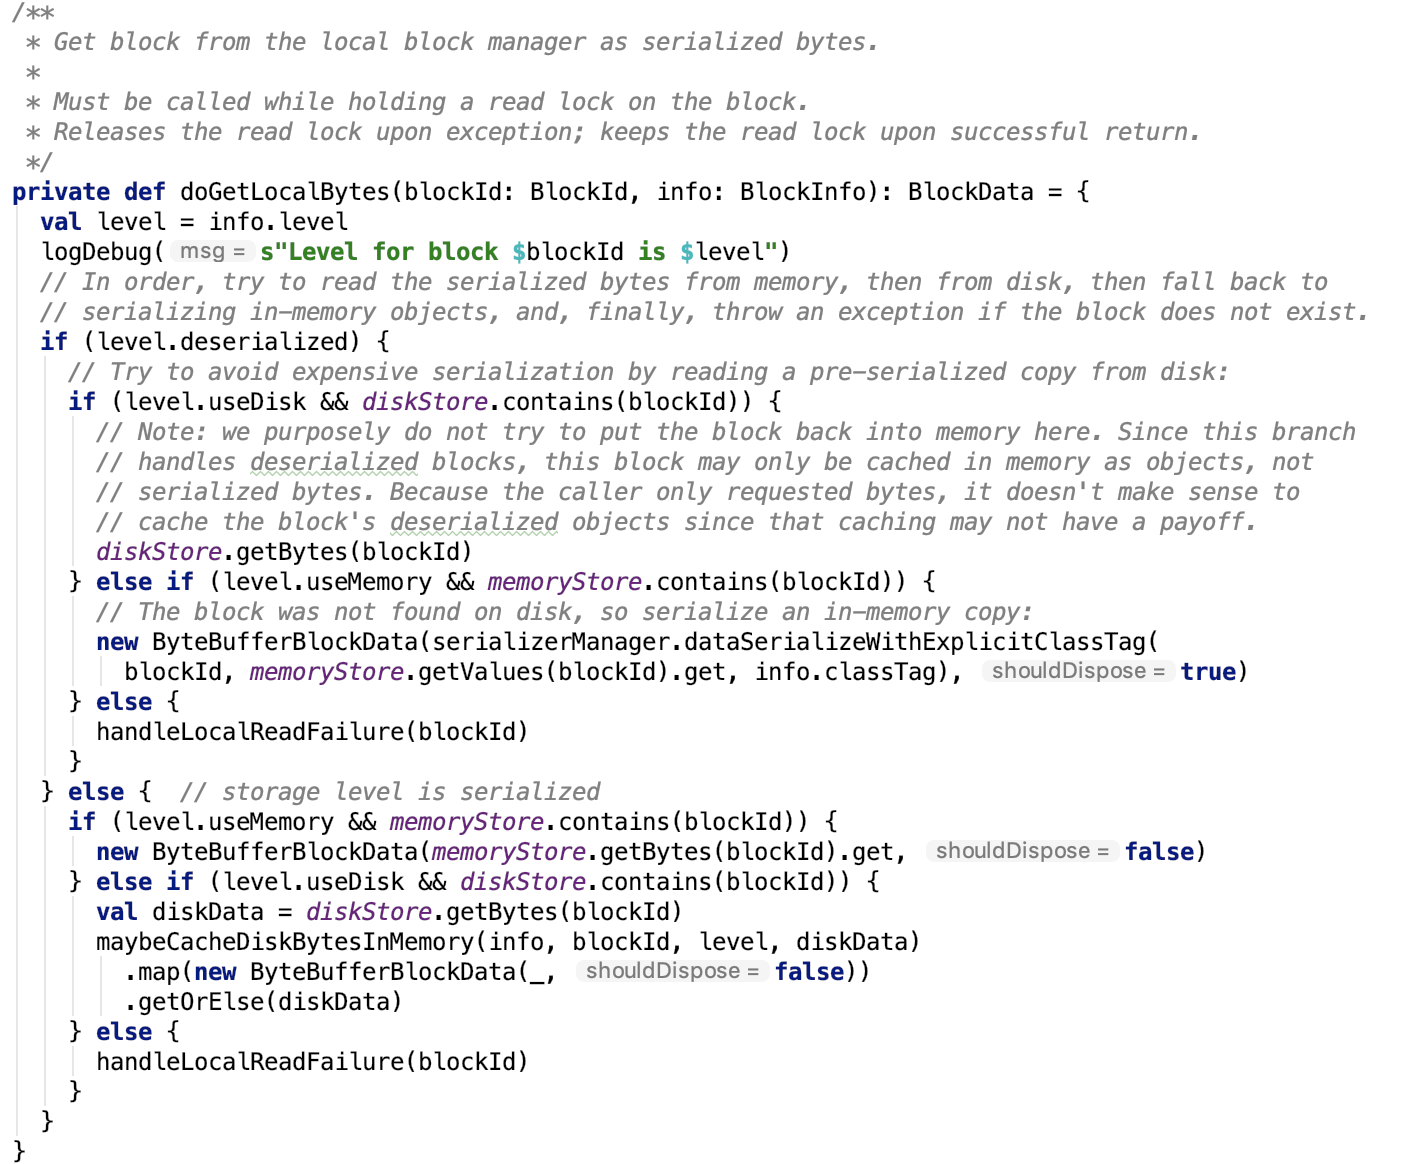
-
存储block数据,直接调用putBytes 方法:
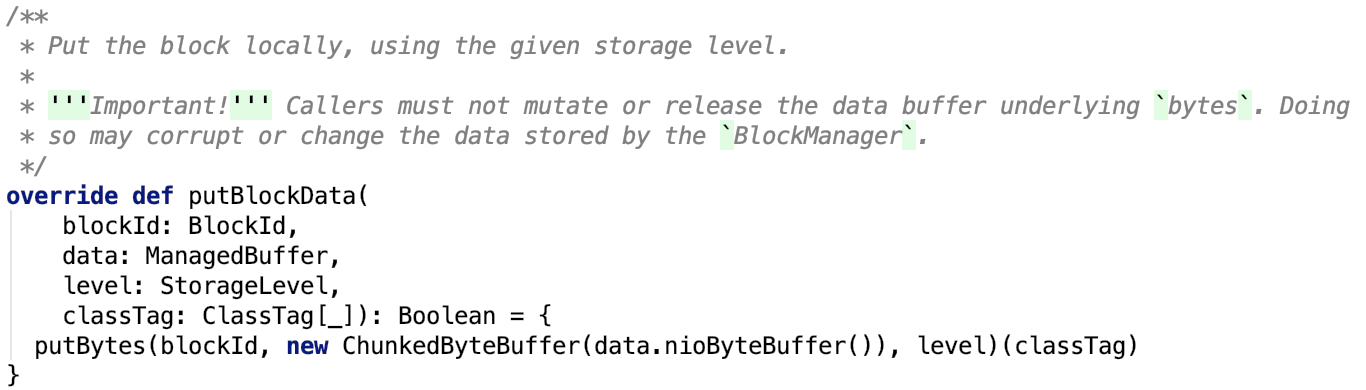
其依赖方法如下,直接调用doPutBytes 方法:
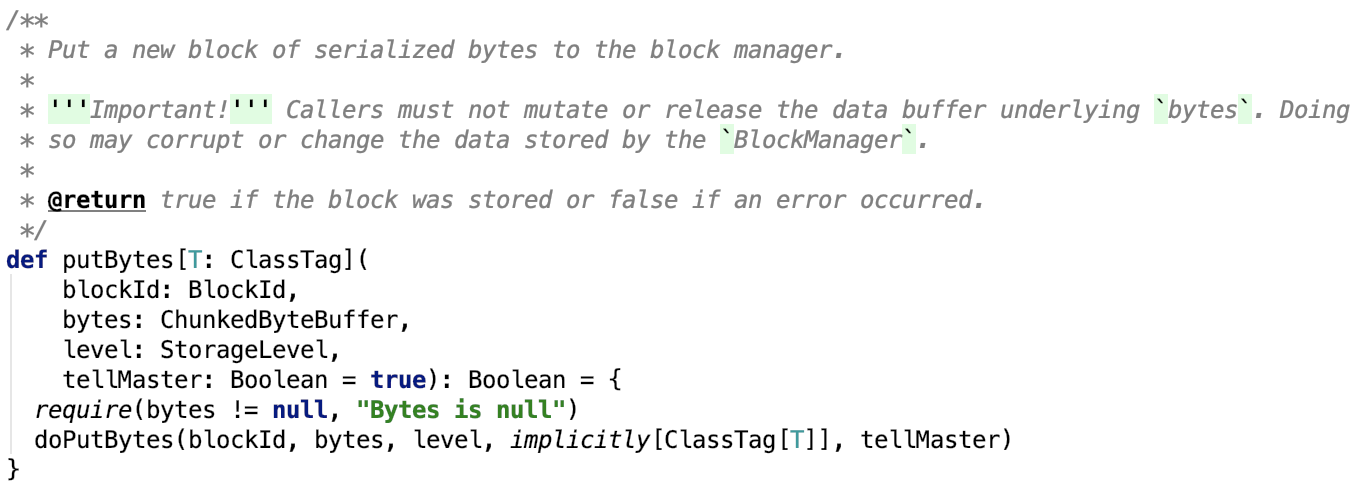
doPutBytes 方法如下:
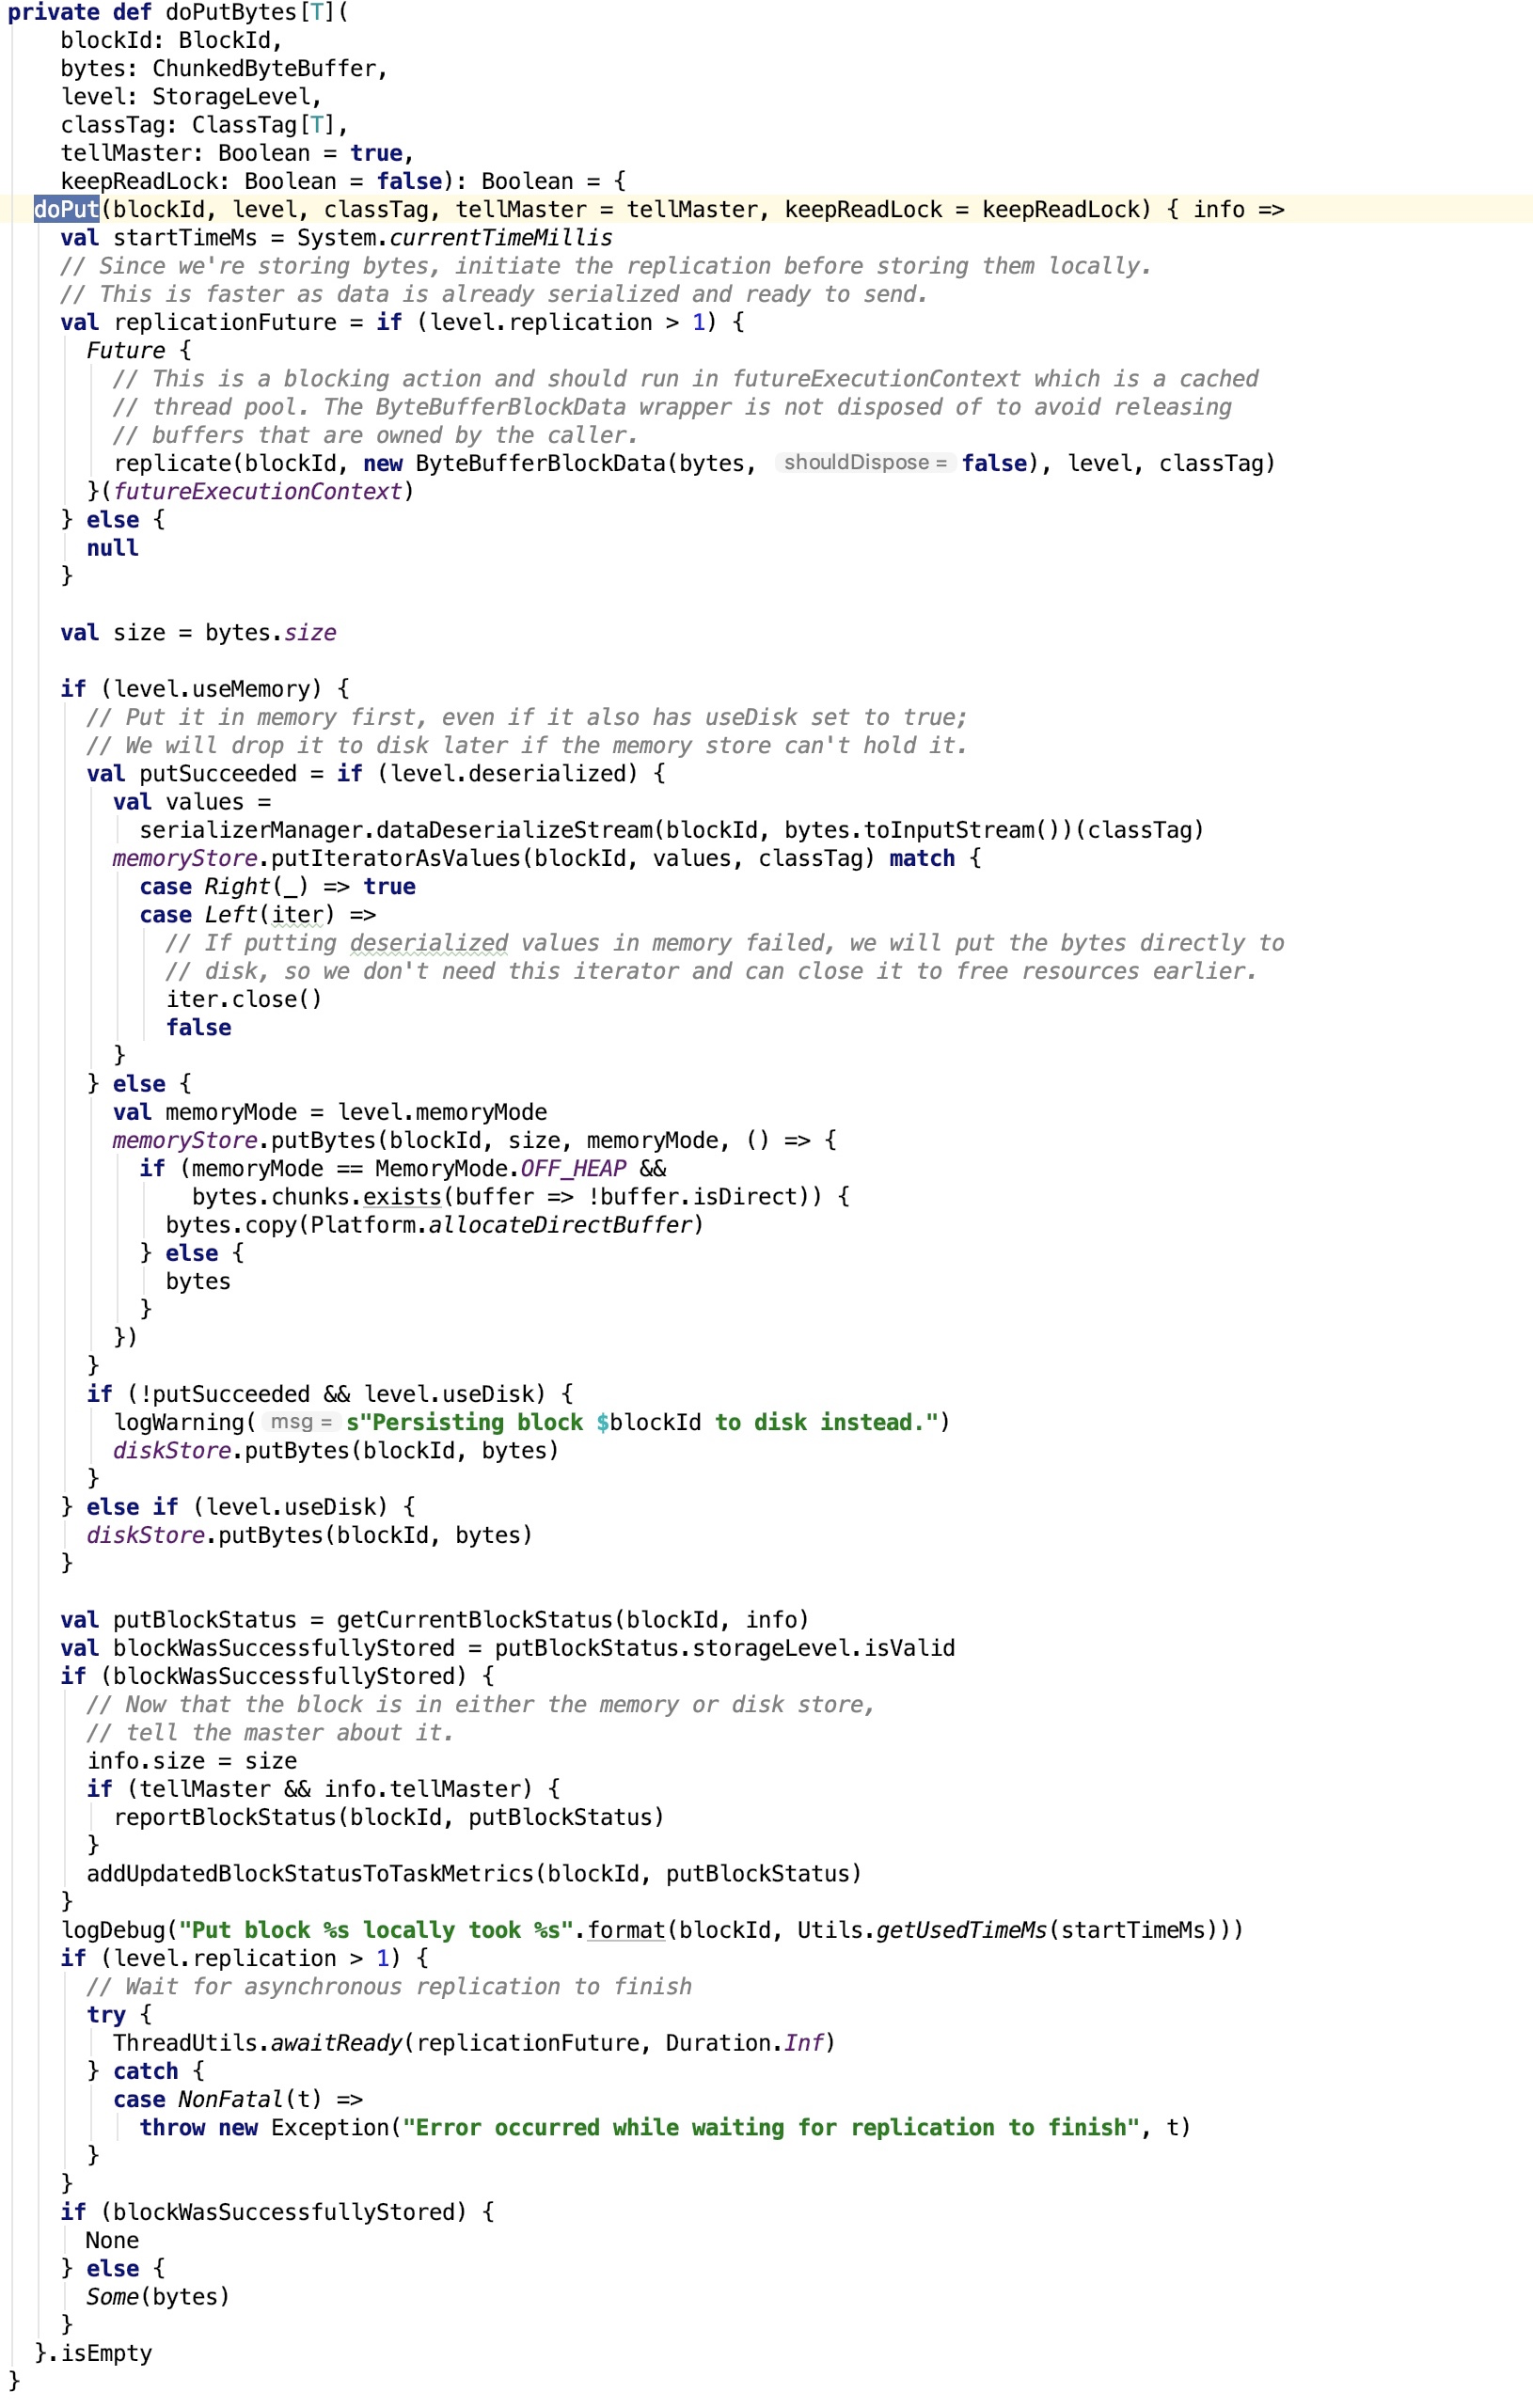
doPut 方法如下,思路,加写锁,执行putBody方法:
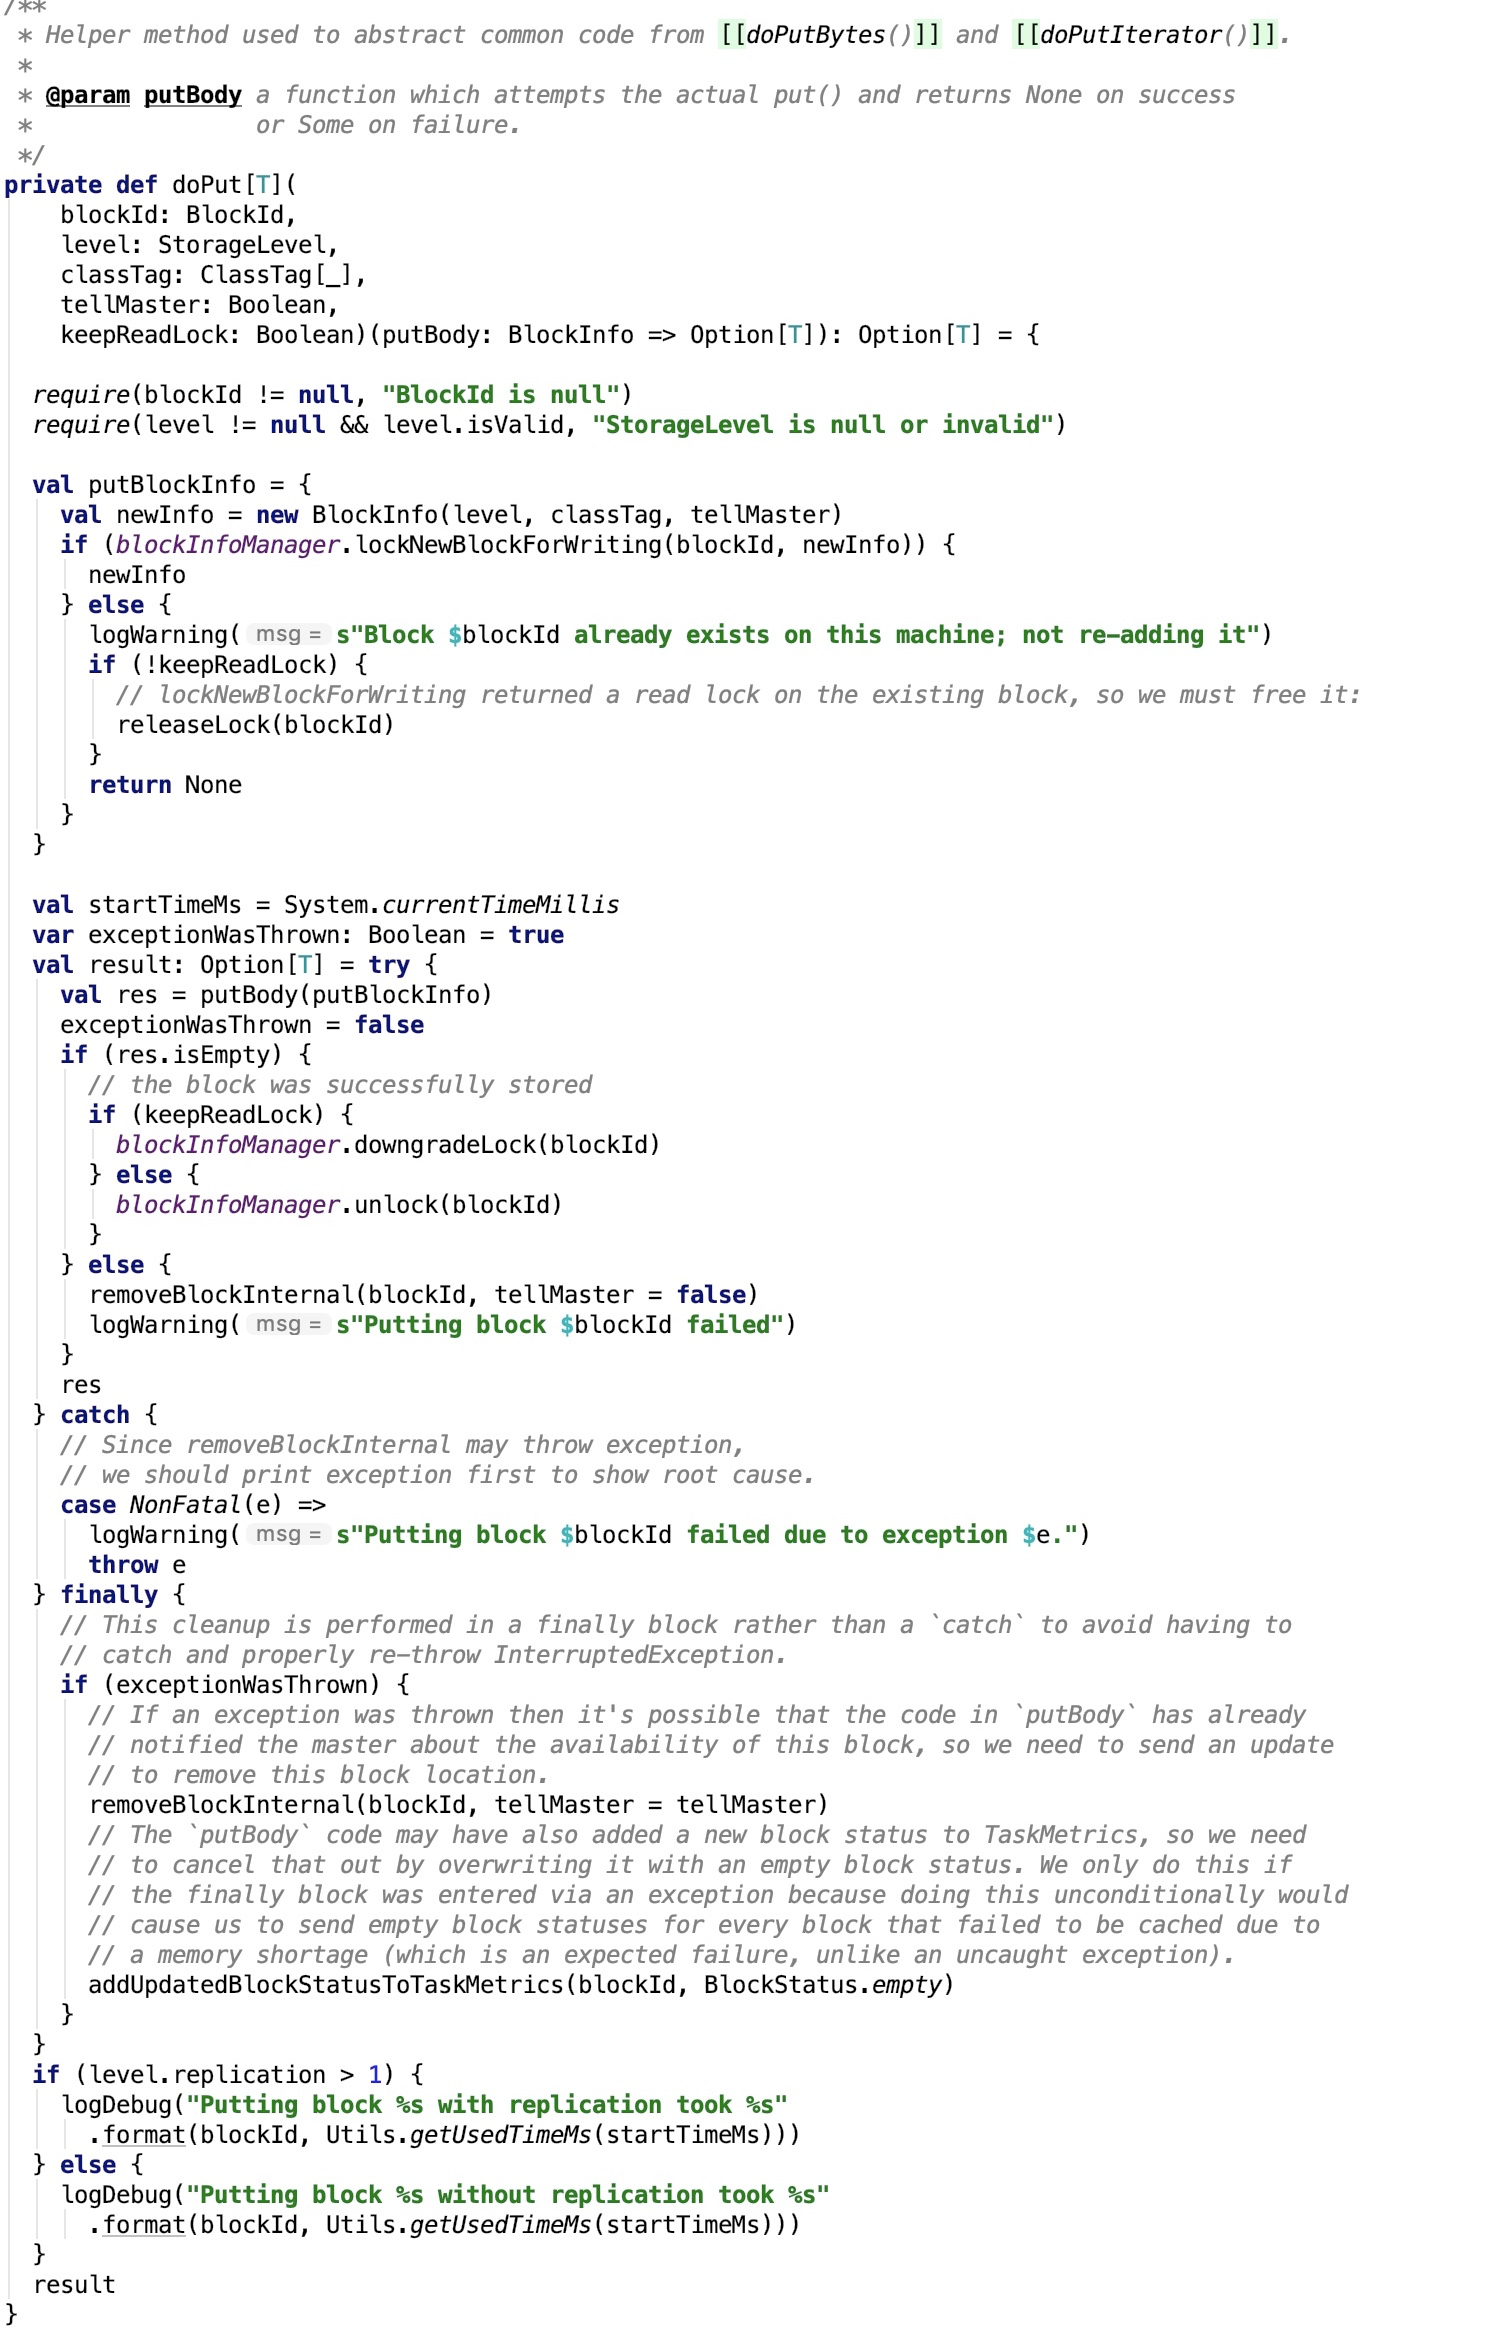
-
保存序列化之后的字节数据
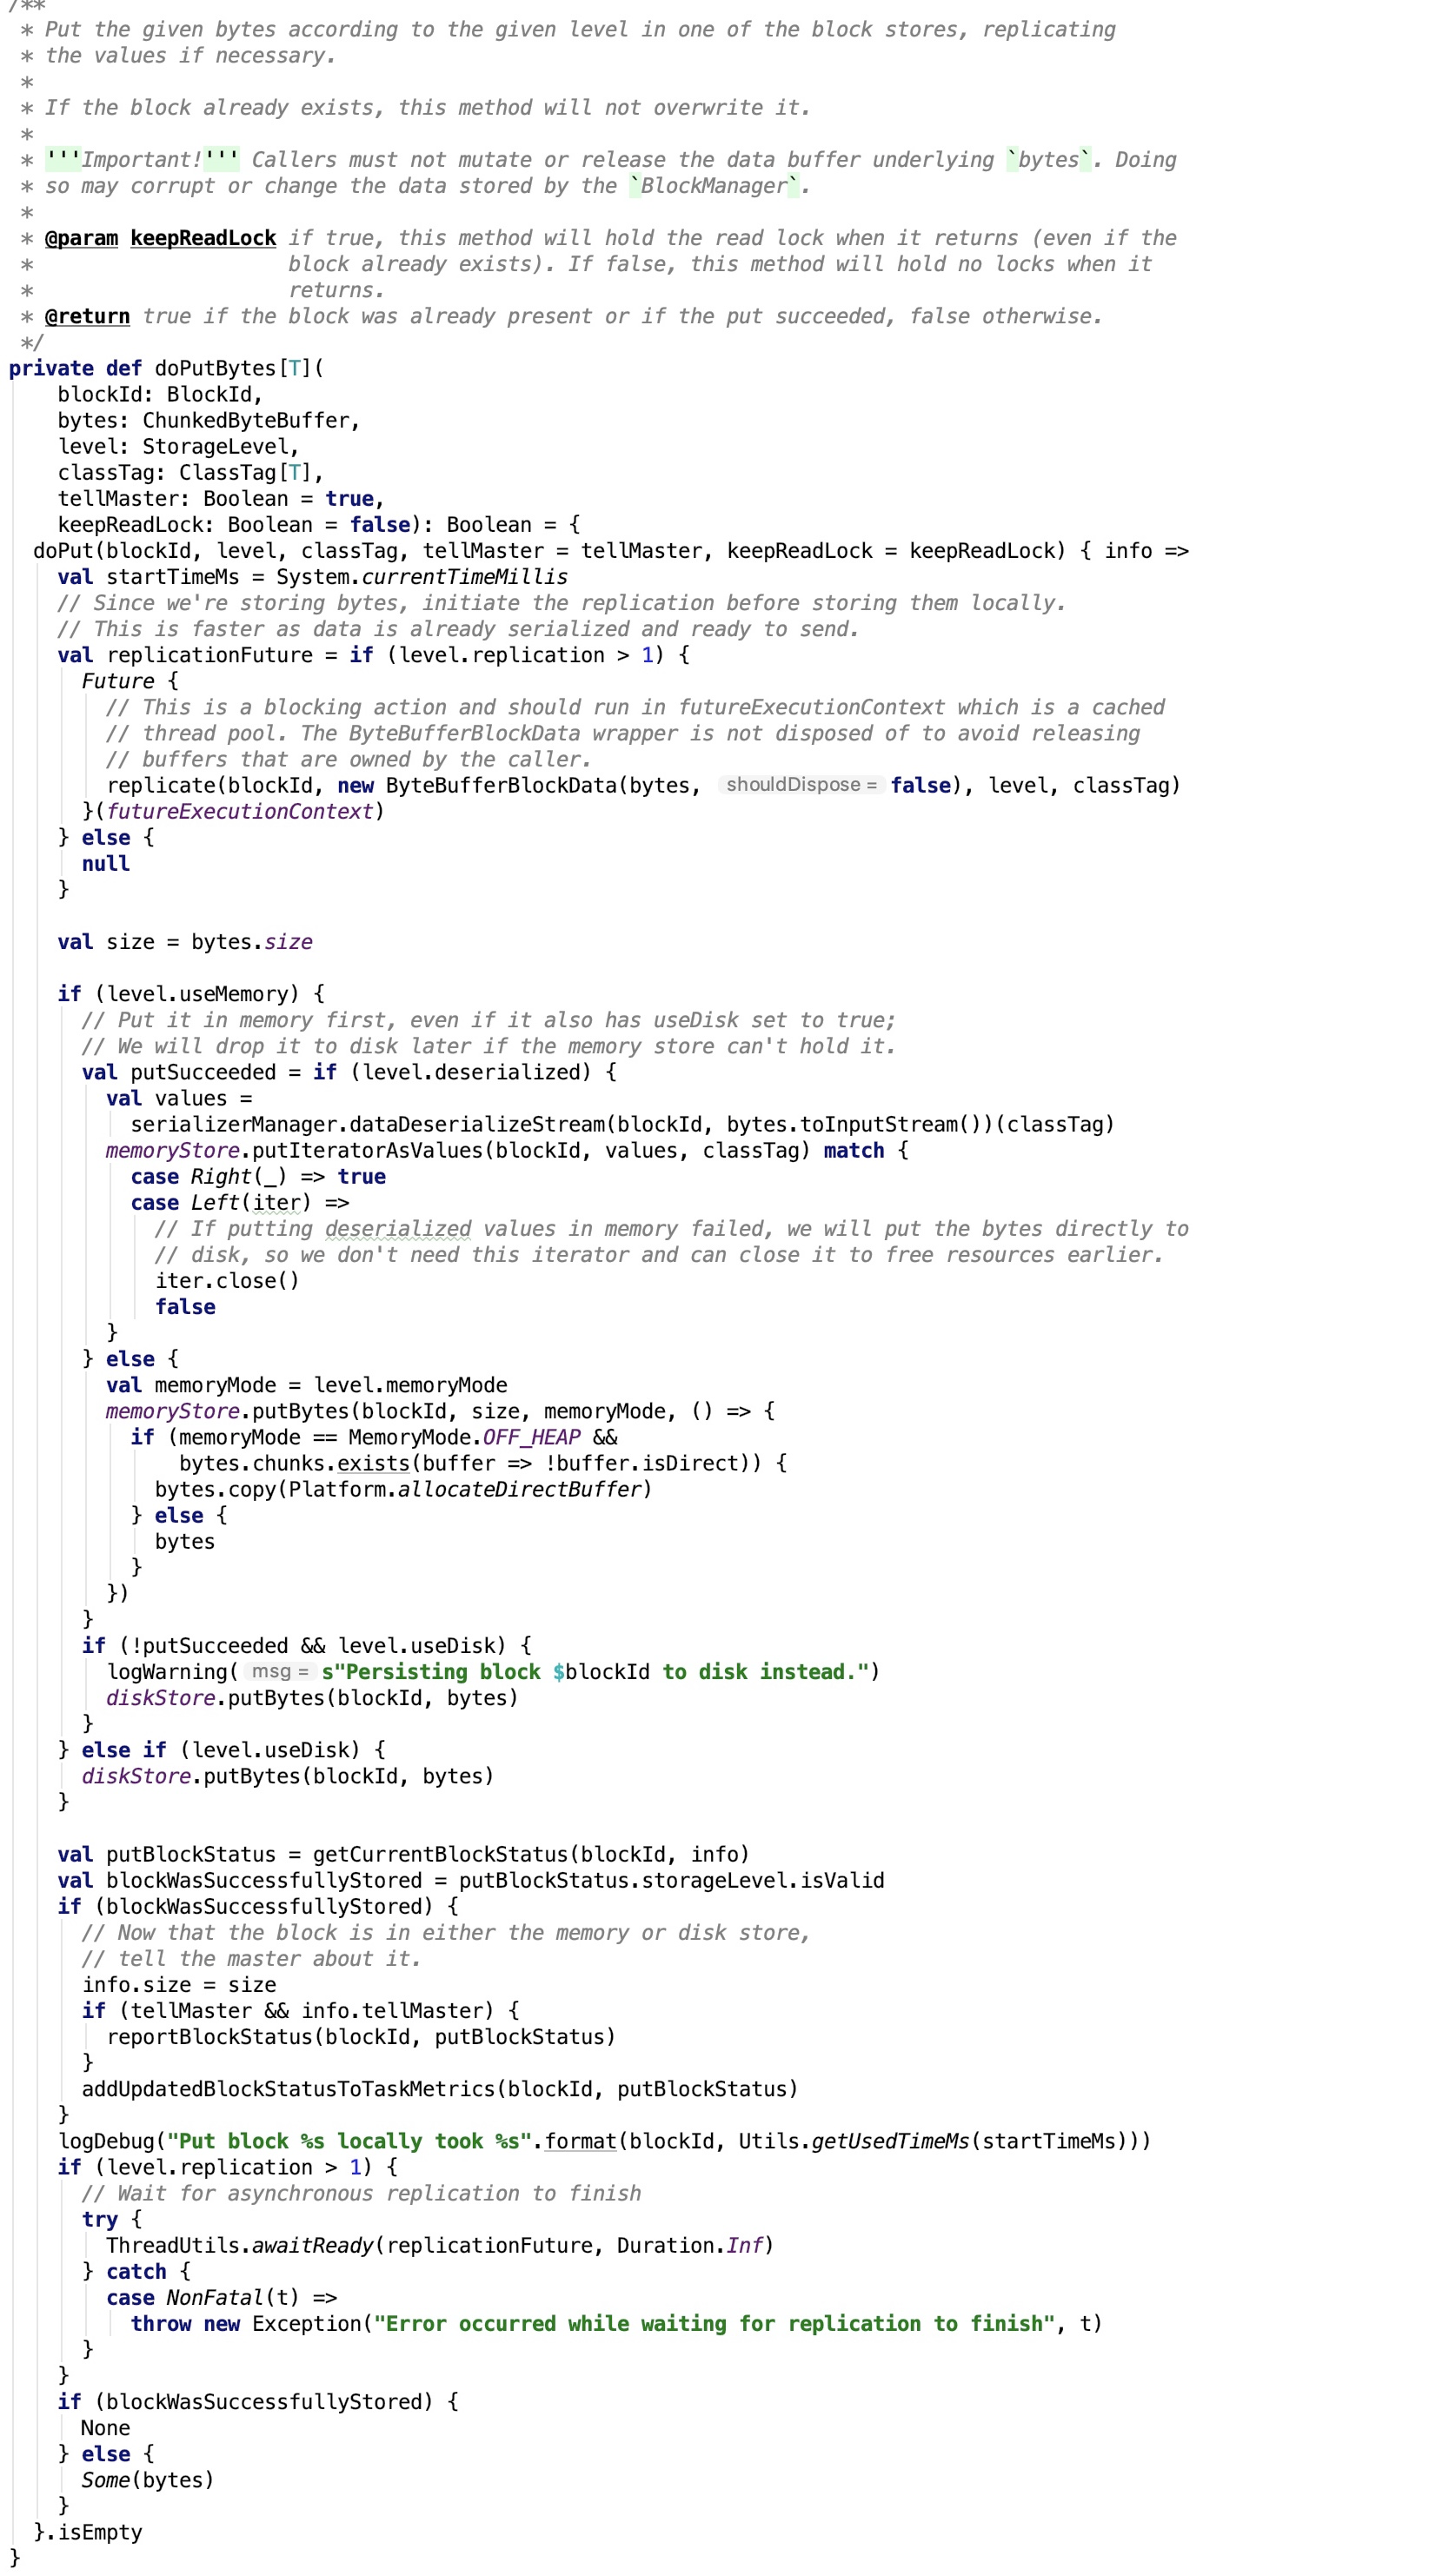
-
保存java对象:
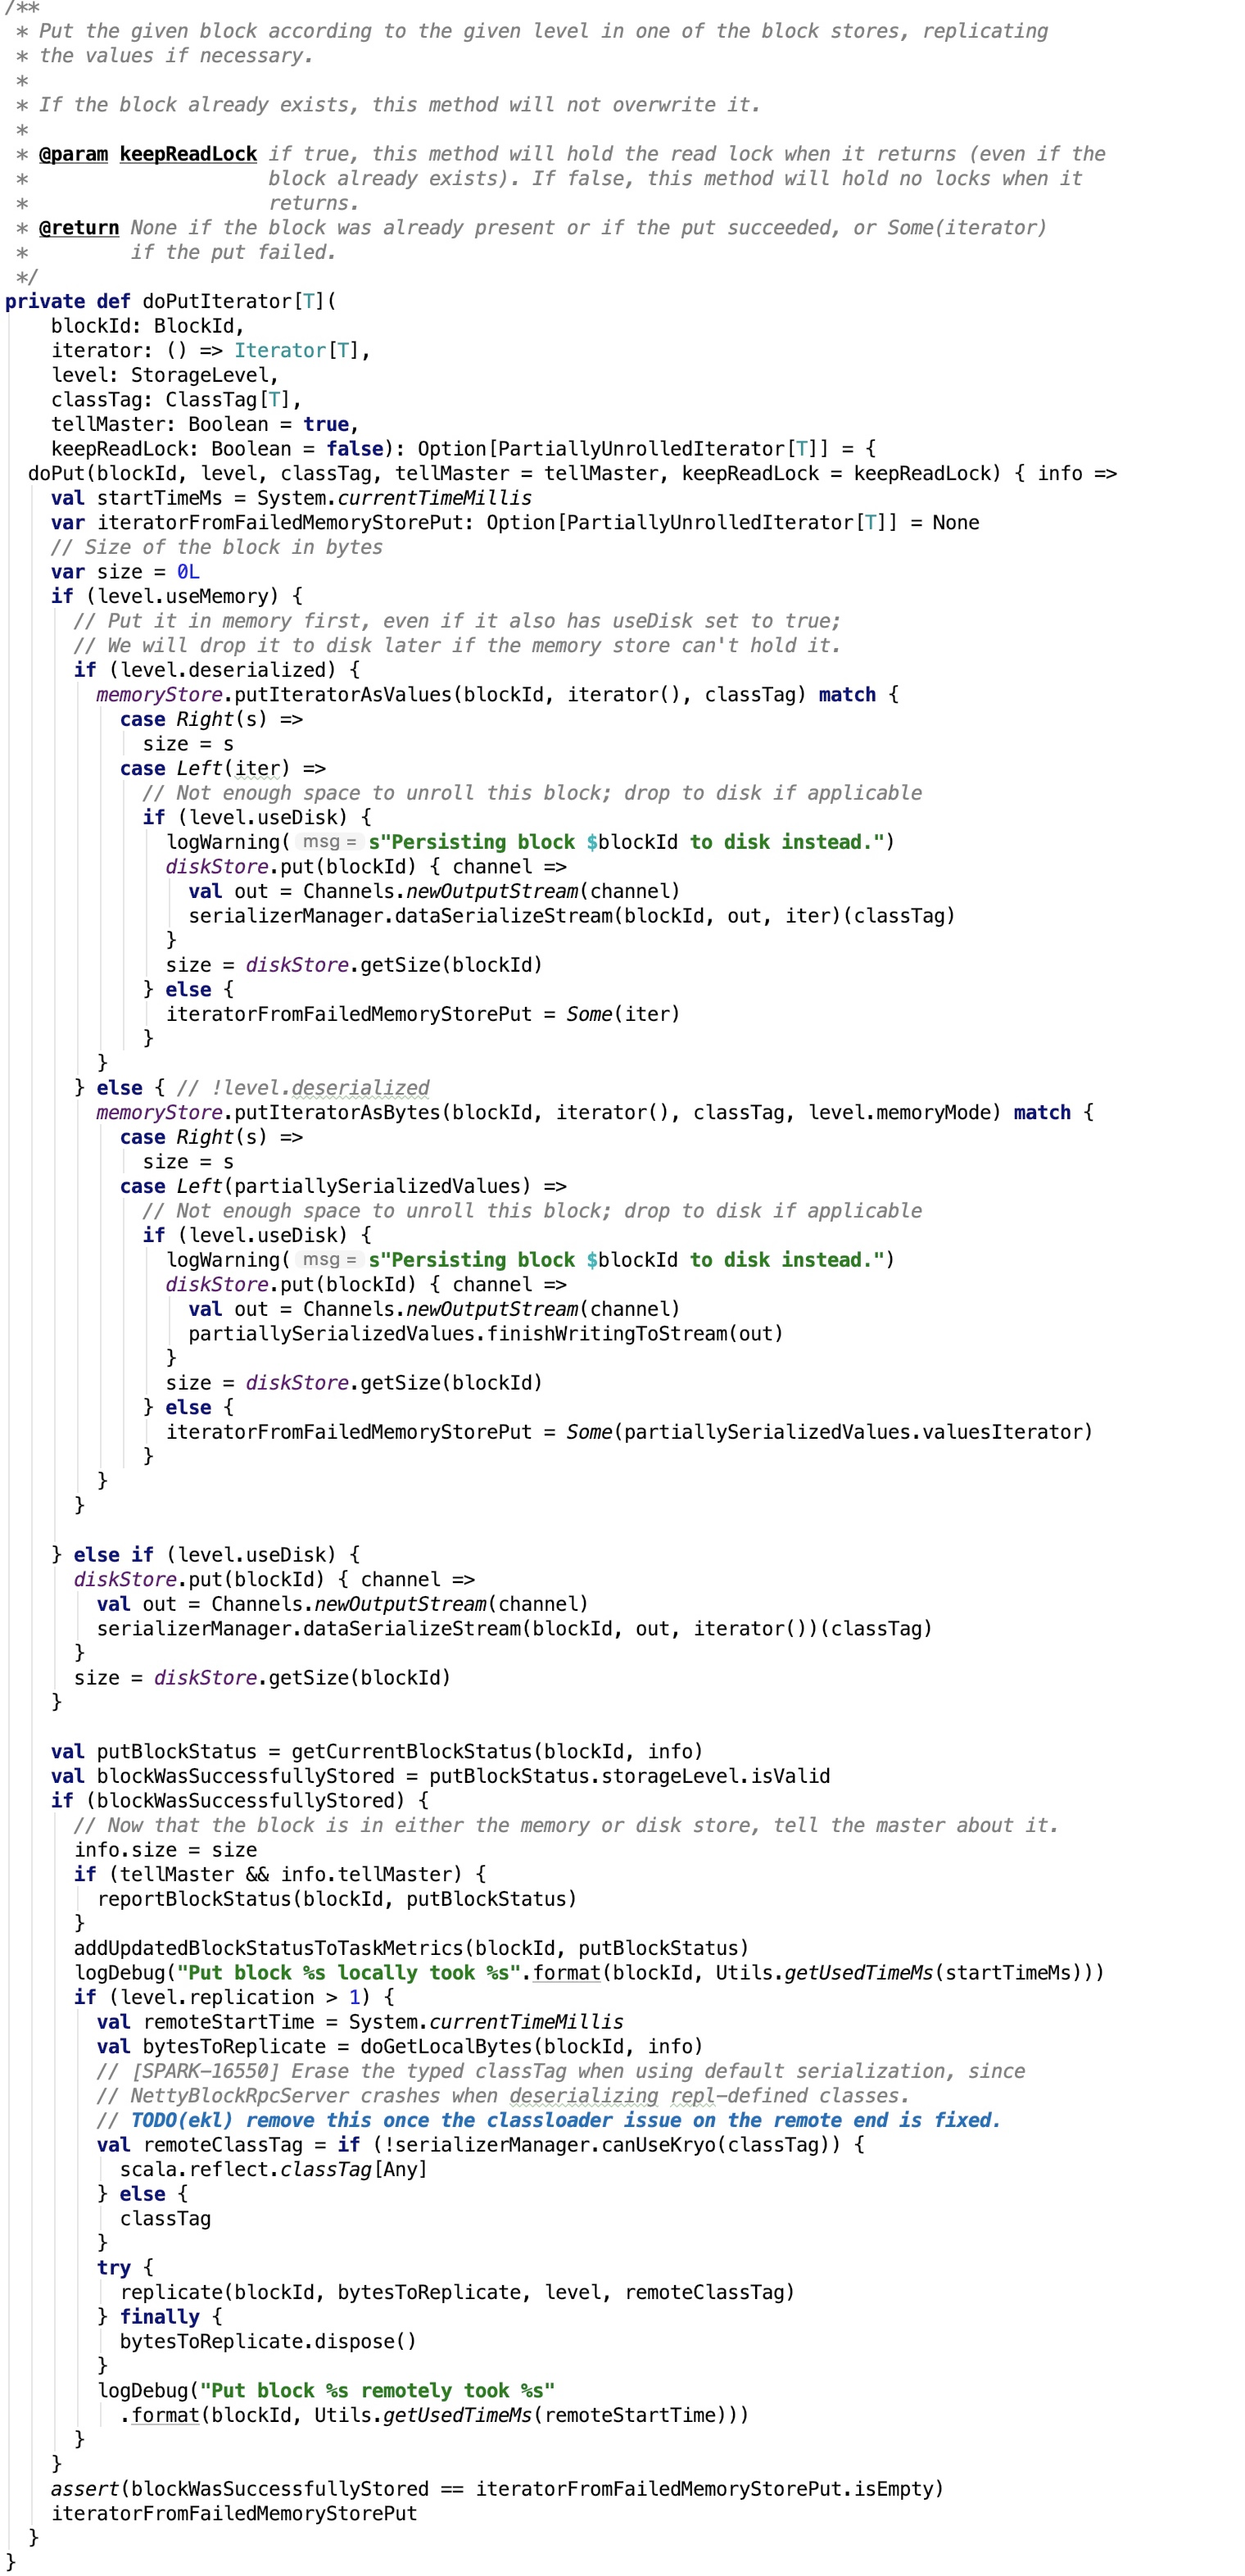
-
缓存读取的数据在内存中:
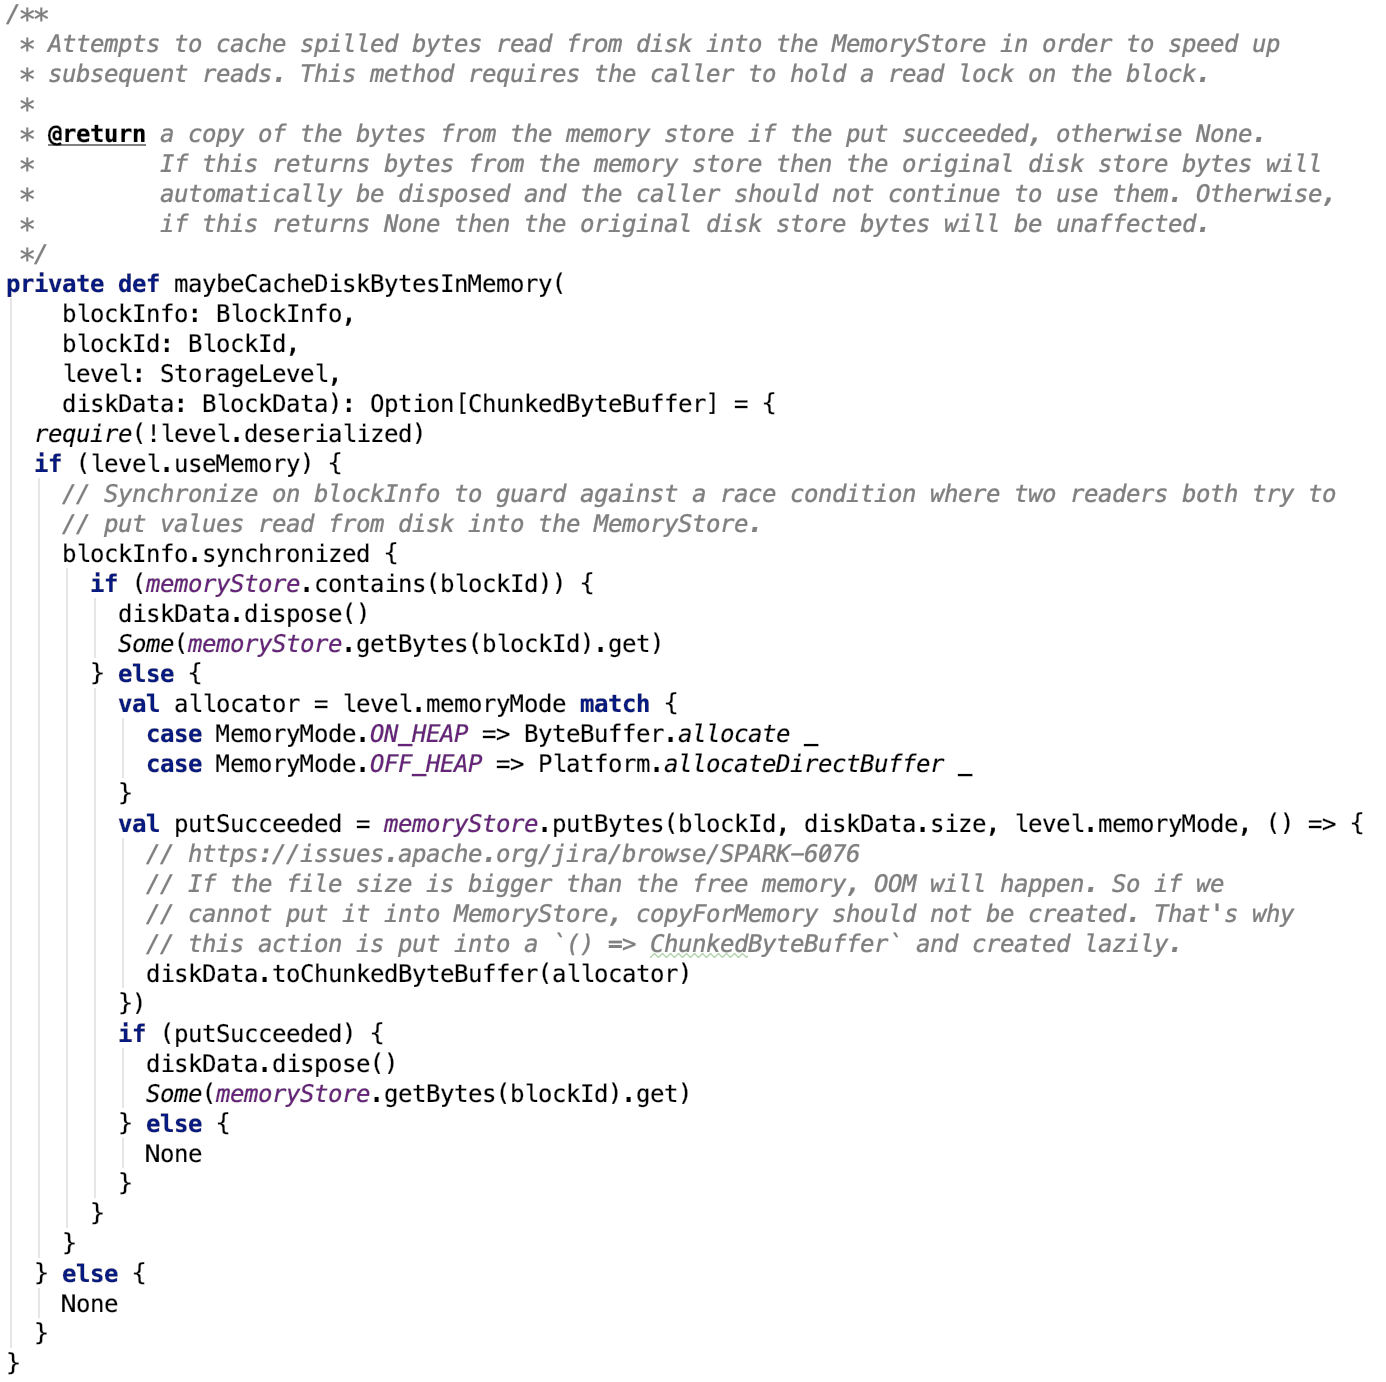
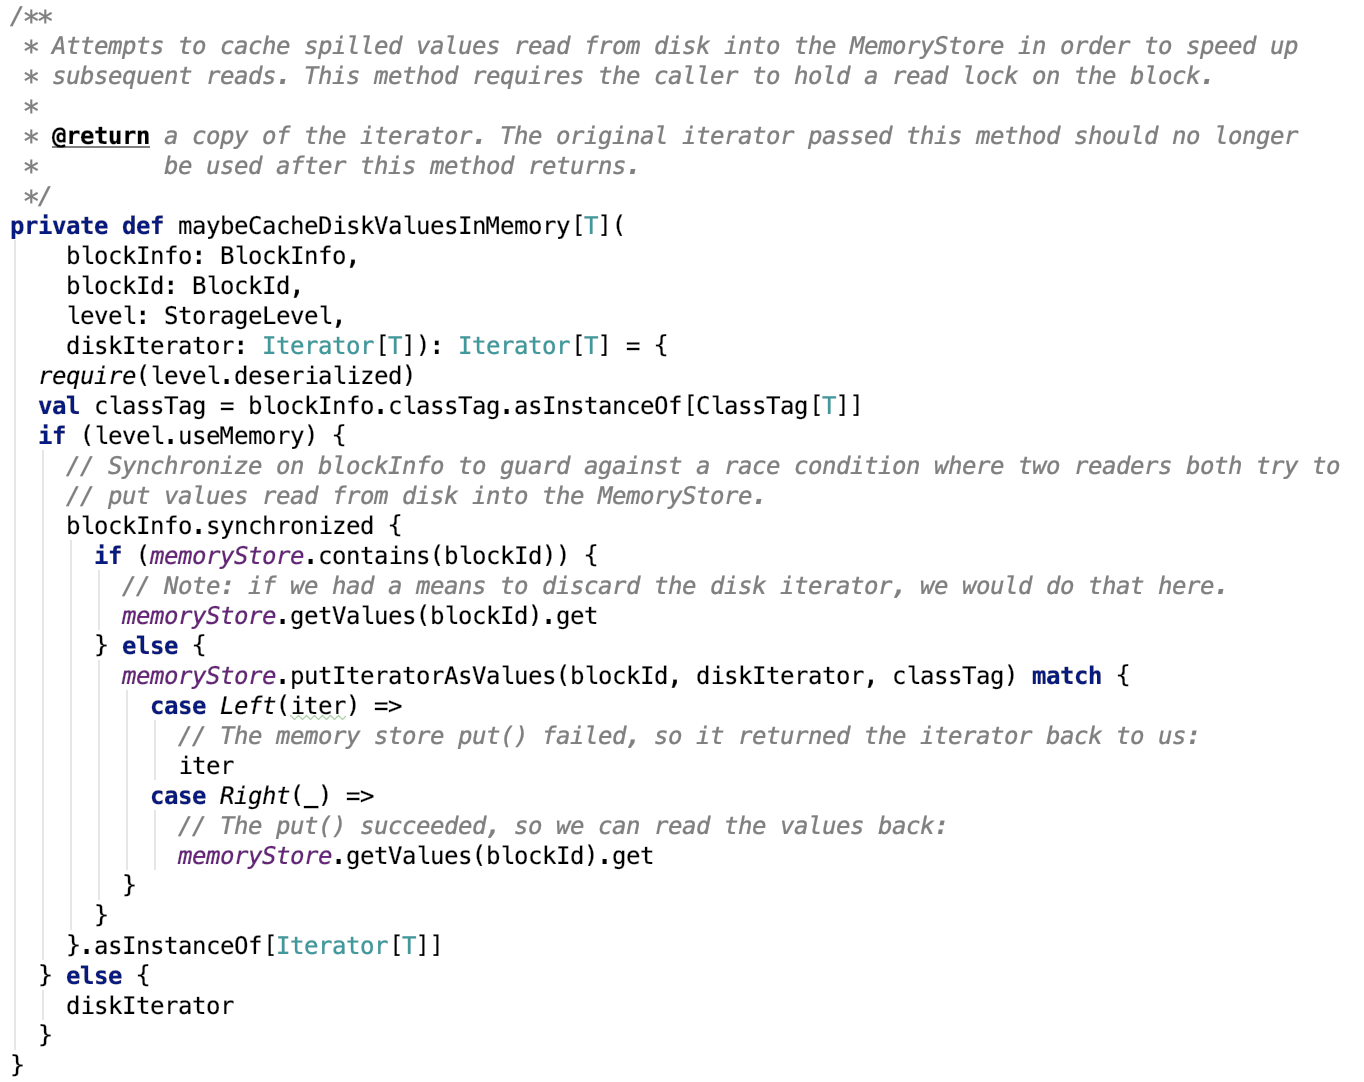
-
获取Saprk 集群中其他的BlockManager信息:
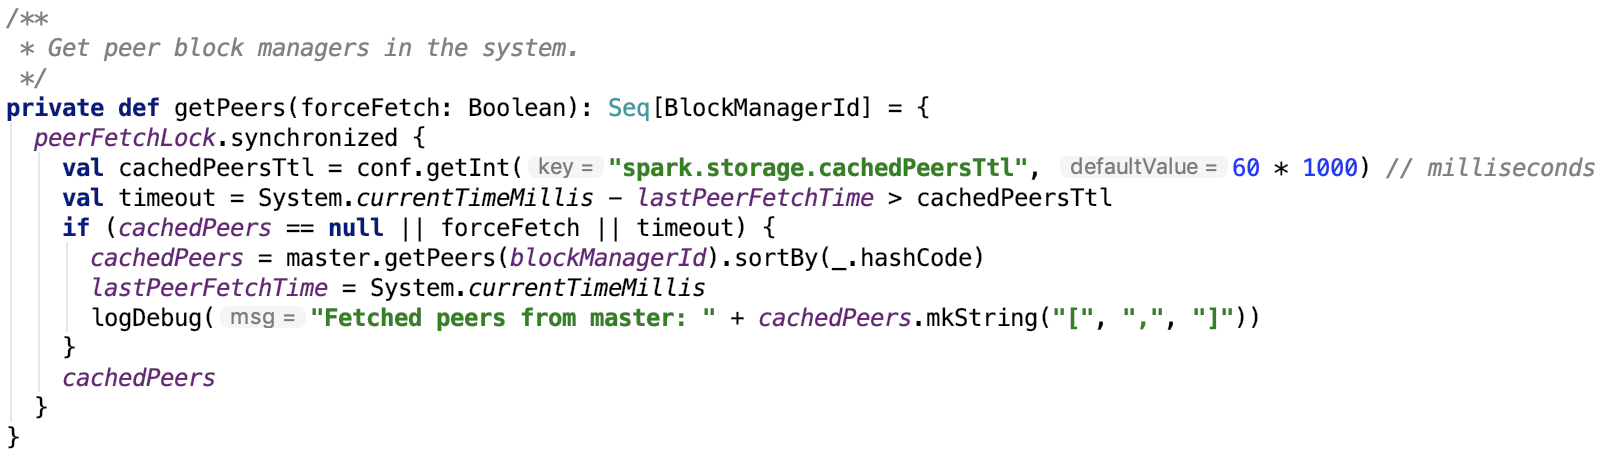
-
同步block到其他的replicas:
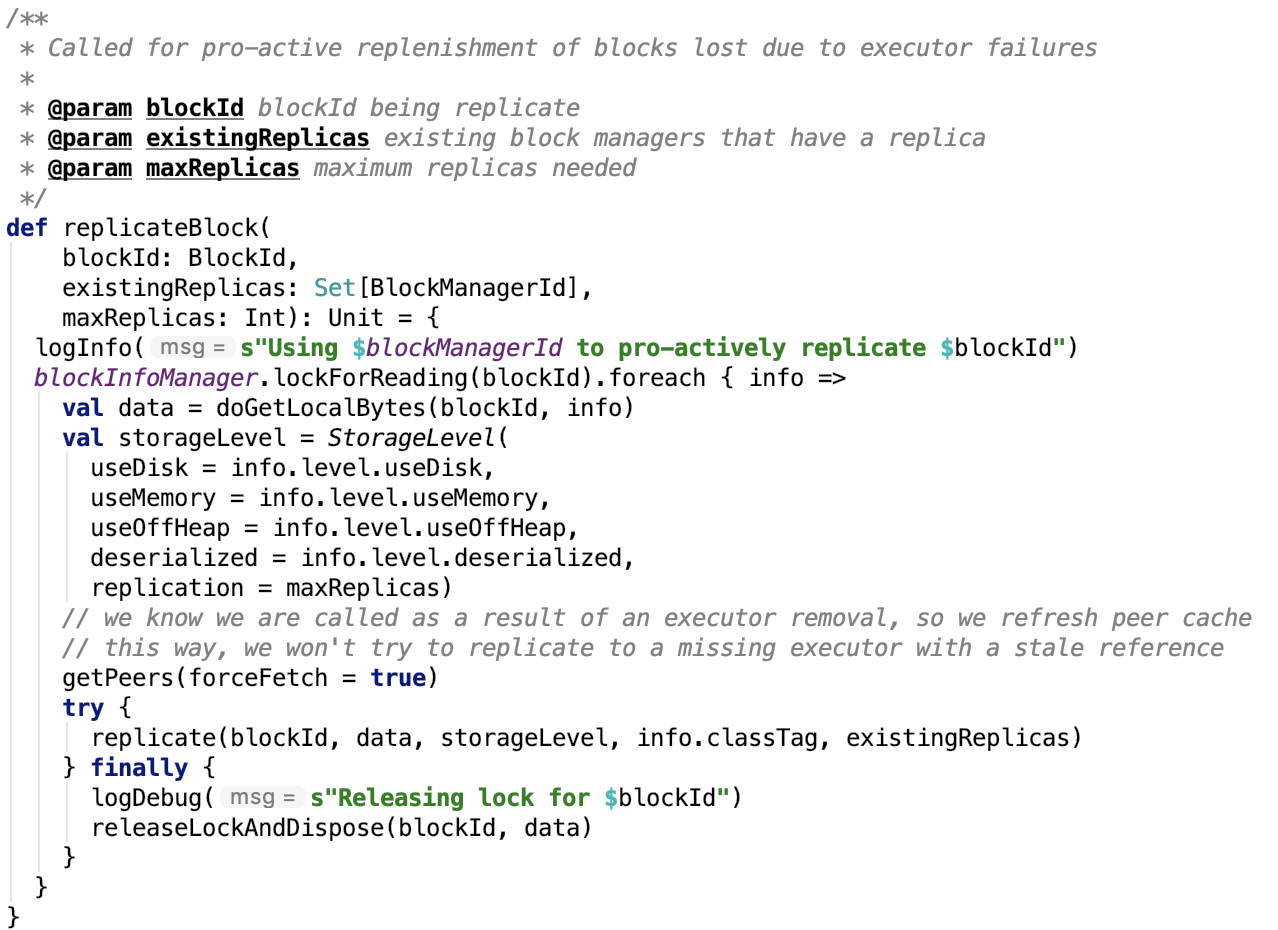
其依赖方法如下:
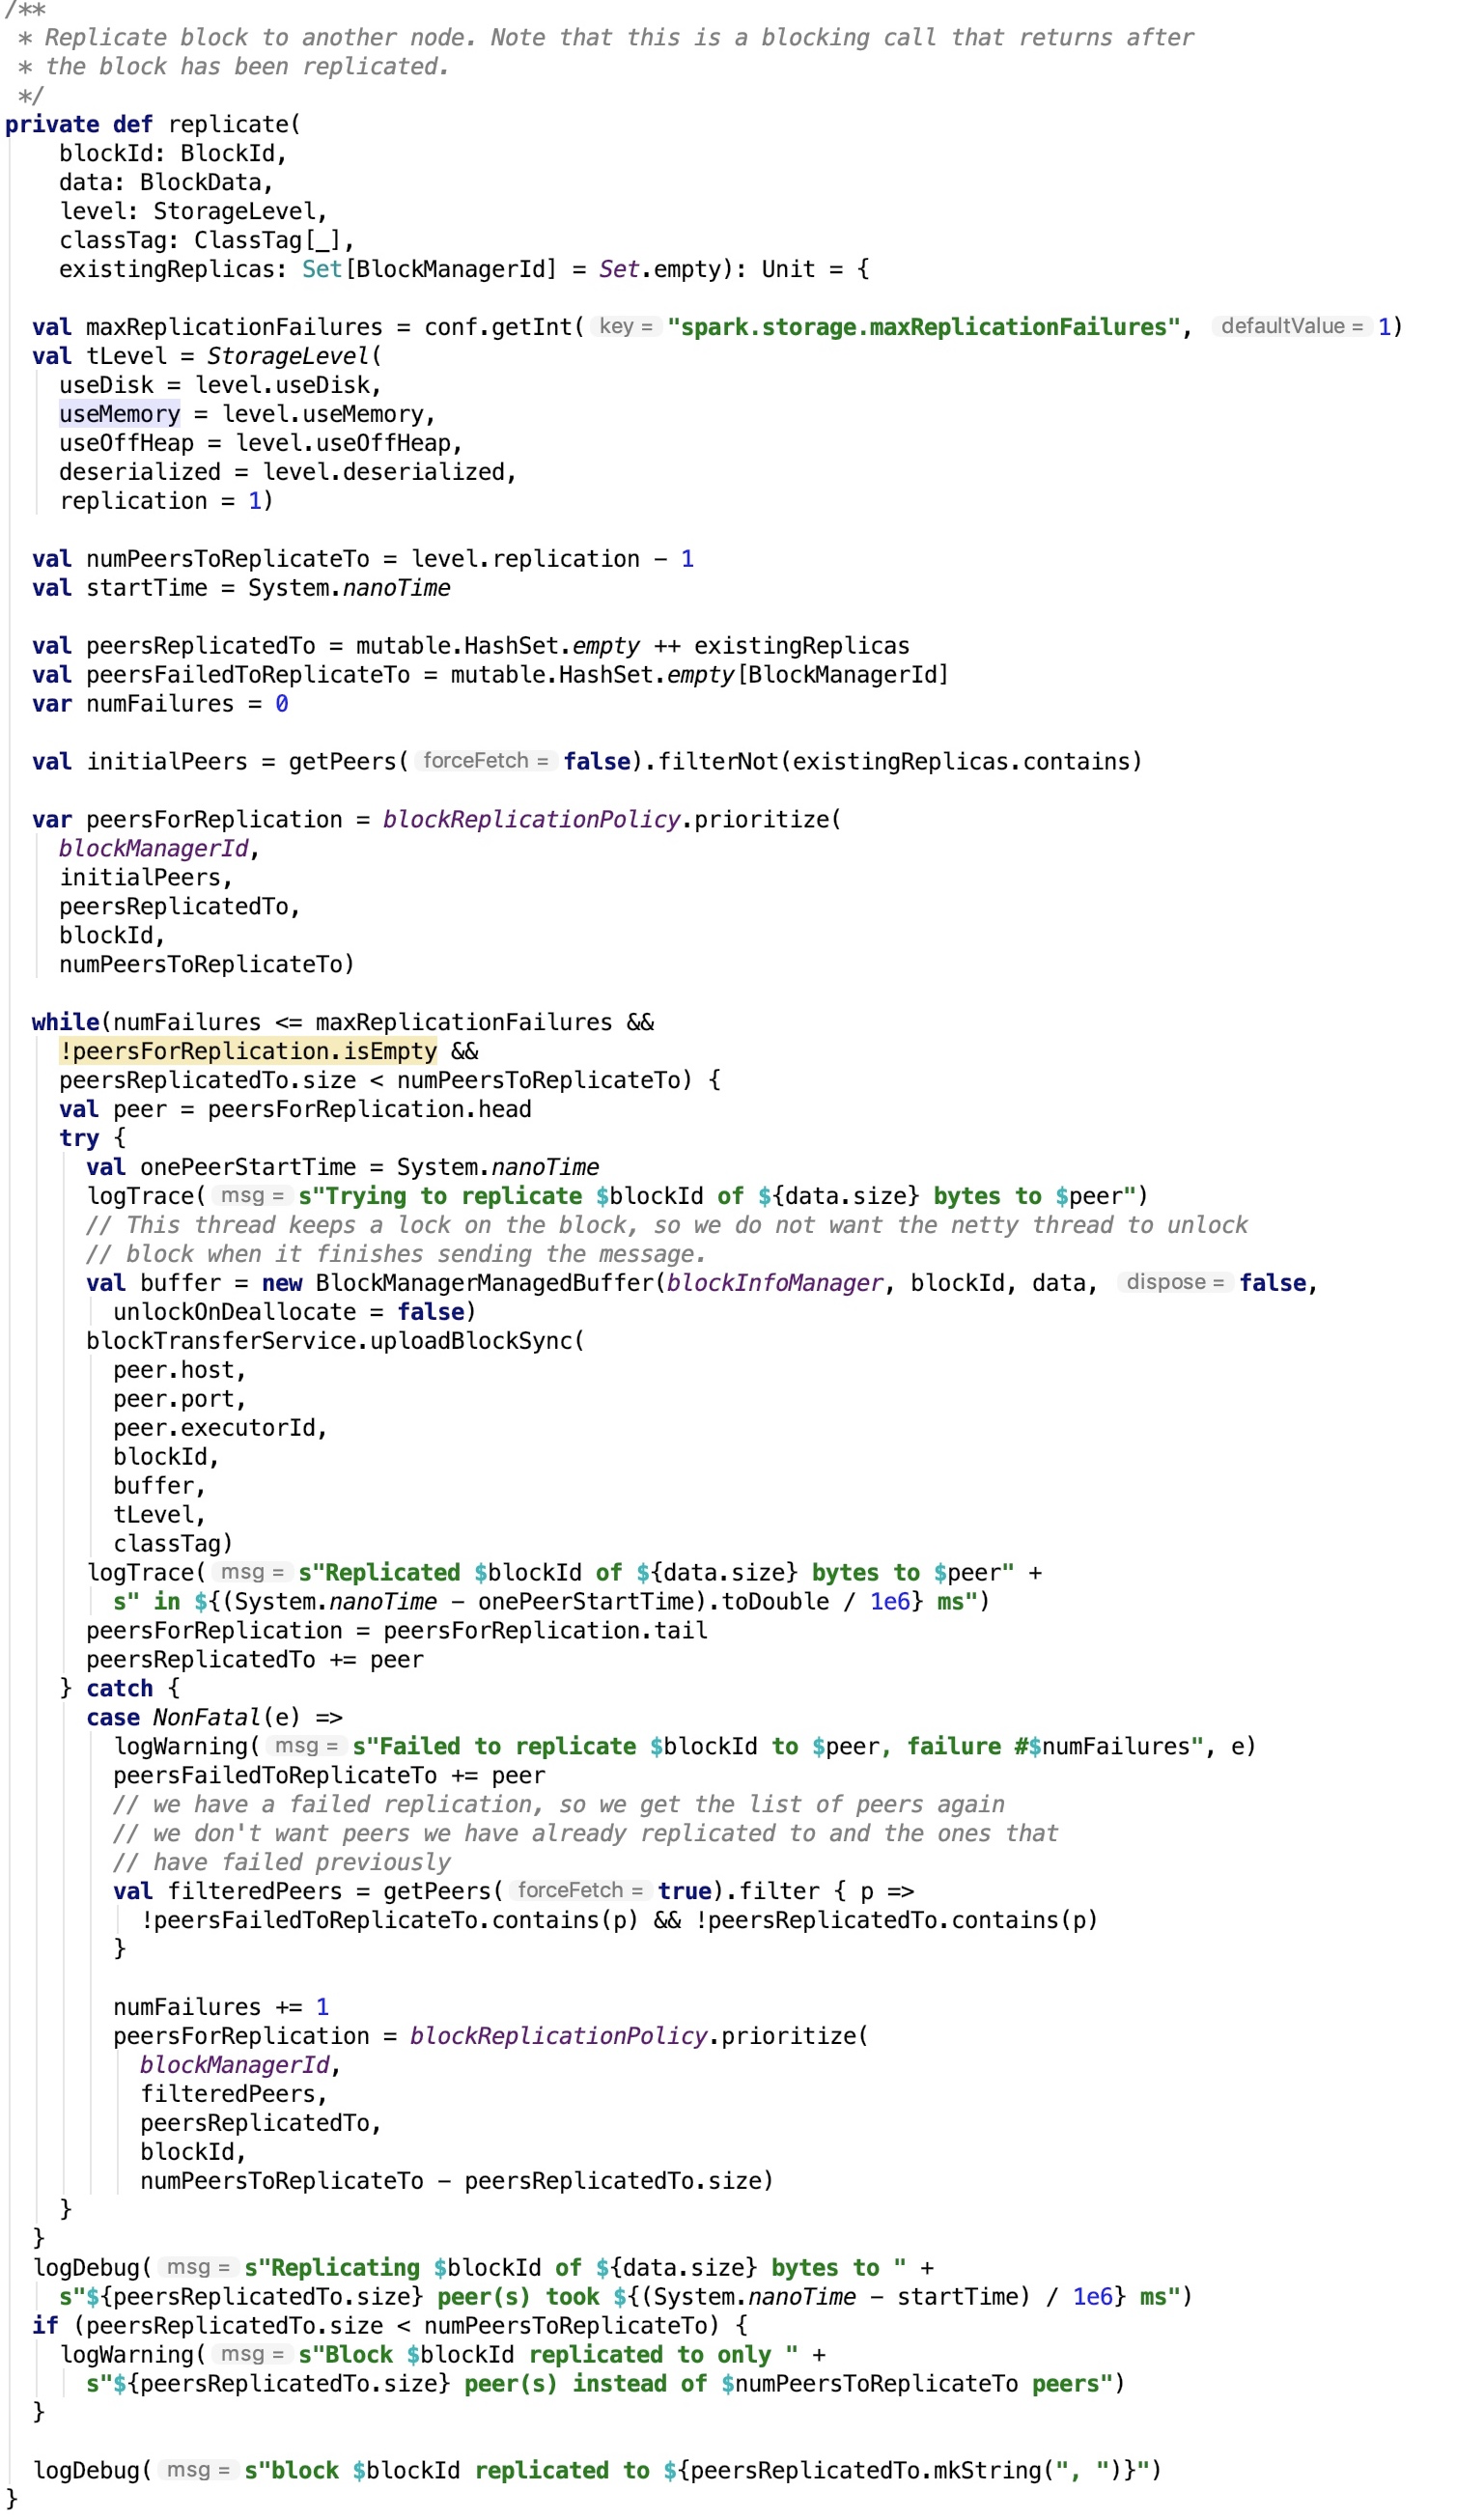
10.把block从内存中驱逐:
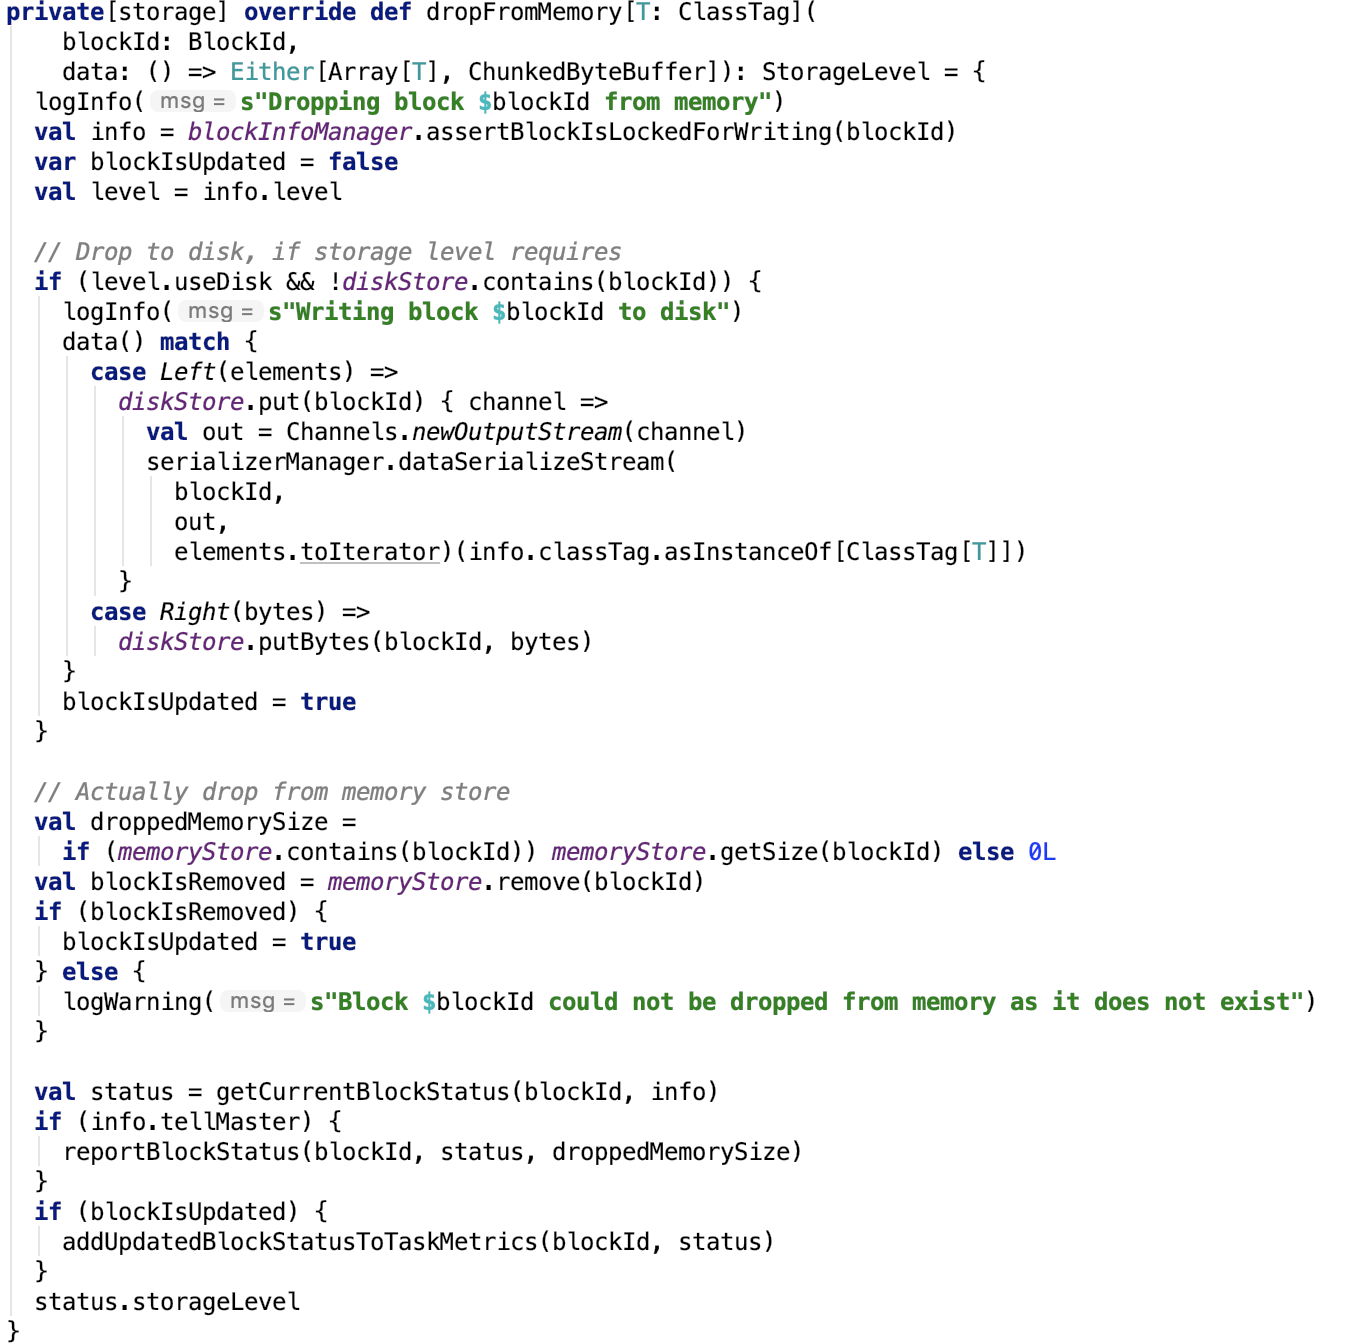
-
移除block:
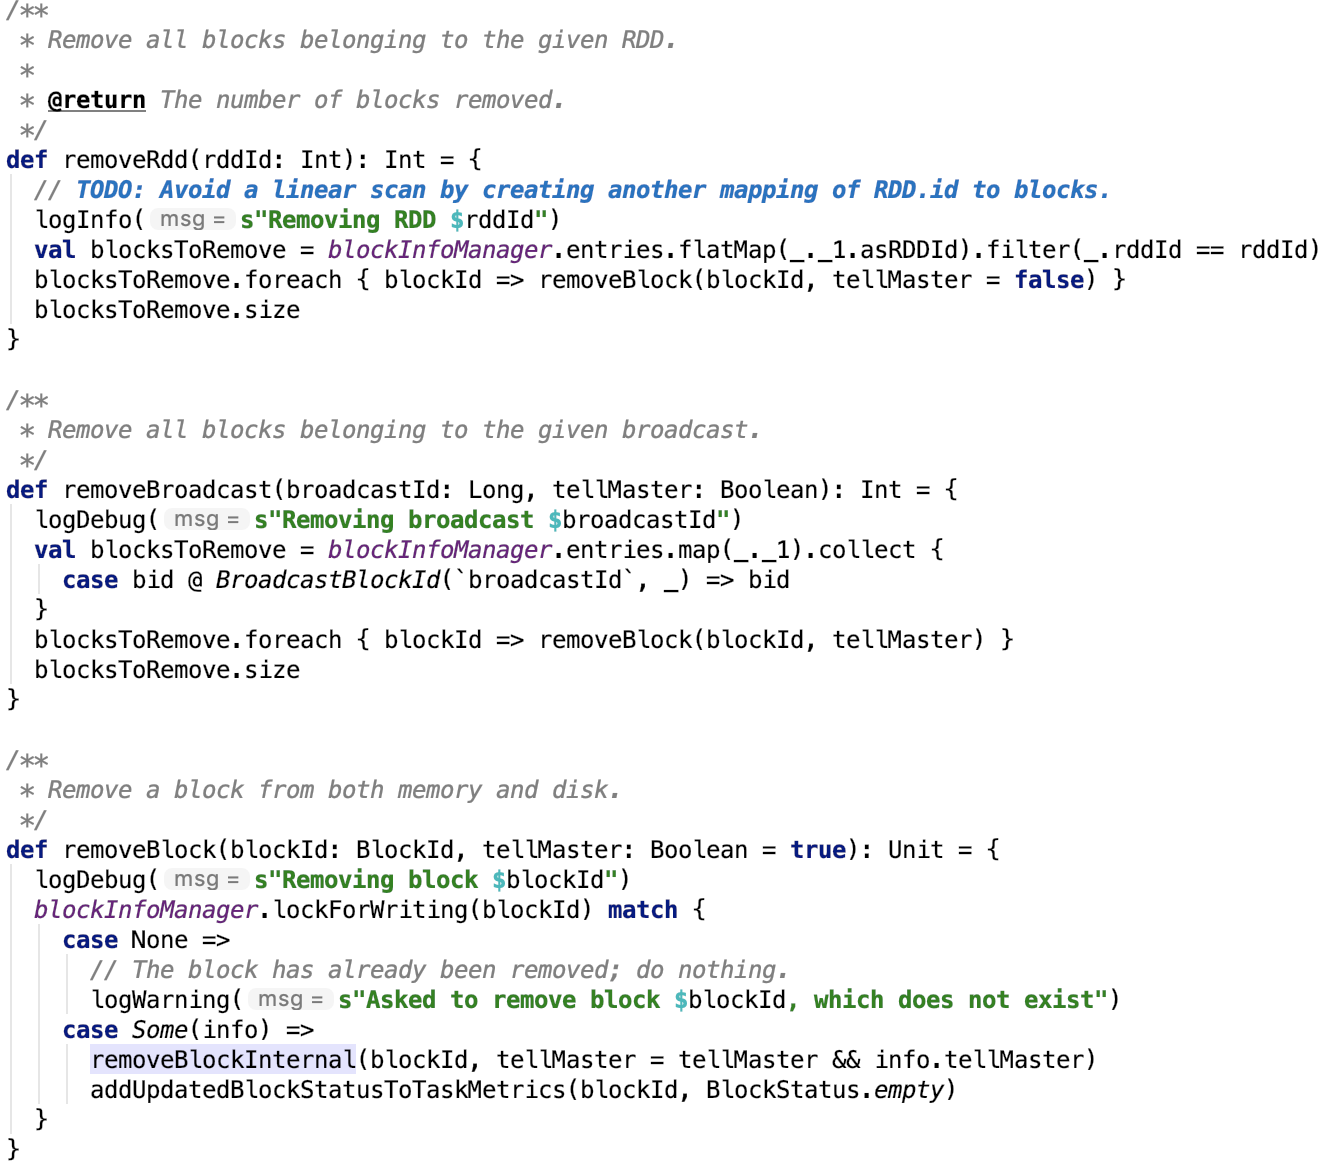
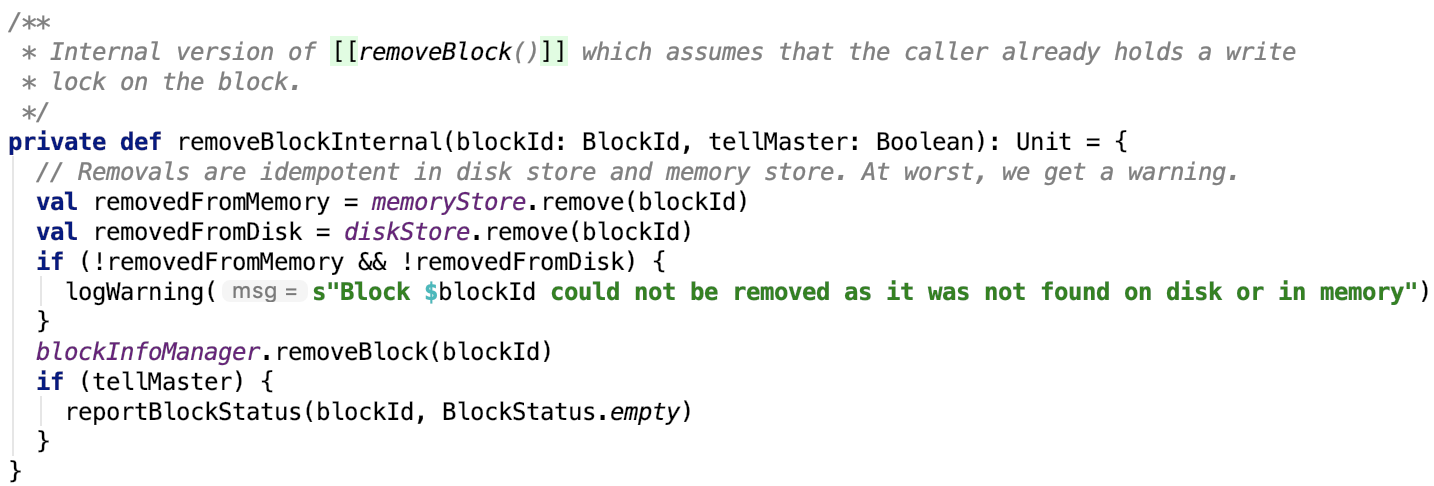
-
停止方法

BlockManager 主要提供写或读本地或远程的block到各种各样的存储介质中,包括磁盘、堆内内存、堆外内存。获取Spark 集群的BlockManager的信息、驱逐内存中block等等方法。
其远程交互依赖于底层的netty模块。有很多的关于存储的方法都依赖于MemoryStore和DiskStore的实现,不再做一一解释。
10、总结
本篇文章介绍了Spark存储体系的最后部分内容。行文有些仓促,有一些类可能会漏掉,但对于理解Spark 存储体系已经绰绰有余。本地存储依赖于MemoryStore和DiskStore,远程调用依赖于NettyBlockTransferService、BlockManagerMaster、MapOutputTracker等,其底层绝大多数依赖于netty与driver或其他executor通信。
Spark shuffle、broadcast等也是依赖于存储系统的。接下来将进入spark的核心部分,去探索Spark底层的RDD是如何构建Stage作业以及每一个作业是如何工作的。
第七章、spark源码分析之任务调度与计算
一、DAG的生成和Stage的划分
在说DAG之前,先简单说一下RDD。
1、对RDD的整体概括
文档说明如下:
RDD全称Resilient Distributed Dataset,即分布式弹性数据集。它是Spark的基本抽象,代表不可变的可分区的可并行计算的数据集。
RDD的特点:
-
包含了一系列的分区
-
在每一个split上执行函数计算
-
依赖于其他的RDD
-
对于key-value对的有partitioner
-
每一个计算有优先计算位置
更多内容可以去看Spark的论文:http://people.csail.mit.edu/matei/papers/2012/nsdi_spark.pdf
RDD的操作
RDD支持两种类型的操作:
-
transformation:它从已存在的数据集中创建一个新的数据集。它是懒执行的,即生成RDD的所有操作都是懒执行的,也就是说不会马上计算出结果,它们只会记住它们依赖的基础数据集(文件、MQ等等),等到一个action需要结果返回到driver端的时候,才会执行transform的计算。这种设计使得RDD计算更加高效。
-
action:它在数据集上运行计算之后给driver端返回一个值。
注意:reduce 是一个action,而 reduceByKey 则是一个transform,因为它返回的是一个分布式数据集,并没有把数据返回给driver节点。
2、Action函数
官方提供了RDD的action函数,如下:

注意:这只是常见的函数,并没有列举所有的action函数。
3、Action函数的特点
那么action函数有哪些特点呢?
根据上面介绍的,即action会返回一个值给driver节点。即它们的函数返回值是一个具体的非RDD类型的值或Unit,而不是RDD类型的值。
4、Transformation函数
官方提供了Transform 函数,如下:
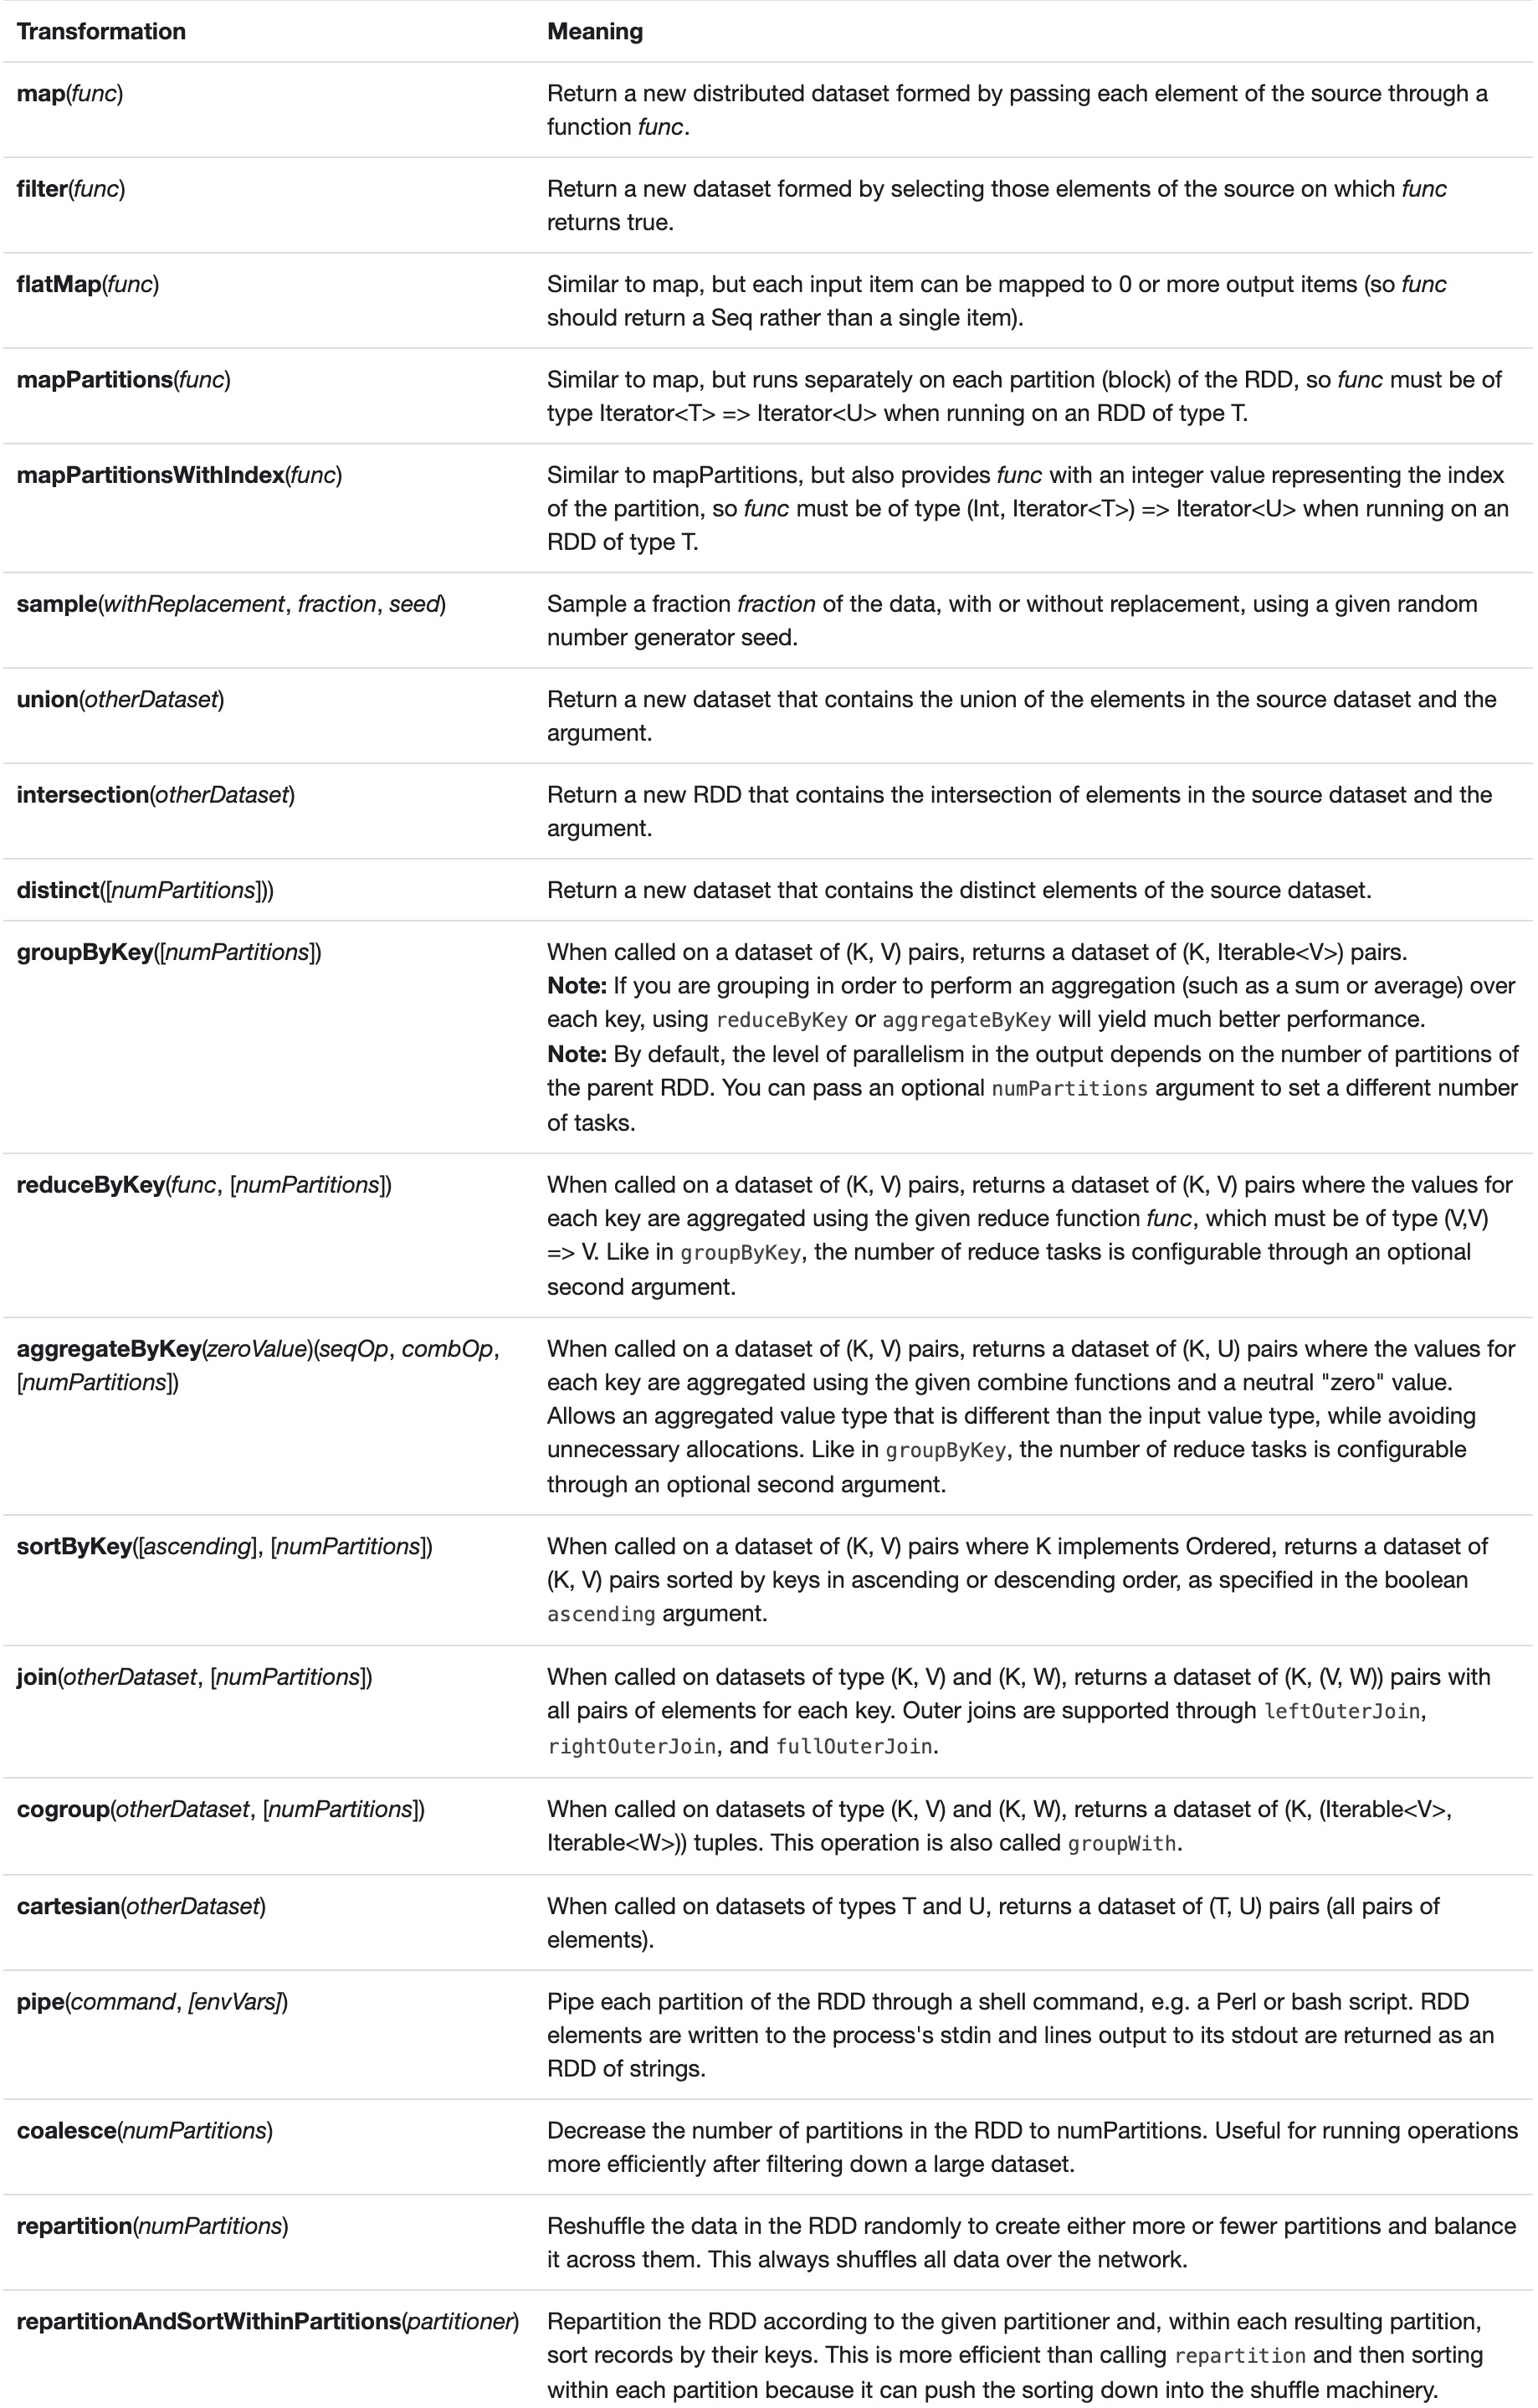
5、Transformation函数的特点
上文提到,transformation接收一个存在的数据集,并将计算结果作为新的RDD返回。也是就说,它的返回结果是RDD。
6、总结
其实,理解了action和transformation的特点,看函数的定义就知道是action还是transformation。
2、RDD的依赖关系
官方文档里,聊完RDD的操作,紧接着就聊了一下shuffle,我们按照这样的顺序来做一下说明。
1、Shuffle
官方给出的shuffle的解释如下:

注意:shuffle是特定操作才会发生的事情,这跟action和transformation划分没有关系。
官方给出了一些常见的例子。
Operations which can cause a shuffle include repartition operations like repartition and coalesce, ByKey operations (except for counting) like groupByKey and reduceByKey, and join operations like cogroup and join.
2、RDD的四种依赖关系
那么shuffle跟什么有关系呢?
shuffle跟依赖有关系,说到 RDD 分为宽依赖和窄依赖,其中窄依赖有三种,一对一依赖、Range依赖、Prune 依赖。宽依赖只有一种,那就是 shuffle 依赖。
即RDD跟父RDD的依赖关系是宽依赖,那么就是父RDD在生成新的子RDD的过程中是存在shuffle过程的。
如图:
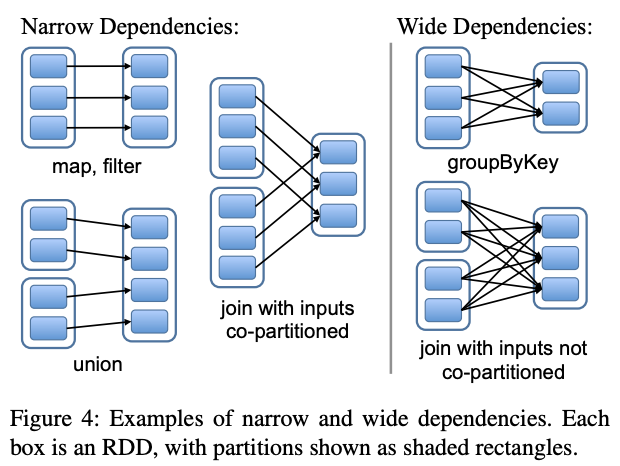
这张图也说明了一个结论,并不是所有的join都是宽依赖。
3、依赖关系在源码中的体现
我们通常说的 RDD,在Spark中具体表现为一个抽象类,所有的RDD子类继承自该RDD,全称为 org.apache.spark.rdd.RDD,如下:

它有两个参数,一个参数是SparkContext,另一个是deps,即Dependency集合,Dependency是所有依赖的公共父类,即deps保存了父类的依赖关系。
其中,窄依赖的父类是 NarrowDependency, 它的构造方法里是由父RDD这个参数的,宽依赖 ShuffleDependency ,它的构造方法里也是有父RDD这个参数的。
3、RDD 依赖关系的不确定性
1、getDependencies 方法

这只是定义在RDD抽象父类中的默认方法,不同的子类会有不同的实现。
它在如下类中又重新实现了这个方法,如下:
是否是shuffle依赖,跟分区的数量也有一定的关系,具体可以看下面的几个RDD的依赖的实现:
2、CoGroupedRDD
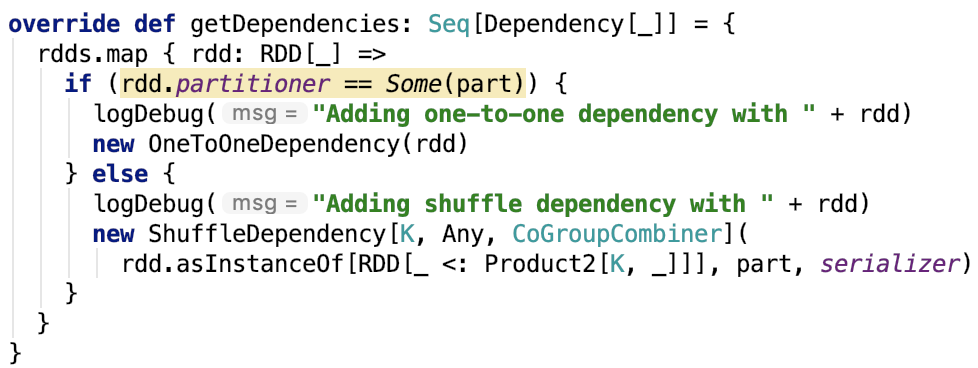
3、SubtractedRDD
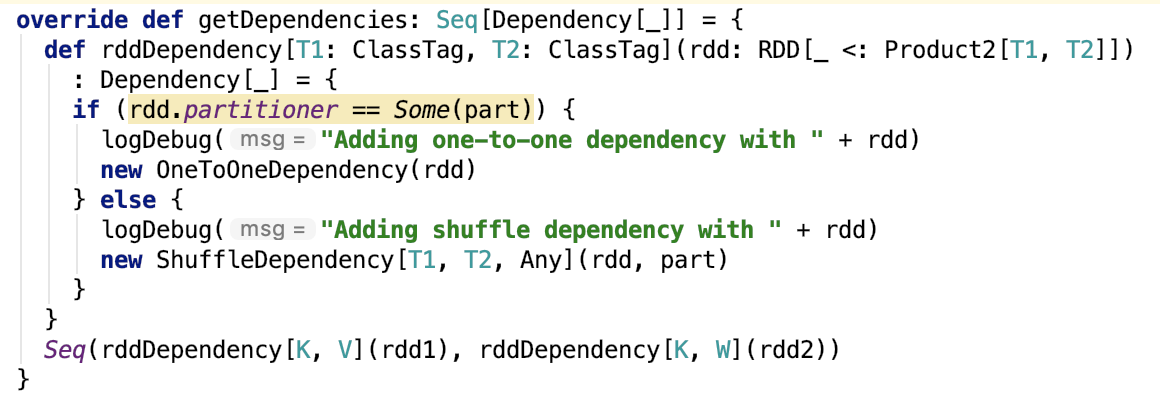
4、DAG在Spark作业中的重要性
如下图,一个application的执行过程被划分为四个阶段:
阶段一:我们编写driver程序,定义RDD的action和transformation操作。这些依赖关系形成操作的DAG。
阶段二:根据形成的DAG,DAGScheduler将其划分为不同的stage。
阶段三:每一个stage中有一个TaskSet,DAGScheduler将TaskSet交给TaskScheduler去执行,TaskScheduler将任务执行完毕之后结果返回给DAGSCheduler。
阶段四:TaskScheduler将任务分发到每一个Worker节点去执行,并将结果返回给TaskScheduler。
本篇文章的定位就是阶段一和阶段二。后面会介绍阶段三和阶段四。
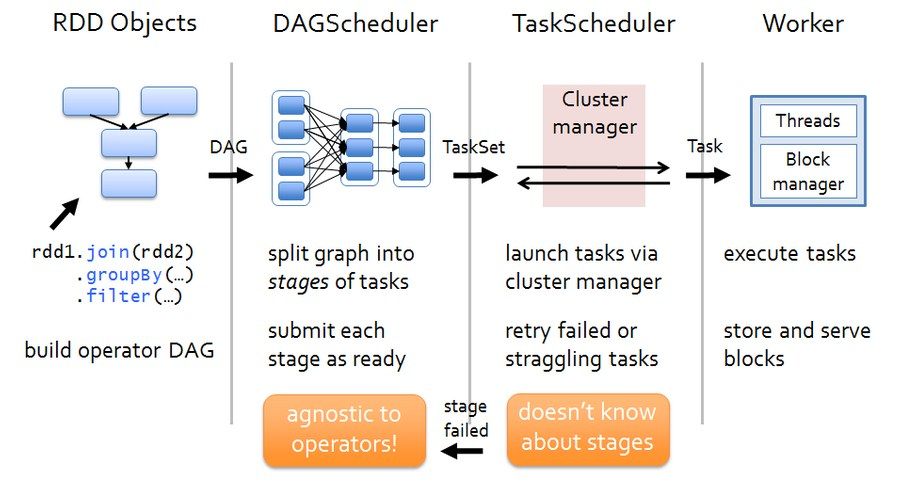
注:图片不知出处。
5、DAG的创建
我们先来分析一个top N案例。
1、一个真实的TopN案例
需求:一个大文件里有很多的重复整数,现在求出重复次数最多的前10个数。
代码如下(为了多几个stage,特意加了几个repartition):
scala> val sourceRdd = sc.textFile("/tmp/hive/hive/result",10).repartition(5) sourceRdd: org.apache.spark.rdd.RDD[String] = MapPartitionsRDD[5] at repartition at <console>:27
scala> val allTopNs = sourceRdd.flatMap(line => line.split(" ")).map(word => (word, 1)).reduceByKey(+).repartition(10).sortByKey(ascending = true, 100).map(tup => (tup.2, tup.1)).mapPartitions( | iter => { | iter.toList.sortBy(tup => tup._1).takeRight(100).iterator | } | ).collect()
// 结果略 scala> val finalTopN = scala.collection.SortedMap.empty[Int, String].++(allTopNs) //结果略
scala> finalTopN.takeRight(10).foreach(tup => {println(tup.2 + " occurs times : " + tup.1)})
53 occurs times : 1070 147 occurs times : 1072 567 occurs times : 1073 931 occurs times : 1075 267 occurs times : 1077 768 occurs times : 1080 612 occurs times : 1081 877 occurs times : 1082 459 occurs times : 1084 514 occurs times : 1087
下面看一下生成的DAG和Stage
任务概览

Description描述的就是每一个job的最后一个方法。
stage 0 到 3的DAG图:

stage 4 到 8的DAG图:
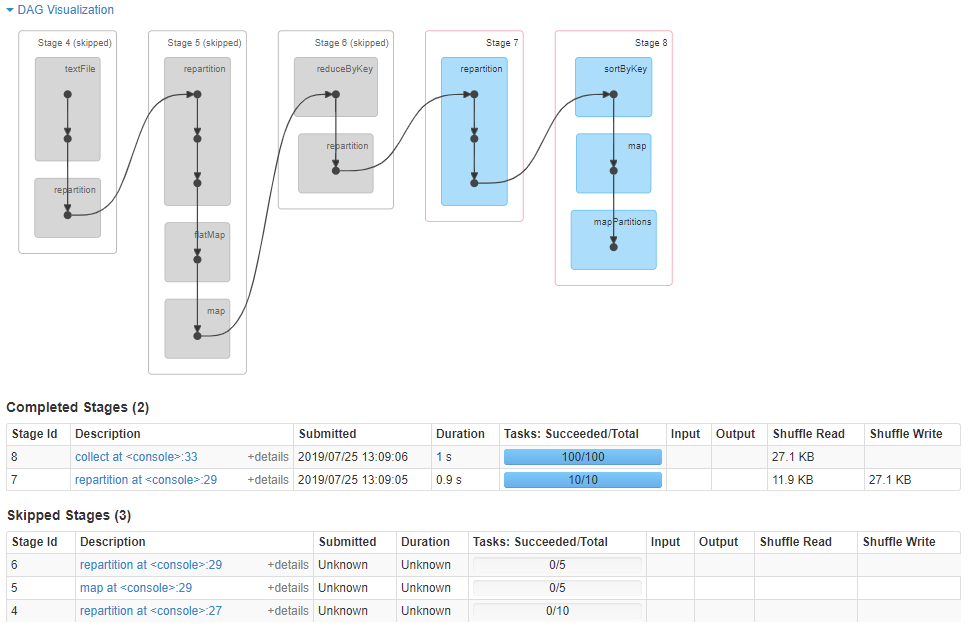
每一个stage的Description描述的是stage的最后一个方法。
2、总结
可以看出,RDD的依赖关系是有driver端对RDD的操作形成的。
一个Stage中DAG的是根据RDD的依赖来构建的。
我们来看一下源码。
6、Stage
1、构造方法
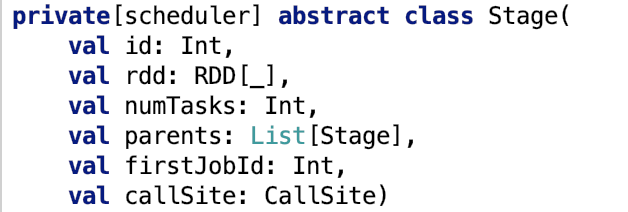
参数介绍如下:
id – Unique stage ID rdd – RDD that this stage runs on: for a shuffle map stage, it's the RDD we run map tasks on, while for a result stage, it's the target RDD that we ran an action on numTasks – Total number of tasks in stage; result stages in particular may not need to compute all partitions, e.g. for first(), lookup(), and take(). parents – List of stages that this stage depends on (through shuffle dependencies). firstJobId – ID of the first job this stage was part of, for FIFO scheduling. callSite – Location in the user program associated with this stage: either where the target RDD was created, for a shuffle map stage, or where the action for a result stage was called
callSite其实记录的就是stage用户代码的位置。
2、成员变量

3、成员方法
其实相对来说比较简单。
4、Stage的子类
它有两个子类,如下:

7、ResultStage
类说明:
ResultStages apply a function on some partitions of an RDD to compute the result of an action. The ResultStage object captures the function to execute, func, which will be applied to each partition, and the set of partition IDs, partitions. Some stages may not run on all partitions of the RDD, for actions like first() and lookup().
ResultStage在RDD的某些分区上应用函数来计算action操作的结果。 对于诸如first()和lookup()之类的操作,某些stage可能无法在RDD的所有分区上运行。
简言之,ResultStage是应用action操作在action上进而得出计算结果。
源码如下:

8、ShuffleMapStage
1、类说明
ShuffleMapStage 是中间的stage,为shuffle生产数据。它们在shuffle之前出现。当执行完毕之后,结果数据被保存,以便reduce 任务可以获取到。
2、构造方法
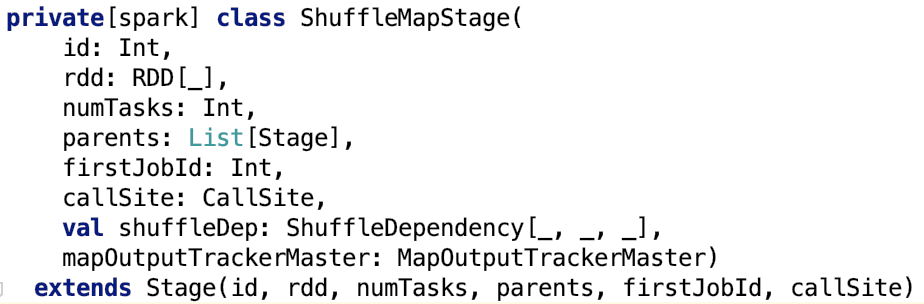
shuffleDep记录了每一个stage所属的shuffle。
9、Stage的划分
在上面我们提到,每一个RDD都有对父RDD的依赖关系,这样的依赖关系形成了一个有向无环图。即DAG。
当一个用户在一个RDD上运行一个action时,调度会检查RDD的血缘关系(即依赖关系)来创建一个stage中的DAG图来执行。
如下图:
在说stage划分之前先,剖析一下跟DAGScheduler相关的类。
10、EventLoop
1、类说明
Note: The event queue will grow indefinitely. So subclasses should make sure onReceive can handle events in time to avoid the potential OOM.
它定义了异步消息处理机制框架。
2、消息队列
其内部有一个阻塞双端队列,用于存放消息:

3、post到消息队列
外部线程调用 post 方法将事件post到堵塞队列中:

4、消费线程
有一个消息的消费线程:
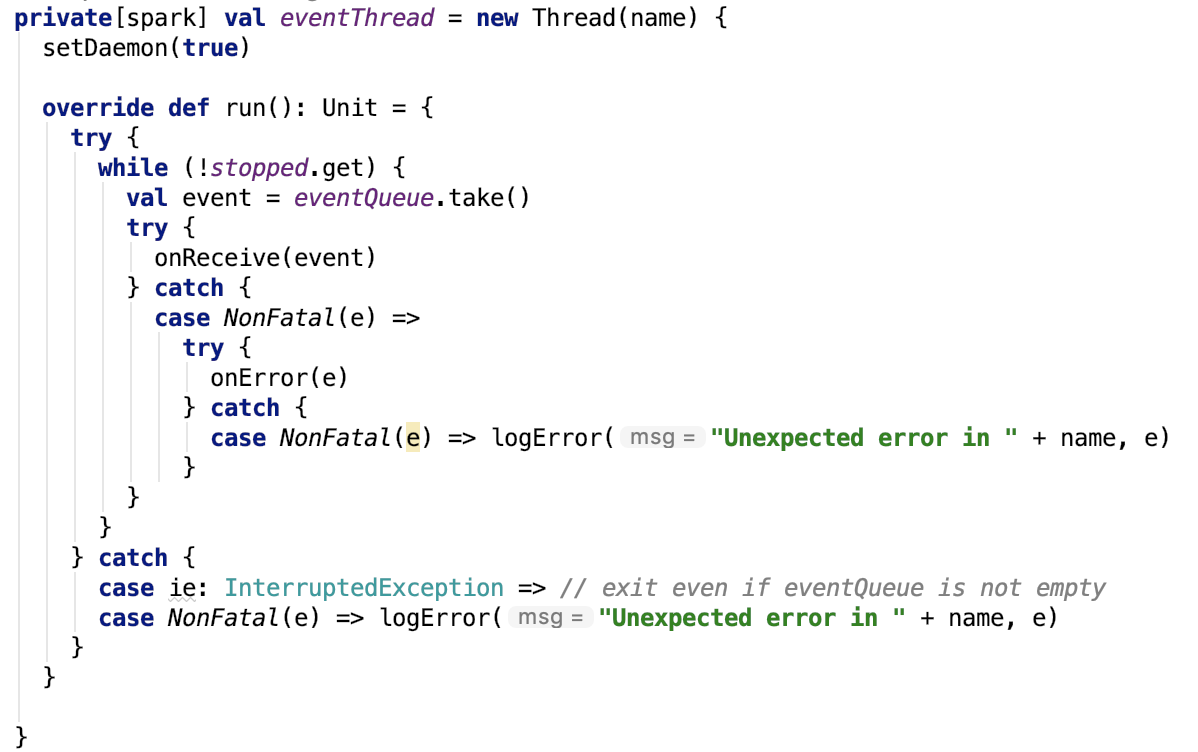
onReceive 方法是一个抽象方法,由子类来实现。
下面来看其实现类 -- DAGSchedulerEventProcessLoop。
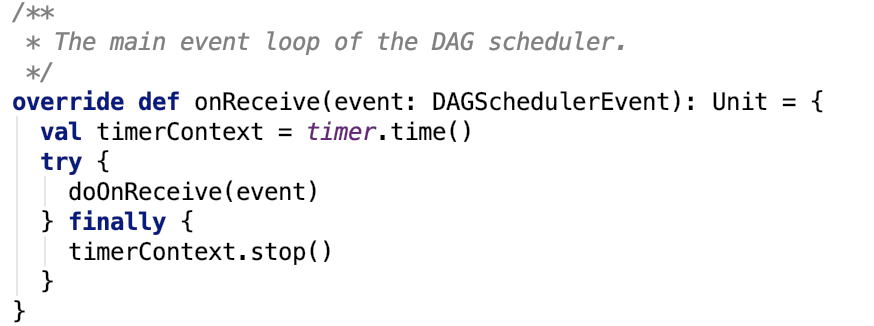
其接收的是DAGSchedulerEvent类型的事件。DAGSchedulerEvent 是一个sealed trait,其实现如下:
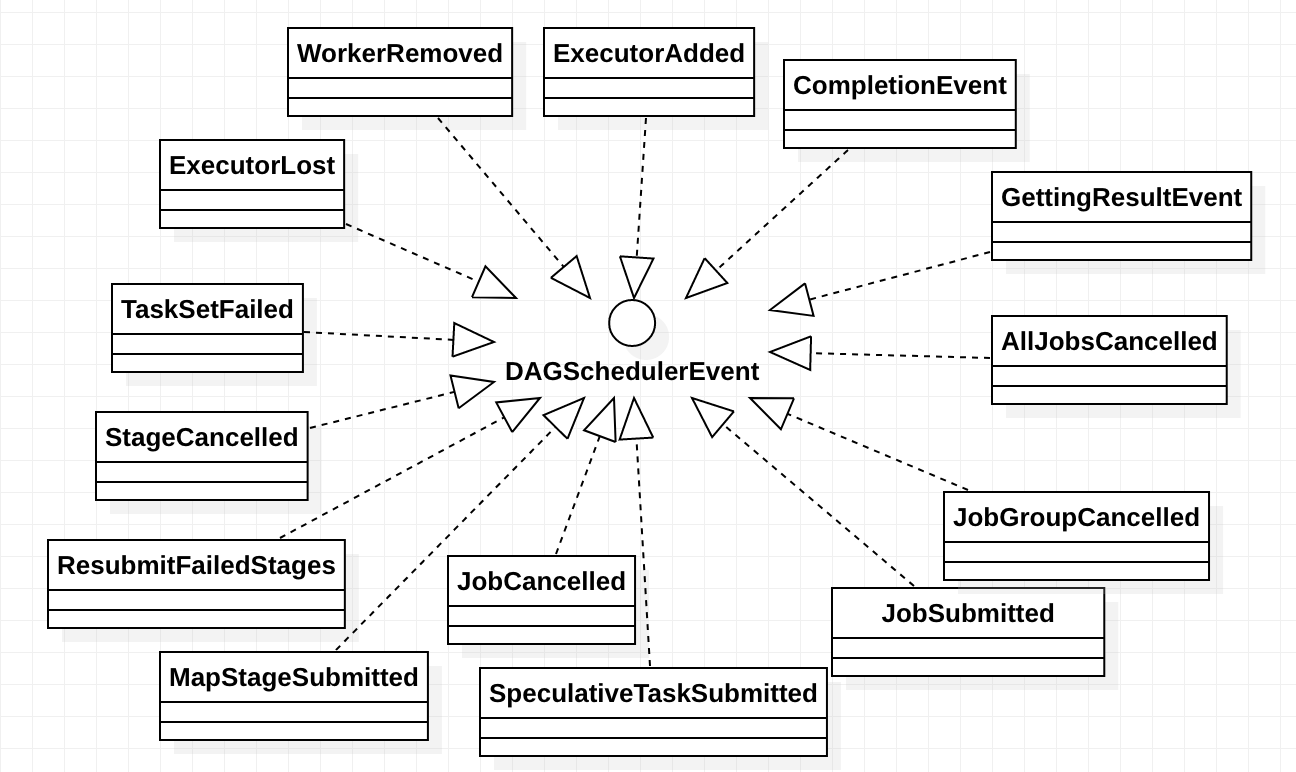
它的每一个子类事件,在doOnReceive 方法中都有体现,如下:
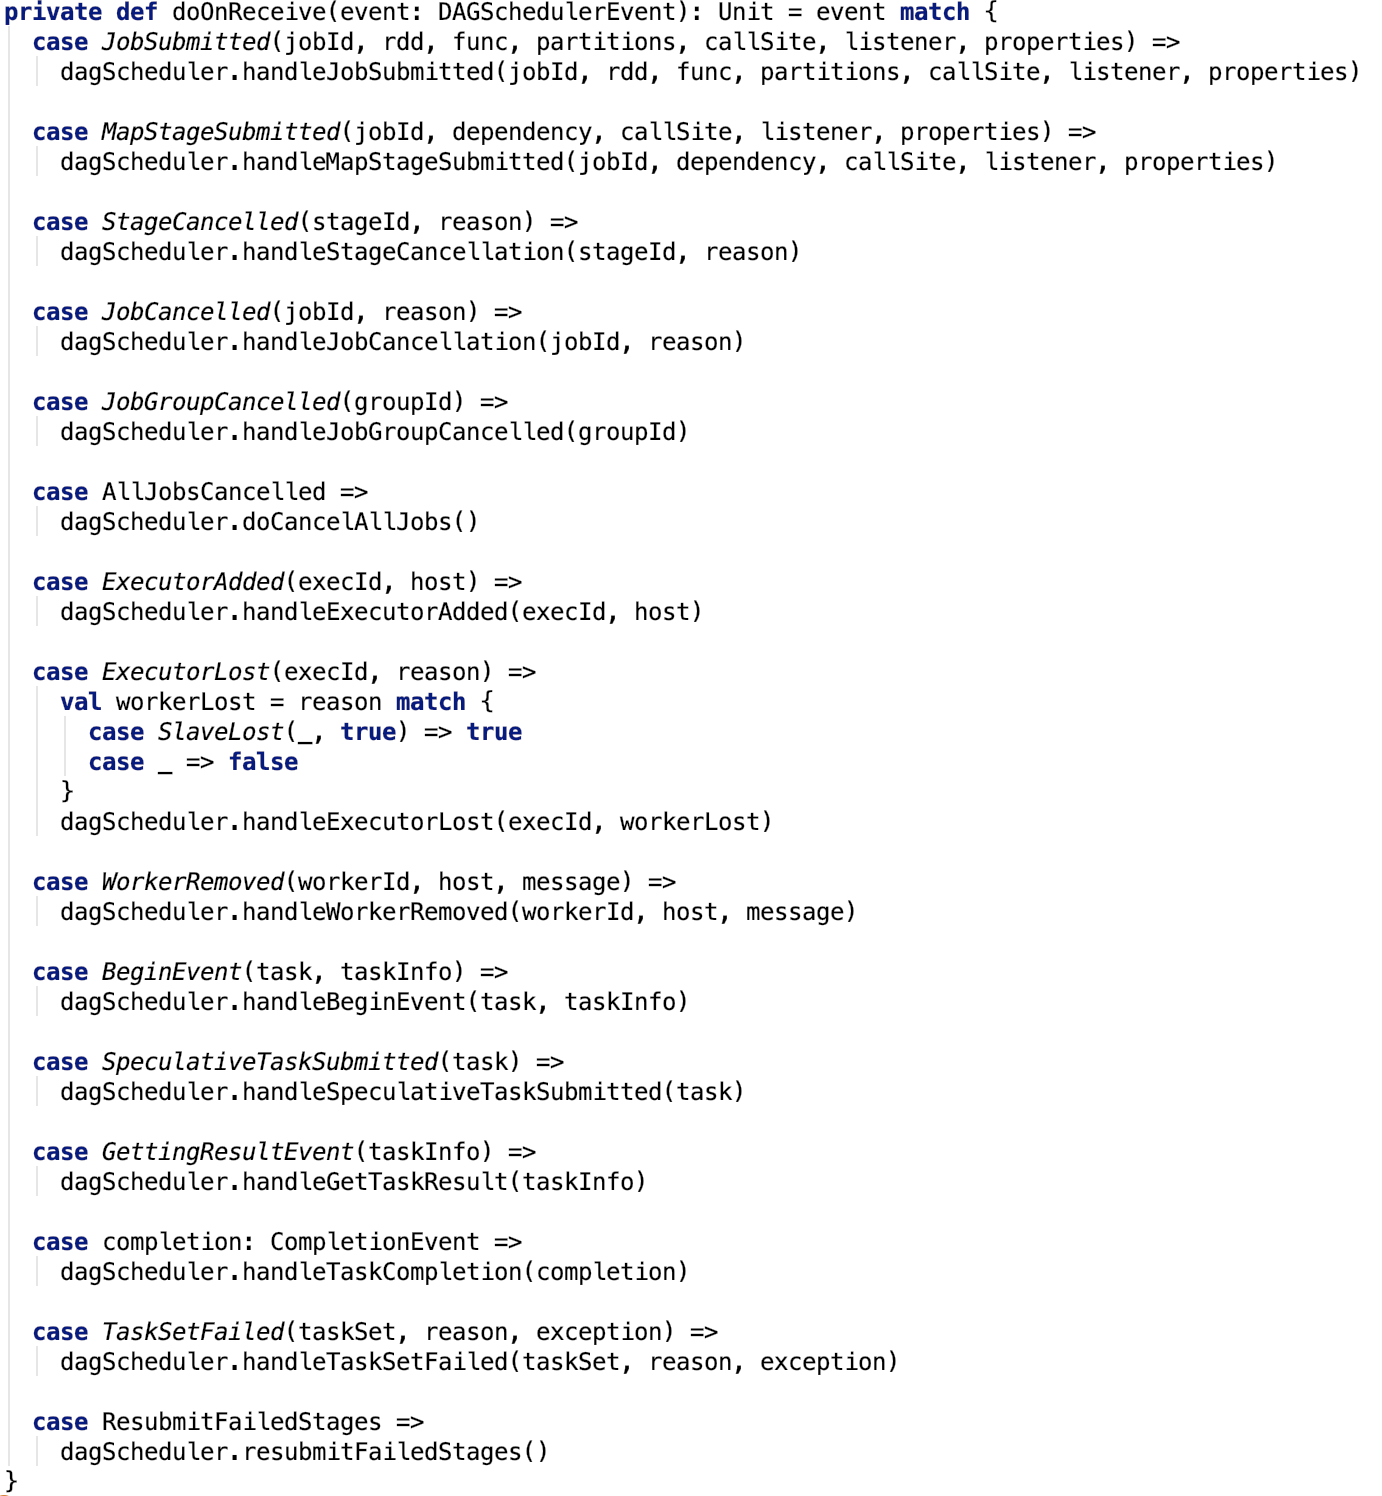
11、DAGScheduler
这个类的定义已经超过2k行了。所以也不打算全部介绍,本篇文章只介绍跟stage任务的生成相关的属性和方法。
1、类说明
The high-level scheduling layer that implements stage-oriented scheduling. It computes a DAG of stages for each job, keeps track of which RDDs and stage outputs are materialized, and finds a minimal schedule to run the job. It then submits stages as TaskSets to an underlying TaskScheduler implementation that runs them on the cluster. A TaskSet contains fully independent tasks that can run right away based on the data that's already on the cluster (e.g. map output files from previous stages), though it may fail if this data becomes unavailable.
Spark stages are created by breaking the RDD graph at shuffle boundaries. RDD operations with "narrow" dependencies, like map() and filter(), are pipelined together into one set of tasks in each stage, but operations with shuffle dependencies require multiple stages (one to write a set of map output files, and another to read those files after a barrier). In the end, every stage will have only shuffle dependencies on other stages, and may compute multiple operations inside it. The actual pipelining of these operations happens in the RDD.compute() functions of various RDDs
In addition to coming up with a DAG of stages, the DAGScheduler also determines the preferred locations to run each task on, based on the current cache status, and passes these to the low-level TaskScheduler. Furthermore, it handles failures due to shuffle output files being lost, in which case old stages may need to be resubmitted. Failures within a stage that are not caused by shuffle file loss are handled by the TaskScheduler, which will retry each task a small number of times before cancelling the whole stage. When looking through this code, there are several key concepts:
- Jobs (represented by ActiveJob) are the top-level work items submitted to the scheduler. For example, when the user calls an action, like count(), a job will be submitted through submitJob. Each Job may require the execution of multiple stages to build intermediate data.
- Stages (Stage) are sets of tasks that compute intermediate results in jobs, where each task computes the same function on partitions of the same RDD. Stages are separated at shuffle boundaries, which introduce a barrier (where we must wait for the previous stage to finish to fetch outputs). There are two types of stages: ResultStage, for the final stage that executes an action, and ShuffleMapStage, which writes map output files for a shuffle. Stages are often shared across multiple jobs, if these jobs reuse the same RDDs.
- Tasks are individual units of work, each sent to one machine.
- Cache tracking: the DAGScheduler figures out which RDDs are cached to avoid recomputing them and likewise remembers which shuffle map stages have already produced output files to avoid redoing the map side of a shuffle.
- Preferred locations: the DAGScheduler also computes where to run each task in a stage based on the preferred locations of its underlying RDDs, or the location of cached or shuffle data.
- Cleanup: all data structures are cleared when the running jobs that depend on them finish, to prevent memory leaks in a long-running application.
To recover from failures, the same stage might need to run multiple times, which are called "attempts". If the TaskScheduler reports that a task failed because a map output file from a previous stage was lost, the DAGScheduler resubmits that lost stage. This is detected through a CompletionEvent with FetchFailed, or an ExecutorLost event. The DAGScheduler will wait a small amount of time to see whether other nodes or tasks fail, then resubmit TaskSets for any lost stage(s) that compute the missing tasks. As part of this process, we might also have to create Stage objects for old (finished) stages where we previously cleaned up the Stage object. Since tasks from the old attempt of a stage could still be running, care must be taken to map any events received in the correct Stage object.
Here's a checklist to use when making or reviewing changes to this class:
- All data structures should be cleared when the jobs involving them end to avoid indefinite accumulation of state in long-running programs.
- When adding a new data structure, update DAGSchedulerSuite.assertDataStructuresEmpty to include the new structure. This will help to catch memory leaks.
下面直接来看stage的划分
12.从源码看Stage的划分
1、从action函数到DAGScheduler
collect 函数定义如下:
其调用了SparkContext的 runJob 方法,又调用了几次其重载方法最终调用的runJob 方法如下:
其内部调用了DAGScheduler的runJob 方法
2、DAGScheduler对stage的划分
DAGScheduler的runJob 方法如下:
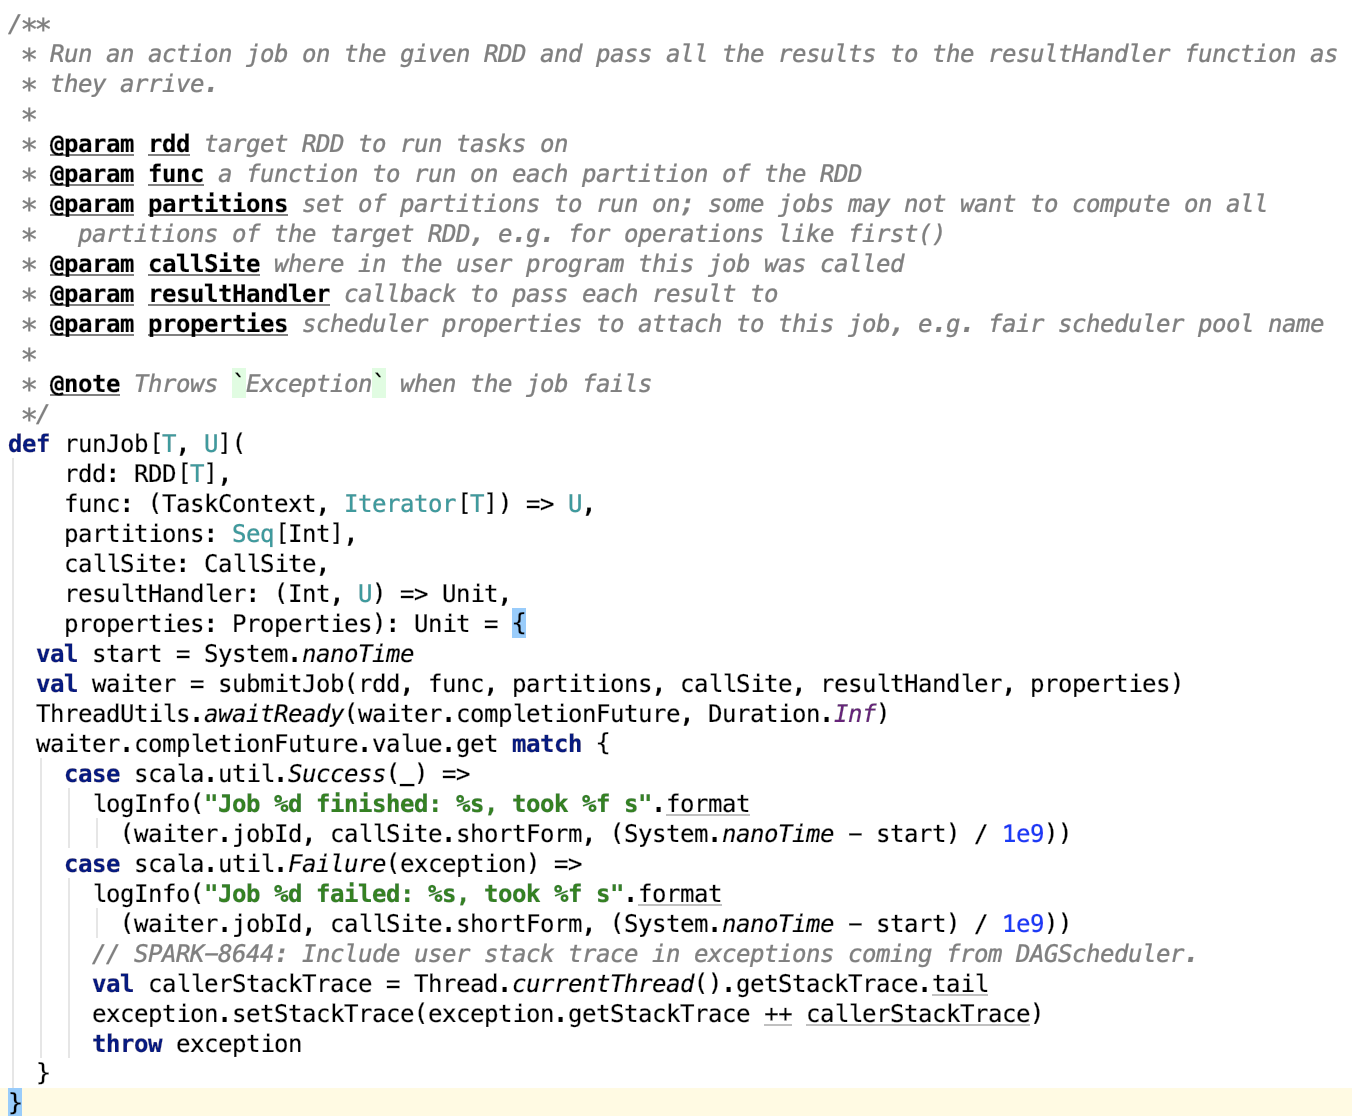
思路,提交方法后返回一个JobWaiter 对象,等待任务执行完成,然后根据任务执行状态去执行对应的成功或失败的方法。
submitJob 如下:
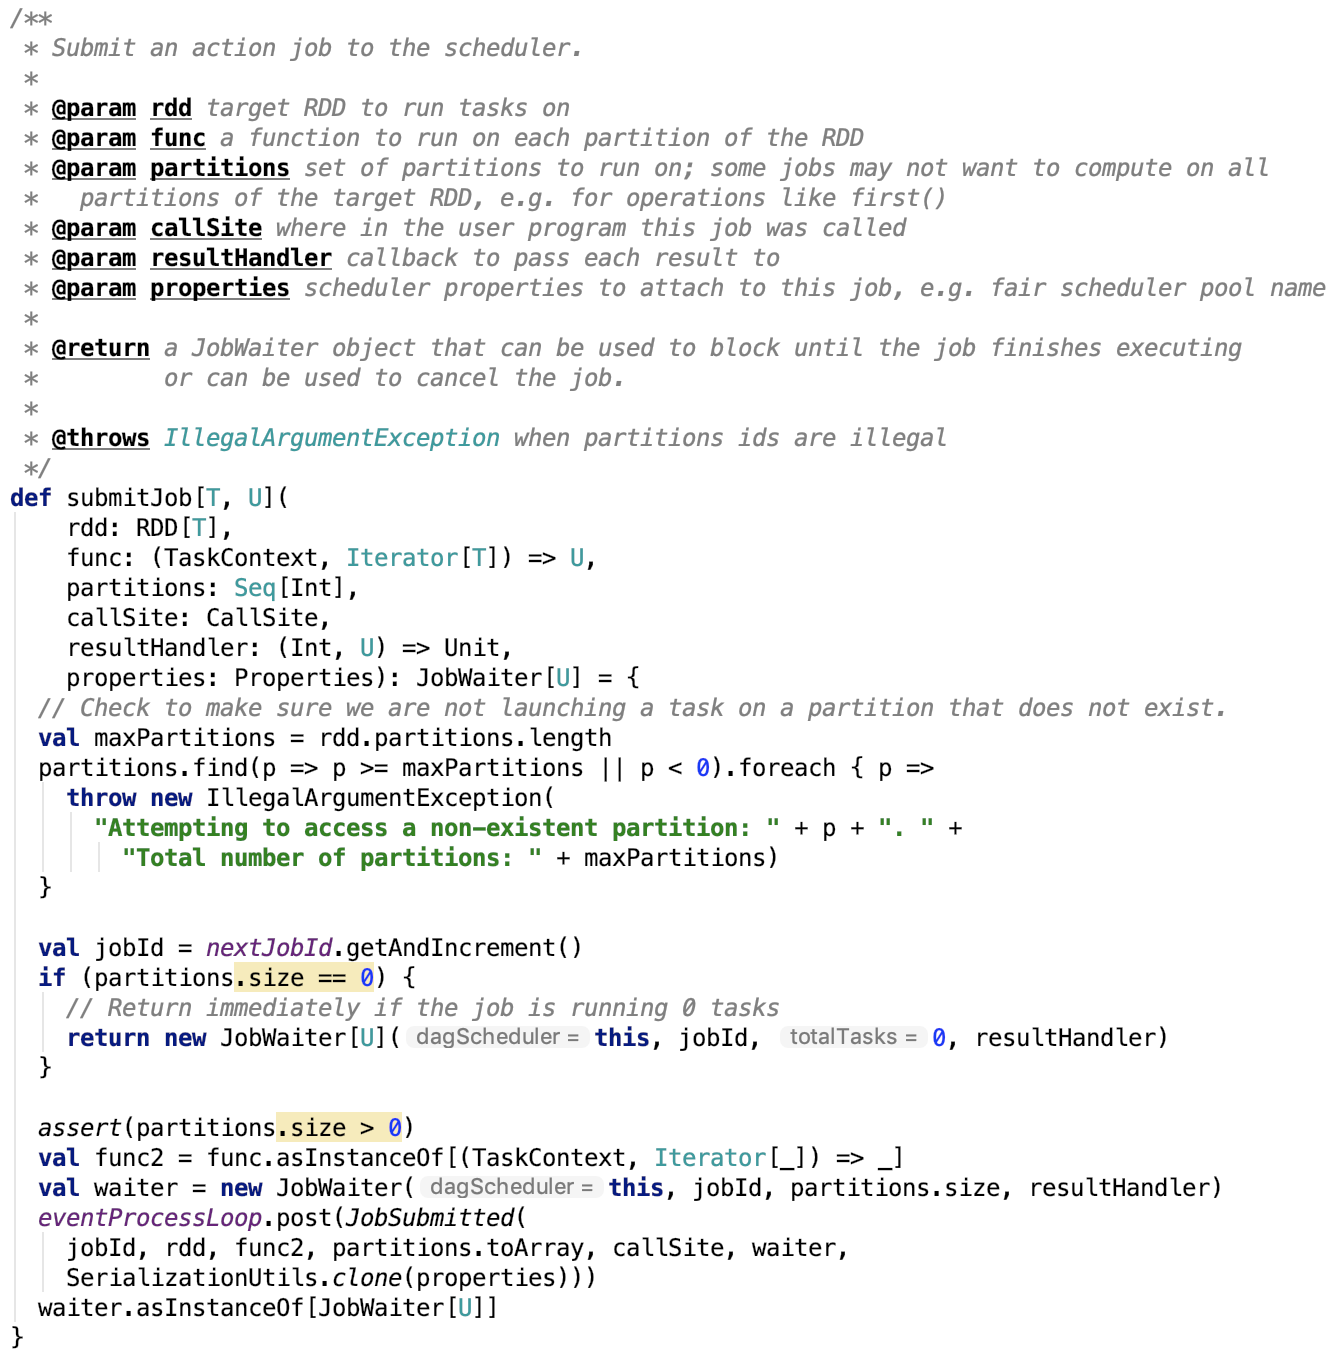
最终任务被封装进了JobSubmitted 事件消息体中,最终该事件消息被放入了eventProcessLoop 对象中,eventProcessLoop定义如下:

即事件被放入到了上面我们提到的 DAGSchedulerEventProcessLoop 异步消息处理模型中。
DAGSchedulerEventProcessLoop 的 doOnReceive 中,发现了 JobSubmitted 事件对应的分支为:

即会执行DAGScheduler的handleJobSubmitted方法,如下:
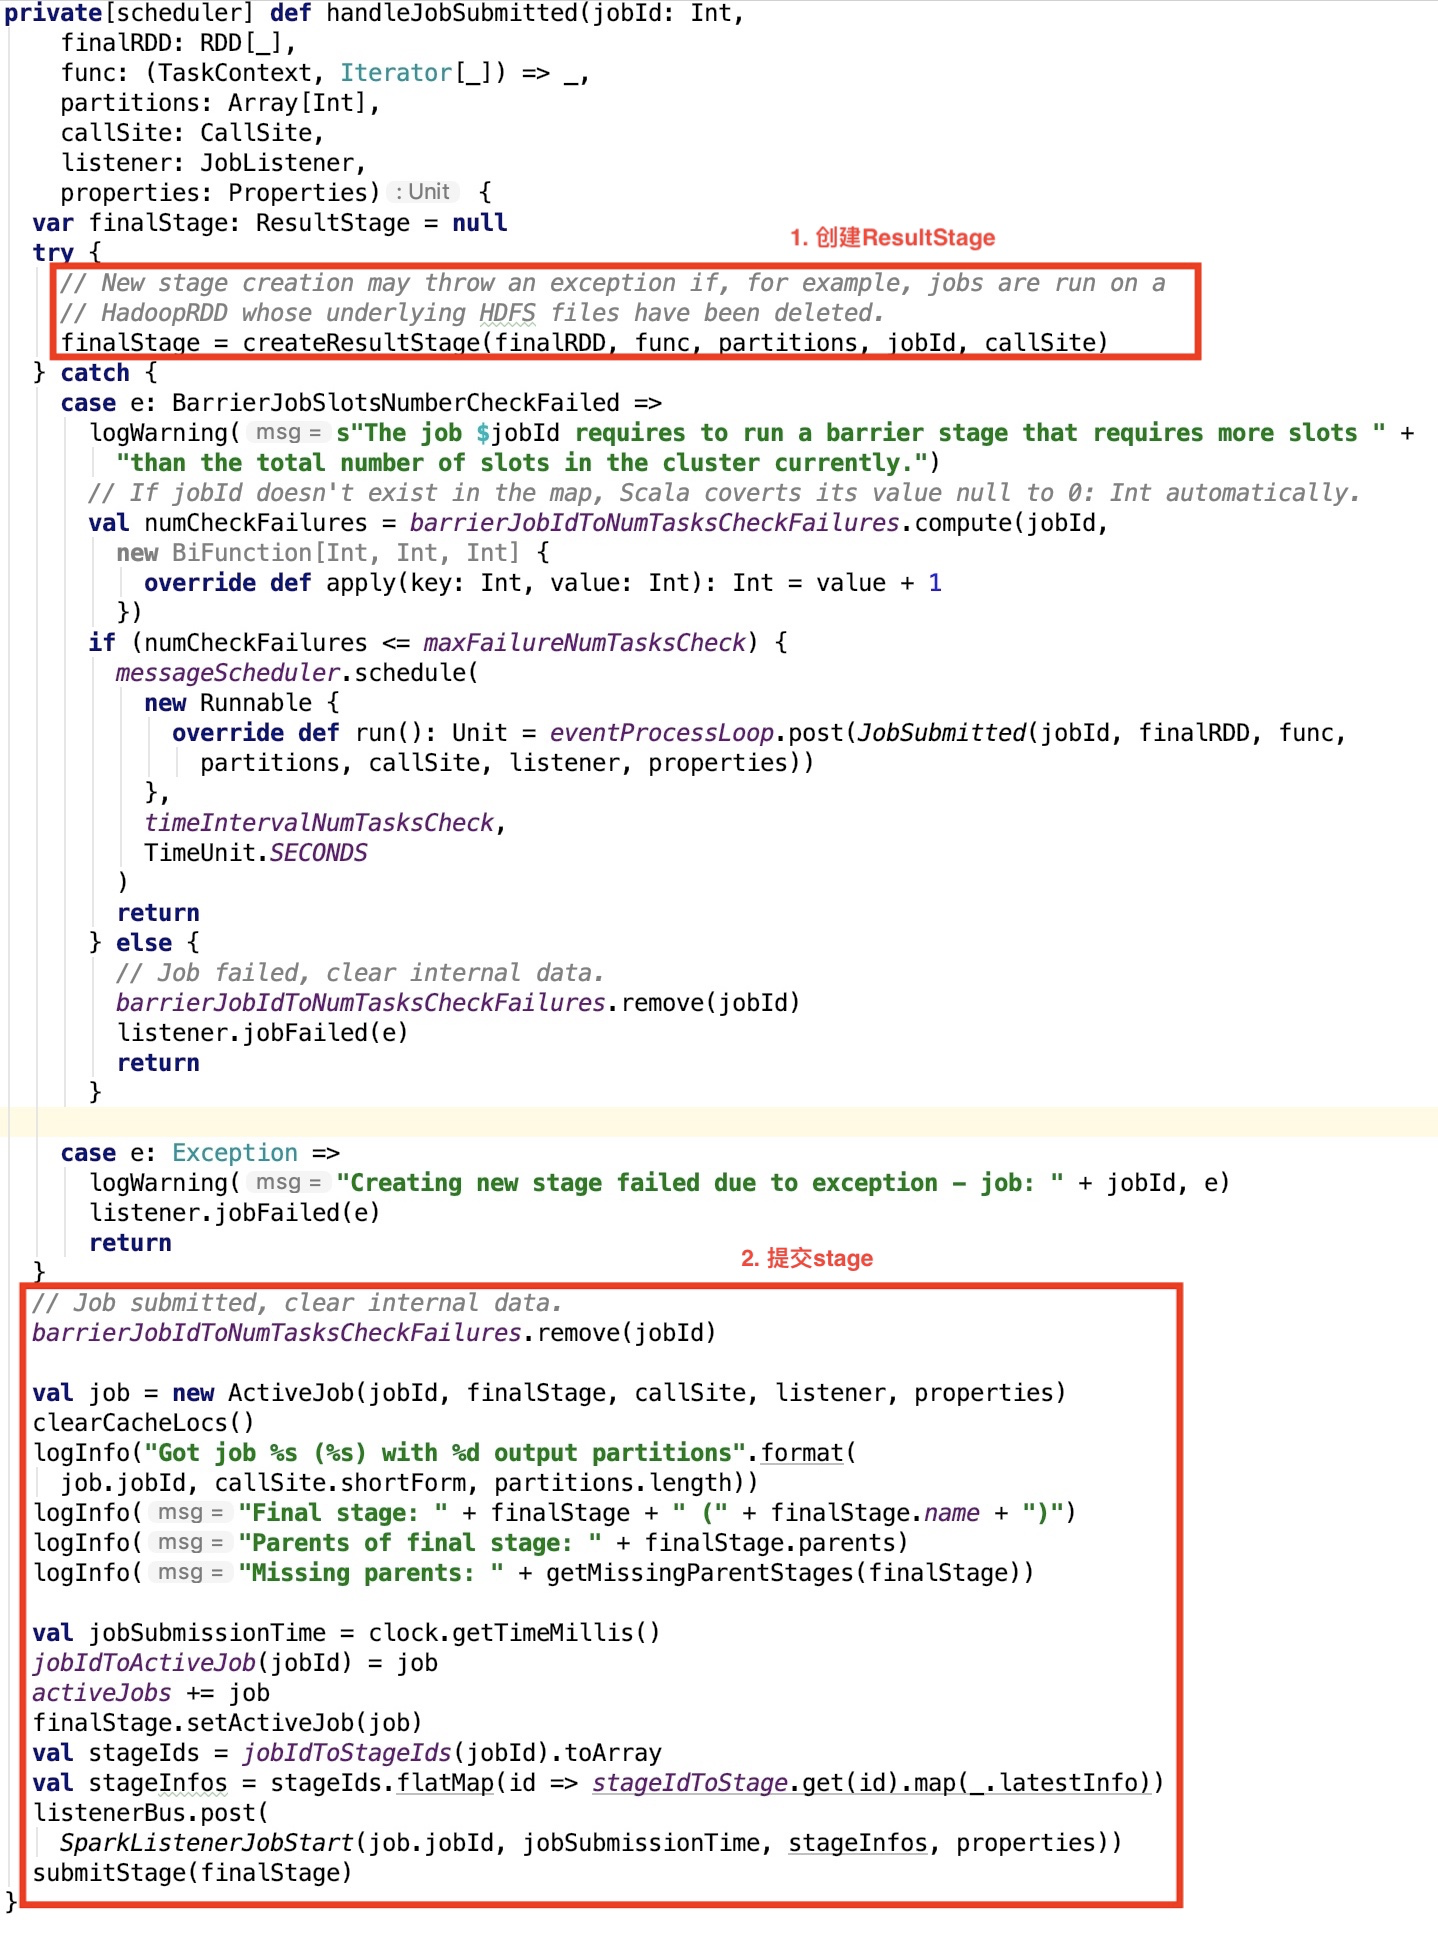
这个方法里面有两步:
-
创建ResultStage
-
提交Stage
本篇文章,我们只分析第一步,第二步在下篇文章分析。
createResultStage 方法如下:
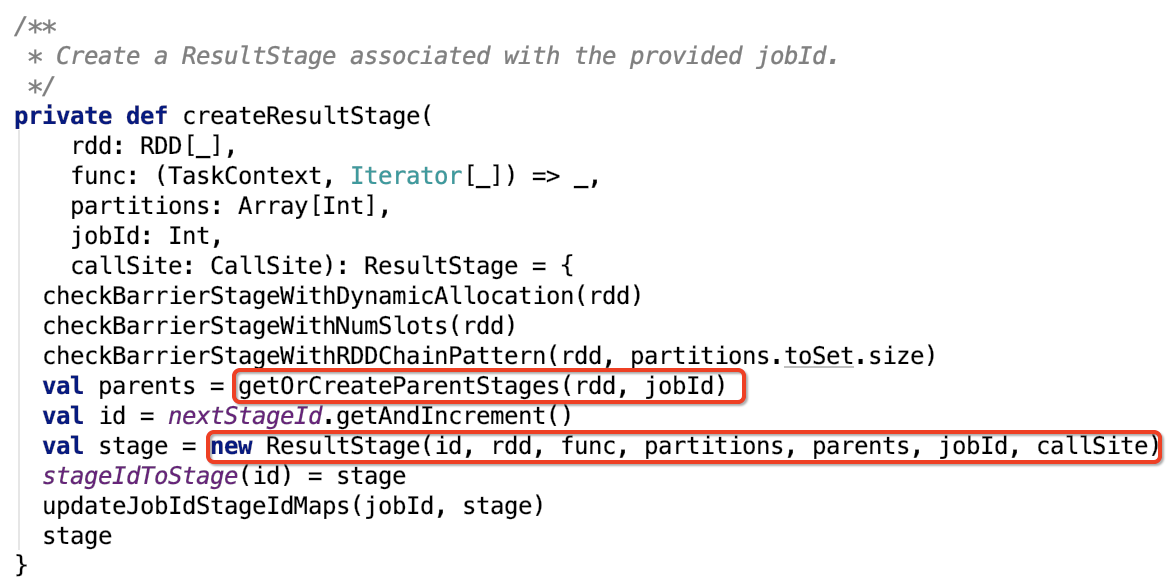
getOrCreateParentStage 方法创建或获取该RDD的Shuffle依赖关系,然后根据shuffle依赖进而划分stage,源码如下:

获取其所有父类的shuffle依赖,getShuffleDependency 方法如下,类似于树的深度遍历。
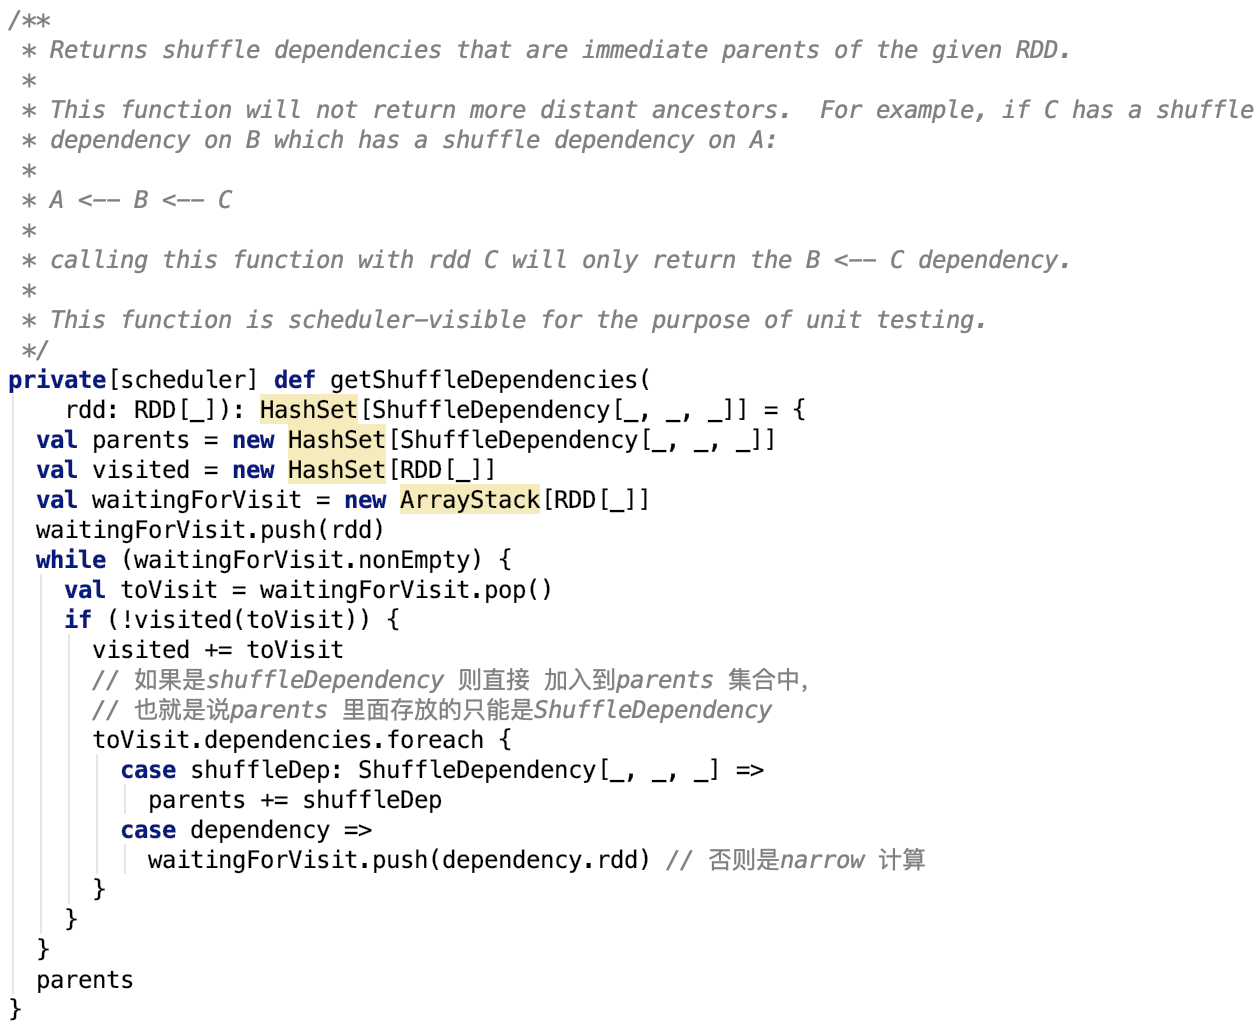
getOrCreateShuffleMapStage方法根据shuffle依赖创建ShuffleMapStage,如下,思路,先查看当前stage是否已经记录在shuffleIdToMapStage变量中,若存在,表示已经创建过了,否则需要根据依赖的RDD去找其RDD的shuffle依赖,然后再创建shuffleMapStage。
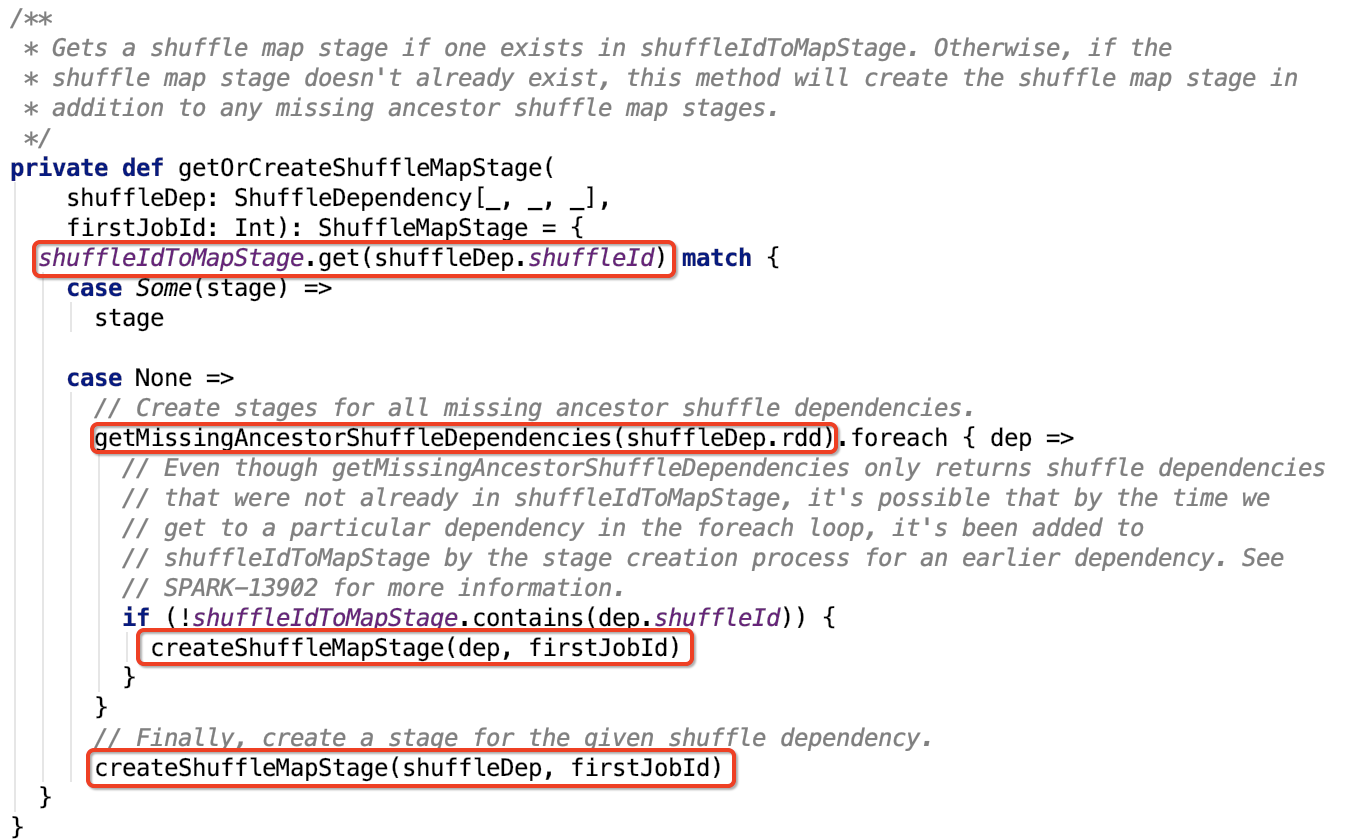
shuffleIdToMapStage定义如下:

这个map中只包含正在运行的job的stage信息。
其中shuffle 依赖的唯一id 是:shuffleId,这个id 是 SpackContext 生成的全局shuffleId。
getMissingAncestorShuffleDependencies 方法如下,思路:深度遍历依赖关系,把所有未运行的shuffle依赖都找到。

到此,所有寻找shuffle依赖关系的的逻辑都已经剖析完毕,下面看创建MapShuffleStage的方法,

思路:生成ShuffleMapStage,并更新 stageIdToStage变量,更新shuffleIdToMapStage变量,如果 MapOutputTrackerMaster 中没有注册过该shuffle,需要注册,最后返回ShuffleMapStage对象。
updateJobIdStageIdMaps方法如下,思路该ResultStage依赖的所有ShuffleMapStage的jobId设定为指定的jobId,即跟ResultStage一致的jobId:

至此,stage的划分逻辑剖析完毕。
13、总结
本篇文章对照官方文档,说明了RDD的主要操作,action和transformation,进一步引出了RDD的依赖关系,最后剖析了DAGScheduler根据shuffle依赖划分stage的逻辑。
二、Stage的提交
1、引言

2、紧接上篇文章
上篇文章中,DAGScheduler的handleJobSubmitted方法我们只剖析了stage的生成部分,下面我们看一下stage的提交部分源码。
1、提交Stage的思路
首先构造ActiveJob对象,其次清除缓存的block location信息,然后记录jobId和job对象的映射关系到jobIdToActiveJob map集合中,并且将该jobId记录到活动的job集合中。
获取到Job所有的stage的唯一标识,并且根据唯一标识来获取stage对象,并且调用其lastestInfo方法获取其StageInfo对象。
然后进一步封装成 SparkListenerJobStart 事件对象,并post到 listenerBus中,listenerBus 是一个 LiveListenerBus 对象,其内部封装了四个消息队列组成的集合。
最后调用submitStage 方法执行Stage的提交。
先来看一下ActiveJob的说明。
2、ActiveJob类说明
它代表了正运行在DAGScheduler中的一个job,job有两种类型:result job,其通过计算一个ResultStage来执行一个action操作;map-stage job,它在下游的stage提交之前,为ShuffleMapStage计算map的输出。
构造方法

finalStages是这个job的最后一个stage。
3、提交Stage前的准备
直接先来看submitStage方法,如下:

思路: 首先先获取可能丢失的父stage信息,如果该stage的父stage被遗漏了,则递归调用查看其爷爷stage是否被遗漏。
1、查找遗漏父Stage
getMissingParentStages方法如下:
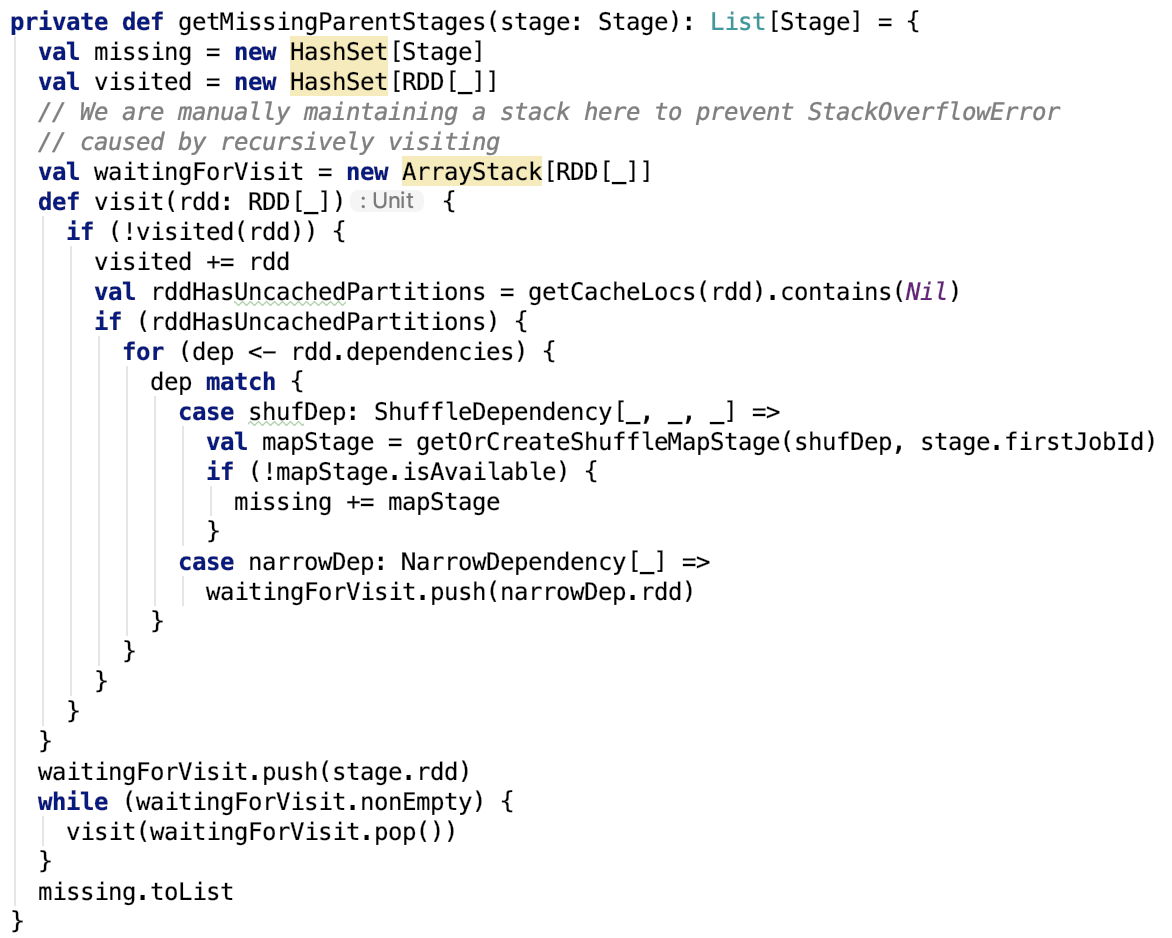
思路:不断创建父stage,可以看上篇文章 spark 源码分析之十九 -- DAG的生成和Stage的划分 做进一步了解。
4、提交Stage
submitMissingTasks方法过于长,为方便分析,按功能大致分为如下部分:
1、获取Stage需要计算的partition信息

org.apache.spark.scheduler.ResultStage#findMissingPartitions 方法如下:
org.apache.spark.scheduler.ShuffleMapStage#findMissingPartitions 方法如下:

org.apache.spark.MapOutputTrackerMaster#findMissingPartitions 方法如下:

2、将stage和分区记录到OutputCommitCoordinator中
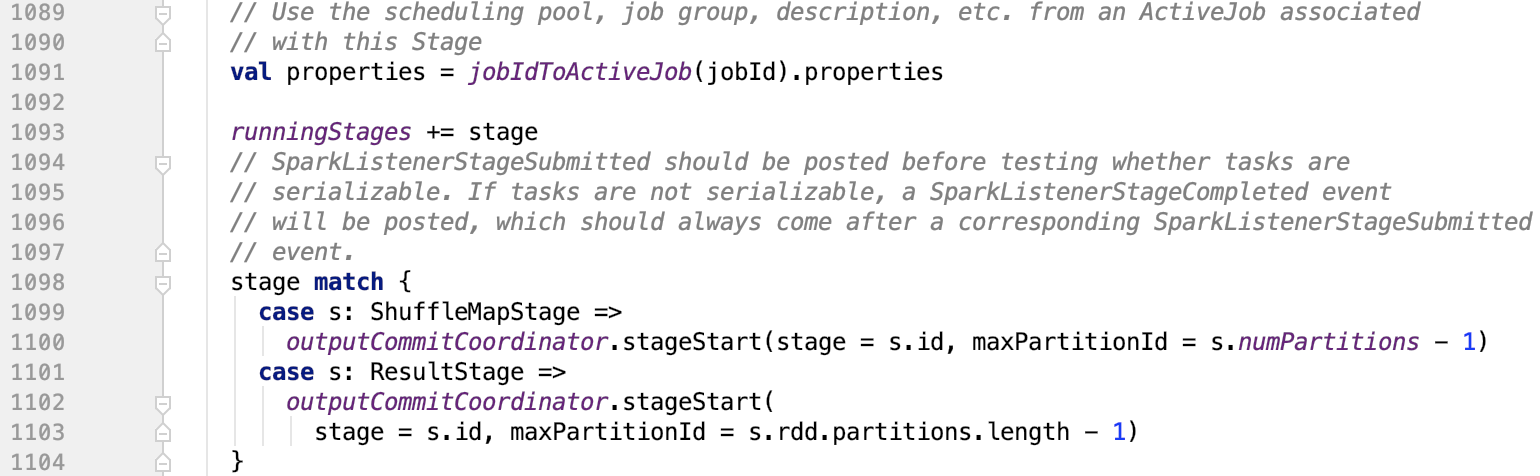
OutputCommitCoordinator 的 stageStart实现如下:

本质上就是把它放入到一个map中了。
3、获取分区的优先位置
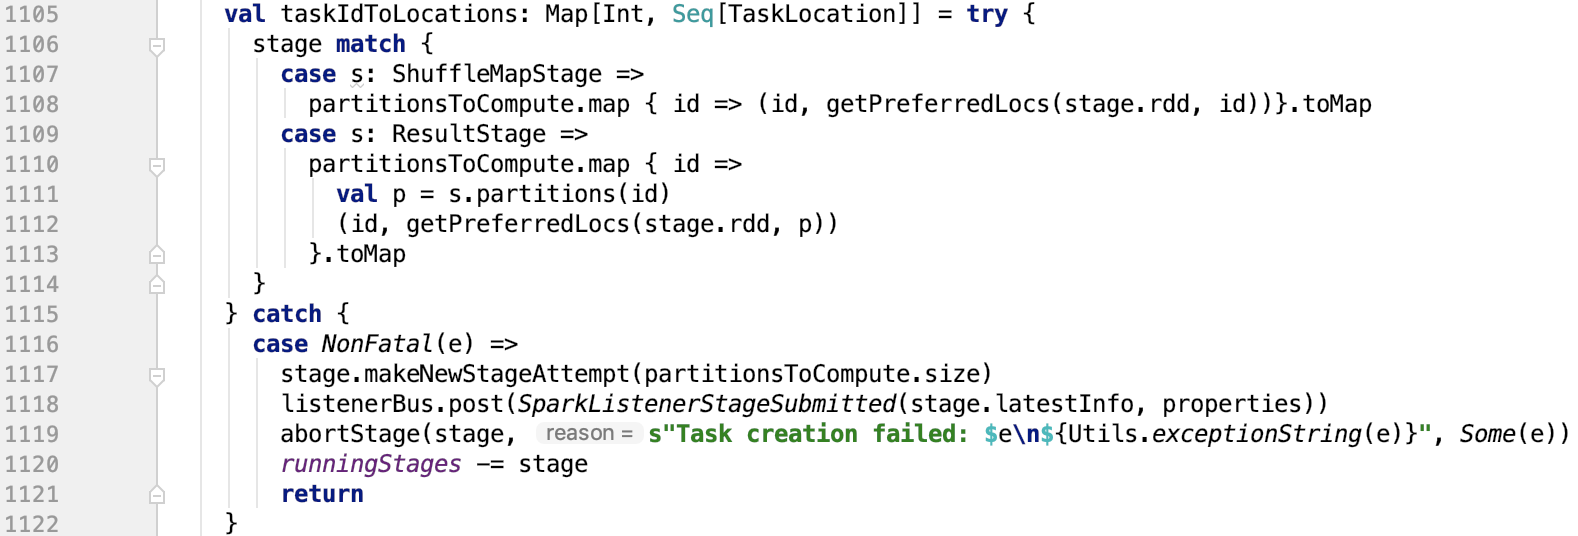
思路:根据stage的RDD和分区id获取到其rdd中的分区的优先位置。
下面看一下 getPreferredLocs 方法:

注释中说到,它是线程安全的,下面看一下,它是如何实现的,即 getPrefferredLocsInternal 方法。
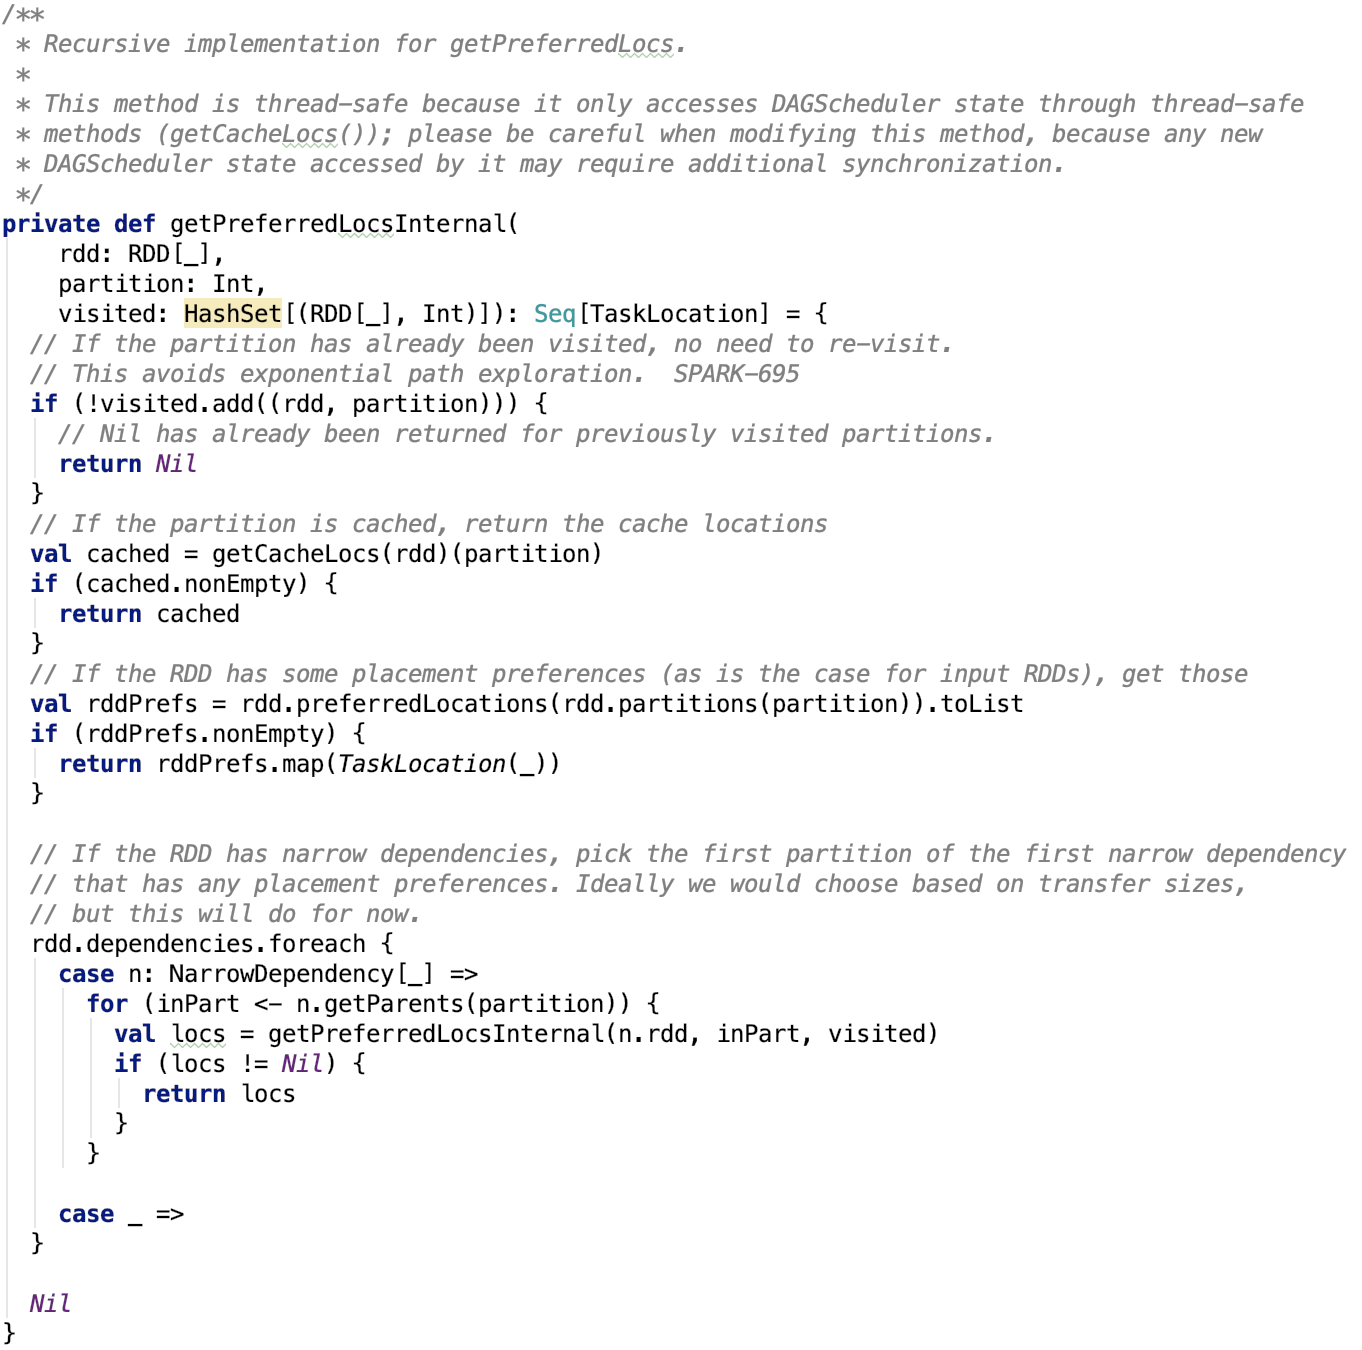
这个方法中提到四种情况:
-
如果之前获取到过,那么直接返回Nil即可。
-
如果之前已经缓存在内存中,直接从缓存的内存句柄中取出返回即可。
-
如果RDD对应的是HDFS输入的文件等,则使用RDD记录的优先位置。
-
如果上述三种情况都不满足,且是narrowDependency,则调用该方法,获取子RDDpartition对应的父RDD的partition的优先位置。
下面仔细说一下中间两种情况。
从缓存中取
getCacheLocs 方法如下:
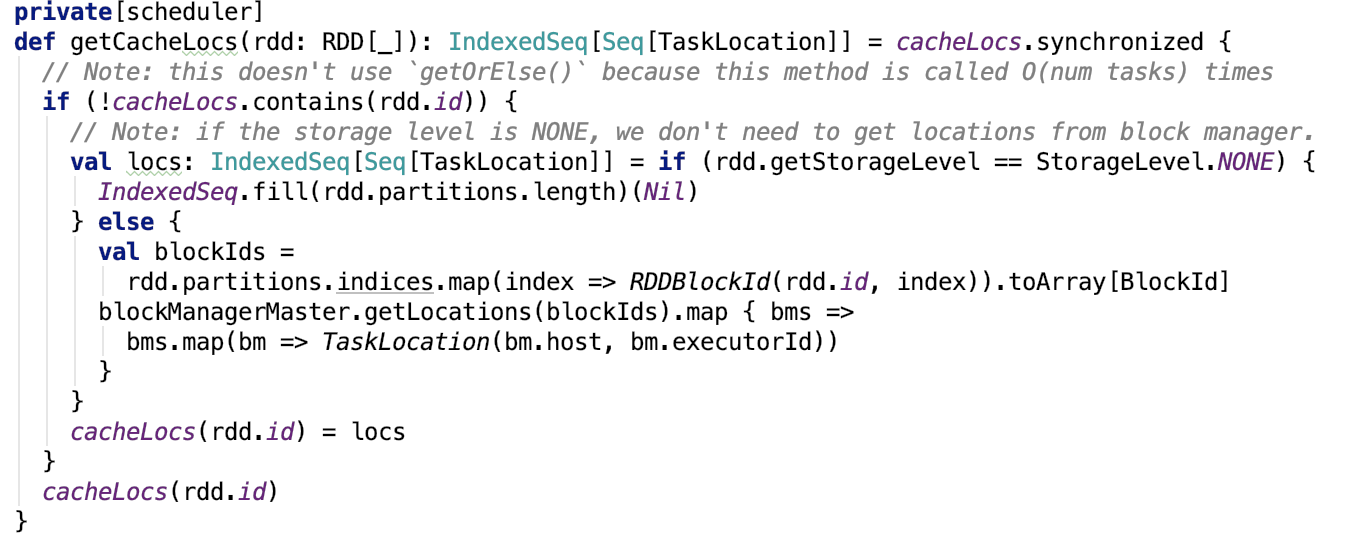
思路:先查看rdd的存储级别,如果没有存储级别,则直接返回Nil,否则根据RDD和分区id组成BlockId集合,请求存储系统中的BlockManager来获取block的位置,然后转换为TaskLocation信息返回。
获取RDD的优先位置
RDD的 preferredLocations 方法如下:

思路:先从checkpoint中找,如果checkpoint中没有,则返回默认的为Nil。
返回对象是TaskLocation对象,做一下简单的说明。
TaskLocation
类说明
A location where a task should run. This can either be a host or a (host, executorID) pair. In the latter case, we will prefer to launch the task on that executorID, but our next level of preference will be executors on the same host if this is not possible.
它有三个子类,如下:

这三个类定义如下:

很简单,不做过多说明。
TaskLocation伴随对象如下,现在用的方法是第二种 apply 方法:
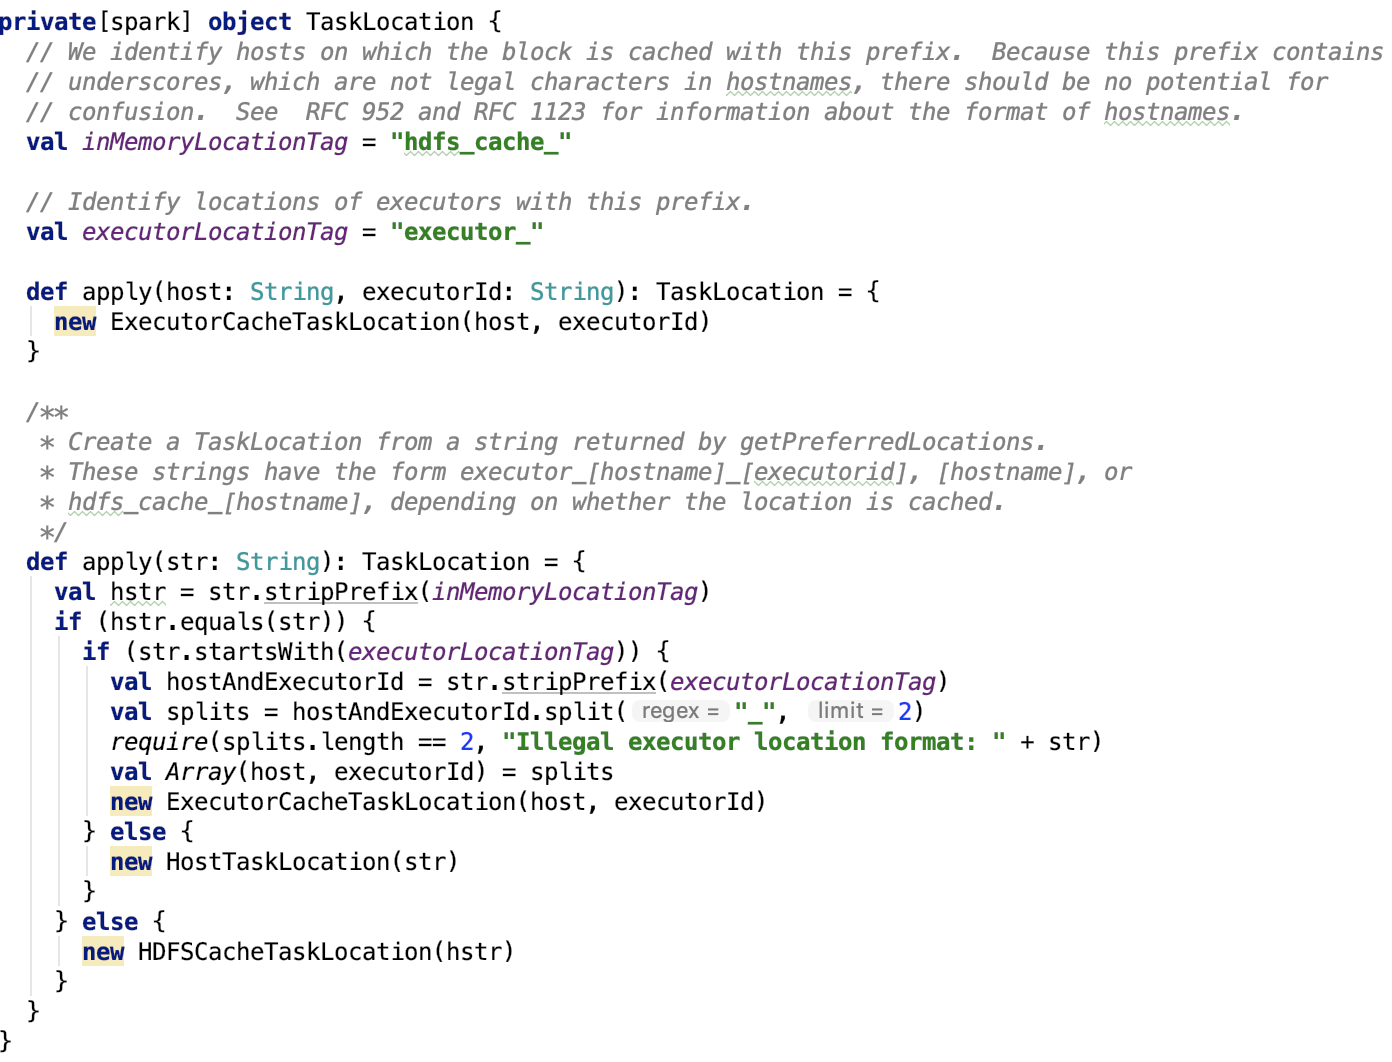
4、创建新的StageInfo
对应方法如下:

org.apache.spark.scheduler.Stage#makeNewStageAttempt 方法如下:
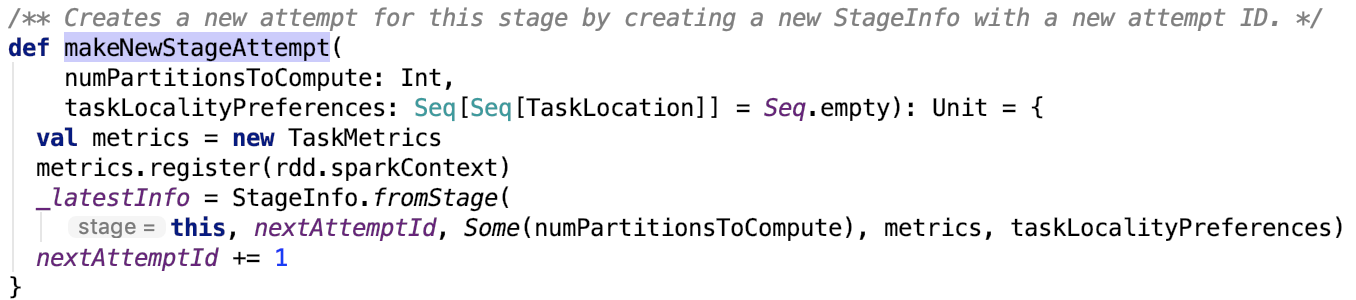
很简单,主要是调用了StageInfo的fromStage方法。
先来看Stage类。
StageInfo
StageInfo封装了关于Stage的一些信息,用于调度和SparkListener传递stage信息。
其伴生对象如下:

5、广播要执行task函数
对应源码如下:
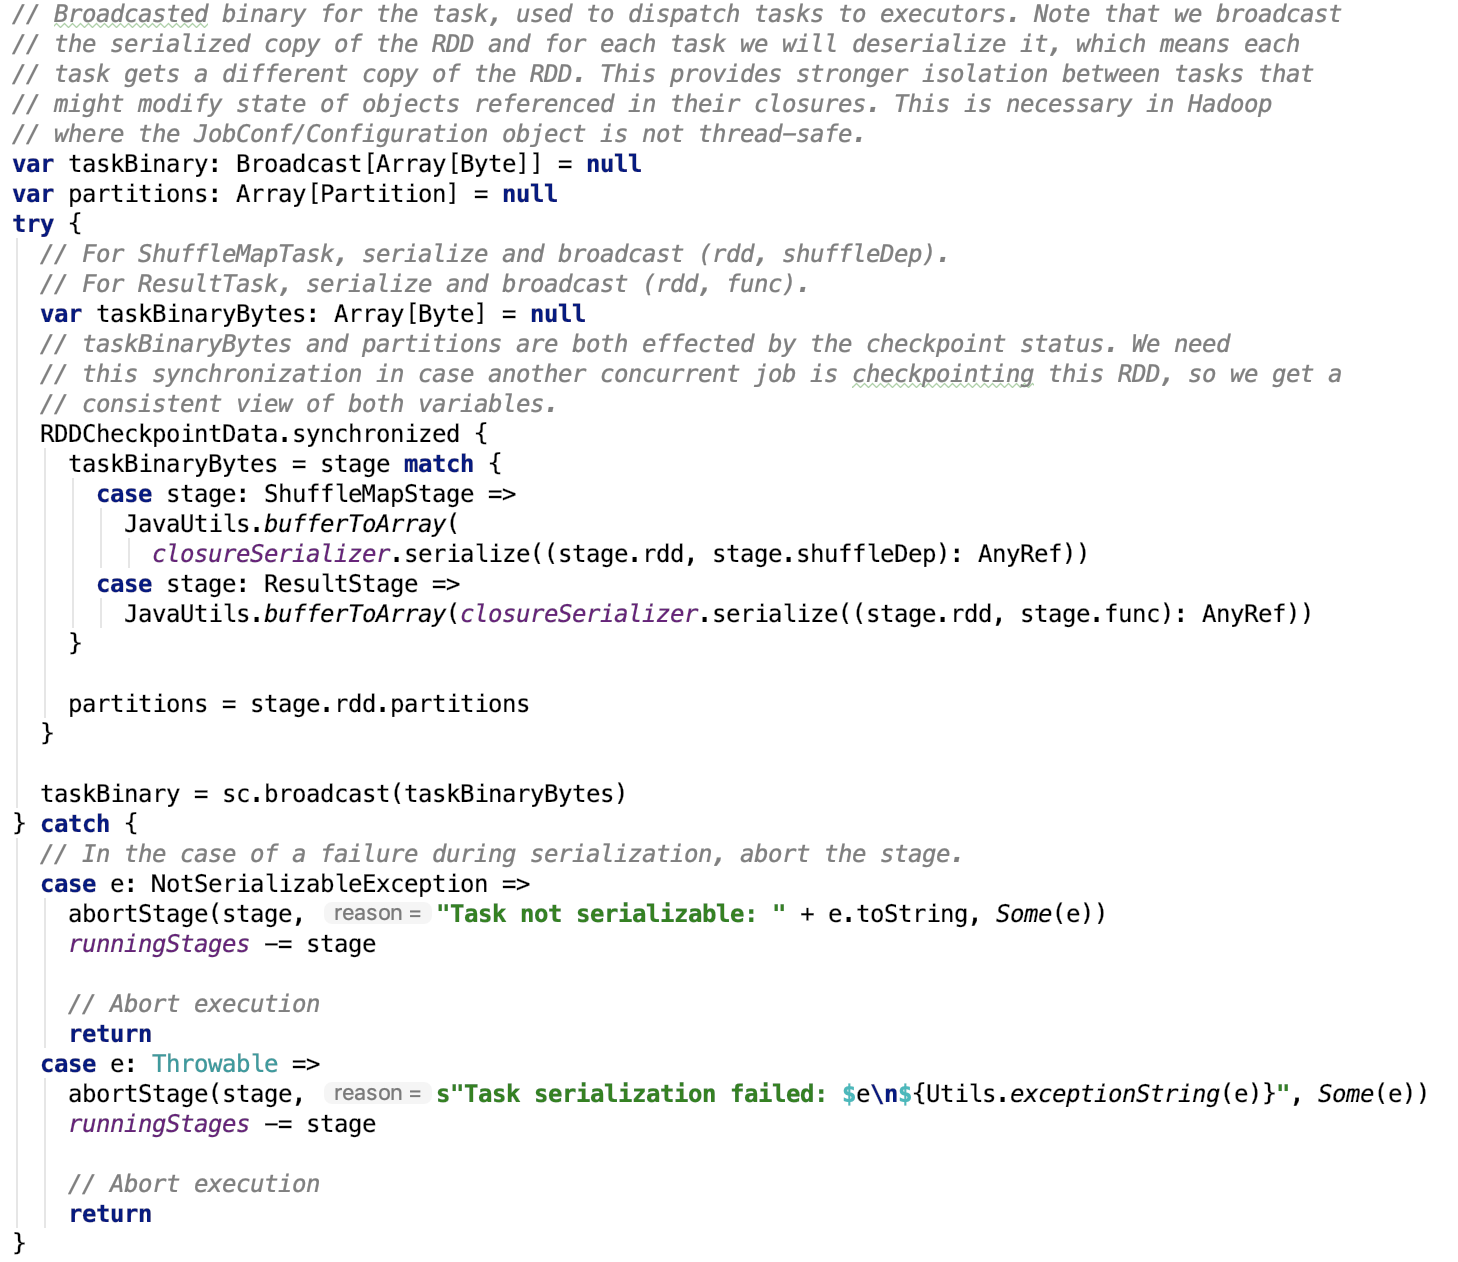
通过broadcast机制,将数据广播到spark集群中的driver和各个executor中。关于broadcast的实现细节,可以查
6、生成Task集合
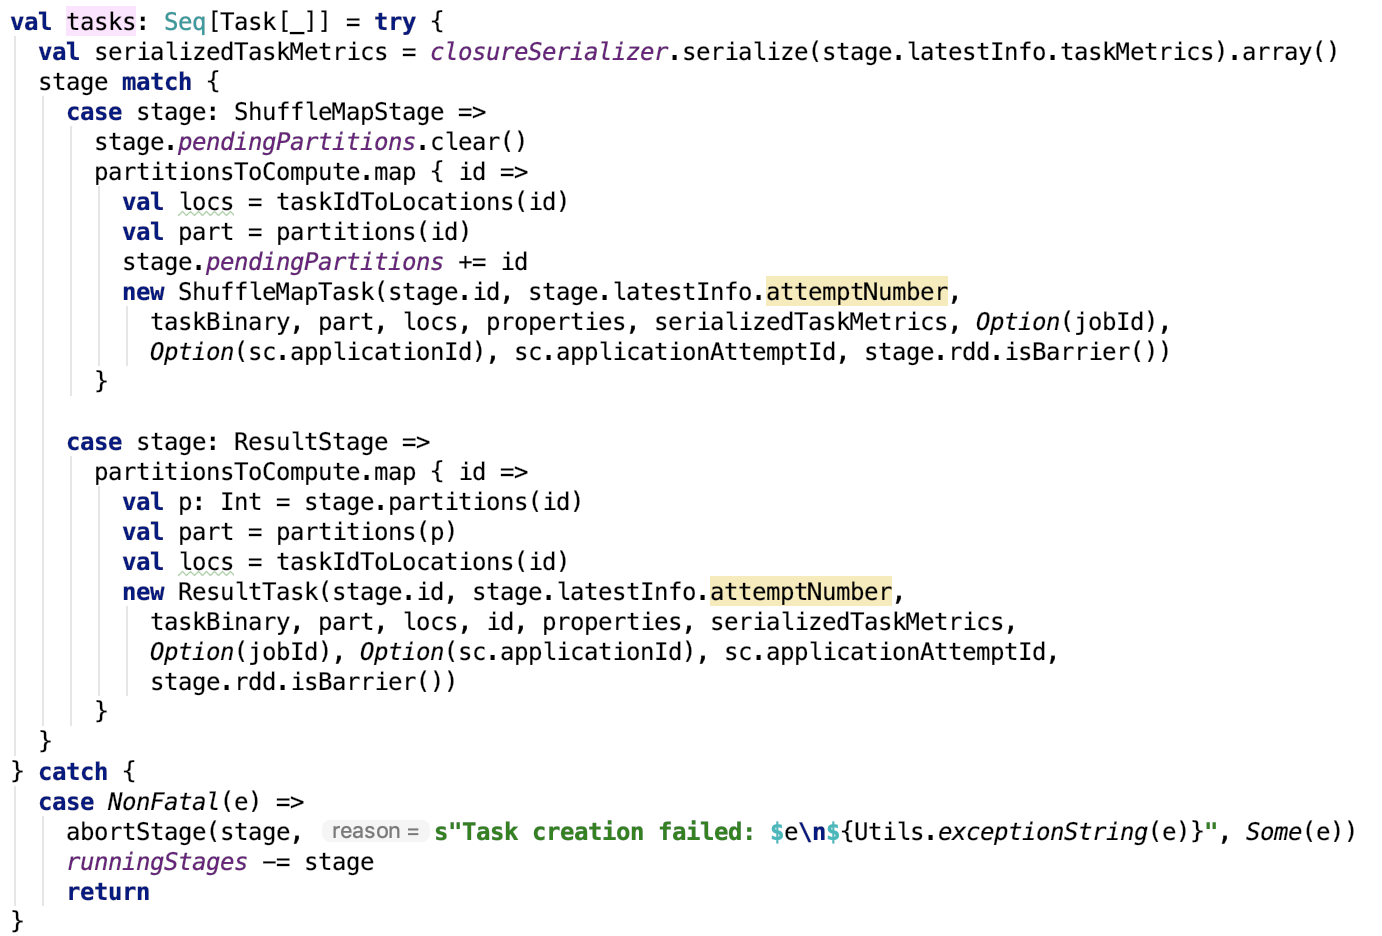
根据stage的类型生成不同的类型Task。关于过多Task 的内容,在阶段四进行剖析。
7、TaskScheduler提交TaskSet
对应代码如下:
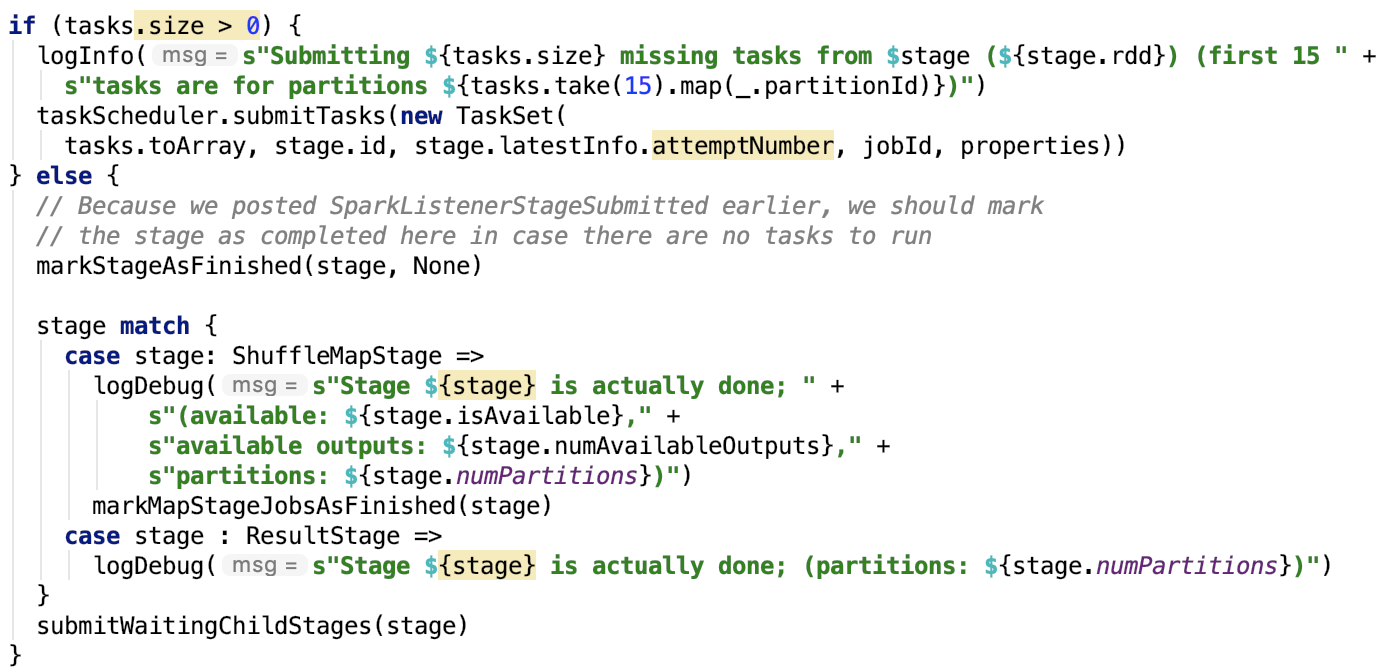
其中taskScheduler是 TaskSchedulerImpl,它是TaskScheduler的唯一子类实现。它负责task的调度。
org.apache.spark.scheduler.TaskSchedulerImpl#submitTasks方法实现如下:
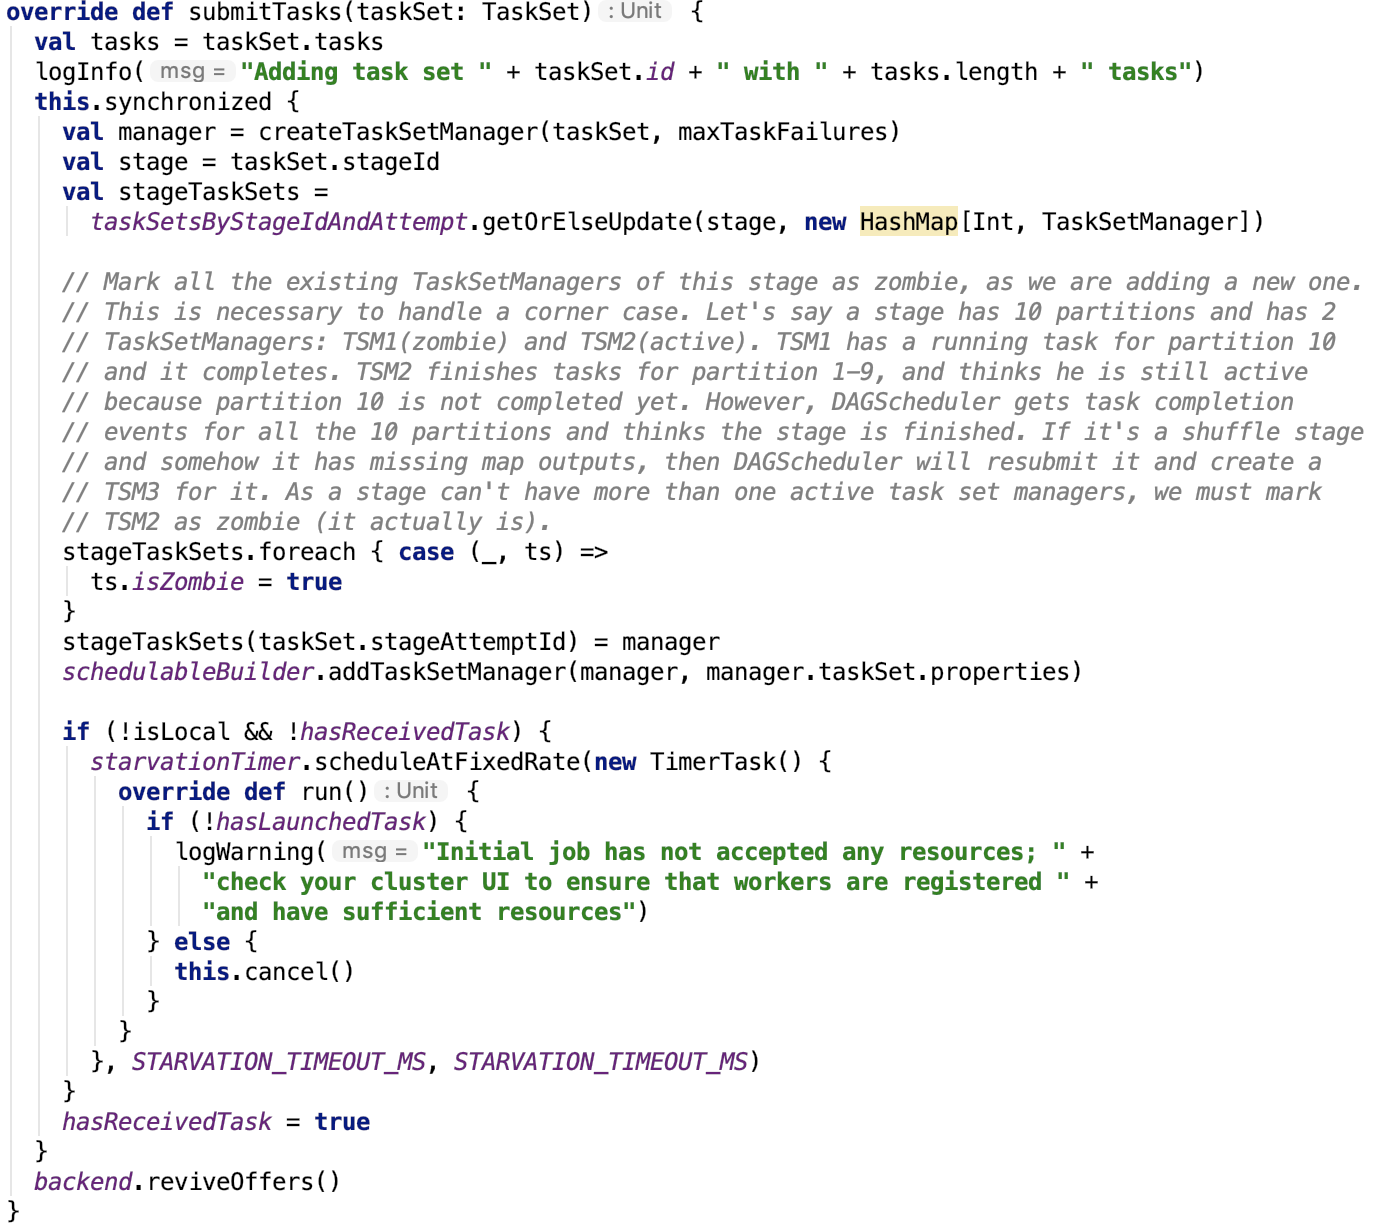
其中 createTaskSetManager 方法如下:

SchedulableBuilder类是构建Schedulable树的接口。
schedulableBuilder 定义如下:

其中schedulingMode 可以通过参数 spark.scheduler.mode 来调整,默认为FIFO。
schedulableBuilder 初始化如下:
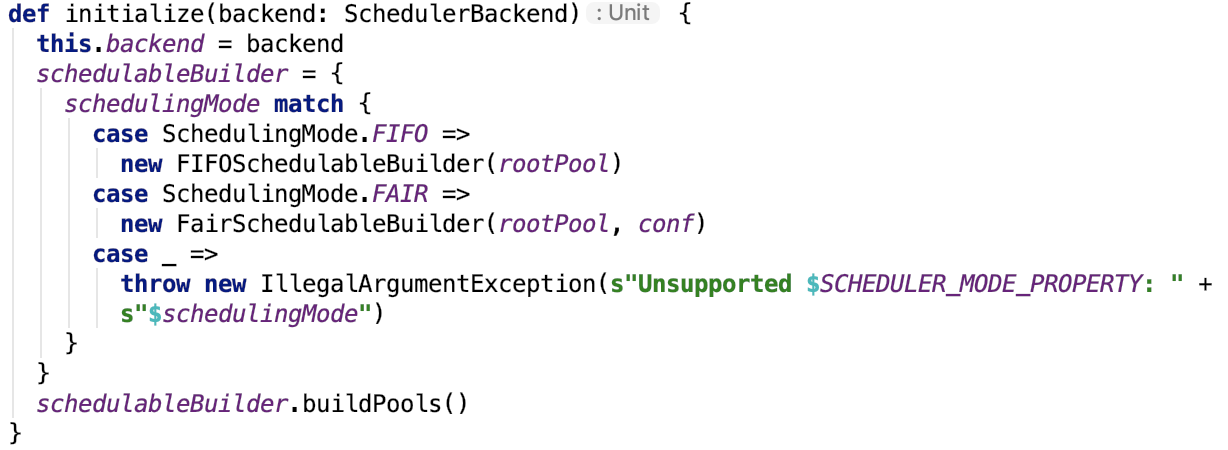
schedulableBuilder的 addTaskSetManager (FIFO)方法如下:

即调用了内部Pool对象的addSchedulable 方法:

关于更多TaskSetManager的内容,将在阶段四进行剖析。
backend是一个 SchedulerBackend 实例。在SparkContetx的初始化过程中调用 createTaskScheduler 初始化 backend
在yarn 模式下,它有两个实现yarn-client 模式下的 org.apache.spark.scheduler.cluster.YarnClientSchedulerBackend实现 和 yarn-cluster 模式下的 org.apache.spark.scheduler.cluster.YarnClusterSchedulerBackend 实现。
这两个类在spark 项目的 resource-managers 目录下的 yarn 目录下定义实现,当然它也支持 kubernetes 和 mesos,不做过多说明。
这两个类的继承关系如下:
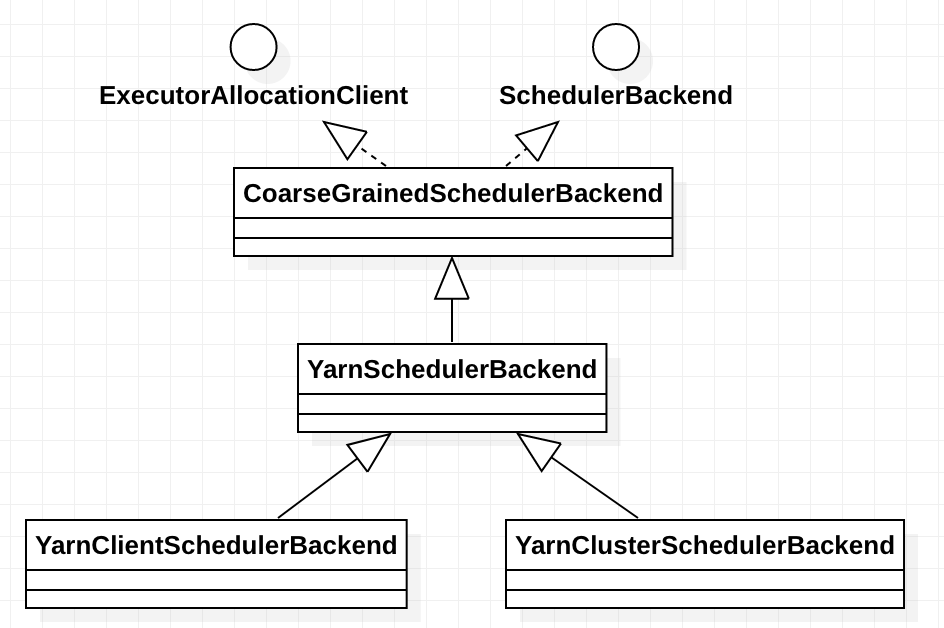
org.apache.spark.scheduler.cluster.CoarseGrainedSchedulerBackend#reviveOffers 实现如下:

发送ReviveOffers 请求给driver。
driver端的 CoarseGrainedSchedulerBackend 的 receive 方法有如下事件处理分支:
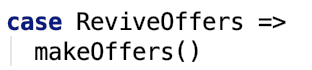
其内部经过一系列RPC过程,关于 RPC 可以看 spark 源码分析之十二--Spark RPC剖析之Spark RPC总结 做进一步了解。
即会调用driver端的makeOffsers方法,如下:

5、总结
本篇文章剖析了从DAGScheduler生成的Stage是如何被提交给TaskScheduler,以及TaskScheduler是如何把TaskSet提交给ResourceManager的。
下面就是task的运行部分了,下篇文章对其做详细介绍。跟task执行关系很密切的TaskSchedulerBackend、Task等内容,也将在下篇文章做更详细的说明。
三、Task的执行流程
1、引言
如下图,我们在前两篇文章中剖析了DAG的构建,Stage的划分以及Stage转换为TaskSet后的提交,本篇文章主要剖析TaskSet被TaskScheduler提交之后的Task的整个执行流程,关于具体Task是如何执行的两种stage对应的Task的执行有本质的区别,我们将在下一篇文章剖析。

我们先来剖析一下SchdulerBackend的子类实现。在yarn 模式下,它有两个实现yarn-client 模式下的 org.apache.spark.scheduler.cluster.YarnClientSchedulerBackend实现 和 yarn-cluster 模式下的 org.apache.spark.scheduler.cluster.YarnClusterSchedulerBackend 实现,如下图。
这两个类在spark 项目的 resource-managers 目录下的 yarn 目录下定义实现。

下面简单看一下这几个类的定义和实现。
2、ExecutorAllocationClient
简单说明一下,这个类主要是负责想Cluster Master请求或杀掉executor。核心方法如下,不做过多解释,可以看源码做进一步了解。

3、SchedulerBackend
1、主要方法
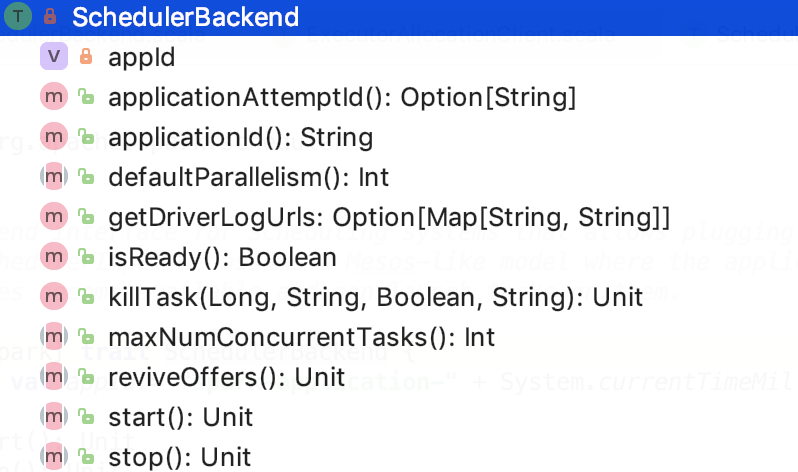
killTask:请求 executor 杀掉正在运行的task
applicationId:获取job的applicationId
applicationAttemptId:获取task的 attemptId
getDriverLogUrls:获取驱动程序日志的URL。这些URL用于显示驱动程序的UI Executors选项卡中的链接。
maxNumConcurrentTasks:当前task的最大并发数
下面我们来看一下它的子类。
4、CoarseGrainedSchedulerBackend
1、类声明
调度程序后端,等待粗粒度执行程序进行连接。 此后端在Spark作业期间保留每个执行程序,而不是在任务完成时放弃执行程序并要求调度程序为每个新任务启动新的执行程序。 执行程序可以以多种方式启动,例如用于粗粒度Mesos模式的Mesos任务或用于Spark的独立部署模式(spark.deploy。*)的独立进程。
2、内部类DriverEndpoint
类说明类结构
rpcEnv 是指的每个节点上的NettyRpcEnv
executorsPendingLossReason:记录了已经丢失的并且不知道原因的executor
addressToExecutorId:记录了每一个executor的id和executor地址的映射关系
下面我们看一下Task以及其继承关系。
5、Task
1、类说明
它是Task的基本单元。
2、类结构
即内部结构如下:
下面看一下其核心方法。

runTask 运行Task,被run方法调用,它是一个抽象方法,由子类来实现。
kill:杀死Task。源码如下:

下面看一下其继承关系。
3、继承关系
Task的继承关系如下:
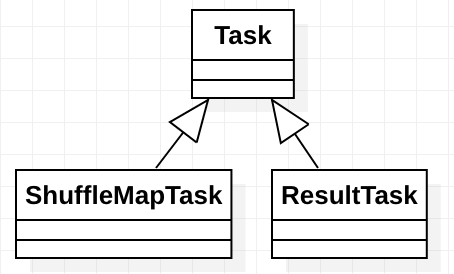
A unit of execution. We have two kinds of Task's in Spark:
- org.apache.spark.scheduler.ShuffleMapTask
- org.apache.spark.scheduler.ResultTask
A Spark job consists of one or more stages.
The very last stage in a job consists of multiple ResultTasks, while earlier stages consist of ShuffleMapTasks. A ResultTask executes the task and sends the task output back to the driver application. A ShuffleMapTask executes the task and divides the task output to multiple buckets (based on the task's partitioner).
下面分别看一下两个Task的实现,是如何定义 runTask 方法的?
6、ResultTask
类名:org.apache.spark.scheduler.ResultTask
其runTask方法如下:

7、ShuffleMapTask
类名:org.apache.spark.scheduler.ShuffleMapTask
其runTask方法如下:
8、Executor
全称:org.apache.spark.executor.Executor
1、类说明
Executor对象是Spark Executor的抽象,它背后有一个线程池用来执行任务。其实从源码可以看出,Spark的Executor这个术语,其实来自于Java线程池部分的Executors。
下面主要分析一下其内部的结构。
2、执行Task的线程池
线程池定义如下:
3、心跳机制
Executor会不断地向driver发送心跳来汇报其健康状况,如下:
EXECUTOR_HEARTBEAT_INTERVAL 值默认为 10s, 可以通过参数 spark.executor.heartbeatInterval 来进行调整。
startDriverHeartBeater方法如下:
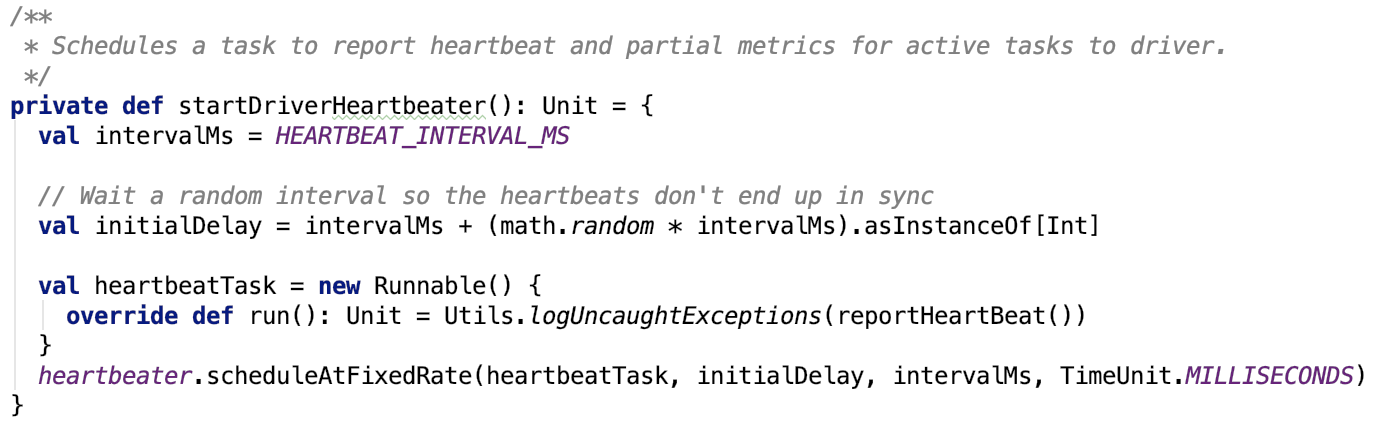
其依赖方法 reportHeartBeat 方法源码如下:
4、杀死任务机制--reaper机制
首先先来了解一下 TaskReaper。
TaskReaper
类说明:
Supervises the killing / cancellation of a task by sending the interrupted flag, optionally sending a Thread.interrupt(), and monitoring the task until it finishes. Spark's current task cancellation / task killing mechanism is "best effort" because some tasks may not be interruptable or may not respond to their "killed" flags being set. If a significant fraction of a cluster's task slots are occupied by tasks that have been marked as killed but remain running then this can lead to a situation where new jobs and tasks are starved of resources that are being used by these zombie tasks. The TaskReaper was introduced in SPARK-18761 as a mechanism to monitor and clean up zombie tasks. For backwards-compatibility / backportability this component is disabled by default and must be explicitly enabled by setting spark.task.reaper.enabled=true. A TaskReaper is created for a particular task when that task is killed / cancelled. Typically a task will have only one TaskReaper, but it's possible for a task to have up to two reapers in case kill is called twice with different values for the interrupt parameter. Once created, a TaskReaper will run until its supervised task has finished running. If the TaskReaper has not been configured to kill the JVM after a timeout (i.e. if spark.task.reaper.killTimeout < 0) then this implies that the TaskReaper may run indefinitely if the supervised task never exits.
其源码如下:
思路:发送kill信号,等待一定时间后,如果任务停止,则返回,否则yarn模式下抛出一场,对local模式没有影响。
是否启用reaper机制
reaper机制默认是不启用的,可以通过参数 spark.task.reaper.enabled 来启用。
taskReapter线程池

它也是一个daemon的支持多个worker同时工作的线程池,也就是说可以同时停止多个任务。
kill任务
当kill任务的时候,会调用kill Task方法,源码如下:

9、driver端SchedulerBackend接受task请求
提到SchedulerBackend接收到task请求后调用了 makeOffsers 方法,如下:

先调用TaskScheduler分配资源,并返回TaskDescription对象,然后拿着该对象去执行任务。
10、分配资源
1、过滤掉即将被回收的executor

其中ExecutorData 是记录着executor的信息。包括 executor的address,port,可用cpu核数,总cpu核数等信息。
executorIsAlive方法定义如下:

即该executor既不在即将被回收的集合中也不在丢失的executor集合中。
2、构造WorkOffer集合
WorkOffer对象代表着一个executor上的可用资源,类定义如下:

3、分配资源
org.apache.spark.scheduler.TaskSchedulerImpl#resourceOffers 方法如下:

思路:先过滤掉不可用的WorkOffser对象,然后给每一个TaskSet分配资源。如果taskSet是barrier的,需要初始化barrierCoordinator的rpc endpoint。
记录映射关系
记录hostname和executorId的映射关系,记录executorId和taskId的映射关系,源码如下:
-
其中 executorAdded的源码如下:

org.apache.spark.scheduler.DAGScheduler#executorAdded的映射关系如下:
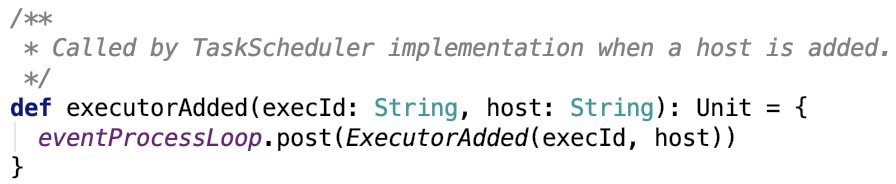
经过eventProcessLoop异步消息队列后,最终被如下分支处理:

最终处理逻辑如下,即把状态健康的executor从失败的epoch集合中移除。

-
其中,获取host的rack信息的方法没有实现,返回None。

更新不可用executor集合

blacklistTrackerOpt 定义如下:

org.apache.spark.scheduler.BlacklistTracker#isBlacklistEnabled 方法如下:
即 BLACKLIST_ENABLED 可以通过设置参数 spark.blacklist.enabled 来设定是否使用blacklist,默认没有设置。如果设定了spark.scheduler.executorTaskBlacklistTime参数值大于 0 ,也启用 blacklist。
BlacklistTracker 主要就是用来追踪有问题的executor和host信息的,其类说明如下:
BlacklistTracker is designed to track problematic executors and nodes. It supports blacklisting executors and nodes across an entire application (with a periodic expiry). TaskSetManagers add additional blacklisting of executors and nodes for individual tasks and stages which works in concert with the blacklisting here. The tracker needs to deal with a variety of workloads, eg.:
bad user code -- this may lead to many task failures, but that should not count against individual executors
many small stages -- this may prevent a bad executor for having many failures within one stage, but still many failures over the entire application
"flaky" executors -- they don't fail every task, but are still faulty enough to merit blacklisting See the design doc on SPARK-8425 for a more in-depth discussion.
过滤不可用WorkOffer
过滤掉host或executor在黑名单中的WorkOffer,对应源码如下:

对TaskSetManager排序
对应源码如下:
首先对WorkOffer集合随机打乱顺序,然后获取其可用core,可用slot的信息,然后获取排序后的TaskSetManager队列。rootPool是Pool对象,源码在 TaskScheduler提交TaskSet 中有描述,不再赘述。
CPUS_PER_TASK的核数默认是1,即一个task使用一个core,所以在spark算子中,尽量不要使用多线程,因为就一个core,提高不了多少的性能。可以通过spark.task.cpus参数进行调节。
org.apache.spark.scheduler.Pool#getSortedTaskSetQueue 源码如下:
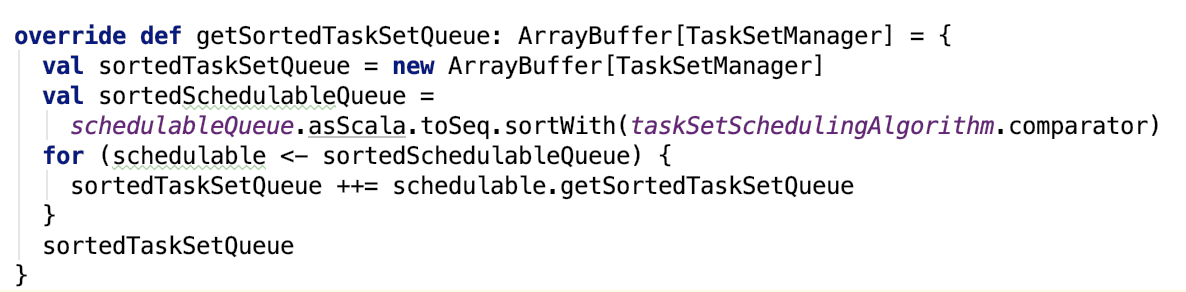
其中TaskSetManager的 getSortedTaskSetManager的源码如下:

重新计算本地性:
org.apache.spark.scheduler.TaskSetManager#executorAdded 的源码如下:
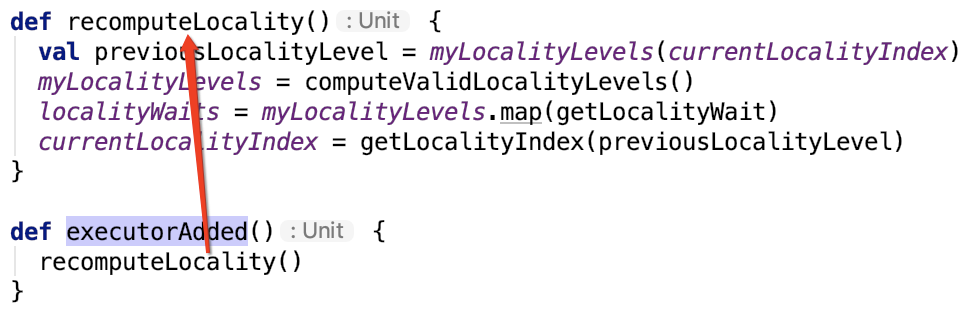
org.apache.spark.scheduler.TaskSetManager#computeValidLocalityLevels 源码如下:
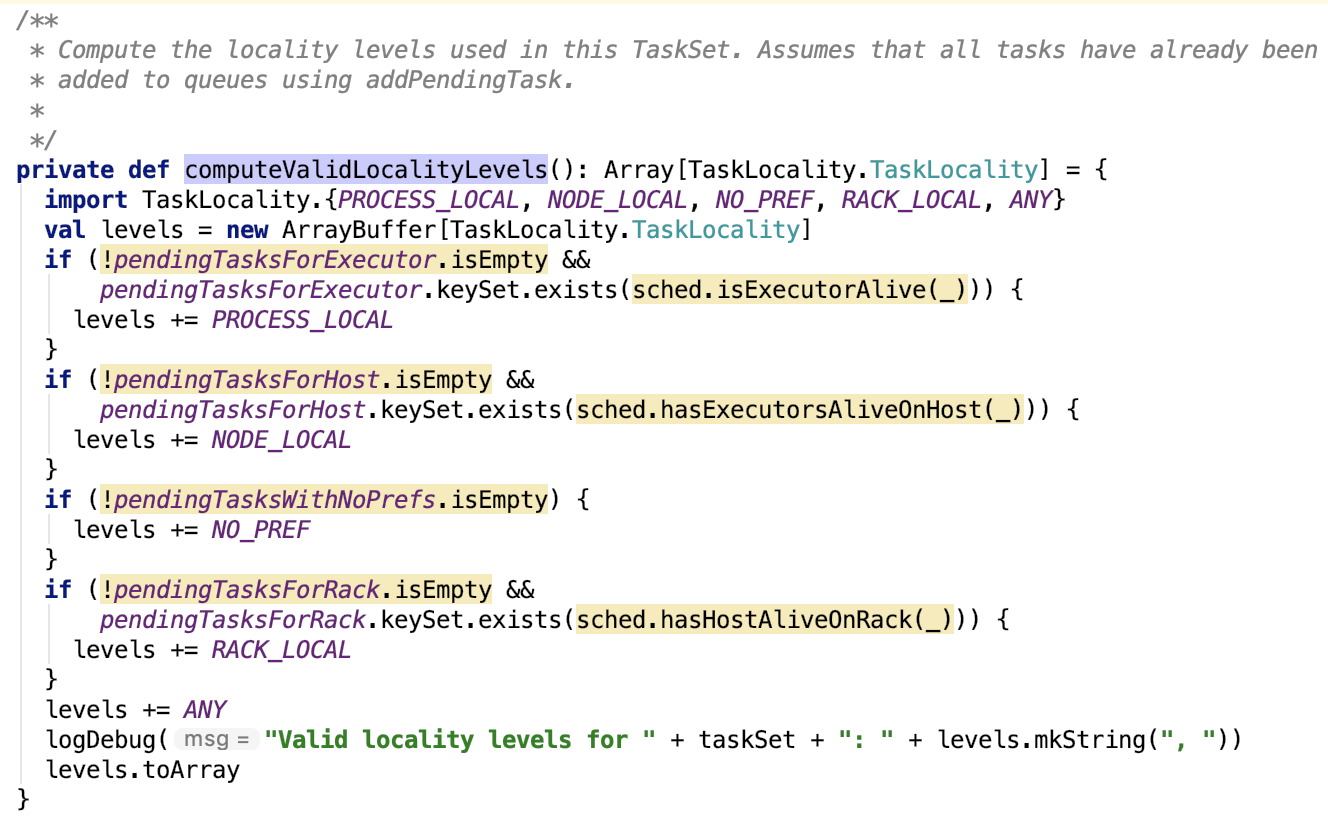
在这里,可以很好的理解五种数据本地性级别。先加入数据本地性数组的优先考虑使用。
为每一个TaskSet分配资源
对应源码如下:
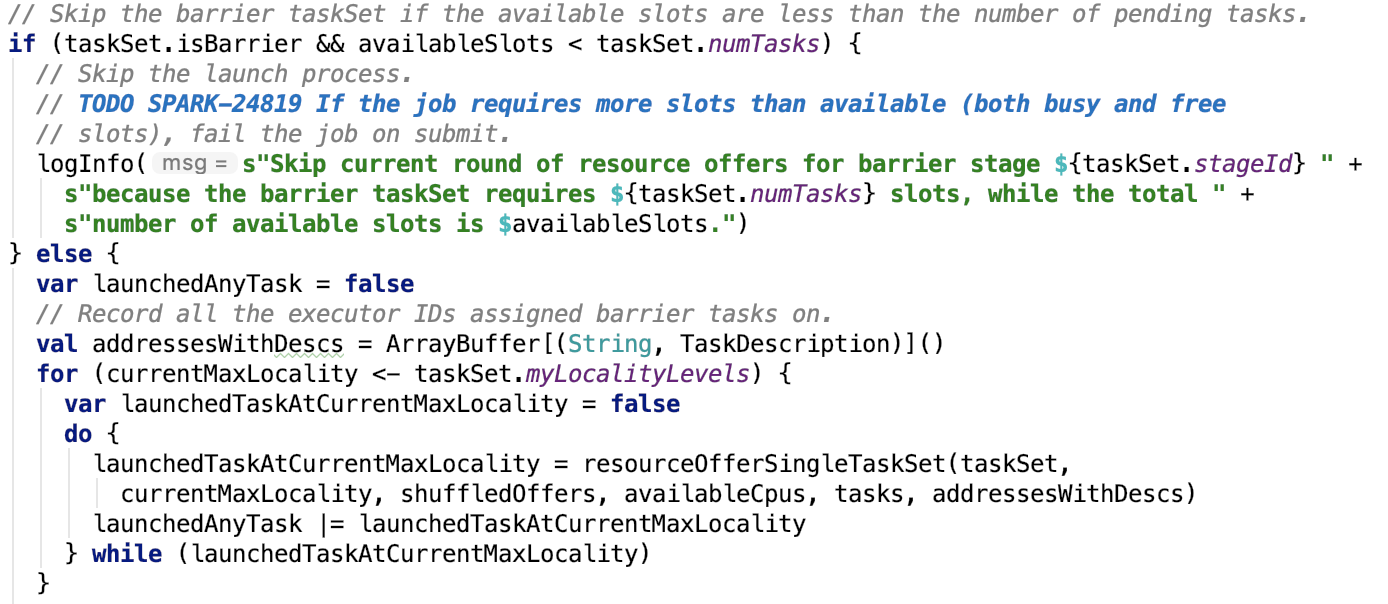
如果slot资源够用或者TaskSet不是barrier的,开始为TaskSet分配资源。
org.apache.spark.scheduler.TaskSchedulerImpl#resourceOfferSingleTaskSet 源码如下:

思路:遍历每一个shuffledOffers,如果其可用cpu核数不小于一个slot所用的核数,则分配资源,分配资源完毕后,记录taskId和taskSetManager的映射关系、taskId和executorId的映射关系、executorId和task的映射关系。最后可用核数减一个slot所以的cpu核数。
其依赖方法 org.apache.spark.scheduler.TaskSetManager#resourceOffer 源码如下,思路:先检查该executor和该executor所在的host都不在黑名单中,若在则返回None,否则开始分配资源。
分配资源步骤:
-
计算数据本地性。
-
每一个task出队并构建 TaskDescription 对象。
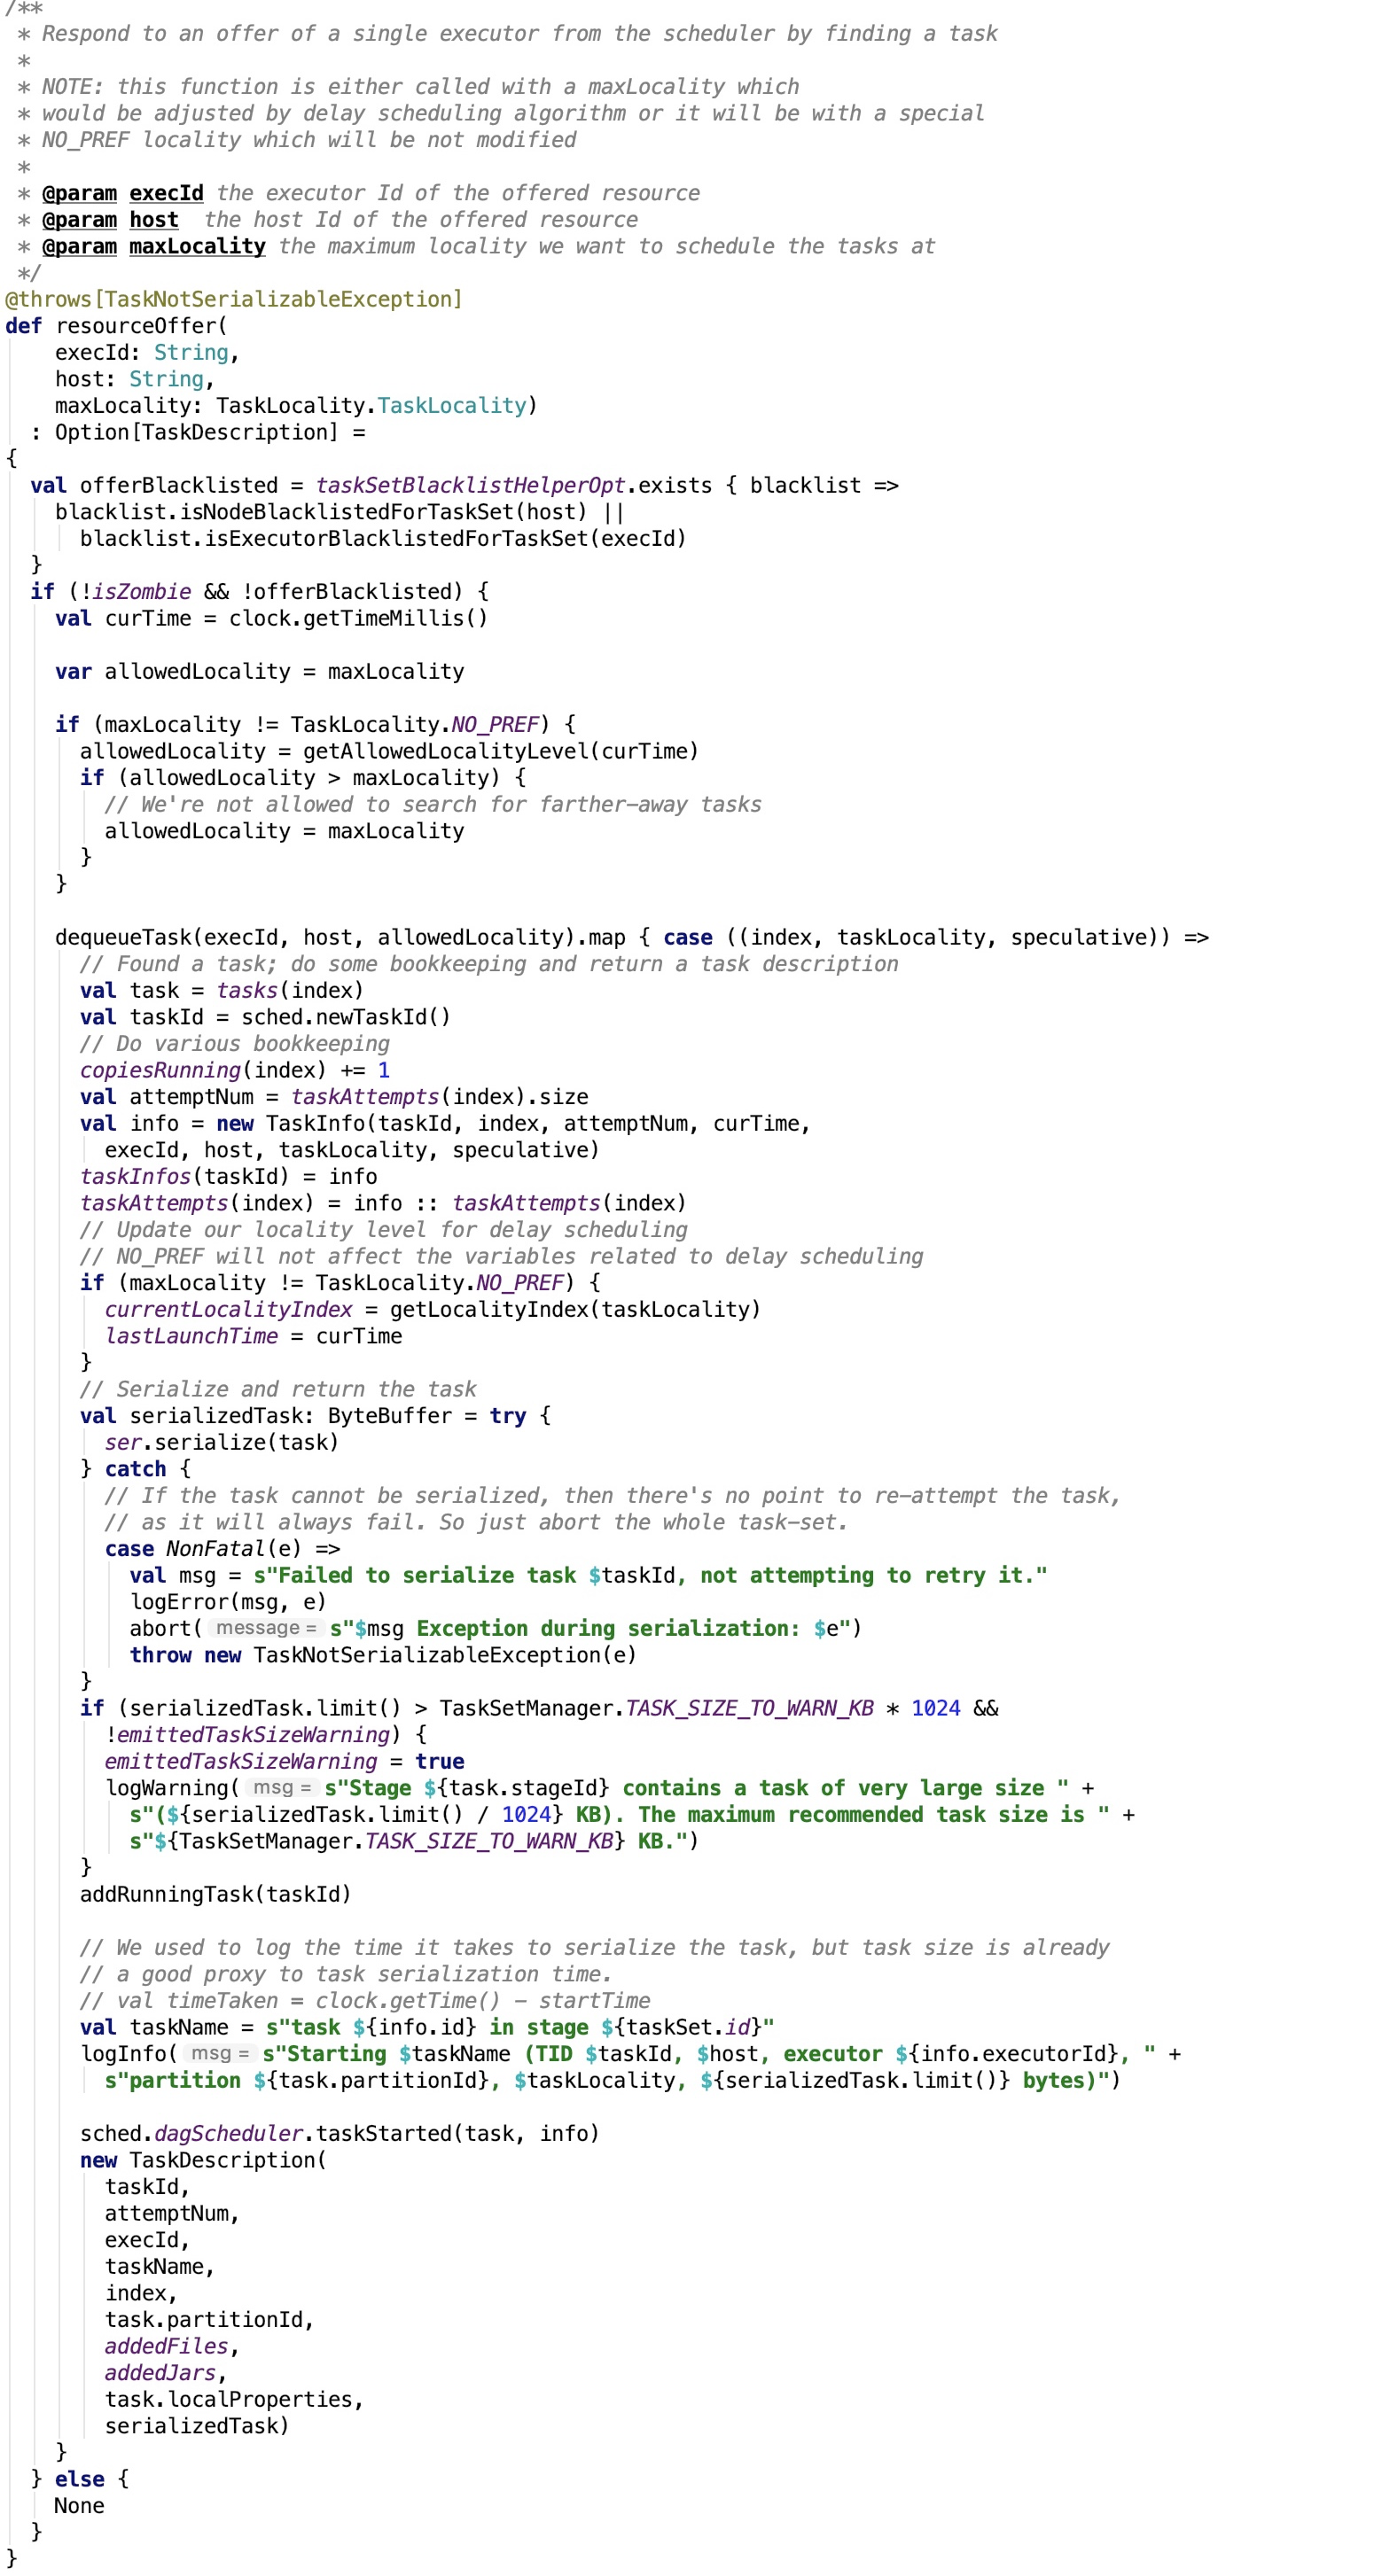
其依赖方法 org.apache.spark.scheduler.TaskSetManager#getAllowedLocalityLevel 源码如下,目的就是计算该task 的允许的最大数据本地性。
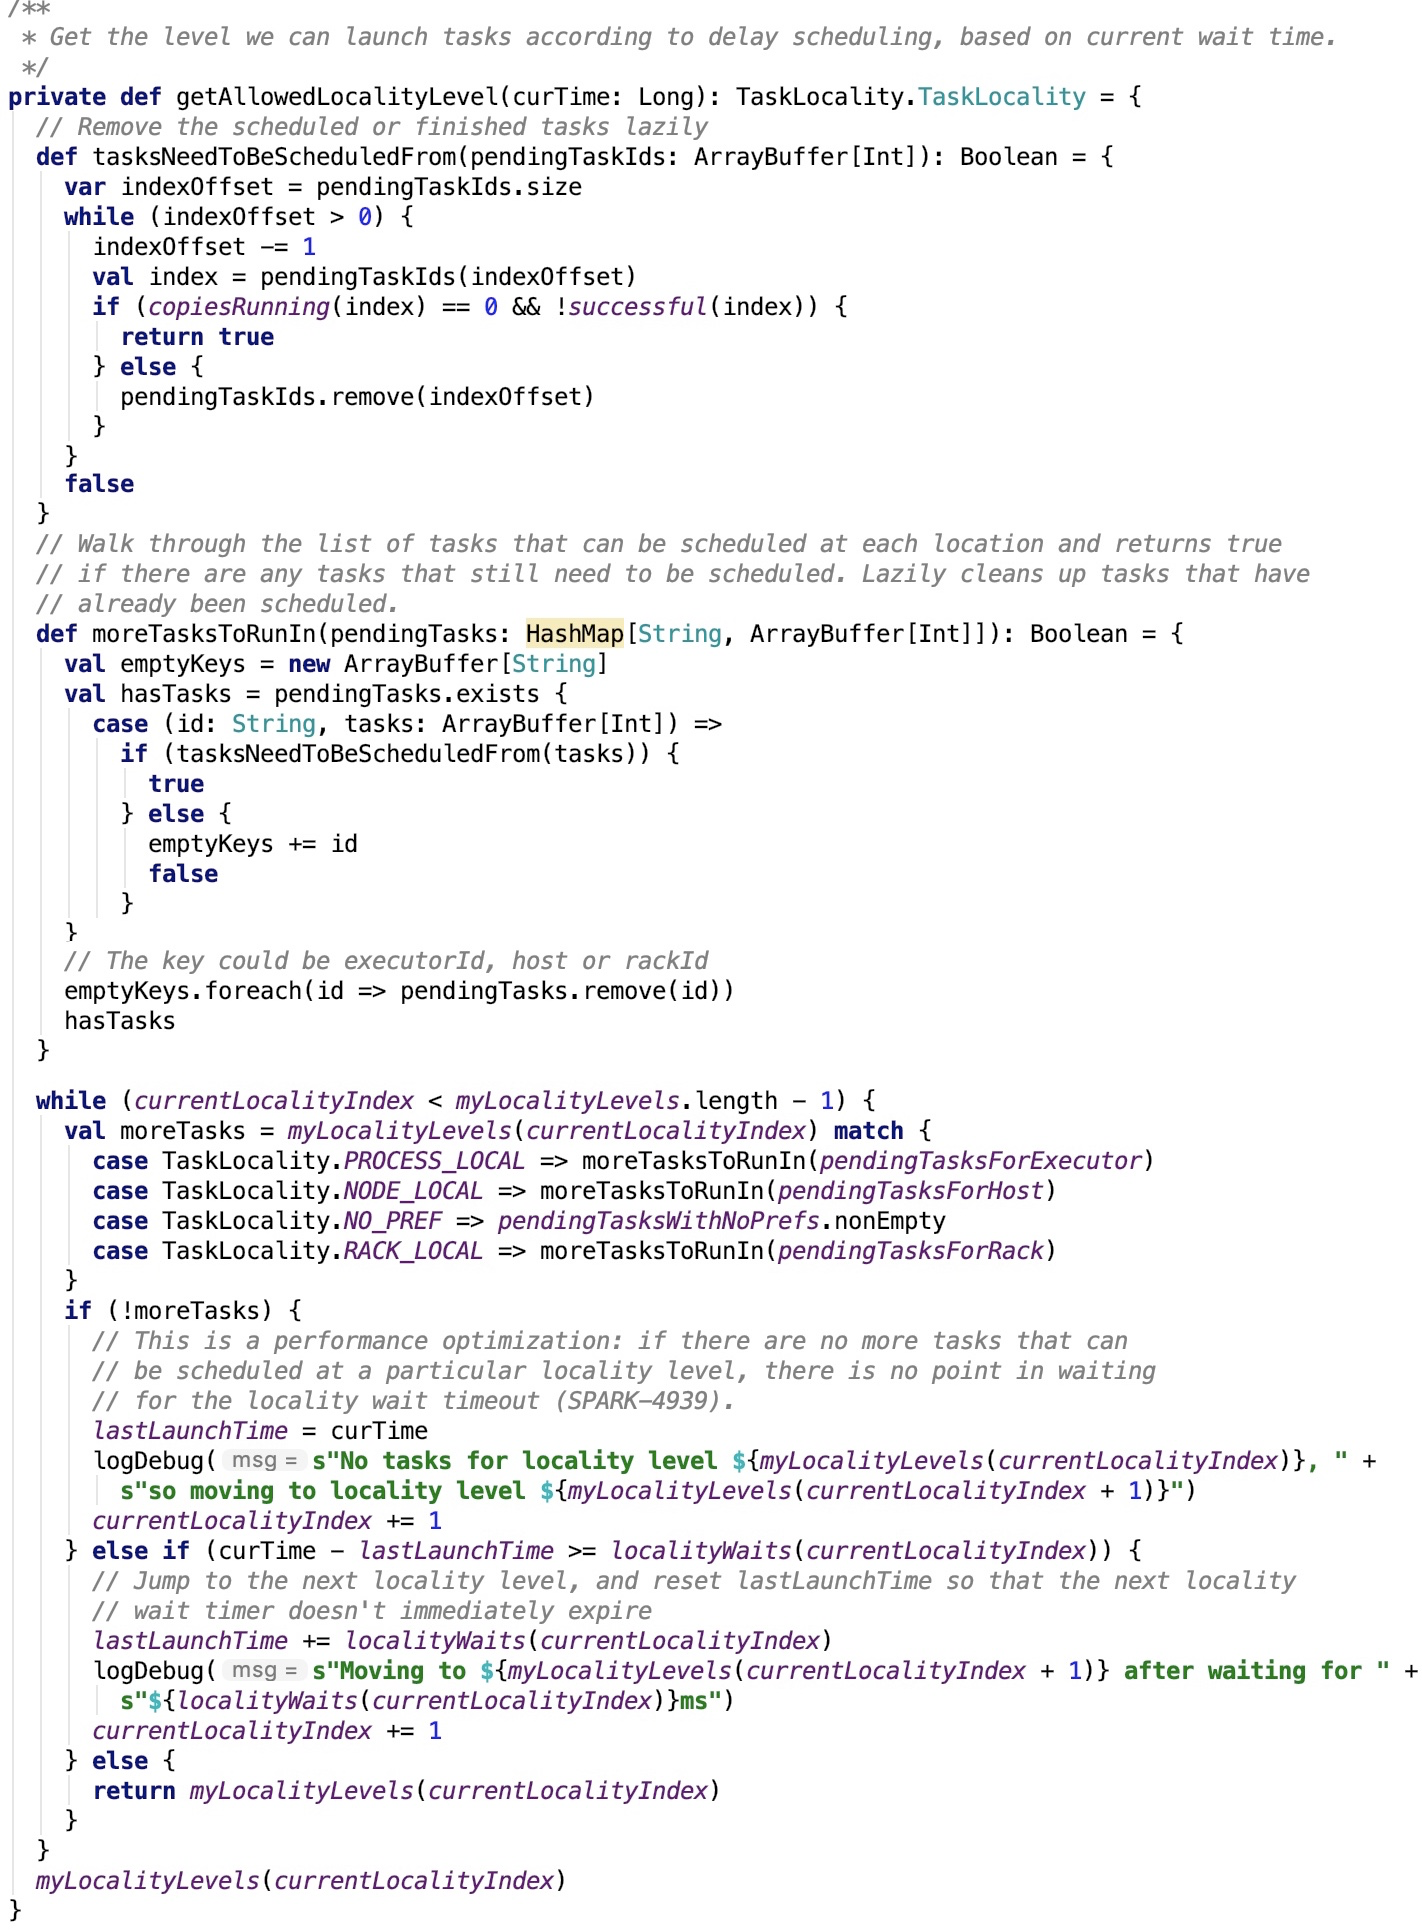
初始化BarrierCoordinator
如果任务资源分配成功并且TaskSet是barrier的,则初始化BarrierCoordinator,源码如下:
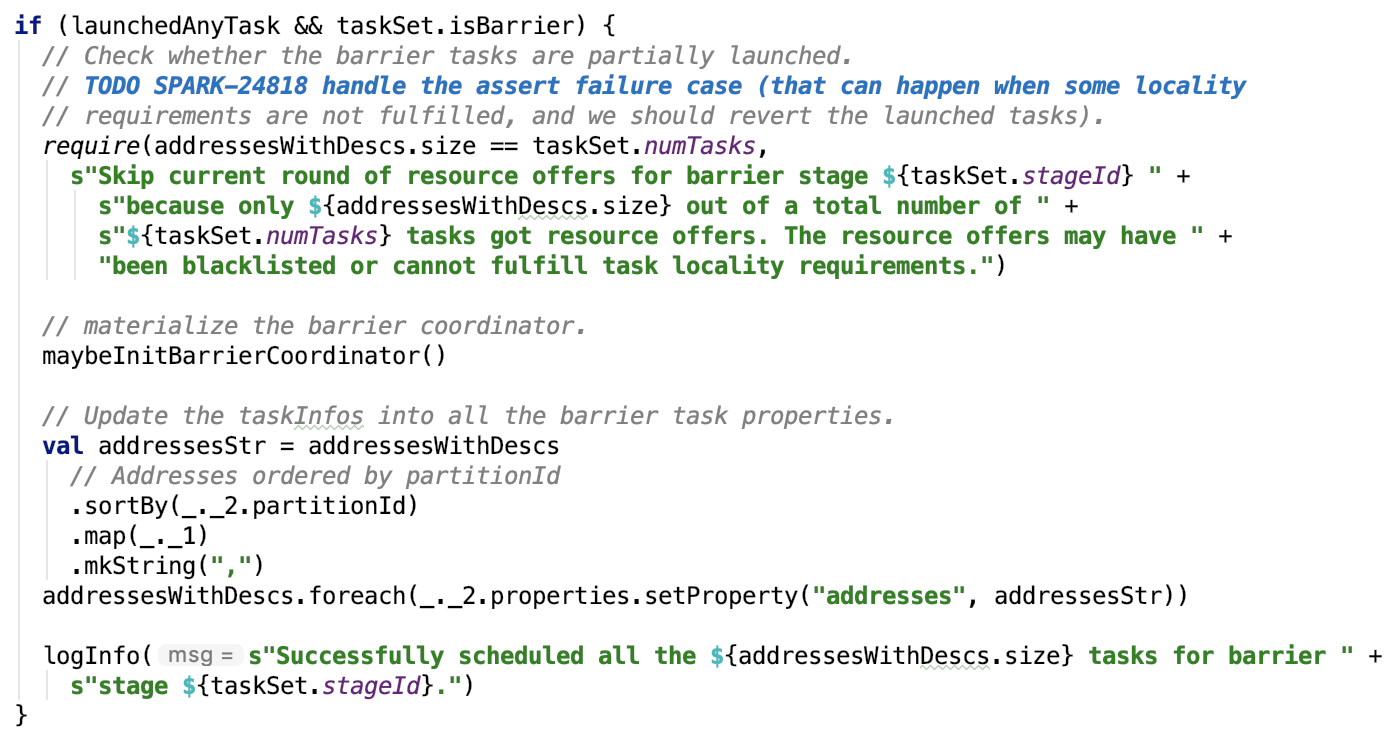
依赖方法 org.apache.spark.scheduler.TaskSchedulerImpl#maybeInitBarrierCoordinator 如下:
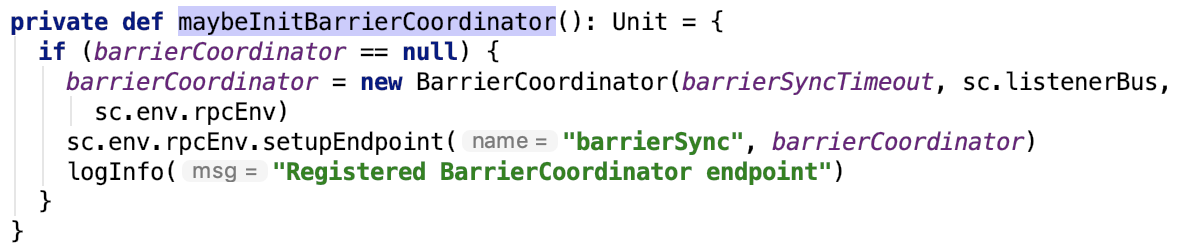
11、运行Task
org.apache.spark.scheduler.cluster.CoarseGrainedSchedulerBackend.DriverEndpoint#makeOffers中,分配资源结束后,就可以运行task了,源码如下:
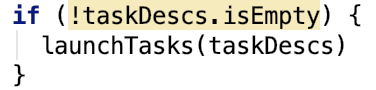
1、序列化TaskDescription
其依赖方法 lauchTasks 源码如下:
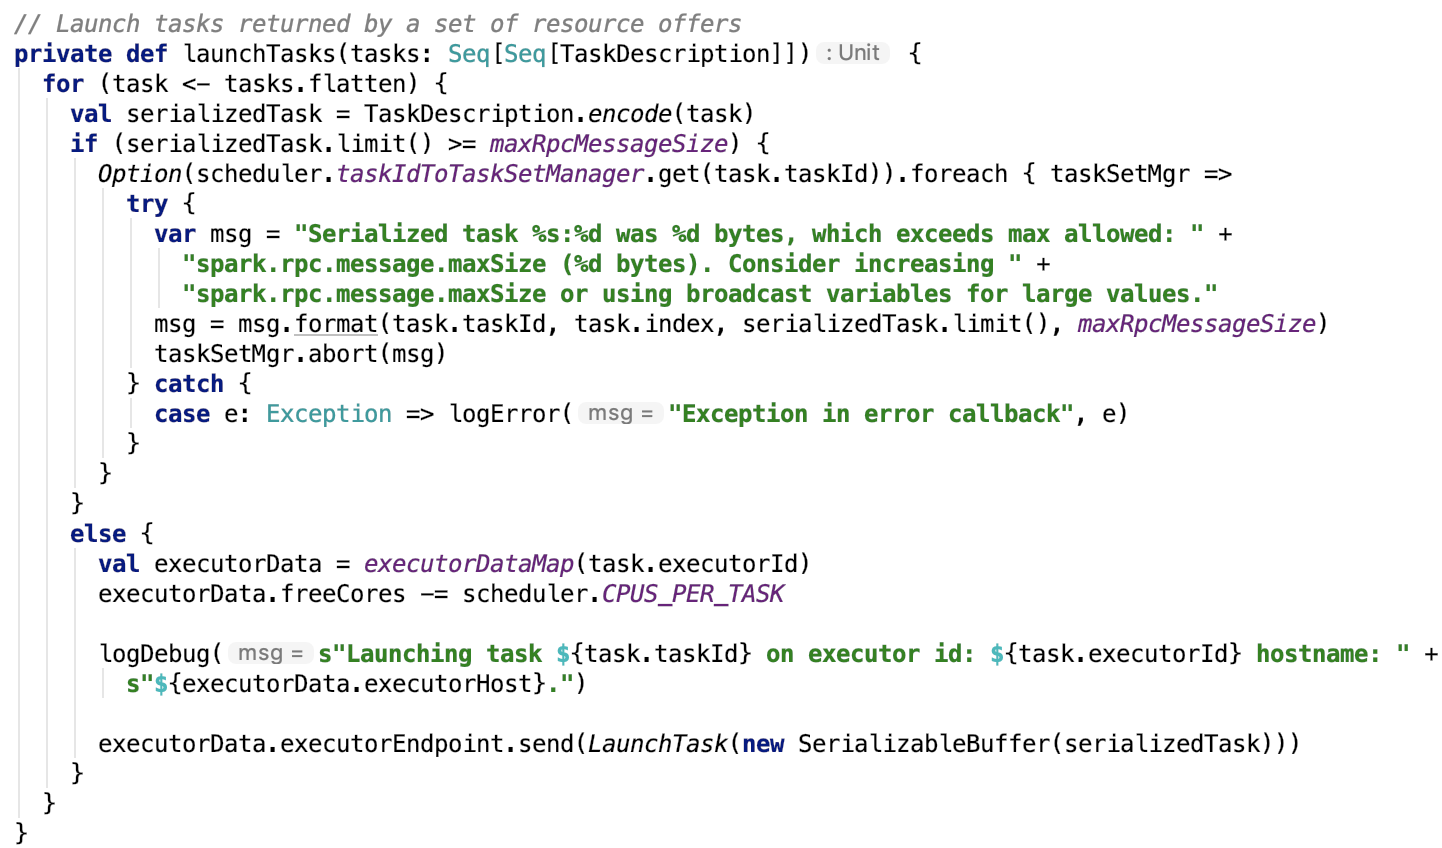
org.apache.spark.scheduler.TaskDescription#encode 方法是一个序列化的操作,将内存中的Java Function对象序列化为字节数组。源码如下:
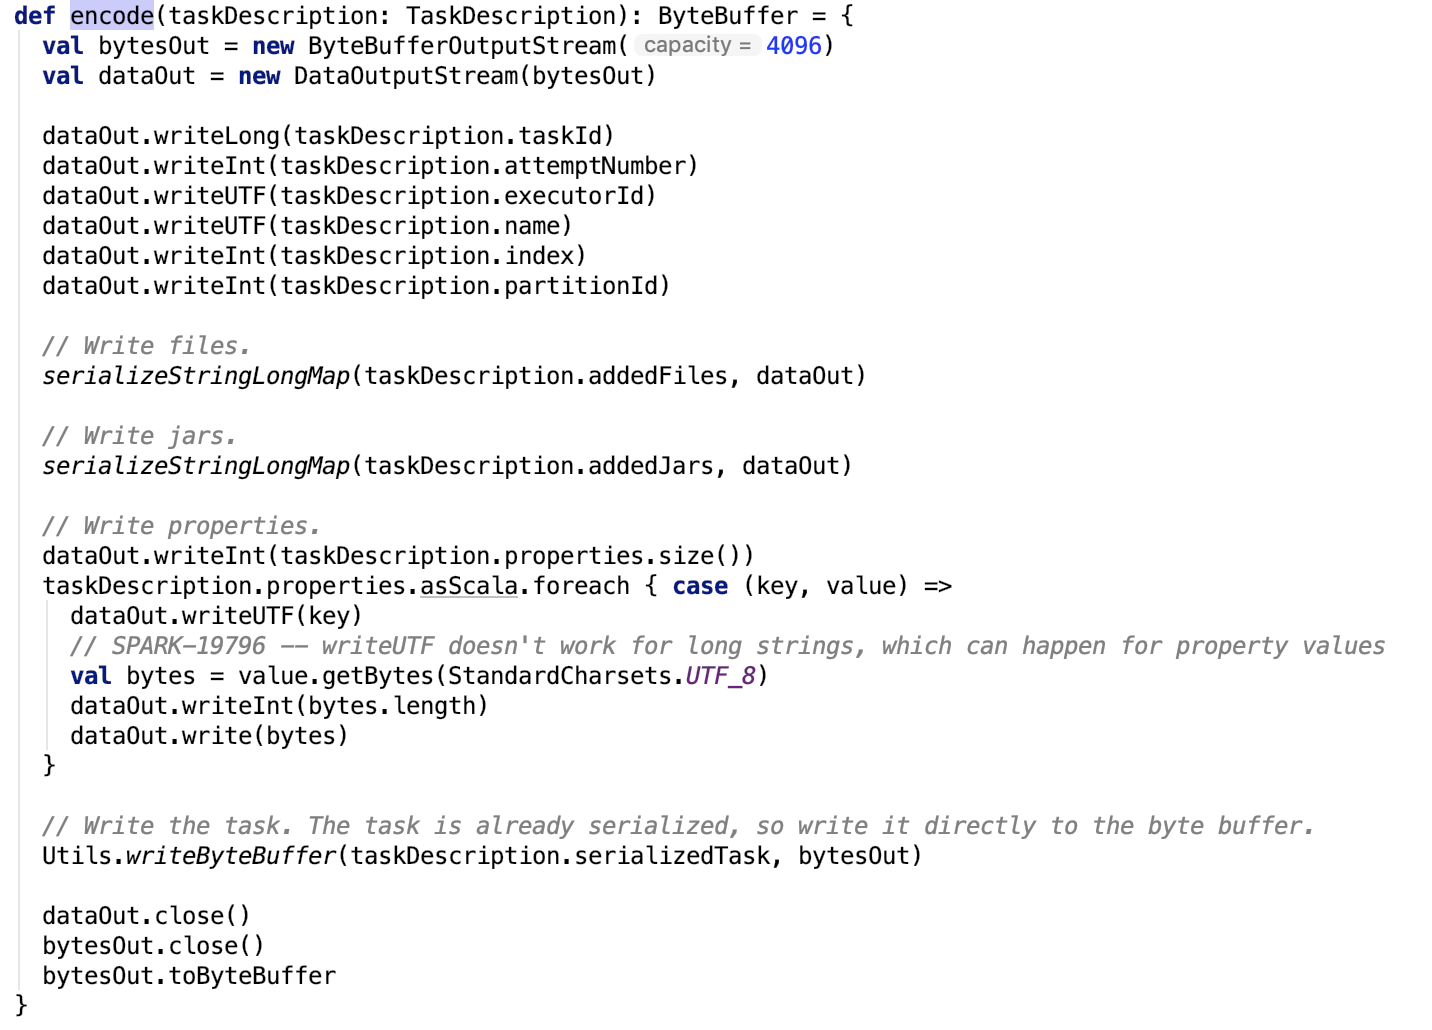
maxRpcMessageSize定义如下:

org.apache.spark.util.RpcUtils#maxMessageSizeBytes 源码如下:
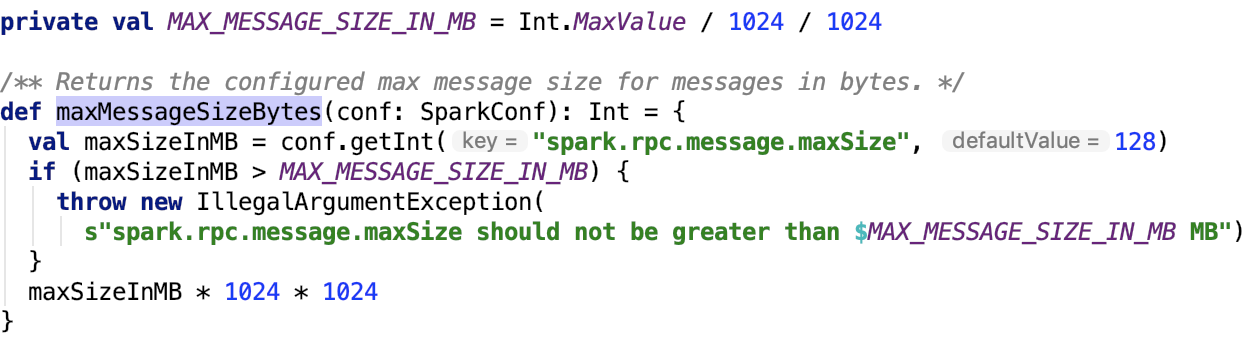
默认为128MB,可以通过参数 spark.rpc.message.maxSize 来调整。
executorData可用核数减去一个Slot所需的核数后,去调用executor运行task。
2、发送RPC请求executor运行任务
对应 lauchTasks 源码如下:

经过底层RPC的传输,executorEndpoint的处理代码receive方法处理分支为:
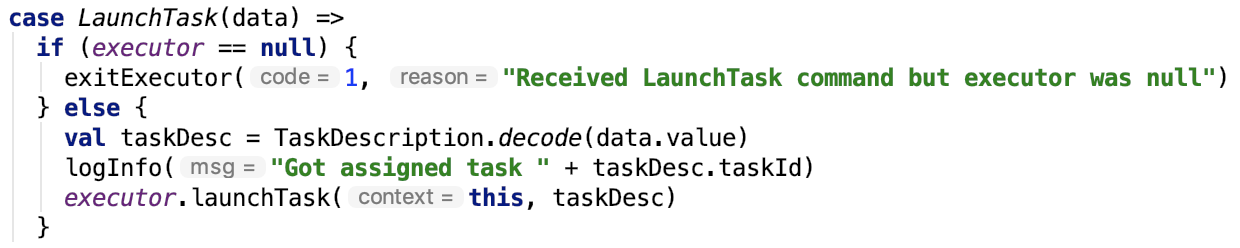
其主要有两步,反序列化TaskDescription字节数据为Java对象。
调用executor来运行task。
下面详细来看每一步。
3、executor反序列化TaskDescription
思路:将通过RPC传输过来的ByteBuffer对象中的字节数据内容反序列化为在内存中的Java对象,即TaskDescription对象。
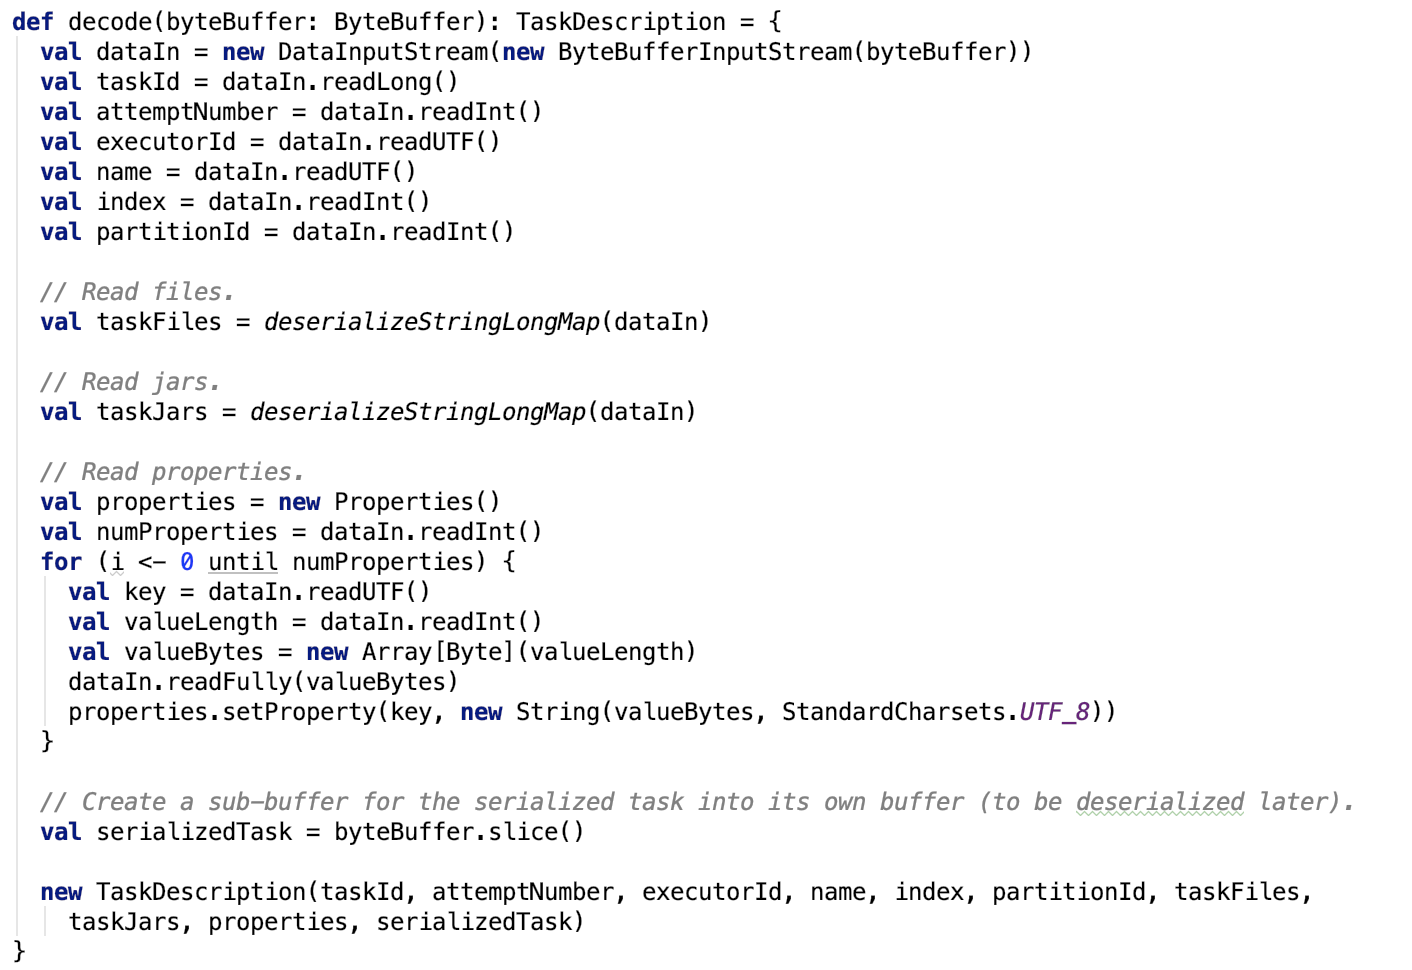
4、executor运行task
Executor对象是Spark Executor的抽象,它背后有一个线程池用来执行任务。其实从源码可以看出,Spark的Executor这个术语,其实来自于Java线程池部分的Executors。
launchTasks方法源码如下:

TaskRunner是一个Runnable的实现,worker线程池中的worker会去执行其run方法。
下面来看一下TaskRunner类。
12、TaskRunner
13、运行任务
run方法比较长,划分为四部分来说明。
1、准备环境
对应源码如下:
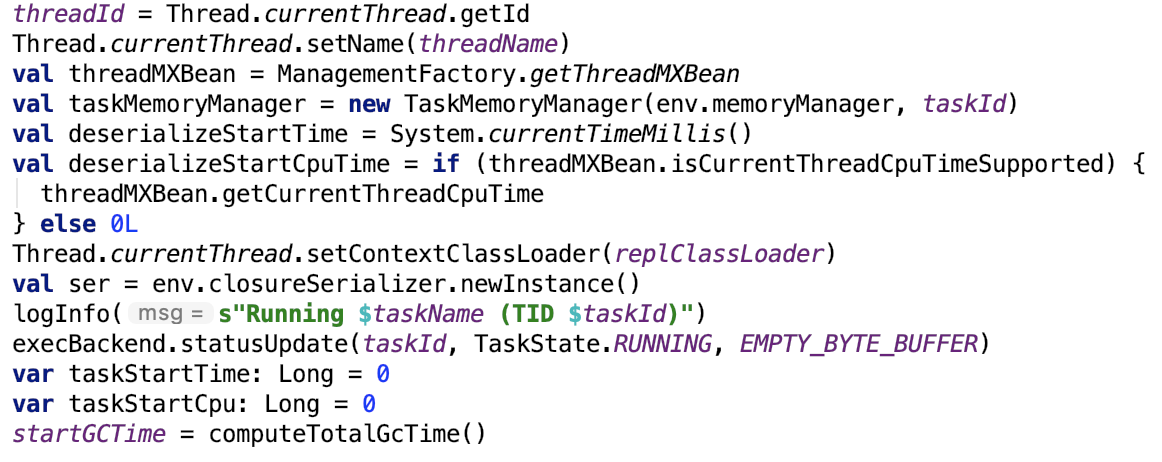
初始化环境,修改task的运行状态为RUNNING,初始化gc时间。
2、准备task配置
其源码如下:
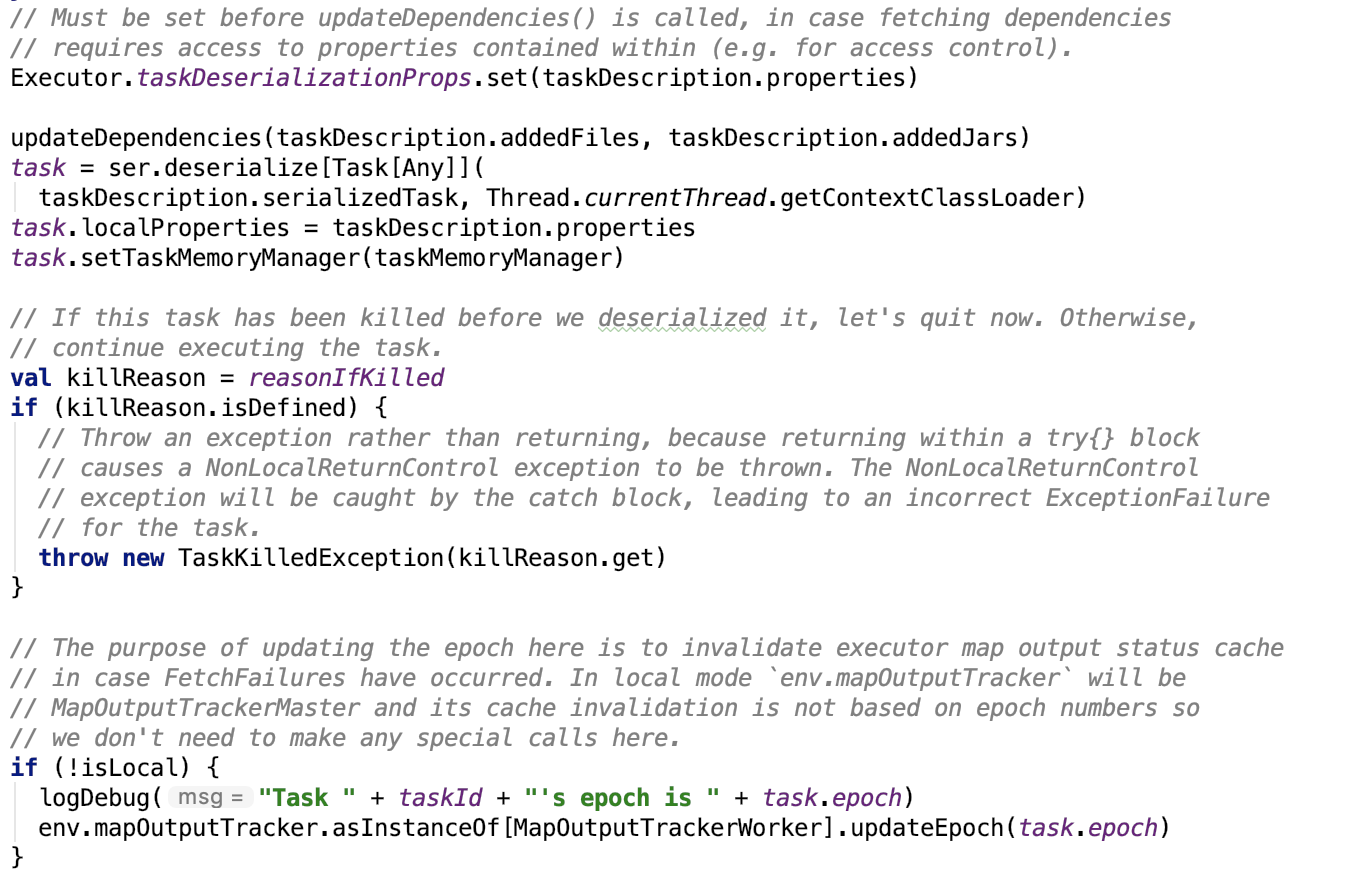
反序列化Task对象,并且设置Task的依赖。
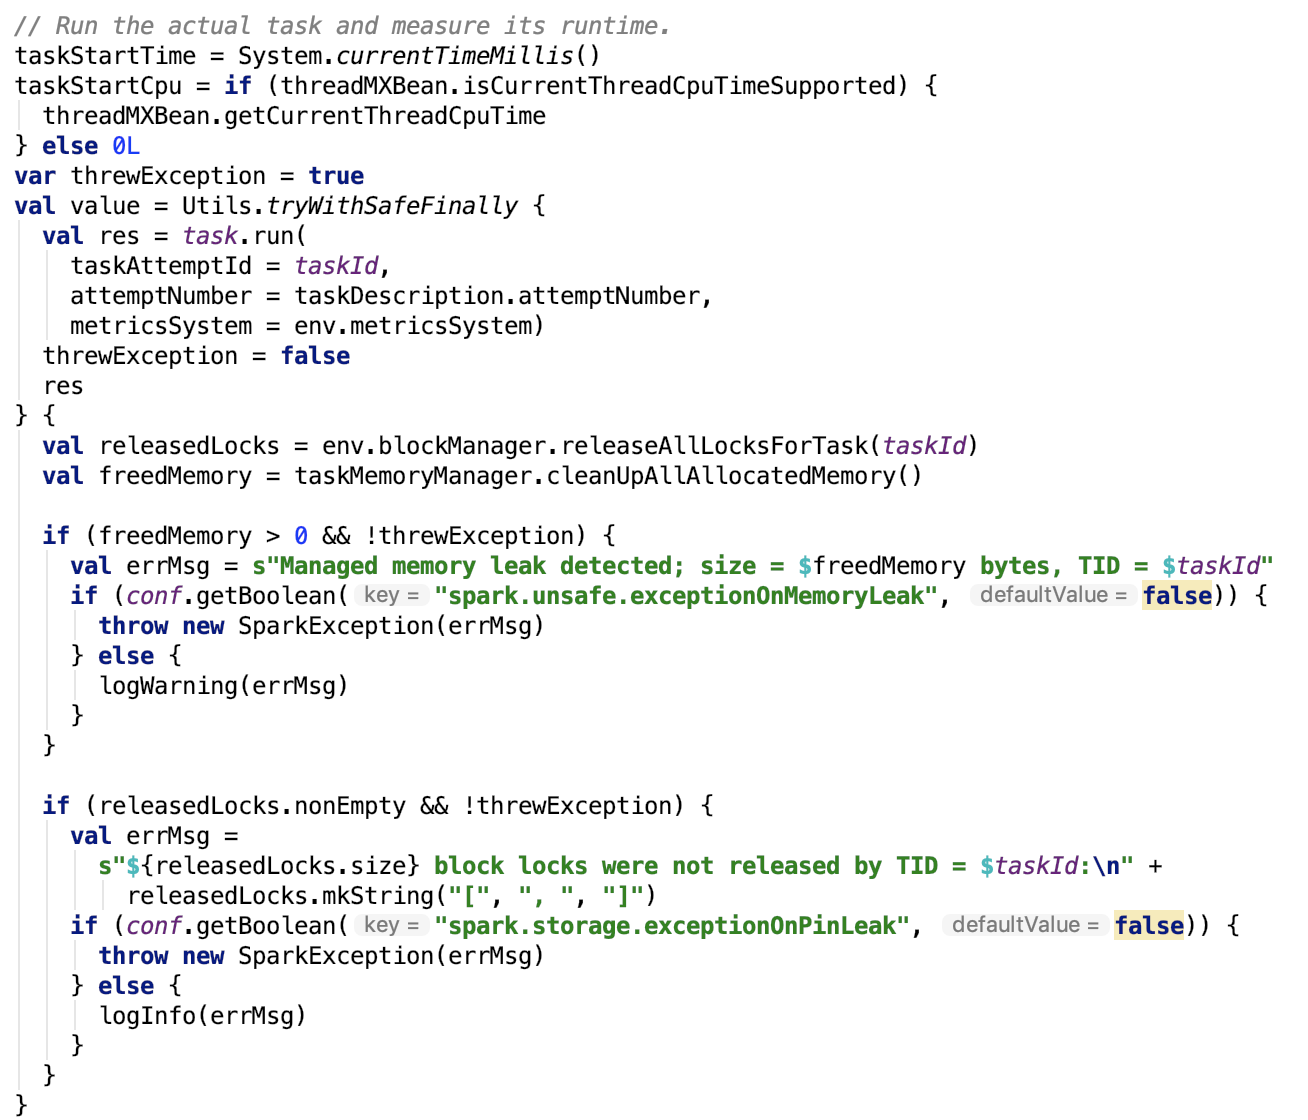
3、运行task
记录任务开始时间,开始使用cpu时间,运行task,最后释放内存。
其依赖方法 org.apache.spark.util.Utils#tryWithSafeFinally 源码如下:

从源码可以看出,第一个方法是执行的方法,第二个方法是finally方法体中需要执行的方法。即释放内存。
4、处理失败任务
源码如下:

5、更新metrics信息
关于metrics的相关内容,不做过多介绍。源码如下:
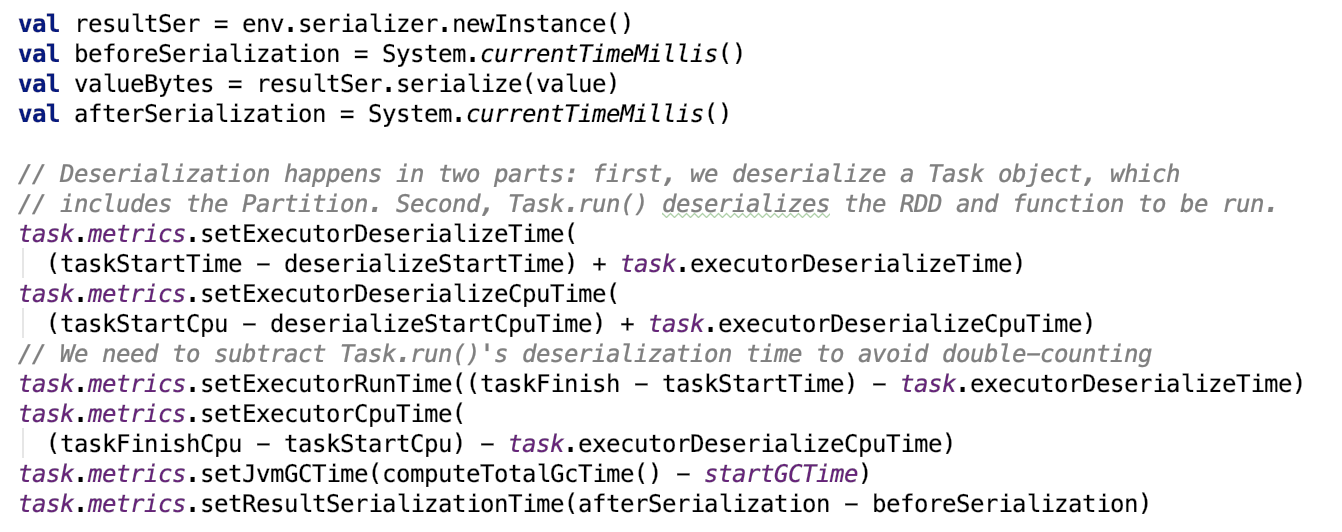
6、序列化Task执行结果
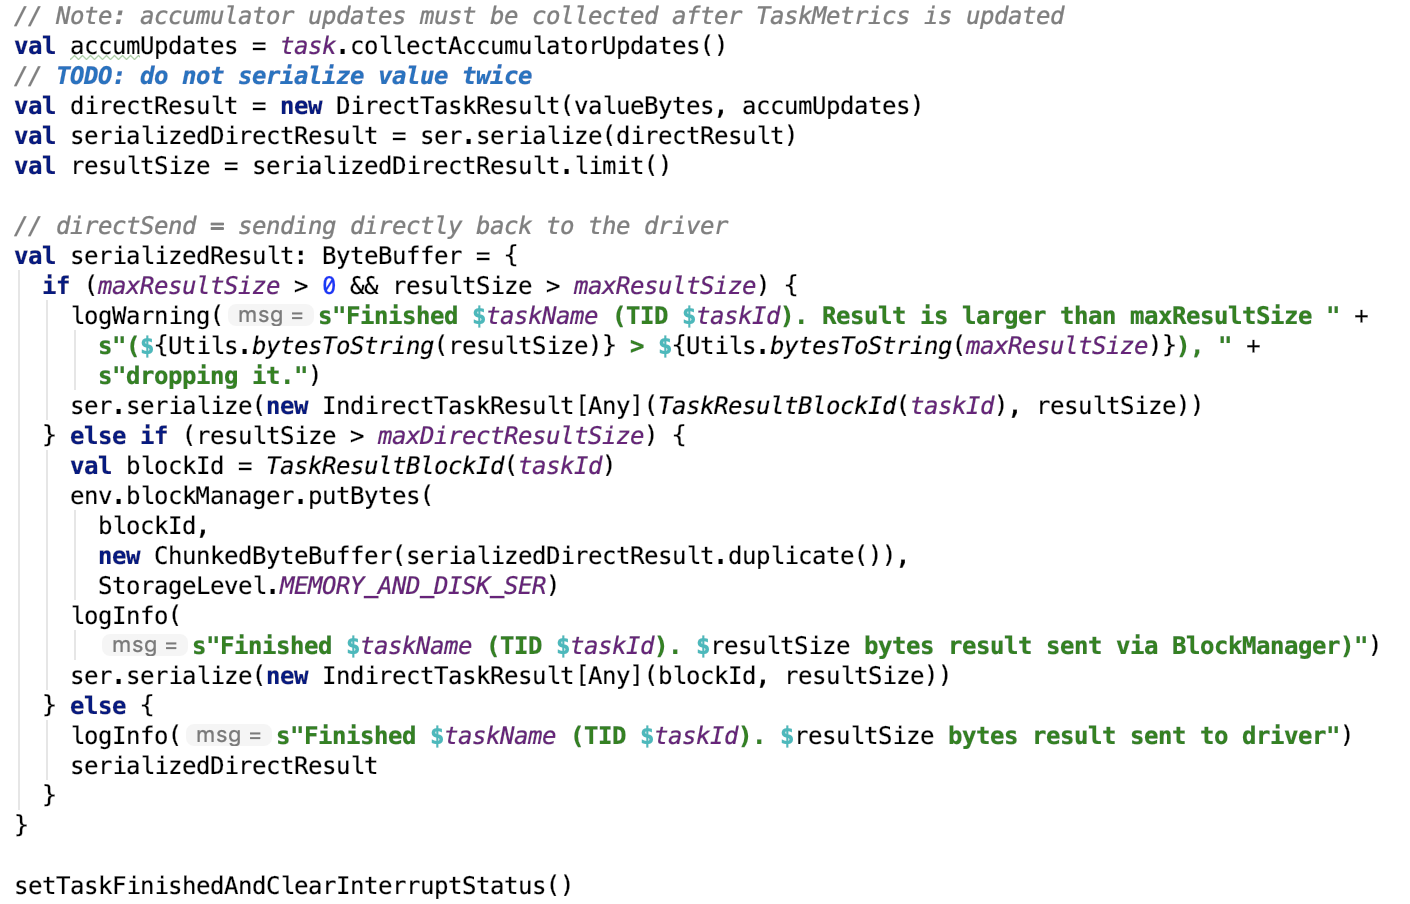
思路:将返回值序列化为ByteBuffer对象。
7、将结果返回给driver

org.apache.spark.executor.CoarseGrainedExecutorBackend#statusUpdate 方法如下:

经过rpc后,driver端org.apache.spark.executor.CoarseGrainedExecutorBackend 的 receive 方法如下:
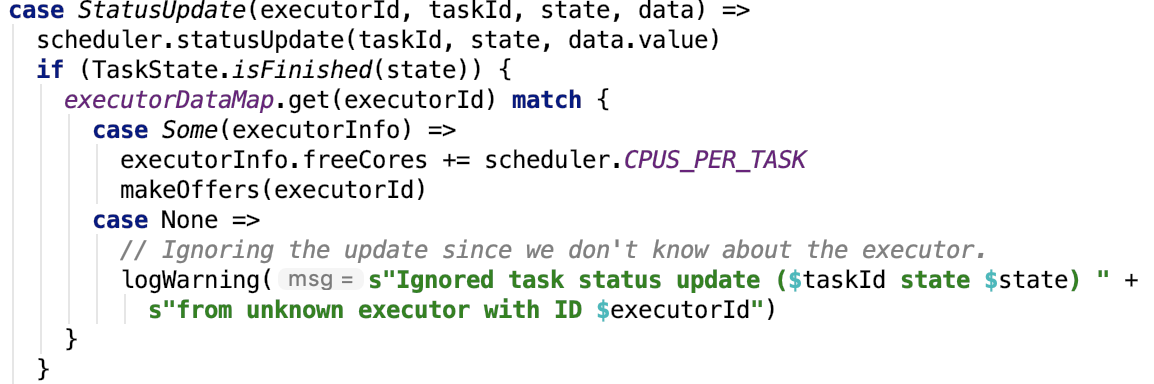
思路:更新task的状态,接着在同一个executor上分配资源,执行任务。
8、更新task状态
org.apache.spark.scheduler.TaskSchedulerImpl#statusUpdate 方法如下:
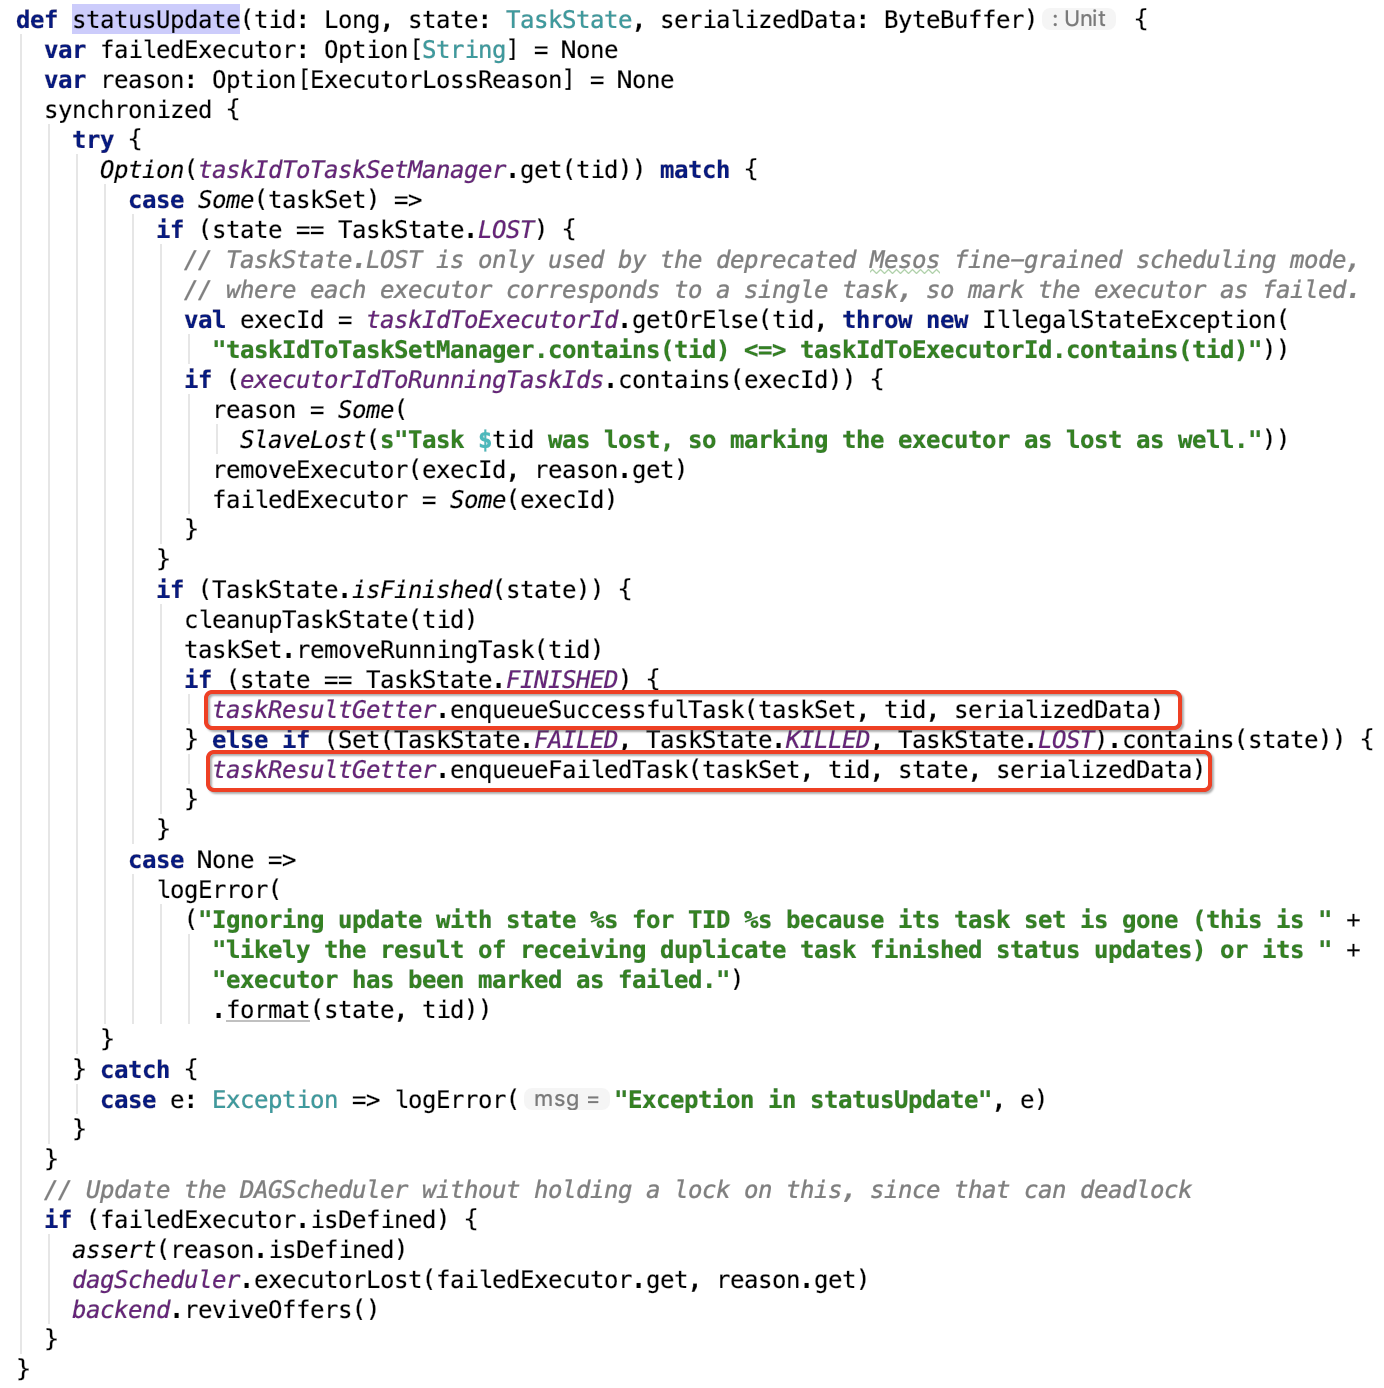
9、处理失败任务
源码如下,不做再深入的剖析:
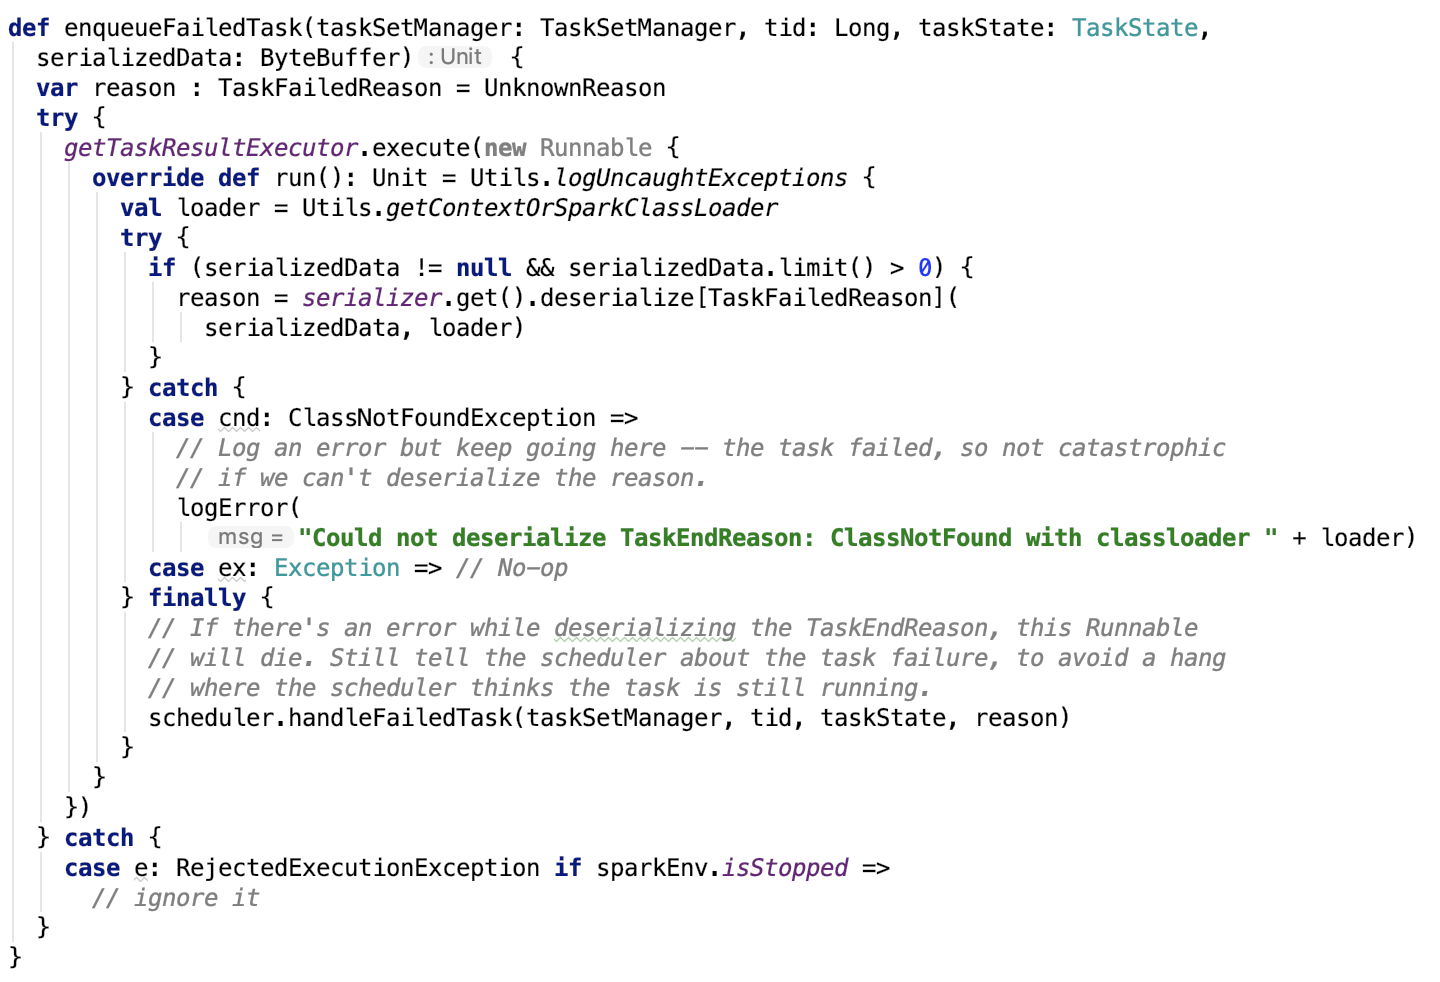
10、处理成功任务
源码如下:
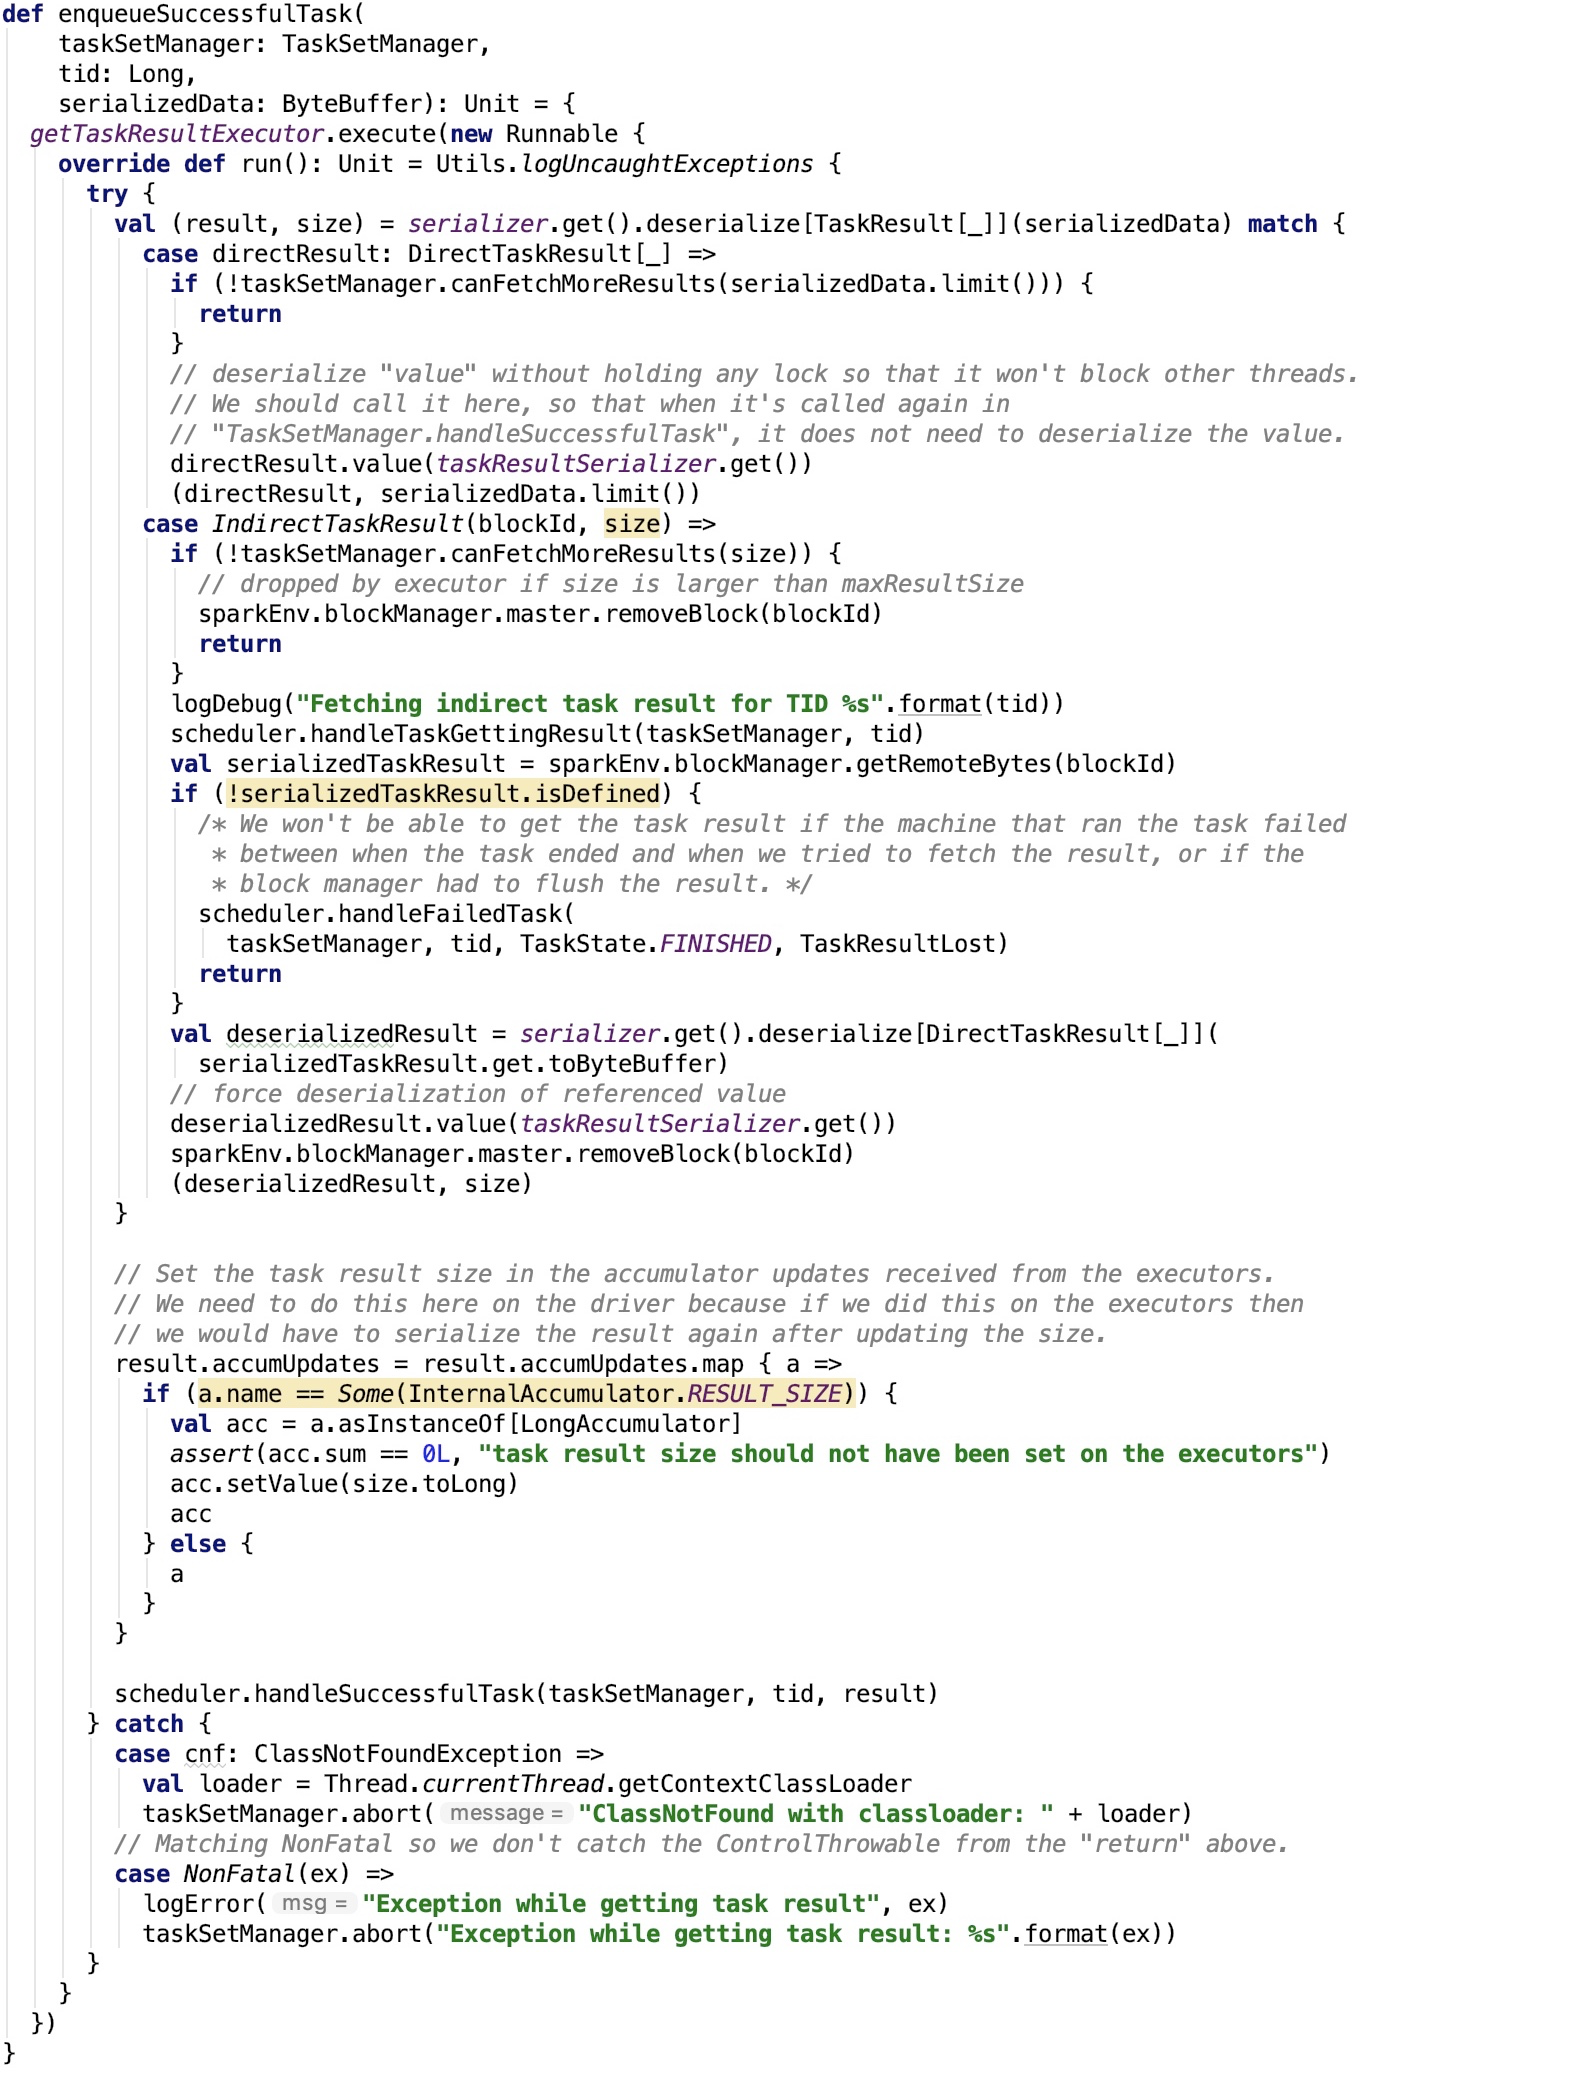
其依赖方法 org.apache.spark.scheduler.TaskSchedulerImpl#handleSuccessfulTask 源码如下:
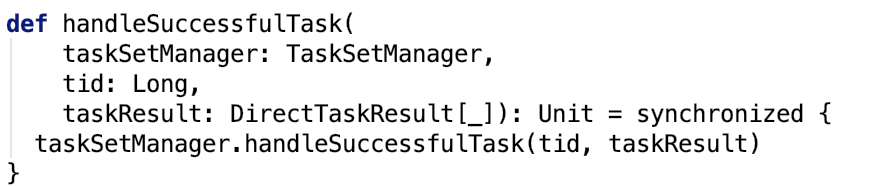
org.apache.spark.scheduler.TaskSetManager#handleSuccessfulTask 源码如下:
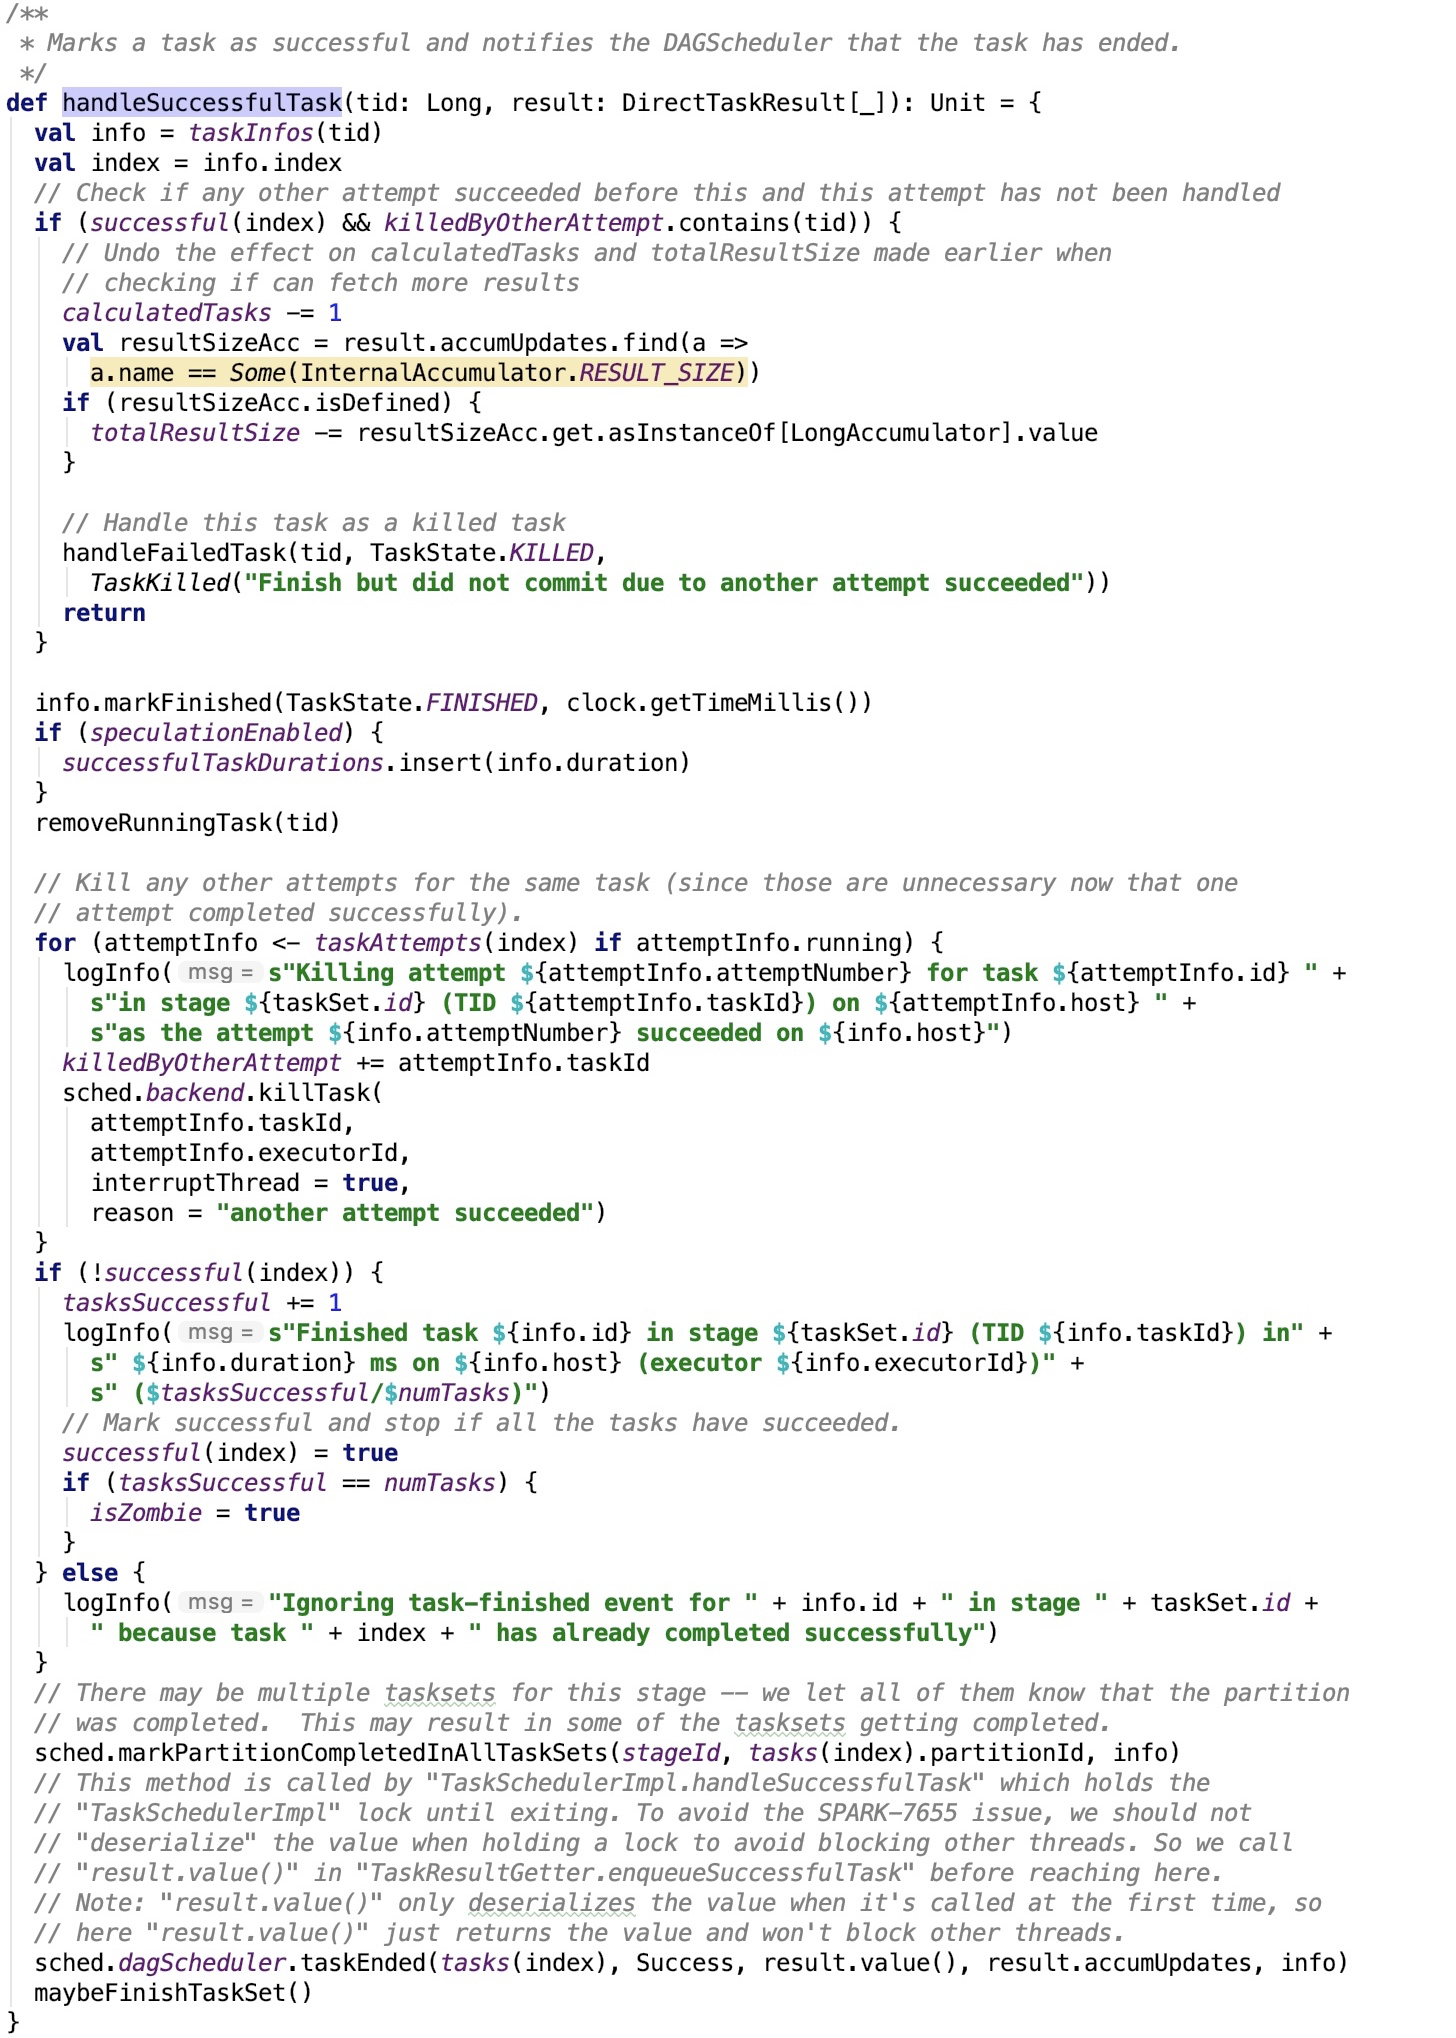
org.apache.spark.scheduler.TaskSchedulerImpl#markPartitionCompletedInAllTaskSets 源码如下:
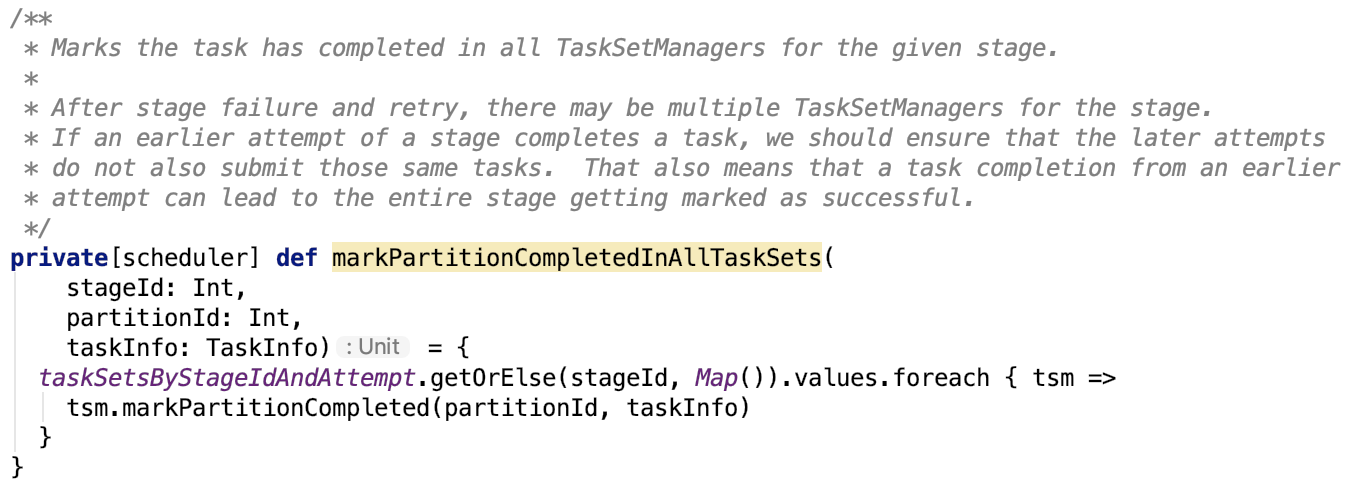
org.apache.spark.scheduler.TaskSetManager#markPartitionCompleted 的源码如下:

org.apache.spark.scheduler.TaskSetManager#maybeFinishTaskSet 源码如下:

11、通知DAGScheduler任务已完成
在org.apache.spark.scheduler.TaskSetManager#handleSuccessfulTask 源码中,最后调用了dagScheduler的taskEnded 方法,源码如下:
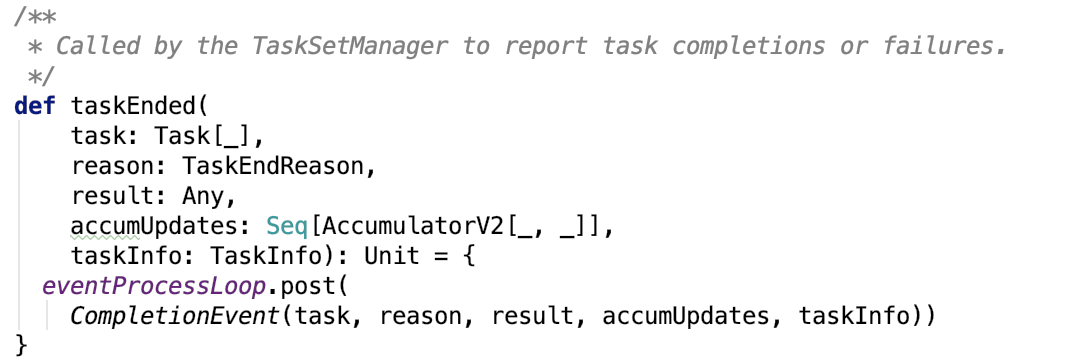
即发送事件消息给eventProcessLoop队列做异步处理:
在 org.apache.spark.scheduler.DAGSchedulerEventProcessLoop#doOnReceive 源码中,处理该事件的分支为:

即会调用 org.apache.spark.scheduler.DAGScheduler#handleTaskCompletion,源码中处理成功的返回值的代码如下:
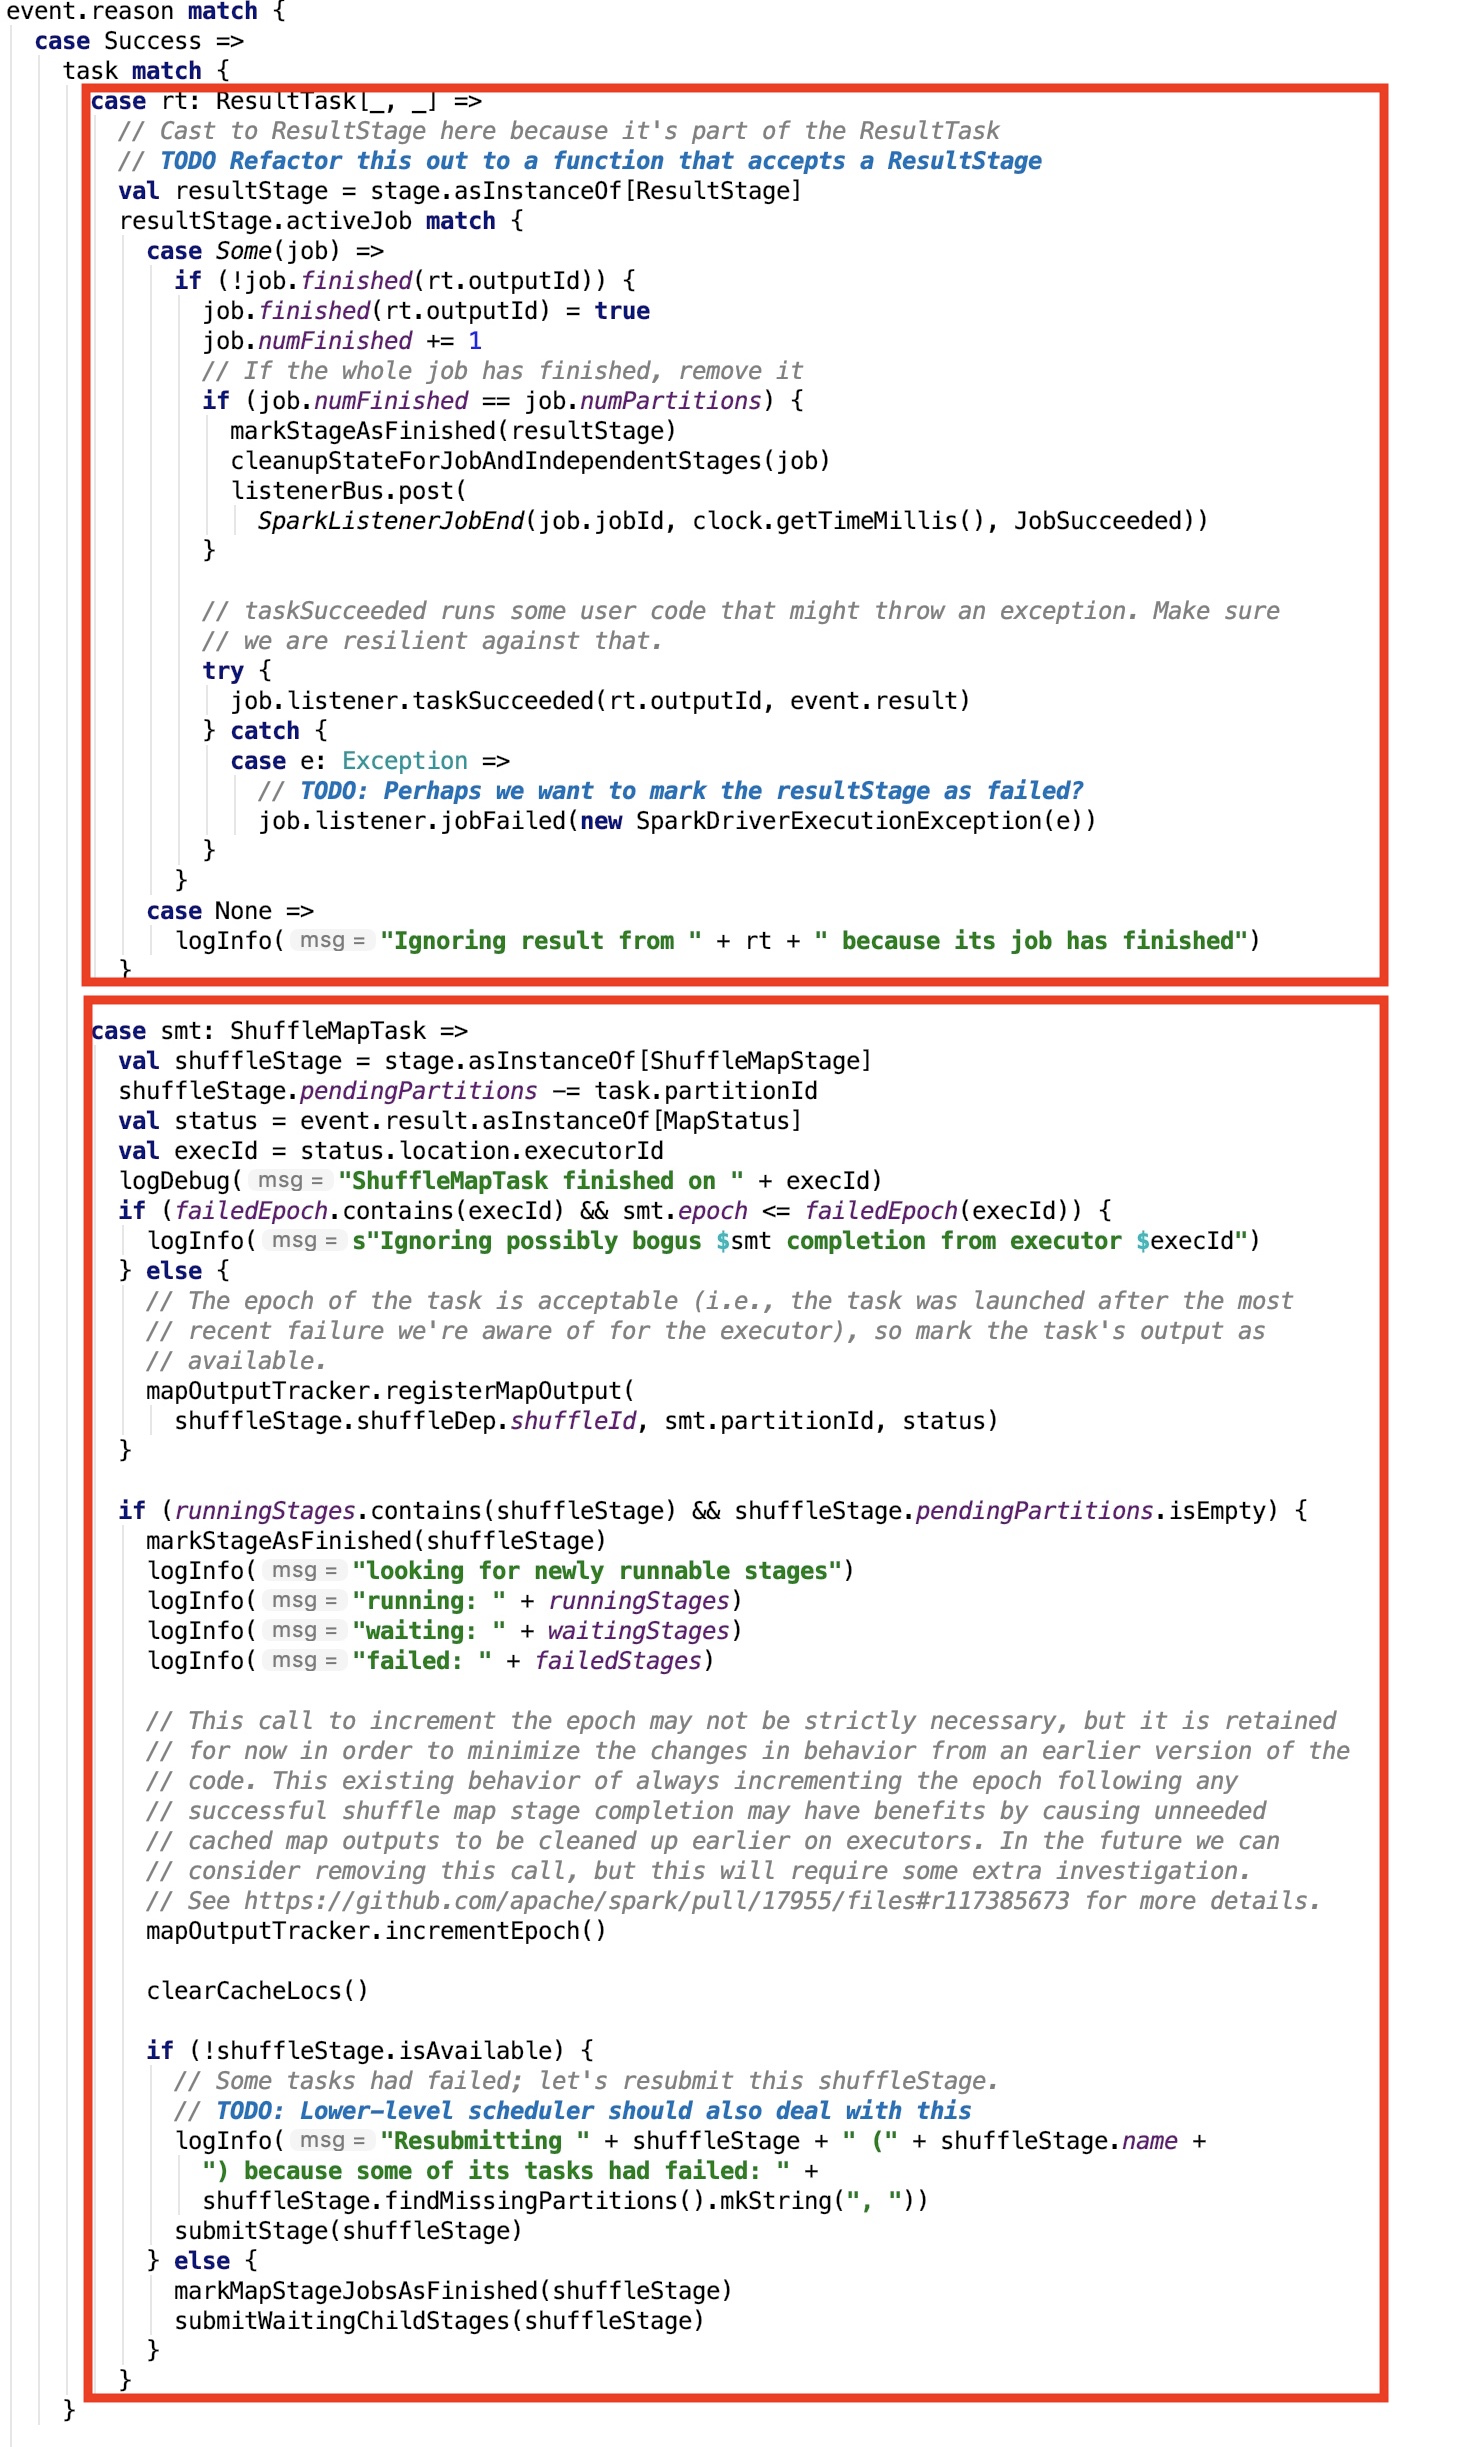
我们重点关注其返回值的处理,如果执行的是一个Action操作,则会进入第一个分支。如果执行的是shuffle操作,则会进入第二个分支。
12、Action作业的返回值处理
先来看第一个分支:
跟返回值有关的代码如下:

org.apache.spark.scheduler.JobWaiter#taskSucceeded源码如下:
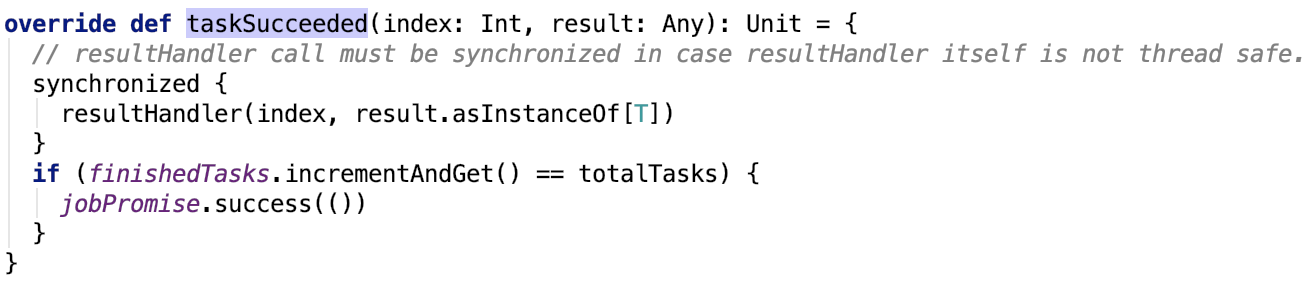
思路:调用RDD定义的resultHandler方法,取出返回值,如果该 task执行完毕之后,所有task都已经执行完毕了,那么jobPromise可以标志为成功,driver就可以拿着action操作返回的值做进一步操作。
假设是collect方法,可以根据 org.apache.spark.SparkContext#submitJob 依赖方法推出resultHandler的定义,如下:

可以知道,resultHandler是在调用方法之前传递过来的方法参数。
我们从collect 方法正向推:

其调用的SparkContext的几个重载的runJob方法如下:


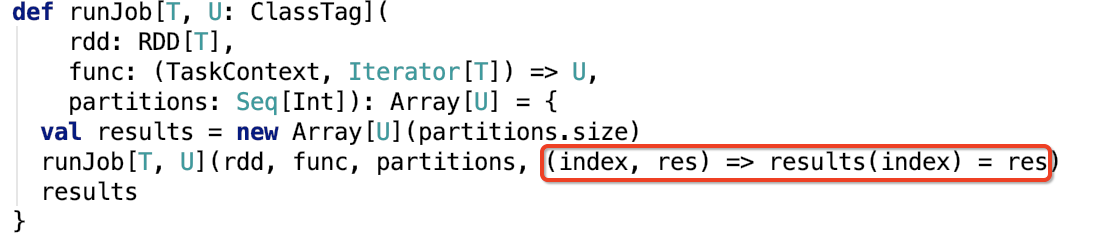
即,上图中标红的就是resultHandler方法,collect方法是应用于整个RDD的分区的。
也就是说,org.apache.spark.scheduler.JobWaiter#taskSucceeded的第一个参数其实就是partition,第二个参数就是该action在RDD的该partition上计算后的返回值。
该resultHandler方法将返回值,直接赋值给result的特定分区。最终,将所有分区的数据都返回给driver。注意,现在的返回值是数组套数组的形式,即二维数组。
最终collect方法中也定义了二维数组flatten为一维数组的方法,如下:

这个方法内部是会生成一个ArrayBuilder对象的用来添加数组元素,最终构造新数组返回。这个方法是会内存溢出的,所以不建议使用这个方法获取大量结果数据。
下面,我们来看第二个分支。
13、Shuffle作业的返回值处理
shuffle作业的返回值是 MapStatus 类型。
先来聊一下MapStatus类。
MapStatus
主要方法如下:
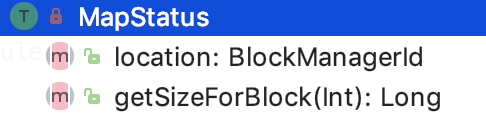
location表示 shuffle的output数据由哪个BlockManager管理着。
getSizeForBlock:获取指定block的大小。
其继承关系如下:
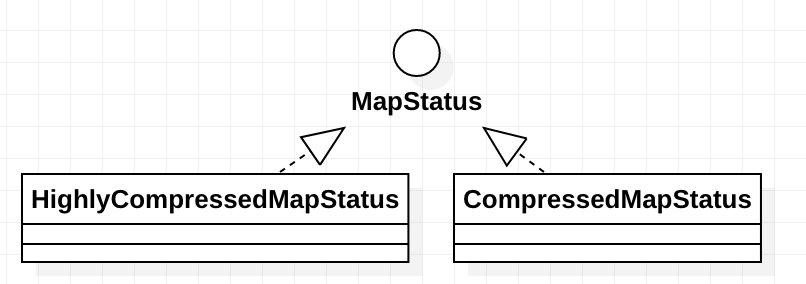
CompressedMapStatus 主要是实现了压缩的MapStatus,即在网络传输进行序列化的时候,可以对MapStatus进行压缩。
HighlyCompressedMapStatus 主要实现了大block的存储,以及保存了block的平均大小以及block是否为空的信息。
处理shuffle 作业返回值
我们只关注返回值的处理,org.apache.spark.scheduler.DAGScheduler#handleTaskCompletion方法中涉及值处理的源码如下:
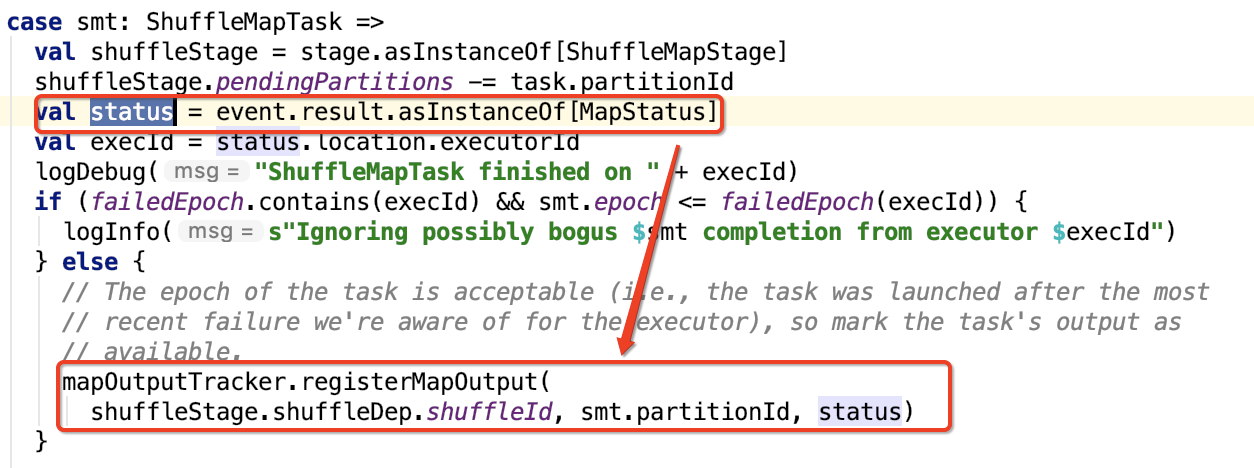
org.apache.spark.MapOutputTrackerMaster#registerMapOutput 的源码如下,mapId就是partition的id:

其中,成员变量 shuffleStatuses 定义如下:

即shuffleStatuses在driver端保存了shuffleId和shuffleStatus的信息。便于后续stage可以调用 MapOutputTrackerMasterEndpoint ref 来获取该stage返回的MapStatus信息。具体内容,我们将在下一节分析。
14、总结
本篇文章主要介绍了跟Spark内部Task运行的细节流程,关于Task的运行部分没有具体涉及,Task按照ResultStage和ShuffleStage划分为两种Task,ResultStage任务和ShuffleStage分别对应的Task的执行流程有本质的区别,将在下一篇文章进行更加详细的剖析。
四、Task的内存管理
1、提出问题
-
spark任务在执行的时候,其内存是如何管理的?
-
堆内内存的寻址是如何设计的?是如何避免由于JVM的GC的存在引起的内存地址变化的?其内部的内存缓存池回收机制是如何设计的?
-
堆外和堆内内存分别是通过什么来分配的?其数据的偏移量是如何计算的?
-
消费者MemoryConsumer是什么?
-
数据在内存页中是如何寻址的?
单个任务的内存管理是由 org.apache.spark.memory.TaskMemoryManager 来管理的。
2、TaskMemoryManager
它主要是负责管理单个任务的内存。
首先内存分为堆外内存和堆内内存。
对于堆外内存,可以内存地址直接使用64位长整型地址寻址。
对于堆内内存,内存地址由一个base对象和一个offset对象组合起来表示。
类在设计的过程中遇到的问题:
对于其他结构内部的结构的地址的保存是存在问题的,比如在hashmap或者是 sorting buffer 中的记录的指针,尽管我们决定使用128位来寻址,我们不能只存base对象的地址,因为由于gc的存在,这个地址不能保证是稳定不变的。(由于分代回收机制的存在,内存中的对象会不断移动,每次移动,对象内存地址都会改变,但这对于不关注对象地址的开发者来说,是透明的)
最终的方案:
对于堆外内存,只保存其原始地址,因为堆外内存不受gc影响;对于堆内内存,我们使用64位的高13位来保存内存页数,低51位来保存这个页中的offset,使用page表来保存base对象,其在page表中的索引就是该内存的内存页数。页数最多有8192页,理论上允许索引 8192 * (2^31 -1)* 8 bytes,相当于140TB的数据。其中 2^31 -1 是整数的最大值,因为page表中记录索引的是一个long型数组,这个数组的最大长度是2^31 -1。实际上没有那么大。因为64位中除了用来设计页数和页内偏移量外还用于存放数据的分区信息。
3、MemoryLocation
其中这个base对象和offset对象被封装进了 MemoryLocation对象中,也就是说,这个类就是用来内存寻址的,如下:
其唯一实现类为 org.apache.spark.unsafe.memory.MemoryBlock。
4、MemoryBlock
它表示一段连续的内存块,包括一个起始位置和一个固定大小。起始位置有MemoryLocation来表示。
也就是说它有四个属性:
这段连续内存块的起始地址:从父类继承而来的base对象和offset。
固定大小 length以及对这个内存块的唯一标识 - 内存页码(page number)
主要方法如下,其中Platform是跟操作系统有关的一个类,不做过多说明。
5、MemoryAllocator
其主要负责内存的申请工作。这个接口的实现类是真正分配内存的。后面介绍的TaskMemoryManager只是负责管理内存,但是不负责具体的内存分配事宜。
其继承关系如下,有两个子类:
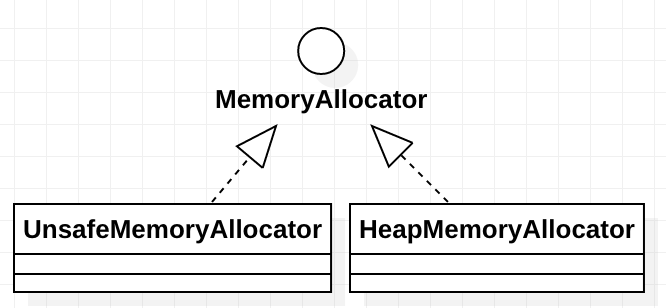
其定义的主要的常量和方法如下:
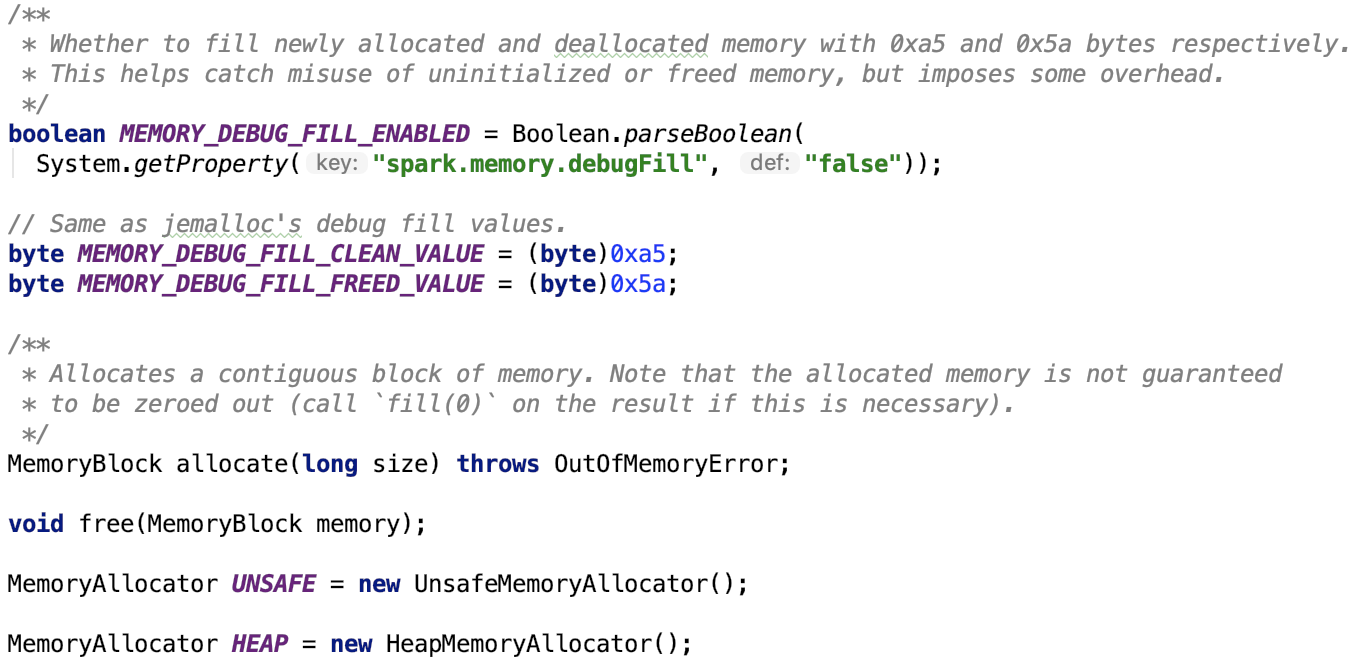
主要方法主要用来分配和释放内存块。下面主要来看一下它两个子类的实现。
6、HeapMemoryAllocator
全称:org.apache.spark.unsafe.memory.HeapMemoryAllocator
主要负责分配堆内内存,其主要分配long型数组,最大分配内存为16GB。
1、成员变量

bufferPoolBySize是一个HashMap,其内部的value里面存放的数据都是弱引用类型的数据,在JVM 发生GC时,数据可能会被回收。它里面存放的数据都是已经不用的废弃掉的内存块。
2、是否使用内存缓存池

申请的内存块的大小大于阀值才使用内存缓存池。
3、分配内存

思路:首先根据bytes大小计算处words的大小,然后字节对齐计算出对齐需要的字节,断言对齐后的字节大小大于等于之前未对齐的字节大小。为什么要对齐呢?因为长整型数组的内存大小是对齐的。
如果对齐后的字节大小满足使用缓存池的条件,则先从缓存池中弹出对应的pool,并且如果弹出的pool不为空,则逐一取出之前释放的数组,并将其封装进MmeoryBlock对象,并且使用标志位清空之前的历史数据返回之。
否则,则初始化指定的words长度的长整型数组,并将其封装进MmeoryBlock对象,并且使用标志位清空之前的历史数据返回之。总之缓存的是长整型数组,存放数据的也是长整型数组。
4、释放内存
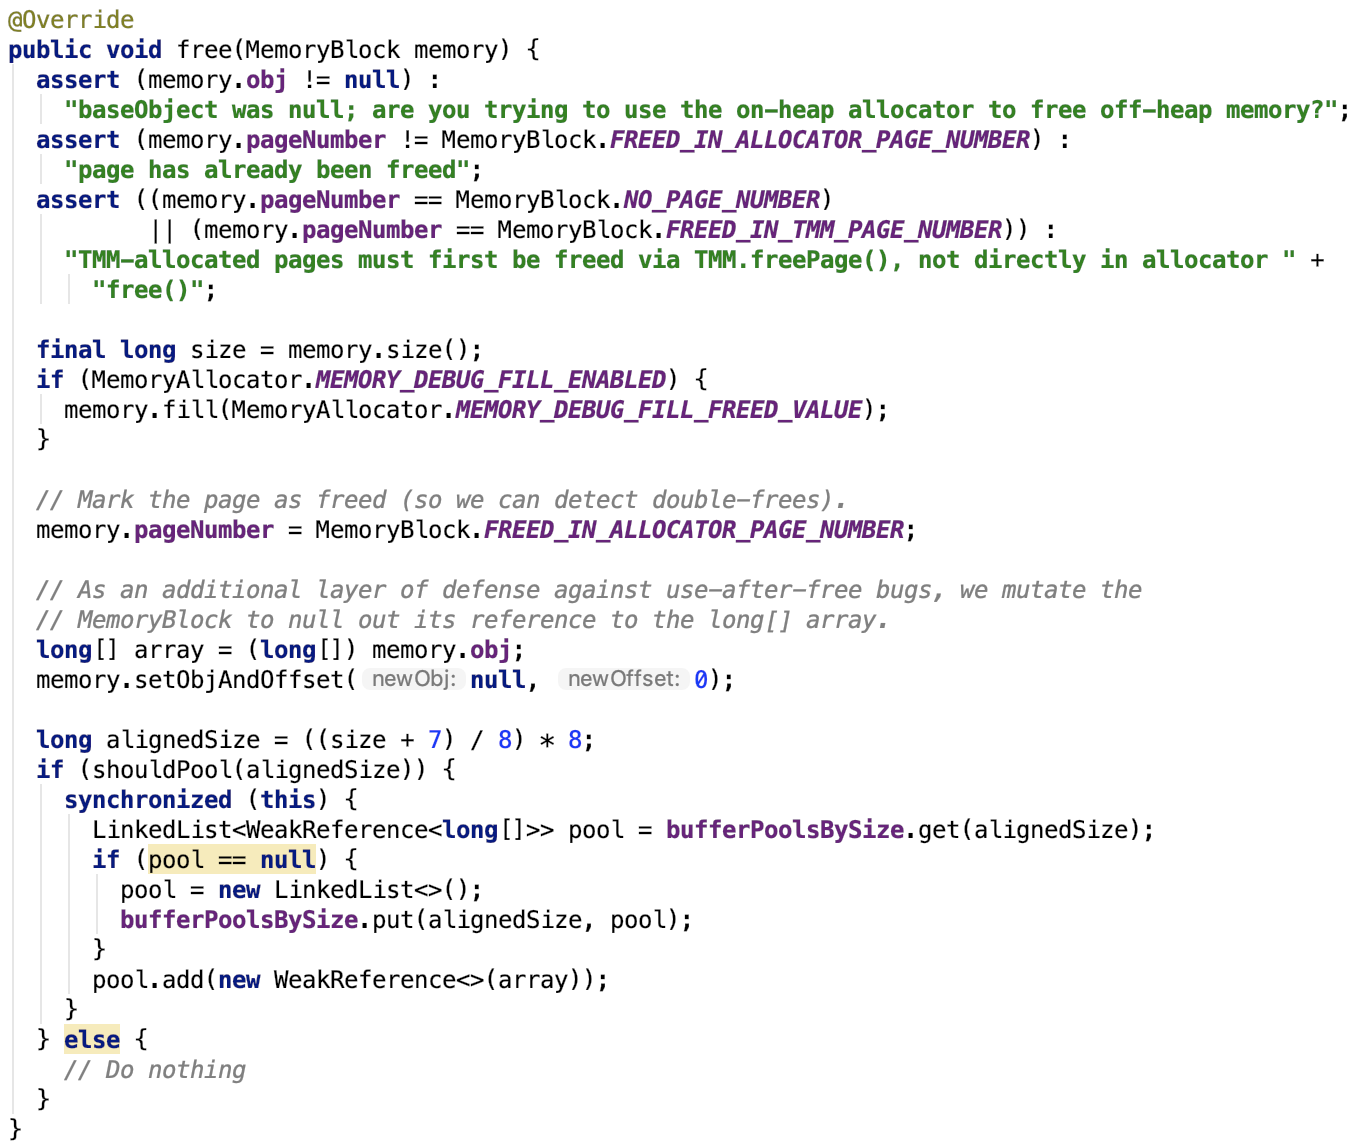
首先把要释放的内存数据使用free标志位覆盖,pageNumber置为占位的page number。
然后取出其内部的长整型数组赋值给临时变量,并且把base对象置为null,offset置为0。
取出的长整型数组计算其对齐大小,内存页的大小不一定等于数组的长度 * 8,此时的size是内存页的大小,需要进行对齐操作。
对齐之后的内存页大小如果满足缓存池条件,则将其暂存缓存池,等待下次回收再用或者JVM的GC回收。
这个方法结束之后,这个长整型数组被LinkedList对象(即pool)引用,但这是一个若引用,所以说,现在这个数组是一个游离对象,当JVM回收时,会回收它。
5、对堆内内存的总结
对于堆内内存上的数据真实受JVM的GC影响,其真实数据的内存地址会发生改变,巧妙使用数组这种容器以及偏移量巧妙地将这个问题规避了,数据回收也可以使用缓存池机制来减少数组频繁初始化带来的开销。其内部使用虚引用来引用释放的数组,也不会导致无法回收导致内存泄漏。
7、UnsafeMemoryAllocator
全称:org.apache.spark.unsafe.memory.UnsafeMemoryAllocator
负责分配堆外内存。
1、分配内存
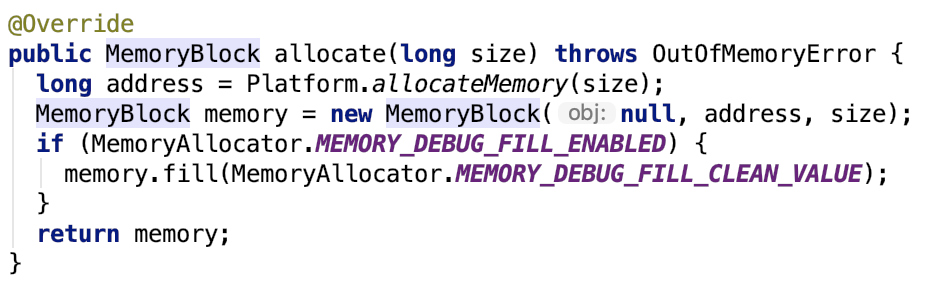
思路:底层使用unsafe这个类来分配堆外内存。这里的offset就是操作系统的内存地址,base对象为null。
2、释放内存
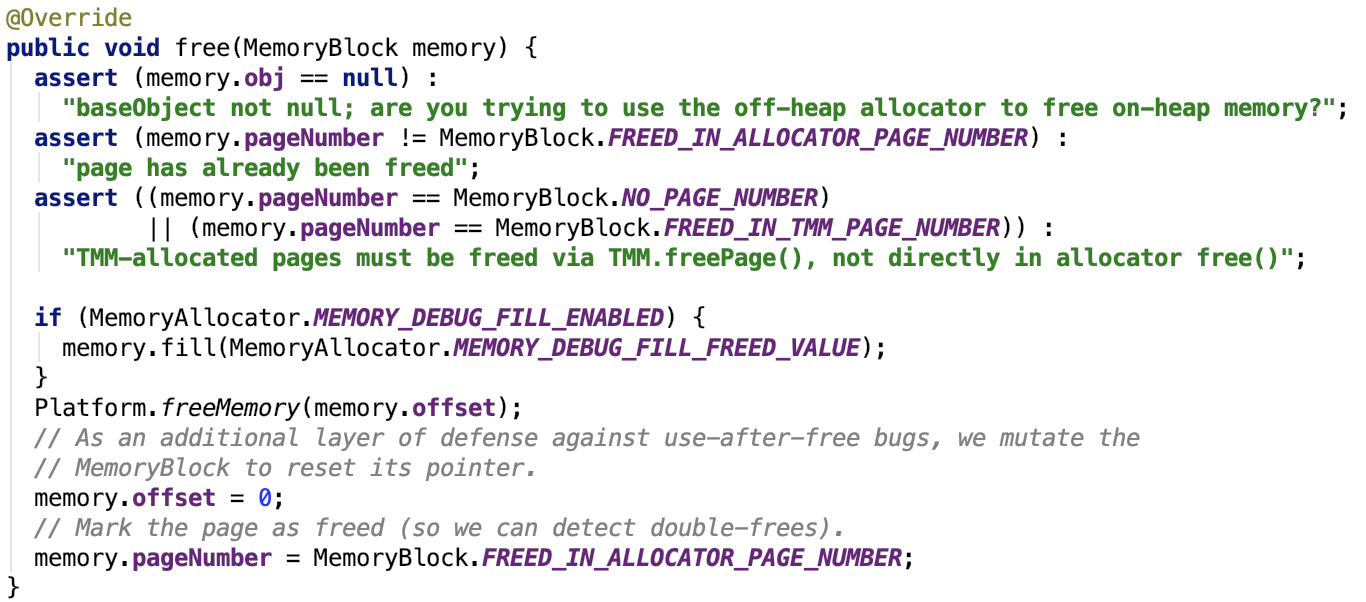
堆外内存的释放不能使用缓存池,因为堆外内存不受JVM的管理,将会导致遗留的不用的内存无法回收从而引发更严重的内存泄漏,更甚者堆外内存使用的是系统内存,严重的话还会导致出现系统级问题。
3、堆堆外内存的总结
简言之,对于堆外内存的分配和回收,都是通过java内置的Unsafe类来实现的,其统一规范中的base对象为null,其offset就是该内存页在操作系统中的真实地址。
下面剖析一下TaskMemoryManager的成员变量和核心方法。
8、进一步剖析TaskMemoryManager
1、成员变量
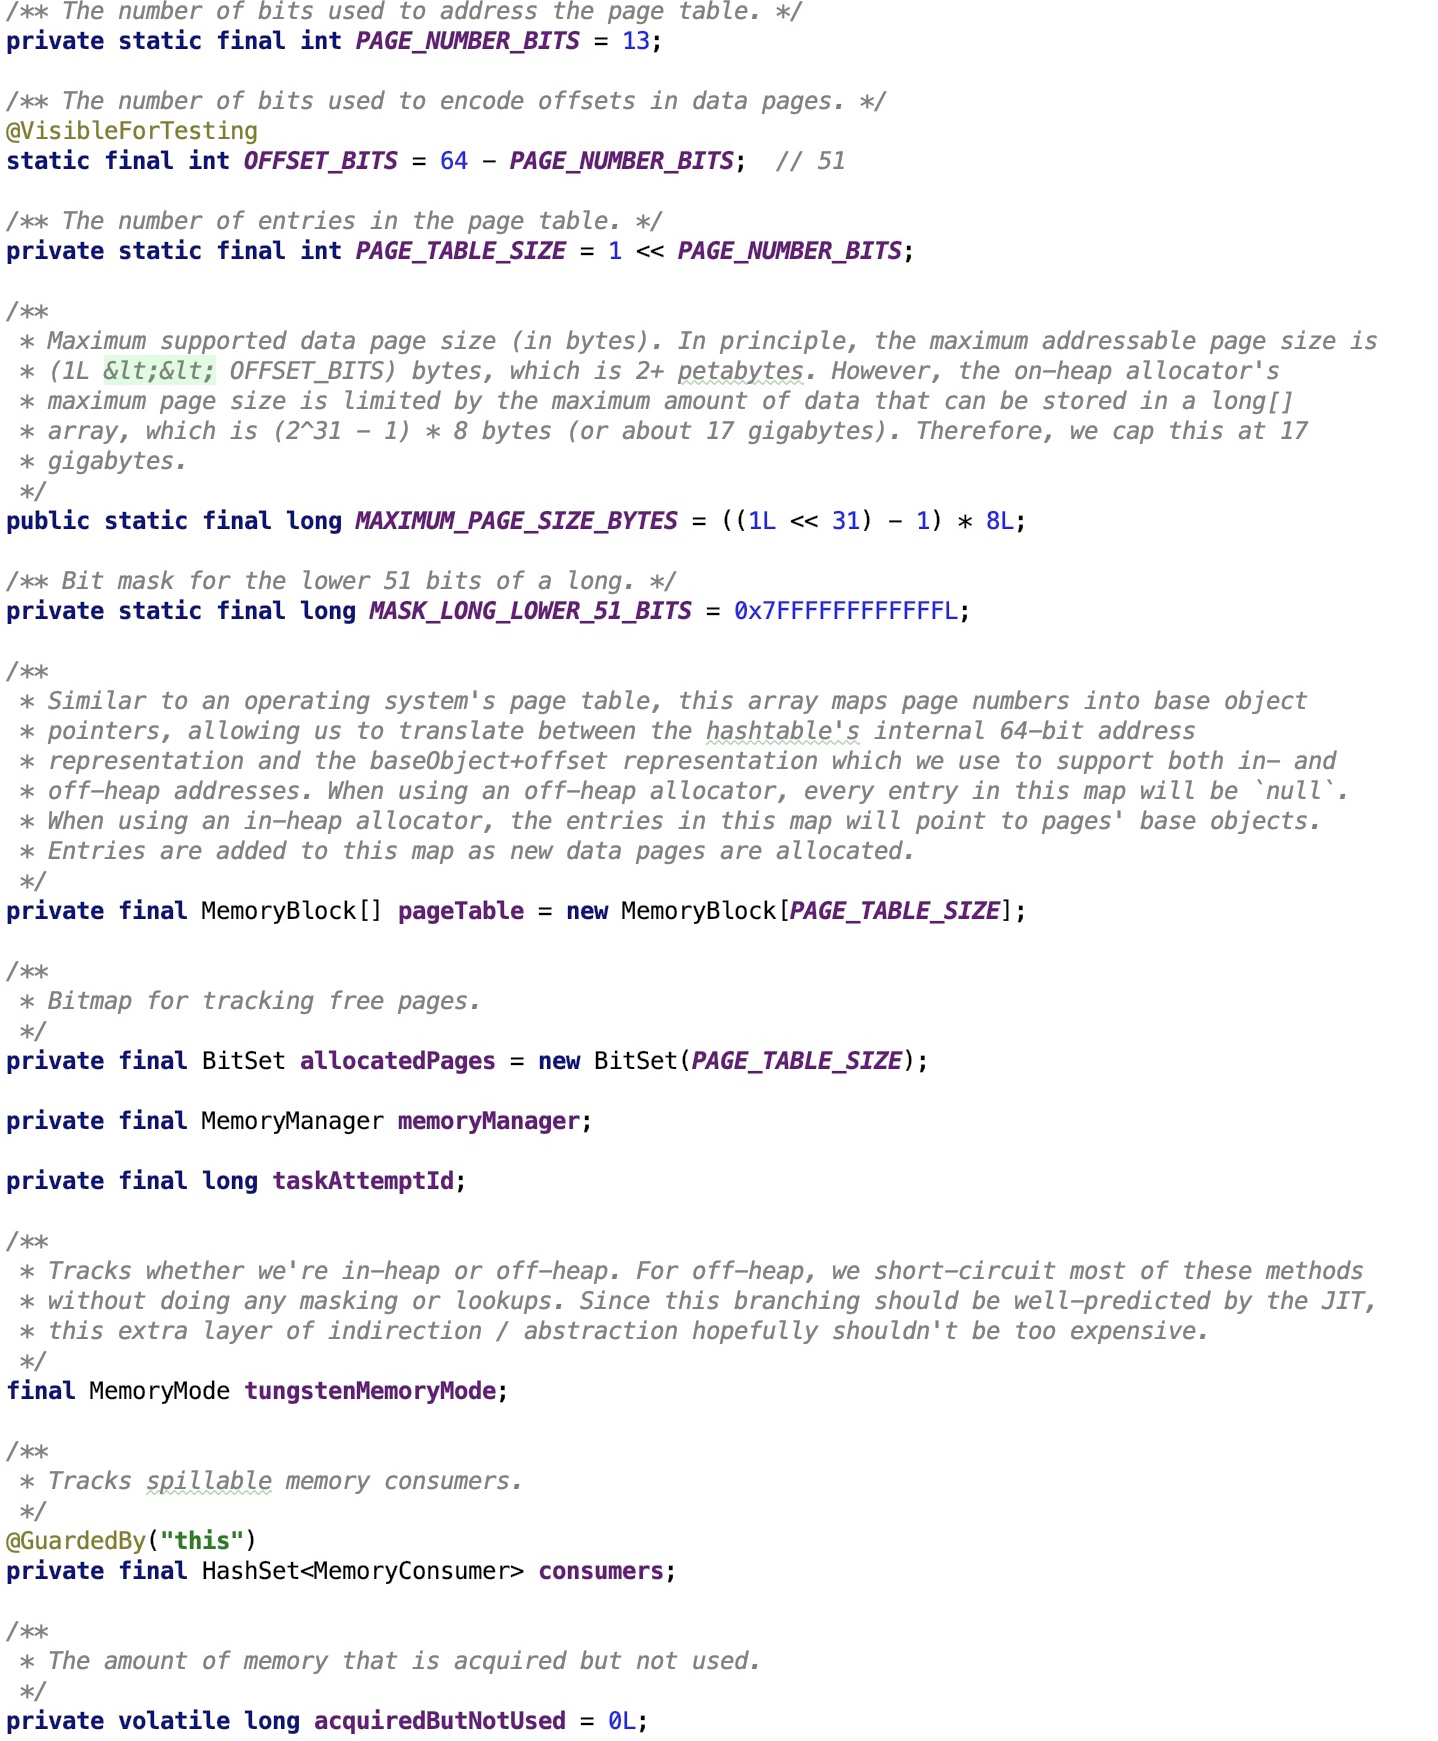
对主要的成员变量做如下解释:
OFFSET_BITS:是指的page number 占用的bit个数
MAXIMUM_PAGE_SIZE_BYTES:约17GB,每页最大可存内存大小
pageTable:主要用来存放内存页的
allocatedPages:主要用来追踪内存页是否为空的
memoryManager:主要负责Spark内存管理,具体细节可以参照 spark 源码分析之十五 -- Spark内存管理剖析 做进一步了解。
taskAttemptId:任务id
tungstenMemoryMode:tungsten内存模式,是堆外内存还是堆内内存
consumers:记录了任务内存的所有消费者
2、核心方法
所有方法如下:

下面,我们来逐一对其进行源码剖析。
-
获取执行内存

思路:首先先去MemoryManager中去申请执行内存,如果内存不够,则获取所有的MemoryConsumer,调用其spill方法将内存数据溢出到磁盘,直到释放内存空间满足申请的内存空间则停止spill操作。
-
释放执行内存

这其实不是真正意义上的内存释放,只是管账的把这笔内存占用划掉了,真正的内存释放还是需要调用MemoryConsumer的spill方法将内存数据溢出到磁盘来释放内存。
-
获取内存页大小

-
分配内存页
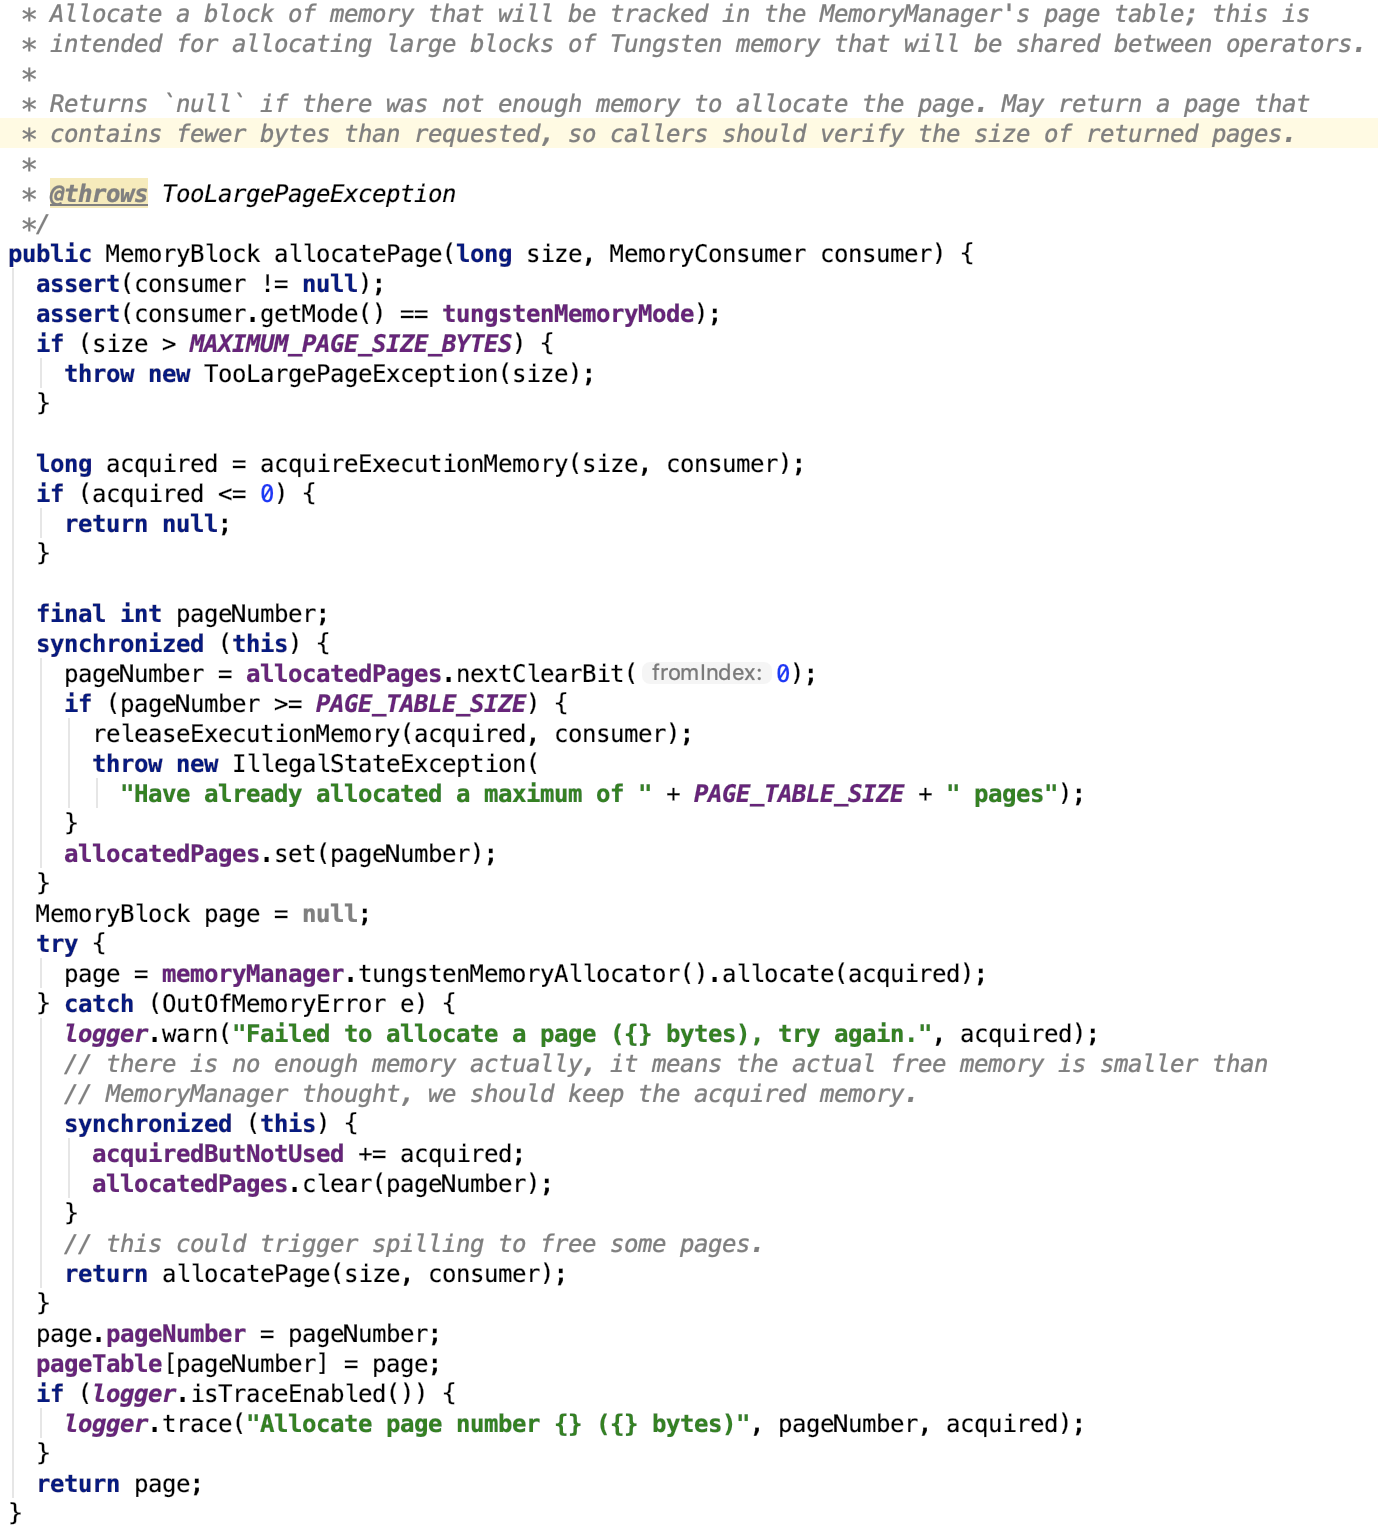
思路:首先获取执行内存。执行内存获取成功后,找到一个空的内存页。
如果内存页码大于指定的最大页码,则释放刚申请的内存,返回;否则使用MemoryAllocator分配内存页、初始化内存页码并将其放入page表的管理,最后返回page。关于MemoryAllocator分配内存的细节,请参照上文关于其堆内内存或堆外内存的内存分配的详细剖析。
-
释放内存页
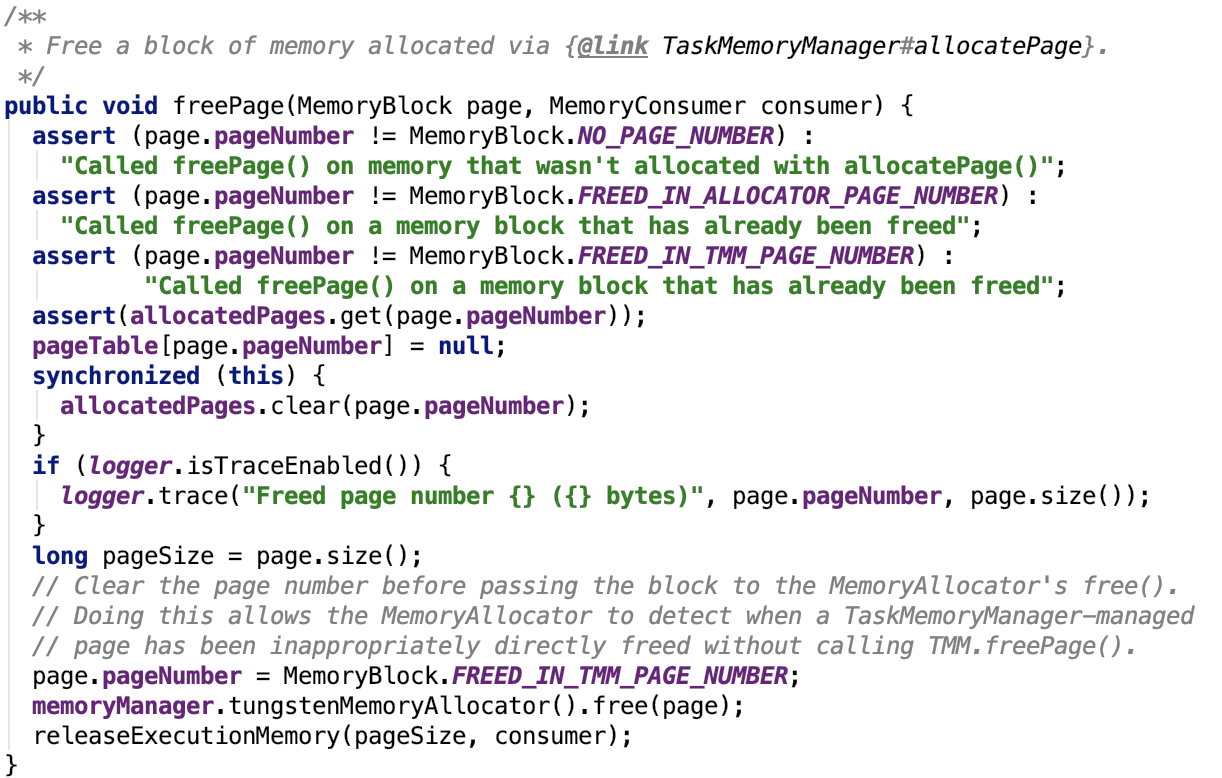
思路:首先调用EMmoryAllocator的free 方法来释放内存,并且调用 方法2 来划掉内存的占用情况。
-
内存地址加密
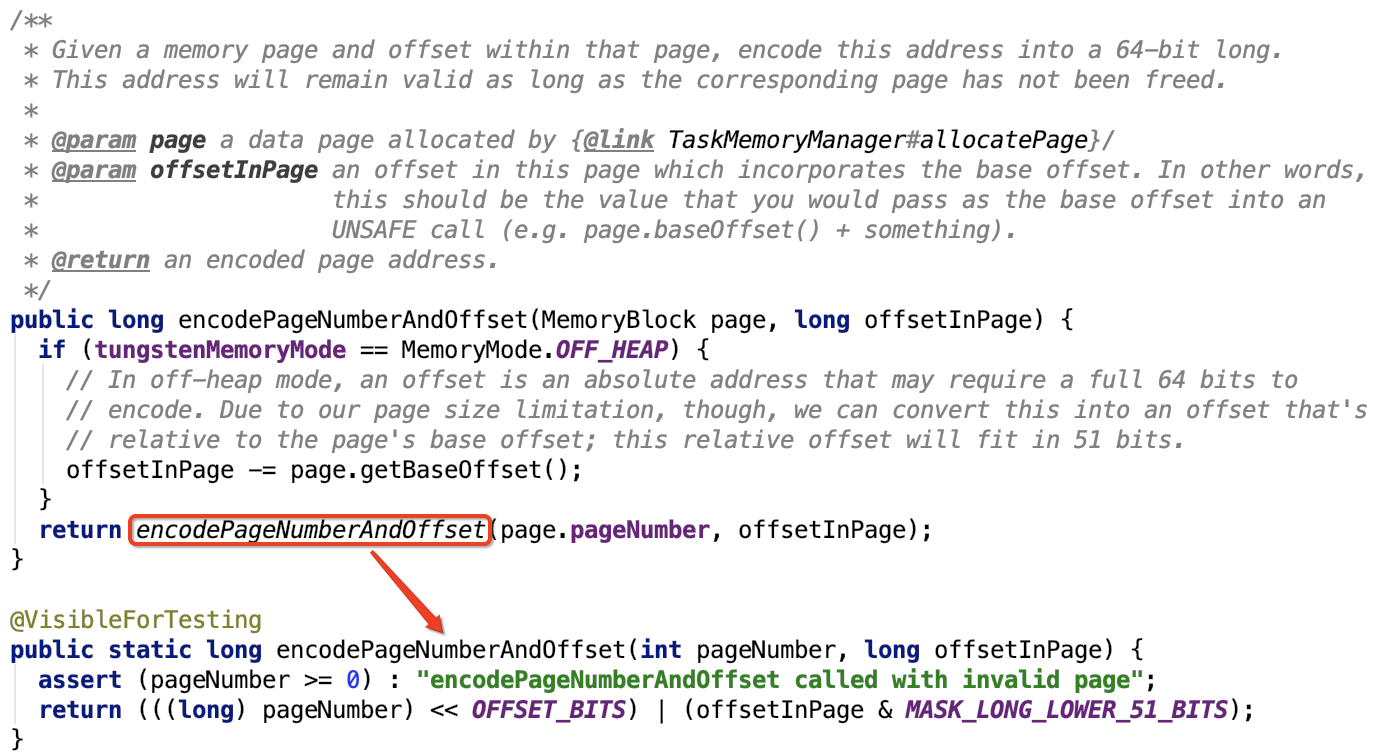
思路:高13位保存的是page number,低51位保存的是地址的offset
7.内存地址解密
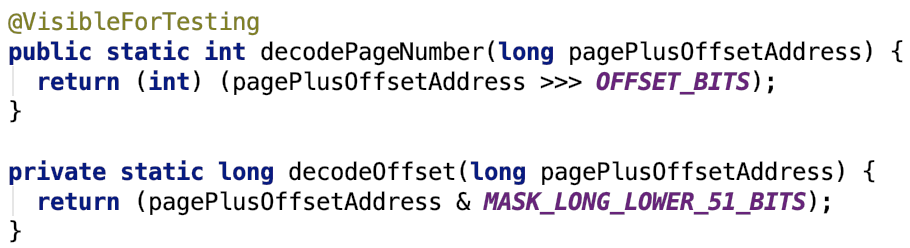
思路: 跟 方法6 的编码思路相反
8.根据内存地址获取内存的base对象,前提是必须是堆内内存页,否则没有base对象。
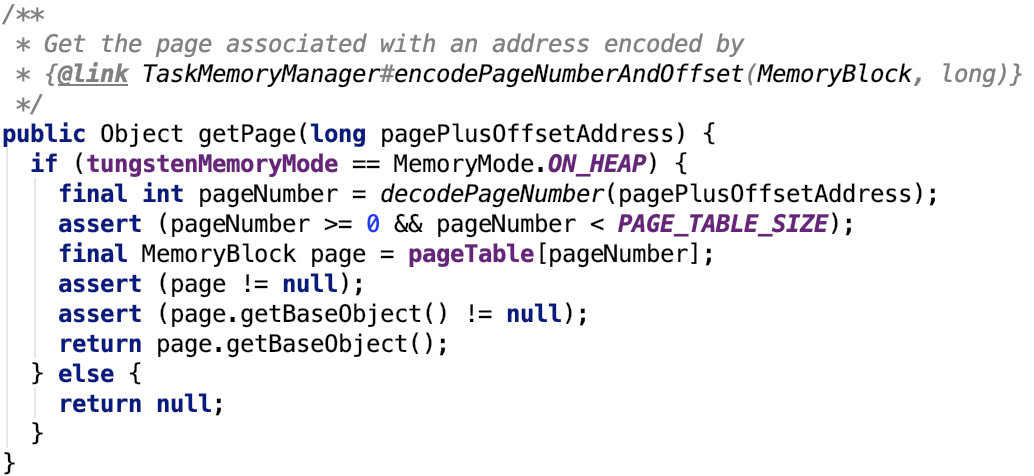
9.获取内存地址在内存页的偏移量offset
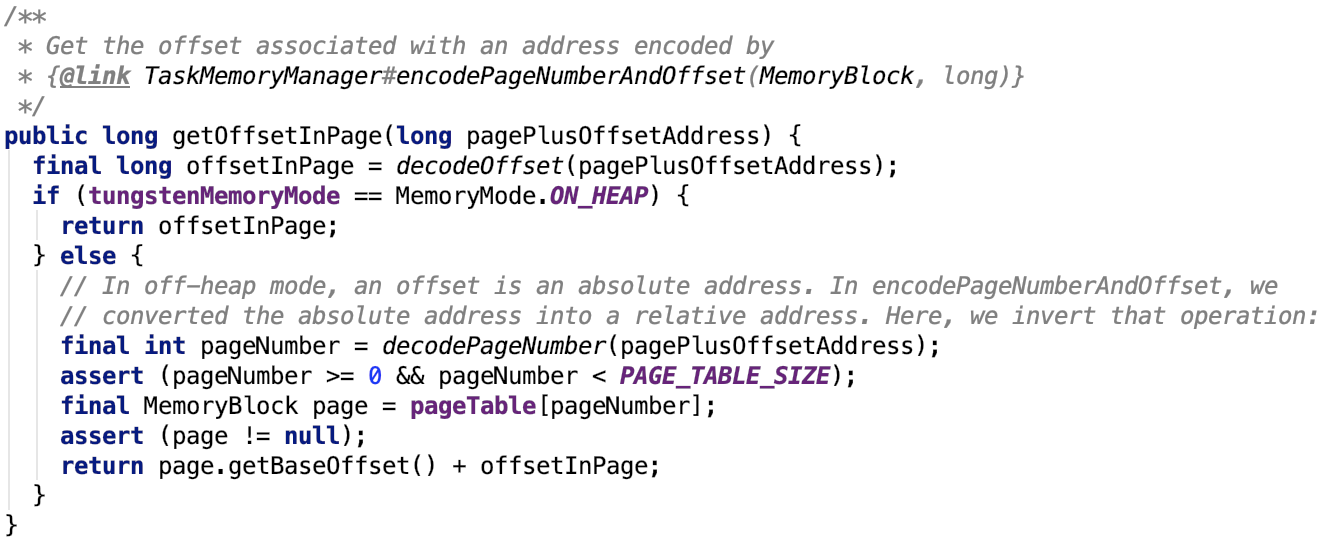
如果是堆内内存,则直接返回其解码之后的offset即可。
如果是堆外内存,分配内存时的offset + 页内的偏移量就是真正的偏移量,是针对操作系统的,也是绝对的偏移量。
10.清空所有内存页

思路:使用MemoryAllocator释放内存,并且请求管账的MemoryManager释放执行内存和task的所有内存。
11.获取单个任务的执行内存使用情况

思路:从MemoryManager处获取指定任务的执行内存使用情况。
下面看一下跟TaskMemoryManager交互的消费者对象 -- MemoryConsumer。
9、MemoryConsumer
1、类说明
它是任务内存的消费者。
其类结构如下:
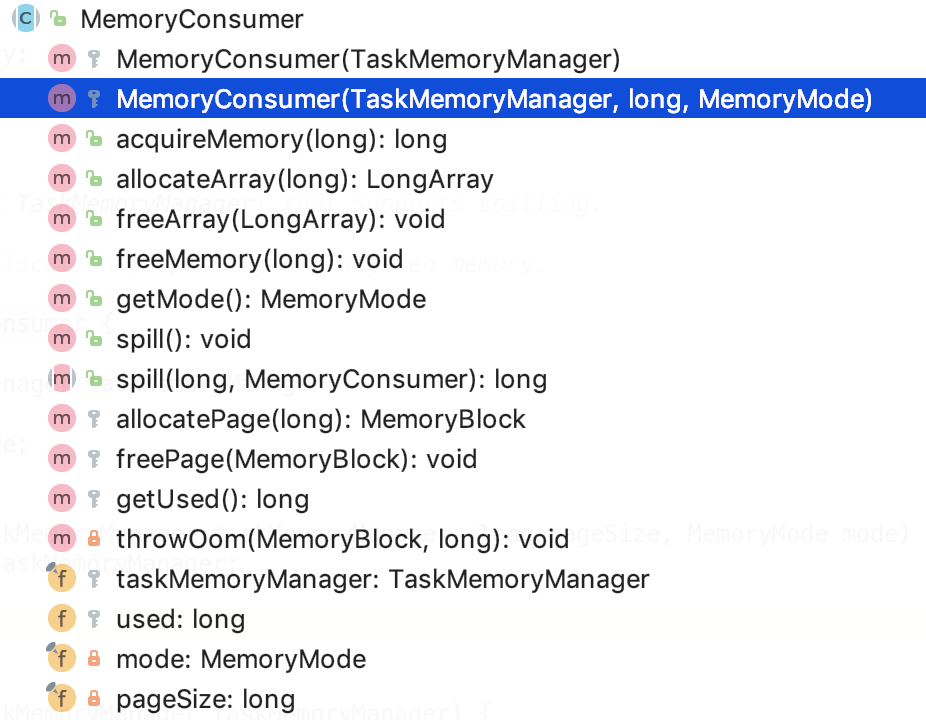
2、成员变量
taskMemoryManager:是负责任务内存管理。
used:表示使用的内存。
mode:表示内存的模式是堆内内存还是堆外内存。
pageSize:表示页大小。
3、主要方法
-
内存数据溢出到磁盘,抽象方法,等待子类实现。
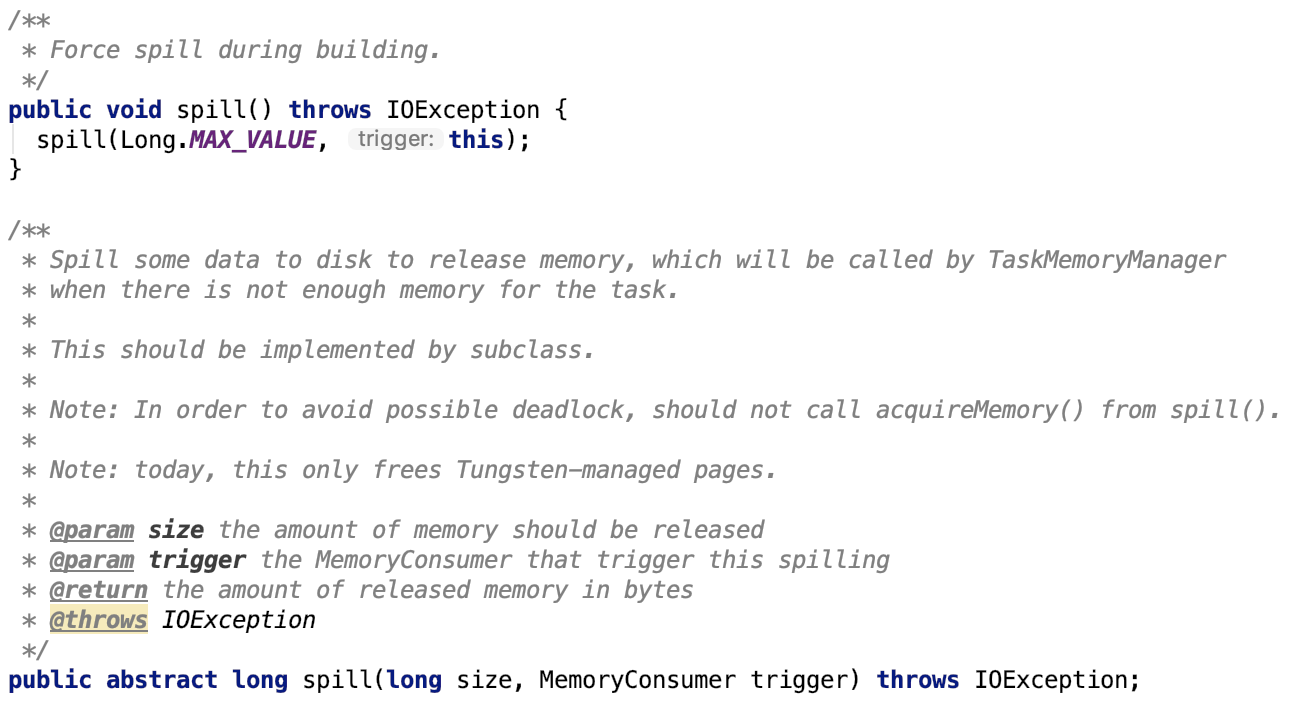
-
申请释放内存部分,不再做详细的分析,都是依赖于 TaskMemoryManager 做的操作。
关于更多MemoryConsumer的以及其子类的相关内容,将在下一篇文章Shuffle的写操作中详细剖析。
10、总结
本篇文章主要剖析了Task在任务执行时内存的管理相关的内容,现在可能还看不出其重要性,后面在含有sort的shuffle过程中,会频繁的使用基于内存的sorter,此时的sorter包含大量的数据,是需要内存管理的。
五、spark shuffle的写操作之准备工作
1、前言
1、紧接上篇
我们再来看一下,ResultTask和ShuffleMapTask的runTask方法。现在只关注数据处理逻辑,下面的两张图都做了标注。
2、ResultTask
类名:org.apache.spark.scheduler.ResultTask
其runTask方法如下:
3、ShuffleMapTask
类名:org.apache.spark.scheduler.ShuffleMapTask
其runTask方法如下:
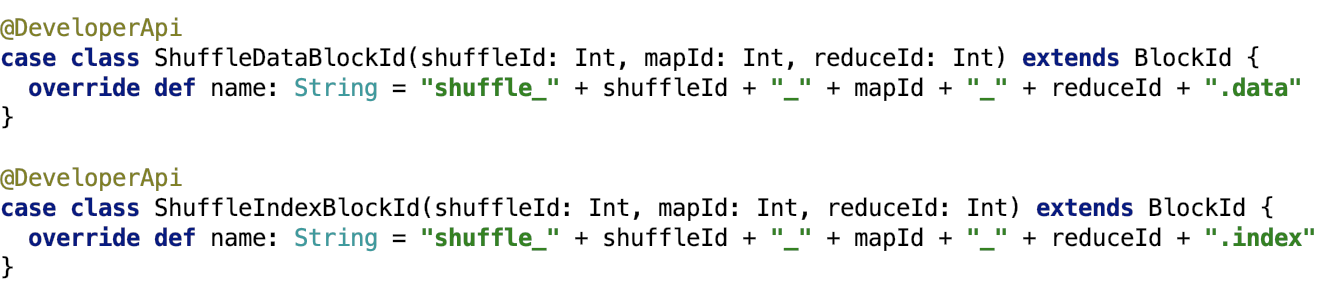
4、shuffle数据的管理类--IndexShuffleBlockResolver
下面说一下 IndexShuffleBlockResolver 类。这个类负责shuffle数据的获取和删除,以及shuffle索引数据的更新和删除。
IndexShuffleBlockResolver继承关系如下:
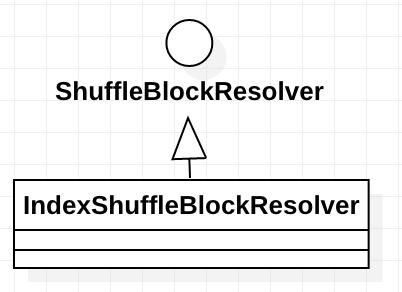
我们先来看父类ShuffleBlockResolver。
5、ShuffleBlockResolver
主要是负责根据逻辑的shuffle的标识(比如mapId、reduceId或shuffleId)来获取shuffle的block。shuffle数据一般都被File或FileSegment包装。
其接口定义如下:
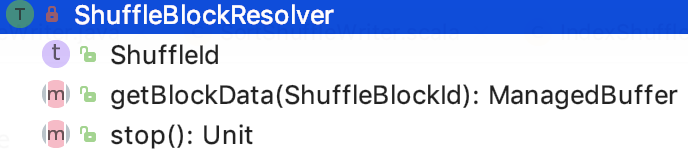
其中,getBlockData根据shuffleId获取shuffle数据。
下面来看 IndexShuffleBlockResolver的实现。
6、IndexShuffleBlockResolver
这个类负责shuffle数据的获取和删除,以及shuffle索引数据的更新和删除。
类结构如下:
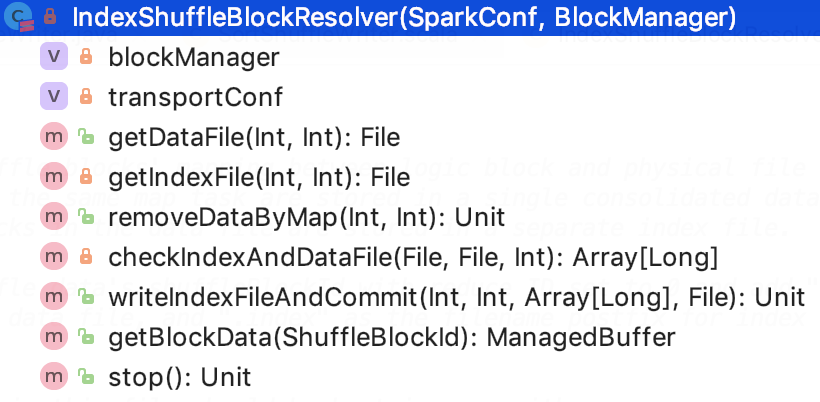
blockManager是executor上的BlockManager类。
transportCpnf主要是包含了关于shuffle的一些参数配置。
NOOP_REDUCE_ID是0,因为此时还不知道reduce的id。
核心方法如下:
-
获取shuffle数据文件,源码如下,思路:根据blockManager的DiskBlockManager获取shuffle的blockId对应的物理文件。

-
获取shuffle索引文件,源码如下,思路:根据blockManager的DiskBlockManager获取shuffle索引的blockId对应的物理文件。

3.根据mapId将shuffle数据移除,源码如下,思路:根据shuffleId和mapId删除shuffle数据和索引文件
4.校验shuffle索引和数据,源码如下。
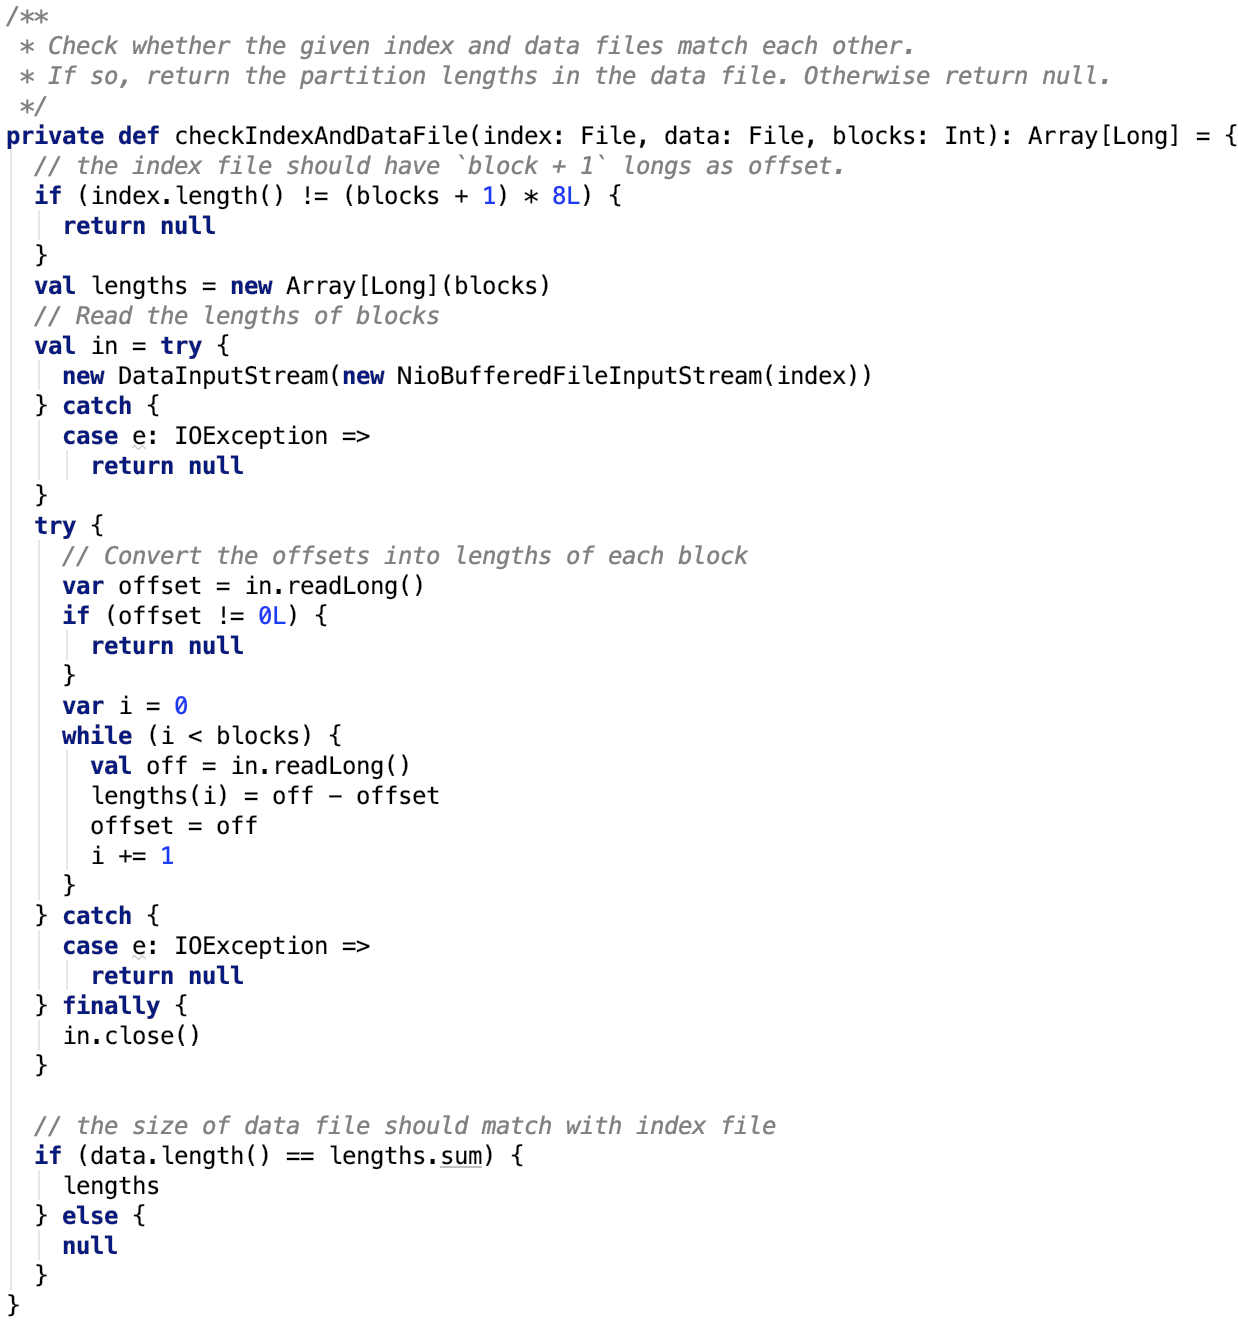
从上面可以看出,文件里第一个long型数是占位符,必为0.
后面的保存的数据是每一个block的大小,可以看出来,每次读的long型数,是前面所有block的大小总和。
所以,当前block的大小=这次读取到的offset - 上次读取到的offset
这种索引的设计非常巧妙。每一个block大小合起来就是整个文件的大小。每一个block的在整个文件中的offset也都记录在索引文件中。
-
写索引文件,源码如下。

思路:首先先获取shuffle的数据文件并创建索引的临时文件。
获取索引文件的每一个block 的大小。如果索引存在,则更新新的索引数组,删除临时数据文件,返回。
若索引不存在,将新的数据的索引数据写入临时索引文件,最终删除历史数据文件和历史索引文件,然后临时数据文件和临时数据索引文件重命名为新的数据和索引文件。
这样的设计,确保了数据索引随着数据的更新而更新。
-
根据shuffleId获取block数据,源码如下。

思路:
先获取shuffle数据的索引数据,然后调用position位上,获取block 的大小,然后初始化FileSegmentManagedBuffer,读取文件的对应segment的数据。
可以看出 reduceId就是block物理文件中的小的block(segment)的索引。
-
停止blockResolver,空实现。
总结,在这个类中,可以学习到spark shuffle索引的设计思路,在工作中需要设计File和FileSegment的索引文件,这也是一种参考思路。
2、Shuffle的写数据前的准备工作
直接来看 org.apache.spark.scheduler.ShuffleMapTask 的runTask的关键代码如下:

这里的manager是SortShuffleManager,是ShuffleManager的唯一实现。
org.apache.spark.shuffle.sort.SortShuffleManager#getWriter 源码如下:
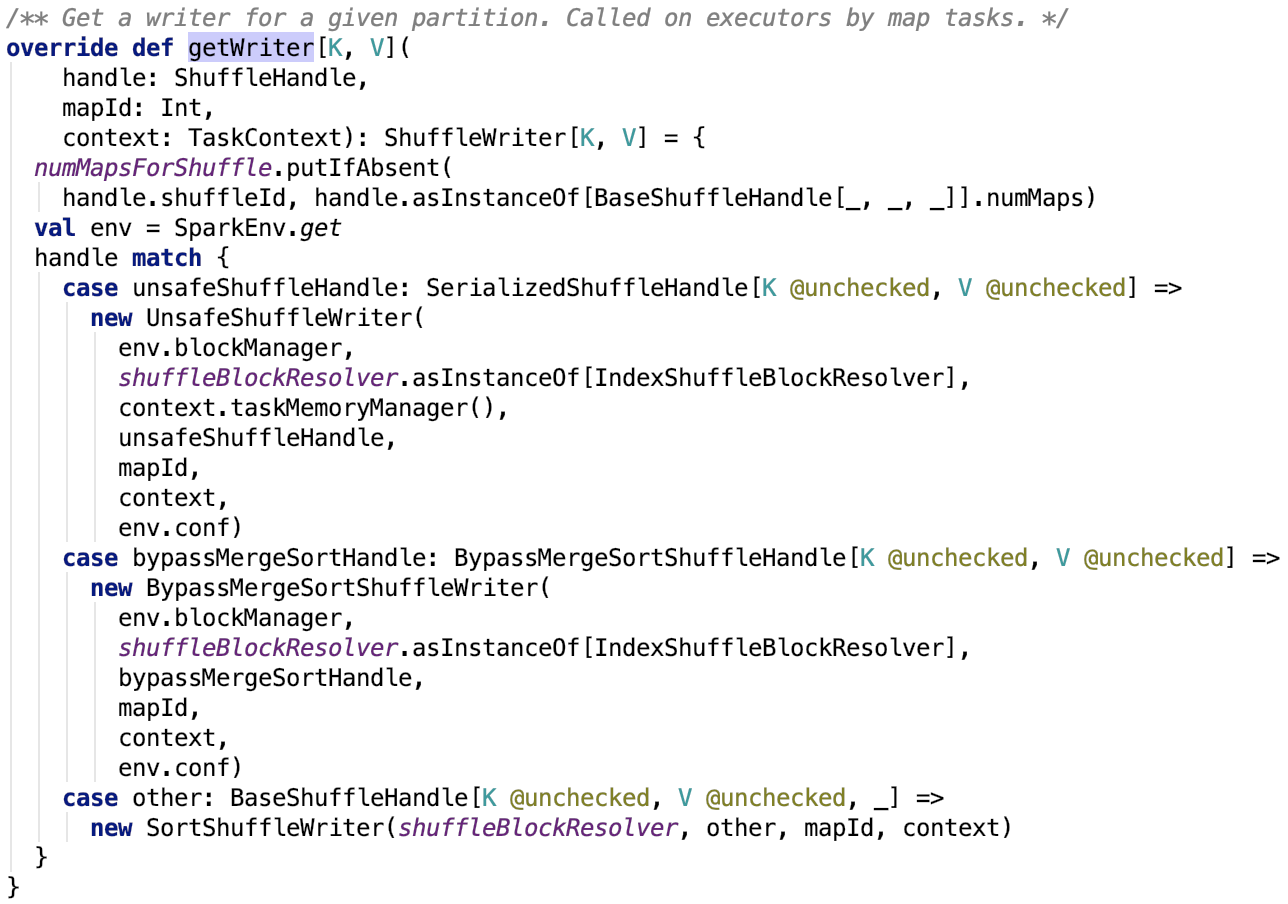
其中,numMapsForShuffle 定义如下:

它保存了shuffleID和mapper数量的映射关系。
1、获取ShuffleHandle
首先,先来了解一下ShuffleHandle类。
ShuffleHandle
下面大致了解一下ShuffleHandle的相关内容。
类说明:
这个类是Spark内部使用的一个类,包含了关于Shuffle的一些信息,主要给ShuffleManage 使用。本质上来说,它是一个标志位,除了包含一些用于shuffle的一些属性之外,没有其他额外的方法,用case class来实现更好一点。
类源码如下:

继承关系如下:
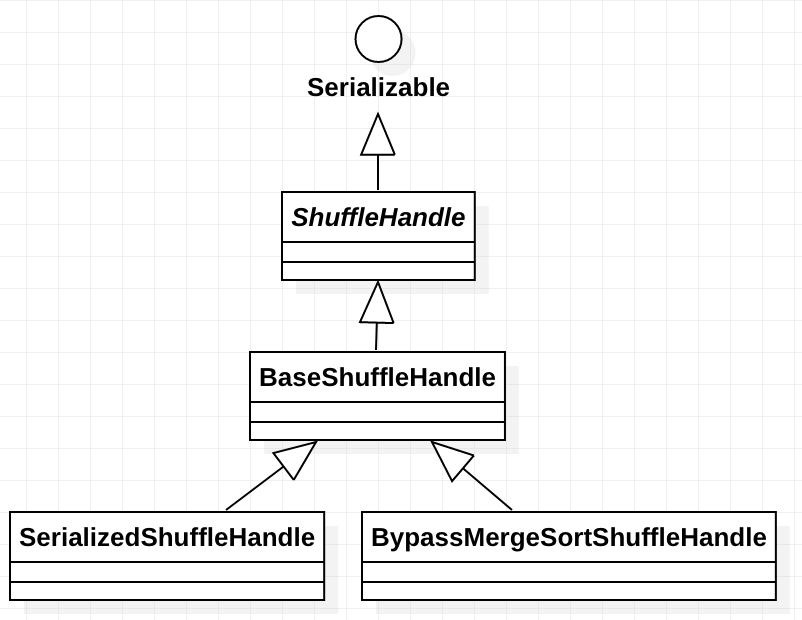
BaseShuffleHandle
全称:org.apache.spark.shuffle.BaseShuffleHandle
类说明:
它是ShuffleHandle的基础实现。
类源码如下:
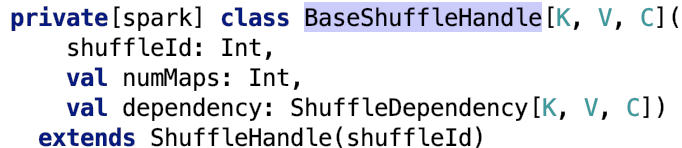
下面来看一下它的两个子类实现。
BypassMergeSortShuffleHandle
全称:org.apache.spark.shuffle.sort.BypassMergeSortShuffleHandle
类说明:
如果想用于序列化的shuffle实现,可以使用这个标志类。其源码如下:
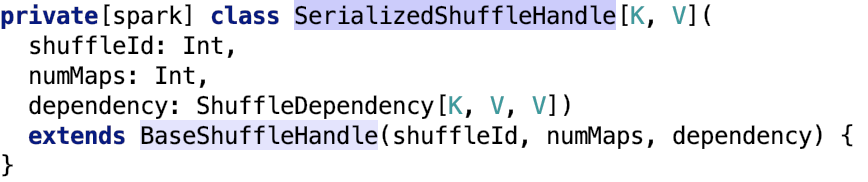
SerializedShuffleHandle
全称:org.apache.spark.shuffle.sort.SerializedShuffleHandle
类说明:
used to identify when we've chosen to use the bypass merge sort shuffle path.
类源码如下:
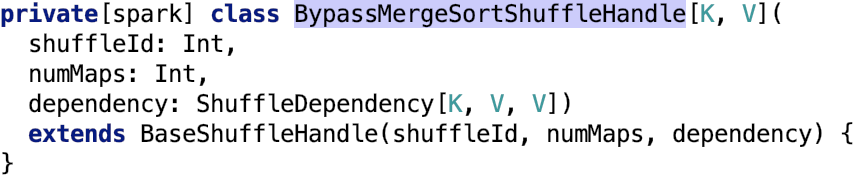
获取ShuffleHandle
在org.apache.spark.ShuffleDependency中有如下定义:

shuffleId是SparkContext生成的唯一全局id。
org.apache.spark.shuffle.sort.SortShuffleManager#registerShuffle 源码如下:
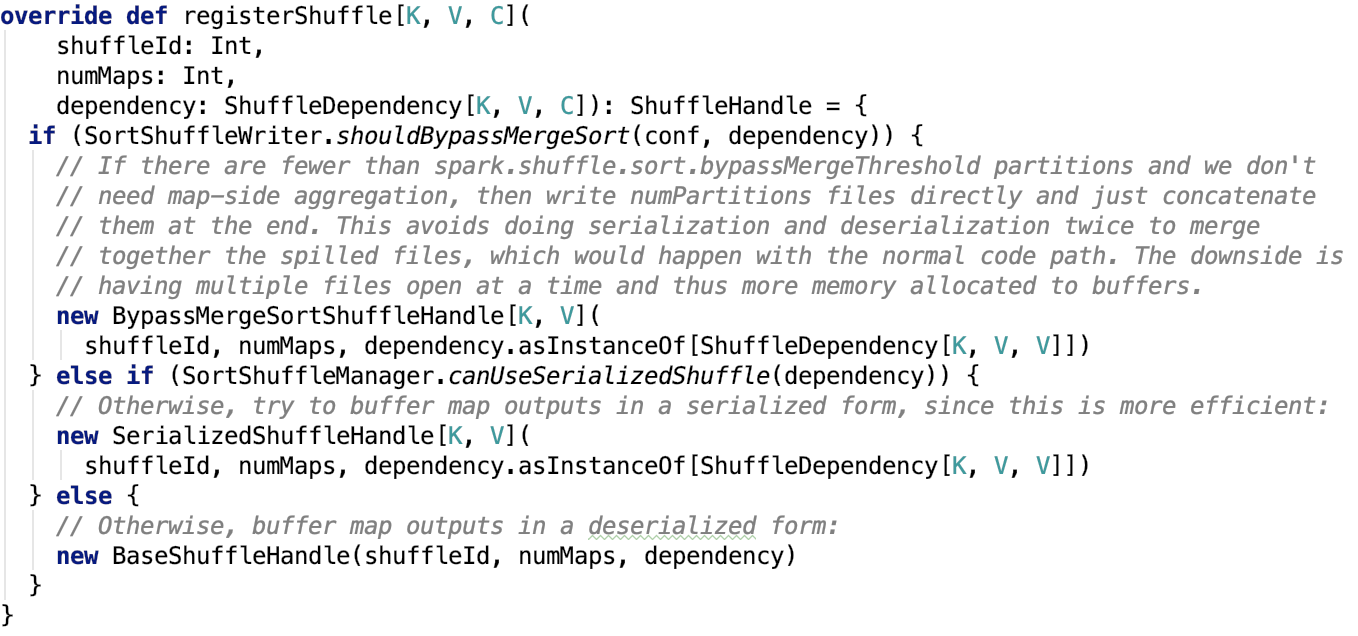
可以看出,mapper的数量等于父RDD的分区的数量。
下面,看一下使用bypassMergeSort的条件,即org.apache.spark.shuffle.sort.SortShuffleWriter#shouldBypassMergeSort 源码如下:

思路:首先如果父RDD没有启用mapSideCombine并且父RDD的结果分区数量小于bypassMergeSort阀值,则使用 bypassMergeSort。其中bypassMergeSort阀值 默认是200,可以通过 spark.shuffle.sort.bypassMergeThreshold 参数设定。
使用serializedShuffle的条件,即org.apache.spark.shuffle.sort.SortShuffleManager#canUseSerializedShuffle 源码如下:

思路:序列化类支持支持序列化对象的迁移,并且不使用mapSideCombine操作以及父RDD的分区数不大于 (1 << 24) 即可使用该模式的shuffle。
2、根据ShuffleHandle获取ShuffleWriter
首先先对ShuffleWriter做一下简单说明。
ShuffleWriter
类说明:它负责将map任务的输出写入到shuffle系统。其继承关系如下,对应着ShuffleHandle的三种shuffle实现标志。
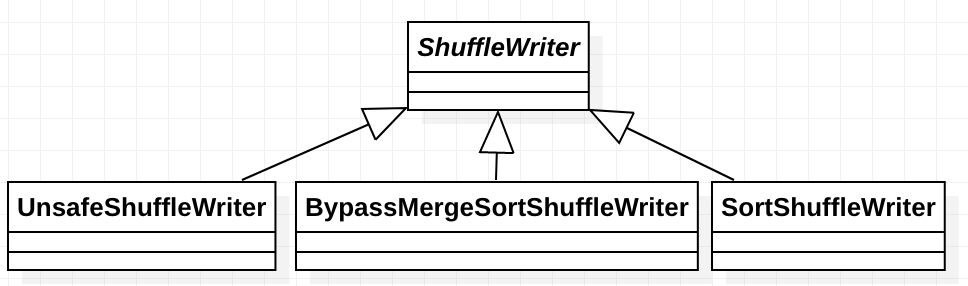
获取ShuffleWriter
org.apache.spark.shuffle.sort.SortShuffleManager#getWriter源码如下:
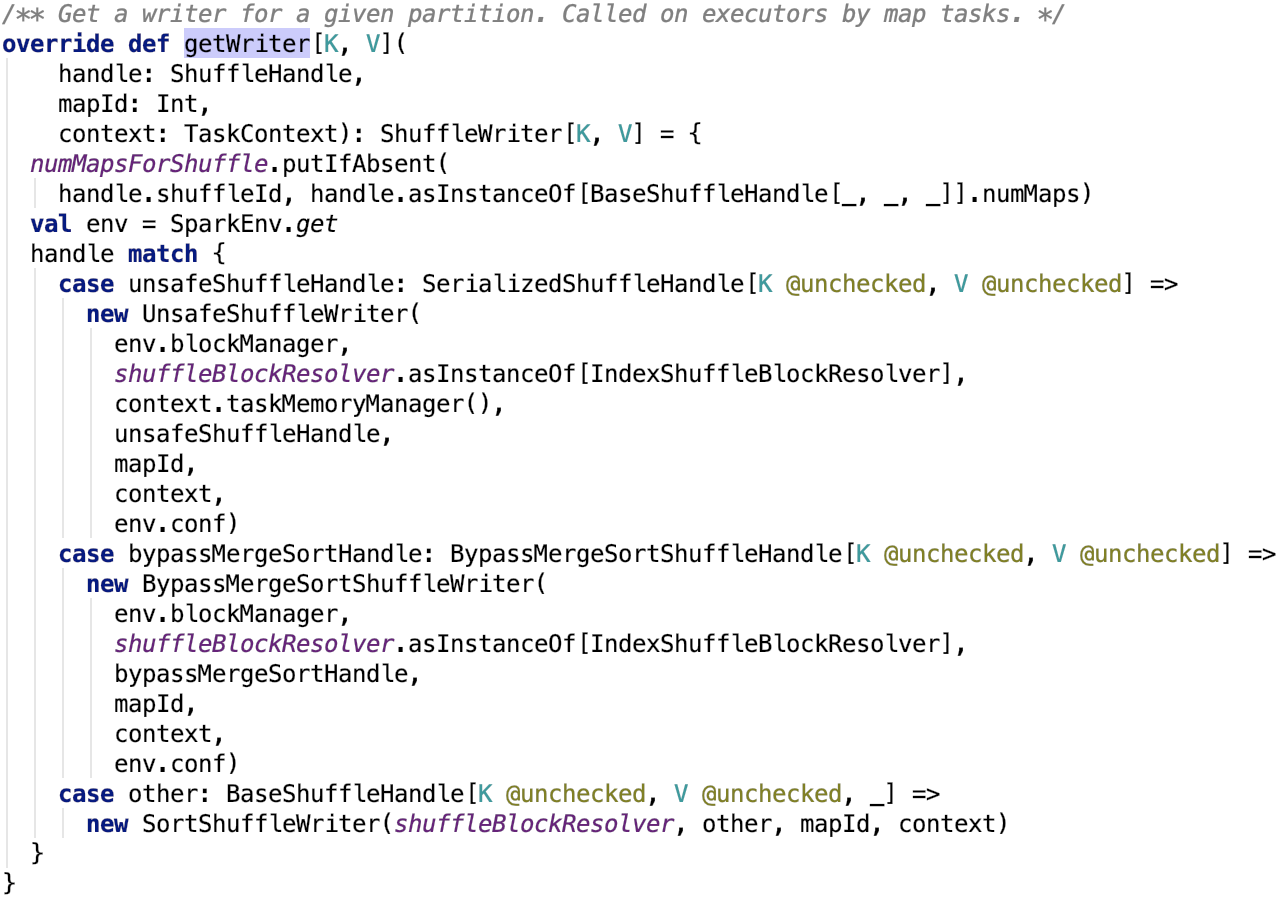
一个mapper对应一个writer,一个writer往一个分区上的写数据。
3、总结
本篇文章主要从Task 的差异和相同点出发,引出spark shuffle的重要性,接着对Spark shuffle数据的类型以及spark shuffle的管理类做了剖析。最后介绍了三种shuffle类型的标志位以及如何确定使用哪种类型的数据的。
接下来,正式进入mapper写数据部分。spark内部有三种实现,每一种写方式会有一篇文章专门剖析,我们逐一来看其实现机制。
六、spark shuffle写操作三部曲之BypassMergeSortShuffleWriter
1、前言
先上源码,后解释:
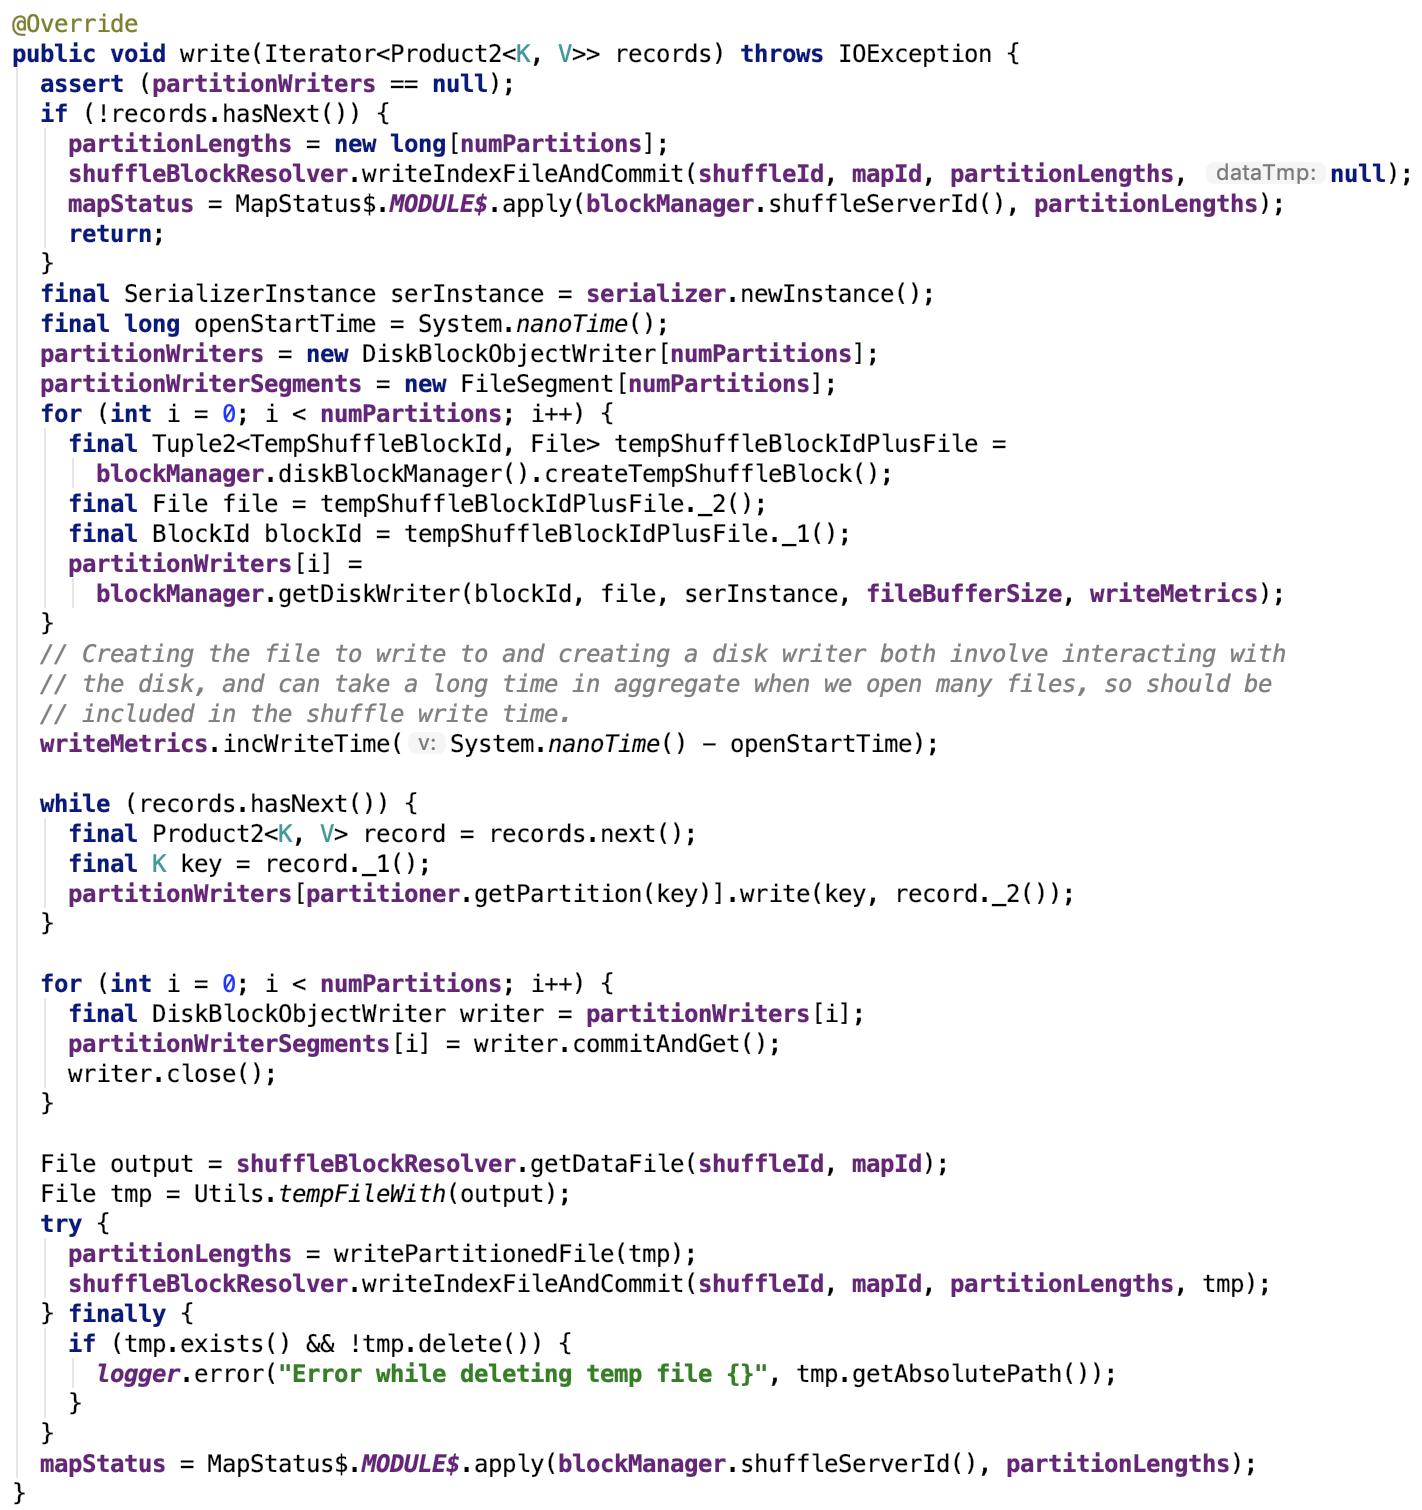
流程如下:
2、map数据根据分区函数写入分区文件
如果没有数据要写,那么数据文件为空,索引文件中各个segment的大小为0,返回初始化的MapStatus。
如果有数据要写到各个reducer的文件中,首先初始化序列化工具实例,遍历初始化各个partition的partitionWriter数组中的DiskBlockObjectWriter对象,初始化各个partition的FileSegment数组。
然后遍历每一个要写入的记录值,并且取出记录的key值,根据Partitioner的getPartition函数确定其reduce到的目标分区索引,然后根据计算出的索引确定负责写数据的DiskBlockObjectWriter对象,然后根据该对象将键值对写入到临时分区文件。
当每一个要写入的记录值遍历操作完毕,遍历每一个分区,将该分区对应的partitionWriter执行commitAndGet操作,返回该分区的FileSegment对象。
其依赖方法commitAndGet源码如下:
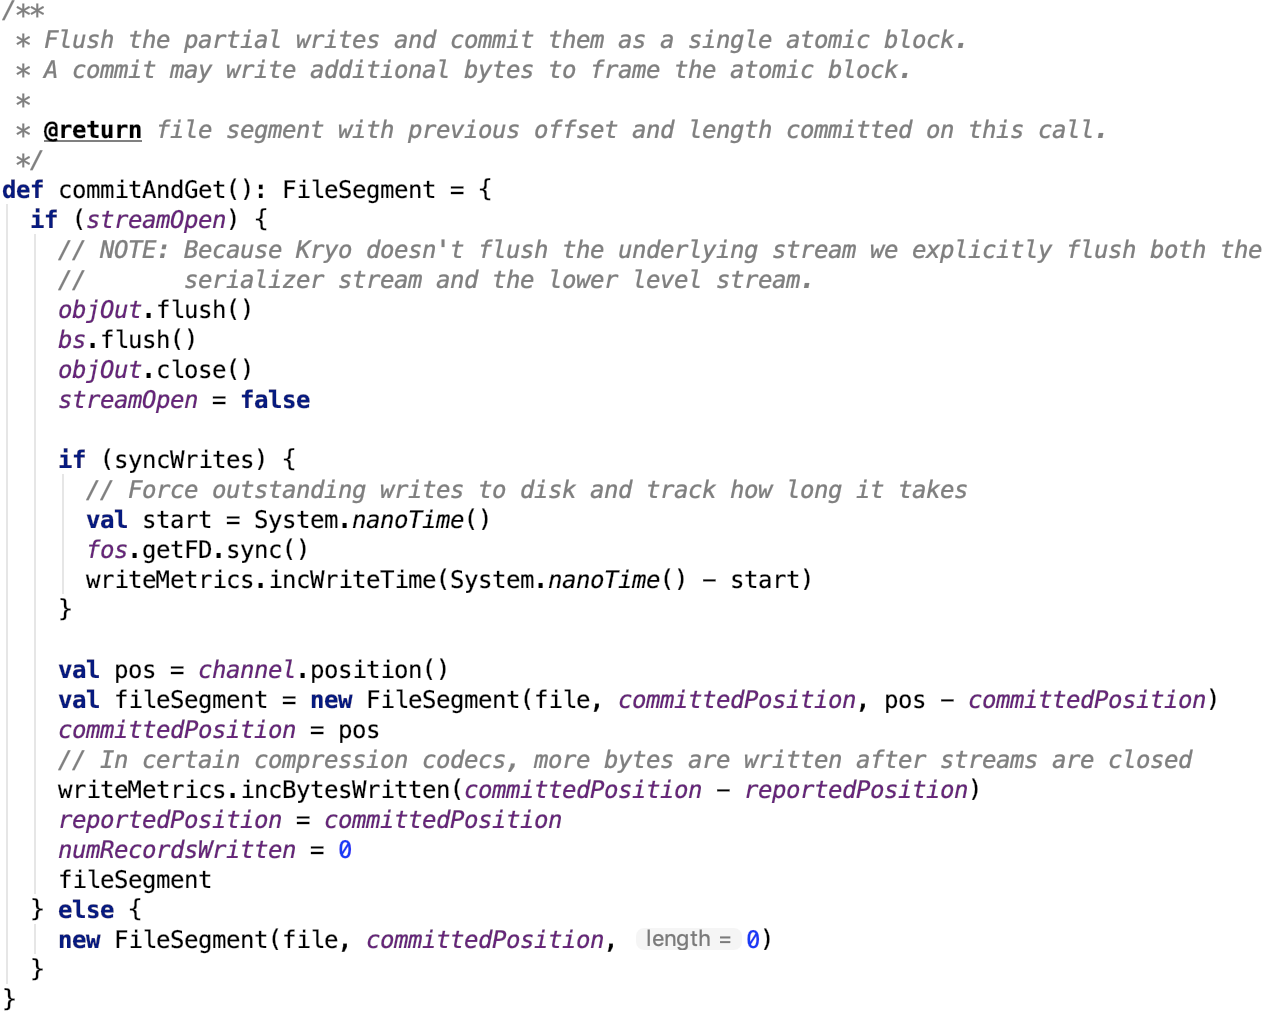
至此,大多数情况下,reduce的每一个partition的数据有被写入到一个单独的文件。明明是FileSegment,为什么是单独的文件呢?原因就在于DiskBlockManager返回的临时ShuffleBlockId是不重复的,org.apache.spark.storage.DiskBlockManager#createTempShuffleBlock源码如下:

又因为创建临时文件,只是创建临时文件的句柄,此时对应的物理文件,并不存在,所以,这个方法不能保证创建的临时文件不重复。所以多个partition数据写入到一个临时文件的概率还是有的,只不过是小概率事件。
最后小的分区文件会被合并为一个文件。
首先调用ShuffleBlockResolver(它是IndexShuffleBlockResolver实例)的getDataFile方法获取数据文件的句柄File对象,org.apache.spark.util.Utils的tempFileWith获取临时文件,org.apache.spark.util.Utils#tempFileWith源码如下,即获得一个带uuid后缀的文件:

3、合并分区文件
最后调用org.apache.spark.shuffle.sort.BypassMergeSortShuffleWriter的writePartitionedFile方法将多个小文件合并为一个大文件并返回包含每一个partition
对应的文件段的大小的数组,源码如下:
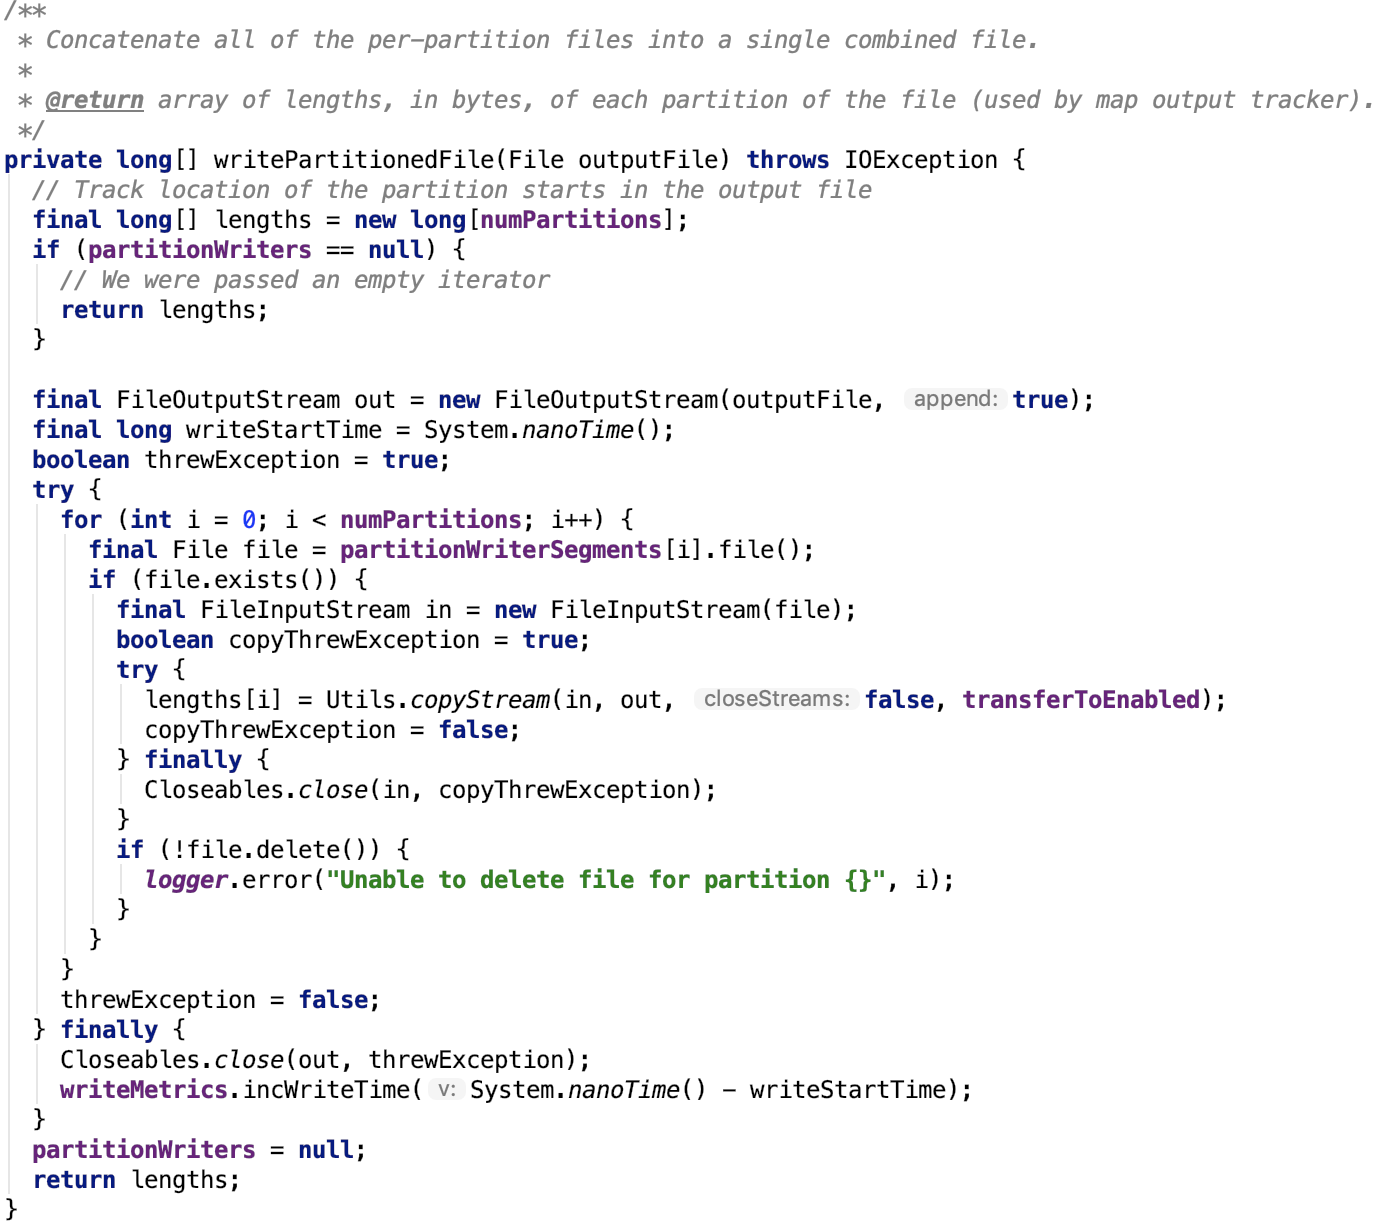
4、更新索引文件
最后更新索引文件,给数据文件重命名后整个写过程就彻底结束了,源码不再做过多解释,在 spark shuffle的写操作之准备工作 中 IndexShuffleBlockResolver类中有说明。
5、总结
BypassMergeSortShuffleWriter是基于文件做的分区,没有sort操作,最后分区数据被写入一个完整文件,并且有一个索引文件记录文件中每一个分区对应的FileSegment的大小。这种设计是比较朴素的,也很简单,易实现。
七、spark shuffle写操作三部曲之UnsafeShuffleWriter
1、前言
下面先来看UnsafeShuffleWriter的主要依赖实现类 -- ShuffleExternalSorter。
2、sort-based shuffle的外部sorter -- ShuffleExternalSorter**
在看本小节之前,建议先参照 spark 源码分析之二十二-- Task的内存管理 对任务的内存管理做一下详细的了解,因为ShuffleExternalSorter使用了内存的排序。任务在做大数据量的内存操作时,内存是需要管理的。
在正式剖析之前,先剖析其依赖类。
1、依赖之记录block元信息-- SpillInfo
它记录了block的一些元数据信息。
其类结构如下:
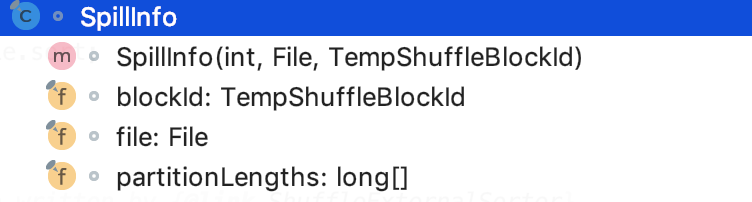
其中,blockId就是shuffle的临时的blockId,file就是shuffle合并后的文件,partitionLengths表示每一个分区的大小。
2、依赖之分区排序器 -- ShuffleInMemorySorter可以在任何内存使用的数组--LongArray
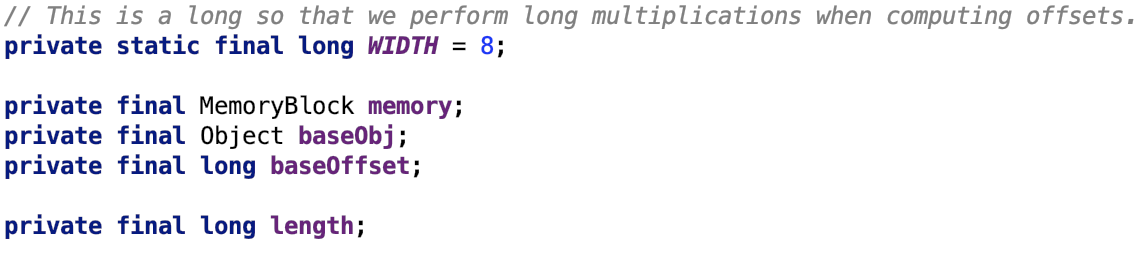
数组里的一个元素的地址等于:
if (baseObj == null) ? baseOffset(is real os address) + (length - 1) * WIDTH : address(baseObj) + baseOffset(is relative address 0) + (length - 1) * WIDTH
所有元素设为0:
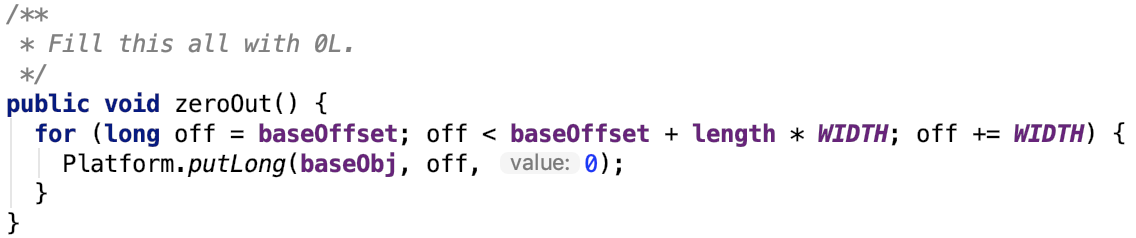
设置元素

其底层使用unsafe类来设置值
获取元素

其底层使用unsafe类来获取值
记录指针地址压缩器 -- PackedRecordPointer
全称:org.apache.spark.shuffle.sort.PackedRecordPointer
成员常量:

压缩记录指针和分区:

获取记录的地址:

获取记录的分区:

自定义比较器--SortComparator
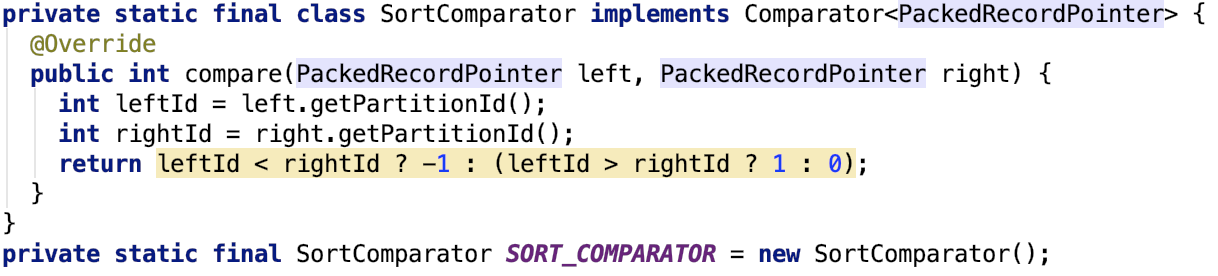
思路也很简单,就是根据分区来排序,即相同分区的数据被排到了一起。
遍历自定义数组的迭代器 -- ShuffleSorterIterator
其定义如下:
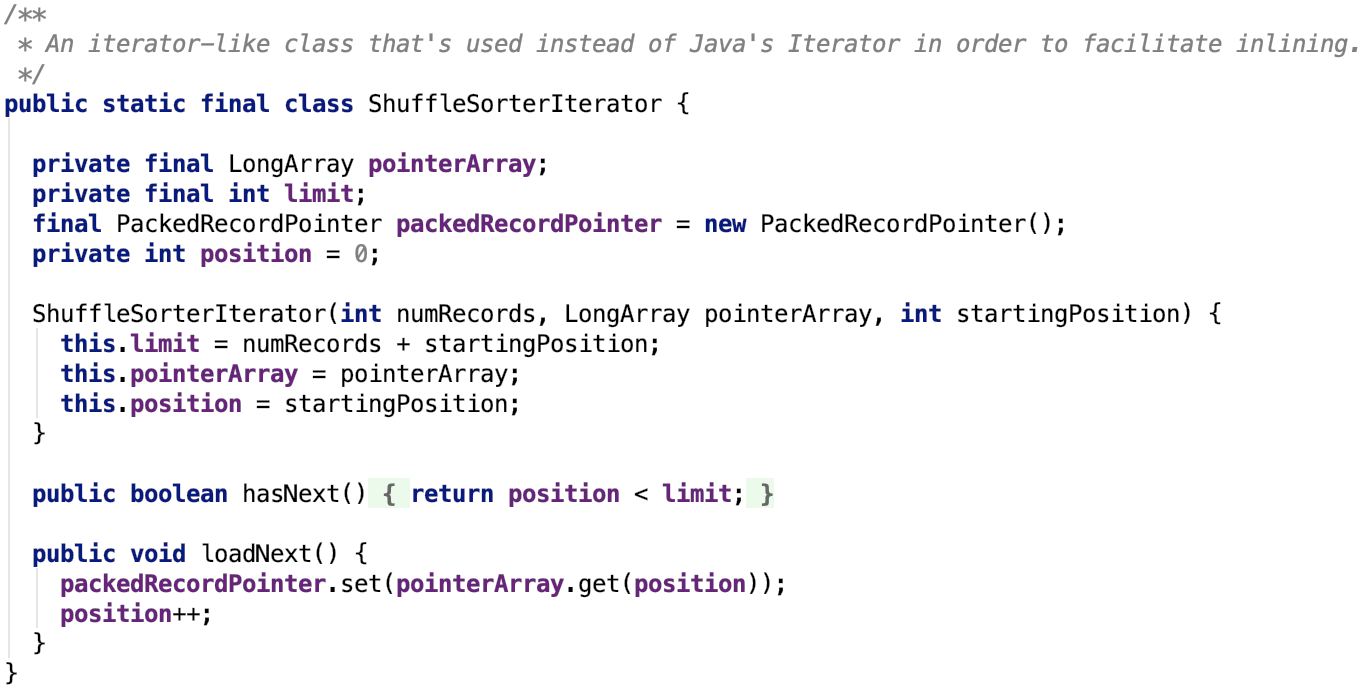
其思路很简单,hasNext跟JDK标准库的实现一致,多了一个loadNext,每次都需要把数组中下一个位置的元素放到packetRecordPointer中,然后从packedRecordPointer中取出数据的地址和分区信息。
获取迭代器
获取迭代器的源码如下:

其中 useRadixSort表示是否使用基数排序,默认是使用基数排序的,由参数 spark.shuffle.sort.useRadixSort 配置。
如果不使用基数排序,则会使用Spark的Sorter排序,sorter底层实现是TimSort,TimSort是优化之后的MergeSort。
总之,ShuffleSorterIterator中的数据已经是有序的了,只需要迭代式取出即可。
插入数据到自定义的数组中

思路很简单,插入的数据就是记录的地址和分区数据,这两种数据被PackedRecordPointer压缩编码之后被存入到数组中。
3、继承关系
其继承关系如下:

即它是MemoryConsumer的子类,其实现了spill方法。
4、成员变量
其成员变量如下:

DISK_WRITE_BUFFER_SIZE:写到磁盘前的缓冲区大小为1M
numPartitions:reduce的分区数
TaskContext:任务执行的上下文对象。
numElementsForSpillThreshold:ShuffleInMemorySorter 数据溢出前的元素阀值。
fileBufferSizeBytes:DiskBlockObjectWriter溢出前的buffer大小。
diskWriteBufferSize:溢出到磁盘前的buffer大小。
allocatedPages:记录分配的内存页。
spills:记录溢出信息
peakMemoryUsedBytes:内存使用峰值。
inMemSorter:内存排序器
currentPage:当前使用内存页
pageCursor:内存页游标,标志在内存页的位置。
5、构造方法
其构造方法如下:
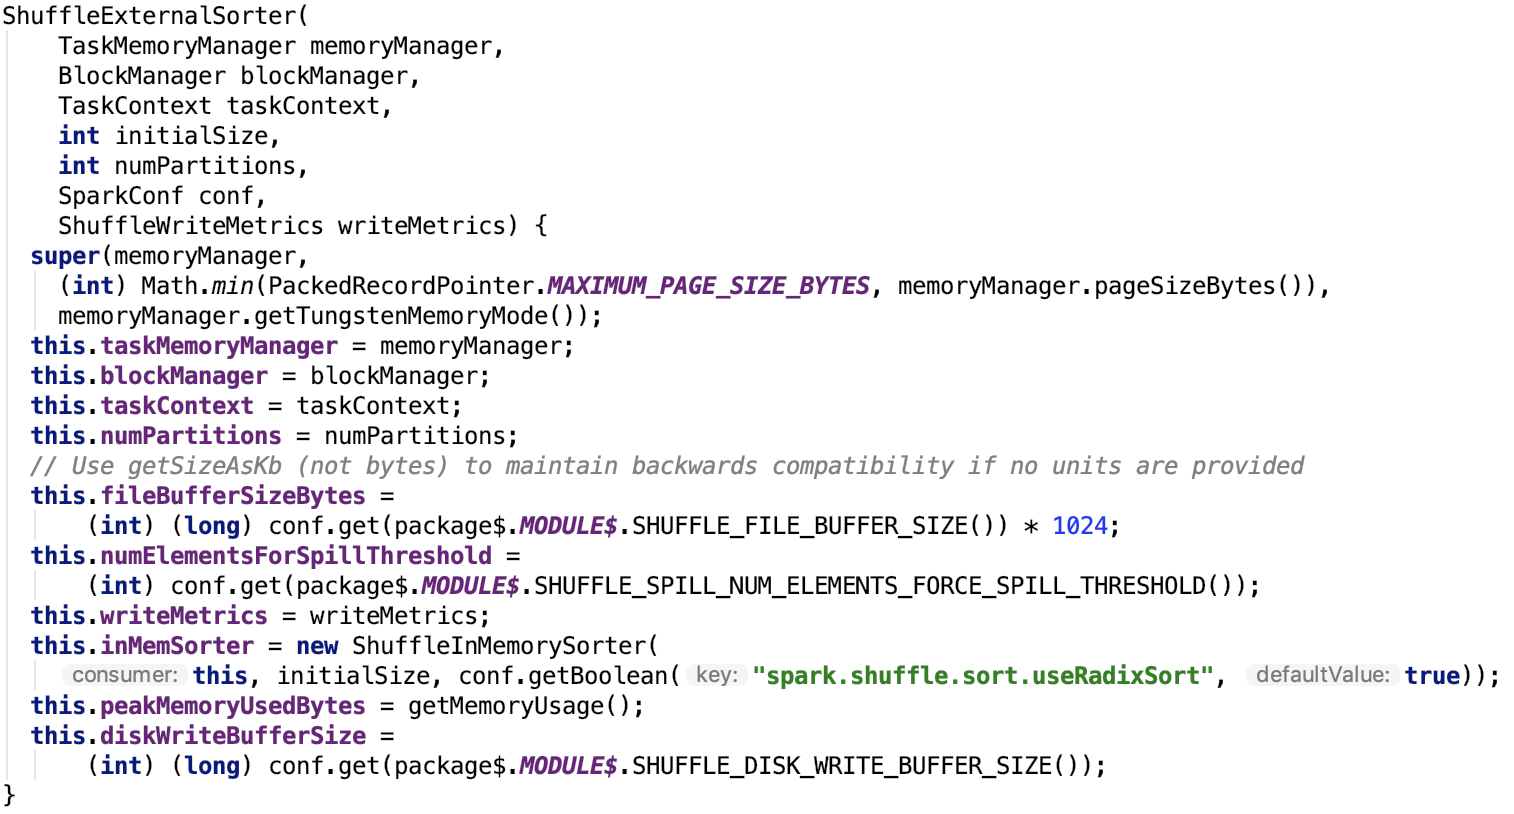
fileBufferSizeBytes:通过参数 spark.shuffle.file.buffer 来配置,默认为 32k
numElementsForSpillThreshold:通过参数spark.shuffle.spill.numElementsForceSpillThreshold来配置,默认是整数的最大值。
diskWriteBufferSize:通过 spark.shuffle.spill.diskWriteBufferSize 来配置,默认为 1M
6、核心方法
主要方法如下:
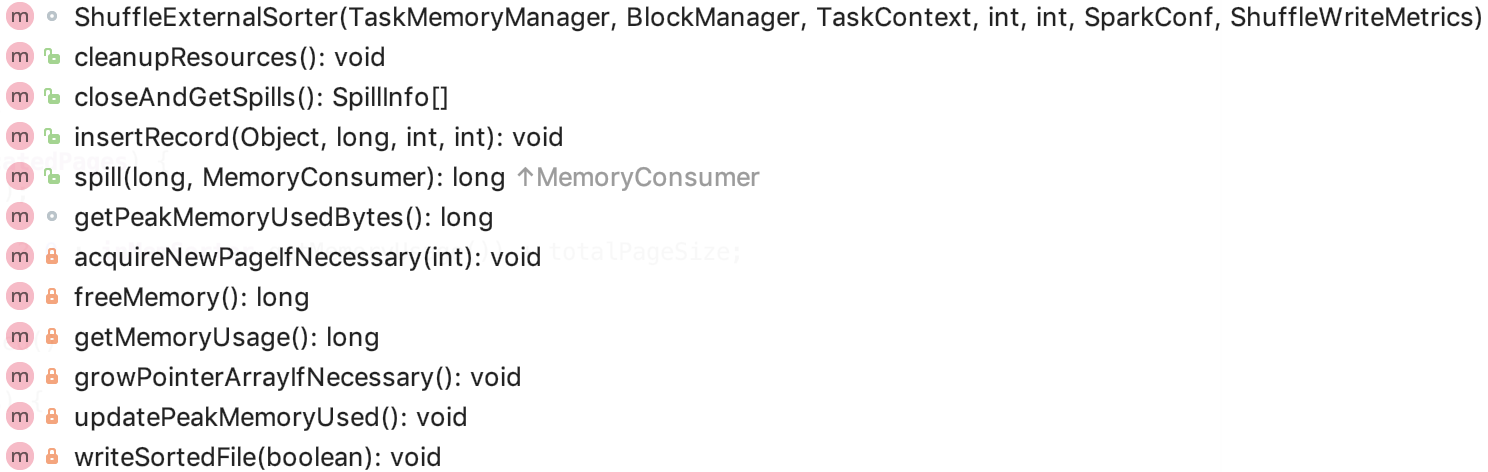
我们主要分析其主要方法。
溢出操作
其源码如下:
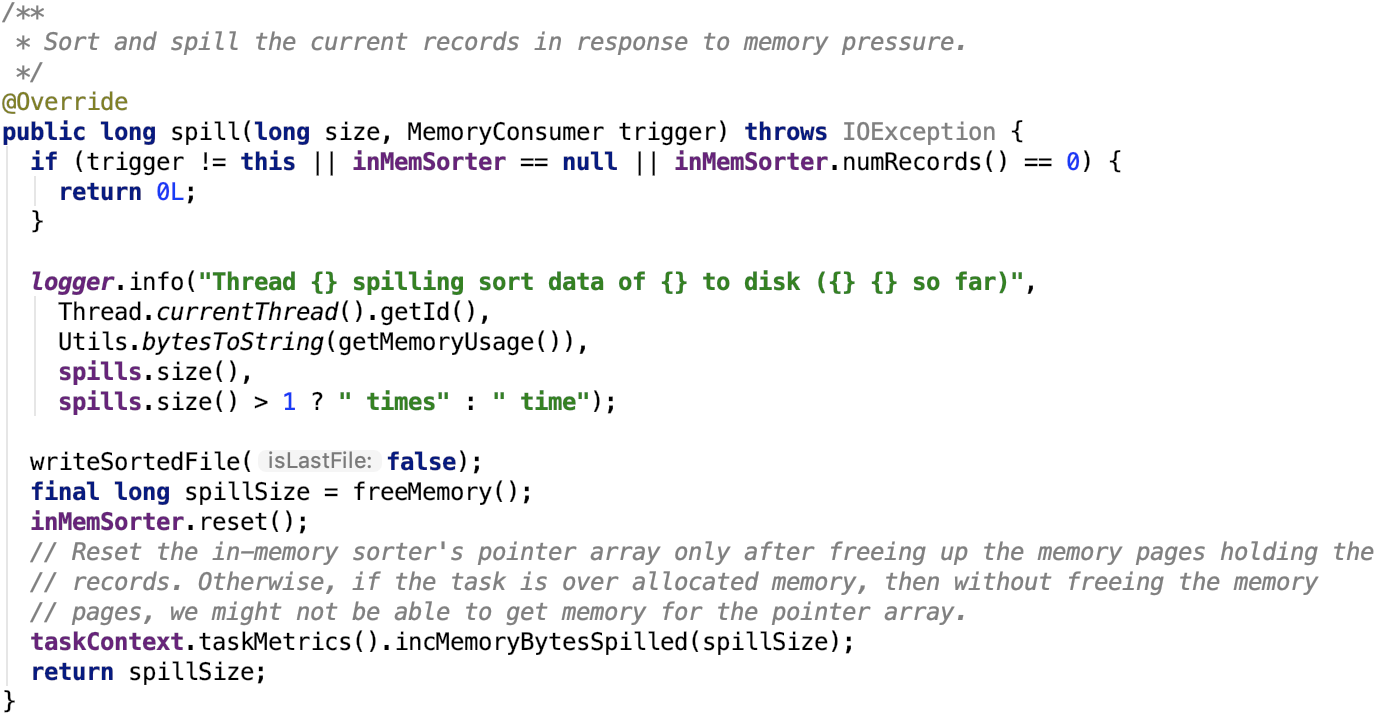
思路很简单,调用writeSortedFile将数据写入到文件中,释放内存,重置inMemSorter。
freeMemory方法如下:
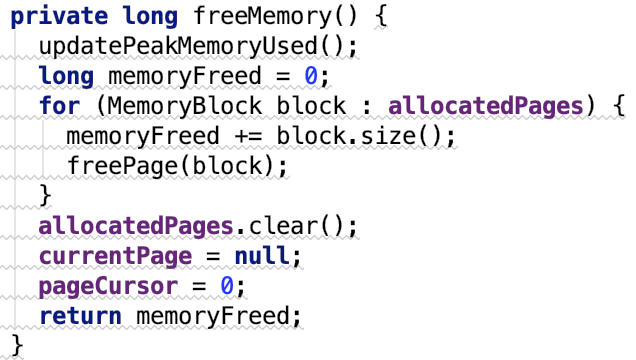
writeSortedFile 源码如下:
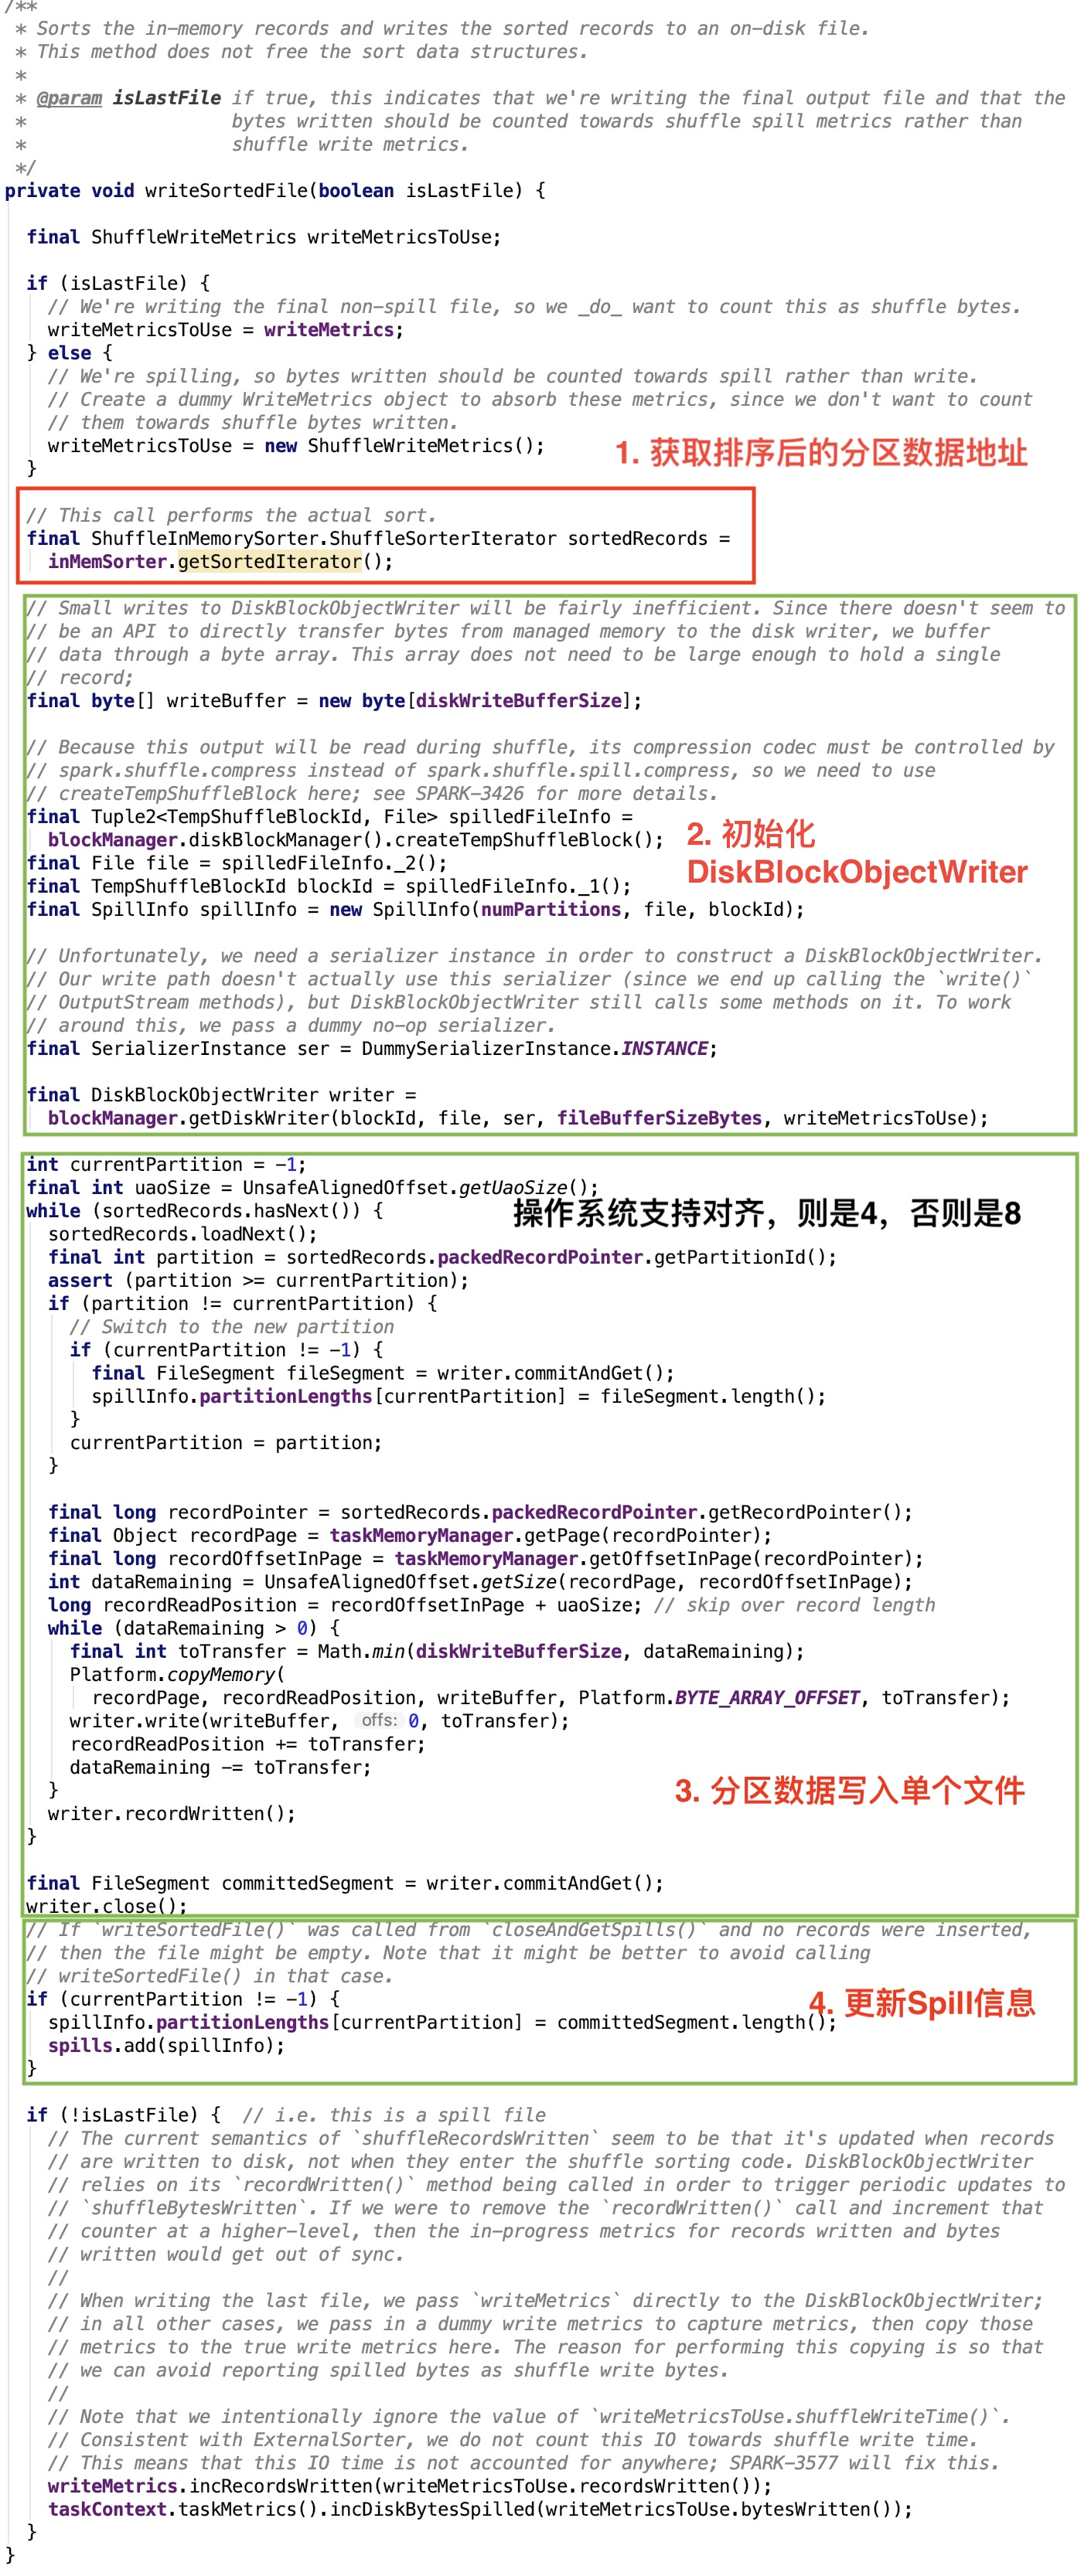
图中,我大致把步骤划分为四部分。整体思路:遍历sorter中的所有分区数据,最终同一分区的数据被写入到同一个FileSegment中,这些FileSegment最终又构成了一个合并的文件,其中FileSegment的大小被存放在SpillInfo中,最后放到了spills集合中。重点说一下第三步的获取地址信息,如果是堆内地址,recordPage就是base对象,recordOffsetInPage就是记录相对于base对象的偏移量,如果是堆外地址,recordPage为null,因为堆外地址没有base对象,其baseOffset就是其在操作系统内存中的绝对地址,recordOffsetInPage = offsetInPage + baseOffset,具体可以在 spark 源码分析之二十二-- Task的内存管理 中看TaskMemoryManager的实现细节。
插入记录
其源码如下:
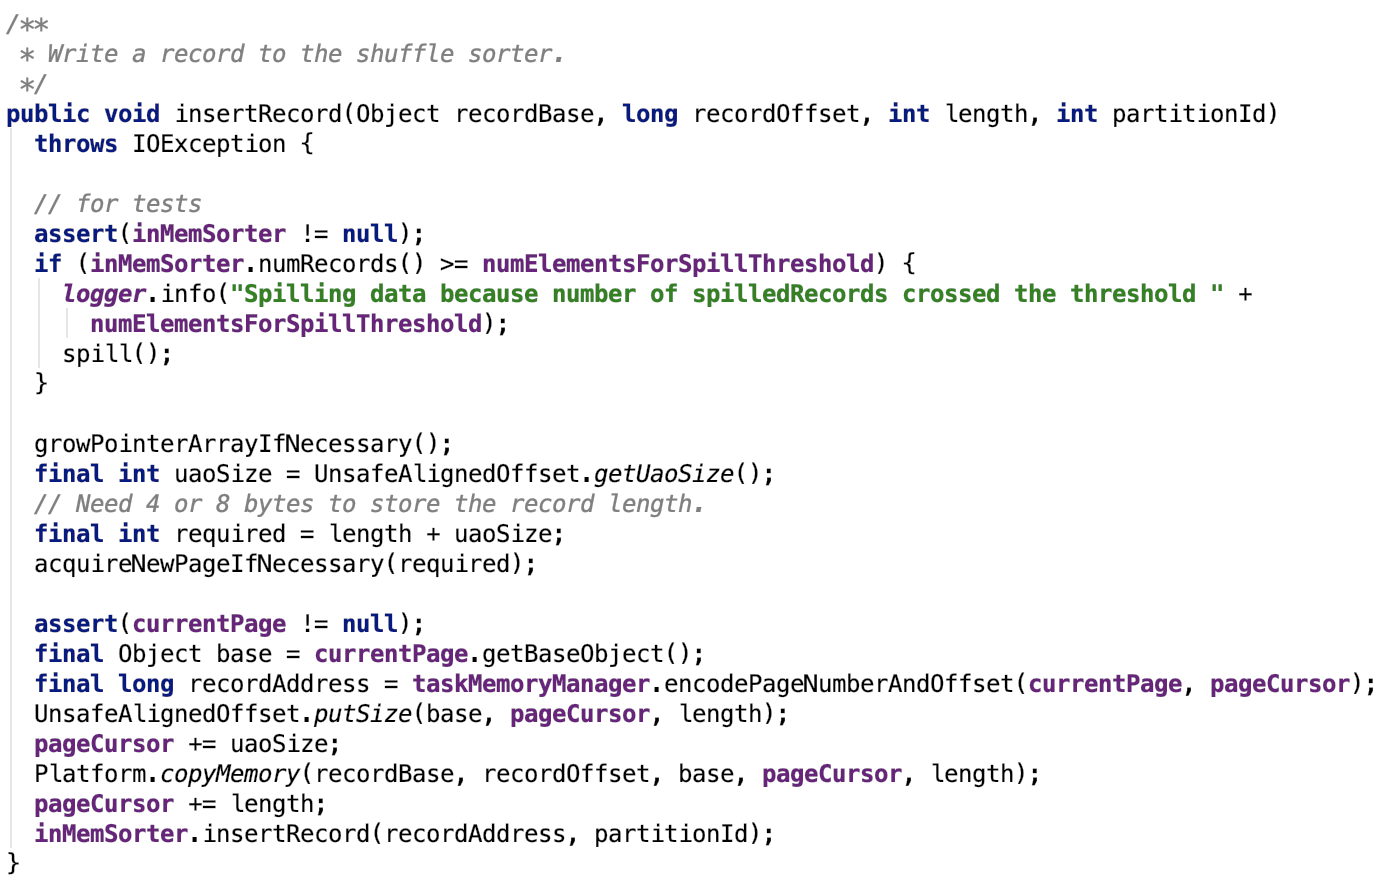
注意:如果是堆内内存,baseObject就是分配的数组,baseOffset就是数组的下标索引。如果是堆外内存,baseObject为null,baseOffset就是操作系统内存中的地址。
在地址编码的时候,如果是堆内内存,页内的偏移量就是baseObject,如果是堆外内存,页内偏移量为: 真实偏移量 - baseOffset。
它在插入数据之前,offset做了字节对齐,如果系统支持对齐,则向后错4位,否则向后错8位。这跟溢出操作里取数据是对应的,即可以跟上文中 writeSortedFile 方法对比看。
org.apache.spark.shuffle.sort.ShuffleExternalSorter#growPointerArrayIfNecessary源码如下:

解释:首先hasSpaceForAnotherRecord会比较数组中下一个写的索引位置跟数组的最大容量比较,如果索引位置大于最大容量,那么就没有空间来存放下一个记录了,则需要把扩容,used是指的数组现在使用的大小,扩容倍数为源数组的一倍。
org.apache.spark.shuffle.sort.ShuffleExternalSorter#acquireNewPageIfNecessary 源码如下:
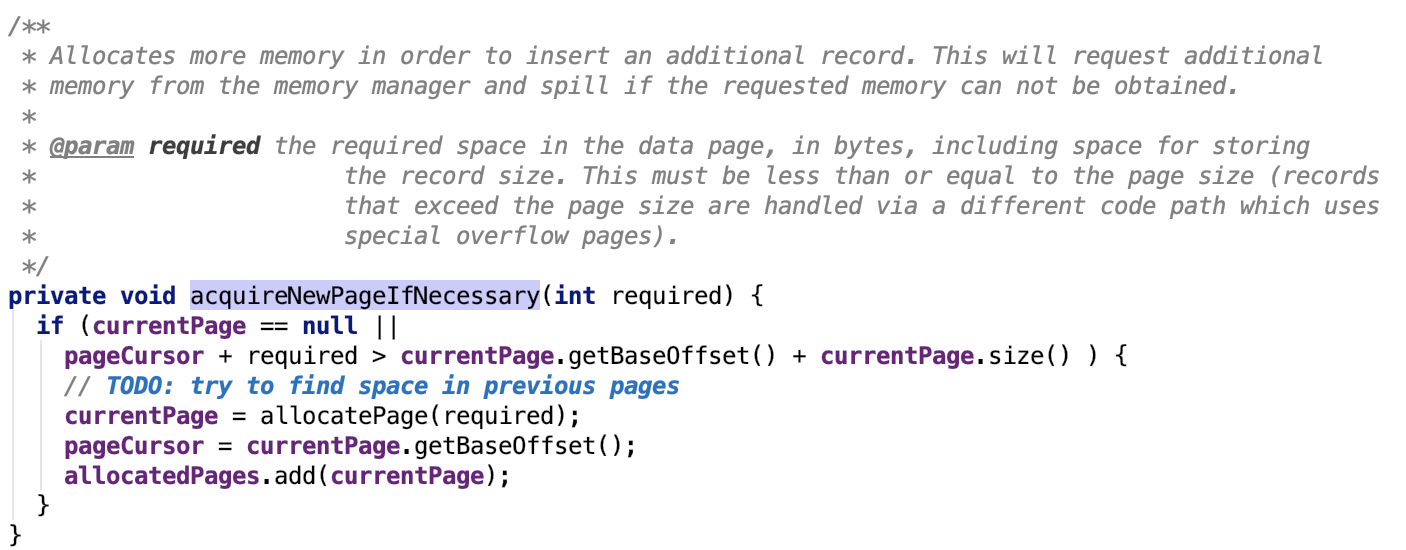
解释:分配内存页的条件是当前页的游标 + 需要的页大小 大于当前页的最大容量,则需要重新分配一个内存页。
关闭并且获取spill信息
其源码如下:

思路:执行最后一次溢出,然后将数据溢出信息返回。
清理资源

思路:释放内存排序器的内存,删除溢出的临时文件。
获取内存使用峰值
源码如下:

思路:当前使用内存大于最大峰值则更新最大峰值,否则直接返回。
7、总结
这个sorter内部集成的内存sorter会把同一分区的数据排序到一起,数据溢出时,相同分区的数据会聚集到溢出文件的一个segment中。
3、使用UnsafeShuffleWriter写数据
先上源码,后解释:

思路:流程很简单,将所有的数据逐一遍历放入sorter,然后将sorter关闭,获取输出文件,结束。
下面我们具体来看每一步是具体怎么实现的:
1、初始化Sorter
在org.apache.spark.shuffle.sort.UnsafeShuffleWriter的构造方法源码如下:

简单做一下说明:
DEFAULT_INITIAL_SORT_BUFFER_SIZE为 4096
DEFAULT_INITIAL_SER_BUFFER_SIZE 大小为 1M
reduce 分区数量最大为 16777216
SHUFFLE_FILE_BUFFER_SIZE默认为32k,大小由参数 spark.shuffle.file.buffer 配置。
SHUFFLE_UNSAFE_FILE_OUTPUT_BUFFER_SIZE 默认大小为32k,大小由参数 spark.shuffle.unsafe.file.output.buffer 配置。
其open方法如下:
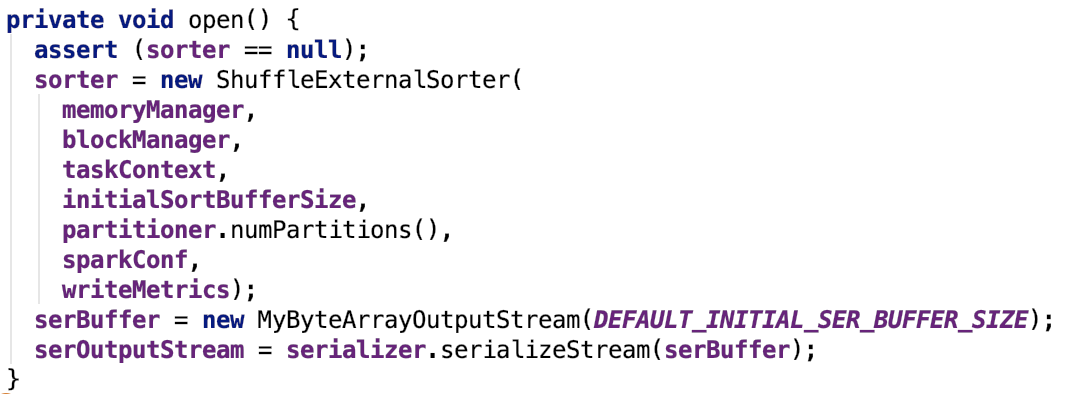
这个方法里涉及了三个类:ShuffleExternalSorter,MyByteArrayOutputStream以及SerializationStream三个类。ShuffleExternalSorter在上文已经剖析过了,MyByteArrayOutputStream是一个ByteArrayOutputStream子类负责想堆内内存中写数据,SerializationStream是一个序列化之后的流,数据最终会被写入到serBuffer内存流中,调用其flush方法后,其内部的buf就是写入的数据,如下:

2、数据写入概述
核心方法write源码如下:

其主要有两步,一步是遍历每一条记录,将数据写入到sorter中;第二步是关闭sorter,并将数据写入到一个shuffle 文件中同时更新shuffle索引信息;最后清除shuffle过程中sorter使用的资源。
先来看第一步:数据写入到sorter中。
3、数据插入到Sorter
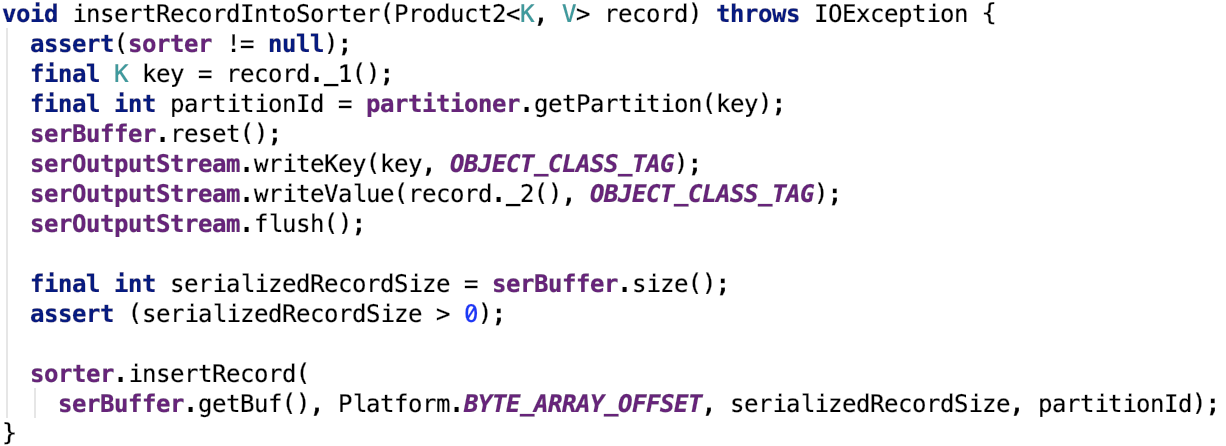
记录中的键值被序列化到serBuffer的buf字节数组中,然后被写入到 sorter(ShuffleExternalSorter)中。在sorter中序列化数据被写入到内存中(内存不足会溢出到磁盘中),其地址信息被写入到 ShuffleInMemorySorter 中,具体可以看上文介绍。
4、溢出文件归并为一个文件
一步是遍历每一条记录,将数据写入到sorter中后会调用sorter的closeAndGetSpills方法执行最后一次spill操作,然后获取到整个shuffle过程中所有的SpillInfo信息。然后使用ShuffleBlockResolver获取到shuffle的blockId对应的shuffle文件,最终调用mergeSpills 方法合并所有的溢出文件到最终的shuffle文件,然后更新shuffle索引文件,设置Shuffle结果的MapStatus信息,结束。
org.apache.spark.shuffle.sort.UnsafeShuffleWriter#closeAndWriteOutput 源码如下:
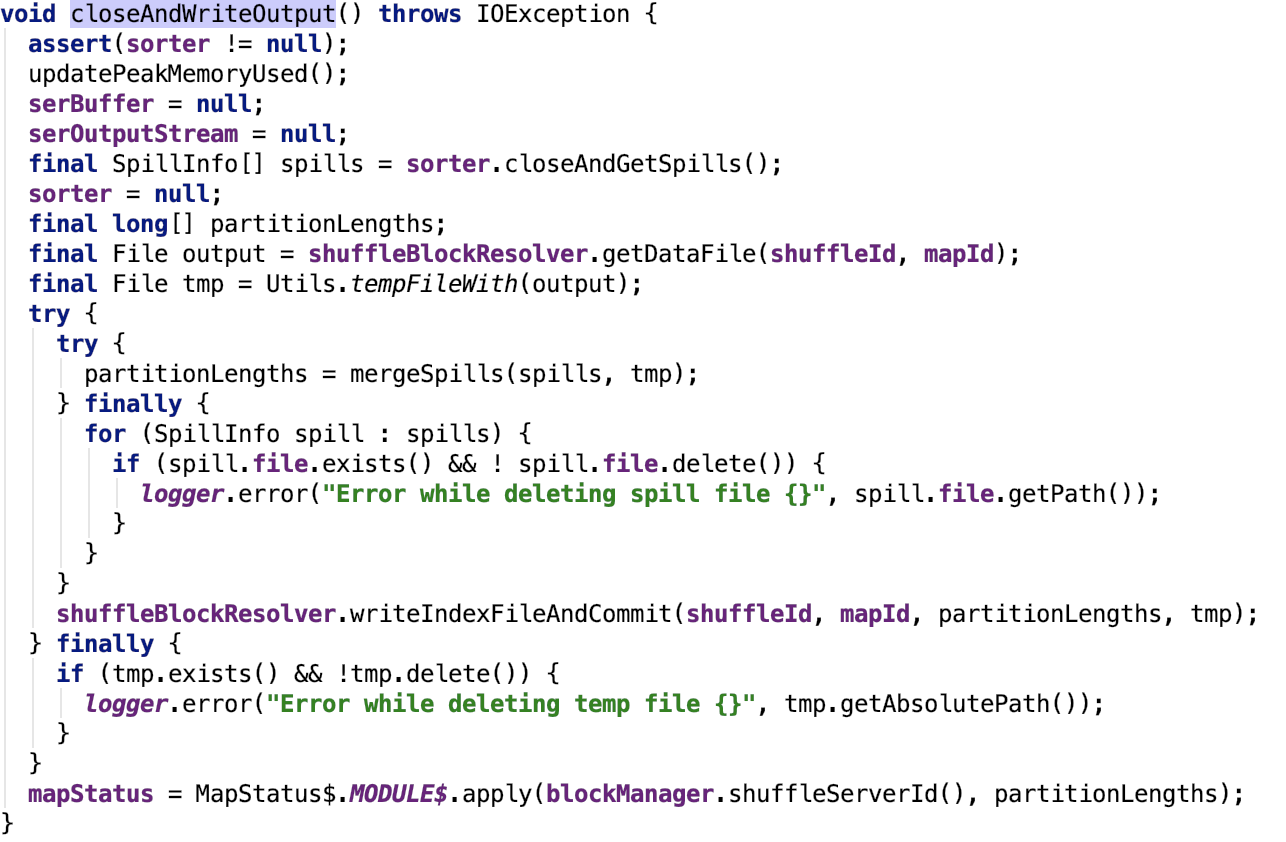
其关键方法 org.apache.spark.shuffle.sort.UnsafeShuffleWriter#mergeSpills 源码如下:
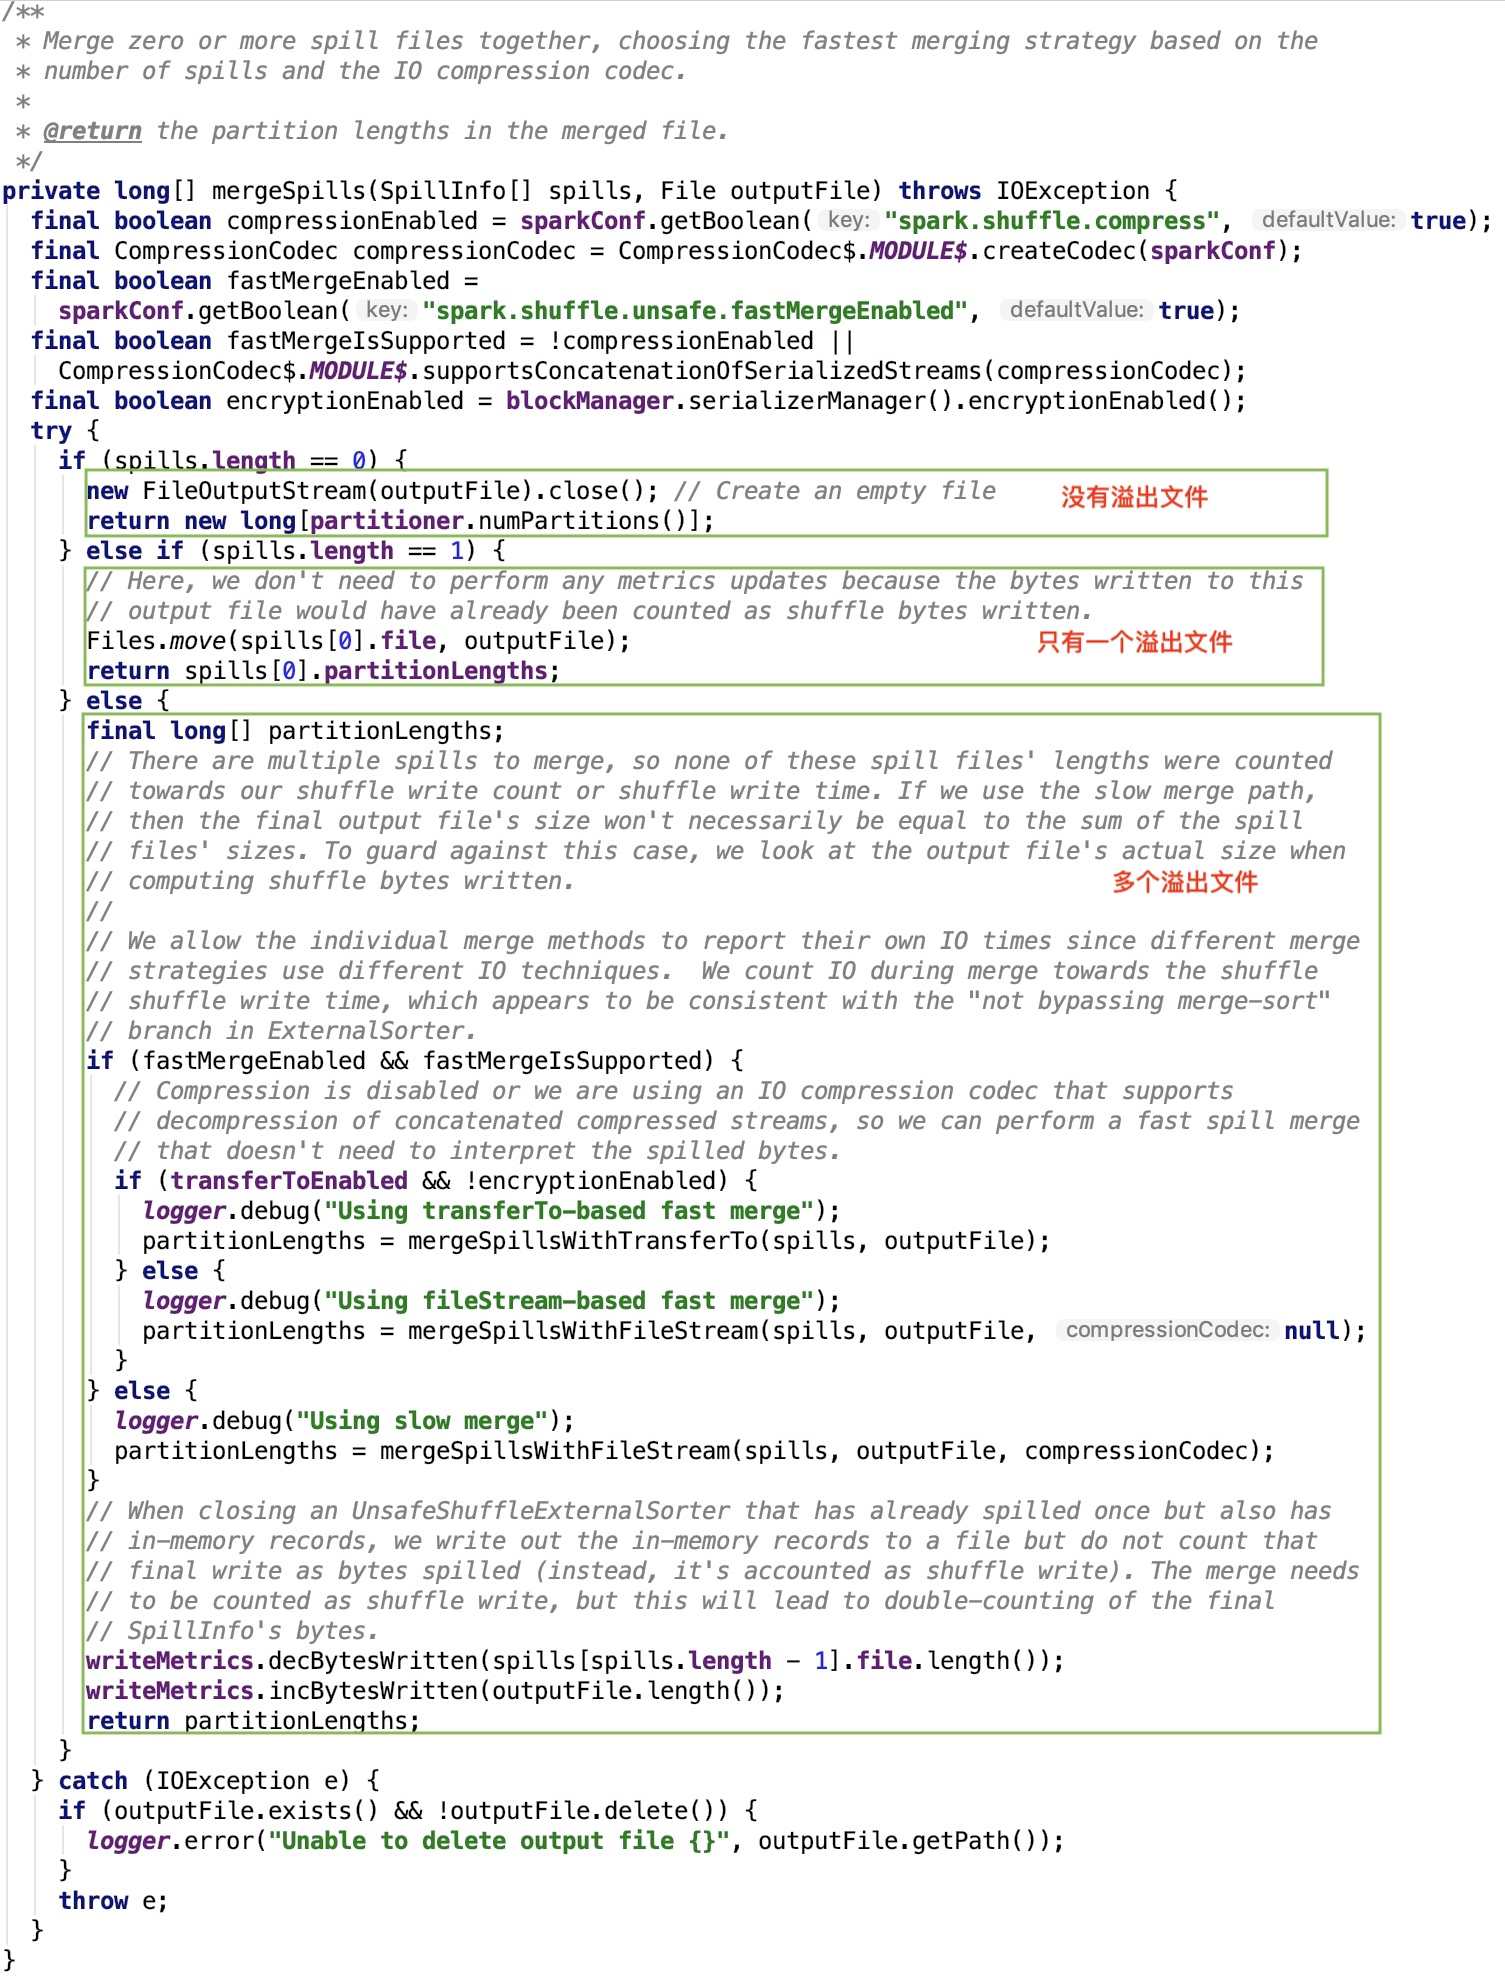
如果溢出文件为0,直接返回全是0的分区数组。
如果溢出文件为1,文件重命名后返回只有一个元素的分区数组。
如果溢出文件多于1个则,多个溢出文件开始merge。
首先先看一下五个变量:
encryptionEnabled:是否启用加密,默认为false,通过 spark.io.encryption.enabled 参数来设置。
transferToEnabled:是否可以使用nio的transferTo传输,默认为true,通过 spark.file.transferTo 参数来设置。
compressionEnabled:是否使用压缩,默认为true,通过 spark.shuffle.compress 参数来设置。
compressionCodec:默认压缩类,默认为LZ4CompressionCodec,通过 spark.io.compression.codec 参数来设置。
fastMergeEnabled:是否启用fast merge,默认为true,通过 spark.shuffle.unsafe.fastMergeEnabled 参数来设置。
fastMergeIsSupported:是否支持 fast merge,如果不使用压缩或者是压缩算法是 org.apache.spark.io.SnappyCompressionCodec、org.apache.spark.io.LZFCompressionCodec、org.apache.spark.io.LZ4CompressionCodec、org.apache.spark.io.ZStdCompressionCodec这四种支持连接的压缩算法中的一种都是可以使用 fast merge的。
三种merge多个文件的方式:transfered-based fast merge、fileStream-based fast merge以及slow merge三种方式。
使用transfered-based fast merge条件:使用 fast merge并且压缩算法支持fast merge,并且启用了nio的transferTo传输且不启用文件加密。
使用fileStream-based fast merge条件:使用 fast merge并且压缩算法支持fast merge,并且未启用nio的transferTo传输或启用了文件加密。
使用slow merge条件:未使用 fast merge或压缩算法不支持fast merge。
下面我们来看三种合并溢出的方式。
transfered-based fast merge
其核心方法org.apache.spark.shuffle.sort.UnsafeShuffleWriter#mergeSpillsWithTransferTo 源码如下:
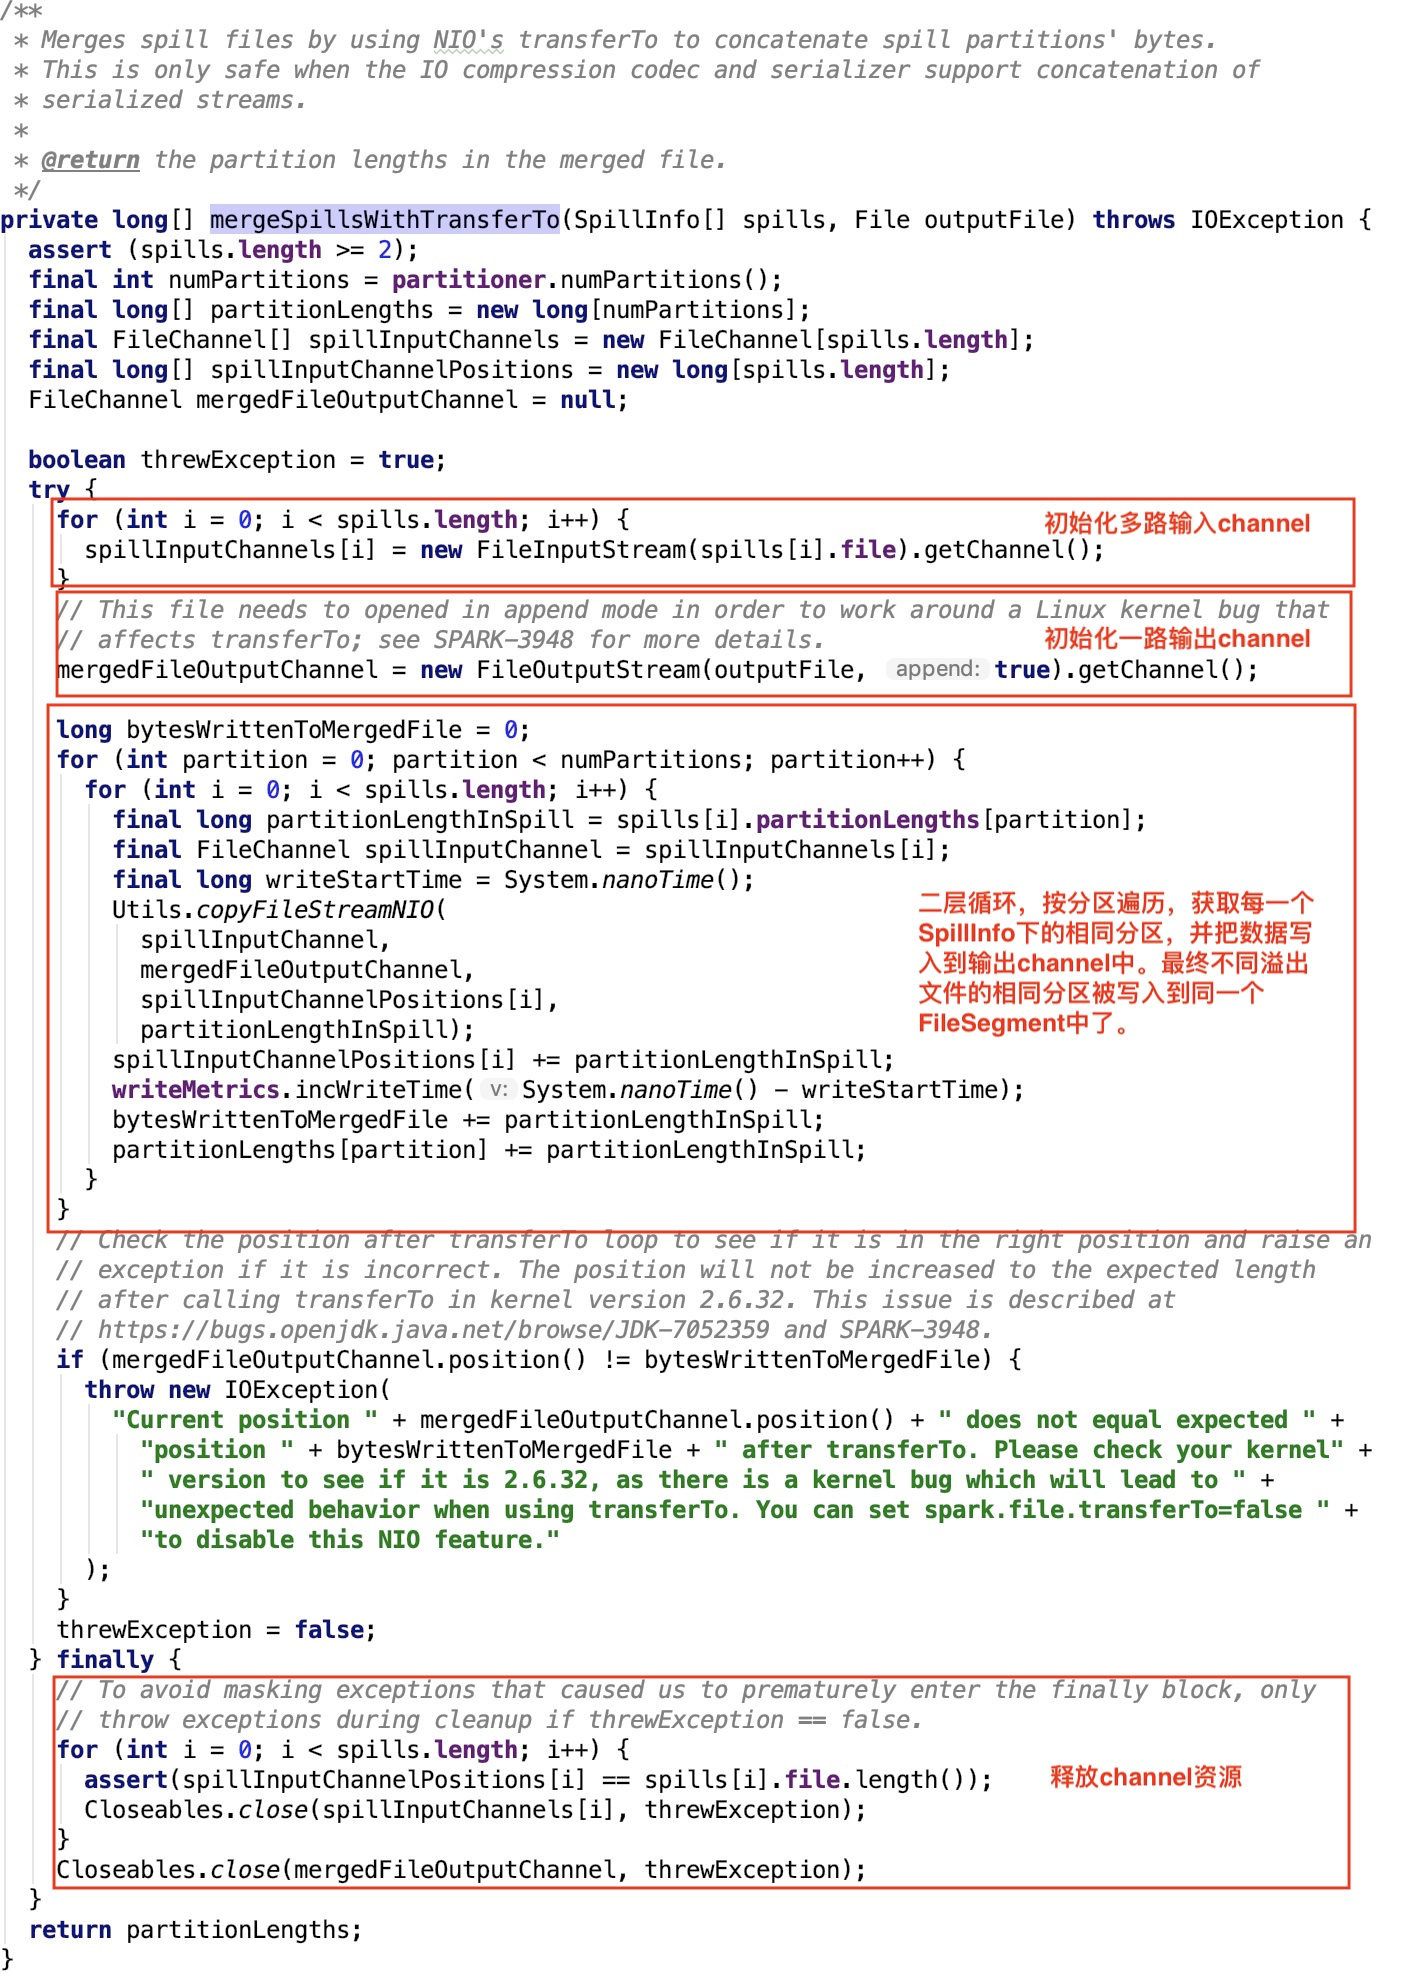
其依赖方法 org.apache.spark.util.Utils#copyFileStreamNIO 如下:
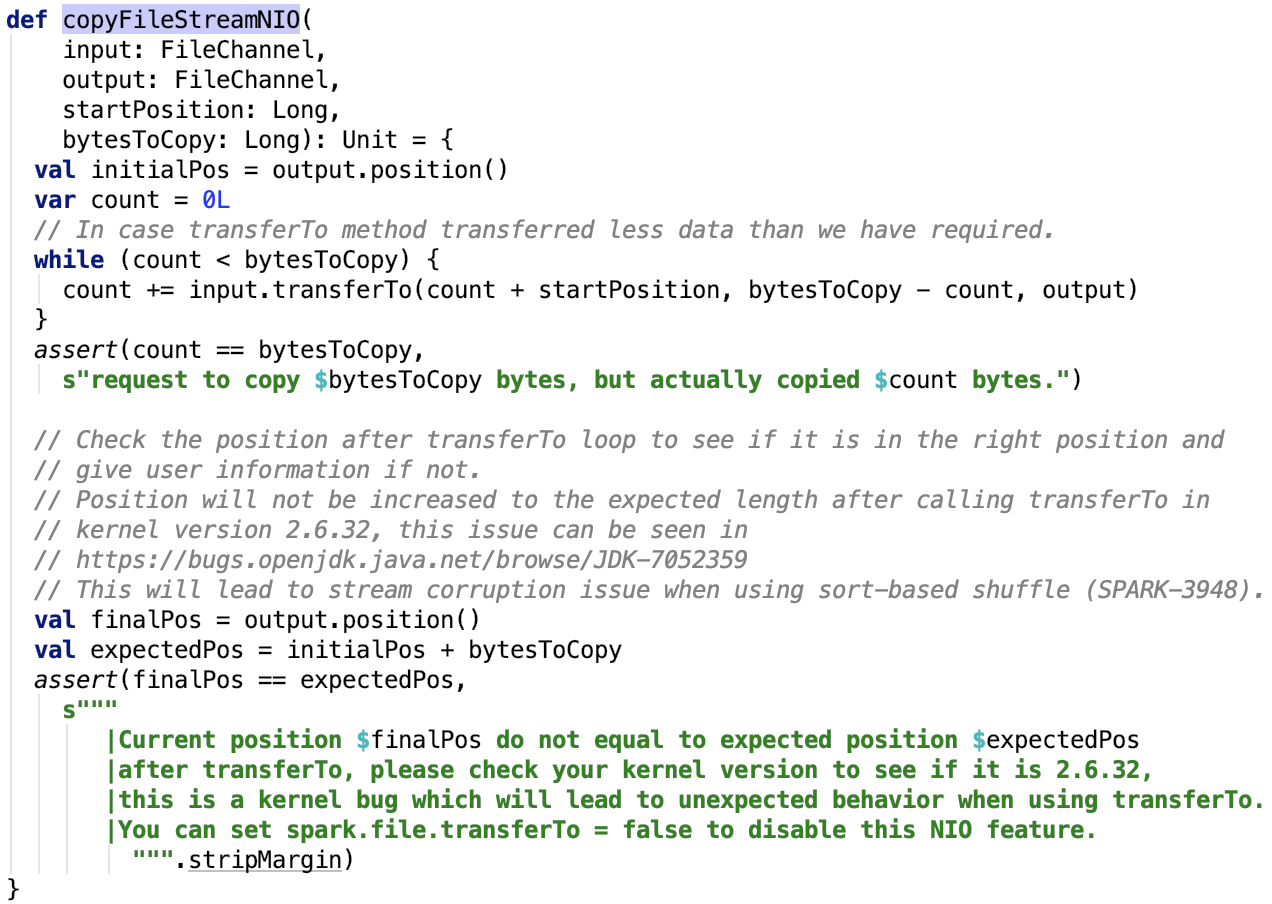
很简单,底层依赖于Java的NIO的transferTo方法实现。
fileStream-based fast merge
其核心方法 org.apache.spark.shuffle.sort.UnsafeShuffleWriter#mergeSpillsWithFileStream 源码如下,这里不传入任何压缩类,见 org.apache.spark.shuffle.sort.UnsafeShuffleWriter#mergeSpills 源码。
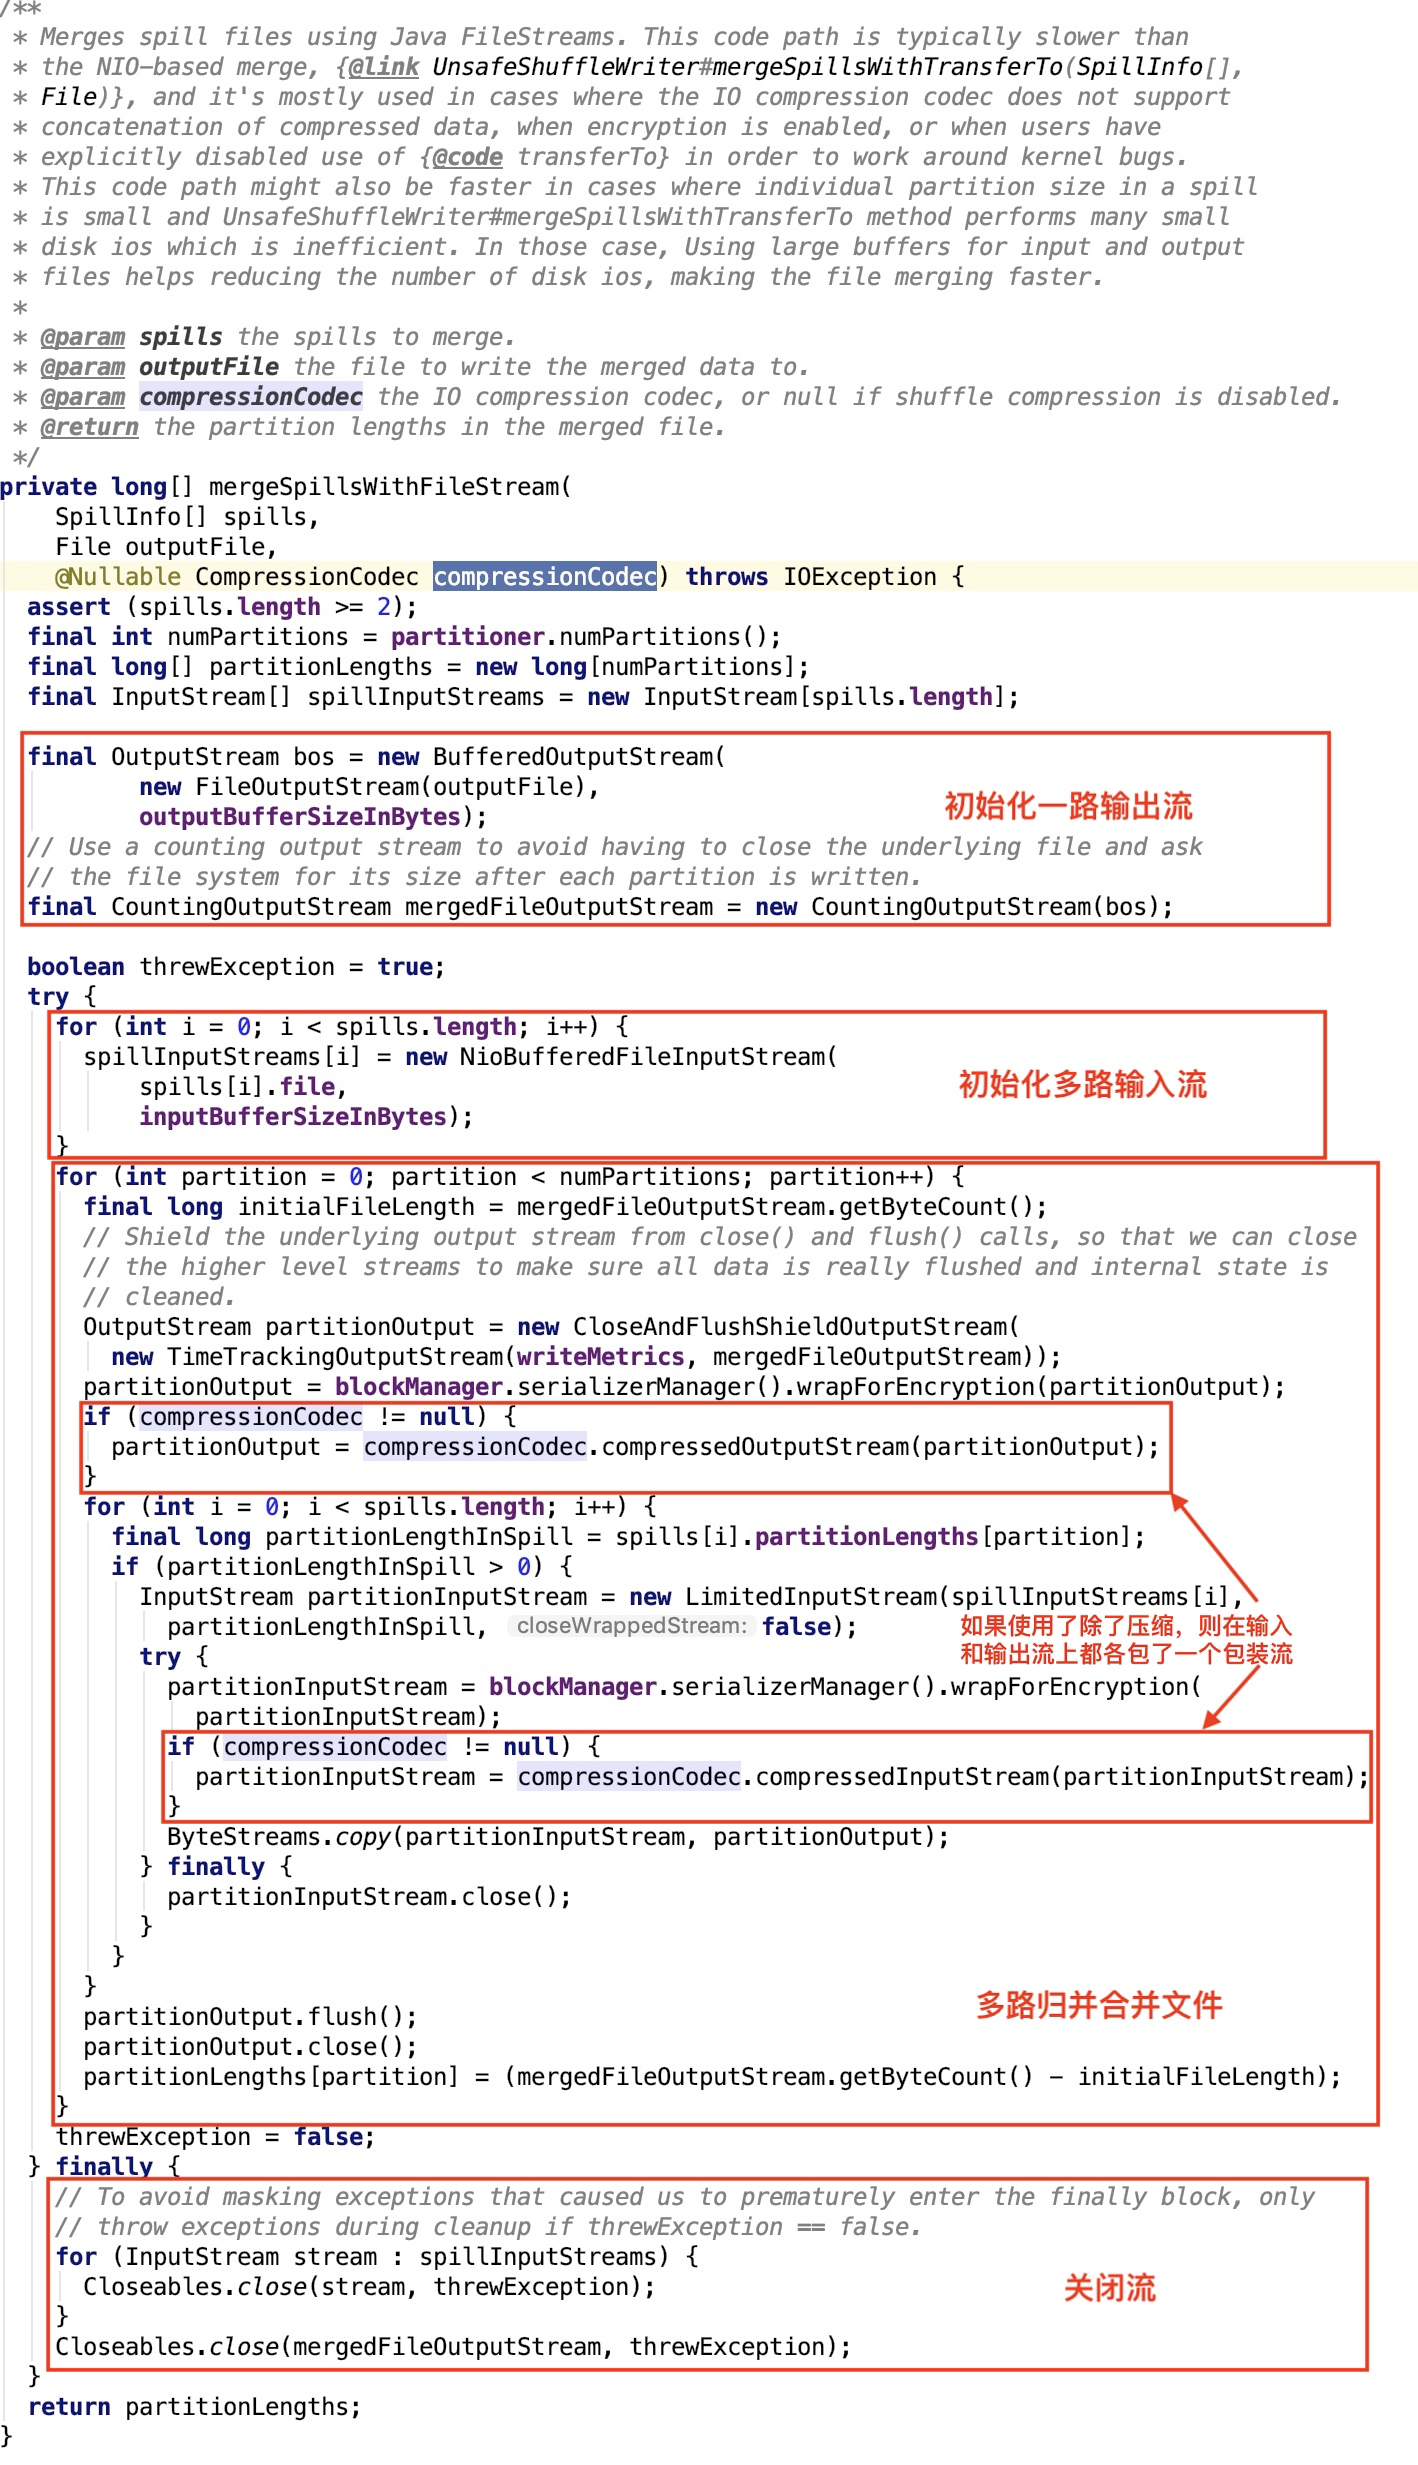
slow merge
其其核心方法 org.apache.spark.shuffle.sort.UnsafeShuffleWriter#mergeSpillsWithFileStream 源码跟 fileStream-based fast merge 里的一样,不做过多解释,只不过这里多传入了一个压缩类,见 org.apache.spark.shuffle.sort.UnsafeShuffleWriter#mergeSpills 源码。
5、更新shuffle索引
这部分更详细的可以看 org.apache.spark.shuffle.IndexShuffleBlockResolver#writeIndexFileAndCommit 源码。在上篇文章 spark shuffle写操作三部曲之BypassMergeSortShuffleWriter 中使用BypassMergeSortShuffleWriter写数据已经剖析过,不再剖析。
4、总结
ShuffleExternalSorter将数据不断溢出到溢出小文件中,溢出文件内的数据是按分区规则排序的,分区内的数据是乱序的。
多个分区的数据同时溢出到一个溢出文件,最后使用三种归并方式中的一种将多个溢出文件归并到一个文件,分区内的数据是乱序的。最终数据的格式跟第一种shuffle写操作的结果是一样的,即有分区的shuffle数据文件和记录分区大小的shuffle索引文件。
八、spark shuffle写操作三部曲之SortShuffleWriter
1、提出问题
-
spark shuffle的预聚合操作是如何做的,其中底层的数据结构是什么?在数据写入到内存中有预聚合,在读溢出文件合并到最终的文件时是否也有预聚合操作?
-
shuffle数据的排序是如何做的? 分区内的数据是否是有序的?若有序,spark 内部是按照什么排序算法来排序每一个分区上的key的?
-
shuffle的溢出操作和TaskMemoryManager的关系?
-
在数据溢出阶段,内存中数据的排序是使用算法进行排序的?
-
在溢出文件数据合并阶段,内存中的数据的排序是使用的什么算法?
-
为什么在读取溢出文件到内存中时,返回的结果是迭代器而不是直接的数据结果?
。。。。。。还有很多的细节。
2、前言
剖析最后一种 shuffle 写的方式。
我们先来看第三种shuffle的相关依赖类。
3、SizeTrackingAppendOnlyMap
这个类继承了AppendOnlyMap并实现了SizeTracker trait。
其内部方法如下:
它依赖的类都是其父类,他只是它的两个父类的拼凑,所以要想了解真正的动作,还是需要去看其父类AppendOnlyMap和trait SizeTracker。
1、父类AppendOnlyMap
这个类继承了Iterable trait和 Serializable 接口。
其类结构如下:
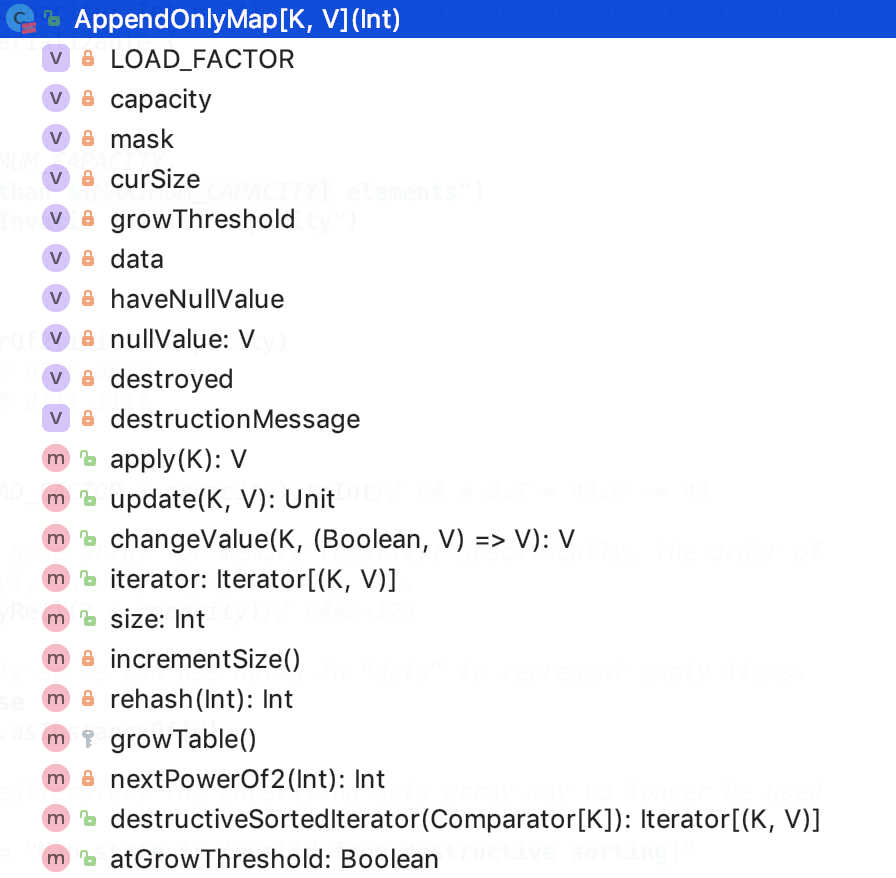
成员变量
成员变量如下:

LOAD_FACTOR:负载因子,为0.7,实际存储数据占比大于负载因子则需要扩容。
mask的作用:将任意的数映射到[0,mask]的范围内。
data:是真正保存数据的数组。
haveNullValue:是否有null值,因为数组中的null值还有一个作用,那就是表示该索引位置没有元素存在。
nullValue:null值。
destoryed:表示数据是否已经被销毁。
理论最大容量为:512MB
成员方法如下:
根据key获取value
解释:
1.如果是null值,则返回null值,因为约定 null值key对应null值value。
-
首先先把原来的hashcode再求一次hash码,然后和掩码做与操作将其映射到 [0,mask] 范围内。
-
尝试取出数据如果取出来的key是指定的key,则返回数据,若取出的key是null,表示之前没有保存过,返回null,若取出的数据的key不是当前key,则使用再散列法 先有pos + delta逐步散列,求得下一次的pos,然后再重复第三步,直至找匹配的值或null值后返回。
设置键值对
更新键值思路:跟查找的思路一样,只不过找到之后不返回,是执行更新操作。
在指定key的value上执行函数
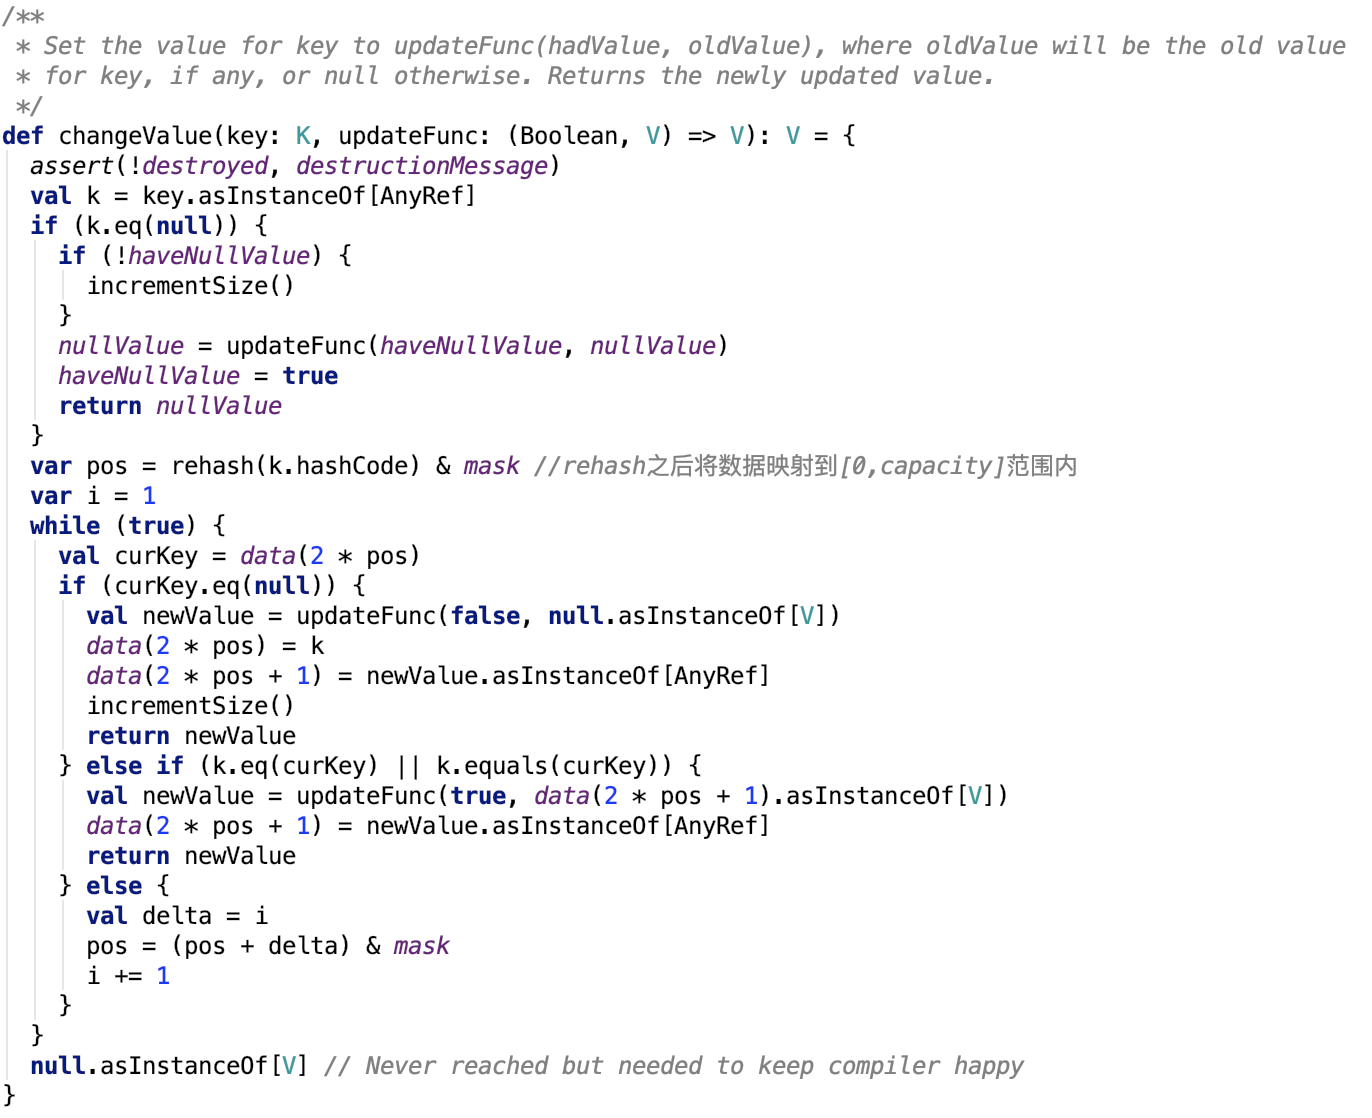
更新键值思路:跟查找的思路一样,只不过找到之后不返回,如果找的的值是null值,则执行赋值操作,否则更新value为执行更新函数后的值。
获取未排序的迭代器
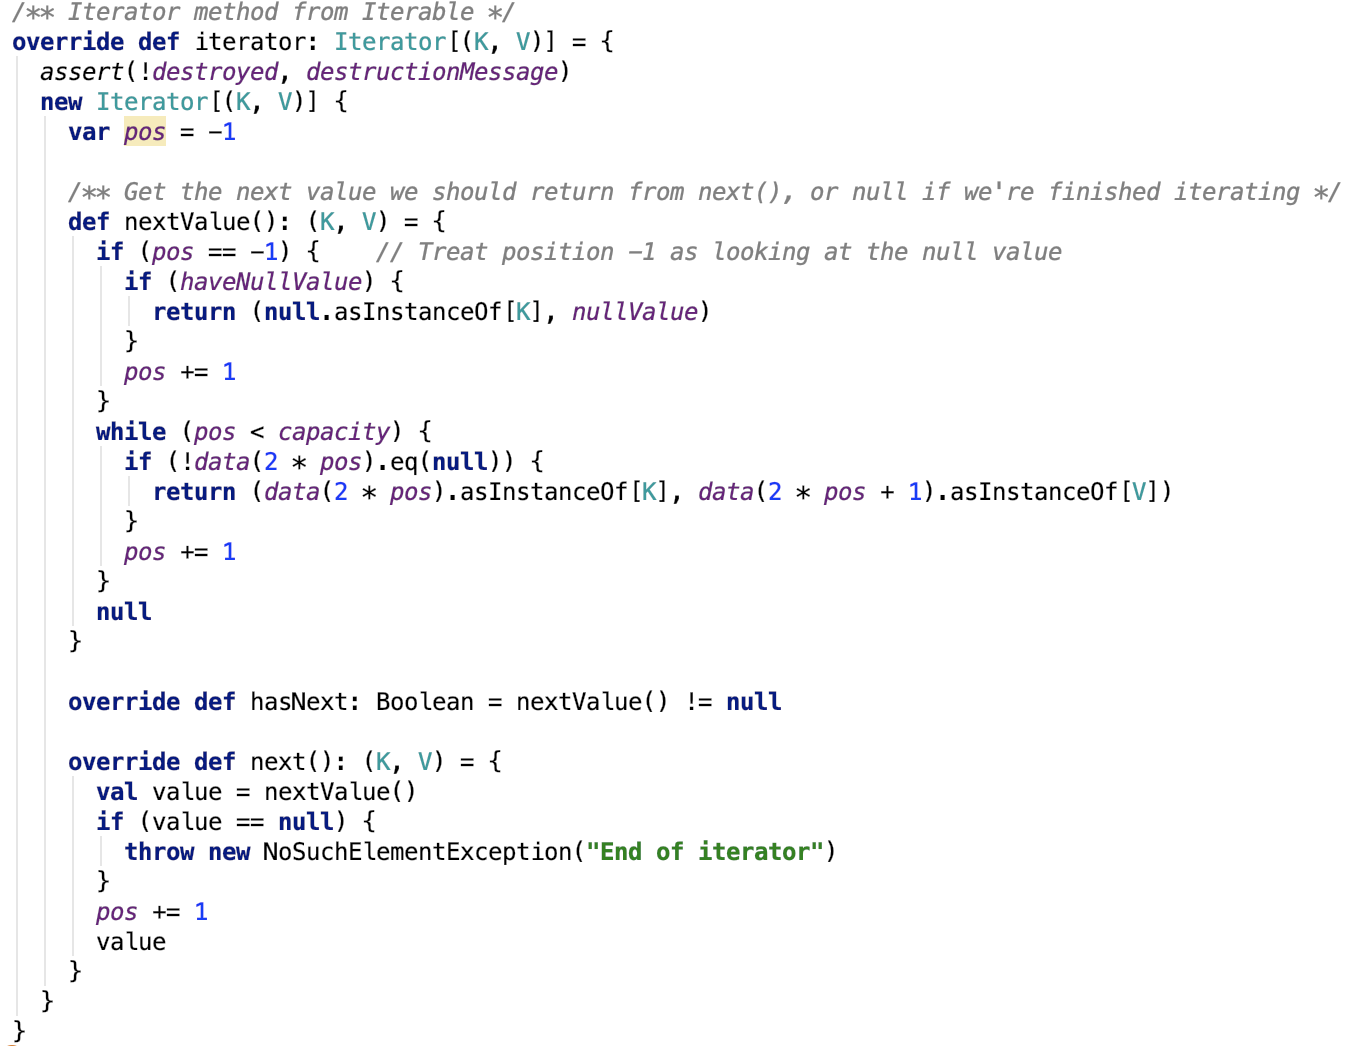
本质上是遍历数组,只不过这里的元素是稀疏的,只返回有元素的数据,不做过多说明。

先整理数组,将数组的数据变为紧凑的数据。再按照key来进行排序。最后返回一个迭代器,这个迭代器里的数据是有序的。
rehash

扩容

如果当前使用容量占比大于负载因子,则开始扩容。
新容量是旧容量的一倍。遍历旧的数组中的每一个非null元素,将其映射到新的数组中。
2、父类SizeTracker
A general interface for collections to keep track of their estimated sizes in bytes. We sample with a slow exponential back-off using the SizeEstimator to amortize the time, as each call to SizeEstimator is somewhat expensive (order of a few milliseconds).
集合的通用接口,用于跟踪其估计的大小(以字节为单位)。 我们使用SizeEstimator以缓慢的指数退避进行采样以分摊时间,因为每次调用SizeEstimator都有点昂贵。
成员变量
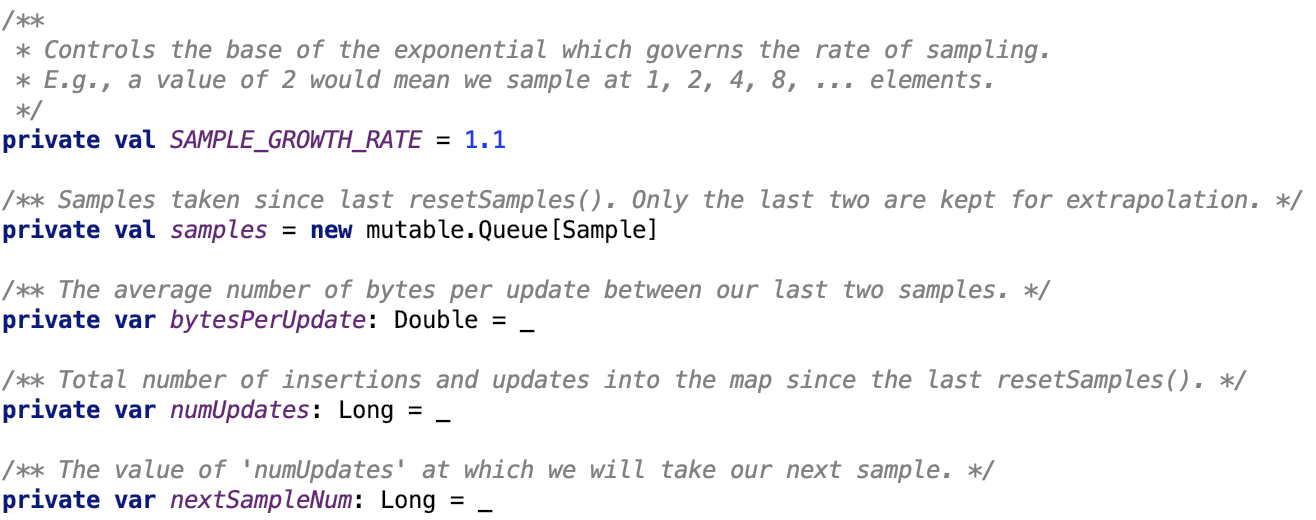
SAMPLE_GROWTH_RATE指数增长因子,比如是2,则是 1,2,4,8,16,......
核心方法如下:
采样

估算大小

重采样
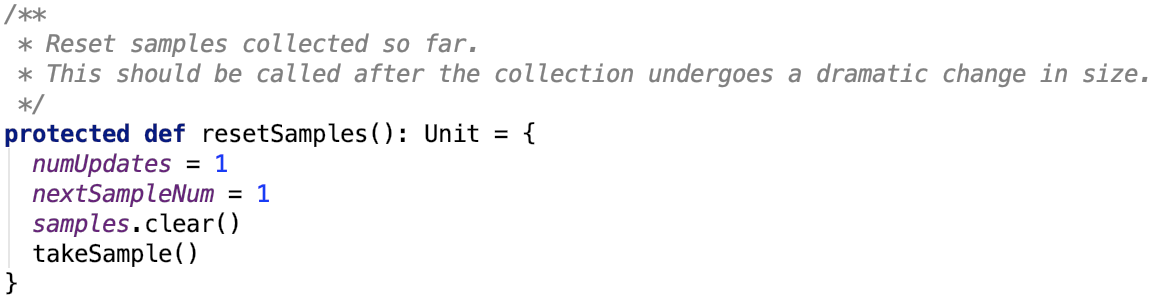
更新后采样

3、依赖类 -- SizeEstimator
主要用于数据占用内存的估算。
4、ExternalAppendOnlyMap
1、继承关系
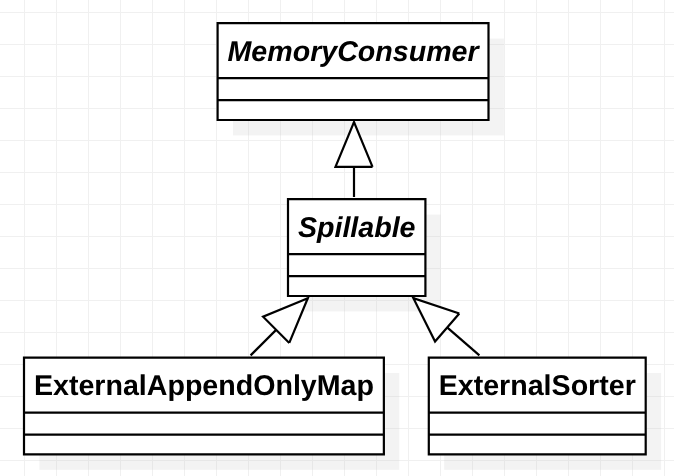
其父类是Spillable抽象类。
先来看父类Spillable
2、超类--Spillable
类说明:当内存不足时,这个类会把内存里的集合溢出到磁盘中。
其成员变量如下,不做过多解释。
主要方法如下:
溢出内存到磁盘
它实现了父类的抽象方法 spill方法,源码如下:
思路:如果consumer不是这个类并且内存模式是堆内内存才支持内存溢出。
其依赖方法如下:
org.apache.spark.util.collection.Spillable#forceSpill源码如下,它是一个抽象方法,没有具体实现。

释放内存方法,其调用了 父类的freeMemory方法:

尝试溢出来释放内存
org.apache.spark.util.collection.Spillable#maybeSpill 源码如下:
其依赖方法spill方法如下,注意这个方法是用来溢出集合的数据到内存的,它是抽象方法,待子类实现。

这个类留给子类两个方法来实现,forceSpill和spill方法。
ExternalAppendOnlyMap这个类里面的是对 SizeTrackingAppendOnlyMap 的进一步封装,下面我们先看 SizeTrackingAppendOnlyMap。
3、数据比较器 -- HashComparator
其源码如下:
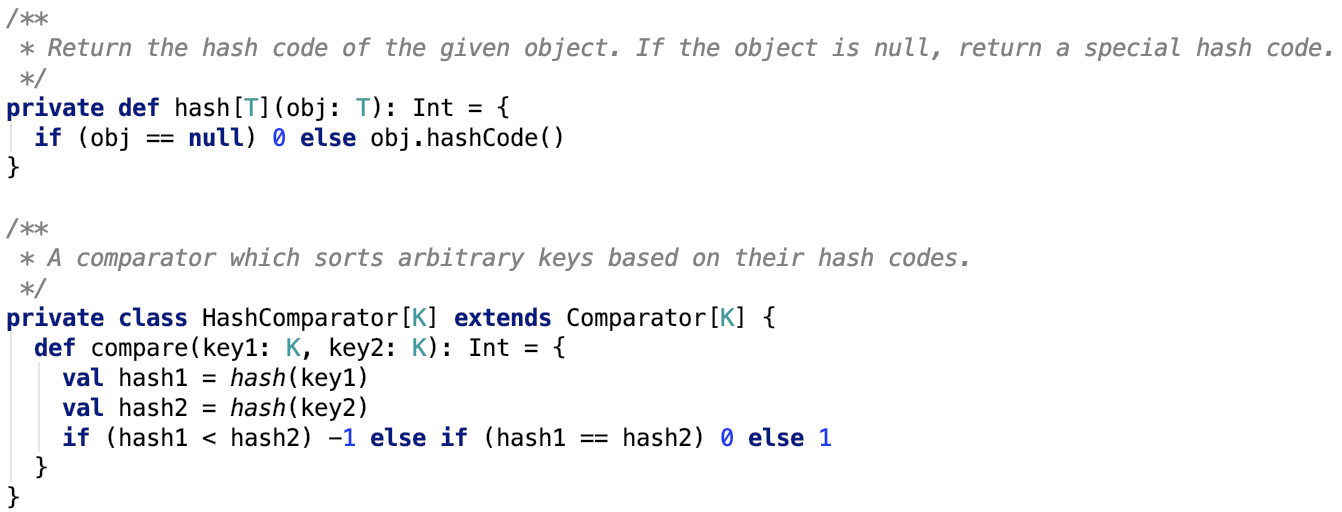
总之,它是根据哈希码进行比较的。
4、SpillableIterator
首先,它是org.apache.spark.util.collection.ExternalAppendOnlyMap的内部类,实现了Iterator trait,它是跟ExternalAppendOnlyMap一起使用的,也使用了 ExternalAppendOnlyMap 里的方法。
成员变量
其成员变量如下:
SPILL_LOCK是一个对象锁,每次执行溢出操作都会先获取锁再执行溢出操作,执行完毕后释放锁。
cur表示下一个未读的元素。
hasSpilled表示是否有溢出。
核心方法
1.溢出
其源码如下:
2.销毁数据释放内存

其依赖方法 org.apache.spark.util.collection.ExternalAppendOnlyMap#freeCurrentMap 如下:

-
读取下一个
-
是否有下一个

-
获取下一个元素
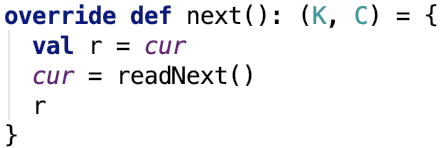
-
转换为CompletionIterator

总结
从本质来来说,它是一个包装类,数据从构造方法以Iterator的形式传递过来,而它自己也是一个Iterator,除了实现了Iterator本身的方法外,还具备了溢出到磁盘、销毁内存数据、转换为CompletionIterator的功能。
5、DiskMapIterator
这个类就是用来读取文件的数据的,只不过文件被划分为了多个文件段,有一个数组专门记录这多个文件段的段大小,如构造函数所示:

其中file就是要读取的数据文件,blockId表示文件在shuffle系统中对应的blockId,batchSize就是指的每一个文件段的大小。
成员变量如下:
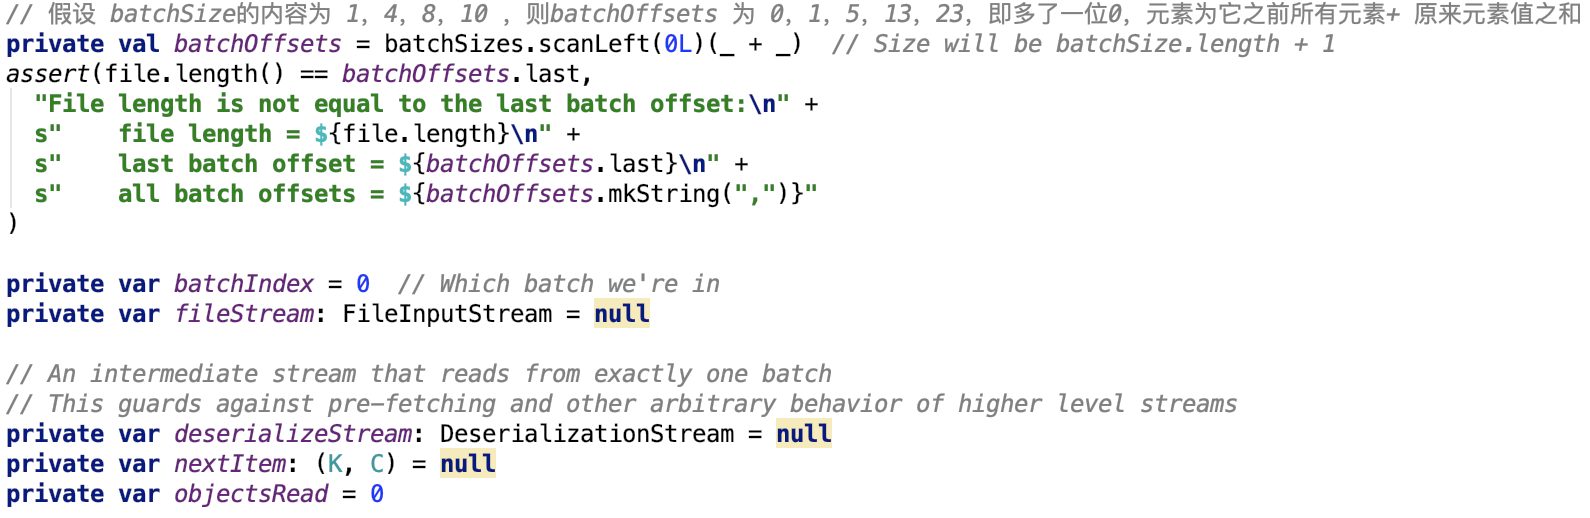
下面从Iterator的主要方法入手,去剖析整个类。
是否有下一个元素

其依赖方法 org.apache.spark.util.collection.ExternalAppendOnlyMap.DiskMapIterator#readNextItem 源码如下:

思路:首先先读取下一个key-value对,若读取完毕后,发现这个批次的数据已经读取完毕,则调用 nextBatchStream 方法,关闭现有反序列化流,初始化读取下一个文件段的反序列化流。
其依赖方法 org.apache.spark.util.collection.ExternalAppendOnlyMap.DiskMapIterator#nextBatchStream 如下:

思路:首先先确定该批次的数据是否读取完毕,若读取完毕,则做完清理操作后,返回null值,否则先关闭现有的反序列化流,然后获取下一个反序列化流的开始和结束offset,最后初始化一个反序列化流返回给调用端。
其依赖方法 org.apache.spark.util.collection.ExternalAppendOnlyMap.DiskMapIterator#cleanup 方法如下:

思路:首先关闭现有的反序列化流和文件流,最后如果文件存在,则删除之。
读取下一个元素
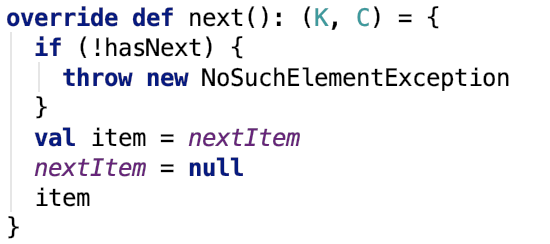
思路很简单,其中,nextItem已经在是否有下一个元素的时候反序列化出来了。
6、构造方法
它有两个重载的构造方法:
和
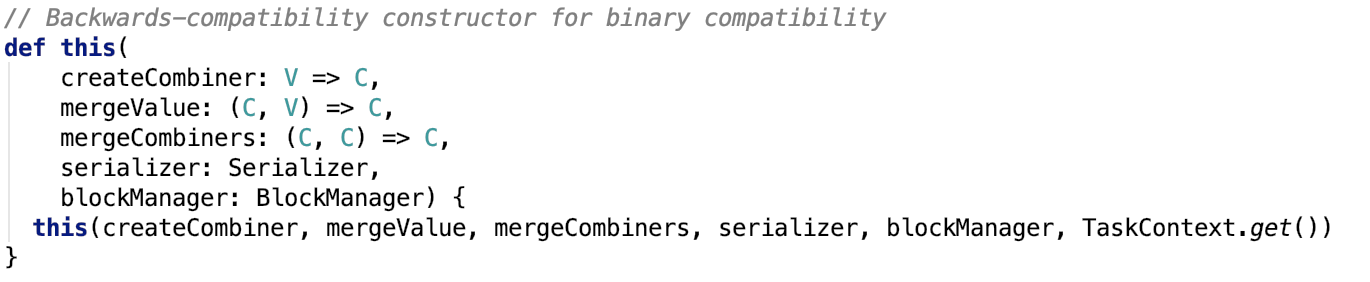
解释一下其中的参数:
createCombiner:是根据一个原值来创建其combine之后的值的函数。
mergeValue:是根据一个combine之后的值和一个原值求combine之后的值的函数。
mergeCombiner:是根据两个combine之后的值求combine之后的值函数。
本质上这几个函数就是逐步归并聚合的体现。
7、成员变量
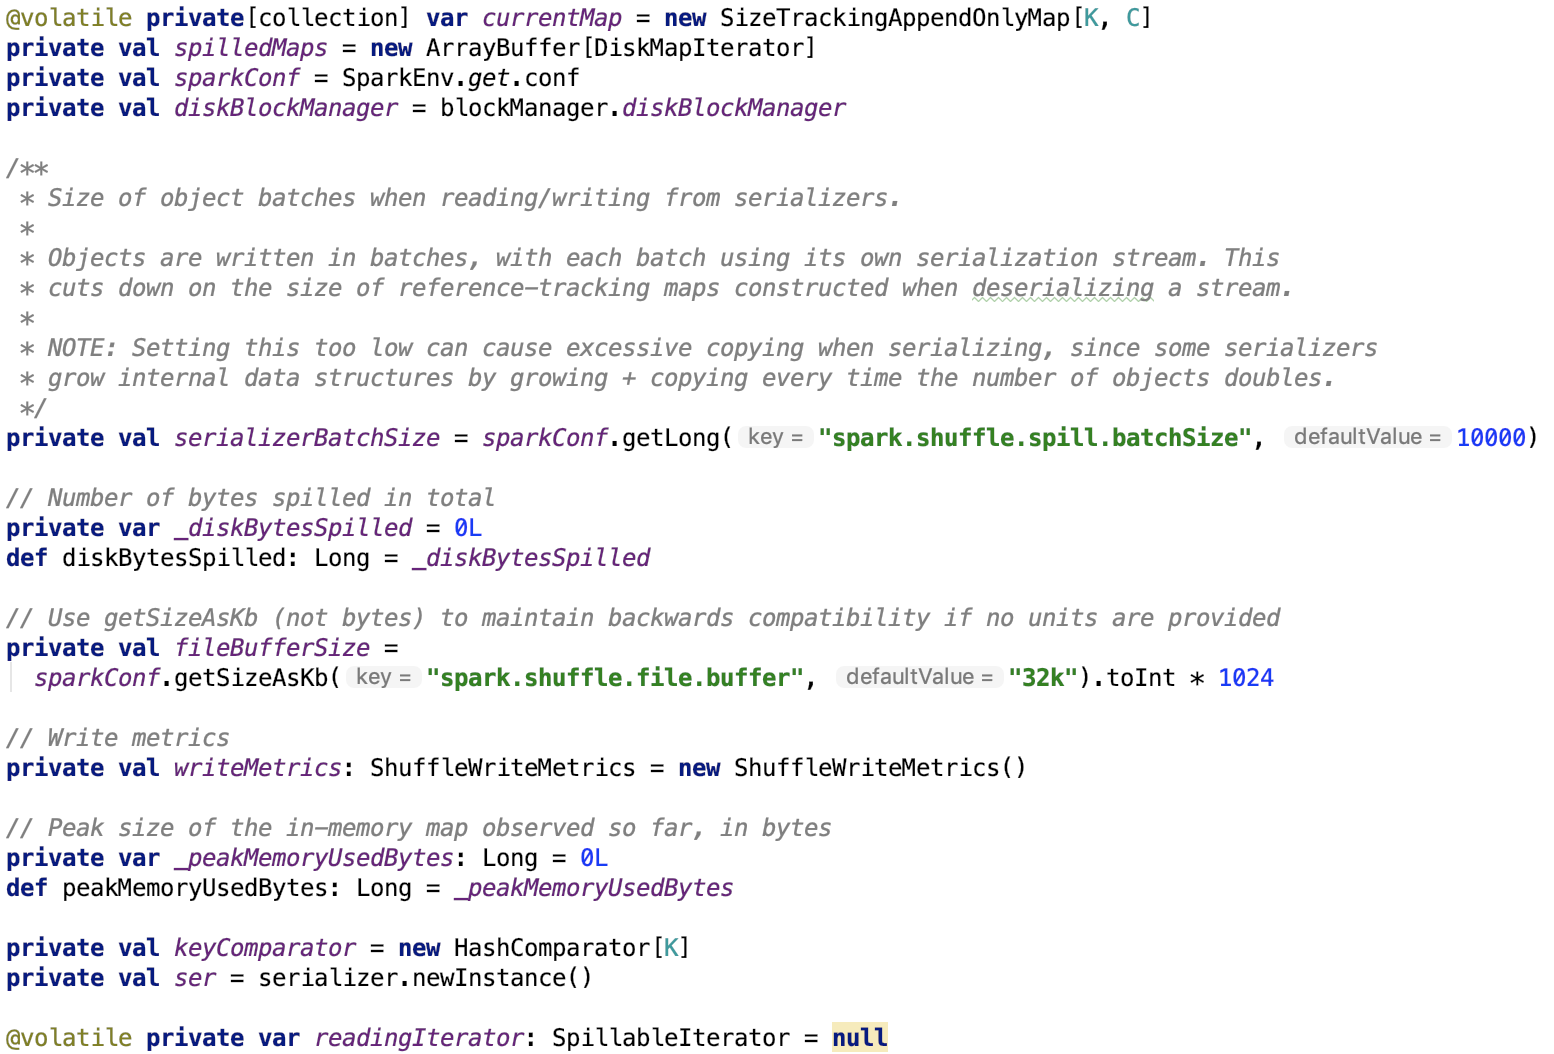
serializerBatchSize:表示每次溢出时,写入文件的批次大小,这个批次是指的写入的对象的次数,而不是通常意义上的buffer的缓冲区大小。
_diskBytesSpilled :表示总共溢出的字节大小
fileBufferSize: 文件缓存大小,默认为 32k
_peakMemoryUsedBytes: 表示内存使用峰值
keyComparater:表示内存排序的比较器
8、核心方法之插入数据
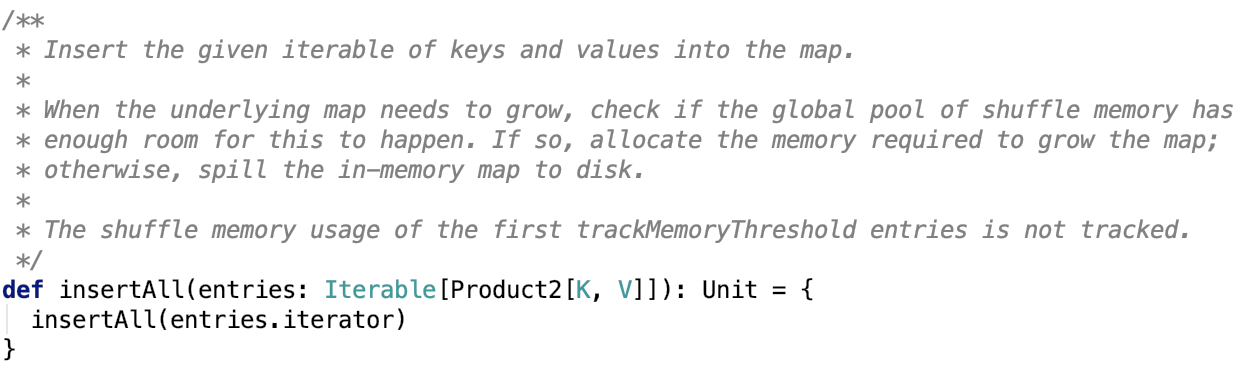
溢出操作

思路:首先先调用currentMap的destructiveSortedIterator方法,先整理其内部的数据成紧凑的数据,然后对数据进行排序,最终有序数据以Iterator的结果返回。然后调用
将数据溢出到磁盘,最后将溢出的信息记录到spilledMaps中,其依赖方法 org.apache.spark.util.collection.ExternalAppendOnlyMap#spillMemoryIteratorToDisk 源码如下:

思路:创建本地临时block,并获取其writer,最终遍历内存数组的迭代器,将数据都通过writer写入到file中,其中写文件是分批写入的,即每次满足serializerBatchSize大小之后,执行flush写入,最后执行一次flush写入,关闭文件,最终返回DiskMapIterator对象。
强制溢出
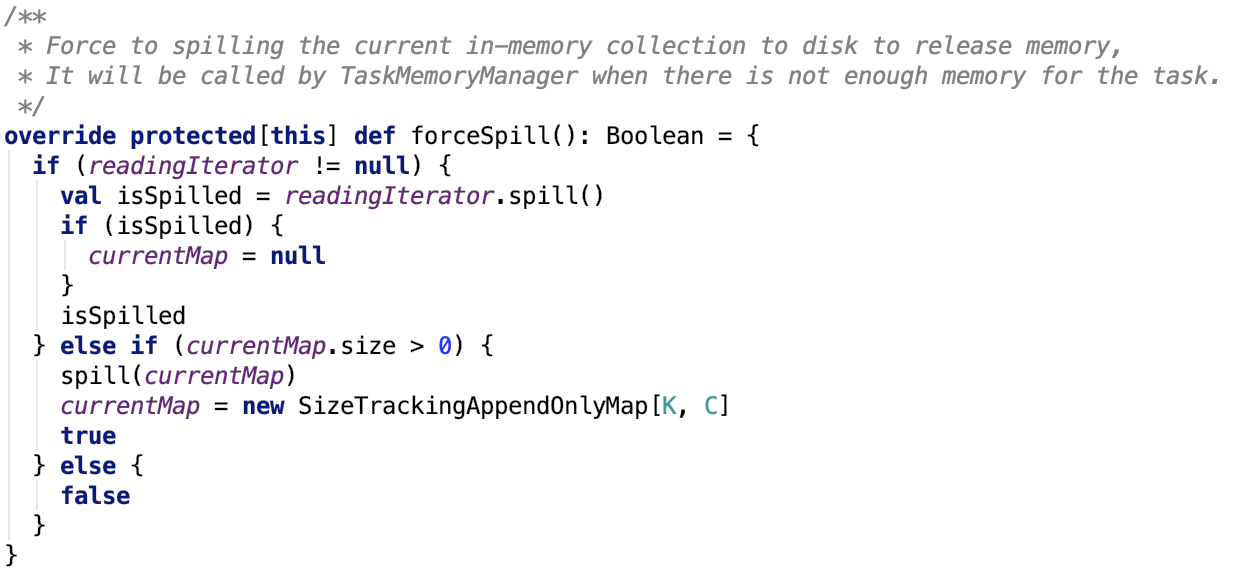
摧毁迭代器
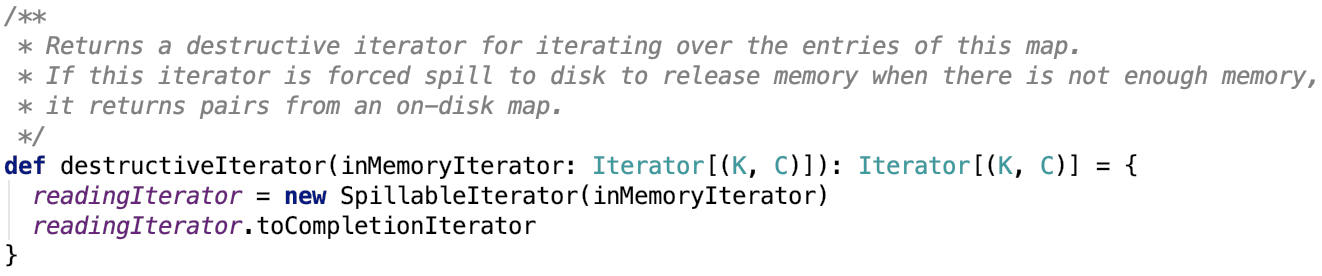
获取迭代器

5、预聚合类 -- Aggregator
其源码如下:
这个类的两个方法 combineValuesByKey 和 combineCombinersByKey 都依赖于 ExternalAppendOnlyMap类。
下面继续来看ExternalSorter类的内部实现。
6/支持排序预聚合的sorter -- ExternalSorter
1、类说明
Sorts and potentially merges a number of key-value pairs of type (K, V) to produce key-combiner pairs of type (K, C). Uses a Partitioner to first group the keys into partitions, and then optionally sorts keys within each partition using a custom Comparator. Can output a single partitioned file with a different byte range for each partition, suitable for shuffle fetches. If combining is disabled, the type C must equal V -- we'll cast the objects at the end. Note: Although ExternalSorter is a fairly generic sorter, some of its configuration is tied to its use in sort-based shuffle (for example, its block compression is controlled by spark.shuffle.compress). We may need to revisit this if ExternalSorter is used in other non-shuffle contexts where we might want to use different configuration settings.
对类型(K,V)的多个键值对进行排序并可能合并,以生成类型(K,C)的键组合对。使用分区程序首先将key分组到分区中,然后可以选择使用自定义Comparator对每个分区中的key进行排序。可以为每个分区输出具有不同字节范围的单个分区文件,适用于随机提取。如果禁用了组合,则类型C必须等于V - 我们将在末尾转换对象。注意:虽然ExternalSorter是一个相当通用的排序器,但它的一些配置与基于排序的shuffle的使用有关(例如,它的块压缩由spark.shuffle.compress控制)。如果在我们可能想要使用不同配置设置的其他非随机上下文中使用ExternalSorter,我们可能需要重新审视这一点。
下面,先来看其构造方法:
2、构造方法

参数如下:
aggregator:可选的聚合器,可以用于归并数据
partitioner :可选的分区器,如果有的话,先按分区Id排序,再按key排序
ordering : 可选的排序,它在每一个分区内按key进行排序,它也可以是全局排序
serializer :用于溢出内存数据到磁盘的序列化器
其成员变量和核心方法,先不做剖析,其方法围绕两个核心展开,一部分是跟数据的插入有关的方法,一部分是跟多个溢出文件的合并操作有关的方法。
下面来看看它的一些内部类。
3、只读一个分区数据的迭代器 -- IteratorForPartition
这个类实现了Iterator trait,只负责迭代读取一个特定分区的数据,其定义如下:
比较简单,不做过多说明。
4、溢出文件的描述 -- SpilledFile

这个类是一个 case class ,它记录了溢出文件的一些关键信息,构造方法的各个字段如下:
file:溢出文件
blockId:溢出文件对应的blockId
serializerBatchSizes:表示每一个序列化类对应的batch的大小。
elementsPerPartition:表示每一个分区的元素的个数。
比较简单,没有类的方法定义。
5、读取溢出文件的内容 -- SpillReader
它负责读取一个按分区做文件分区的文件,希望按分区顺序读取分区文件的内容。
其类结构如下:
成员变量
先看其成员变量:
batchOffsets:序列化类的每一个批次的offset
partitionId:分区id
indexInPartition:在分区内的索引信息
batchId:batch的id
indexInBatch:在batch中的索引信息
lastPartitionId:上一个partition ID
nextPartitionToRead:下一个要读取的partition的id
fileStream:文件输入流
deserializeStream:分序列化流
nextItem:下一个键值对
finished:是否读取完毕
下面,来看其核心方法:
获取下一个批次的反序列化流

思路跟DiskMapIterator的获取下一个流的思路很类似,不做过多解释。
读取下一个partition的数据
其返回的是一个迭代器,org.apache.spark.util.collection.ExternalSorter.SpillReader#readNextPartition源码如下:
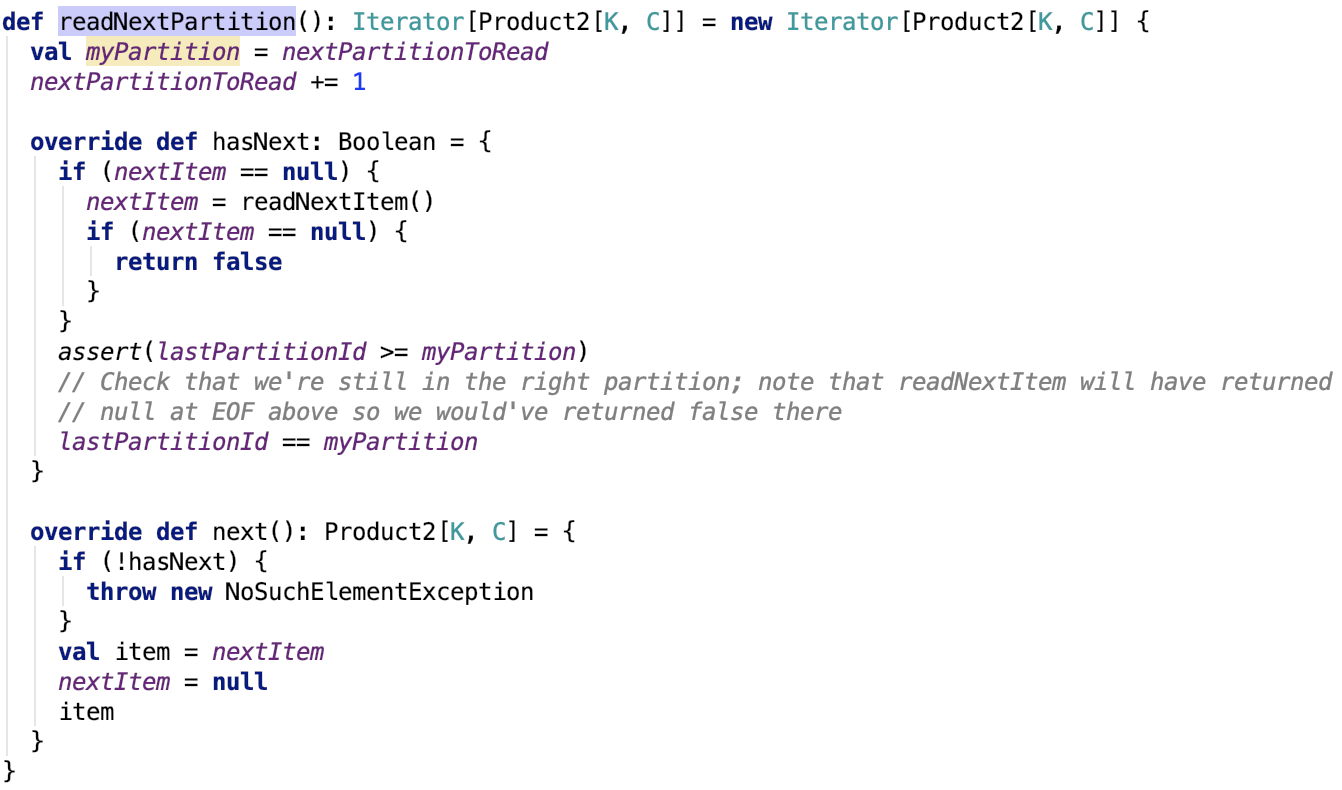
思路:其返回迭代器中,的hasNext中先去读取下一个item,如果读取到的下一个元素为null,则返回false,表示没有数据可以返回。
其依赖方法 org.apache.spark.util.collection.ExternalSorter.SpillReader#readNextItem 源码如下:
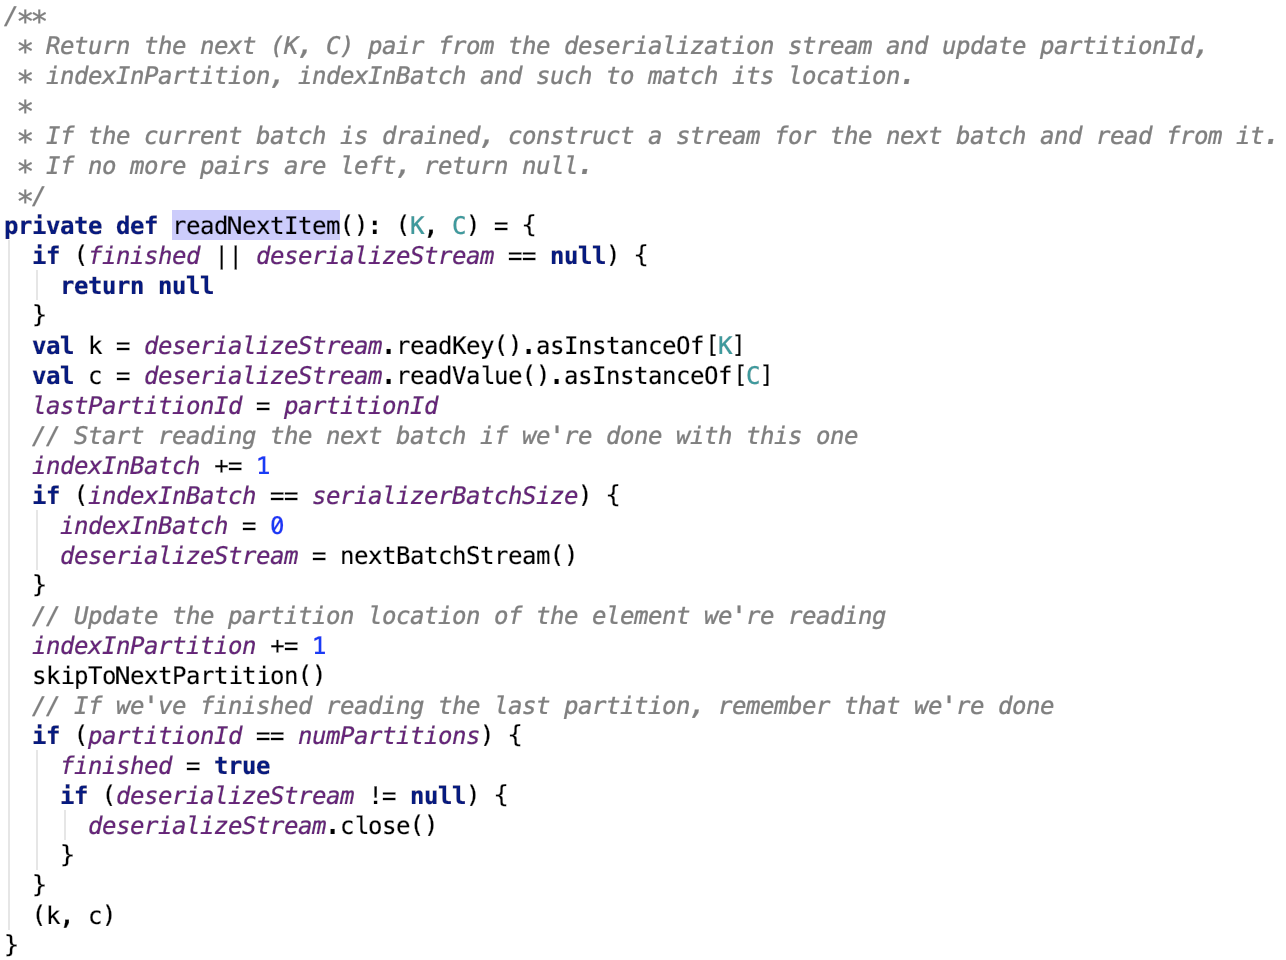
思路:首先该批次数据读取完毕,则关闭掉读取该批次数据的流,继续读取下一个批次的流。
其依赖方法 org.apache.spark.util.collection.ExternalSorter.SpillReader#skipToNextPartition 方法如下:
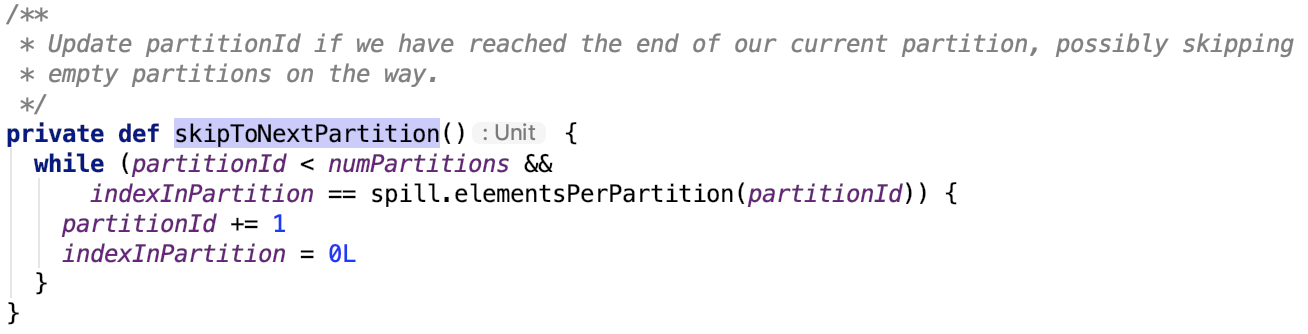
下面,整理一下思路:
每次读取一个文件的分区,该分区读取完毕,关闭分区文件,读取下一个文件的下一个分区数据。只不过它在读文件的分区的时候,会有batch操作,一个分区可能会对应多个batch,但是一个batch有且只能有一个分区。
7、SpillableIterator
首先它跟 org.apache.spark.util.collection.ExternalAppendOnlyMap.SpillableIterator 很像, 实现方法也很类似,都是实现了一个Iterator trait,构造方法以一个Iterator对象传入,并且对其做了封装,可以跟上文的 SpillableIterator 对比剖析。
其成员变量如下:
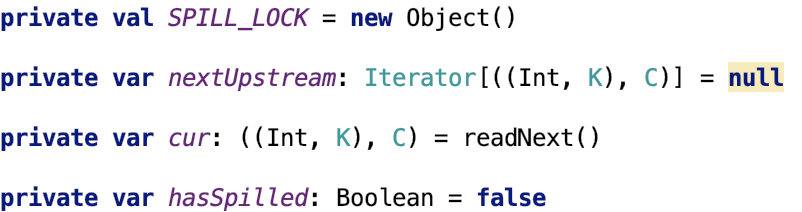
nextUpStream:下一个批次的stream
1、对Iterator的实现
先来看Iterator的方法实现:
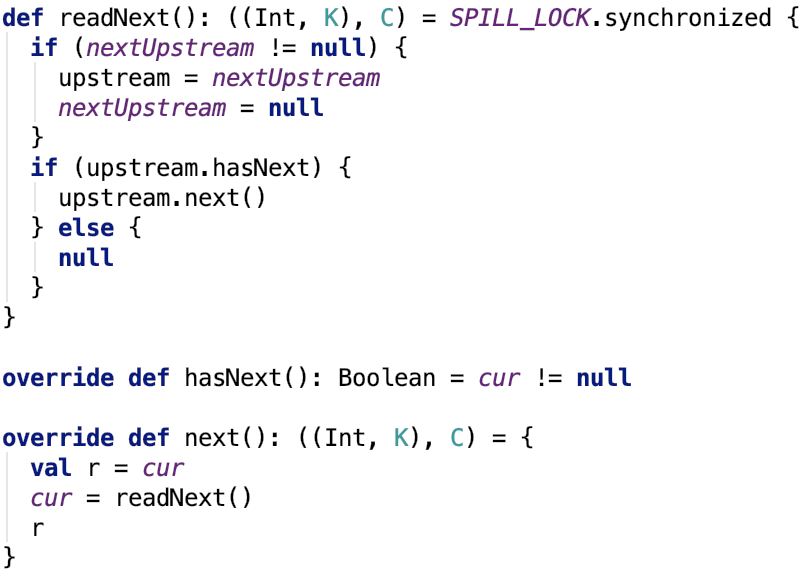
2、溢出
其源码如下:
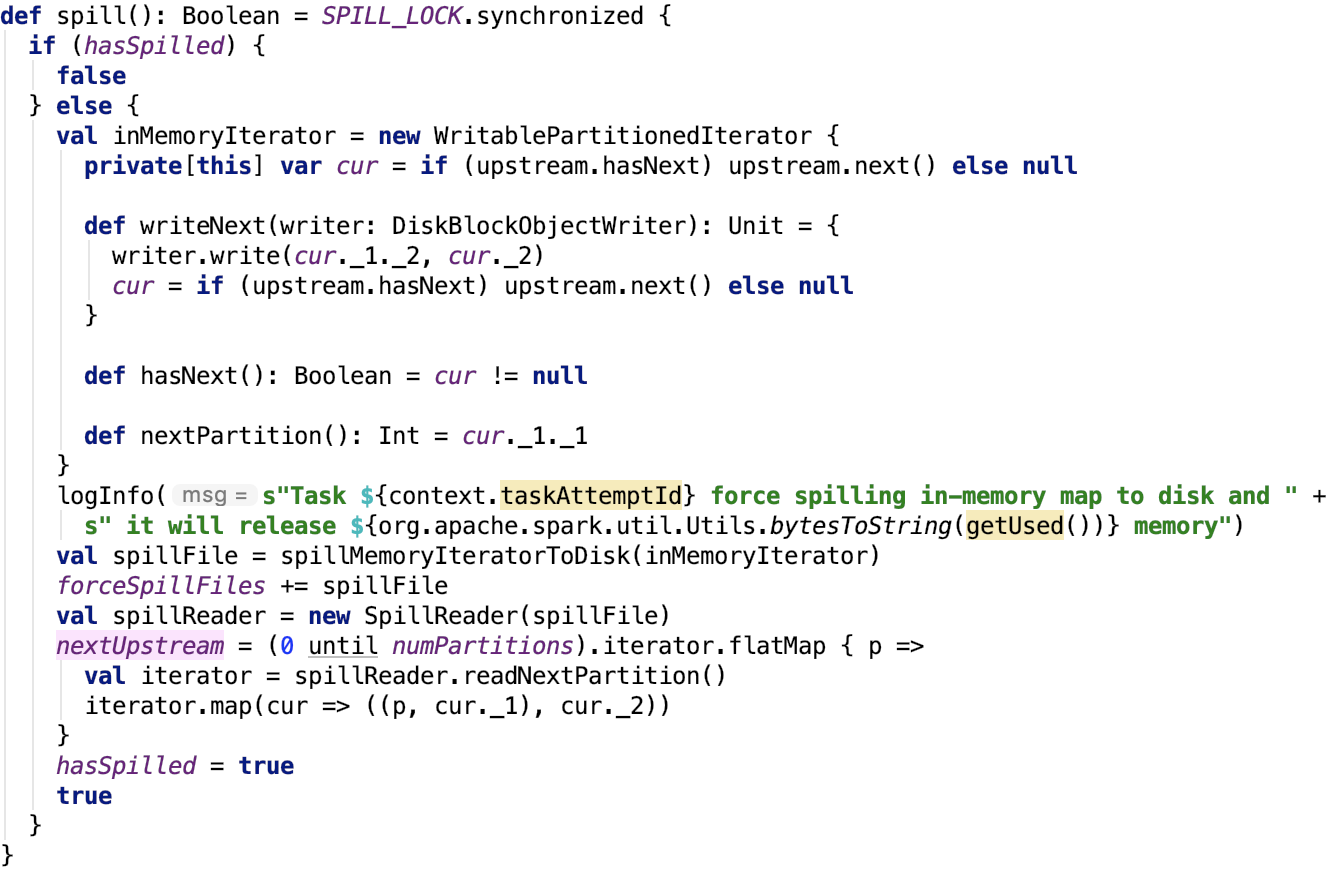
思路如下:首先创建内存迭代器,然后遍历内存迭代器,将数据溢出到磁盘中,其关键方法 spillMemoryIteratorToDisk。
8、两种存放溢出前数据的数据结构
1、PartitionedAppendOnlyMap
它是SizeTrackingAppendOnlyMap和 WritablePartitionPairCollection的子类。
其源码如下:
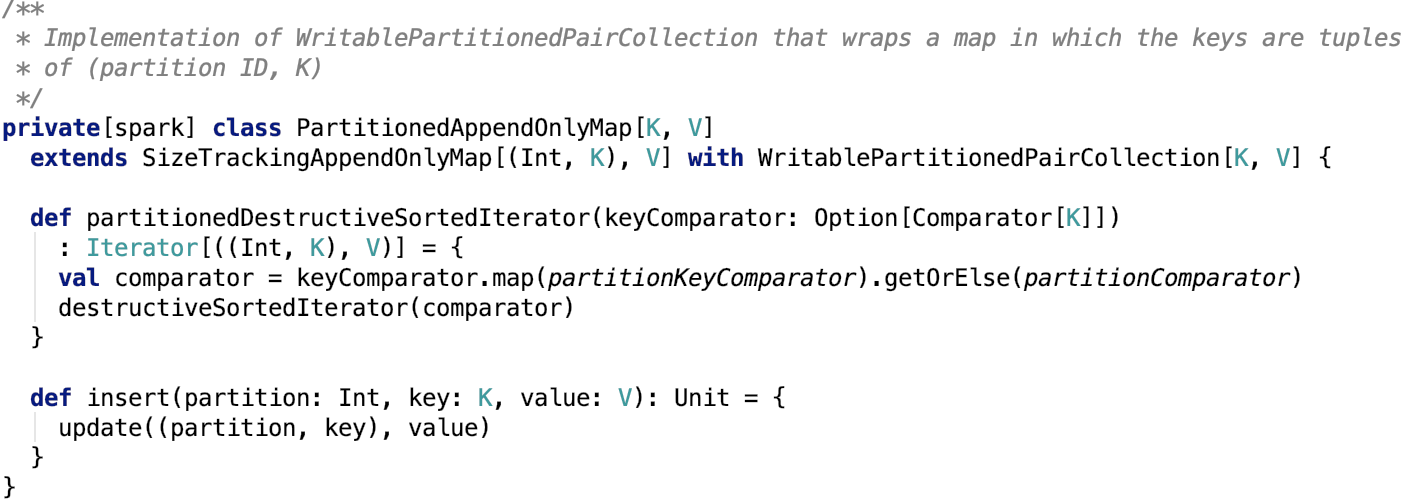
2、PartitionedPairBuffer
这个类底层是数组,数据按数组的形式紧凑排列。不支持多个相同key的预聚合操作。
它是SizeTracker 和 WritablePartitionPairCollection的子类。
其源码如下:
插入数据
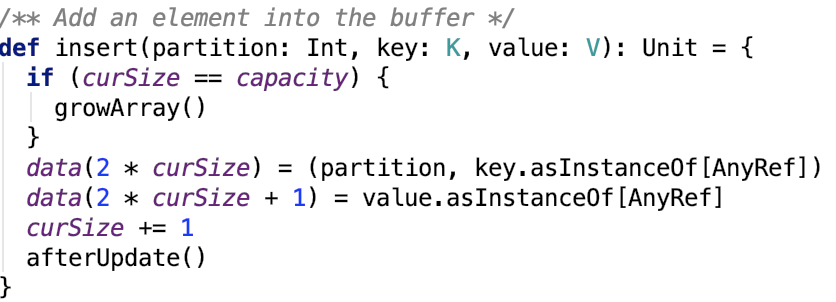
数组扩容
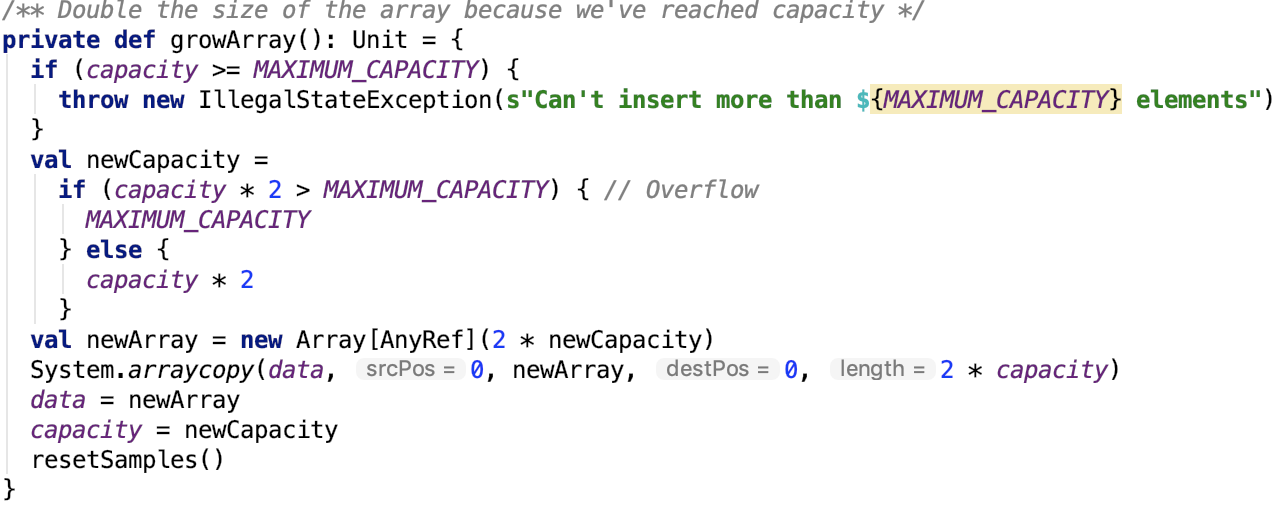
获取排序后的迭代器

获取读取数组数据的迭代器

下面来看最后一种shuffle数据写的方式。
9、使用SortShuffleWriter写数据
这种shuffle方式支持预聚合操作。
其下操作源码如下:
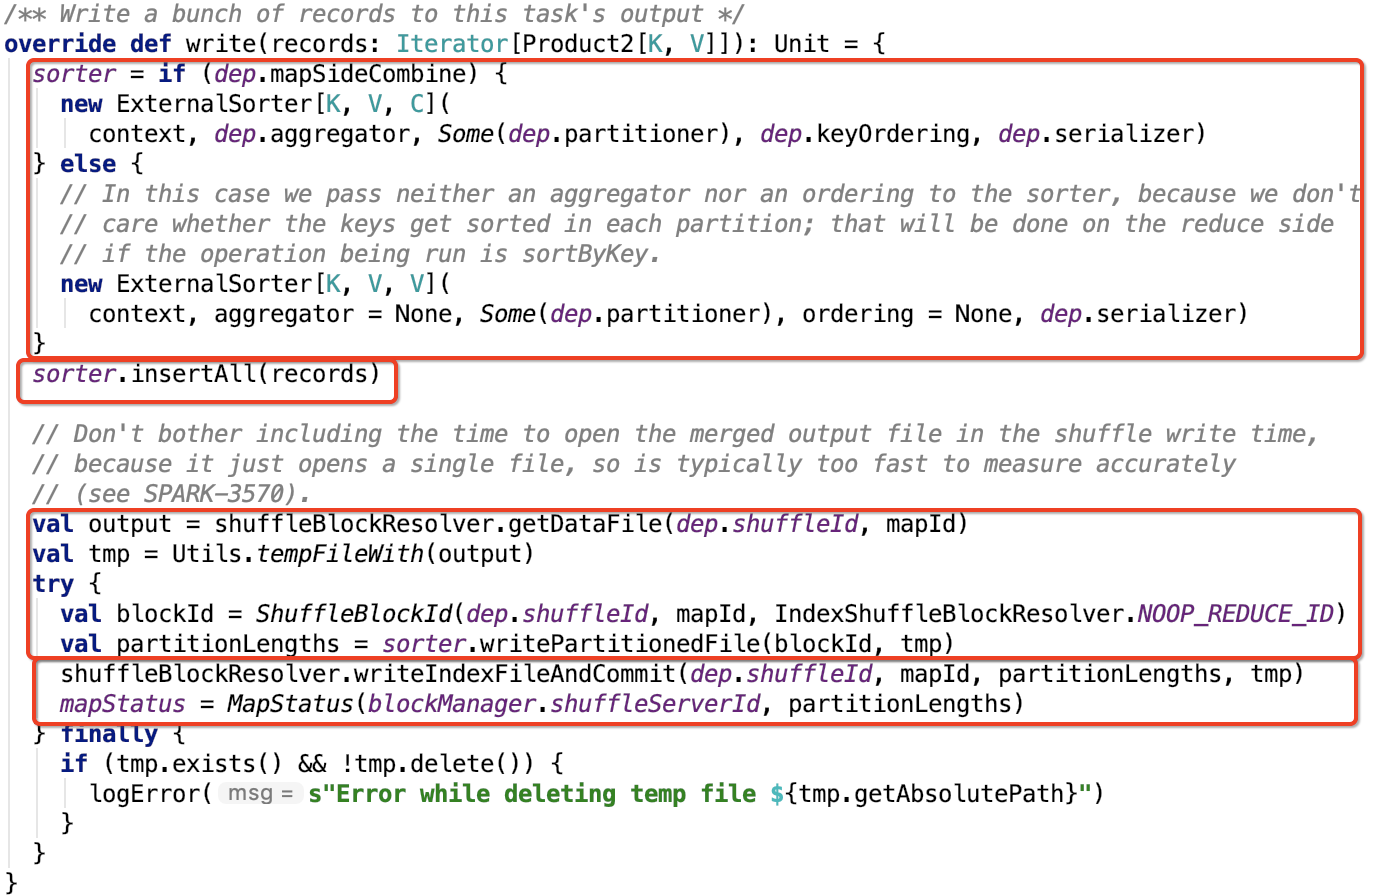
1、初始化Sorter
如果需要在map段做combine操作,则需要指定 aggragator和 keyOrdering,即map端的数据会做预聚合操作,并且分区内的数据有序,其排序规则是按照hashCode做排序的。
否则这两个参数为null,即map端的数据没有预聚合,并且分区内数据无序。
2、向sorter插入数据
其源码如下:

org.apache.spark.util.collection.ExternalSorter#insertAll的源码如下:
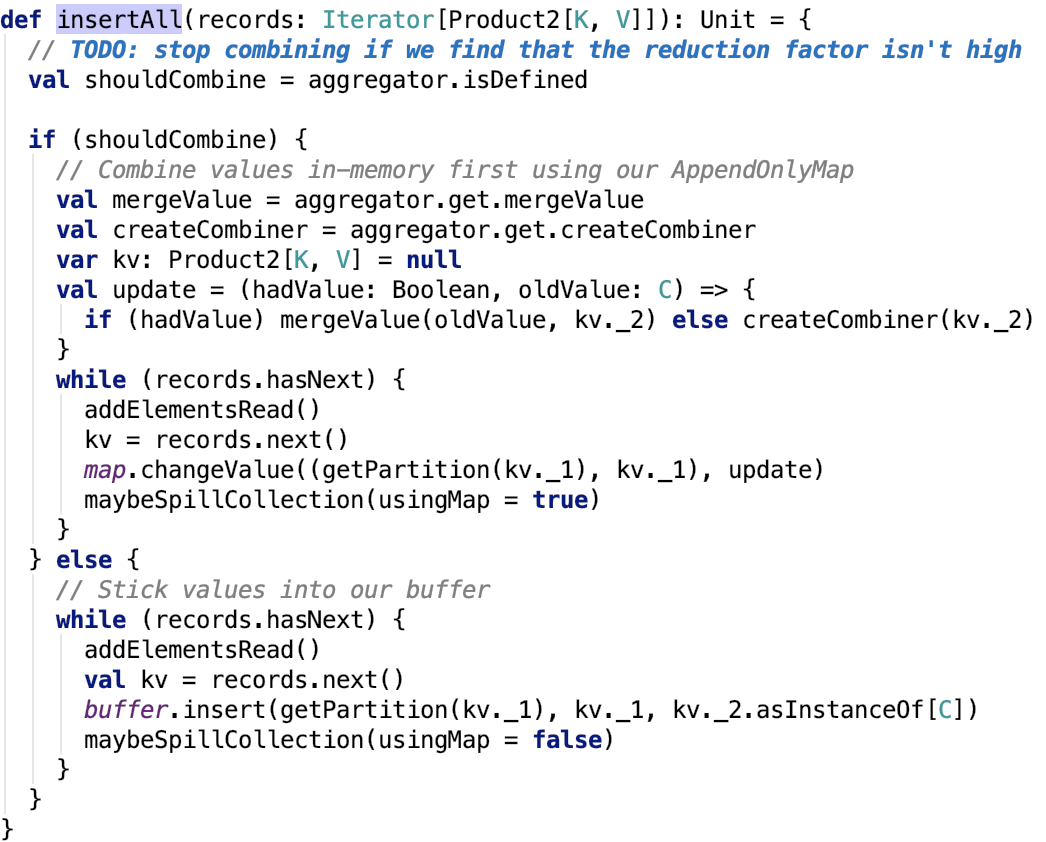
思路:首先如果数据需要执行map端的combine操作,则使用 PartitionedAppendOnlyMap 类来操作,这个类可以支持数据的combine操作。如果不需要 执行map 端的combine 操作,则使用 PartitionedPairBuffer 来实现,这个类不会对数据进行预聚合。每次数据写入之后,都要查看是否需要执行溢出内存数据到磁盘的操作。
这两个类在上文中已经做了详细的说明。
其依赖方法 addElementsRead 源码如下:

溢出内存数据到磁盘的核心方法 maybeSpillCollection 源码如下:

思路:它有一个标志位 usingMap表示是否使用的是map的数据结构,即是否是 PartitionedAppendOnlyMap,其思路几乎一样,只不过在调用 mayBeSpill 方法中传入的参数不一样。其中使用的内存的大小,都是经过采样评估计算过的。其依赖方法 org.apache.spark.util.collection.Spillable#maybeSpill 如下:

思路:如果读取的数据是 32 的整数倍并且当前使用的内存比初始内存大,则开始向TaskMemoryManager申请分配内存,如果申请成功,则返回申请的大小,注意:在向TaskMemoryManager申请内存的过程中,如果内存不够,也会去调用 org.apache.spark.util.collection.Spillable#spill 方法,在其内部也会去调用 org.apache.spark.util.collection.ExternalSorter#forceSpill 方法其源码如下,其中readingIterator是SpillableIterator类型的对象。
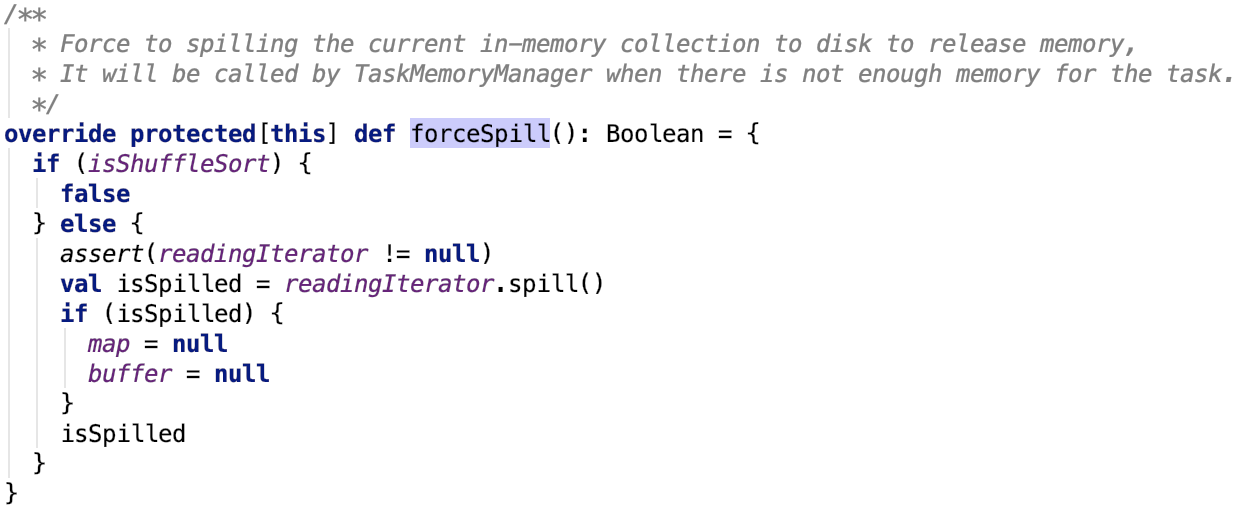
其依赖方法 org.apache.spark.util.collection.Spillable#logSpillage 会打印一些溢出日志。不再过多说明。
其依赖方法 org.apache.spark.util.collection.ExternalSorter#spill 源码如下:
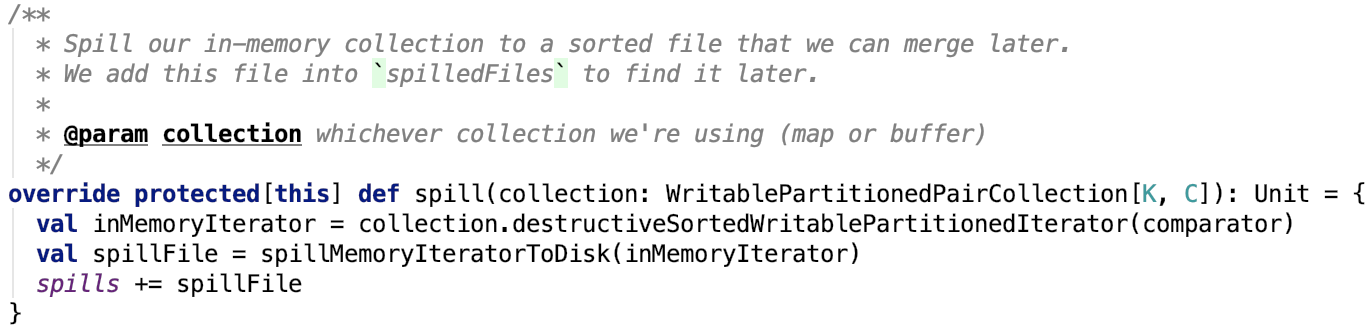
思路相对比较简单,主要是先获取排序后集合的迭代器,然后将迭代器传入 org.apache.spark.util.collection.ExternalSorter#spillMemoryIteratorToDisk ,将内存数据溢出到临时的磁盘文件后返回一个SpilledFile对象,将其记录到 spills中,spills这个变量主要记录了内存数据的溢出过程中的溢出文件的信息。
其溢出磁盘方法 org.apache.spark.util.collection.ExternalSorter#spillMemoryIteratorToDisk 源码如下:
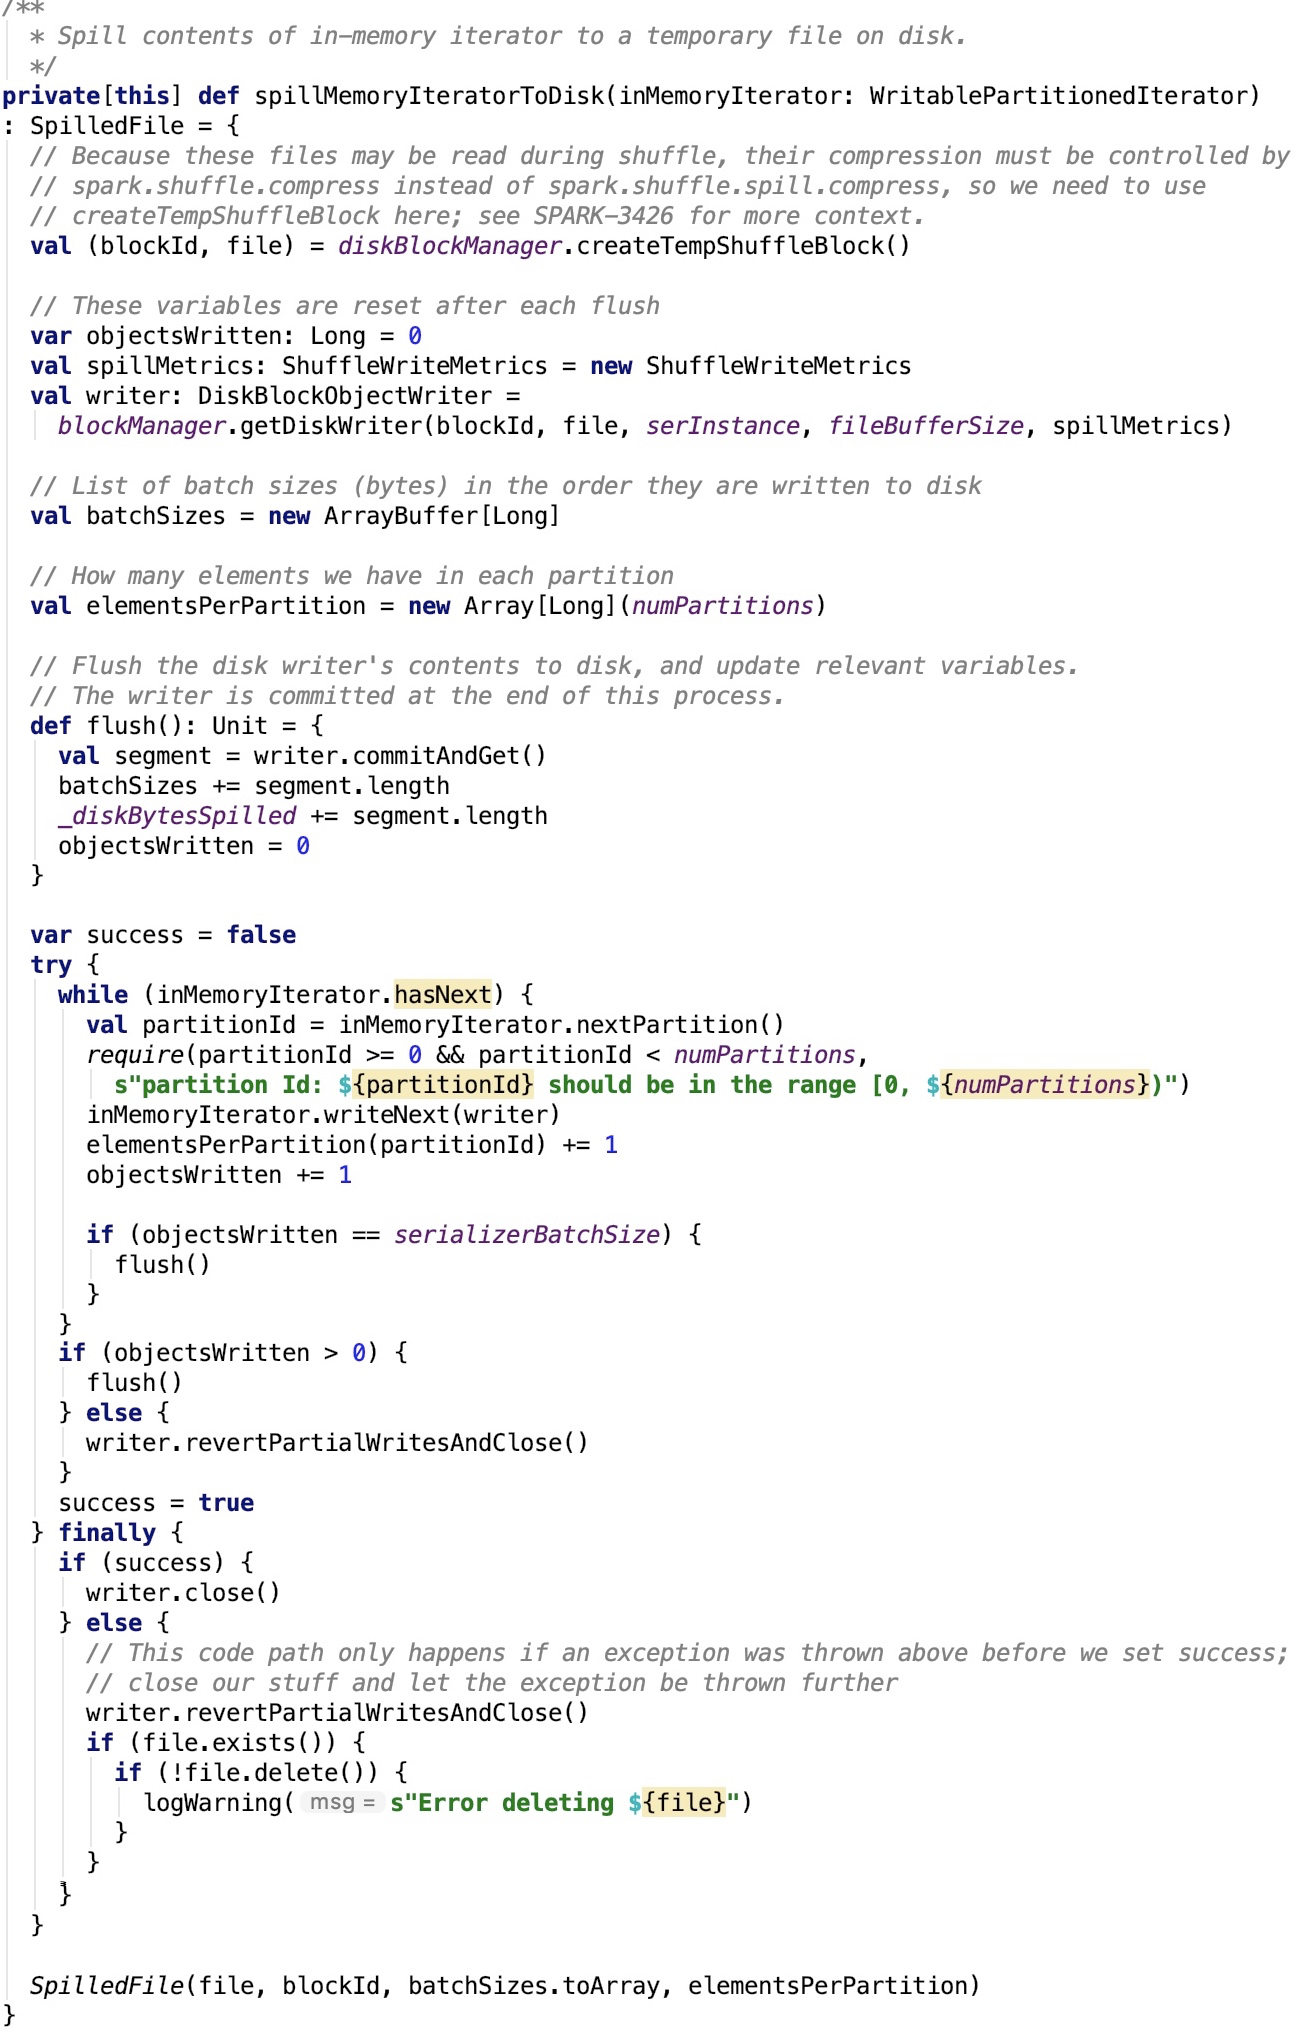
首先获取写序列化文件的writer,然后遍历数据的迭代器,将数据迭代写入到磁盘中,在写入过程中,不断将每一个分区的大小信息以及每一个分区内元素的个数记录下来,最终将溢出文件、分区元素个数,以及每一个segment的大小信息封装到SpilledFile对象中返回。
3、多文件归并为一个文件
其核心代码如下:

思路:首先先初始化一个临时的最终文件(以uuid作为后缀),然后初始化blockId,最后调用 org.apache.spark.util.collection.ExternalSorter的writePartitionedFile 方法。将数据写入一个临时文件,并将该文件中每一个分区对应的FileSegment的大小返回。
其关键方法 org.apache.spark.util.collection.ExternalSorter#writePartitionedFile 源码如下:

思路:首先如果从来没有过溢出文件,则首先先看一下是否需要map端聚合,若是需要,则数据已经被写入到了map中,否则是buffer中。然后调用集合的转成迭代器的方法,将内存的数据排序后输出,最终迭代遍历这个迭代器,将数据不断写入到最终的临时文件中,更新分区大小返回。
如果之前已经有溢出文件了,则先调用 org.apache.spark.util.collection.ExternalSorter的partitionedIterator 方法将数据合并后返回合并后的迭代器。
最终遍历每一个分区的数据,将分区的数据写入到最终的临时文件,更新分区大小;最后返回分区大小。
下面重点剖析一下合并方法 org.apache.spark.util.collection.ExternalSorter#partitionedIterator,其源码如下:

首先,要说明的是,通过我们上面的程序分支进入该程序,此时历史溢出文件集合是空的,即它不会执行第一个分支的处理流程,但还是要做一下简单的说明。
它有三个依赖方法分别如下:
依赖方法 org.apache.spark.util.collection.ExternalSorter#destructiveIterator 源码如下:

思路:首先 isShuffleSort为 true,我们现在就是走的 shuffle sort的流程,肯定是需要走第一个分支的,即它不会返回一个SpillableIterator迭代器。
值得注意的是,这里的comparator跟内存排序使用的comparator是一样的,即排序方式是一样的。
依赖方法 org.apache.spark.util.collection.ExternalSorter#groupByPartition 源码如下:
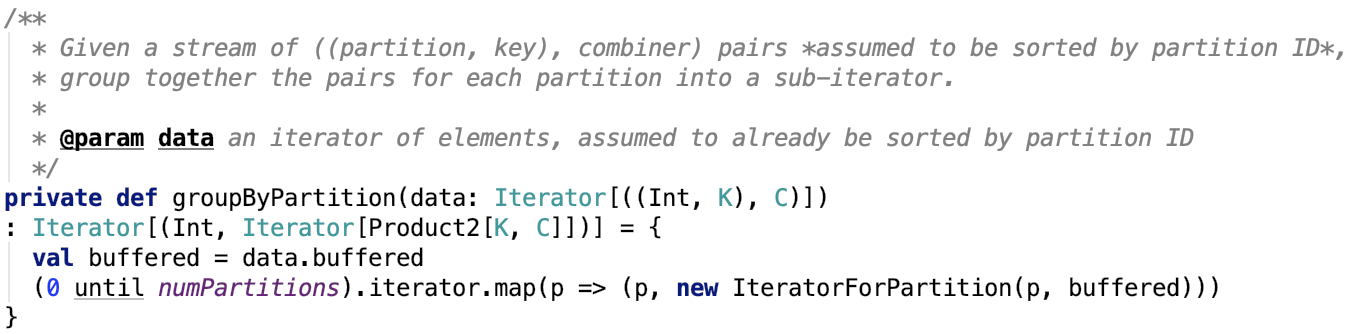
思路:遍历每一个分区返回一个IteratorForPartition的分区迭代器。
注意:由于历史溢出文件集合此时不为空,将不会调用这个方法。
依赖方法 org.apache.spark.util.collection.ExternalSorter#merge 源码如下:

思路:传给merge方法的有两个参数,一个是代表溢出文件的SpiiledFile集合,一个是代表内存数据的迭代器。
首先遍历每一个溢出文件,创建一个读取该溢出文件的SpillReader对象,然后遍历每一个分区创建一个IteratorForPartition迭代器,然后读取每一个溢出文件的分区的迭代器,最终和 作为参数传入merge 方法的内存迭代器合并到一个迭代器集合中。
如果是需要预聚合的,则调用 mergeWithAggregation 方法,如果是需要排序的,则调用mergeSort 方法,对其进行排序,最后如果不满足前两种情况,调用集合的flatten 方法,将打平到一个迭代器中返回。
它有两个依赖方法,分别如下:
org.apache.spark.util.collection.ExternalSorter#mergeSort 源码如下:
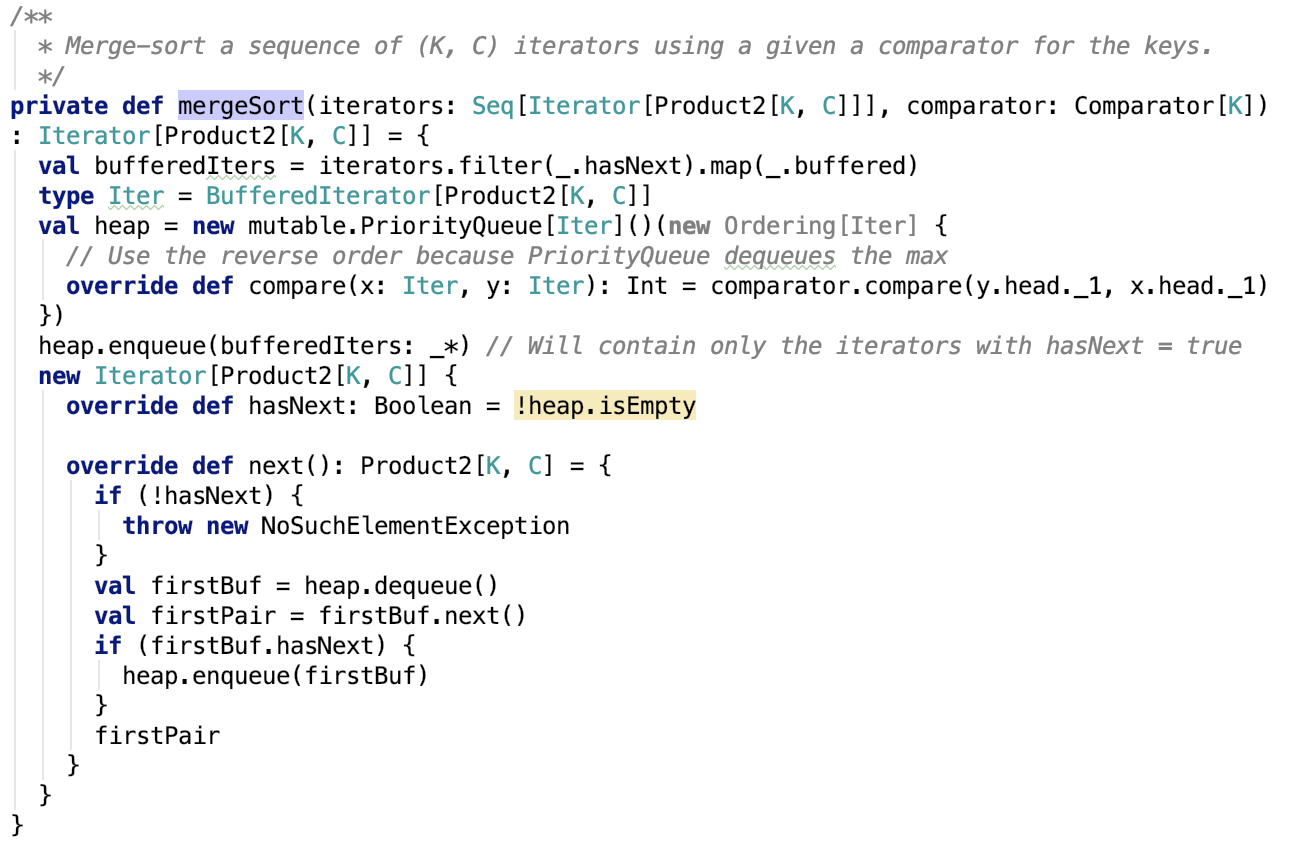
思路:使用堆排序构造优先队列,对数据进行排序,最终返回一个迭代器。每次先从堆中根据partitionID排序,将同一个partition的排到前面,每次取出一个Iterator,然后取出该Iterator中的一个元素,再放入堆中,因为可能取出一个元素后,Iterator的头节点的partitionId改变了,所以需要再次排序,就这样动态的出堆入堆,让不同Iterator的相同partition的数据总是在一起被迭代取出。注意这里的comparator在指定ordering或aggragator的时候,是支持二级排序的,即不仅仅支持分区排序,还支持分区内的数据按key进行排序,其排序器源码如下:
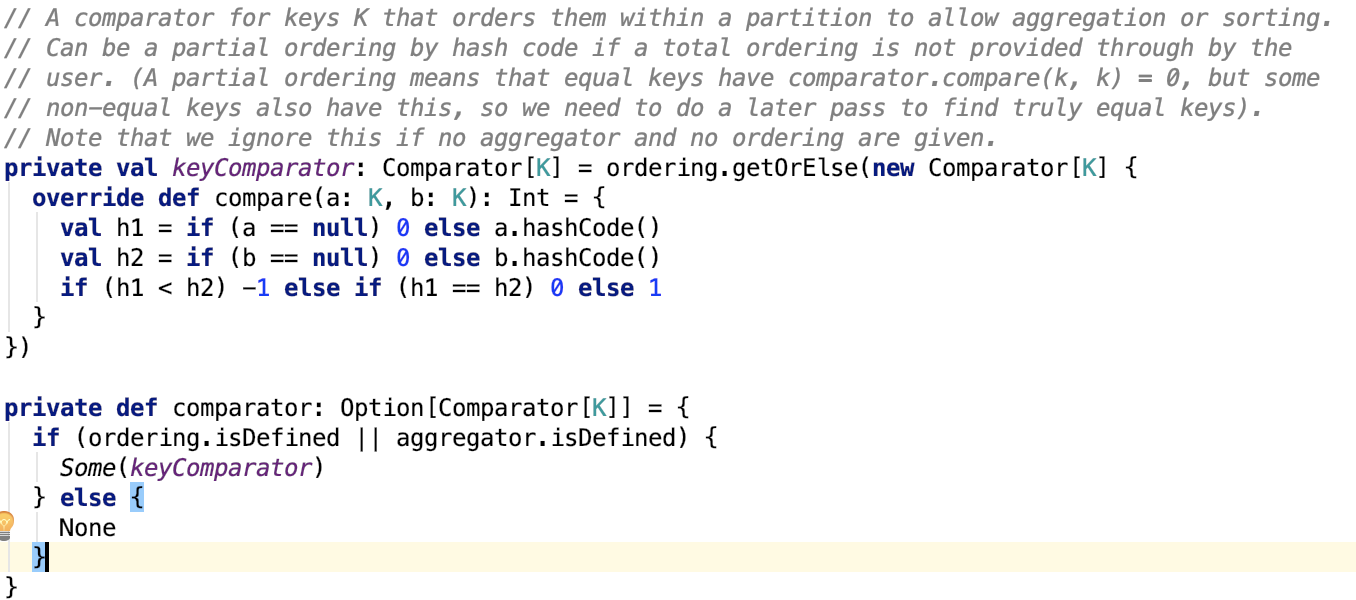
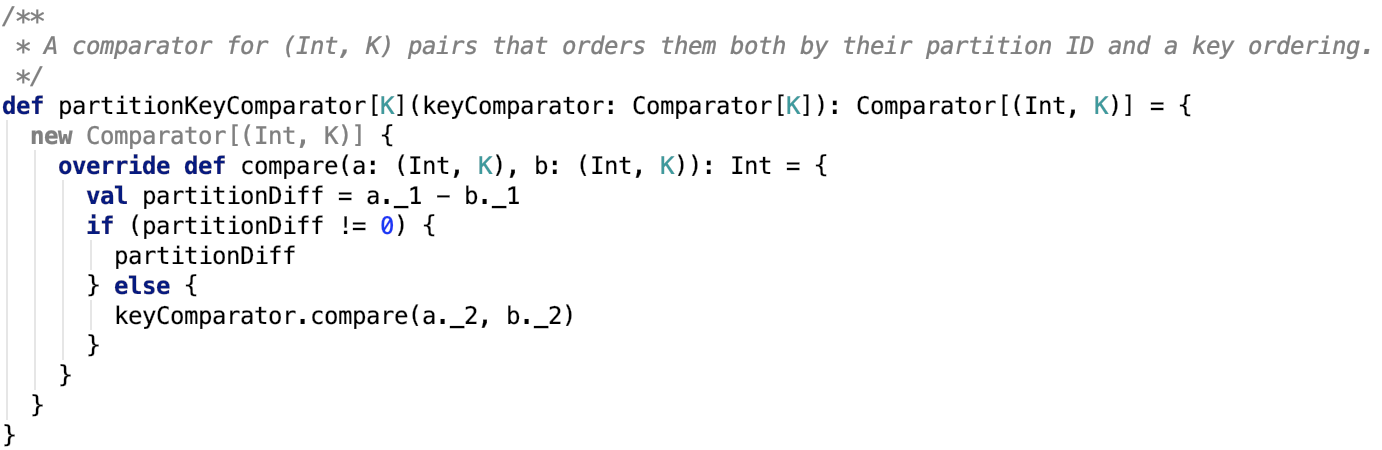
如果ordering和aggragator没有指定,则数据排序器为:
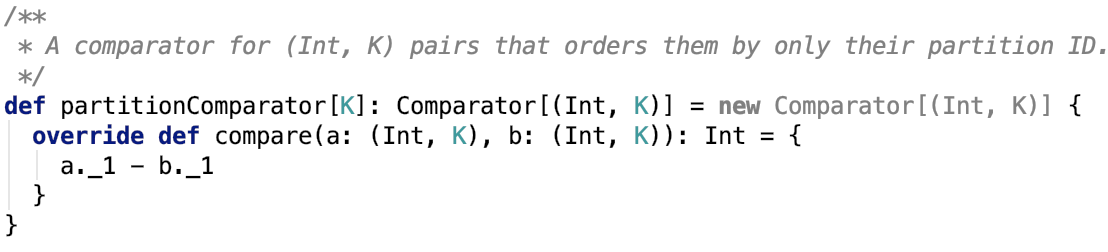
即只按分区排序,跟第二种shuffle的最终格式很类似,分区内部数据无序。
org.apache.spark.util.collection.ExternalSorter#mergeWithAggregation源码如下:

思路:如果数据整体并不要求有序,则会使用combiner将数据整体进行combine操作,最终相同key的数据被聚合在一起。如果数据整体要求有序,则直接对有序的数据按照顺序一边聚合一边迭代输出下一个元素,最终数据是整体有序的。
4、创建索引文件
其关键源码如下:

其思路很简单,可以参考 spark shuffle写操作三部曲之UnsafeShuffleWriter 对应部分的说明。
10、总结
在本篇文章中,剖析了spark shuffle的最后一种写方式。溢出前数据使用数组自定义的Map或者是列表来保存,如果指定了aggerator,则使用Map结构,Map数据结构支持map端的预聚合操作,但是列表方式的不支持预聚合。
数据每次溢出数据都进行排序,如果指定了ordering,则先按分区排序,再按每个分区内的key排序,最终数据溢出到磁盘中的临时文件中,在merge阶段,数据被SpillReader读取出来和未溢出的数据整体排序,最终数据可以整体有序的落到最终的数据文件中。
至此,spark shuffle的三种写方式都剖析完了。之后会有文章来剖析shuffle的读取操作。
九、spark shuffle读操作
1、提出问题
-
shuffle过程的数据是如何传输过来的,是按文件来传输,还是只传输该reduce对应在文件中的那部分数据?
-
shuffle读过程是否有溢出操作?是如何处理的?
-
shuffle读过程是否可以排序、聚合?是如何做的?
。。。。。。
2、概述
1、计算或者读取RDD
org.apache.spark.rdd.RDD#iterator源码如下,它是一个final方法,只在此有实现,子类不允许重实现这个方法:
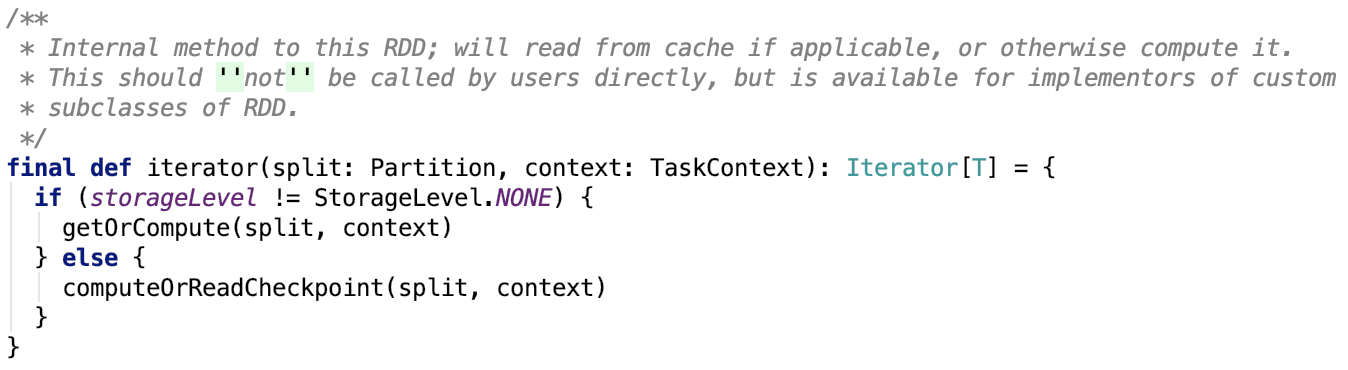
思路:如果是已经缓存下来了,则调用 org.apache.spark.rdd.RDD#getOrCompute 方法,通过底层的存储系统或者重新计算来获取父RDD的map数据。否则调用 org.apache.spark.rdd.RDD#computeOrReadCheckpoint ,从checkpoint中读取或者是通过计算来来获取父RDD的map数据。
我们逐一来看其依赖方法:
org.apache.spark.rdd.RDD#getOrCompute 源码如下:
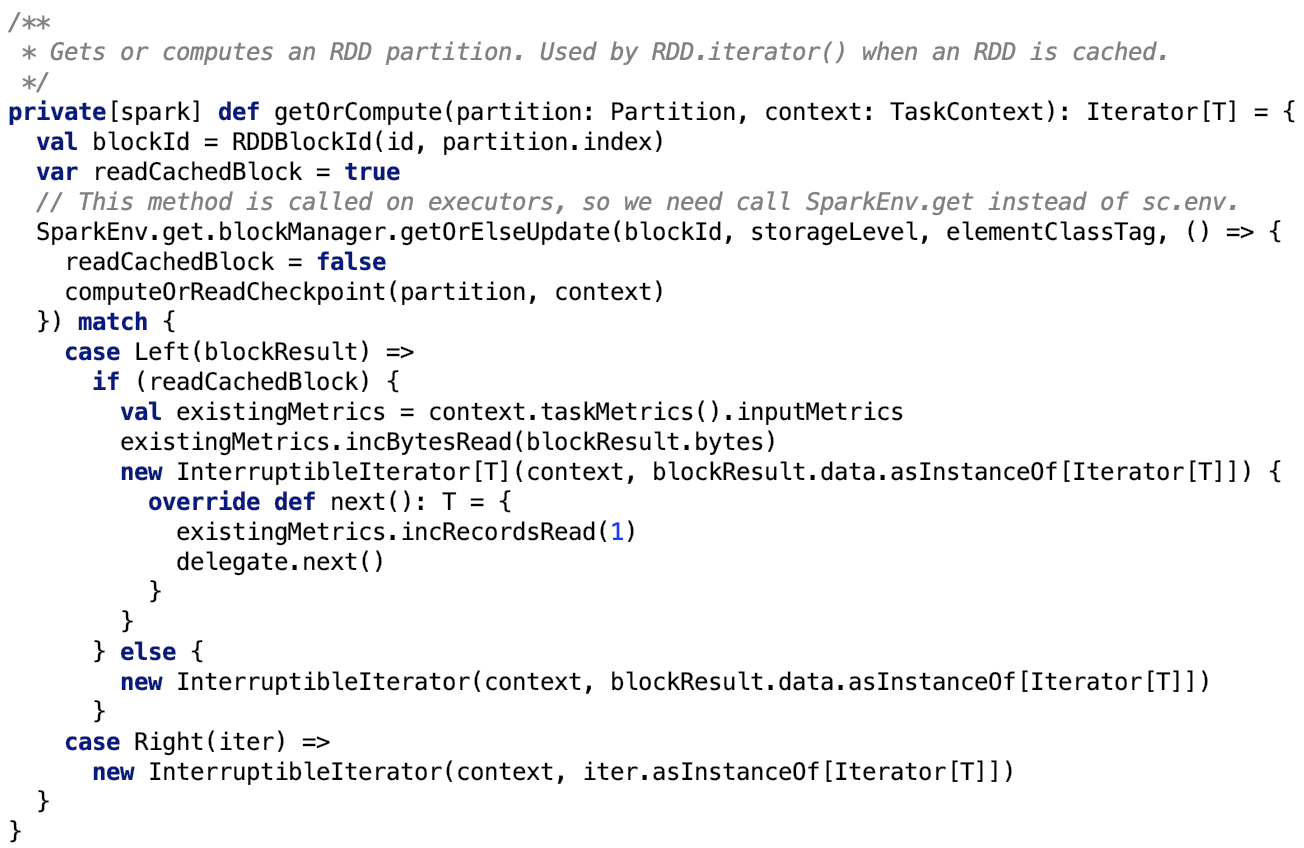
首先先通过Spark底层的存储系统获取 block。如果底层存储没有则调用 org.apache.spark.rdd.RDD#computeOrReadCheckpoint,其源码如下:

主要通过三种途径获取数据 -- 通过spark 底层的存储系统、通过父RDD的checkpoint、直接计算。
2、处理返回的数据
读取完毕之后,数据的处理基本上一样,都使用 org.apache.spark.InterruptibleIterator 以迭代器的形式返回,org.apache.spark.InterruptibleIterator 源码如下:
比较简单,使用委托模式,将迭代下一个行为委托给受委托类。
下面我们逐一来看三种获取数据的实现细节。
3、通过spark 底层的存储系统
其核心源码如下:

思路:首先先从本地或者是远程executor中的存储系统中获取到block,如果是block存在,则直接返回,如果不存在,则调用 computeOrReadCheckpoint计算或者通过读取父RDD的checkpoint来获取RDD的分区信息,并且将根据其持久化级别(即StorageLevel)将数据做持久化。 关于持久化的内容 可以参考 Spark 源码分析系列 中的 Spark存储部分 做深入了解。
4、通过父RDD的checkpoint
其核心源码如下:

通过父RDD的checkpoint也是需要通过spark底层存储系统或者是直接计算来得出数据的。
不做过多的说明。
下面我们直接进入主题,看shuffle的读操作是如何进行的。
5、直接计算
其核心方法如下:

首先,org.apache.spark.rdd.RDD#compute是一个抽象方法。
我们来看shuffle过程reduce的读map数据的实现。
表示shuffle结果的是 org.apache.spark.rdd.ShuffledRDD。
其compute 方法如下:

整体思路:首先从 shuffleManager中获取一个 ShuffleReader 对象,并调用该reader对象的read方法将数据读取出来,最后将读取结果强转为Iterator[(K,C)]
该shuffleManager指的是org.apache.spark.shuffle.sort.SortShuffleManager。
其 getReader 源码如下:
简单来说明一下参数:
handle:是一个ShuffleHandle的实例,它有三个子类,可以参照 spark shuffle的写操作之准备工作 做深入了解。
startPartition:表示开始partition的index
endPartition:表示结束的partition的index
context:表示Task执行的上下文对象
其返回的是一个 org.apache.spark.shuffle.BlockStoreShuffleReader 对象,下面直接来看这个对象。
6、BlockStoreShuffleReader
这个类的继承关系如下:
其中ShuffleReader的说明如下:
Obtained inside a reduce task to read combined records from the mappers.
ShuffleReader只有一个read方法,其子类BlockStoreShuffleReader也比较简单,也只有一个实现了的read方法。
下面我们直接来看这个方法的源码。

在上图,把整个流程划分为5个步骤 -- 获取block输入流、反序列化输入流、添加监控、数据聚合、数据排序。
下面我们分别来看这5个步骤。这5个流程中输入流和迭代器都没有把大数据量的数据一次性全部加载到内存中。并且即使在数据聚合和数据排序阶段也没有,但是会有数据溢出的操作。我们下面具体来看每一步的具体流程是如何进行的。
7、获取block输入流
其核心源码如下:

我们先来对 ShuffleBlockFetcherIterator 做进一步了解。
1、使用ShuffleBlockFetcherIterator获取输入流
这个类就是用来获取block的输入流的。
blockId等相关信息传入构造方法
其构造方法如下:

它继承了Iterator trait,是一个 [(BlockId,InputStream)] 的迭代器。
对构造方法参数做进一步说明:
context:TaskContext,是作业执行的上下文对象
shuffleClieent:默认为 NettyBlockTransferService,如果使用外部shuffle系统则使用 ExternalShuffleClient
blockManager:底层存储系统的核心类
blocksByAddress:需要的block的blockManager的信息以及block的信息。
通过 org.apache.spark.MapOutputTracker#getMapSizesByExecutorId 获取,其源码如下:
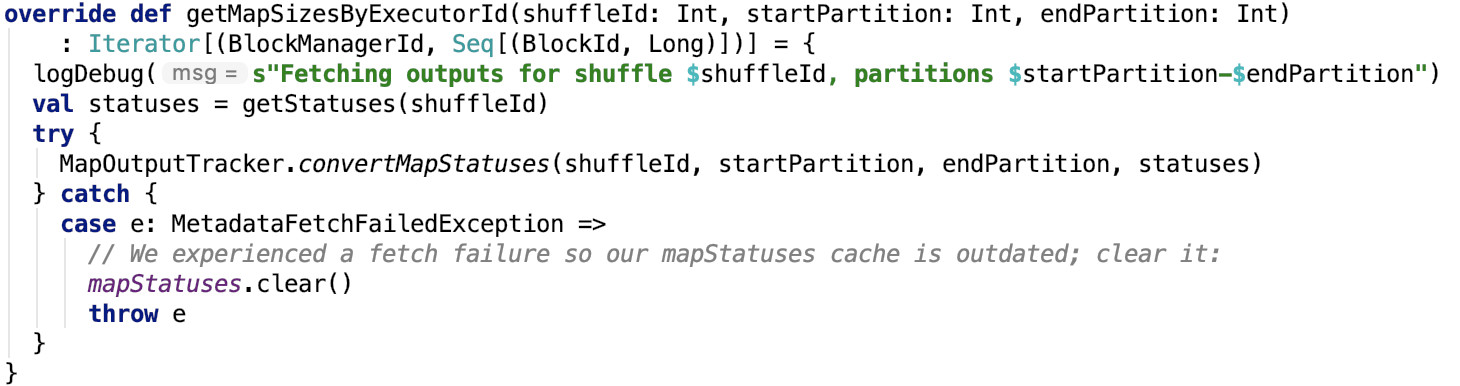
org.apache.spark.MapOutputTrackerWorker#getStatuses 其源码如下:
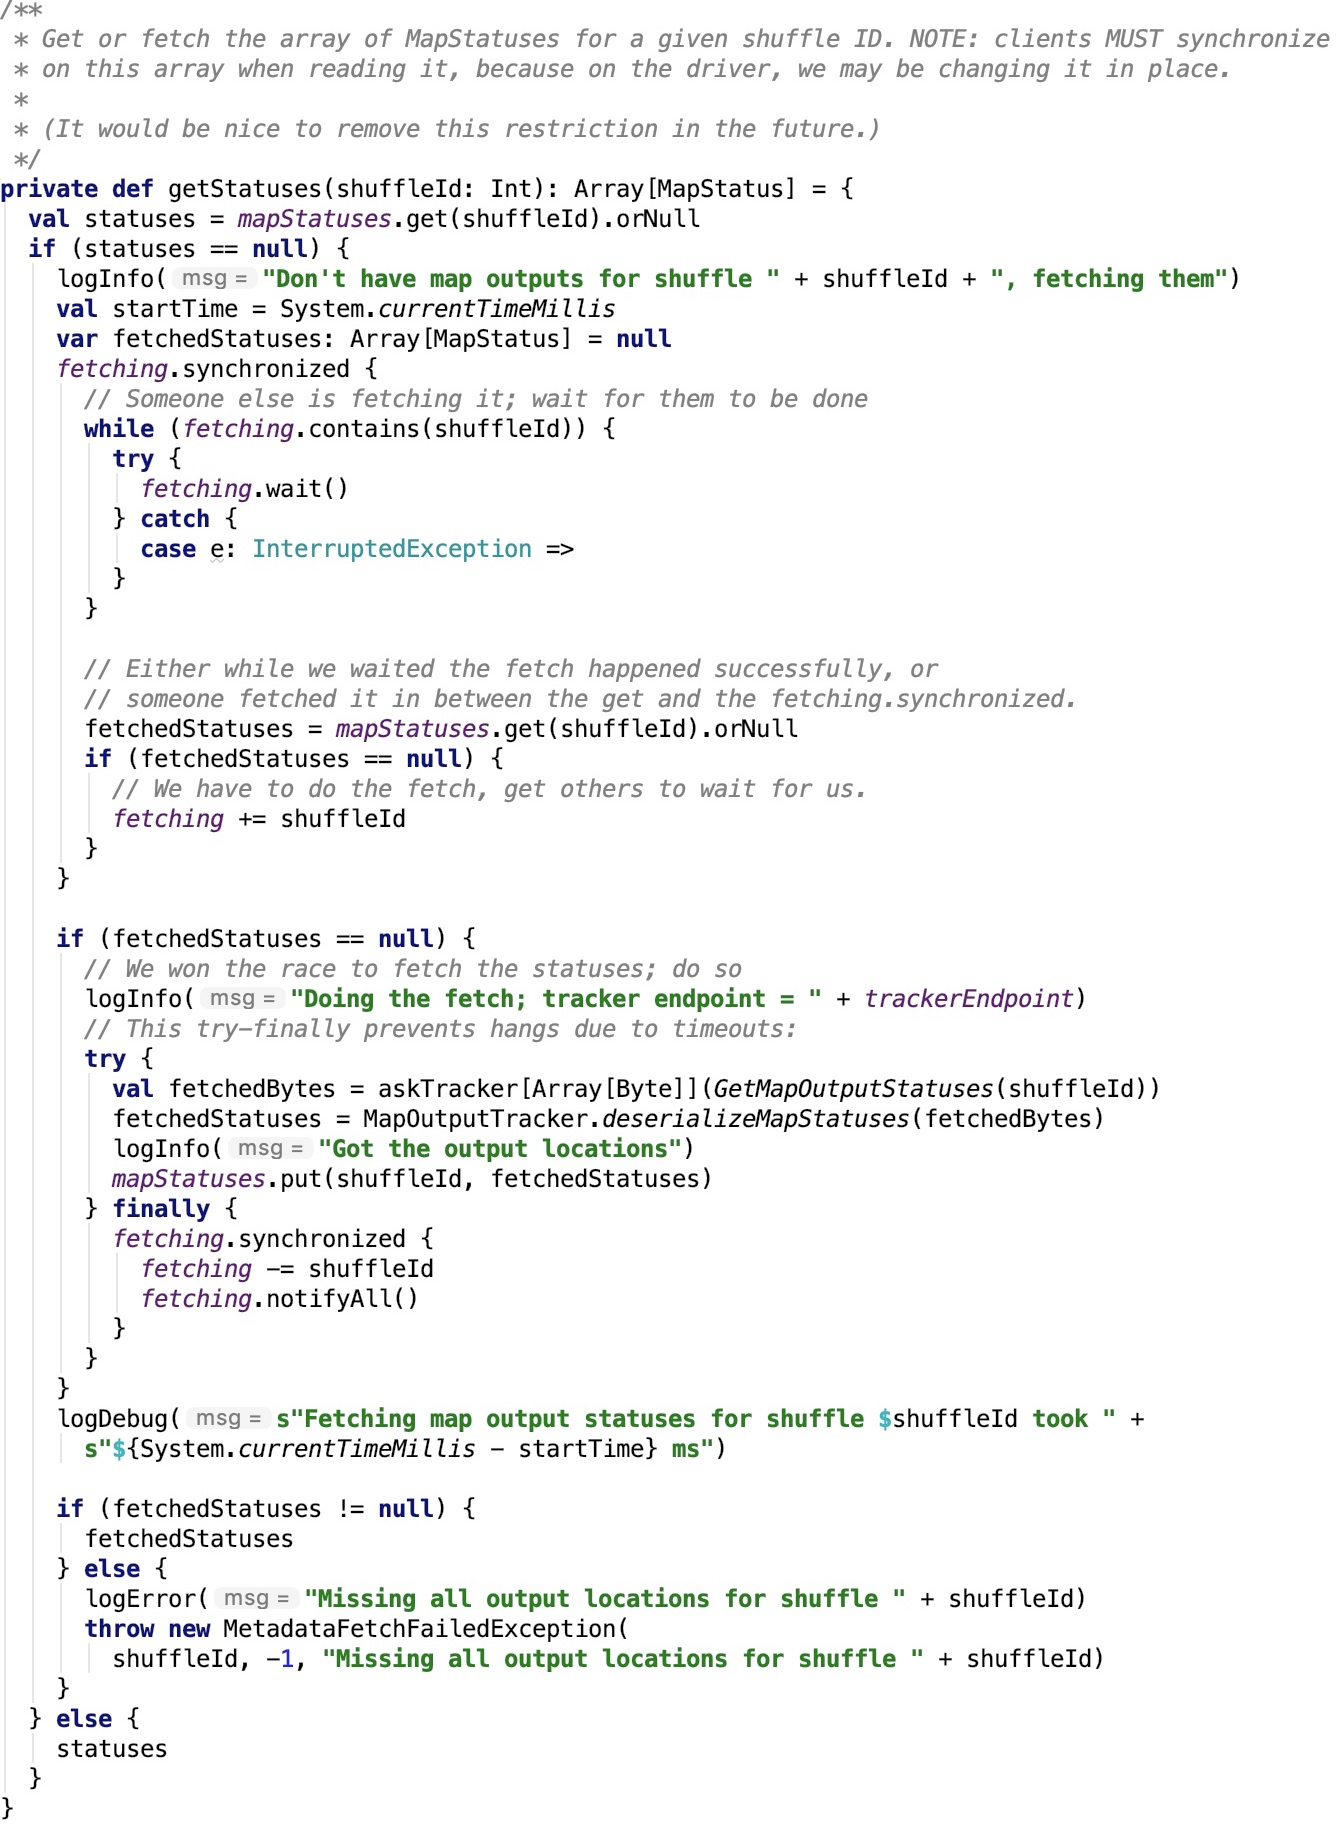
思路:如果有shuffleId对应的MapStatus则返回,否则使用 MapOutputTrackerMasterEndpointRef 请求 driver端的 MapOutputTrackerMaster 返回 对应的MapStatus信息。
org.apache.spark.MapOutputTracker#convertMapStatuses 源码如下:

思路:将MapStatus转换为一个可以迭代查看BlockManagerId、BlockId以及对应大小的迭代器。
streamWrapper:输入流的解密以及解压缩操作的包装器,其依赖方法 org.apache.spark.serializer.SerializerManager#wrapStream 源码如下:

读取数据
在迭代方法next中不断去读取远程的block以及本地的block输入流。不做详细剖析,见 ShuffleBlockFetcherIterator.scala 中next 相关方法的剖析。
8、反序列化输入流
核心方法如下:
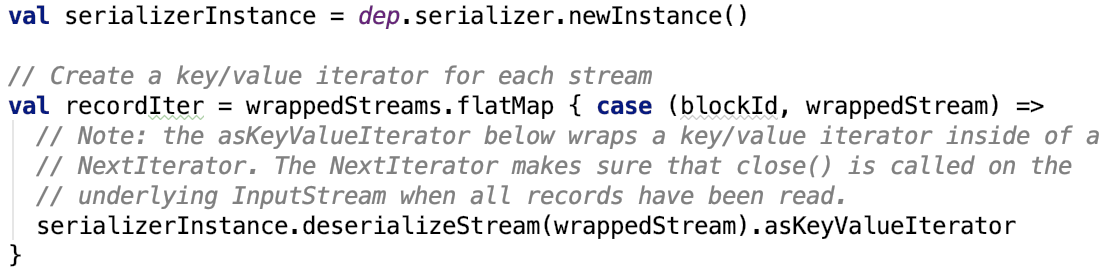
其依赖方法 scala.collection.Iterator#flatMap 源码如下:
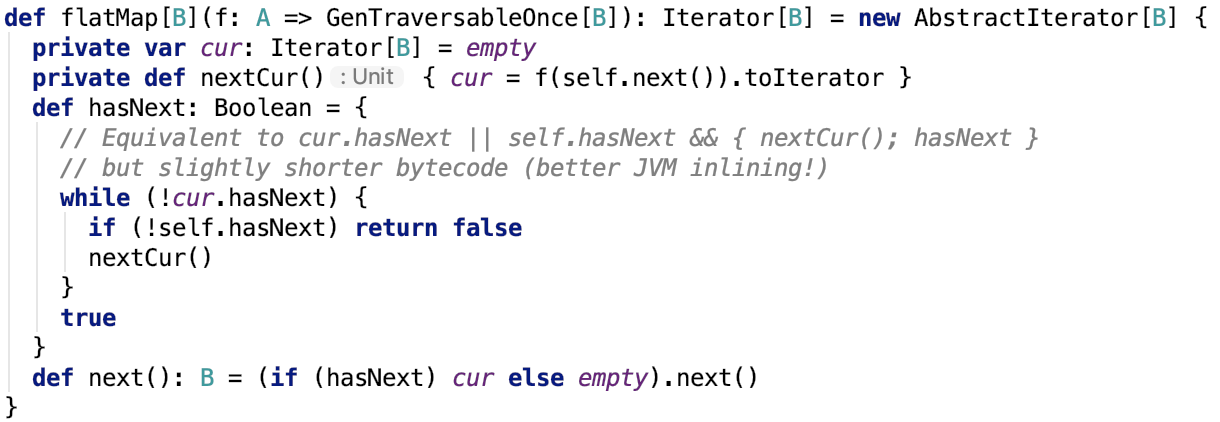
可见,即使是在这里,数据并没有全部落到内存中。流跟管道的概念很类似,数据并没有一次性加载到内存中。它只不过是在使用迭代器的不断衔接,最终形成了新的处理链。在这个链中的每一个环节,数据都是懒加载式的被加载到内存中,这在处理大数据量的时候是一个很好的技巧。当然也是责任链的一种具体实现方式。
9、添加监控
其实这一步跟上一步本质上区别并不大,都是在责任链上添加了一个新的环节,其核心源码如下:

其中,核心方法 scala.collection.Iterator#map 源码如下:
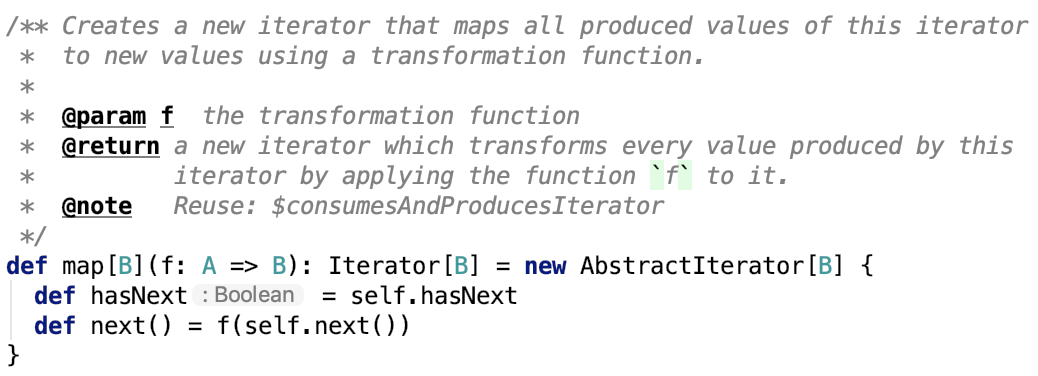
又是一个新的迭代器处理环节被加到责任链中。
10、数据聚合*
数据聚合其实也很简单。
其核心源码如下:
在聚合的过程中涉及到了数据的溢出操作,如果有溢出操作还涉及 ExternalSorter的溢出合并操作。
其核心源码不做进一步解释,有兴趣可以看 spark shuffle写操作三部曲之SortShuffleWriter 做进一步了解。
11、数据排序
数据排序其实也很简单。如果使用了排序,则使用ExternalSorter则在分区内部进行排序。
其核心源码如下:
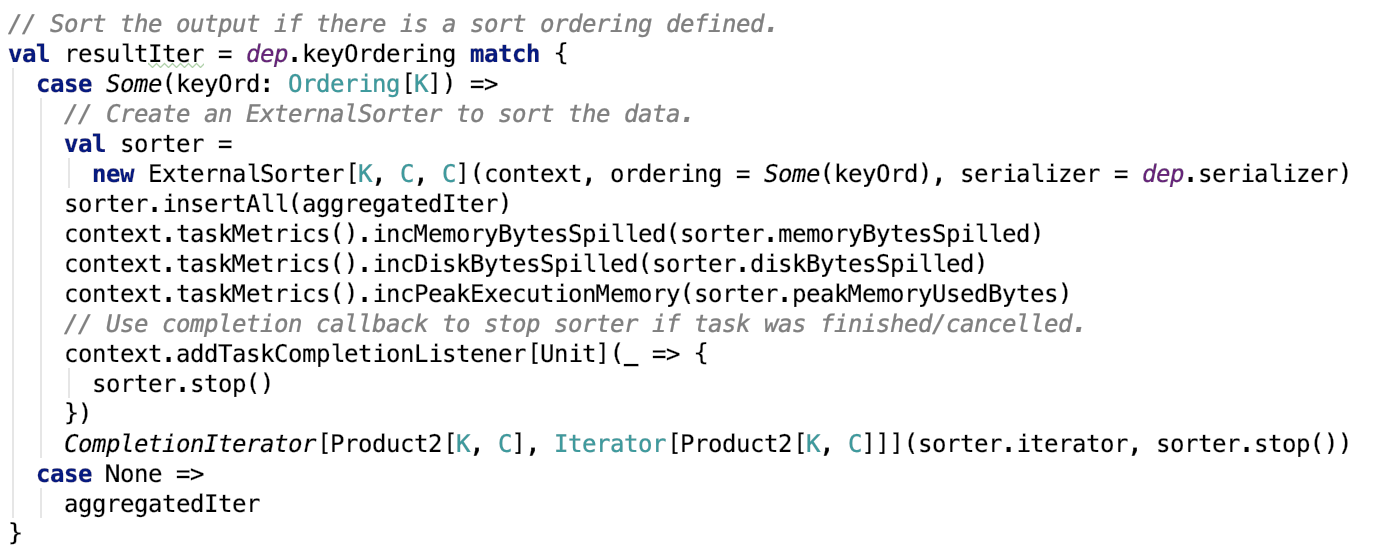
1、总结
主要从实现细节和设计思路上来说。
2、实现细节
首先在实现细节上,先使用ShuffleBlockFetcherIterator获取本地或远程节点上的block并转化为流,最终返回一小部分数据的迭代器,随后序列化、解压缩、解密流操作被放在一个迭代器中该迭代器后执行,然后添加了监控相关的迭代器、数据聚合相关的迭代器、数据排序相关的迭代器等等。这些迭代器保证了处理大量数据的高效性,在数据聚合和排序阶段,大数据量被不断溢出到磁盘中,数据最终还是以迭代器形式返回,确保了内存不会被大数据量占用,提高了数据的吞吐量和处理数据的高效性。
3、设计思路
在设计上,主要说三点:
-
责任链和迭代器的混合使用,即使得程序易扩展,处理环节可插拔,处理流程清晰易懂。
-
关于聚合和排序的使用,在前面文章中shuffle写操作也提到了,聚合和排序的类是独立出来的,跟shuffle的处理耦合性很低,这使得在shuffle的读和写阶段的数据内存排序聚合溢出操作的处理类可以重复使用。
-
shuffle数据的设计也很巧妙,shuffle的数据是按reduceId分区的,分区信息被保存在索引文件中,这使得每一个reduce task只需要取得一个文件中属于它分区的那部分shuffle数据就可以了,极大地减少无用了数据量的网络传输,提高了shuffle的效率。还值得说的是,shuffle数据的格式是一个约定,不管map阶段的数据是如何被处理,最终数据形式肯定是约定好的,这使得map和reduce阶段的处理类之间的耦合性大大地降低。
至此,spark 的shuffle阶段的细节就彻底剖析完毕。
八、spark sql
一、spark sql 执行计划生成案例
1、前言
一个SQL从词法解析、语法解析、逻辑执行计划、物理执行计划最终转换为可以执行的RDD,中间经历了很多的步骤和流程。其中词法分析和语法分析均有ANTLR4完成,可以进一步学习ANTLR4的相关知识做进一步了解。
本篇文章主要对一个简单的SQL生成的逻辑执行计划物理执行计划的做一个简单地说明。
2、示例代码
case class Person(name: String, age: Long)
private def runBasicDataFrameExample2(spark: SparkSession): Unit = {
  import spark.implicits._
  val df: DataFrame = spark.sparkContext
    .parallelize(
      Array(
        Person("zhangsan", 10),
        Person("lisi", 20),
        Person("wangwu", 30))).toDF("name", "age")
  df.createOrReplaceTempView("people")
  spark.sql("select * from people where age >= 20").show()
}
3、生成逻辑物理执行计划示例
生成的逻辑和物理执行计划,右侧的是根据QueryExecution的 toString 方法,得到的对应结果

4、QueryExecution关键源码分析
对关键源码,自己做了简单的分析。如下图:

其中SparkSqlParser使用ASTBuilder生成UnResolved LogicalPlan。
5、最后
注意Spark SQL 从driver 提交经过词法分析、语法分析、逻辑执行计划、到可落地执行的物理执行计划。其中前三部分都是 spark catalyst 子模块的功能,与最终在哪个SQL执行引擎上执行并无多大关系。物理执行计划是后续转换为RDD的基础和必要条件。
本文对Spark SQL中关键步骤都有一定的涉及,也可以针对QueryExecution做后续的分析,建议修改SparkSQL 源码,做本地调试。后续会进一步分析,主要结合 《SparkSQL 内核剖析》这本书以及自己在工作学习中遇到的各种问题,做进一步源码分析
二、如何查看SparkSQL 生成的抽象语法树?
1、前言
在《Spark SQL内核剖析》书中4.3章节,谈到Catalyst体系中生成的抽象语法树的节点都是以Context来结尾,在ANLTR4以及生成的SqlBaseParser解析SQL生成,其源码部分就是语法解析,其生成的抽象语法树的节点都是ParserRuleContext的子类。
2、提出问题
ANLTR4解析SQL生成抽象语法树,最终这颗树长成什么样子,如何查看?
1、测试案列
spark.sql("select id, count(name) from student group by id").show()
2、源码入口
SparkSession的sql 方法如下:
def sql(sqlText: String): DataFrame = {
    // TODO 1. 生成LogicalPlan
    // sqlParser 为 SparkSqlParser
    val logicalPlan: LogicalPlan = sessionState.sqlParser.parsePlan(sqlText)
    // 根据 LogicalPlan
    val frame: DataFrame = Dataset.ofRows(self, logicalPlan)
    frame // sqlParser
  }
3、定位SparkSqlParser
入口源码涉及到SessionState这个关键类,其初始化代码如下:
lazy val sessionState: SessionState = {
    parentSessionState
      .map(_.clone(this))
      .getOrElse {
        // 构建 org.apache.spark.sql.internal.SessionStateBuilder
        val state = SparkSession.instantiateSessionState(
          SparkSession.sessionStateClassName(sparkContext.conf),
          self)
        initialSessionOptions.foreach { case (k, v) => state.conf.setConfString(k, v) }
        state
      }
  }
org.apache.spark.sql.SparkSession$#sessionStateClassName 方法具体如下:
private def sessionStateClassName(conf: SparkConf): String = {
    // spark.sql.catalogImplementation, 分为 hive 和 in-memory模式,默认为 in-memory 模式
    conf.get(CATALOG_IMPLEMENTATION) match {
      case "hive" => HIVE_SESSION_STATE_BUILDER_CLASS_NAME // hive 实现 org.apache.spark.sql.hive.HiveSessionStateBuilder
      case "in-memory" => classOf[SessionStateBuilder].getCanonicalName // org.apache.spark.sql.internal.SessionStateBuilder
    }
  }
其中,这里用到了builder模式,org.apache.spark.sql.internal.SessionStateBuilder就是用来构建 SessionState的。在 SparkSession.instantiateSessionState 中有具体说明,如下:
/**
   * Helper method to create an instance of `SessionState` based on `className` from conf.
   * The result is either `SessionState` or a Hive based `SessionState`.
   */
  private def instantiateSessionState(
      className: String,
      sparkSession: SparkSession): SessionState = {
    try {
      // org.apache.spark.sql.internal.SessionStateBuilder
      // invoke `new [Hive]SessionStateBuilder(SparkSession, Option[SessionState])`
      val clazz = Utils.classForName(className)
      val ctor = clazz.getConstructors.head
      ctor.newInstance(sparkSession, None).asInstanceOf[BaseSessionStateBuilder].build()
    } catch {
      case NonFatal(e) =>
        throw new IllegalArgumentException(s"Error while instantiating '$className':", e)
    }
  }
其中,BaseSessionStateBuilder下面有两个主要实现,分别为 org.apache.spark.sql.hive.HiveSessionStateBuilder(hive模式) 和 org.apache.spark.sql.internal.SessionStateBuilder(in-memory模式,默认)
org.apache.spark.sql.internal.BaseSessionStateBuilder#build 方法,源码如下:
/**
   * Build the [[SessionState]].
   */
  def build(): SessionState = {
    new SessionState(
      session.sharedState,
      conf,
      experimentalMethods,
      functionRegistry,
      udfRegistration,
      () => catalog,
      sqlParser,
      () => analyzer,
      () => optimizer,
      planner,
      streamingQueryManager,
      listenerManager,
      () => resourceLoader,
      createQueryExecution,
      createClone)
  }
SessionState中,包含了很多的参数,关键参数介绍如下:
conf:SparkConf对象,对SparkSession的配置
functionRegistry:FunctionRegistry对象,负责函数的注册,其内部维护了一个map对象用于维护注册的函数。
UDFRegistration:UDFRegistration对象,用于注册UDF函数,其依赖于FunctionRegistry
catalogBuilder: () => SessionCatalog:返回SessionCatalog对象,其主要用于管理SparkSession的Catalog
sqlParser: ParserInterface, 实际为 SparkSqlParser 实例,其内部调用ASTBuilder将SQL解析为抽象语法树
analyzerBuilder: () => Analyzer, org.apache.spark.sql.internal.BaseSessionStateBuilder.analyzer 自定义 org.apache.spark.sql.catalyst.analysis.Analyzer.Analyzer
optimizerBuilder: () => Optimizer, // org.apache.spark.sql.internal.BaseSessionStateBuilder.optimizer --> 自定义 org.apache.spark.sql.execution.SparkOptimizer.SparkOptimizer
planner: SparkPlanner, // org.apache.spark.sql.internal.BaseSessionStateBuilder.planner --> 自定义 org.apache.spark.sql.execution.SparkPlanner.SparkPlanner
resourceLoaderBuilder: () => SessionResourceLoader,返回资源加载器,主要用于加载函数的jar或资源
createQueryExecution: LogicalPlan => QueryExecution:根据LogicalPlan生成QueryExecution对象
4、parsePlan方法
SparkSqlParser没有该方法的实现,具体是现在其父类 AbstractSqlParser中,如下:
/** Creates LogicalPlan for a given SQL string. */
    // TODO 根据 sql语句生成 逻辑计划 LogicalPlan
  override def parsePlan(sqlText: String): LogicalPlan = parse(sqlText) { parser =>
      val singleStatementContext: SqlBaseParser.SingleStatementContext = parser.singleStatement()
    astBuilder.visitSingleStatement(singleStatementContext) match {
      case plan: LogicalPlan => plan
      case _ =>
        val position = Origin(None, None)
        throw new ParseException(Option(sqlText), "Unsupported SQL statement", position, position)
    }
  }
其中 parse 方法后面的方法是一个回调函数,它在parse 方法中被调用,如下:
org.apache.spark.sql.execution.SparkSqlParser#parse源码如下:
private val substitutor = new VariableSubstitution(conf) // 参数替换器

  protected override def parse[T](command: String)(toResult: SqlBaseParser => T): T = {
    super.parse(substitutor.substitute(command))(toResult)
  }
其中,substitutor是一个参数替换器,用于把SQL中的参数都替换掉,继续看其父类AbstractSqlParser的parse 方法:
protected def parse[T](command: String)(toResult: SqlBaseParser => T): T = {
    logDebug(s"Parsing command: $command")

    // 词法分析
    val lexer = new SqlBaseLexer(new UpperCaseCharStream(CharStreams.fromString(command)))
    lexer.removeErrorListeners()
    lexer.addErrorListener(ParseErrorListener)
    lexer.legacy_setops_precedence_enbled = SQLConf.get.setOpsPrecedenceEnforced

    // 语法分析
    val tokenStream = new CommonTokenStream(lexer)
    val parser = new SqlBaseParser(tokenStream)
    parser.addParseListener(PostProcessor)
    parser.removeErrorListeners()
    parser.addErrorListener(ParseErrorListener)
    parser.legacy_setops_precedence_enbled = SQLConf.get.setOpsPrecedenceEnforced

    try {
      try {
        // first, try parsing with potentially faster SLL mode
        parser.getInterpreter.setPredictionMode(PredictionMode.SLL)
        // 使用 AstBuilder 生成 Unresolved LogicalPlan
        toResult(parser)
      }
      catch {
        case e: ParseCancellationException =>
          // if we fail, parse with LL mode
          tokenStream.seek(0) // rewind input stream
          parser.reset()

          // Try Again.
          parser.getInterpreter.setPredictionMode(PredictionMode.LL)
          toResult(parser)
      }
    }
    catch {
      case e: ParseException if e.command.isDefined =>
        throw e
      case e: ParseException =>
        throw e.withCommand(command)
      case e: AnalysisException =>
        val position = Origin(e.line, e.startPosition)
        throw new ParseException(Option(command), e.message, position, position)
    }
  }
在这个方法中调用ANLTR4的API将SQL转换为AST抽象语法树,然后调用 toResult(parser) 方法,这个 toResult 方法就是parsePlan 方法的回调方法。
截止到调用astBuilder.visitSingleStatement 方法之前, AST抽象语法树已经生成。
4、打印生成AST
1、源码
override def visitSingleStatement(ctx: SingleStatementContext): LogicalPlan = withOrigin(ctx) {
    val statement: StatementContext = ctx.statement
    printRuleContextInTreeStyle(statement, 1)
    // 调用accept 生成 逻辑算子树AST
    visit(statement).asInstanceOf[LogicalPlan]
  }
在使用访问者模式访问AST节点生成UnResolved LogicalPlan之前,我定义了一个方法用来打印刚解析生成的抽象语法树, printRuleContextInTreeStyle 代码如下:
/**
   * 树形打印抽象语法树
   */
  private def printRuleContextInTreeStyle(ctx: ParserRuleContext, level:Int): Unit = {
    val prefix:String = "|"
    val curLevelStr: String = "-" * level
    val childLevelStr: String = "-" * (level + 1)
    println(s"${prefix}${curLevelStr} ${ctx.getClass.getCanonicalName}")
    val children: util.List[ParseTree] = ctx.children
    if( children == null || children.size() == 0) {
      return
    }
    children.iterator().foreach {
      case context: ParserRuleContext => printRuleContextInTreeStyle(context, level + 1)
      case _ => println(s"${prefix}${childLevelStr} ${ctx.getClass.getCanonicalName}")
    }
  }
2、三种SQL打印示例SQL示例1(带where)
其生成的AST如下:
|- org.apache.spark.sql.catalyst.parser.SqlBaseParser.StatementDefaultContext
|-- org.apache.spark.sql.catalyst.parser.SqlBaseParser.QueryContext
|--- org.apache.spark.sql.catalyst.parser.SqlBaseParser.SingleInsertQueryContext
|---- org.apache.spark.sql.catalyst.parser.SqlBaseParser.QueryTermDefaultContext
|----- org.apache.spark.sql.catalyst.parser.SqlBaseParser.QueryPrimaryDefaultContext
|------ org.apache.spark.sql.catalyst.parser.SqlBaseParser.QuerySpecificationContext
|------- org.apache.spark.sql.catalyst.parser.SqlBaseParser.QuerySpecificationContext
|------- org.apache.spark.sql.catalyst.parser.SqlBaseParser.NamedExpressionSeqContext
|-------- org.apache.spark.sql.catalyst.parser.SqlBaseParser.NamedExpressionContext
|--------- org.apache.spark.sql.catalyst.parser.SqlBaseParser.ExpressionContext
|---------- org.apache.spark.sql.catalyst.parser.SqlBaseParser.PredicatedContext
|----------- org.apache.spark.sql.catalyst.parser.SqlBaseParser.ValueExpressionDefaultContext
|------------ org.apache.spark.sql.catalyst.parser.SqlBaseParser.ColumnReferenceContext
|------------- org.apache.spark.sql.catalyst.parser.SqlBaseParser.IdentifierContext
|-------------- org.apache.spark.sql.catalyst.parser.SqlBaseParser.UnquotedIdentifierContext
|--------------- org.apache.spark.sql.catalyst.parser.SqlBaseParser.UnquotedIdentifierContext
|------- org.apache.spark.sql.catalyst.parser.SqlBaseParser.FromClauseContext
|-------- org.apache.spark.sql.catalyst.parser.SqlBaseParser.FromClauseContext
|-------- org.apache.spark.sql.catalyst.parser.SqlBaseParser.RelationContext
|--------- org.apache.spark.sql.catalyst.parser.SqlBaseParser.TableNameContext
|---------- org.apache.spark.sql.catalyst.parser.SqlBaseParser.TableIdentifierContext
|----------- org.apache.spark.sql.catalyst.parser.SqlBaseParser.IdentifierContext
|------------ org.apache.spark.sql.catalyst.parser.SqlBaseParser.UnquotedIdentifierContext
|------------- org.apache.spark.sql.catalyst.parser.SqlBaseParser.UnquotedIdentifierContext
|---------- org.apache.spark.sql.catalyst.parser.SqlBaseParser.TableAliasContext
|------- org.apache.spark.sql.catalyst.parser.SqlBaseParser.QuerySpecificationContext
|------- org.apache.spark.sql.catalyst.parser.SqlBaseParser.PredicatedContext
|-------- org.apache.spark.sql.catalyst.parser.SqlBaseParser.ComparisonContext
|--------- org.apache.spark.sql.catalyst.parser.SqlBaseParser.ValueExpressionDefaultContext
|---------- org.apache.spark.sql.catalyst.parser.SqlBaseParser.ColumnReferenceContext
|----------- org.apache.spark.sql.catalyst.parser.SqlBaseParser.IdentifierContext
|------------ org.apache.spark.sql.catalyst.parser.SqlBaseParser.UnquotedIdentifierContext
|------------- org.apache.spark.sql.catalyst.parser.SqlBaseParser.UnquotedIdentifierContext
|--------- org.apache.spark.sql.catalyst.parser.SqlBaseParser.ComparisonOperatorContext
|---------- org.apache.spark.sql.catalyst.parser.SqlBaseParser.ComparisonOperatorContext
|--------- org.apache.spark.sql.catalyst.parser.SqlBaseParser.ValueExpressionDefaultContext
|---------- org.apache.spark.sql.catalyst.parser.SqlBaseParser.ConstantDefaultContext
|----------- org.apache.spark.sql.catalyst.parser.SqlBaseParser.NumericLiteralContext
|------------ org.apache.spark.sql.catalyst.parser.SqlBaseParser.IntegerLiteralContext
|------------- org.apache.spark.sql.catalyst.parser.SqlBaseParser.IntegerLiteralContext
|---- org.apache.spark.sql.catalyst.parser.SqlBaseParser.QueryOrganizationContext
SQL示例2(带排序)
select name from student where age > 18 order by id desc
其生成的AST如下:
|- org.apache.spark.sql.catalyst.parser.SqlBaseParser.StatementDefaultContext
|-- org.apache.spark.sql.catalyst.parser.SqlBaseParser.QueryContext
|--- org.apache.spark.sql.catalyst.parser.SqlBaseParser.SingleInsertQueryContext
|---- org.apache.spark.sql.catalyst.parser.SqlBaseParser.QueryTermDefaultContext
|----- org.apache.spark.sql.catalyst.parser.SqlBaseParser.QueryPrimaryDefaultContext
|------ org.apache.spark.sql.catalyst.parser.SqlBaseParser.QuerySpecificationContext
|------- org.apache.spark.sql.catalyst.parser.SqlBaseParser.QuerySpecificationContext
|------- org.apache.spark.sql.catalyst.parser.SqlBaseParser.NamedExpressionSeqContext
|-------- org.apache.spark.sql.catalyst.parser.SqlBaseParser.NamedExpressionContext
|--------- org.apache.spark.sql.catalyst.parser.SqlBaseParser.ExpressionContext
|---------- org.apache.spark.sql.catalyst.parser.SqlBaseParser.PredicatedContext
|----------- org.apache.spark.sql.catalyst.parser.SqlBaseParser.ValueExpressionDefaultContext
|------------ org.apache.spark.sql.catalyst.parser.SqlBaseParser.ColumnReferenceContext
|------------- org.apache.spark.sql.catalyst.parser.SqlBaseParser.IdentifierContext
|-------------- org.apache.spark.sql.catalyst.parser.SqlBaseParser.UnquotedIdentifierContext
|--------------- org.apache.spark.sql.catalyst.parser.SqlBaseParser.UnquotedIdentifierContext
|------- org.apache.spark.sql.catalyst.parser.SqlBaseParser.FromClauseContext
|-------- org.apache.spark.sql.catalyst.parser.SqlBaseParser.FromClauseContext
|-------- org.apache.spark.sql.catalyst.parser.SqlBaseParser.RelationContext
|--------- org.apache.spark.sql.catalyst.parser.SqlBaseParser.TableNameContext
|---------- org.apache.spark.sql.catalyst.parser.SqlBaseParser.TableIdentifierContext
|----------- org.apache.spark.sql.catalyst.parser.SqlBaseParser.IdentifierContext
|------------ org.apache.spark.sql.catalyst.parser.SqlBaseParser.UnquotedIdentifierContext
|------------- org.apache.spark.sql.catalyst.parser.SqlBaseParser.UnquotedIdentifierContext
|---------- org.apache.spark.sql.catalyst.parser.SqlBaseParser.TableAliasContext
|------- org.apache.spark.sql.catalyst.parser.SqlBaseParser.QuerySpecificationContext
|------- org.apache.spark.sql.catalyst.parser.SqlBaseParser.PredicatedContext
|-------- org.apache.spark.sql.catalyst.parser.SqlBaseParser.ComparisonContext
|--------- org.apache.spark.sql.catalyst.parser.SqlBaseParser.ValueExpressionDefaultContext
|---------- org.apache.spark.sql.catalyst.parser.SqlBaseParser.ColumnReferenceContext
|----------- org.apache.spark.sql.catalyst.parser.SqlBaseParser.IdentifierContext
|------------ org.apache.spark.sql.catalyst.parser.SqlBaseParser.UnquotedIdentifierContext
|------------- org.apache.spark.sql.catalyst.parser.SqlBaseParser.UnquotedIdentifierContext
|--------- org.apache.spark.sql.catalyst.parser.SqlBaseParser.ComparisonOperatorContext
|---------- org.apache.spark.sql.catalyst.parser.SqlBaseParser.ComparisonOperatorContext
|--------- org.apache.spark.sql.catalyst.parser.SqlBaseParser.ValueExpressionDefaultContext
|---------- org.apache.spark.sql.catalyst.parser.SqlBaseParser.ConstantDefaultContext
|----------- org.apache.spark.sql.catalyst.parser.SqlBaseParser.NumericLiteralContext
|------------ org.apache.spark.sql.catalyst.parser.SqlBaseParser.IntegerLiteralContext
|------------- org.apache.spark.sql.catalyst.parser.SqlBaseParser.IntegerLiteralContext
|---- org.apache.spark.sql.catalyst.parser.SqlBaseParser.QueryOrganizationContext
|----- org.apache.spark.sql.catalyst.parser.SqlBaseParser.QueryOrganizationContext
|----- org.apache.spark.sql.catalyst.parser.SqlBaseParser.QueryOrganizationContext
|----- org.apache.spark.sql.catalyst.parser.SqlBaseParser.SortItemContext
|------ org.apache.spark.sql.catalyst.parser.SqlBaseParser.ExpressionContext
|------- org.apache.spark.sql.catalyst.parser.SqlBaseParser.PredicatedContext
|-------- org.apache.spark.sql.catalyst.parser.SqlBaseParser.ValueExpressionDefaultContext
|--------- org.apache.spark.sql.catalyst.parser.SqlBaseParser.ColumnReferenceContext
|---------- org.apache.spark.sql.catalyst.parser.SqlBaseParser.IdentifierContext
|----------- org.apache.spark.sql.catalyst.parser.SqlBaseParser.UnquotedIdentifierContext
|------------ org.apache.spark.sql.catalyst.parser.SqlBaseParser.UnquotedIdentifierContext
|------ org.apache.spark.sql.catalyst.parser.SqlBaseParser.SortItemContext
SQL示例2(带分组)
select id, count(name) from student group by id
其生成的AST如下:
|- org.apache.spark.sql.catalyst.parser.SqlBaseParser.StatementDefaultContext
|-- org.apache.spark.sql.catalyst.parser.SqlBaseParser.QueryContext
|--- org.apache.spark.sql.catalyst.parser.SqlBaseParser.SingleInsertQueryContext
|---- org.apache.spark.sql.catalyst.parser.SqlBaseParser.QueryTermDefaultContext
|----- org.apache.spark.sql.catalyst.parser.SqlBaseParser.QueryPrimaryDefaultContext
|------ org.apache.spark.sql.catalyst.parser.SqlBaseParser.QuerySpecificationContext
|------- org.apache.spark.sql.catalyst.parser.SqlBaseParser.QuerySpecificationContext
|------- org.apache.spark.sql.catalyst.parser.SqlBaseParser.NamedExpressionSeqContext
|-------- org.apache.spark.sql.catalyst.parser.SqlBaseParser.NamedExpressionContext
|--------- org.apache.spark.sql.catalyst.parser.SqlBaseParser.ExpressionContext
|---------- org.apache.spark.sql.catalyst.parser.SqlBaseParser.PredicatedContext
|----------- org.apache.spark.sql.catalyst.parser.SqlBaseParser.ValueExpressionDefaultContext
|------------ org.apache.spark.sql.catalyst.parser.SqlBaseParser.ColumnReferenceContext
|------------- org.apache.spark.sql.catalyst.parser.SqlBaseParser.IdentifierContext
|-------------- org.apache.spark.sql.catalyst.parser.SqlBaseParser.UnquotedIdentifierContext
|--------------- org.apache.spark.sql.catalyst.parser.SqlBaseParser.UnquotedIdentifierContext
|-------- org.apache.spark.sql.catalyst.parser.SqlBaseParser.NamedExpressionSeqContext
|-------- org.apache.spark.sql.catalyst.parser.SqlBaseParser.NamedExpressionContext
|--------- org.apache.spark.sql.catalyst.parser.SqlBaseParser.ExpressionContext
|---------- org.apache.spark.sql.catalyst.parser.SqlBaseParser.PredicatedContext
|----------- org.apache.spark.sql.catalyst.parser.SqlBaseParser.ValueExpressionDefaultContext
|------------ org.apache.spark.sql.catalyst.parser.SqlBaseParser.FunctionCallContext
|------------- org.apache.spark.sql.catalyst.parser.SqlBaseParser.QualifiedNameContext
|-------------- org.apache.spark.sql.catalyst.parser.SqlBaseParser.IdentifierContext
|--------------- org.apache.spark.sql.catalyst.parser.SqlBaseParser.UnquotedIdentifierContext
|---------------- org.apache.spark.sql.catalyst.parser.SqlBaseParser.UnquotedIdentifierContext
|------------- org.apache.spark.sql.catalyst.parser.SqlBaseParser.FunctionCallContext
|------------- org.apache.spark.sql.catalyst.parser.SqlBaseParser.ExpressionContext
|-------------- org.apache.spark.sql.catalyst.parser.SqlBaseParser.PredicatedContext
|--------------- org.apache.spark.sql.catalyst.parser.SqlBaseParser.ValueExpressionDefaultContext
|---------------- org.apache.spark.sql.catalyst.parser.SqlBaseParser.ColumnReferenceContext
|----------------- org.apache.spark.sql.catalyst.parser.SqlBaseParser.IdentifierContext
|------------------ org.apache.spark.sql.catalyst.parser.SqlBaseParser.UnquotedIdentifierContext
|------------------- org.apache.spark.sql.catalyst.parser.SqlBaseParser.UnquotedIdentifierContext
|------------- org.apache.spark.sql.catalyst.parser.SqlBaseParser.FunctionCallContext
|------- org.apache.spark.sql.catalyst.parser.SqlBaseParser.FromClauseContext
|-------- org.apache.spark.sql.catalyst.parser.SqlBaseParser.FromClauseContext
|-------- org.apache.spark.sql.catalyst.parser.SqlBaseParser.RelationContext
|--------- org.apache.spark.sql.catalyst.parser.SqlBaseParser.TableNameContext
|---------- org.apache.spark.sql.catalyst.parser.SqlBaseParser.TableIdentifierContext
|----------- org.apache.spark.sql.catalyst.parser.SqlBaseParser.IdentifierContext
|------------ org.apache.spark.sql.catalyst.parser.SqlBaseParser.UnquotedIdentifierContext
|------------- org.apache.spark.sql.catalyst.parser.SqlBaseParser.UnquotedIdentifierContext
|---------- org.apache.spark.sql.catalyst.parser.SqlBaseParser.TableAliasContext
|------- org.apache.spark.sql.catalyst.parser.SqlBaseParser.AggregationContext
|-------- org.apache.spark.sql.catalyst.parser.SqlBaseParser.AggregationContext
|-------- org.apache.spark.sql.catalyst.parser.SqlBaseParser.AggregationContext
|-------- org.apache.spark.sql.catalyst.parser.SqlBaseParser.ExpressionContext
|--------- org.apache.spark.sql.catalyst.parser.SqlBaseParser.PredicatedContext
|---------- org.apache.spark.sql.catalyst.parser.SqlBaseParser.ValueExpressionDefaultContext
|----------- org.apache.spark.sql.catalyst.parser.SqlBaseParser.ColumnReferenceContext
|------------ org.apache.spark.sql.catalyst.parser.SqlBaseParser.IdentifierContext
|------------- org.apache.spark.sql.catalyst.parser.SqlBaseParser.UnquotedIdentifierContext
|-------------- org.apache.spark.sql.catalyst.parser.SqlBaseParser.UnquotedIdentifierContext
|---- org.apache.spark.sql.catalyst.parser.SqlBaseParser.QueryOrganizationContext
5、总结
在本篇文章中,主要从测试代码出发,到如何调用ANTLR4解析SQL得到生成AST,并且修改了源码来打印这个AST树。尽管现在看来,使用ANTLR解析SQL生成AST是一个black box,但对于Spark SQL来说,其后续流程的输入已经得到。
第九章、sparkstreaming
一、spark streaming 接收kafka消息之一 -- 两种接收方式
源码分析的spark版本是1.6。
首先,先看一下 org.apache.spark.streaming.dstream.InputDStream 的 类说明:
This is the abstract base class for all input streams. This class provides methods start() and stop() which is called by Spark Streaming system to start and stop receiving data. Input streams that can generate RDDs from new data by running a service/thread only on the driver node (that is, without running a receiver on worker nodes), can be implemented by directly inheriting this InputDStream. For example, FileInputDStream, a subclass of InputDStream, monitors a HDFS directory from the driver for new files and generates RDDs with the new files. For implementing input streams that requires running a receiver on the worker nodes, use org.apache.spark.streaming.dstream.ReceiverInputDStream as the parent class.
翻译如下:
所有输入stream 的抽象父类,这个类提供了 start 和 stop 方法, 这两个方法被spark streaming系统来开始接收或结束接收数据。
两种接收数据的两种方式:
在driver 端接收数据;
1. 输入流通过在driver 节点上运行一个线程或服务,从新数据产生 RDD,继承自 InputDStream 的子类
2. 输入流通过运行在 worker 节点上的一个receiver ,从新数据产生RDD , 继承自 org.apache.spark.streaming.dstream.ReceiverInputDStream
也就是说 spark 1.6 版本的输入流的抽象父类就是 org.apache.spark.streaming.dstream.InputDStream,其子类如下图所示:
与kafka 对接的两个类已经 在上图中标明。
现在对两种方式做一下简单的比较:
相同点:
1.内部都是通过SimpleConsumer 来获取消息,在获取消息之前,在获取消息之前,from offset 和 until offset 都已经确定。
2.都需要在构造 FetchRequest之前,确定leader, offset 等信息。
3.其内部都有一个速率评估器,起到平衡速率的作用
不同点:
-
offset 的管理不同。
DirectKafkaInputStream 可以通过外部介质来管理 offset, 比如 redis, mysql等数据库,也可以是hbase等。
KafkaInputStream 则需要使用zookeeper 来管理consumer offset数据, 其内部需要监控zookeeper 的状态。
-
receiver运行的节点不同。
DirectKafkaInputStream 对应的 receiver 是运行在 driver 节点上的。
KafkaInputStream 对应的 receiver 是运行在非driver 的executor 上的。
-
内部对应的RDD不一样。
DirectKafkaInputStream 对应的是 KafkaRDD,内部的迭代器是KafkaRDDIterator
KafkaInputStream 对应的是 WriteAheadLogBackedBlockRDD 或者是 BlockRDD,内部的迭代器 是自定义的 NextIterator
-
保证Exactly-once 语义的机制不一样。
DirectKafkaInputStream 是根据 offset 和 KafkaRDD 的机制来保证 exactly-once 语义的
KafkaInputStream 是根据zookeeper的 offset 和WAL 机制来保证 exactly-once 语义的,接收到消息之后,会先保存到checkpoint 的 WAL 中
二、spark streaming 接收kafka消息之二 -- 运行在driver端的receiver
先从源码来深入理解一下 DirectKafkaInputDStream 的将 kafka 作为输入流时,如何确保 exactly-once 语义。
val stream: InputDStream[(String, String, Long)] = KafkaUtils.createDirectStream
      [String, String, StringDecoder, StringDecoder, (String, String, Long)](
        ssc, kafkaParams, fromOffsets,
        (mmd: MessageAndMetadata[String, String]) => (mmd.key(), mmd.message(), mmd.offset))
对应的源码如下:
def createDirectStream[
    K: ClassTag,
    V: ClassTag,
    KD <: Decoder[K]: ClassTag,
    VD <: Decoder[V]: ClassTag,
    R: ClassTag] (
      ssc: StreamingContext,
      kafkaParams: Map[String, String],
      fromOffsets: Map[TopicAndPartition, Long],
      messageHandler: MessageAndMetadata[K, V] => R
  ): InputDStream[R] = {
    val cleanedHandler = ssc.sc.clean(messageHandler)
    new DirectKafkaInputDStream[K, V, KD, VD, R](
      ssc, kafkaParams, fromOffsets, cleanedHandler)
  }
DirectKafkaInputDStream 的类声明如下:
A stream of org.apache.spark.streaming.kafka.KafkaRDD where each given Kafka topic/partition corresponds to an RDD partition. The spark configuration spark.streaming.kafka.maxRatePerPartition gives the maximum number of messages per second that each partition will accept. Starting offsets are specified in advance, and this DStream is not responsible for committing offsets, so that you can control exactly-once semantics. For an easy interface to Kafka-managed offsets, see org.apache.spark.streaming.kafka.KafkaCluster
简言之,Kafka RDD 的一个流,每一个指定的topic 的每一个 partition 对应一个 RDD partition
在父类 InputDStream 中,对 compute 方法的解释如下:
Method that generates a RDD for the given time
对于给定的时间,生成新的Rdd
这就是生成RDD 的入口:
override def compute(validTime: Time): Option[KafkaRDD[K, V, U, T, R]] = {
  // 1. 先获取这批次数据的 until offsets
val untilOffsets = clamp(latestLeaderOffsets(maxRetries))
// 2. 生成KafkaRDD 实例
  val rdd = KafkaRDD[K, V, U, T, R](
    context.sparkContext, kafkaParams, currentOffsets, untilOffsets, messageHandler)

  // Report the record number and metadata of this batch interval to InputInfoTracker.
// 获取 该批次 的 offset 的范围
  val offsetRanges = currentOffsets.map { case (tp, fo) =>
    val uo = untilOffsets(tp) // 获取 until offset
    OffsetRange(tp.topic, tp.partition, fo, uo.offset)
  }
//3. 将当前批次的metadata和offset 的信息报告给 InputInfoTracker
  val description = offsetRanges.filter { offsetRange =>
    // Don't display empty ranges.
    offsetRange.fromOffset != offsetRange.untilOffset
  }.map { offsetRange =>
    s"topic: ${offsetRange.topic}\tpartition: ${offsetRange.partition}\t" +
      s"offsets: ${offsetRange.fromOffset} to ${offsetRange.untilOffset}"
  }.mkString("\n")
  // Copy offsetRanges to immutable.List to prevent from being modified by the user
  val metadata = Map(
    "offsets" -> offsetRanges.toList,
    StreamInputInfo.METADATA_KEY_DESCRIPTION -> description)
  val inputInfo = StreamInputInfo(id, rdd.count, metadata)
  ssc.scheduler.inputInfoTracker.reportInfo(validTime, inputInfo)
  // 4. 更新当前的 offsets
  currentOffsets = untilOffsets.map(kv => kv._1 -> kv._2.offset)
  Some(rdd)
}
1、获取这批次数据的 until offsets
详细分析 获取 leaderOffset 的步骤,即 latestLeaderOffsets 方法:
@tailrec
protected final def latestLeaderOffsets(retries: Int): Map[TopicAndPartition, LeaderOffset] = {

  val o = kc.getLatestLeaderOffsets(currentOffsets.keySet)
  // Either.fold would confuse @tailrec, do it manually
  if (o.isLeft) { // left 代表 error
    val err = o.left.get.toString
    if (retries <= 0) {
      throw new SparkException(err)
    } else {
      log.error(err)
      Thread.sleep(kc.config.refreshLeaderBackoffMs)
      latestLeaderOffsets(retries - 1)
    }
  } else { // right 代表结果
    o.right.get
  }
}
分析 kc.getLatestLeaderOffsets(currentOffsets.keySet) 字段赋值语句:protected val kc = new KafkaCluster(kafkaParams) 即调用了 KafkaCluster的getLatestLeaderOffsets 调用栈如下:
def getLatestLeaderOffsets(
    topicAndPartitions: Set[TopicAndPartition]
  ): Either[Err, Map[TopicAndPartition, LeaderOffset]] =
  getLeaderOffsets(topicAndPartitions, OffsetRequest.LatestTime)
// 调用了下面的方法:
def getLeaderOffsets(
    topicAndPartitions: Set[TopicAndPartition],
    before: Long
  ): Either[Err, Map[TopicAndPartition, LeaderOffset]] = {
  getLeaderOffsets(topicAndPartitions, before, 1).right.map { r =>
    r.map { kv =>
      // mapValues isnt serializable, see SI-7005
      kv._1 -> kv._2.head
    }
  }
}
// getLeaderOffsets 调用了下面的方法,用于获取leader 的offset,现在是最大的offset:
def getLeaderOffsets(
    topicAndPartitions: Set[TopicAndPartition],
    before: Long,
    maxNumOffsets: Int
  ): Either[Err, Map[TopicAndPartition, Seq[LeaderOffset]]] = {
// 获取所有的partition 的leader的 host和 port 信息
  findLeaders(topicAndPartitions).right.flatMap { tpToLeader =>
    // tp -> (l.host -> l.port) ==> (l.host -> l.port) ->seq[tp]
val leaderToTp: Map[(String, Int), Seq[TopicAndPartition]] = flip(tpToLeader)
// 所有的leader 的 连接方式
    val leaders = leaderToTp.keys
    var result = Map[TopicAndPartition, Seq[LeaderOffset]]()
    val errs = new Err
// 通过leader 获取每一个 leader的offset,现在是最大的 offset
    withBrokers(leaders, errs) { consumer =>
      val partitionsToGetOffsets: Seq[TopicAndPartition] =
        leaderToTp((consumer.host, consumer.port))
      val reqMap = partitionsToGetOffsets.map { tp: TopicAndPartition =>
        tp -> PartitionOffsetRequestInfo(before, maxNumOffsets)
      }.toMap
      val req = OffsetRequest(reqMap)
      val resp = consumer.getOffsetsBefore(req)
      val respMap = resp.partitionErrorAndOffsets
      partitionsToGetOffsets.foreach { tp: TopicAndPartition =>
        respMap.get(tp).foreach { por: PartitionOffsetsResponse =>
          if (por.error == ErrorMapping.NoError) {
            if (por.offsets.nonEmpty) {
              result += tp -> por.offsets.map { off =>
                LeaderOffset(consumer.host, consumer.port, off)
              }
            } else {
              errs.append(new SparkException(
                s"Empty offsets for ${tp}, is ${before} before log beginning?"))
            }
          } else {
            errs.append(ErrorMapping.exceptionFor(por.error))
          }
        }
      }
      if (result.keys.size == topicAndPartitions.size) {
        return Right(result)
      }
    }
    val missing = topicAndPartitions.diff(result.keySet)
    errs.append(new SparkException(s"Couldn't find leader offsets for ${missing}"))
    Left(errs)
  }
}
// 根据 TopicAndPartition 获取partition leader 的 host 和 port 信息
def findLeaders(
    topicAndPartitions: Set[TopicAndPartition]
  ): Either[Err, Map[TopicAndPartition, (String, Int)]] = {
  val topics = topicAndPartitions.map(_.topic)
// 获取给定topics集合的所有的partition 的 metadata信息
  val response = getPartitionMetadata(topics).right
// 获取所有的partition 的 leader 的 host 和port 信息
  val answer = response.flatMap { tms: Set[TopicMetadata] =>
    val leaderMap = tms.flatMap { tm: TopicMetadata =>
      tm.partitionsMetadata.flatMap { pm: PartitionMetadata =>
        val tp = TopicAndPartition(tm.topic, pm.partitionId)
        if (topicAndPartitions(tp)) {
          pm.leader.map { l =>
            tp -> (l.host -> l.port)
          }
        } else {
          None
        }
      }
    }.toMap

    if (leaderMap.keys.size == topicAndPartitions.size) {
      Right(leaderMap)
    } else {
      val missing = topicAndPartitions.diff(leaderMap.keySet)
      val err = new Err
      err.append(new SparkException(s"Couldn't find leaders for ${missing}"))
      Left(err)
    }
  }
  answer
}
// 获取给定的 topic集合的所有partition 的metadata 信息
def getPartitionMetadata(topics: Set[String]): Either[Err, Set[TopicMetadata]] = {
// 创建TopicMetadataRequest对象
  val req = TopicMetadataRequest(
    TopicMetadataRequest.CurrentVersion, 0, config.clientId, topics.toSeq)
  val errs = new Err
// 随机打乱 broker-list的顺序
  withBrokers(Random.shuffle(config.seedBrokers), errs) { consumer =>
    val resp: TopicMetadataResponse = consumer.send(req)
    val respErrs = resp.topicsMetadata.filter(m => m.errorCode != ErrorMapping.NoError)

    if (respErrs.isEmpty) {
      return Right(resp.topicsMetadata.toSet)
    } else {
      respErrs.foreach { m =>
        val cause = ErrorMapping.exceptionFor(m.errorCode)
        val msg = s"Error getting partition metadata for '${m.topic}'. Does the topic exist?"
        errs.append(new SparkException(msg, cause))
      }
    }
  }
  Left(errs)
}
// Try a call against potentially multiple brokers, accumulating errors
private def withBrokers(brokers: Iterable[(String, Int)], errs: Err)
  (fn: SimpleConsumer => Any): Unit = {
//这里虽然是一个 foreach循环,但一旦获取到metadata,就返回,之所以使用一个foreach循环,是为了增加重试次数,// 防止kafka cluster 的单节点宕机,除此之外,还设计了 单节点的多次重试机制。只不过是循环重试,即多个节点都访问完后,// 再sleep 200ms(默认),然后再进行下一轮访问,可以适用于节点瞬间服务不可用情况。
  brokers.foreach { hp =>
    var consumer: SimpleConsumer = null
    try {
// 获取SimpleConsumer 的连接
      consumer = connect(hp._1, hp._2)
      fn(consumer) // 发送请求并获取到partition 的metadata
/* fn 即 后面定义的
consumer =>
    val resp: TopicMetadataResponse = consumer.send(req)
    val respErrs = resp.topicsMetadata.filter(m => m.errorCode != ErrorMapping.NoError)

    if (respErrs.isEmpty) {
      return Right(resp.topicsMetadata.toSet)
    } else {
      respErrs.foreach { m =>
        val cause = ErrorMapping.exceptionFor(m.errorCode)
        val msg = s"Error getting partition metadata for '${m.topic}'. Does the topic exist?"
        errs.append(new SparkException(msg, cause))
      }
    }
  }
  Left(errs)
*/
    } catch {
      case NonFatal(e) =>
        errs.append(e)
    } finally {
      if (consumer != null) {
        consumer.close()
      }
    }
  }
}


private def flip[K, V](m: Map[K, V]): Map[V, Seq[K]] =
  m.groupBy(_._2).map { kv =>
    kv._1 -> kv._2.keys.toSeq
  }
然后,根据获取的 每一个 partition的leader 最大 offset 来,确定每一个partition的 until offset,即clamp 函数的功能:
// limits the maximum number of messages per partition
protected def clamp(
  leaderOffsets: Map[TopicAndPartition, LeaderOffset]): Map[TopicAndPartition, LeaderOffset] = {
  maxMessagesPerPartition.map { mmp =>
    leaderOffsets.map { case (tp, lo) =>
// 评估的until offset = 当前offset + 评估速率
// 从 每一个topic partition leader 的最大offset 和 评估的 until offset 中选取较小值作为 每一个 topic partition 的 until offset
      tp -> lo.copy(offset = Math.min(currentOffsets(tp) + mmp, lo.offset))
    }
  }.getOrElse(leaderOffsets) // 如果是第一次获取数据,并且没有设置spark.streaming.kafka.maxRatePerPartition 参数,则会返回 每一个 leader 的最大大小
}


protected def maxMessagesPerPartition: Option[Long] = {
// rateController 是负责评估流速的
  val estimatedRateLimit = rateController.map(_.getLatestRate().toInt)
// 所有的 topic 分区数
  val numPartitions = currentOffsets.keys.size
  // 获取当前的流处理速率
  val effectiveRateLimitPerPartition = estimatedRateLimit
    .filter(_ > 0) // 过滤掉非正速率
    .map { limit =>
// 通过spark.streaming.kafka.maxRatePerPartition设置这个参数,默认是0
      if (maxRateLimitPerPartition > 0) {
// 从评估速率和设置的速率中取一个较小值
        Math.min(maxRateLimitPerPartition, (limit / numPartitions))
      } else { // 如果没有设置,评估速率 / 分区数
        limit / numPartitions
      }
    }.getOrElse(maxRateLimitPerPartition) // 如果速率评估率不起作用时,使用设置的速率,如果不设置是 0

  if (effectiveRateLimitPerPartition > 0) { // 如果每一个分区的有效速率大于0
    val secsPerBatch = context.graph.batchDuration.milliseconds.toDouble / 1000
// 转换成每ms的流速率
    Some((secsPerBatch * effectiveRateLimitPerPartition).toLong)
  } else {
    None
  }
}
2、生成KafkaRDD
KafkaRDD 伴生对象的 apply 方法:

def apply[
  K: ClassTag,
  V: ClassTag,
  U <: Decoder[_]: ClassTag,
  T <: Decoder[_]: ClassTag,
  R: ClassTag](
    sc: SparkContext,
    kafkaParams: Map[String, String],
    fromOffsets: Map[TopicAndPartition, Long],
    untilOffsets: Map[TopicAndPartition, LeaderOffset],
    messageHandler: MessageAndMetadata[K, V] => R
  ): KafkaRDD[K, V, U, T, R] = {
// 从 untilOffsets 中获取 TopicAndPartition 和 leader info( host, port) 的映射关系
  val leaders = untilOffsets.map { case (tp, lo) =>
      tp -> (lo.host, lo.port)
  }.toMap

  val offsetRanges = fromOffsets.map { case (tp, fo) =>
// 根据 fromOffsets 和 untilOffset ,拼接成OffsetRange 对象
      val uo = untilOffsets(tp)
      OffsetRange(tp.topic, tp.partition, fo, uo.offset)
  }.toArray
  // 返回 KafkaRDD class 的实例
  new KafkaRDD[K, V, U, T, R](sc, kafkaParams, offsetRanges, leaders, messageHandler)
}
先看KafkaRDD 的解释:
A batch-oriented interface for consuming from Kafka.
Starting and ending offsets are specified in advance,
so that you can control exactly-once semantics.
从kafka 消费的针对批处理的API,开始和结束 的 offset 都提前设定了,所以我们可以控制exactly-once 的语义。
重点看 KafkaRDD 的 compute 方法,它以分区作为参数:
override def compute(thePart: Partition, context: TaskContext): Iterator[R] = {
  val part = thePart.asInstanceOf[KafkaRDDPartition]
  assert(part.fromOffset <= part.untilOffset, errBeginAfterEnd(part))
  if (part.fromOffset == part.untilOffset) { // 如果 from offset == until offset,返回一个空的迭代器对象
    log.info(s"Beginning offset ${part.fromOffset} is the same as ending offset " +
      s"skipping ${part.topic} ${part.partition}")
    Iterator.empty
  } else {
    new KafkaRDDIterator(part, context)
  }
}
KafkaRDDIterator的源码如下,首先这个类比较好理解,因为只重写了两个非private 方法,close和 getNext, close 是用于关闭 SimpleConsumer 实例的(主要用于关闭socket 连接和 用于读response和写request的blockingChannel),getNext 是用于获取数据的
类源码如下:
private class KafkaRDDIterator(
    part: KafkaRDDPartition,
    context: TaskContext) extends NextIterator[R] {

  context.addTaskCompletionListener{ context => closeIfNeeded() }

  log.info(s"Computing topic ${part.topic}, partition ${part.partition} " +
    s"offsets ${part.fromOffset} -> ${part.untilOffset}")
 // KafkaCluster 是与 kafka cluster通信的client API
  val kc = new KafkaCluster(kafkaParams)
// kafka 消息的 key 的解码器
// classTag 是scala package 下的 package object – reflect定义的一个classTag方法,该方法返回一个 ClassTag 对象,// 该对象中 runtimeClass 保存了运行时被擦除的范型Class对象, Decoder 的实现类都有一个 以VerifiableProperties // 变量作为入参的构造方法。获取到构造方法后,利用反射实例化具体的Decoder实现对象,然后再向上转型为 Decoder
  val keyDecoder = classTag[U].runtimeClass.getConstructor(classOf[VerifiableProperties])
    .newInstance(kc.config.props)
    .asInstanceOf[Decoder[K]]
// kafka 消息的 value 的解码器
  val valueDecoder = classTag[T].runtimeClass.getConstructor(classOf[VerifiableProperties])
    .newInstance(kc.config.props)
    .asInstanceOf[Decoder[V]]
  val consumer = connectLeader
  var requestOffset = part.fromOffset
  var iter: Iterator[MessageAndOffset] = null

  // The idea is to use the provided preferred host, except on task retry atttempts,
  // to minimize number of kafka metadata requests
  private def connectLeader: SimpleConsumer = {
    if (context.attemptNumber > 0) {
// 如果重试次数大于 0, 则允许重试访问--bootstrap-server 列表里的所有 broker,一旦获取到 topic 的partition 的leader 信息,则马上返回
      kc.connectLeader(part.topic, part.partition).fold(
        errs => throw new SparkException(
          s"Couldn't connect to leader for topic ${part.topic} ${part.partition}: " +
            errs.mkString("\n")),
        consumer => consumer
      )
    } else {
      kc.connect(part.host, part.port)
    }
  }
 // 在fetch数据失败时所做的操作,无疑,这是一个hook 函数
  private def handleFetchErr(resp: FetchResponse) {
    if (resp.hasError) {
      val err = resp.errorCode(part.topic, part.partition)
      if (err == ErrorMapping.LeaderNotAvailableCode ||
        err == ErrorMapping.NotLeaderForPartitionCode) {
        log.error(s"Lost leader for topic ${part.topic} partition ${part.partition}, " +
          s" sleeping for ${kc.config.refreshLeaderBackoffMs}ms")
        Thread.sleep(kc.config.refreshLeaderBackoffMs)
      }
      // Let normal rdd retry sort out reconnect attempts
      throw ErrorMapping.exceptionFor(err)
    }
  }
  //注意此时的 返回结果是MessageAndOffset(Message(ByteBuffer)和 offset) 的迭代器
  private def fetchBatch: Iterator[MessageAndOffset] = {
// 首先,见名之意,这是一个builder,作用就是构建一个FetchRequest 对象
    val req = new FetchRequestBuilder()
      .addFetch(part.topic, part.partition, requestOffset, kc.config.fetchMessageMaxBytes)
      .build()
// 调用 SimpleConsumer 的 fetch 方法,发送 FetchRequest 请求并获取返回的 topic 消息
    val resp = consumer.fetch(req)
// 查看是否有错误,如果有,则抛出一场,否则继续处理返回的消息
    handleFetchErr(resp)
    // kafka may return a batch that starts before the requested offset
// 因为网络延迟等原因,可能会获取到之前的发送的请求结果,此时的 offset 是小于当前的 offset 的,需要过滤掉
    resp.messageSet(part.topic, part.partition)
      .iterator
      .dropWhile(_.offset < requestOffset)
  }

  override def close(): Unit = {
    if (consumer != null) {
      consumer.close()
    }
  }
 // 我们重点看getNext 方法, 它的返回值 为R, 从KafkaUtils类中的初始化KafkaRDD 方法可以看出 R 其实是 <K,V>, 即会返回一个key 和 value的pair
  override def getNext(): R = {
    if (iter == null || !iter.hasNext) { // 第一次或者是已经消费完了
      iter = fetchBatch // 调用 fetchBatch 方法,获取得到MessageAndOffset的迭代器
    }
    if (!iter.hasNext) { // 如果本批次没有数据需要处理或者本批次内还有所有数据均被处理,直接修改标识位,返回null
      assert(requestOffset == part.untilOffset, errRanOutBeforeEnd(part))
      finished = true
      null.asInstanceOf[R]
    } else {
      val item = iter.next() // 获取下一个 MessageAndOffset 对象
      if (item.offset >= part.untilOffset) { // 如果返回的消息大于等于本批次的until offset,则会返回 null
        assert(item.offset == part.untilOffset, errOvershotEnd(item.offset, part))
        finished = true
        null.asInstanceOf[R]
      } else { // 获取的 MessageAndOffse的Offset 大于等于 from offset并且小于 until offset
        requestOffset = item.nextOffset // 需要请求 kafka cluster 的消息是本条消息的下一个offset对应的消息
// MessageAndMetadata 是封装了单条消息的相关信息,包括 topic, partition, 对应的消息ByteBuffer,消息的offset,key解码器,value解码类
// messageHandler 是一个回调方法, 对应了本例中的(mmd: MessageAndMetadata[String, String]) => (mmd.key(), mmd.message(), mmd.offset)代码
        messageHandler(new MessageAndMetadata(
          part.topic, part.partition, item.message, item.offset, keyDecoder, valueDecoder))
      }
    }
  }
}
3、总结
有如下问题: 1.这个类是如何接收 kafka 的消息的? 通过KafkaRDD来获取单批次的数据的,KafkaRDD的compute方法返回一个迭代器,这个迭代器封装了kafka partition数据的批量抓取以及负责调用传入的消息处理回调函数并将单条处理结果返回。 其中,spark streaming 的exactly-once 消费机制是通过 KafkaRDD 来保证的,在创建KafkaRDD之前,就已经通过 currentOffset和 估算出的速率,以及每个分区的自定义最大抓取速率,和从partition的leader获取的最大offset,确定分区untilOffset的值,最终fromOffset和untilOffset构成OffsetRange,在KafkaRDD中生成的迭代器中会丢弃掉offset不在该OffsetRange内的数据,最终调用用户传入的消息处理函数,处理数据成用户想要的数据格式。 2.这个类是如何将单个partition的消息转换为 RDD单个partition的数据的? KafkaRDD 的compute 方法 以 partition 作为参数,这个partition是 KafkaRDDPartition 的实例, 包含了分区消息的 offset range,topic, partition 等信息,该方法会返回一个KafkaRDDIterat,该类提供了访问 该分区内kafka 数据的 数据,内部通过SimpleConsumer 来从leader 节点来批量获取数据,然后再从批量数据中获取我们想要的数据(由offset range来保证)。 3.这个类是如何估算 kafka 消费速率的? 提供了 PIDRateEstimator 类, 该类通过传入batch 处理结束时间,batch 处理条数, 实际处理时间和 batch 调度时间来估算速率的。 4.这个类是如何做WAL 的?这个类做不了 WAL
三、spark streaming 接收kafka消息之三 -- kafka broker 如何处理 fetch 请求
首先看一下 KafkaServer 这个类的声明:
Represents the lifecycle of a single Kafka broker. Handles all functionality required to start up and shutdown a single Kafka node.
代表了单个 broker 的生命周期,处理所有功能性的请求,以及startup 和shutdown 一个broker node。
在这个类的startup中,有一个线程池被实例化了:
/* start processing requests */
// 处理所有的请求
apis = new KafkaApis(socketServer.requestChannel, replicaManager, adminManager, groupCoordinator, transactionCoordinator,
  kafkaController, zkUtils, config.brokerId, config, metadataCache, metrics, authorizer, quotaManagers,
  brokerTopicStats, clusterId, time)
 // 请求处理的线程池
requestHandlerPool = new KafkaRequestHandlerPool(config.brokerId, socketServer.requestChannel, apis, time,
  config.numIoThreads)
KafkaRequestHandlerPool 的源代码如下:
 class KafkaRequestHandlerPool(val brokerId: Int,
                               val requestChannel: RequestChannel,
                               val apis: KafkaApis,
                               time: Time,
                               numThreads: Int) extends Logging with KafkaMetricsGroup {

   /* a meter to track the average free capacity of the request handlers */
   private val aggregateIdleMeter = newMeter("RequestHandlerAvgIdlePercent", "percent", TimeUnit.NANOSECONDS)

   this.logIdent = "[Kafka Request Handler on Broker " + brokerId + "], "
   val runnables = new Array[KafkaRequestHandler](numThreads)
   for(i <- 0 until numThreads) { // 实例化所有runnable 对象
     runnables(i) = new KafkaRequestHandler(i, brokerId, aggregateIdleMeter, numThreads, requestChannel, apis, time)
 // 初始化并启动daemon thread
     Utils.daemonThread("kafka-request-handler-" + i, runnables(i)).start()
   }
  // 关闭线程池中的所有的线程
   def shutdown() {
     info("shutting down")
     for (handler <- runnables)
       handler.initiateShutdown()
     for (handler <- runnables)
       handler.awaitShutdown()
     info("shut down completely")
   }
 }
再看一下 KafkaRequestHandler 的源码:
 class KafkaRequestHandler(id: Int,
                           brokerId: Int,
                           val aggregateIdleMeter: Meter,
                           val totalHandlerThreads: Int,
                           val requestChannel: RequestChannel,
                           apis: KafkaApis,
                           time: Time) extends Runnable with Logging {
   this.logIdent = "[Kafka Request Handler " + id + " on Broker " + brokerId + "], "
   private val latch = new CountDownLatch(1)

   def run() {
     while (true) { // 这个 run 方法会一直运行
       try {
         var req : RequestChannel.Request = null
         while (req == null) { // 如果没有 请求过来,就一直死循环下去
           // We use a single meter for aggregate idle percentage for the thread pool.
           // Since meter is calculated as total_recorded_value / time_window and
           // time_window is independent of the number of threads, each recorded idle
           // time should be discounted by # threads.
           val startSelectTime = time.nanoseconds
           req = requestChannel.receiveRequest(300)
           val endTime = time.nanoseconds
           if (req != null)
             req.requestDequeueTimeNanos = endTime
           val idleTime = endTime - startSelectTime
           aggregateIdleMeter.mark(idleTime / totalHandlerThreads)
         }

         if (req eq RequestChannel.AllDone) {
           debug("Kafka request handler %d on broker %d received shut down command".format(id, brokerId))
           latch.countDown()
           return
         }
         trace("Kafka request handler %d on broker %d handling request %s".format(id, brokerId, req))
         apis.handle(req) // 处理请求
       } catch {
         case e: FatalExitError =>
           latch.countDown()
           Exit.exit(e.statusCode)
         case e: Throwable => error("Exception when handling request", e)
       }
     }
   }

   def initiateShutdown(): Unit = requestChannel.sendRequest(RequestChannel.AllDone)

   def awaitShutdown(): Unit = latch.await()

 }
重点看一下, kafka.server.KafkaApis#handle 源码:
 /**
  * Top-level method that handles all requests and multiplexes to the right api
  */
 def handle(request: RequestChannel.Request) {
   try {
     trace("Handling request:%s from connection %s;securityProtocol:%s,principal:%s".
       format(request.requestDesc(true), request.connectionId, request.securityProtocol, request.session.principal))
     ApiKeys.forId(request.requestId) match {
       case ApiKeys.PRODUCE => handleProduceRequest(request)
       case ApiKeys.FETCH => handleFetchRequest(request) // 这是请求fetch消息的请求
       case ApiKeys.LIST_OFFSETS => handleListOffsetRequest(request)
       case ApiKeys.METADATA => handleTopicMetadataRequest(request)
       case ApiKeys.LEADER_AND_ISR => handleLeaderAndIsrRequest(request)
       case ApiKeys.STOP_REPLICA => handleStopReplicaRequest(request)
       case ApiKeys.UPDATE_METADATA_KEY => handleUpdateMetadataRequest(request)
       case ApiKeys.CONTROLLED_SHUTDOWN_KEY => handleControlledShutdownRequest(request)
       case ApiKeys.OFFSET_COMMIT => handleOffsetCommitRequest(request)
       case ApiKeys.OFFSET_FETCH => handleOffsetFetchRequest(request)
       case ApiKeys.FIND_COORDINATOR => handleFindCoordinatorRequest(request)
       case ApiKeys.JOIN_GROUP => handleJoinGroupRequest(request)
       case ApiKeys.HEARTBEAT => handleHeartbeatRequest(request)
       case ApiKeys.LEAVE_GROUP => handleLeaveGroupRequest(request)
       case ApiKeys.SYNC_GROUP => handleSyncGroupRequest(request)
       case ApiKeys.DESCRIBE_GROUPS => handleDescribeGroupRequest(request)
       case ApiKeys.LIST_GROUPS => handleListGroupsRequest(request)
       case ApiKeys.SASL_HANDSHAKE => handleSaslHandshakeRequest(request)
       case ApiKeys.API_VERSIONS => handleApiVersionsRequest(request)
       case ApiKeys.CREATE_TOPICS => handleCreateTopicsRequest(request)
       case ApiKeys.DELETE_TOPICS => handleDeleteTopicsRequest(request)
       case ApiKeys.DELETE_RECORDS => handleDeleteRecordsRequest(request)
       case ApiKeys.INIT_PRODUCER_ID => handleInitProducerIdRequest(request)
       case ApiKeys.OFFSET_FOR_LEADER_EPOCH => handleOffsetForLeaderEpochRequest(request)
       case ApiKeys.ADD_PARTITIONS_TO_TXN => handleAddPartitionToTxnRequest(request)
       case ApiKeys.ADD_OFFSETS_TO_TXN => handleAddOffsetsToTxnRequest(request)
       case ApiKeys.END_TXN => handleEndTxnRequest(request)
       case ApiKeys.WRITE_TXN_MARKERS => handleWriteTxnMarkersRequest(request)
       case ApiKeys.TXN_OFFSET_COMMIT => handleTxnOffsetCommitRequest(request)
       case ApiKeys.DESCRIBE_ACLS => handleDescribeAcls(request)
       case ApiKeys.CREATE_ACLS => handleCreateAcls(request)
       case ApiKeys.DELETE_ACLS => handleDeleteAcls(request)
       case ApiKeys.ALTER_CONFIGS => handleAlterConfigsRequest(request)
       case ApiKeys.DESCRIBE_CONFIGS => handleDescribeConfigsRequest(request)
     }
   } catch {
     case e: FatalExitError => throw e
     case e: Throwable => handleError(request, e)
   } finally {
     request.apiLocalCompleteTimeNanos = time.nanoseconds
   }
 }
再看 handleFetchRequest:
 // call the replica manager to fetch messages from the local replica
     replicaManager.fetchMessages(
       fetchRequest.maxWait.toLong, // 在这里是 0
       fetchRequest.replicaId,
       fetchRequest.minBytes,
       fetchRequest.maxBytes,
       versionId <= 2,
       authorizedRequestInfo,
       replicationQuota(fetchRequest),
       processResponseCallback,
       fetchRequest.isolationLevel)
fetchMessage 源码如下:
  /**
  * Fetch messages from the leader replica, and wait until enough data can be fetched and return;
  * the callback function will be triggered either when timeout or required fetch info is satisfied
  */
 def fetchMessages(timeout: Long,
                   replicaId: Int,
                   fetchMinBytes: Int,
                   fetchMaxBytes: Int,
                   hardMaxBytesLimit: Boolean,
                   fetchInfos: Seq[(TopicPartition, PartitionData)],
                   quota: ReplicaQuota = UnboundedQuota,
                   responseCallback: Seq[(TopicPartition, FetchPartitionData)] => Unit,
                   isolationLevel: IsolationLevel) {
   val isFromFollower = replicaId >= 0
   val fetchOnlyFromLeader: Boolean = replicaId != Request.DebuggingConsumerId
   val fetchOnlyCommitted: Boolean = ! Request.isValidBrokerId(replicaId)
  // 从本地 logs 中读取数据
   // read from local logs
   val logReadResults = readFromLocalLog(
     replicaId = replicaId,
     fetchOnlyFromLeader = fetchOnlyFromLeader,
     readOnlyCommitted = fetchOnlyCommitted,
     fetchMaxBytes = fetchMaxBytes,
     hardMaxBytesLimit = hardMaxBytesLimit,
     readPartitionInfo = fetchInfos,
     quota = quota,
     isolationLevel = isolationLevel)

   // if the fetch comes from the follower,
   // update its corresponding log end offset
   if(Request.isValidBrokerId(replicaId))
     updateFollowerLogReadResults(replicaId, logReadResults)

   // check if this fetch request can be satisfied right away
   val logReadResultValues = logReadResults.map { case (_, v) => v }
   val bytesReadable = logReadResultValues.map(_.info.records.sizeInBytes).sum
   val errorReadingData = logReadResultValues.foldLeft(false) ((errorIncurred, readResult) =>
     errorIncurred || (readResult.error != Errors.NONE))
  // 立即返回的四个条件:
 // 1. Fetch 请求不希望等待
 // 2. Fetch 请求不请求任何数据
 // 3. 有足够数据可以返回
 // 4. 当读取数据的时候有error 发生
   // respond immediately if 1) fetch request does not want to wait
   //                        2) fetch request does not require any data
   //                        3) has enough data to respond
   //                        4) some error happens while reading data
   if (timeout <= 0 || fetchInfos.isEmpty || bytesReadable >= fetchMinBytes || errorReadingData) {
     val fetchPartitionData = logReadResults.map { case (tp, result) =>
       tp -> FetchPartitionData(result.error, result.highWatermark, result.leaderLogStartOffset, result.info.records,
         result.lastStableOffset, result.info.abortedTransactions)
     }
     responseCallback(fetchPartitionData)
   } else {// DelayedFetch
     // construct the fetch results from the read results
     val fetchPartitionStatus = logReadResults.map { case (topicPartition, result) =>
       val fetchInfo = fetchInfos.collectFirst {
         case (tp, v) if tp == topicPartition => v
       }.getOrElse(sys.error(s"Partition $topicPartition not found in fetchInfos"))
       (topicPartition, FetchPartitionStatus(result.info.fetchOffsetMetadata, fetchInfo))
     }
     val fetchMetadata = FetchMetadata(fetchMinBytes, fetchMaxBytes, hardMaxBytesLimit, fetchOnlyFromLeader,
       fetchOnlyCommitted, isFromFollower, replicaId, fetchPartitionStatus)
     val delayedFetch = new DelayedFetch(timeout, fetchMetadata, this, quota, isolationLevel, responseCallback)

     // create a list of (topic, partition) pairs to use as keys for this delayed fetch operation
     val delayedFetchKeys = fetchPartitionStatus.map { case (tp, _) => new TopicPartitionOperationKey(tp) }

     // try to complete the request immediately, otherwise put it into the purgatory;
     // this is because while the delayed fetch operation is being created, new requests
     // may arrive and hence make this operation completable.
     delayedFetchPurgatory.tryCompleteElseWatch(delayedFetch, delayedFetchKeys)
   }
 }
继续追踪 readFromLocalLog 源码:
  /**
  * Read from multiple topic partitions at the given offset up to maxSize bytes
  */
 // 他负责从多个 topic partition中读数据到最大值,默认1M
 隔离级别: 读已提交、读未提交
 def readFromLocalLog(replicaId: Int,
                      fetchOnlyFromLeader: Boolean,
                      readOnlyCommitted: Boolean,
                      fetchMaxBytes: Int,
                      hardMaxBytesLimit: Boolean,
                      readPartitionInfo: Seq[(TopicPartition, PartitionData)],
                      quota: ReplicaQuota,
                      isolationLevel: IsolationLevel): Seq[(TopicPartition, LogReadResult)] = {

   def read(tp: TopicPartition, fetchInfo: PartitionData, limitBytes: Int, minOneMessage: Boolean): LogReadResult = {
     val offset = fetchInfo.fetchOffset
     val partitionFetchSize = fetchInfo.maxBytes
     val followerLogStartOffset = fetchInfo.logStartOffset

     brokerTopicStats.topicStats(tp.topic).totalFetchRequestRate.mark()
     brokerTopicStats.allTopicsStats.totalFetchRequestRate.mark()

     try {
       trace(s"Fetching log segment for partition $tp, offset $offset, partition fetch size $partitionFetchSize, " +
         s"remaining response limit $limitBytes" +
         (if (minOneMessage) s", ignoring response/partition size limits" else ""))

       // decide whether to only fetch from leader
       val localReplica = if (fetchOnlyFromLeader)
         getLeaderReplicaIfLocal(tp)
       else
         getReplicaOrException(tp)

       val initialHighWatermark = localReplica.highWatermark.messageOffset
       val lastStableOffset = if (isolationLevel == IsolationLevel.READ_COMMITTED)
         Some(localReplica.lastStableOffset.messageOffset)
       else
         None

       // decide whether to only fetch committed data (i.e. messages below high watermark)
       val maxOffsetOpt = if (readOnlyCommitted)
         Some(lastStableOffset.getOrElse(initialHighWatermark))
       else
         None

       /* Read the LogOffsetMetadata prior to performing the read from the log.
        * We use the LogOffsetMetadata to determine if a particular replica is in-sync or not.
        * Using the log end offset after performing the read can lead to a race condition
        * where data gets appended to the log immediately after the replica has consumed from it
        * This can cause a replica to always be out of sync.
        */
       val initialLogEndOffset = localReplica.logEndOffset.messageOffset
       val initialLogStartOffset = localReplica.logStartOffset
       val fetchTimeMs = time.milliseconds
       val logReadInfo = localReplica.log match {
         case Some(log) =>
           val adjustedFetchSize = math.min(partitionFetchSize, limitBytes)

           // Try the read first, this tells us whether we need all of adjustedFetchSize for this partition
 // 尝试从 Log 中读取数据
           val fetch = log.read(offset, adjustedFetchSize, maxOffsetOpt, minOneMessage, isolationLevel)

           // If the partition is being throttled, simply return an empty set.
           if (shouldLeaderThrottle(quota, tp, replicaId))
             FetchDataInfo(fetch.fetchOffsetMetadata, MemoryRecords.EMPTY)
           // For FetchRequest version 3, we replace incomplete message sets with an empty one as consumers can make
           // progress in such cases and don't need to report a `RecordTooLargeException`
           else if (!hardMaxBytesLimit && fetch.firstEntryIncomplete)
             FetchDataInfo(fetch.fetchOffsetMetadata, MemoryRecords.EMPTY)
           else fetch

         case None =>
           error(s"Leader for partition $tp does not have a local log")
           FetchDataInfo(LogOffsetMetadata.UnknownOffsetMetadata, MemoryRecords.EMPTY)
       }

       LogReadResult(info = logReadInfo,
                     highWatermark = initialHighWatermark,
                     leaderLogStartOffset = initialLogStartOffset,
                     leaderLogEndOffset = initialLogEndOffset,
                     followerLogStartOffset = followerLogStartOffset,
                     fetchTimeMs = fetchTimeMs,
                     readSize = partitionFetchSize,
                     lastStableOffset = lastStableOffset,
                     exception = None)
     } catch {
       // NOTE: Failed fetch requests metric is not incremented for known exceptions since it
       // is supposed to indicate un-expected failure of a broker in handling a fetch request
       case e@ (_: UnknownTopicOrPartitionException |
                _: NotLeaderForPartitionException |
                _: ReplicaNotAvailableException |
                _: OffsetOutOfRangeException) =>
         LogReadResult(info = FetchDataInfo(LogOffsetMetadata.UnknownOffsetMetadata, MemoryRecords.EMPTY),
                       highWatermark = -1L,
                       leaderLogStartOffset = -1L,
                       leaderLogEndOffset = -1L,
                       followerLogStartOffset = -1L,
                       fetchTimeMs = -1L,
                       readSize = partitionFetchSize,
                       lastStableOffset = None,
                       exception = Some(e))
       case e: Throwable =>
         brokerTopicStats.topicStats(tp.topic).failedFetchRequestRate.mark()
         brokerTopicStats.allTopicsStats.failedFetchRequestRate.mark()
         error(s"Error processing fetch operation on partition $tp, offset $offset", e)
         LogReadResult(info = FetchDataInfo(LogOffsetMetadata.UnknownOffsetMetadata, MemoryRecords.EMPTY),
                       highWatermark = -1L,
                       leaderLogStartOffset = -1L,
                       leaderLogEndOffset = -1L,
                       followerLogStartOffset = -1L,
                       fetchTimeMs = -1L,
                       readSize = partitionFetchSize,
                       lastStableOffset = None,
                       exception = Some(e))
     }
   }
  // maxSize, 默认1M
   var limitBytes = fetchMaxBytes
   val result = new mutable.ArrayBuffer[(TopicPartition, LogReadResult)]
   var minOneMessage = !hardMaxBytesLimit // hardMaxBytesLimit
   readPartitionInfo.foreach { case (tp, fetchInfo) =>
     val readResult = read(tp, fetchInfo, limitBytes, minOneMessage)
     val messageSetSize = readResult.info.records.sizeInBytes
     // Once we read from a non-empty partition, we stop ignoring request and partition level size limits
     if (messageSetSize > 0)
       minOneMessage = false
     limitBytes = math.max(0, limitBytes - messageSetSize)
     result += (tp -> readResult)
   }
   result
 }
Log.read 源码如下:
 /**
  * Read messages from the log.
  *
  * @param startOffset The offset to begin reading at
  * @param maxLength The maximum number of bytes to read
  * @param maxOffset The offset to read up to, exclusive. (i.e. this offset NOT included in the resulting message set)
  * @param minOneMessage If this is true, the first message will be returned even if it exceeds `maxLength` (if one exists)
  * @param isolationLevel The isolation level of the fetcher. The READ_UNCOMMITTED isolation level has the traditional
  *                       read semantics (e.g. consumers are limited to fetching up to the high watermark). In
  *                       READ_COMMITTED, consumers are limited to fetching up to the last stable offset. Additionally,
  *                       in READ_COMMITTED, the transaction index is consulted after fetching to collect the list
  *                       of aborted transactions in the fetch range which the consumer uses to filter the fetched
  *                       records before they are returned to the user. Note that fetches from followers always use
  *                       READ_UNCOMMITTED.
  *
  * @throws OffsetOutOfRangeException If startOffset is beyond the log end offset or before the log start offset
  * @return The fetch data information including fetch starting offset metadata and messages read.
  */
 def read(startOffset: Long, maxLength: Int, maxOffset: Option[Long] = None, minOneMessage: Boolean = false,
          isolationLevel: IsolationLevel): FetchDataInfo = {
   trace("Reading %d bytes from offset %d in log %s of length %d bytes".format(maxLength, startOffset, name, size))

   // Because we don't use lock for reading, the synchronization is a little bit tricky.
   // We create the local variables to avoid race conditions with updates to the log.
   val currentNextOffsetMetadata = nextOffsetMetadata
   val next = currentNextOffsetMetadata.messageOffset
   if (startOffset == next) {
     val abortedTransactions =
       if (isolationLevel == IsolationLevel.READ_COMMITTED) Some(List.empty[AbortedTransaction])
       else None
     return FetchDataInfo(currentNextOffsetMetadata, MemoryRecords.EMPTY, firstEntryIncomplete = false,
       abortedTransactions = abortedTransactions)
   }

   var segmentEntry = segments.floorEntry(startOffset)

   // return error on attempt to read beyond the log end offset or read below log start offset
   if (startOffset > next || segmentEntry == null || startOffset < logStartOffset)
     throw new OffsetOutOfRangeException("Request for offset %d but we only have log segments in the range %d to %d.".format(startOffset, logStartOffset, next))

   // Do the read on the segment with a base offset less than the target offset
   // but if that segment doesn't contain any messages with an offset greater than that
   // continue to read from successive segments until we get some messages or we reach the end of the log
   while(segmentEntry != null) {
     val segment = segmentEntry.getValue

     // If the fetch occurs on the active segment, there might be a race condition where two fetch requests occur after
     // the message is appended but before the nextOffsetMetadata is updated. In that case the second fetch may
     // cause OffsetOutOfRangeException. To solve that, we cap the reading up to exposed position instead of the log
     // end of the active segment.
     val maxPosition = {
       if (segmentEntry == segments.lastEntry) {
         val exposedPos = nextOffsetMetadata.relativePositionInSegment.toLong
         // Check the segment again in case a new segment has just rolled out.
         if (segmentEntry != segments.lastEntry)
           // New log segment has rolled out, we can read up to the file end.
           segment.size
         else
           exposedPos
       } else {
         segment.size
       }
     }
 // 从segment 中去读取数据
     val fetchInfo = segment.read(startOffset, maxOffset, maxLength, maxPosition, minOneMessage)
     if (fetchInfo == null) {
       segmentEntry = segments.higherEntry(segmentEntry.getKey)
     } else {
       return isolationLevel match {
         case IsolationLevel.READ_UNCOMMITTED => fetchInfo
         case IsolationLevel.READ_COMMITTED => addAbortedTransactions(startOffset, segmentEntry, fetchInfo)
       }
     }
   }

   // okay we are beyond the end of the last segment with no data fetched although the start offset is in range,
   // this can happen when all messages with offset larger than start offsets have been deleted.
   // In this case, we will return the empty set with log end offset metadata
   FetchDataInfo(nextOffsetMetadata, MemoryRecords.EMPTY)
 }
LogSegment 的 read 方法:
 /**
  * Read a message set from this segment beginning with the first offset >= startOffset. The message set will include
  * no more than maxSize bytes and will end before maxOffset if a maxOffset is specified.
  *
  * @param startOffset A lower bound on the first offset to include in the message set we read
  * @param maxSize The maximum number of bytes to include in the message set we read
  * @param maxOffset An optional maximum offset for the message set we read
  * @param maxPosition The maximum position in the log segment that should be exposed for read
  * @param minOneMessage If this is true, the first message will be returned even if it exceeds `maxSize` (if one exists)
  *
  * @return The fetched data and the offset metadata of the first message whose offset is >= startOffset,
  *         or null if the startOffset is larger than the largest offset in this log
  */
 @threadsafe
 def read(startOffset: Long, maxOffset: Option[Long], maxSize: Int, maxPosition: Long = size,
          minOneMessage: Boolean = false): FetchDataInfo = {
   if (maxSize < 0)
     throw new IllegalArgumentException("Invalid max size for log read (%d)".format(maxSize))

   val logSize = log.sizeInBytes // this may change, need to save a consistent copy
   val startOffsetAndSize = translateOffset(startOffset)
  // offset 已经到本 segment 的结尾,返回 null
   // if the start position is already off the end of the log, return null
   if (startOffsetAndSize == null)
     return null
  // 开始位置
   val startPosition = startOffsetAndSize.position
   val offsetMetadata = new LogOffsetMetadata(startOffset, this.baseOffset, startPosition)
  // 调整的最大位置
   val adjustedMaxSize =
     if (minOneMessage) math.max(maxSize, startOffsetAndSize.size)
     else maxSize

   // return a log segment but with zero size in the case below
   if (adjustedMaxSize == 0)
     return FetchDataInfo(offsetMetadata, MemoryRecords.EMPTY)

   // calculate the length of the message set to read based on whether or not they gave us a maxOffset
   val fetchSize: Int = maxOffset match {
     case None =>
       // no max offset, just read until the max position
       min((maxPosition - startPosition).toInt, adjustedMaxSize)
     case Some(offset) =>
       // there is a max offset, translate it to a file position and use that to calculate the max read size;
       // when the leader of a partition changes, it's possible for the new leader's high watermark to be less than the
       // true high watermark in the previous leader for a short window. In this window, if a consumer fetches on an
       // offset between new leader's high watermark and the log end offset, we want to return an empty response.
       if (offset < startOffset)
         return FetchDataInfo(offsetMetadata, MemoryRecords.EMPTY, firstEntryIncomplete = false)
       val mapping = translateOffset(offset, startPosition)
       val endPosition =
         if (mapping == null)
           logSize // the max offset is off the end of the log, use the end of the file
         else
           mapping.position
       min(min(maxPosition, endPosition) - startPosition, adjustedMaxSize).toInt
   }

   FetchDataInfo(offsetMetadata, log.read(startPosition, fetchSize),
     firstEntryIncomplete = adjustedMaxSize < startOffsetAndSize.size)
 }

 log.read(startPosition, fetchSize)  的源码如下:
 /**
  * Return a slice of records from this instance, which is a view into this set starting from the given position
  * and with the given size limit.
  *
  * If the size is beyond the end of the file, the end will be based on the size of the file at the time of the read.
  *
  * If this message set is already sliced, the position will be taken relative to that slicing.
  *
  * @param position The start position to begin the read from
  * @param size The number of bytes after the start position to include
  * @return A sliced wrapper on this message set limited based on the given position and size
  */
 public FileRecords read(int position, int size) throws IOException {
     if (position < 0)
         throw new IllegalArgumentException("Invalid position: " + position);
     if (size < 0)
         throw new IllegalArgumentException("Invalid size: " + size);

     final int end;
     // handle integer overflow
     if (this.start + position + size < 0)
         end = sizeInBytes();
     else
         end = Math.min(this.start + position + size, sizeInBytes());
     return new FileRecords(file, channel, this.start + position, end, true);
 }
processResponseCallback(在kafka.server.KafkaApis#handleFetchRequest 中定义)源码如下:
 // fetch response callback invoked after any throttling
   def fetchResponseCallback(bandwidthThrottleTimeMs: Int) {
     def createResponse(requestThrottleTimeMs: Int): RequestChannel.Response = {
       val convertedData = new util.LinkedHashMap[TopicPartition, FetchResponse.PartitionData]
       fetchedPartitionData.asScala.foreach { case (tp, partitionData) =>
         convertedData.put(tp, convertedPartitionData(tp, partitionData))
       }
       val response = new FetchResponse(convertedData, 0)
       val responseStruct = response.toStruct(versionId)

       trace(s"Sending fetch response to client $clientId of ${responseStruct.sizeOf} bytes.")
       response.responseData.asScala.foreach { case (topicPartition, data) =>
         // record the bytes out metrics only when the response is being sent
         brokerTopicStats.updateBytesOut(topicPartition.topic, fetchRequest.isFromFollower, data.records.sizeInBytes)
       }

       val responseSend = response.toSend(responseStruct, bandwidthThrottleTimeMs + requestThrottleTimeMs,
         request.connectionId, request.header)
       RequestChannel.Response(request, responseSend)
     }

     if (fetchRequest.isFromFollower)
       sendResponseExemptThrottle(createResponse(0))
     else
       sendResponseMaybeThrottle(request, request.header.clientId, requestThrottleMs =>
         requestChannel.sendResponse(createResponse(requestThrottleMs)))
   }

   // When this callback is triggered, the remote API call has completed.
   // Record time before any byte-rate throttling.
   request.apiRemoteCompleteTimeNanos = time.nanoseconds

   if (fetchRequest.isFromFollower) {
     // We've already evaluated against the quota and are good to go. Just need to record it now.
     val responseSize = sizeOfThrottledPartitions(versionId, fetchRequest, mergedPartitionData, quotas.leader)
     quotas.leader.record(responseSize)
     fetchResponseCallback(bandwidthThrottleTimeMs = 0)
   } else {
     // Fetch size used to determine throttle time is calculated before any down conversions.
     // This may be slightly different from the actual response size. But since down conversions
     // result in data being loaded into memory, it is better to do this after throttling to avoid OOM.
     val response = new FetchResponse(fetchedPartitionData, 0)
     val responseStruct = response.toStruct(versionId)
     quotas.fetch.recordAndMaybeThrottle(request.session.sanitizedUser, clientId, responseStruct.sizeOf,
       fetchResponseCallback)
   }
 }
结论,会具体定位到具体LogSegment, 通过 start 和 size 来获取 logSegement中的记录,最大大小默认为1 M,可以设置。
并且提供了数据隔离机制,可以支持读已提交和读未提交(默认是读未提交)。如果没有数据会直接返回的。
四、spark streaming 接收kafka消息之四 -- 运行在 worker 上的 receiver
使用分布式receiver来获取数据 使用 WAL 来实现 At least once 操作: conf.set("spark.streaming.receiver.writeAheadLog.enable","true") // 开启 WAL // 1、At most once - 每条数据最多被处理一次(0次或1次),这种语义下会出现数据丢失的问题; // 2、At least once - 每条数据最少被处理一次 (1次或更多),这个不会出现数据丢失,但是会出现数据重复; // 3、Exactly once - 每条数据只会被处理一次,没有数据会丢失,并且没有数据会被多次处理,这种语义是大家最想要的,但是也是最难实现的。
如果不做容错,将会带来数据丢失,因为Receiver一直在接收数据,在其没有处理的时候(已通知zk数据接收到),Executor突然挂掉(或是driver挂掉通知executor关闭),缓存在内存中的数据就会丢失。因为这个问题,Spark1.2开始加入了WAL(Write ahead log)开启 WAL,将receiver获取数据的存储级别修改为StorageLevel. MEMORY_AND_DISK_SER_2
1 // 缺点,不能自己维护消费 topic partition 的 offset
2 // 优点,开启 WAL,来确保 exactly-once 语义
3 val stream: ReceiverInputDStream[(String, String)] = KafkaUtils.createStream[String,String,StringDecoder,StringDecoder](
4     ssc,kafkaParams,map,StorageLevel.MEMORY_AND_DISK_SER_2)
1、从Kafka 中读取数据
1、Driver 规划 receiver 运行的信息
org.apache.spark.streaming.StreamingContext#start中启动了 JobScheduler实例
 // private[streaming] val scheduler = new JobScheduler(this)

 // Start the streaming scheduler in a new thread, so that thread local properties
 // like call sites and job groups can be reset without affecting those of the
 // current thread.
 ThreadUtils.runInNewThread("streaming-start") { // 单独的一个daemon线程运行函数题
   sparkContext.setCallSite(startSite.get)
   sparkContext.clearJobGroup()
   sparkContext.setLocalProperty(SparkContext.SPARK_JOB_INTERRUPT_ON_CANCEL, "false")
 // 执行start 方法
   scheduler.start()
 }
 state = StreamingContextState.ACTIVE
org.apache.spark.streaming.scheduler.JobScheduler#start 源码如下:
 def start(): Unit = synchronized {
   if (eventLoop != null) return // scheduler has already been started

   logDebug("Starting JobScheduler")
   eventLoop = new EventLoop[JobSchedulerEvent]("JobScheduler") {
     override protected def onReceive(event: JobSchedulerEvent): Unit = processEvent(event)

     override protected def onError(e: Throwable): Unit = reportError("Error in job scheduler", e)
   }
   eventLoop.start()

   // attach rate controllers of input streams to receive batch completion updates
   for {
     inputDStream <- ssc.graph.getInputStreams
     rateController <- inputDStream.rateController
   } ssc.addStreamingListener(rateController)

   listenerBus.start(ssc.sparkContext)
   receiverTracker = new ReceiverTracker(ssc)
   inputInfoTracker = new InputInfoTracker(ssc)
   receiverTracker.start()
   jobGenerator.start()
   logInfo("Started JobScheduler")
 }
ReceiverTracker 的类声明如下:
This class manages the execution of the receivers of ReceiverInputDStreams. Instance of this class must be created after all input streams have been added and StreamingContext.start() has been called because it needs the final set of input streams at the time of instantiation.
 此类负责执行ReceiverInputDStreams的receiver。必须在添加所有输入流并调用StreamingContext.start()之后创建此类的实例,因为它在实例化时需要最终的输入流集。
其 start 方法如下:
 /** Start the endpoint and receiver execution thread. */
 def start(): Unit = synchronized {
   if (isTrackerStarted) {
     throw new SparkException("ReceiverTracker already started")
   }

   if (!receiverInputStreams.isEmpty) {
 // 建立rpc endpoint
     endpoint = ssc.env.rpcEnv.setupEndpoint( // 注意,这是一个driver的 endpoint
       "ReceiverTracker", new ReceiverTrackerEndpoint(ssc.env.rpcEnv))
 // driver节点上发送启动 receiver 命令
     if (!skipReceiverLaunch) launchReceivers()
     logInfo("ReceiverTracker started")
     trackerState = Started
   }
 }

 /**
  * Get the receivers from the ReceiverInputDStreams, distributes them to the
  * worker nodes as a parallel collection, and runs them.
  */
 // 从ReceiverInputDStreams 获取到 receivers,然后将它们分配到不同的 worker 节点并运行它们。
 private def launchReceivers(): Unit = {
   val receivers = receiverInputStreams.map(nis => {
 // 未启用WAL 是KafkaReceiver,启动WAL后是ReliableKafkaReceiver
     val rcvr = nis.getReceiver()
     rcvr.setReceiverId(nis.id)
     rcvr
   })
   // 运行一个简单的应用来确保所有的salve node都已经启动起来,避免所有的 receiver 任务都在同一个local node上
   runDummySparkJob()

   logInfo("Starting " + receivers.length + " receivers")
   endpoint.send(StartAllReceivers(receivers)) // 发送请求driver 转发 启动 receiver 的命令
 }
Driver 端StartAllReceivers 的处理代码如下:
 override def receive: PartialFunction[Any, Unit] = {
   // Local messages
   case StartAllReceivers(receivers) =>
 // schduleReceiver
     val scheduledLocations = schedulingPolicy.scheduleReceivers(receivers, getExecutors)
     for (receiver <- receivers) {
       val executors = scheduledLocations(receiver.streamId)
       updateReceiverScheduledExecutors(receiver.streamId, executors)
       receiverPreferredLocations(receiver.streamId) = receiver.preferredLocation
       startReceiver(receiver, executors)
     }
 ……
 }
getExecutors源码如下:
 /**
  * Get the list of executors excluding driver
  */
 // 如果是 local 模式,返回 本地线程; 如果是 yarn 模式,返回 非driver 节点上的 excutors
 private def getExecutors: Seq[ExecutorCacheTaskLocation] = {
   if (ssc.sc.isLocal) { // 如果在 local 模式下运行
     val blockManagerId = ssc.sparkContext.env.blockManager.blockManagerId
     Seq(ExecutorCacheTaskLocation(blockManagerId.host, blockManagerId.executorId))
   } else { // 在 yarn 模式下,过滤掉 driver 的 executor
     ssc.sparkContext.env.blockManager.master.getMemoryStatus.filter { case (blockManagerId, _) =>
       blockManagerId.executorId != SparkContext.DRIVER_IDENTIFIER // Ignore the driver location
     }.map { case (blockManagerId, _) =>
       ExecutorCacheTaskLocation(blockManagerId.host, blockManagerId.executorId)
     }.toSeq
   }
 }
org.apache.spark.streaming.scheduler.ReceiverSchedulingPolicy#scheduleReceivers的解释如下:
 Try our best to schedule receivers with evenly distributed. However, if the preferredLocations of receivers are not even, we may not be able to schedule them evenly because we have to respect them. Here is the approach to schedule executors:
 First, schedule all the receivers with preferred locations (hosts), evenly among the executors running on those host.
 Then, schedule all other receivers evenly among all the executors such that overall distribution over all the receivers is even.
 This method is called when we start to launch receivers at the first time.
 该方法就是确保receiver 能够在worker node 上均匀分布的。遵循以下两个原则:
 1.使用 preferred location 分配 receiver 到这些node 上
 2.将其他的未分配的receiver均匀分布均匀分布到 每一个 worker node 上
org.apache.spark.streaming.scheduler.ReceiverTracker#updateReceiverScheduledExecutors 负责更新receiverid 和 receiver info 的映射关系,源码如下:
 private def updateReceiverScheduledExecutors(
     receiverId: Int, scheduledLocations: Seq[TaskLocation]): Unit = {
   val newReceiverTrackingInfo = receiverTrackingInfos.get(receiverId) match {
     case Some(oldInfo) =>
       oldInfo.copy(state = ReceiverState.SCHEDULED,
         scheduledLocations = Some(scheduledLocations))
     case None =>
       ReceiverTrackingInfo(
         receiverId,
         ReceiverState.SCHEDULED,
         Some(scheduledLocations),
         runningExecutor = None)
   }
   receiverTrackingInfos.put(receiverId, newReceiverTrackingInfo)
 }
2、Driver 发送分布式启动receiver job
startReceiver 负责启动 receiver,源码如下:
  /**
  * Start a receiver along with its scheduled executors
  */
 private def startReceiver(
     receiver: Receiver[_],
     scheduledLocations: Seq[TaskLocation]): Unit = {
   def shouldStartReceiver: Boolean = {
     // It's okay to start when trackerState is Initialized or Started
     !(isTrackerStopping || isTrackerStopped)
   }

   val receiverId = receiver.streamId
   if (!shouldStartReceiver) {
     onReceiverJobFinish(receiverId)
     return
   }

   val checkpointDirOption = Option(ssc.checkpointDir)
   val serializableHadoopConf =
     new SerializableConfiguration(ssc.sparkContext.hadoopConfiguration)

 // 在 worker node 上启动 receiver 的方法
   val startReceiverFunc: Iterator[Receiver[_]] => Unit =
     (iterator: Iterator[Receiver[_]]) => {
       if (!iterator.hasNext) {
         throw new SparkException(
           "Could not start receiver as object not found.")
       }
       if (TaskContext.get().attemptNumber() == 0) {
         val receiver = iterator.next()
         assert(iterator.hasNext == false)
         val supervisor = new ReceiverSupervisorImpl(
           receiver, SparkEnv.get, serializableHadoopConf.value, checkpointDirOption)
         supervisor.start()
         supervisor.awaitTermination()
       } else {
         // It's restarted by TaskScheduler, but we want to reschedule it again. So exit it.
       }
     }

   // Create the RDD using the scheduledLocations to run the receiver in a Spark job
   val receiverRDD: RDD[Receiver[_]] =
     if (scheduledLocations.isEmpty) {
       ssc.sc.makeRDD(Seq(receiver), 1)
     } else {
       val preferredLocations = scheduledLocations.map(_.toString).distinct
       ssc.sc.makeRDD(Seq(receiver -> preferredLocations))
     }
   receiverRDD.setName(s"Receiver $receiverId")
   ssc.sparkContext.setJobDescription(s"Streaming job running receiver $receiverId")
   ssc.sparkContext.setCallSite(Option(ssc.getStartSite()).getOrElse(Utils.getCallSite()))
   // 提交分布式receiver 启动任务
   val future = ssc.sparkContext.submitJob[Receiver[_], Unit, Unit](
     receiverRDD, startReceiverFunc, Seq(0), (_, _) => Unit, ())
   // We will keep restarting the receiver job until ReceiverTracker is stopped
   future.onComplete {
     case Success(_) =>
       if (!shouldStartReceiver) {
         onReceiverJobFinish(receiverId)
       } else {
         logInfo(s"Restarting Receiver $receiverId")
         self.send(RestartReceiver(receiver))
       }
     case Failure(e) =>
       if (!shouldStartReceiver) {
         onReceiverJobFinish(receiverId)
       } else {
         logError("Receiver has been stopped. Try to restart it.", e)
         logInfo(s"Restarting Receiver $receiverId")
         self.send(RestartReceiver(receiver))
       }
   }(submitJobThreadPool)
   logInfo(s"Receiver ${receiver.streamId} started")
 }
3、Worker节点启动 receiver监管服务
org.apache.spark.streaming.receiver.ReceiverSupervisorImpl#ReceiverSupervisorImpl 的 start 方法如下:
  /** Start the supervisor */
 def start() {
   onStart()
   startReceiver()
 }
 override protected def onStart() { // 启动 BlockGenerator 服务
   registeredBlockGenerators.foreach { _.start() }
 }
 // startReceiver 方法如下:
 /** Start receiver */
 def startReceiver(): Unit = synchronized {
   try {
     if (onReceiverStart()) { // 注册receiver 成功
       logInfo("Starting receiver")
       receiverState = Started
       receiver.onStart() // 启动 receiver
       logInfo("Called receiver onStart")
     } else {
       // The driver refused us
       stop("Registered unsuccessfully because Driver refused to start receiver " + streamId, None)
     }
   } catch {
     case NonFatal(t) =>
       stop("Error starting receiver " + streamId, Some(t))
   }
 }
4、注册 receiver 到 driver节点
 override protected def onReceiverStart(): Boolean = {
   val msg = RegisterReceiver(
     streamId, receiver.getClass.getSimpleName, host, executorId, endpoint)
   trackerEndpoint.askWithRetry[Boolean](msg)
 }
简单描述一下driver 端做的事情,主要负责将其纳入到org.apache.spark.streaming.scheduler.ReceiverTracker 的管理中来,具体streamid 和 ReceiverTrackingInfo 的映射关系保存在receiverTrackingInfos中。
org.apache.spark.streaming.scheduler.ReceiverTracker#registerReceiver关键代码如下:
  val name = s"${typ}-${streamId}"
 val receiverTrackingInfo = ReceiverTrackingInfo(
   streamId,
   ReceiverState.ACTIVE,
   scheduledLocations = None,
   runningExecutor = Some(ExecutorCacheTaskLocation(host, executorId)),
   name = Some(name),
   endpoint = Some(receiverEndpoint))
 receiverTrackingInfos.put(streamId, receiverTrackingInfo)
 listenerBus.post(StreamingListenerReceiverStarted(receiverTrackingInfo.toReceiverInfo))
5、启动 receiver 线程
由于我们启用了 WAL, 所以 这里的receiver 是ReliableKafkaReceiver 的实例 receiver.onStart 即 org.apache.spark.streaming.kafka.ReliableKafkaReceiver#onStart, 源码如下:
  override def onStart(): Unit = {
   logInfo(s"Starting Kafka Consumer Stream with group: $groupId")

   // Initialize the topic-partition / offset hash map.
 // 1. 负责维护消费的 topic-partition 和 offset 的映射关系
   topicPartitionOffsetMap = new mutable.HashMap[TopicAndPartition, Long]

   // Initialize the stream block id / offset snapshot hash map.
 // 2. 负责维护 block-id 和 partition-offset 之间的映射关系
   blockOffsetMap = new ConcurrentHashMap[StreamBlockId, Map[TopicAndPartition, Long]]()

   // Initialize the block generator for storing Kafka message.
 // 3. 负责保存 kafka message 的 block generator,入参是GeneratedBlockHandler 实例,这是一个负责监听 block generator事件的一个监听器
 // Generates batches of objects received by a org.apache.spark.streaming.receiver.Receiver and puts them into appropriately named blocks at regular intervals. This class starts two threads, one to periodically start a new batch and prepare the previous batch of as a block, the other to push the blocks into the block manager.
   blockGenerator = supervisor.createBlockGenerator(new GeneratedBlockHandler)
   // 4. 关闭consumer 自动提交 offset 选项
 // auto_offset_commit 应该是 false
   if (kafkaParams.contains(AUTO_OFFSET_COMMIT) && kafkaParams(AUTO_OFFSET_COMMIT) == "true") {
     logWarning(s"$AUTO_OFFSET_COMMIT should be set to false in ReliableKafkaReceiver, " +
       "otherwise we will manually set it to false to turn off auto offset commit in Kafka")
   }

   val props = new Properties()
   kafkaParams.foreach(param => props.put(param._1, param._2))
   // Manually set "auto.commit.enable" to "false" no matter user explicitly set it to true,
   // we have to make sure this property is set to false to turn off auto commit mechanism in Kafka.
   props.setProperty(AUTO_OFFSET_COMMIT, "false")

   val consumerConfig = new ConsumerConfig(props)

   assert(!consumerConfig.autoCommitEnable)

   logInfo(s"Connecting to Zookeeper: ${consumerConfig.zkConnect}")
 // 5. 初始化 consumer 对象
 // consumerConnector 是ZookeeperConsumerConnector的实例
   consumerConnector = Consumer.create(consumerConfig)
   logInfo(s"Connected to Zookeeper: ${consumerConfig.zkConnect}")
   // 6. 初始化zookeeper 的客户端
   zkClient = new ZkClient(consumerConfig.zkConnect, consumerConfig.zkSessionTimeoutMs,
     consumerConfig.zkConnectionTimeoutMs, ZKStringSerializer)
    // 7. 创建线程池来处理消息流,池的大小是固定的,为partition 的总数,并指定线程池中每一个线程的name 的前缀,内部使用ThreadPoolExecutor,并且 创建线程的 factory类是guava 工具包提供的。
   messageHandlerThreadPool = ThreadUtils.newDaemonFixedThreadPool(
     topics.values.sum, "KafkaMessageHandler")
    // 8. 启动 BlockGenerator内的两个线程
   blockGenerator.start()

 // 9. 创建MessageStream对象
   val keyDecoder = classTag[U].runtimeClass.getConstructor(classOf[VerifiableProperties])
     .newInstance(consumerConfig.props)
     .asInstanceOf[Decoder[K]]

   val valueDecoder = classTag[T].runtimeClass.getConstructor(classOf[VerifiableProperties])
     .newInstance(consumerConfig.props)
     .asInstanceOf[Decoder[V]]

   val topicMessageStreams = consumerConnector.createMessageStreams(
     topics, keyDecoder, valueDecoder)
 // 10. 将待处理的MessageHandler 放入 线程池中,等待执行
   topicMessageStreams.values.foreach { streams =>
     streams.foreach { stream =>
       messageHandlerThreadPool.submit(new MessageHandler(stream))
     }
   }
 }
其中, 第9 步,创建MessageStream对象, kafka.consumer.ZookeeperConsumerConnector#createMessageStreams 方法如下:
 def createMessageStreams[K,V](topicCountMap: Map[String,Int], keyDecoder: Decoder[K], valueDecoder: Decoder[V])
     : Map[String, List[KafkaStream[K,V]]] = {
   if (messageStreamCreated.getAndSet(true))
     throw new MessageStreamsExistException(this.getClass.getSimpleName +
                                  " can create message streams at most once",null)
   consume(topicCountMap, keyDecoder, valueDecoder)
 }
其调用了 consume 方法,源码如下:
def consume[K, V](topicCountMap: scala.collection.Map[String,Int], keyDecoder: Decoder[K], valueDecoder: Decoder[V])
    : Map[String,List[KafkaStream[K,V]]] = {
  debug("entering consume ")
  if (topicCountMap == null)
    throw new RuntimeException("topicCountMap is null")
 // 1. 初始化 topicCount
  val topicCount = TopicCount.constructTopicCount(consumerIdString, topicCountMap)
 // 2. 获取 每一个topic 和 threadId 集合的映射关系
  val topicThreadIds = topicCount.getConsumerThreadIdsPerTopic

  // make a list of (queue,stream) pairs, one pair for each threadId
// 3. 得到每一个 threadId 对应 (queue, stream) 的映射列表
  val queuesAndStreams = topicThreadIds.values.map(threadIdSet =>
    threadIdSet.map(_ => {
      val queue =  new LinkedBlockingQueue[FetchedDataChunk](config.queuedMaxMessages)
      val stream = new KafkaStream[K,V](
        queue, config.consumerTimeoutMs, keyDecoder, valueDecoder, config.clientId)
      (queue, stream)
    })
  ).flatten.toList
 // 4. 获取 groupId 在 zookeeper 中的path
  val dirs = new ZKGroupDirs(config.groupId)
// 5. 注册 consumer 到 groupId(在zk中)
  registerConsumerInZK(dirs, consumerIdString, topicCount)
// 6. 重新初始化 consumer
  reinitializeConsumer(topicCount, queuesAndStreams)
  // 7. 返回流
  loadBalancerListener.kafkaMessageAndMetadataStreams.asInstanceOf[Map[String, List[KafkaStream[K,V]]]]
}
6、consumer消费kafka数据
在 kafka.consumer.ZookeeperConsumerConnector#consume方法中,有如下操作:
 // 得到每一个 threadId 对应 (queue, stream) 的映射列表
   val queuesAndStreams = topicThreadIds.values.map(threadIdSet =>
     threadIdSet.map(_ => {
       val queue =  new LinkedBlockingQueue[FetchedDataChunk](config.queuedMaxMessages)
       val stream = new KafkaStream[K,V](
         queue, config.consumerTimeoutMs, keyDecoder, valueDecoder, config.clientId)
       (queue, stream)
     })
   ).flatten.toList
  // 获取 groupId 在 zookeeper 中的path
   val dirs = new ZKGroupDirs(config.groupId)
 // 注册 consumer 到 groupId(在zk中)
   registerConsumerInZK(dirs, consumerIdString, topicCount)
 // 重新初始化 consumer
   reinitializeConsumer(topicCount, queuesAndStreams)
在上面的代码中,可以看到初始化的queue(LinkedBlockingQueue实例)除了被传入stream(KafkaStream)的构造函数被迭代器从中取数据,还和 stream 重组成Tuple2[LinkedBlockingQueue[FetchedDataChunk]的list,之后被传入reinitializeConsumer 方法中。 kafka.consumer.ZookeeperConsumerConnector#reinitializeConsume 其源码如下:
 private def reinitializeConsumer[K,V](
     topicCount: TopicCount,
     queuesAndStreams: List[(LinkedBlockingQueue[FetchedDataChunk],KafkaStream[K,V])]) {
  // 1. 获取 该groupid 在 zk 中的路径
   val dirs = new ZKGroupDirs(config.groupId)

   // listener to consumer and partition changes
 // 2. 初始化loadBalancerListener,这个负载均衡listener 会时刻监控 consumer 和 partition 的变化
   if (loadBalancerListener == null) {
     val topicStreamsMap = new mutable.HashMap[String,List[KafkaStream[K,V]]]
     loadBalancerListener = new ZKRebalancerListener(
       config.groupId, consumerIdString, topicStreamsMap.asInstanceOf[scala.collection.mutable.Map[String, List[KafkaStream[_,_]]]])
   }

   // create listener for session expired event if not exist yet
   // 3. 监控 session 过期的listner, 有新session注册初始化,会通知 loadBalancer
 if (sessionExpirationListener == null)
     sessionExpirationListener = new ZKSessionExpireListener(
       dirs, consumerIdString, topicCount, loadBalancerListener)

   // create listener for topic partition change event if not exist yet
 // 4. 初始化ZKTopicPartitionChangeListener实例,当topic partition 变化时,这个listener会通知 loadBalancer
   if (topicPartitionChangeListener == null)
     topicPartitionChangeListener = new ZKTopicPartitionChangeListener(loadBalancerListener)
  // 5. 将queuesAndStreams 的值经过一系列转换,并添加到loadBalancerListener.kafkaMessageAndMetadataStreams 中
   val topicStreamsMap = loadBalancerListener.kafkaMessageAndMetadataStreams

   // map of {topic -> Set(thread-1, thread-2, ...)}
   val consumerThreadIdsPerTopic: Map[String, Set[ConsumerThreadId]] =
     topicCount.getConsumerThreadIdsPerTopic

   val allQueuesAndStreams = topicCount match {
     case wildTopicCount: WildcardTopicCount => // 这里是WildcardTopicCount,走这个分支
       /*
        * Wild-card consumption streams share the same queues, so we need to
        * duplicate the list for the subsequent zip operation.
        */
       (1 to consumerThreadIdsPerTopic.keySet.size).flatMap(_ => queuesAndStreams).toList
     case statTopicCount: StaticTopicCount =>
       queuesAndStreams
   }

   val topicThreadIds = consumerThreadIdsPerTopic.map {
     case(topic, threadIds) =>
       threadIds.map((topic, _))
   }.flatten

   require(topicThreadIds.size == allQueuesAndStreams.size,
     "Mismatch between thread ID count (%d) and queue count (%d)"
     .format(topicThreadIds.size, allQueuesAndStreams.size))
   val threadQueueStreamPairs = topicThreadIds.zip(allQueuesAndStreams)

   threadQueueStreamPairs.foreach(e => {
     val topicThreadId = e._1
     val q = e._2._1
     topicThreadIdAndQueues.put(topicThreadId, q)
     debug("Adding topicThreadId %s and queue %s to topicThreadIdAndQueues data structure".format(topicThreadId, q.toString))
     newGauge(
       "FetchQueueSize",
       new Gauge[Int] {
         def value = q.size
       },
       Map("clientId" -> config.clientId,
         "topic" -> topicThreadId._1,
         "threadId" -> topicThreadId._2.threadId.toString)
     )
   })

   val groupedByTopic = threadQueueStreamPairs.groupBy(_._1._1)
   groupedByTopic.foreach(e => {
     val topic = e._1
     val streams = e._2.map(_._2._2).toList
     topicStreamsMap += (topic -> streams)
     debug("adding topic %s and %d streams to map.".format(topic, streams.size))
   })

   // listener to consumer and partition changes
 // 6. 使用 zkClient 注册sessionExpirationListener 实例
   zkClient.subscribeStateChanges(sessionExpirationListener)
  // 7. 使用 zkClient 注册loadBalancerListener 实例
   zkClient.subscribeChildChanges(dirs.consumerRegistryDir, loadBalancerListener)
  // 遍历每一个topic,使用zkClient 注册topicPartitionChangeListener 实例
   topicStreamsMap.foreach { topicAndStreams =>
     // register on broker partition path changes
     val topicPath = BrokerTopicsPath + "/" + topicAndStreams._1
     zkClient.subscribeDataChanges(topicPath, topicPartitionChangeListener)
   }

   // explicitly trigger load balancing for this consumer
 // 8. 使用 loadBalancerListener 同步做负载均衡
   loadBalancerListener.syncedRebalance()
 }
重点看 第 8 步,使用 loadBalancerListener 同步做负载均衡。 kafka.consumer.ZookeeperConsumerConnector.ZKRebalancerListener#syncedRebalance 源码如下:
 def syncedRebalance() {
   rebalanceLock synchronized {
     rebalanceTimer.time {
       if(isShuttingDown.get())  { // 如果ZookeeperConsumerConnector
 已经shutdown了,直接返回
         return
       } else {
         for (i <- 0 until config.rebalanceMaxRetries) { // 默认是 4 次
           info("begin rebalancing consumer " + consumerIdString + " try #" + i)
           var done = false
           var cluster: Cluster = null
           try {
             // 1. 根据zkClient 实例 获取并创建Cluster 对象,这个 cluster 实例包含了一个 Broker(broker的id,broker在zk中的路径) 列表
             cluster = getCluster(zkClient)
             // 2. 在cluster中做 rebalance操作
             done = rebalance(cluster)
           } catch {
             case e: Throwable =>
               /** occasionally, we may hit a ZK exception because the ZK state is changing while we are iterating.
                 * For example, a ZK node can disappear between the time we get all children and the time we try to get
                 * the value of a child. Just let this go since another rebalance will be triggered.
                 **/
               info("exception during rebalance ", e)
           }
           info("end rebalancing consumer " + consumerIdString + " try #" + i)
           if (done) {
             return
           } else {
             /* Here the cache is at a risk of being stale. To take future rebalancing decisions correctly, we should
              * clear the cache */
             info("Rebalancing attempt failed. Clearing the cache before the next rebalancing operation is triggered")
           }
           // stop all fetchers and clear all the queues to avoid data duplication
           closeFetchersForQueues(cluster, kafkaMessageAndMetadataStreams, topicThreadIdAndQueues.map(q => q._2))
           Thread.sleep(config.rebalanceBackoffMs)
         }
       }
     }
   }

   throw new ConsumerRebalanceFailedException(consumerIdString + " can't rebalance after " + config.rebalanceMaxRetries +" retries")
 }
重点看 第2 步,在 cluster 中做 rebalance 操作,kafka.consumer.ZookeeperConsumerConnector.ZKRebalancerListener#rebalance 源码如下:
  private def rebalance(cluster: Cluster): Boolean = {
   // 1. 获取 group和 threadId 的Map 映射关系
   val myTopicThreadIdsMap = TopicCount.constructTopicCount(
     group, consumerIdString, zkClient, config.excludeInternalTopics).getConsumerThreadIdsPerTopic
   // 2. 获取kafka cluster 中所有可用的node
   val brokers = getAllBrokersInCluster(zkClient)
   if (brokers.size == 0) { // 如果可用节点为空,设置listener订阅,返回 true
     // This can happen in a rare case when there are no brokers available in the cluster when the consumer is started.
     // We log an warning and register for child changes on brokers/id so that rebalance can be triggered when the brokers
     // are up.
     warn("no brokers found when trying to rebalance.")
     zkClient.subscribeChildChanges(ZkUtils.BrokerIdsPath, loadBalancerListener)
     true
   }
   else {
     /**
      * fetchers must be stopped to avoid data duplication, since if the current
      * rebalancing attempt fails, the partitions that are released could be owned by another consumer.
      * But if we don't stop the fetchers first, this consumer would continue returning data for released
      * partitions in parallel. So, not stopping the fetchers leads to duplicate data.
      */
    // 3. 做rebalance 之前的准备工作
    // 3.1. 关闭现有 fetcher 连接
     closeFetchers(cluster, kafkaMessageAndMetadataStreams, myTopicThreadIdsMap)
    // 3.2 释放 partition 的所有权(主要是删除zk下的owner 节点的数据以及解除内存中的topic和 fetcher的关联关系)
     releasePartitionOwnership(topicRegistry)
    // 3.3. 重新给partition分配 fetcher
     val assignmentContext = new AssignmentContext(group, consumerIdString, config.excludeInternalTopics, zkClient)
     val partitionOwnershipDecision = partitionAssignor.assign(assignmentContext)
     val currentTopicRegistry = new Pool[String, Pool[Int, PartitionTopicInfo]](
       valueFactory = Some((topic: String) => new Pool[Int, PartitionTopicInfo]))

     // fetch current offsets for all topic-partitions
     // 3.4 获取当前fetcher对应的 partitions 的 offsets,这里的offset是指 consumer 下一个要消费的offset
     val topicPartitions = partitionOwnershipDecision.keySet.toSeq

     val offsetFetchResponseOpt = fetchOffsets(topicPartitions)

     if (isShuttingDown.get || !offsetFetchResponseOpt.isDefined)
       false
     else {
       // 3.5 更新 partition 和 fetcher 的对应关系
       val offsetFetchResponse = offsetFetchResponseOpt.get
       topicPartitions.foreach(topicAndPartition => {
         val (topic, partition) = topicAndPartition.asTuple
 // requestInfo是OffsetFetchResponse实例中的成员变量,它是一个Map[TopicAndPartition, OffsetMetadataAndError]实例
         val offset = offsetFetchResponse.requestInfo(topicAndPartition).offset
         val threadId = partitionOwnershipDecision(topicAndPartition)
         addPartitionTopicInfo(currentTopicRegistry, partition, topic, offset, threadId)
       })

       /**
        * move the partition ownership here, since that can be used to indicate a truly successful rebalancing attempt
        * A rebalancing attempt is completed successfully only after the fetchers have been started correctly
        */
       if(reflectPartitionOwnershipDecision(partitionOwnershipDecision)) {
         allTopicsOwnedPartitionsCount = partitionOwnershipDecision.size

         partitionOwnershipDecision.view.groupBy { case(topicPartition, consumerThreadId) => topicPartition.topic }
                                   .foreach { case (topic, partitionThreadPairs) =>
           newGauge("OwnedPartitionsCount",
             new Gauge[Int] {
               def value() = partitionThreadPairs.size
             },
             ownedPartitionsCountMetricTags(topic))
         }
         // 3.6 将已经新的 topic registry 覆盖旧的
         topicRegistry = currentTopicRegistry
 // 4. 更新 fetcher
         updateFetcher(cluster)
         true
       } else {
         false
       }
     }
   }
 }
其中addPartitionTopicInfo 源码如下:
 private def addPartitionTopicInfo(currentTopicRegistry: Pool[String, Pool[Int, PartitionTopicInfo]],
                                     partition: Int, topic: String,
                                     offset: Long, consumerThreadId: ConsumerThreadId) {
 //如果map没有对应的 key,会使用valueFactory初始化键值对,并返回 对应的 value
     val partTopicInfoMap = currentTopicRegistry.getAndMaybePut(topic)

     val queue = topicThreadIdAndQueues.get((topic, consumerThreadId))
     val consumedOffset = new AtomicLong(offset)
     val fetchedOffset = new AtomicLong(offset)
     val partTopicInfo = new PartitionTopicInfo(topic,
                                                partition,
                                                queue,
                                                consumedOffset,
                                                fetchedOffset,
                                                new AtomicInteger(config.fetchMessageMaxBytes),
                                                config.clientId)
     // 1. 将其注册到新的 Topic注册中心中,即注册 partition 和 fetcher 的关系
 partTopicInfoMap.put(partition, partTopicInfo)
     debug(partTopicInfo + " selected new offset " + offset)
 // 2. 更新consumer 的 已经消费的offset信息
     checkpointedZkOffsets.put(TopicAndPartition(topic, partition), offset)
   }
 }
第4步, 更新 fetcher 源码如下:
 private def updateFetcher(cluster: Cluster) {
   // update partitions for fetcher
   var allPartitionInfos : List[PartitionTopicInfo] = Nil
   for (partitionInfos <- topicRegistry.values)
     for (partition <- partitionInfos.values)
       allPartitionInfos ::= partition
   info("Consumer " + consumerIdString + " selected partitions : " +
     allPartitionInfos.sortWith((s,t) => s.partitionId < t.partitionId).map(_.toString).mkString(","))

   fetcher match {
     case Some(f) =>
       f.startConnections(allPartitionInfos, cluster)
     case None =>
   }
 }
其中,f.startConnections方法真正执行 更新操作。此时引入一个新的类。即 fetcher 类,kafka.consumer.ConsumerFetcherManager。
kafka.consumer.ConsumerFetcherManager#startConnections 的源码如下:
  def startConnections(topicInfos: Iterable[PartitionTopicInfo], cluster: Cluster) {
 // LeaderFinderThread 在 topic 的leader node可用时,将 fetcher 添加到 leader 节点上
   leaderFinderThread = new LeaderFinderThread(consumerIdString + "-leader-finder-thread")
   leaderFinderThread.start()

   inLock(lock) {
 // 更新ConsumerFetcherManager 成员变量
     partitionMap = topicInfos.map(tpi => (TopicAndPartition(tpi.topic, tpi.partitionId), tpi)).toMap
     this.cluster = cluster
     noLeaderPartitionSet ++= topicInfos.map(tpi => TopicAndPartition(tpi.topic, tpi.partitionId))
     cond.signalAll()
   }
 }
ConsumerFetcherManager 有一个LeaderFinderThread 实例,该类的父类kafka.utils.ShutdownableThread ,run 方法如下:
 override def run(): Unit = {
   info("Starting ")
   try{
     while(isRunning.get()){
       doWork()
     }
   } catch{
     case e: Throwable =>
       if(isRunning.get())
         error("Error due to ", e)
   }
   shutdownLatch.countDown()
   info("Stopped ")
 }
doWork其实就是一个抽象方法,其子类LeaderFinderThread的实现如下:
  // thread responsible for adding the fetcher to the right broker when leader is available
 override def doWork() {
 // 1. 获取 partition 和leader node的映射关系
   val leaderForPartitionsMap = new HashMap[TopicAndPartition, Broker]
   lock.lock()
   try {
     while (noLeaderPartitionSet.isEmpty) { // 这个字段在startConnections 已更新新值
       trace("No partition for leader election.")
       cond.await()
     }

     trace("Partitions without leader %s".format(noLeaderPartitionSet))
     val brokers = getAllBrokersInCluster(zkClient) // 获取所有可用broker 节点
     // 获取kafka.api.TopicMetadata 序列,kafka.api.TopicMetadata 保存了 topic 和 partitionId,isr,leader,replicas 的信息
 val topicsMetadata = ClientUtils.fetchTopicMetadata(noLeaderPartitionSet.map(m => m.topic).toSet,
                                                         brokers,
                                                         config.clientId,
                                                         config.socketTimeoutMs,
                                                         correlationId.getAndIncrement).topicsMetadata
     if(logger.isDebugEnabled) topicsMetadata.foreach(topicMetadata => debug(topicMetadata.toString()))
 // 2. 根据获取到的 partition 和 leader node 的关系更新noLeaderPartitionSet 和leaderForPartitionsMap 两个map集合,其中noLeaderPartitionSet 包含的是没有确定leader 的 partition 集合,leaderForPartitionsMap 是 已经确定了 leader 的 partition 集合。
     topicsMetadata.foreach { tmd =>
       val topic = tmd.topic
       tmd.partitionsMetadata.foreach { pmd =>
         val topicAndPartition = TopicAndPartition(topic, pmd.partitionId)
         if(pmd.leader.isDefined && noLeaderPartitionSet.contains(topicAndPartition)) {
           val leaderBroker = pmd.leader.get
           leaderForPartitionsMap.put(topicAndPartition, leaderBroker)
           noLeaderPartitionSet -= topicAndPartition
         }
       }
     }
   } catch {
     case t: Throwable => {
         if (!isRunning.get())
           throw t /* If this thread is stopped, propagate this exception to kill the thread. */
         else
           warn("Failed to find leader for %s".format(noLeaderPartitionSet), t)
       }
   } finally {
     lock.unlock()
   }

   try {
 // 3. 具体为 partition 分配 fetcher
     addFetcherForPartitions(leaderForPartitionsMap.map{
       case (topicAndPartition, broker) =>
         topicAndPartition -> BrokerAndInitialOffset(broker, partitionMap(topicAndPartition).getFetchOffset())}
     )
   } catch {
     case t: Throwable => {
       if (!isRunning.get())
         throw t /* If this thread is stopped, propagate this exception to kill the thread. */
       else {
         warn("Failed to add leader for partitions %s; will retry".format(leaderForPartitionsMap.keySet.mkString(",")), t)
         lock.lock()
         noLeaderPartitionSet ++= leaderForPartitionsMap.keySet
         lock.unlock()
       }
     }
   }
   // 4. 关闭空闲fetcher线程
   shutdownIdleFetcherThreads()
   Thread.sleep(config.refreshLeaderBackoffMs)
 }
重点看第3 步,具体为 partition 分配 fetcher,addFetcherForPartitions 源码如下:
  def addFetcherForPartitions(partitionAndOffsets: Map[TopicAndPartition, BrokerAndInitialOffset]) {
   mapLock synchronized {
 // 获取 fetcher 和 partition的映射关系
     val partitionsPerFetcher = partitionAndOffsets.groupBy{ case(topicAndPartition, brokerAndInitialOffset) =>
       BrokerAndFetcherId(brokerAndInitialOffset.broker, getFetcherId(topicAndPartition.topic, topicAndPartition.partition))}
     for ((brokerAndFetcherId, partitionAndOffsets) <- partitionsPerFetcher) {

       var fetcherThread: AbstractFetcherThread = null
       fetcherThreadMap.get(brokerAndFetcherId) match {
         case Some(f) => fetcherThread = f
         case None =>
 // 根据brokerAndFetcherId 去初始化Fetcher并启动 fetcher
           fetcherThread = createFetcherThread(brokerAndFetcherId.fetcherId, brokerAndFetcherId.broker)
           fetcherThreadMap.put(brokerAndFetcherId, fetcherThread)
           fetcherThread.start
       }

       fetcherThreadMap(brokerAndFetcherId).addPartitions(partitionAndOffsets.map { case (topicAndPartition, brokerAndInitOffset) =>
         topicAndPartition -> brokerAndInitOffset.initOffset
       })
     }
   }

   info("Added fetcher for partitions %s".format(partitionAndOffsets.map{ case (topicAndPartition, brokerAndInitialOffset) =>
     "[" + topicAndPartition + ", initOffset " + brokerAndInitialOffset.initOffset + " to broker " + brokerAndInitialOffset.broker + "] "}))
 }
kafka.consumer.ConsumerFetcherManager#createFetcherThread的源码如下:
 override def createFetcherThread(fetcherId: Int, sourceBroker: Broker): AbstractFetcherThread = {
   new ConsumerFetcherThread(
     "ConsumerFetcherThread-%s-%d-%d".format(consumerIdString, fetcherId, sourceBroker.id),
     config, sourceBroker, partitionMap, this)
 }
先来看ConsumerFetcherThread的构造方法声明:
 class ConsumerFetcherThread(name: String,
                             val config: ConsumerConfig,
                             sourceBroker: Broker,
                             partitionMap: Map[TopicAndPartition, PartitionTopicInfo],
                             val consumerFetcherManager: ConsumerFetcherManager)
         extends AbstractFetcherThread(name = name,
                                       clientId = config.clientId,
                                       sourceBroker = sourceBroker,
                                       socketTimeout = config.socketTimeoutMs,
                                       socketBufferSize = config.socketReceiveBufferBytes,
                                       fetchSize = config.fetchMessageMaxBytes,
                                       fetcherBrokerId = Request.OrdinaryConsumerId,
                                       maxWait = config.fetchWaitMaxMs,
                                       minBytes = config.fetchMinBytes,
                                       isInterruptible = true)
注意,partitionMap 中的value 是PartitionTopicInfo ,这个对象中封装了存放fetch结果值的BlockingQueue[FetchedDataChunk] 实例。 再来看 run 方法,其使用的是 kafka.utils.ShutdownableThread#run 方法,上面我们已经看过了,主要看该子类是如何重新 doWork方法的:
 override def doWork() {
   inLock(partitionMapLock) { // 加锁,执行,释放锁
     if (partitionMap.isEmpty) // 如果没有需要执行的 fetch 操作,等待200ms后返回
       partitionMapCond.await(200L, TimeUnit.MILLISECONDS)
     partitionMap.foreach { // 将所有的 fetch 的信息添加到fetchRequestBuilder中
       case((topicAndPartition, offset)) =>
         fetchRequestBuilder.addFetch(topicAndPartition.topic, topicAndPartition.partition,
                          offset, fetchSize)
     }
   }
   // 构建批抓取的fetchRequest对象
   val fetchRequest = fetchRequestBuilder.build()
 // 处理 FetchRequest
   if (!fetchRequest.requestInfo.isEmpty)
     processFetchRequest(fetchRequest)
 }
其中 kafka.server.AbstractFetcherThread#processFetchRequest 源码如下:
  private def processFetchRequest(fetchRequest: FetchRequest) {
   val partitionsWithError = new mutable.HashSet[TopicAndPartition]
   var response: FetchResponse = null
   try {
     trace("Issuing to broker %d of fetch request %s".format(sourceBroker.id, fetchRequest))
 // 发送请求,并获取返回值。
 // simpleConsumer  就是SimpleConsumer 实例,已作说明,不再赘述。
     response = simpleConsumer.fetch(fetchRequest)
   } catch {
     case t: Throwable =>
       if (isRunning.get) {
         warn("Error in fetch %s. Possible cause: %s".format(fetchRequest, t.toString))
         partitionMapLock synchronized {
           partitionsWithError ++= partitionMap.keys
         }
       }
   }
   fetcherStats.requestRate.mark()

   if (response != null) {
     // process fetched data
     inLock(partitionMapLock) { // 获取锁,执行处理response 操作,释放锁
       response.data.foreach {
         case(topicAndPartition, partitionData) =>
           val (topic, partitionId) = topicAndPartition.asTuple
           val currentOffset = partitionMap.get(topicAndPartition)
           // we append to the log if the current offset is defined and it is the same as the offset requested during fetch
           if (currentOffset.isDefined && fetchRequest.requestInfo(topicAndPartition).offset == currentOffset.get) {
             partitionData.error match { // 根据返回码来确定具体执行哪部分处理逻辑
               case ErrorMapping.NoError => // 成功返回,没有错误
                 try {
                   val messages = partitionData.messages.asInstanceOf[ByteBufferMessageSet]
                   val validBytes = messages.validBytes
                   val newOffset = messages.shallowIterator.toSeq.lastOption match {
                     case Some(m: MessageAndOffset) => m.nextOffset
                     case None => currentOffset.get
                   }
                   partitionMap.put(topicAndPartition, newOffset)
                   fetcherLagStats.getFetcherLagStats(topic, partitionId).lag = partitionData.hw - newOffset
                   fetcherStats.byteRate.mark(validBytes)
                   // Once we hand off the partition data to the subclass, we can't mess with it any more in this thread
                   processPartitionData(topicAndPartition, currentOffset.get, partitionData)
                 } catch {
                   case ime: InvalidMessageException => // 消息获取不完整
                     // we log the error and continue. This ensures two things
                     // 1. If there is a corrupt message in a topic partition, it does not bring the fetcher thread down and cause other topic partition to also lag
                     // 2. If the message is corrupt due to a transient state in the log (truncation, partial writes can cause this), we simply continue and
                     //    should get fixed in the subsequent fetches
                     logger.error("Found invalid messages during fetch for partition [" + topic + "," + partitionId + "] offset " + currentOffset.get + " error " + ime.getMessage)
                   case e: Throwable =>
                     throw new KafkaException("error processing data for partition [%s,%d] offset %d"
                                              .format(topic, partitionId, currentOffset.get), e)
                 }
               case ErrorMapping.OffsetOutOfRangeCode => // offset out of range error
                 try {
                   val newOffset = handleOffsetOutOfRange(topicAndPartition)
                   partitionMap.put(topicAndPartition, newOffset)
                   error("Current offset %d for partition [%s,%d] out of range; reset offset to %d"
                     .format(currentOffset.get, topic, partitionId, newOffset))
                 } catch {
                   case e: Throwable =>
                     error("Error getting offset for partition [%s,%d] to broker %d".format(topic, partitionId, sourceBroker.id), e)
                     partitionsWithError += topicAndPartition
                 }
               case _ =>
                 if (isRunning.get) {
                   error("Error for partition [%s,%d] to broker %d:%s".format(topic, partitionId, sourceBroker.id,
                     ErrorMapping.exceptionFor(partitionData.error).getClass))
                   partitionsWithError += topicAndPartition
                 }
             }
           }
       }
     }
   }

   if(partitionsWithError.size > 0) {
     debug("handling partitions with error for %s".format(partitionsWithError))
     handlePartitionsWithErrors(partitionsWithError)
   }
 }
其中processPartitionData 源码如下,它负责处理具体的返回消息:
  // process fetched data
 def processPartitionData(topicAndPartition: TopicAndPartition, fetchOffset: Long, partitionData: FetchResponsePartitionData) {
 // partitionMap 是一个成员变量,在构造函数中作为入参
   val pti = partitionMap(topicAndPartition)
   if (pti.getFetchOffset != fetchOffset)
     throw new RuntimeException("Offset doesn't match for partition [%s,%d] pti offset: %d fetch offset: %d"
                               .format(topicAndPartition.topic, topicAndPartition.partition, pti.getFetchOffset, fetchOffset))
 // 数据入队
   pti.enqueue(partitionData.messages.asInstanceOf[ByteBufferMessageSet])
 }
可以看到,终于在这里,把从leader中fetch的消息放入了BlockingQueue[FetchedDataChunk] 缓冲堵塞队列中。
7、KafkaStream从queue中堵塞式获取数据
KafkaStream 是依赖于 LinkedBlockingQueue 的同理 KafkaStream 也会返回一个迭代器 kafka.consumer.ConsumerIterator,用于迭代访问 KafkaStream 中的数据。 kafka.consumer.ConsumerIterator 的主要源码如下:
 // 判断是否有下一个元素
 def hasNext(): Boolean = {
   if(state == FAILED)
     throw new IllegalStateException("Iterator is in failed state")
   state match {
     case DONE => false
     case READY => true
     case _ => maybeComputeNext()
   }
 }
 // 获取下一个元素,父类实现
 def next(): T = {
   if(!hasNext())
     throw new NoSuchElementException()
   state = NOT_READY
   if(nextItem == null)
     throw new IllegalStateException("Expected item but none found.")
   nextItem
 }
 // 获取下一个元素,使用子类ConsumerIterator实现
 override def next(): MessageAndMetadata[K, V] = {
   val item = super.next() // 调用父类实现
   if(consumedOffset < 0)
     throw new KafkaException("Offset returned by the message set is invalid %d".format(consumedOffset))
   currentTopicInfo.resetConsumeOffset(consumedOffset)
   val topic = currentTopicInfo.topic
   trace("Setting %s consumed offset to %d".format(topic, consumedOffset))
   consumerTopicStats.getConsumerTopicStats(topic).messageRate.mark()
   consumerTopicStats.getConsumerAllTopicStats().messageRate.mark()
   item
 }
  // 或许有,尝试计算一下下一个
 def maybeComputeNext(): Boolean = {
   state = FAILED
   nextItem = makeNext()
   if(state == DONE) {
     false
   } else {
     state = READY
     true
   }
 }
 // 创建下一个元素,这个在子类ConsumerIterator中有实现
 protected def makeNext(): MessageAndMetadata[K, V] = {
 // 首先channel 是 LinkedBlockingQueue实例, 是 KafkaStream 中的 queue 成员变量,queue 成员变量
   var currentDataChunk: FetchedDataChunk = null
   // if we don't have an iterator, get one
   var localCurrent = current.get()
 // 如果没有迭代器或者是没有下一个元素了,需要从channel中取一个
   if(localCurrent == null || !localCurrent.hasNext) {
 // 删除并返回队列的头节点。
     if (consumerTimeoutMs < 0)
       currentDataChunk = channel.take // 阻塞方法,一直等待,直到有可用元素
     else {
       currentDataChunk = channel.poll(consumerTimeoutMs,  TimeUnit.MILLISECONDS) // 阻塞方法,等待指定时间,超时也会返回
       if (currentDataChunk == null) { // 如果没有数据,重置状态为NOT_READY
         // reset state to make the iterator re-iterable
         resetState()
         throw new ConsumerTimeoutException
       }
     }
 // 关闭命令
     if(currentDataChunk eq ZookeeperConsumerConnector.shutdownCommand) {
       debug("Received the shutdown command")
       return allDone // 该函数将状态设为DONE, 返回null
     } else {
       currentTopicInfo = currentDataChunk.topicInfo
       val cdcFetchOffset = currentDataChunk.fetchOffset
       val ctiConsumeOffset = currentTopicInfo.getConsumeOffset
       if (ctiConsumeOffset < cdcFetchOffset) {
         error("consumed offset: %d doesn't match fetch offset: %d for %s;\n Consumer may lose data"
           .format(ctiConsumeOffset, cdcFetchOffset, currentTopicInfo))
         currentTopicInfo.resetConsumeOffset(cdcFetchOffset)
       }
       localCurrent = currentDataChunk.messages.iterator

       current.set(localCurrent)
     }
     // if we just updated the current chunk and it is empty that means the fetch size is too small!
     if(currentDataChunk.messages.validBytes == 0)
       throw new MessageSizeTooLargeException("Found a message larger than the maximum fetch size of this consumer on topic " +
                                              "%s partition %d at fetch offset %d. Increase the fetch size, or decrease the maximum message size the broker will allow."
                                              .format(currentDataChunk.topicInfo.topic, currentDataChunk.topicInfo.partitionId, currentDataChunk.fetchOffset))
   }
   var item = localCurrent.next()
   // reject the messages that have already been consumed
   while (item.offset < currentTopicInfo.getConsumeOffset && localCurrent.hasNext) {
     item = localCurrent.next()
   }
   consumedOffset = item.nextOffset

   item.message.ensureValid() // validate checksum of message to ensure it is valid
  // 返回处理封装好的 kafka 数据
   new MessageAndMetadata(currentTopicInfo.topic, currentTopicInfo.partitionId, item.message, item.offset, keyDecoder, valueDecoder)
 }
2、消费到的数据cache 到WAL中
我们再来看,org.apache.spark.streaming.kafka.ReliableKafkaReceiver#onStart 的第10 步相应的代码:
 // 10. 将待处理的MessageHandler 放入 线程池中,等待执行
   topicMessageStreams.values.foreach { streams =>
     streams.foreach { stream =>
       messageHandlerThreadPool.submit(new MessageHandler(stream))
     }
   }
其中 MessageHandler 是一个 Runnable 对象,其 run 方法如下:
 override def run(): Unit = {
   while (!isStopped) {
     try {
 // 1. 获取ConsumerIterator 迭代器对象
       val streamIterator = stream.iterator()
       // 2. 遍历迭代器中获取每一条数据,并且保存message和相应的 metadata 信息
 while (streamIterator.hasNext) {
         storeMessageAndMetadata(streamIterator.next)
       }
     } catch {
       case e: Exception =>
         reportError("Error handling message", e)
     }
   }
 }
其中第二步中关键方法,org.apache.spark.streaming.kafka.ReliableKafkaReceiver#storeMessageAndMetadata 方法如下:
 /** Store a Kafka message and the associated metadata as a tuple. */
 private def storeMessageAndMetadata(
     msgAndMetadata: MessageAndMetadata[K, V]): Unit = {
   val topicAndPartition = TopicAndPartition(msgAndMetadata.topic, msgAndMetadata.partition)
   val data = (msgAndMetadata.key, msgAndMetadata.message)
   val metadata = (topicAndPartition, msgAndMetadata.offset)
 // 添加数据到 block
   blockGenerator.addDataWithCallback(data, metadata)
 }
addDataWithCallback 源码如下:
 /**
  * Push a single data item into the buffer. After buffering the data, the
  * `BlockGeneratorListener.onAddData` callback will be called.
  */
 def addDataWithCallback(data: Any, metadata: Any): Unit = {
   if (state == Active) {
     waitToPush()
     synchronized {
       if (state == Active) {
 // 1. 将数据放入 buffer 中,以便处理线程从中获取数据
         currentBuffer += data
 // 2. 在启动 receiver线程中,可以知道listener 是指GeneratedBlockHandler 实例
         listener.onAddData(data, metadata)
       } else {
         throw new SparkException(
           "Cannot add data as BlockGenerator has not been started or has been stopped")
       }
     }
   } else {
     throw new SparkException(
       "Cannot add data as BlockGenerator has not been started or has been stopped")
   }
 }
第二步比较简单,先看一下第二步: org.apache.spark.streaming.kafka.ReliableKafkaReceiver.GeneratedBlockHandler#onAddData的源码如下:
 def onAddData(data: Any, metadata: Any): Unit = {
   // Update the offset of the data that was added to the generator
   if (metadata != null) {
     val (topicAndPartition, offset) = metadata.asInstanceOf[(TopicAndPartition, Long)]
     updateOffset(topicAndPartition, offset)
   }
 }
 // 这里的 updateOffset 调用的是//org.apache.spark.streaming.kafka.ReliableKafkaReceiver#updateOffset,源码如下:
 /** Update stored offset */
 private def updateOffset(topicAndPartition: TopicAndPartition, offset: Long): Unit = {
   topicPartitionOffsetMap.put(topicAndPartition, offset)
 }
第一步的原理如下: 在 BlockGenerator中有一个定时器,定时(200ms)去执行检查currentBuffer是否为empty任务, 若不为空,则执行如下操作并把它放入等待生成block 的队列中,有两外一个线程来时刻监听这个队列,有数据,则执行pushBlock 操作。 第一个定时器线程如下:
 private val blockIntervalTimer =
   new RecurringTimer(clock, blockIntervalMs, updateCurrentBuffer, "BlockGenerator")

 // 其中,updateCurrentBuffer 方法如下
 /** Change the buffer to which single records are added to. */
 private def updateCurrentBuffer(time: Long): Unit = {
   try {
     var newBlock: Block = null
     synchronized {
       if (currentBuffer.nonEmpty) {
         val newBlockBuffer = currentBuffer
         currentBuffer = new ArrayBuffer[Any]
         val blockId = StreamBlockId(receiverId, time - blockIntervalMs)
         listener.onGenerateBlock(blockId)
         newBlock = new Block(blockId, newBlockBuffer)
       }
     }

     if (newBlock != null) {
       blocksForPushing.put(newBlock)  // put is blocking when queue is full
     }
   } catch {
     case ie: InterruptedException =>
       logInfo("Block updating timer thread was interrupted")
     case e: Exception =>
       reportError("Error in block updating thread", e)
   }
 }

 // listener.onGenerateBlock(blockId) 代码如下:
 def onGenerateBlock(blockId: StreamBlockId): Unit = {
   // Remember the offsets of topics/partitions when a block has been generated
   rememberBlockOffsets(blockId)
 }
 // rememberBlockOffsets 代码如下:
 /**
  * Remember the current offsets for each topic and partition. This is called when a block is
  * generated.
  */
 private def rememberBlockOffsets(blockId: StreamBlockId): Unit = {
   // Get a snapshot of current offset map and store with related block id.
   val offsetSnapshot = topicPartitionOffsetMap.toMap
   blockOffsetMap.put(blockId, offsetSnapshot)
   topicPartitionOffsetMap.clear()
 }
 // 可以看出,主要是清除 topic-partition-> offset 映射关系
 // 建立 block 和topic-partition-> offset的映射关系
其中,blocksForPushing是一个有界阻塞队列,另外一个线程会一直轮询它。
  private val blocksForPushing = new ArrayBlockingQueue[Block](blockQueueSize)
 private val blockPushingThread = new Thread() { override def run() { keepPushingBlocks() } }

 /** Keep pushing blocks to the BlockManager. */
 // 这个方法主要的作用就是一直不停地轮询blocksForPushing队列,并处理相应的push block 事件。
 private def keepPushingBlocks() {
   logInfo("Started block pushing thread")

   def areBlocksBeingGenerated: Boolean = synchronized {
     state != StoppedGeneratingBlocks
   }

   try {
     // While blocks are being generated, keep polling for to-be-pushed blocks and push them.
     while (areBlocksBeingGenerated) { // 线程没有被停止,则一直循环
 // 超时poll操作获取并删除头节点,超过时间(10ms)则返回
       Option(blocksForPushing.poll(10, TimeUnit.MILLISECONDS)) match {
         case Some(block) => pushBlock(block) // 如果有数据则进行处理。
         case None =>
       }
     }

     // At this point, state is StoppedGeneratingBlock. So drain the queue of to-be-pushed blocks.
     logInfo("Pushing out the last " + blocksForPushing.size() + " blocks")
     while (!blocksForPushing.isEmpty) { // 如果队列中还有数据,继续进行处理
       val block = blocksForPushing.take() // 这是一个堵塞方法,不过现在会马上返回,因为队列里面有数据。
       logDebug(s"Pushing block $block")
       pushBlock(block) // 处理数据
       logInfo("Blocks left to push " + blocksForPushing.size())
     }
     logInfo("Stopped block pushing thread")
   } catch {
     case ie: InterruptedException =>
       logInfo("Block pushing thread was interrupted")
     case e: Exception =>
       reportError("Error in block pushing thread", e)
   }
 }
其中的pushBlock源码如下:
 private def pushBlock(block: Block) {
   listener.onPushBlock(block.id, block.buffer)
   logInfo("Pushed block " + block.id)
 }
其调用的listener(org.apache.spark.streaming.kafka.ReliableKafkaReceiver.GeneratedBlockHandler)的 onPushBlock 源码如下:
 def onPushBlock(blockId: StreamBlockId, arrayBuffer: mutable.ArrayBuffer[_]): Unit = {
   // Store block and commit the blocks offset
   storeBlockAndCommitOffset(blockId, arrayBuffer)
 }
其中,storeBlockAndCommitOffset具体代码如下:
 /**
  * Store the ready-to-be-stored block and commit the related offsets to zookeeper. This method
  * will try a fixed number of times to push the block. If the push fails, the receiver is stopped.
  */
 private def storeBlockAndCommitOffset(
     blockId: StreamBlockId, arrayBuffer: mutable.ArrayBuffer[_]): Unit = {
   var count = 0
   var pushed = false
   var exception: Exception = null
   while (!pushed && count <= 3) { // 整个过程,总共允许3 次重试
     try {
       store(arrayBuffer.asInstanceOf[mutable.ArrayBuffer[(K, V)]])
       pushed = true
     } catch {
       case ex: Exception =>
         count += 1
         exception = ex
     }
   }
   if (pushed) { // 已经push block
 // 更新 offset
     Option(blockOffsetMap.get(blockId)).foreach(commitOffset)
 // 如果已经push 到 BlockManager 中,则不会再保留 block和topic-partition-> offset的映射关系
     blockOffsetMap.remove(blockId)
   } else {
     stop("Error while storing block into Spark", exception)
   }
 }
 // 其中,commitOffset源码如下:
 /**
  * Commit the offset of Kafka's topic/partition, the commit mechanism follow Kafka 0.8.x's
  * metadata schema in Zookeeper.
  */
 private def commitOffset(offsetMap: Map[TopicAndPartition, Long]): Unit = {
   if (zkClient == null) {
     val thrown = new IllegalStateException("Zookeeper client is unexpectedly null")
     stop("Zookeeper client is not initialized before commit offsets to ZK", thrown)
     return
   }

   for ((topicAndPart, offset) <- offsetMap) {
     try {
 // 获取在 zk 中 comsumer 的partition的目录
       val topicDirs = new ZKGroupTopicDirs(groupId, topicAndPart.topic)
       val zkPath = s"${topicDirs.consumerOffsetDir}/${topicAndPart.partition}"
       // 更新 consumer 的已消费topic-partition 的offset 操作
       ZkUtils.updatePersistentPath(zkClient, zkPath, offset.toString)
     } catch {
       case e: Exception =>
         logWarning(s"Exception during commit offset $offset for topic" +
           s"${topicAndPart.topic}, partition ${topicAndPart.partition}", e)
     }

     logInfo(s"Committed offset $offset for topic ${topicAndPart.topic}, " +
       s"partition ${topicAndPart.partition}")
   }
 }
关键方法store 如下:
 /** Store an ArrayBuffer of received data as a data block into Spark's memory. */
 def store(dataBuffer: ArrayBuffer[T]) {
   supervisor.pushArrayBuffer(dataBuffer, None, None)
 }
其调用了supervisor(org.apache.spark.streaming.receiver.ReceiverSupervisorImpl实例)的pushArrayBuffer方法,内部操作如下:
 /** Store an ArrayBuffer of received data as a data block into Spark's memory. */
 def pushArrayBuffer(
     arrayBuffer: ArrayBuffer[_],
     metadataOption: Option[Any],
     blockIdOption: Option[StreamBlockId]
   ) {
   pushAndReportBlock(ArrayBufferBlock(arrayBuffer), metadataOption, blockIdOption)
 }
org.apache.spark.streaming.receiver.ReceiverSupervisorImpl#pushAndReportBlock 源码如下:
 /** Store block and report it to driver */
 def pushAndReportBlock(
     receivedBlock: ReceivedBlock,
     metadataOption: Option[Any],
     blockIdOption: Option[StreamBlockId]
   ) {
 // 1.准备blockId,time等信息
   val blockId = blockIdOption.getOrElse(nextBlockId)
   val time = System.currentTimeMillis
 // 2. 执行存储 block 操作
   val blockStoreResult = receivedBlockHandler.storeBlock(blockId, receivedBlock)
   logDebug(s"Pushed block $blockId in ${(System.currentTimeMillis - time)} ms")
 // 3. 获取保存的message 的记录数
   val numRecords = blockStoreResult.numRecords
 // 4. 通知trackerEndpoint已经添加block,执行更新driver 的WAL操作
   val blockInfo = ReceivedBlockInfo(streamId, numRecords, metadataOption, blockStoreResult)
   trackerEndpoint.askWithRetry[Boolean](AddBlock(blockInfo))
   logDebug(s"Reported block $blockId")
 }
其中,receivedBlockHandler 的赋值语句如下:
  private val receivedBlockHandler: ReceivedBlockHandler = {
   if (WriteAheadLogUtils.enableReceiverLog(env.conf)) {
     if (checkpointDirOption.isEmpty) {
       throw new SparkException(
         "Cannot enable receiver write-ahead log without checkpoint directory set. " +
           "Please use streamingContext.checkpoint() to set the checkpoint directory. " +
           "See documentation for more details.")
     }
 // enable WAL并且checkpoint dir 不为空,即,在这里,返回WriteAheadLogBasedBlockHandler 对象,这个对象持有了 blockmanager,streamid,storagelevel,conf,checkpointdir 等信息
     new WriteAheadLogBasedBlockHandler(env.blockManager, receiver.streamId,
       receiver.storageLevel, env.conf, hadoopConf, checkpointDirOption.get)
   } else {
     new BlockManagerBasedBlockHandler(env.blockManager, receiver.storageLevel)
   }
 }
ReceivedBlockHandler 的 storeBlock方法源码如下:
 /**
  * This implementation stores the block into the block manager as well as a write ahead log.
  * It does this in parallel, using Scala Futures, and returns only after the block has
  * been stored in both places.
  */
 // 并行地将block 存入 blockmanager 和 write ahead log,使用scala 的Future 机制实现的,当两个都写完毕之后,返回。
 def storeBlock(blockId: StreamBlockId, block: ReceivedBlock): ReceivedBlockStoreResult = {

   var numRecords = None: Option[Long]
   // Serialize the block so that it can be inserted into both
 // 1. 将ReceivedBlock序列化(未使用压缩机制)成字节数组
   val serializedBlock = block match { // serializedBlock 就是序列化后的结果
     case ArrayBufferBlock(arrayBuffer) => // go this branch
       numRecords = Some(arrayBuffer.size.toLong)
       blockManager.dataSerialize(blockId, arrayBuffer.iterator)
     case IteratorBlock(iterator) =>
       val countIterator = new CountingIterator(iterator)
       val serializedBlock = blockManager.dataSerialize(blockId, countIterator)
       numRecords = countIterator.count
       serializedBlock
     case ByteBufferBlock(byteBuffer) =>
       byteBuffer
     case _ =>
       throw new Exception(s"Could not push $blockId to block manager, unexpected block type")
   }

   // 2. Store the block in block manager
   val storeInBlockManagerFuture = Future {
     val putResult =
       blockManager.putBytes(blockId, serializedBlock, effectiveStorageLevel, tellMaster = true)
     if (!putResult.map { _._1 }.contains(blockId)) {
       throw new SparkException(
         s"Could not store $blockId to block manager with storage level $storageLevel")
     }
   }

   // 3. Store the block in write ahead log
   val storeInWriteAheadLogFuture = Future {
     writeAheadLog.write(serializedBlock, clock.getTimeMillis())
   }

   // 4. Combine the futures, wait for both to complete, and return the write ahead log record handle
   val combinedFuture = storeInBlockManagerFuture.zip(storeInWriteAheadLogFuture).map(_._2)
 // 等待future任务结果返回。默认时间是 30s, 使用spark.streaming.receiver.blockStoreTimeout 参数来变更默认值
   val walRecordHandle = Await.result(combinedFuture, blockStoreTimeout)
   // 返回cache之后的block 相关信息
 WriteAheadLogBasedStoreResult(blockId, numRecords, walRecordHandle)
 }
3、将WAL的block信息发送给driver
注意WriteAheadLogBasedStoreResult 这个 WriteAheadLogBasedStoreResult 实例,后面 RDD 在处理的时候会使用到。 org.apache.spark.streaming.receiver.ReceiverSupervisorImpl#pushAndReportBlock 通知driver addBlock 的源码如下:
 // 4. 通知trackerEndpoint已经添加block,执行更新driver 的WAL操作
   val blockInfo = ReceivedBlockInfo(streamId, numRecords, metadataOption, blockStoreResult)
   trackerEndpoint.askWithRetry[Boolean](AddBlock(blockInfo))
   logDebug(s"Reported block $blockId")
4、Driver将WAL block数据写入到 driver 的WAL中
跳过中间的RPC操作,直接到 driver 端org.apache.spark.streaming.scheduler.ReceiverTracker.ReceiverTrackerEndpoint#receiveAndReply 中:
 case AddBlock(receivedBlockInfo) =>
   if (WriteAheadLogUtils.isBatchingEnabled(ssc.conf, isDriver = true)) {
     walBatchingThreadPool.execute(new Runnable {
       override def run(): Unit = Utils.tryLogNonFatalError {
         if (active) {
           context.reply(addBlock(receivedBlockInfo))
         } else {
           throw new IllegalStateException("ReceiverTracker RpcEndpoint shut down.")
         }
       }
     })
   } else {
     context.reply(addBlock(receivedBlockInfo))
   }
其中 addBlock方法源码如下:
 /** Add new blocks for the given stream */
 private def addBlock(receivedBlockInfo: ReceivedBlockInfo): Boolean = {
   receivedBlockTracker.addBlock(receivedBlockInfo)
 }
其中,org.apache.spark.streaming.scheduler.ReceivedBlockTracker#addBlock 源码如下:
 /** Add received block. This event will get written to the write ahead log (if enabled). */
 def addBlock(receivedBlockInfo: ReceivedBlockInfo): Boolean = {
   try {
     val writeResult = writeToLog(BlockAdditionEvent(receivedBlockInfo))
     if (writeResult) {
       synchronized {
         getReceivedBlockQueue(receivedBlockInfo.streamId) += receivedBlockInfo
       }
       logDebug(s"Stream ${receivedBlockInfo.streamId} received " +
         s"block ${receivedBlockInfo.blockStoreResult.blockId}")
     } else {
       logDebug(s"Failed to acknowledge stream ${receivedBlockInfo.streamId} receiving " +
         s"block ${receivedBlockInfo.blockStoreResult.blockId} in the Write Ahead Log.")
     }
     writeResult
   } catch {
     case NonFatal(e) =>
       logError(s"Error adding block $receivedBlockInfo", e)
       false
   }
 }
 /** Write an update to the tracker to the write ahead log */
 private def writeToLog(record: ReceivedBlockTrackerLogEvent): Boolean = {
   if (isWriteAheadLogEnabled) {
     logTrace(s"Writing record: $record")
     try {
       writeAheadLogOption.get.write(ByteBuffer.wrap(Utils.serialize(record)),
         clock.getTimeMillis())
       true
     } catch {
       case NonFatal(e) =>
         logWarning(s"Exception thrown while writing record: $record to the WriteAheadLog.", e)
         false
     }
   } else {
     true
   }
 }
 /** Get the queue of received blocks belonging to a particular stream */
 private def getReceivedBlockQueue(streamId: Int): ReceivedBlockQueue = {
   streamIdToUnallocatedBlockQueues.getOrElseUpdate(streamId, new ReceivedBlockQueue)
 }
上述代码,主要是将BlockAdditionEvent写WAL和更新队列(其实就是mutable.HashMap[Int, ReceivedBlockQueue]),这个队列中存放的是streamId ->UnallocatedBlock 的映射关系
5、从WAL RDD 中读取数据
createStream 源码如下:
 /**
  * Create an input stream that pulls messages from Kafka Brokers.
  * @param ssc         StreamingContext object
  * @param kafkaParams Map of kafka configuration parameters,
  *                    see http://kafka.apache.org/08/configuration.html
  * @param topics      Map of (topic_name -> numPartitions) to consume. Each partition is consumed
  *                    in its own thread.
  * @param storageLevel Storage level to use for storing the received objects
  * @tparam K type of Kafka message key
  * @tparam V type of Kafka message value
  * @tparam U type of Kafka message key decoder
  * @tparam T type of Kafka message value decoder
  * @return DStream of (Kafka message key, Kafka message value)
  */
 def createStream[K: ClassTag, V: ClassTag, U <: Decoder[_]: ClassTag, T <: Decoder[_]: ClassTag](
     ssc: StreamingContext,
     kafkaParams: Map[String, String],
     topics: Map[String, Int],
     storageLevel: StorageLevel
   ): ReceiverInputDStream[(K, V)] = {
 // 可以通过设置spark.streaming.receiver.writeAheadLog.enable参数为 true来开启WAL
   val walEnabled = WriteAheadLogUtils.enableReceiverLog(ssc.conf)
   new KafkaInputDStream[K, V, U, T](ssc, kafkaParams, topics, walEnabled, storageLevel)
 }
创建的是KafkaInputDStream对象:
 /**
  * Input stream that pulls messages from a Kafka Broker.
  *
  * @param kafkaParams Map of kafka configuration parameters.
  *                    See: http://kafka.apache.org/configuration.html
  * @param topics Map of (topic_name -> numPartitions) to consume. Each partition is consumed
  * in its own thread.
  * @param storageLevel RDD storage level.
  */
 private[streaming]
 class KafkaInputDStream[
   K: ClassTag,
   V: ClassTag,
   U <: Decoder[_]: ClassTag,
   T <: Decoder[_]: ClassTag](
     ssc_ : StreamingContext,
     kafkaParams: Map[String, String],
     topics: Map[String, Int],
     useReliableReceiver: Boolean,
     storageLevel: StorageLevel
   ) extends ReceiverInputDStream[(K, V)](ssc_) with Logging {

   def getReceiver(): Receiver[(K, V)] = {
     if (!useReliableReceiver) { // 未启用 WAL,会使用 KafkaReceiver 对象
       new KafkaReceiver[K, V, U, T](kafkaParams, topics, storageLevel)
     } else { // 如果启用了WAL, 使用ReliableKafkaReceiver
       new ReliableKafkaReceiver[K, V, U, T](kafkaParams, topics, storageLevel)
     }
   }
 }
org.apache.spark.streaming.kafka.KafkaInputDStream 继承父类的 compute方法:
  /**
  * Generates RDDs with blocks received by the receiver of this stream. */
 override def compute(validTime: Time): Option[RDD[T]] = {
   val blockRDD = {

     if (validTime < graph.startTime) {
       // If this is called for any time before the start time of the context,
       // then this returns an empty RDD. This may happen when recovering from a
       // driver failure without any write ahead log to recover pre-failure data.
       new BlockRDD[T](ssc.sc, Array.empty)
     } else {
       // Otherwise, ask the tracker for all the blocks that have been allocated to this stream
       // for this batch
       val receiverTracker = ssc.scheduler.receiverTracker
       val blockInfos = receiverTracker.getBlocksOfBatch(validTime).getOrElse(id, Seq.empty)

       // Register the input blocks information into InputInfoTracker
       val inputInfo = StreamInputInfo(id, blockInfos.flatMap(_.numRecords).sum)
       ssc.scheduler.inputInfoTracker.reportInfo(validTime, inputInfo)

       // Create the BlockRDD
       createBlockRDD(validTime, blockInfos)
     }
   }
   Some(blockRDD)
 }
getBlocksOfBatch 如下:
 /** Get the blocks for the given batch and all input streams. */
 def getBlocksOfBatch(batchTime: Time): Map[Int, Seq[ReceivedBlockInfo]] = {
   receivedBlockTracker.getBlocksOfBatch(batchTime)
 }
 调用:
 /** Get the blocks allocated to the given batch. */
 def getBlocksOfBatch(batchTime: Time): Map[Int, Seq[ReceivedBlockInfo]] = synchronized {
   timeToAllocatedBlocks.get(batchTime).map { _.streamIdToAllocatedBlocks }.getOrElse(Map.empty)
 }
6、JobGenerator将WAL block 分配给一个batch,并生成job
1、取出WAL block 信息
在 org.apache.spark.streaming.scheduler.JobGenerator 中声明了一个定时器:
 // timer 会按照批次间隔 生成 GenerateJobs 任务,并放入eventLoop 堵塞队列中
 private val timer = new RecurringTimer(clock, ssc.graph.batchDuration.milliseconds,
   longTime => eventLoop.post(GenerateJobs(new Time(longTime))), "JobGenerator")
EventLoop 实例化代码如下:
 eventLoop = new EventLoop[JobGeneratorEvent]("JobGenerator") {
   override protected def onReceive(event: JobGeneratorEvent): Unit = processEvent(event)

   override protected def onError(e: Throwable): Unit = {
     jobScheduler.reportError("Error in job generator", e)
   }
 }
 eventLoop.start()
EventLoop里定义了一个LinkedBlockingDeque双端堵塞队列和一个执行daemon线程,daemon线程会不停从 双端堵塞队列中堵塞式取数据,一旦取到数据,会调 onReceive 方法,即 processEvent 方法:
 /** Processes all events */
 private def processEvent(event: JobGeneratorEvent) {
   logDebug("Got event " + event)
   event match {
     case GenerateJobs(time) => generateJobs(time)
     case ClearMetadata(time) => clearMetadata(time)
     case DoCheckpoint(time, clearCheckpointDataLater) =>
       doCheckpoint(time, clearCheckpointDataLater)
     case ClearCheckpointData(time) => clearCheckpointData(time)
   }
 }
由于是GenerateJobs 事件, 会继续调用generateJobs 方法:
 /** Generate jobs and perform checkpoint for the given `time`.  */
 private def generateJobs(time: Time) {
   // Set the SparkEnv in this thread, so that job generation code can access the environment
   // Example: BlockRDDs are created in this thread, and it needs to access BlockManager
   // Update: This is probably redundant after threadlocal stuff in SparkEnv has been removed.
   SparkEnv.set(ssc.env)
   Try {
 // 1. 将 WAL block 信息 分配给batch(这些数据块信息是worker 节点cache 到WAL 之后发送给driver 端的)
     jobScheduler.receiverTracker.allocateBlocksToBatch(time)
 // 2. 使用分配的block数据块来生成任务
     graph.generateJobs(time) // generate jobs using allocated block
   } match {
     case Success(jobs) =>
       val streamIdToInputInfos = jobScheduler.inputInfoTracker.getInfo(time)
       jobScheduler.submitJobSet(JobSet(time, jobs, streamIdToInputInfos))
     case Failure(e) =>
       jobScheduler.reportError("Error generating jobs for time " + time, e)
   }
 // 发布DoCheckpoint 事件,保存checkpoint操作,主要是将新的checkpoint 数据写入到 hdfs, 删除旧的 checkpoint 数据
   eventLoop.post(DoCheckpoint(time, clearCheckpointDataLater = false))
 }
第一步中调用的 org.apache.spark.streaming.scheduler.ReceiverTracker#allocateBlocksToBatch方法如下:
 /** Allocate all unallocated blocks to the given batch. */
 def allocateBlocksToBatch(batchTime: Time): Unit = {
   if (receiverInputStreams.nonEmpty) {
     receivedBlockTracker.allocateBlocksToBatch(batchTime)
   }
 }
其中,org.apache.spark.streaming.scheduler.ReceivedBlockTracker#allocateBlocksToBatch 方法如下:
 def allocateBlocksToBatch(batchTime: Time): Unit = synchronized {
   if (lastAllocatedBatchTime == null || batchTime > lastAllocatedBatchTime) {
 // 遍历输入流,根据流的 streamId 获取未被分配的block队列,并返回[streamId, seq[receivedBlockInfo]],由此可知,到此为止,数据其实已经从receiver中读出来了。
    // 获取 streamid和 WAL的blocks 的映射关系
 val streamIdToBlocks = streamIds.map { streamId =>
         (streamId, getReceivedBlockQueue(streamId).dequeueAll(x => true))
     }.toMap
     val allocatedBlocks = AllocatedBlocks(streamIdToBlocks)
     if (writeToLog(BatchAllocationEvent(batchTime, allocatedBlocks))) {
       timeToAllocatedBlocks.put(batchTime, allocatedBlocks)
       lastAllocatedBatchTime = batchTime
     } else {
       logInfo(s"Possibly processed batch $batchTime need to be processed again in WAL recovery")
     }
   } else {
     // This situation occurs when:
     // 1. WAL is ended with BatchAllocationEvent, but without BatchCleanupEvent,
     // possibly processed batch job or half-processed batch job need to be processed again,
     // so the batchTime will be equal to lastAllocatedBatchTime.
     // 2. Slow checkpointing makes recovered batch time older than WAL recovered
     // lastAllocatedBatchTime.
     // This situation will only occurs in recovery time.
     logInfo(s"Possibly processed batch $batchTime need to be processed again in WAL recovery")
   }
 }
其中,getReceivedBlockQueue的源码如下:
 /** Get the queue of received blocks belonging to a particular stream */
 private def getReceivedBlockQueue(streamId: Int): ReceivedBlockQueue = {
   streamIdToUnallocatedBlockQueues.getOrElseUpdate(streamId, new ReceivedBlockQueue)
 }
可以看到,worker node 发送过来的block 数据被取出来了。
2、根据WAL block创建 RDD
org.apache.spark.streaming.dstream.ReceiverInputDStream#createBlockRDD 源码如下:
 private[streaming] def createBlockRDD(time: Time, blockInfos: Seq[ReceivedBlockInfo]): RDD[T] = {

   if (blockInfos.nonEmpty) {
     val blockIds = blockInfos.map { _.blockId.asInstanceOf[BlockId] }.toArray
    // 所有的block已经有了WriteAheadLogRecordHandle, 创建一个WALBackedBlockRDD即可, 否则创建BlockRDD。
 // 其中,WriteAheadLogRecordHandle 是一个跟WAL 相关联的EntryInfo,实现类FileBasedWriteAheadLogSegment就包含了WAL segment 的path, offset 以及 length 信息。RDD 在真正需要数据时,根据这些handle信息从 WAL 中读取数据。
     // Are WAL record handles present with all the blocks
     val areWALRecordHandlesPresent = blockInfos.forall { _.walRecordHandleOption.nonEmpty }

     if (areWALRecordHandlesPresent) {
       // If all the blocks have WAL record handle, then create a WALBackedBlockRDD
       val isBlockIdValid = blockInfos.map { _.isBlockIdValid() }.toArray
       val walRecordHandles = blockInfos.map { _.walRecordHandleOption.get }.toArray
       new WriteAheadLogBackedBlockRDD[T](
         ssc.sparkContext, blockIds, walRecordHandles, isBlockIdValid)
     } else {
       // Else, create a BlockRDD. However, if there are some blocks with WAL info but not
       // others then that is unexpected and log a warning accordingly.
       if (blockInfos.find(_.walRecordHandleOption.nonEmpty).nonEmpty) {
         if (WriteAheadLogUtils.enableReceiverLog(ssc.conf)) {
           logError("Some blocks do not have Write Ahead Log information; " +
             "this is unexpected and data may not be recoverable after driver failures")
         } else {
           logWarning("Some blocks have Write Ahead Log information; this is unexpected")
         }
       }
       val validBlockIds = blockIds.filter { id =>
         ssc.sparkContext.env.blockManager.master.contains(id)
       }
       if (validBlockIds.size != blockIds.size) {
         logWarning("Some blocks could not be recovered as they were not found in memory. " +
           "To prevent such data loss, enabled Write Ahead Log (see programming guide " +
           "for more details.")
       }
       new BlockRDD[T](ssc.sc, validBlockIds)
     }
   } else {
     // If no block is ready now, creating WriteAheadLogBackedBlockRDD or BlockRDD
     // according to the configuration
     if (WriteAheadLogUtils.enableReceiverLog(ssc.conf)) {
       new WriteAheadLogBackedBlockRDD[T](
         ssc.sparkContext, Array.empty, Array.empty, Array.empty)
     } else {
       new BlockRDD[T](ssc.sc, Array.empty)
     }
   }
 }
org.apache.spark.streaming.rdd.WriteAheadLogBackedBlockRDD#compute 的源码如下:
  /**
  * Gets the partition data by getting the corresponding block from the block manager.
  * If the block does not exist, then the data is read from the corresponding record
  * in write ahead log files.
  */
 override def compute(split: Partition, context: TaskContext): Iterator[T] = {
   assertValid()
   val hadoopConf = broadcastedHadoopConf.value
   val blockManager = SparkEnv.get.blockManager
   val partition = split.asInstanceOf[WriteAheadLogBackedBlockRDDPartition]
   val blockId = partition.blockId

   def getBlockFromBlockManager(): Option[Iterator[T]] = {
     blockManager.get(blockId).map(_.data.asInstanceOf[Iterator[T]])
   }

   def getBlockFromWriteAheadLog(): Iterator[T] = {
     var dataRead: ByteBuffer = null
     var writeAheadLog: WriteAheadLog = null
     try {
       // The WriteAheadLogUtils.createLog*** method needs a directory to create a
       // WriteAheadLog object as the default FileBasedWriteAheadLog needs a directory for
       // writing log data. However, the directory is not needed if data needs to be read, hence
       // a dummy path is provided to satisfy the method parameter requirements.
       // FileBasedWriteAheadLog will not create any file or directory at that path.
       // FileBasedWriteAheadLog will not create any file or directory at that path. Also,
       // this dummy directory should not already exist otherwise the WAL will try to recover
       // past events from the directory and throw errors.
       val nonExistentDirectory = new File(
         System.getProperty("java.io.tmpdir"), UUID.randomUUID().toString).getAbsolutePath
       writeAheadLog = WriteAheadLogUtils.createLogForReceiver(
         SparkEnv.get.conf, nonExistentDirectory, hadoopConf)
       dataRead = writeAheadLog.read(partition.walRecordHandle)
     } catch {
       case NonFatal(e) =>
         throw new SparkException(
           s"Could not read data from write ahead log record ${partition.walRecordHandle}", e)
     } finally {
       if (writeAheadLog != null) {
         writeAheadLog.close()
         writeAheadLog = null
       }
     }
     if (dataRead == null) {
       throw new SparkException(
         s"Could not read data from write ahead log record ${partition.walRecordHandle}, " +
           s"read returned null")
     }
     logInfo(s"Read partition data of $this from write ahead log, record handle " +
       partition.walRecordHandle)
     if (storeInBlockManager) {
       blockManager.putBytes(blockId, dataRead, storageLevel)
       logDebug(s"Stored partition data of $this into block manager with level $storageLevel")
       dataRead.rewind()
     }
     blockManager.dataDeserialize(blockId, dataRead).asInstanceOf[Iterator[T]]
   }
  // 如果partition.isBlockIdValid 为true,则说明该 block 数据存在executors 中
   if (partition.isBlockIdValid) {
 // 先根据 BlockManager从 executor中读取数据, 如果没有,再从WAL 中读取数据
 // BlockManager 从内存还是从磁盘上获取的数据 ?
 blockManager 从 local 或 remote 获取 block,其中 local既可以从 memory 中获取也可以从 磁盘中读取, 其中remote获取数据是同步的,即在fetch block 过程中会一直blocking。
     getBlockFromBlockManager().getOrElse { getBlockFromWriteAheadLog() }
   } else {
     getBlockFromWriteAheadLog()
   }
 }
至此,从启动 receiver,到receiver 接收数据并保存到WAL block,driver 接收WAL 的block 信息,直到spark streaming 通过WAL RDD 来获取数据等等都一一做了说明。
五、spark streaming 接收kafka消息之五 -- spark streaming 和 kafka 的对接总结
Spark streaming 和kafka 处理确保消息不丢失的总结
1、接入kafka
我们前面的1到4 都在说 spark streaming 接入 kafka 消息的事情。讲了两种接入方式,以及spark streaming 如何和kafka协作接收数据,处理数据生成rdd的
主要有如下两种方式
1、基于分布式receiver
基于receiver的方法采用Kafka的高级消费者API,每个executor进程都不断拉取消息,并同时保存在executor内存与HDFS上的预写日志(write-ahead log/WAL)。当消息写入WAL后,自动更新ZooKeeper中的offset。 它可以保证at least once语义,但无法保证exactly once语义。原因是虽然引入了WAL来确保消息不会丢失,但有可能会出现消息已写入WAL,但更新comsuer 的offset到zk时失败的情况,此时consumer就会按上一次的offset重新发送消息到kafka重新获取一次已保存到WAL的数据。这种方式还会造成数据冗余(WAL中一份,blockmanager中一份,其中blockmanager可能会做StorageLevel.MEMORY_AND_DISK_SER_2,即内存中一份,磁盘上两份),大大降低了吞吐量和内存磁盘的利用率。现在基本都使用下面基于direct stream的方法了。
2、基于direct stream的方法
基于direct stream的方法采用Kafka的简单消费者API,大大简化了获取message 的流程。executor不再从Kafka中连续读取消息,也消除了receiver和WAL。还有一个改进就是Kafka分区与RDD分区是一一对应的,允许用户控制topic-partition 的offset,程序变得更加可控。 driver进程只需要每次从Kafka获得批次消息的offset range,然后executor进程根据offset range去读取该批次对应的消息即可。由于offset在Kafka中能唯一确定一条消息,且在外部只能被Streaming程序本身感知到,因此消除了不一致性,保证了exactly once语义。不过,由于它采用了简单消费者API,我们就需要自己来管理offset。否则一旦程序崩溃,整个流只能从earliest或者latest点恢复,这肯定是不稳妥的。
2、如何保证处理结果不丢失呢?
主要有两种方案:
2.1. 主要是 通过设计幂等性操作,在 at least once 的语义之上,确保数据不丢失
2.2. 在一些shuffle或者是集合计算的结果集中, 在 exactly-once 的基础上,同时更新 处理结果和 offset,这种情况下,一般都是使用事务来做。
现有的支持事务的,也就是传统的数据库了,对于一些缓存系统为了更简单更高效的访问,即使有事务机制,也设计的非常简单,或是只实现了部分功能,例如 redis 的事务是不能支持回滚的。需要我们在代码中做相应的设计,来确保事务的正确执行。
3、分布式 RDD 计算过程如何确保准确性和一致性?
即分布式RDD计算是如何和确保计算恰好计算一次的呢?后续会出一系列源码分析,分析 spark 是如何做分布式计算的。
第十章、优化
一、spark 集群优化
只有满怀自信的人,能在任何地方都怀有自信,沉浸在生活中,并认识自己的意志。
1、前言
最近公司有一个生产的小集群,专门用于运行spark作业。但是偶尔会因为nn或dn压力过大而导致作业checkpoint操作失败进而导致spark 流任务失败。本篇记录从应用层面对spark作业进行优化,进而达到优化集群的作用。
2、集群使用情况
有数据的目录以及使用情况如下:
| 目录 | 说明 | 大小 | 文件数量 | 数据数量占比 | 数据大小占比 |
|---|---|---|---|---|---|
| /user/root/.sparkStaging/applicationIdxxx | spark任务配置以及所需jar包 | 5G | 约1k | 约20% | 约100% |
| /tmp/checkpoint/xxx/{commits|metadata|offsets|sources} | checkpoint文件,其中commits和offsets频繁变动 | 2M | 约4k | 约80% | 约0% |
对于.sparkStaging目录,不经常变动,只需要优化其大小即可。
对于 checkpoint目录,频繁性增删,从生成周期和保留策略两方面去考虑。
3、 .sparkStaging目录优化
对于/user/root/.sparkStaging下文件,是spark任务依赖文件,可以将jar包上传到指定目录下,避免或减少了jar包的重复上传,进而减少任务的等待时间。
可以在spark的配置文件spark-defaults.conf配置如下内容:
spark.yarn.archive=hdfs://hdfscluster/user/hadoop/jars
spark.yarn.preserve.staging.files=false
1、参数说明
| Property Name | Default | Meaning |
|---|---|---|
| spark.yarn.archive | (none) | An archive containing needed Spark jars for distribution to the YARN cache. If set, this configuration replaces spark.yarn.jars and the archive is used in all the application's containers. The archive should contain jar files in its root directory. Like with the previous option, the archive can also be hosted on HDFS to speed up file distribution. |
| spark.yarn.preserve.staging.files | false | Set to true to preserve the staged files (Spark jar, app jar, distributed cache files) at the end of the job rather than delete them. |
4、checkpoint优化
首先了解一下 checkpoint文件代表的含义。
1、checkpoint文件说明
-
offsets 目录 - 预先记录日志,记录每个批次中存在的偏移量。为了确保给定的批次将始终包含相同的数据,我们在进行任何处理之前将其写入此日志。因此,该日志中的第N个记录指示当前正在处理的数据,第N-1个条目指示哪些偏移已持久地提交给sink。
-
commits 目录 - 记录已完成的批次ID的日志。这用于检查批处理是否已完全处理,并且其输出已提交给接收器,因此无需再次处理。(例如)在重新启动过程中使用,以帮助识别接下来要运行的批处理。
-
metadata 文件 - 与整个查询关联的元数据,只有一个 StreamingQuery 唯一ID
-
sources目录 - 保存起始offset信息
下面从两个方面来优化checkpoint。
第一,从触发checkpoint机制方面考虑
2、trigger的机制
Trigger是用于指示 StreamingQuery 多久生成一次结果的策略。
Trigger有三个实现类,分别为:
-
OneTimeTrigger - A Trigger that processes only one batch of data in a streaming query then terminates the query.
-
ProcessingTime - A trigger that runs a query periodically based on the processing time. If
intervalis 0, the query will run as fast as possible.by default,trigger isProcessingTime, andinterval=0 -
ContinuousTrigger - A Trigger that continuously processes streaming data, asynchronously checkpointing at the specified interval.
可以为 ProcessingTime 指定一个时间 或者使用 指定时间的ContinuousTrigger ,固定生成checkpoint的周期,避免checkpoint生成过于频繁,减轻多任务下小集群的nn的压力
第二,从checkpoint保留机制考虑。
3、保留机制
spark.sql.streaming.minBatchesToRetain - 必须保留并使其可恢复的最小批次数,默认为 100
可以调小保留的batch的次数,比如调小到 20,这样 checkpoint 小文件数量整体可以减少到原来的 20%
5.checkpoint 参数验证
主要验证trigger机制和保留机制
1、验证trigger机制
未设置trigger效果
未设置trigger前,spark structured streaming 的查询batch提交的周期截图如下:
每一个batch的query任务的提交是毫无周期规律可寻。
设置trigger代码
trigger效果
设置trigger代码后效果截图如下:
每一个batch的query任务的提交是有规律可寻的,即每隔5s提交一次代码,即trigger设置生效!
注意,如果消息不能马上被消费,消息会有积压,structured streaming 目前并无与spark streaming效果等同的背压机制,为防止单批次query查询的数据源数据量过大,避免程序出现数据倾斜或者无法挽回的OutOfMemory错误,可以通过 maxOffsetsPerTrigger 参数来设置单个批次允许抓取的最大消息条数。
使用案例如下:
spark.readStream
    .format("kafka")
    .option("kafka.bootstrap.servers", "xxx:9092")
    .option("subscribe", "test-name")
    .option("startingOffsets", "earliest")
    .option("maxOffsetsPerTrigger", 1)
    .option("group.id", "2")
    .option("auto.offset.reset", "earliest")
    .load()
2、验证保留机制
默认保留机制效果
spark任务提交参数
#!/bin/bash
spark-submit \
--class zd.Example \
--master yarn \
--deploy-mode client \
--packages org.apache.spark:spark-sql-kafka-0-10_2.11:2.4.3,org.apache.kafka:kafka-clients:2.0.0 \
--repositories http://maven.aliyun.com/nexus/content/groups/public/ \
/root/spark-test-1.0-SNAPSHOT.jar
如下图,offsets和commits最终最少各保留100个文件。
修改保留策略
通过修改任务提交参数来进一步修改checkpoint的保留策略。
添加 --conf spark.sql.streaming.minBatchesToRetain=2 ,完整脚本如下:
#!/bin/bash
spark-submit \
--class zd.Example \
--master yarn \
--deploy-mode client \
--packages org.apache.spark:spark-sql-kafka-0-10_2.11:2.4.3,org.apache.kafka:kafka-clients:2.0.0 \
--repositories http://maven.aliyun.com/nexus/content/groups/public/ \
--conf spark.sql.streaming.minBatchesToRetain=2 \
/root/spark-test-1.0-SNAPSHOT.jar
修改后保留策略效果
修改后保留策略截图如下:
即 checkpoint的保留策略参数设置生效!
3、总结
本文来自博客园,作者:大码王,转载请注明原文链接:https://www.cnblogs.com/huanghanyu/
 posted on

 浙公网安备 33010602011771号