
python 实用库
python 实用库
1 抓屏


"""1 抓屏"""
# from time import sleep
# from PIL import ImageGrab
#
# m = int(input("请输入想抓屏几分钟:"))
# m = m * 60
# n = 1
# while n < m/2:
#     sleep(0.02)
#     im = ImageGrab.grab()
#     local = (r"%s.jpg" % (n))
#     im.save(local, 'jpeg')
#     n = n + 1
2 制作git图片
"""2 制作git图片"""
from PIL import Image

im = Image.open("1.jpg")
images = []
images.append(Image.open('2.jpg'))
images.append(Image.open('3.jpg'))
im.save('gif.gif', save_all=True, append_images=images, loop=1, duration=1, comment=b"aaabb")
3 des加密(分组加密算法)
#!\Users\Local\Programs\Python37
# -*- coding: utf-8 -*-

# pip install pycryptodomex

# 导入DES模块
from Cryptodome.Cipher import DES
import binascii

# 这是密钥,此处需要将字符串转为字节
key = b'abcdefgh'


# 需要去生成一个DES对象
def pad(text):
    """
      # 加密函数,如果text不是8的倍数【加密文本text必须为8的倍数!】,那就补足为8的倍数
       :param text:
       :return:
    """
    while len(text) % 8 != 0:
        text += ' '
    return text


# 创建一个DES实例
des = DES.new(key, DES.MODE_ECB)
text = "I'm china!"
padded_text = pad(text)
print(padded_text)
# 加密
encrypted_text = des.encrypt(padded_text.encode("utf-8"))
print(encrypted_text)
# rstrip(' ')返回从字符串末尾删除所有字符串的字符串(默认空白字符)的副本

# 解密
plain_text = des.decrypt(encrypted_text).decode().rstrip(' ')
print(plain_text)
4 情感分析
#!\Users\Local\Programs\Python37
# -*- coding: utf-8 -*-

"""
百度飞浆官网:https://www.paddlepaddle.org.cn/install/quick
安装:
pip install paddlepaddle -i https://mirror.baidu.com/pypi/simple
pip install -i https://mirror.baidu.com/pypi/simple paddlehub"""

import paddlehub as hub

# 加载模型
senta = hub.Module(name="senta_lstm")


# 待分类文本
test_test = [
    "你的未来不是渺茫的",
    "《黑色四叶草》是部不错的番"
]

# 情感分析
results = senta.sentiment_classify(data={"text": test_test})

# 得到结果
for result in results:
    print(result)

# 结果展示:
"""
'你长得真好看', 'sentiment_label': 1, 'sentiment_key': 'positive', 'positive_probs': 0.9866, 'negative_probs': 0.0134}
{'text': '《黑色四叶草》是部不错的番', 'sentiment_label': 1, 'sentiment_key': 'positive', 'positive_probs': 0.9401, 'negative_probs': 0.0599}

"""

# 1.sentiment_key 代表分类结果,postive是 积极 ,negative是 消极 。
# 2.sentiment_label 是分类结果标签,1代表 积极 ,0代表 消极 。
# 3. positive_probs 是积极分类的置信度,0.9866即模型判断98.66%的可能性是正面。
# 4. negative_probs 与 positive_probs 相对,是消极分类的置信度。
5 GUI图形化模块-Gooey
git参考:https://github.com/chriskiehl/Gooey
git示例参考:https://github.com/chriskiehl/GooeyExamples
示例一:
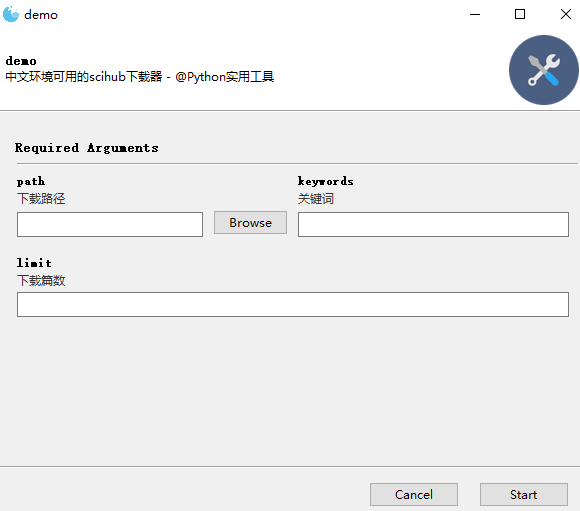
#!\Users\Local\Programs\Python37
# -*- coding: utf-8 -*-

"""
Gooey项目支持用一行代码将(几乎)任何Python 2或3控制台程序转换为GUI应用程序
1 安装:pip install Gooey
2 使用各种widget组件,逻辑编写
3 打包
"""

import asyncio
from scihub import SciHub
from gooey import Gooey, GooeyParser

def search(keywords: str, limit: int, path: str):
    """
    搜索相关论文并下载

    Args:
        keywords (str): 关键词
        limit (int): 篇数
        path (str): 下载路径
    """
    pass
    # sh = SciHub()
    # result = sh.search(keywords, limit=limit)
    # print(result)
    #
    # loop = asyncio.get_event_loop()
    # # 获取所有需要下载的scihub直链
    # tasks = [sh.async_get_direct_url(paper["url"]) for paper in result.get("papers", [])]
    # all_direct_urls = loop.run_until_complete(asyncio.gather(*tasks))
    # print(all_direct_urls)
    #
    # # 下载所有论文
    # loop.run_until_complete(sh.async_download(loop, all_direct_urls, path=path))
    # loop.close()

@Gooey
def main():
    """
    #如果无widget参数,默认文本输入框,help--于提醒用户该选择器的作用
    #支持的widget组件
    1.勾选框 widget="CheckBox"
    2.下拉框 widget="DropDown"
    3.互斥选择框 widget="RadioGroup"
    4.各种目标类型的选择框
        文件选择框 widget="FileChooser"
        目录选择框 widget="DirChooser"
        多文件选择框 widget="MultiFileChooser"
        文件保存目录 widget="FileSaver"
    5.日期/时间选择器 widget="DateChooser/TimeChooser"
    6.密码输入框 wiget="PasswordField"
    7.多选列表框 widget="Listbox"
    8.颜色选择器 widget="ColourChooser"
    9.可过滤的下拉框 widget="FilterableDropdown"
    10.滑片 widget="Slider"

    """

    parser = GooeyParser(description="中文环境可用的scihub下载器 - @Python实用宝典")
    parser.add_argument('path', help="下载路径", widget="DirChooser")
    parser.add_argument('keywords', help="关键词")
    parser.add_argument('limit', help="下载篇数")
    args = parser.parse_args() #将用户输入的所有文本转化为对应对象的变量值,args.var 可提取对应的变量值
    search(args.keywords, int(args.limit), args.path)
    print("下载成功了!!")


main()
示例二:
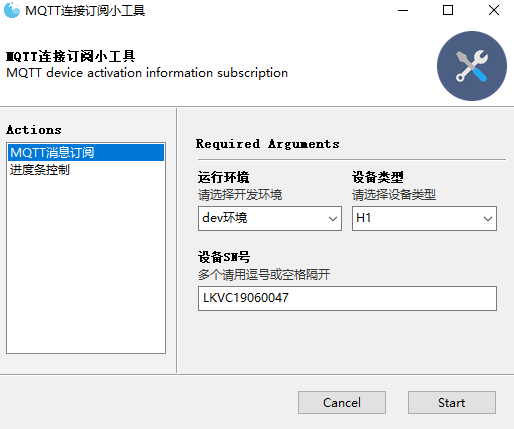
from gooey import Gooey, GooeyParser


@Gooey(
    richtext_controls=True,                 # 打开终端对颜色支持
    program_name="MQTT连接订阅小工具",        # 程序名称
    encoding="utf-8",                       # 设置编码格式,打包的时候遇到问题
    progress_regex=r"^progress: (\d+)%$"    # 正则,用于模式化运行时进度信息
)
def main():
    settings_msg = 'MQTT device activation information subscription'
    parser = GooeyParser(description=settings_msg)

    subs = parser.add_subparsers(help='commands', dest='command')

    my_parser = subs.add_parser('MQTT消息订阅')
    my_parser.add_argument("connect", metavar='运行环境',help="请选择开发环境",choices=['dev环境','staging环境'], default='dev环境')
    my_parser.add_argument("device_type",metavar='设备类型',help="请选择设备类型",choices=['H1','H3'],default='H1')
    my_parser.add_argument("serialNumber", metavar='设备SN号',default='LKVC19060047',help='多个请用逗号或空格隔开')

    siege_parser = subs.add_parser('进度条控制')
    siege_parser.add_argument('num',help='请输入数字',default=100)

    args = parser.parse_args()
    print(args, flush=True)    # flush=True在打包的时候会用到


if __name__ == '__main__':
    main()
示例三:
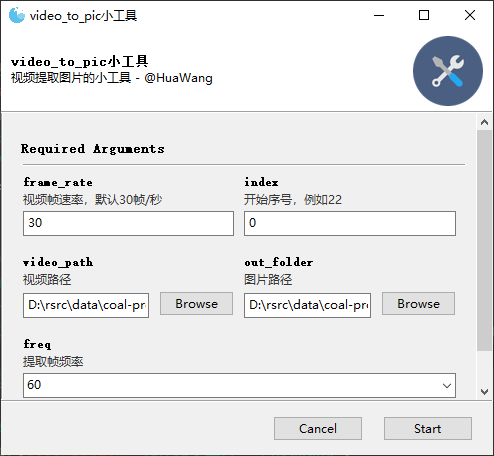
#!\Users\Local\Programs\Python37
# -*- coding: utf-8 -*-
#

import cv2
from moviepy.editor import VideoFileClip
from tqdm import tqdm

from gooey import Gooey, GooeyParser

def get_video_duration(video_path):
    """#获取video时长"""
    duration =VideoFileClip(video_path).duration
    return duration

def extract_frames(video_path, out_folder, index, frame_rate,freq):
    """抽取视频帧"""
    total_time=get_video_duration(video_path)
    total_pic_num =int(total_time*frame_rate)
    pbar = tqdm(total=total_pic_num)

    video = cv2.VideoCapture(video_path)
    if not video.open(video_path):
        print("can not open the video")
        exit(1)
    count = 0
    flag =True
    while flag:
        _, frame = video.read()
        if _:
            if count % freq == 0:
                save_path = "{}/{:>05d}.jpg".format(out_folder, index)
                cv2.imwrite(save_path, frame)
                index += 1
            count += 1
            pbar.update(1)
            print("",flush=True)
        else:
            flag =False
    video.release()
    pbar.close()

    print(f"提取{index}帧图片成功")

@Gooey(program_name="video_to_pic小工具",encoding='cp936')
def main():
    base_path = r"D:\rsrc\data\coal-project"
    parser = GooeyParser(description="视频提取图片的小工具 - @HuaWang")
    parser.add_argument('frame_rate', help="视频帧速率,默认30帧/秒", default=30)
    parser.add_argument('index', help="开始序号,例如22", default=0)
    parser.add_argument('video_path', help="视频路径", widget="FileChooser",default=base_path)
    parser.add_argument('out_folder', help="图片路径", widget="DirChooser",default=base_path)

    parser.add_argument('freq', help="提取帧频率",choices=["30","60","90","120","240","360"],default="60")
    args = parser.parse_args() #将用户输入的所有文本转化为对应对象的变量值,args.var 可提取对应的变量值
    extract_frames(args.video_path, args.out_folder,int(args.index),int(args.frame_rate),int(args.freq))
    print("over!!!!!",flush=True)


if __name__ == '__main__':

    main()

# if __name__ == '__main__':
#     base_path =r"D:\rsrc\data\coal-project"
#     video_path = fr'{base_path}\belt\youshi\youshi-belt1.mp4'
#     out_folder = fr'{base_path}\belt\youshi\frames'
#     if not os.path.exists(out_folder):
#         os.makedirs(out_folder)
#     freq = 60 #要提取的图片 1帧/60帧   viedo:30帧/s
#     index =0 #开始序号
#     frame_rate=30 #视频每秒帧数
#     extract_frames(video_path, out_folder,index,frame_rate,freq)
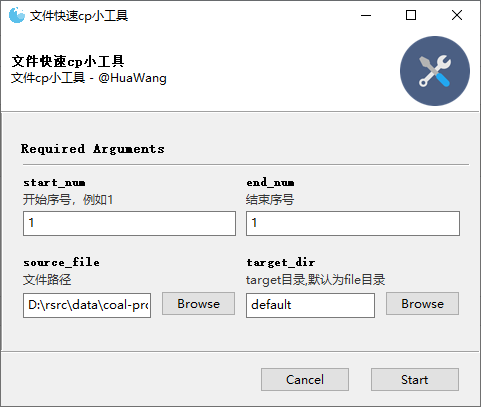
from gooey import Gooey, GooeyParser
import shutil
import os

def copy_files(satrt_num,end_number,source_file,target_dir):
    # target_dir =os.path.dirname(__file__)
    for i in range(satrt_num, end_number+1):
       file_name = "{:>05d}.txt".format(i)
       if target_dir=="default":
           target_dir = os.path.dirname(source_file)

       try:
           shutil.copy(source_file, fr"{target_dir}\{file_name}")
       except Exception as e:
           print("copy{:>05d}.txt失败,reason:".format(i), e)
    print("恭喜你,复制文件{:>05d}.txt-{:>05d}.txt成功!".format(satrt_num,end_number))

@Gooey(program_name="文件快速cp小工具",encoding='cp936')
def main():
    base_path = r"D:\rsrc\data\coal-project"
    parser = GooeyParser(description="文件cp小工具 - @HuaWang")
    parser.add_argument('start_num', help="开始序号,例如1", default=1)
    parser.add_argument('end_num', help="结束序号", default=1)
    parser.add_argument('source_file', help="文件路径", widget="FileChooser",default=base_path)
    parser.add_argument('target_dir', help="target目录,默认为file目录", widget="DirChooser",default ="default")

    args = parser.parse_args() #将用户输入的所有文本转化为对应对象的变量值,args.var 可提取对应的变量值
    copy_files(int(args.start_num), int(args.end_num),args.source_file,args.target_dir)
    print("over!!!!!",flush=True)


if __name__ == '__main__':

    main()
6 GUI自动化
GUI自动化就是写程序直接控制键盘和鼠标
#1  example:让我们用 Python 自动化在文件编辑窗口中输入 Helloworld!。首先,打开一个新的文件编辑窗口,将它放在屏幕的左上角,以便pyautogui 点击正确的位置,让它获得焦点

import pyautogui
import time
time.sleep(2)
pyautogui.click(300, 300)
time.sleep(2)
pyautogui.typewrite('Hello world!',interval=0.25)

#2 press 按下键盘
import pyautogui
import time
time.sleep(2)
pyautogui.click(300, 300)
time.sleep(2)
pyautogui.typewrite('Hello world!',interval=0.25)
time.sleep(1)
pyautogui.press('enter')
time.sleep(2)
pyautogui.typewrite('Hello world!',interval=0.25)

#3 按下和释放键盘
import pyautogui
import time
time.sleep(2)
pyautogui.keyDown('shift')
pyautogui.press('4')
pyautogui.keyUp('shift')

# 4 ctrl-v
import pyautogui
import time
time.sleep(2)
pyautogui.hotkey('command', 'v')
# 安装:pip install pyautogui

#1获取电脑屏幕的宽和高的像素数
import pyautogui
width, height = pyautogui.size()
print(width,height)

# 2移动鼠标
import pyautogui
for i in range(5):
    pyautogui.moveTo(100, 100, duration=0.25)
    pyautogui.moveTo(200, 100, duration=0.25)
    pyautogui.moveTo(200, 200, duration=0.25)
    pyautogui.moveTo(100, 200, duration=0.25)

# 3 基于当前位置移动鼠标
import pyautogui
for i in range(5):
    pyautogui.moveRel(100, 0, duration=0.25)
    pyautogui.moveRel(0, 100, duration=0.25)
    pyautogui.moveRel(-100, 0, duration=0.25)
    pyautogui.moveRel(0, -100, duration=0.25)

# 4 获取当前鼠标位置
pyautogui.position()

# 5 控制鼠标交互
#5.1实现:鼠标移到屏幕左上角的位置,并点击一次。完整的“点击”是指按下鼠标按键,然后放开,同时不移动位置
import pyautogui
pyautogui.click(10, 5)

#5.2 指定鼠标按键
import pyautogui
pyautogui.click(600, 509,button='right')

"""
- 实现点击的其他方法
    - pyautogui. mouseDown()
        - 只是按下鼠标按键
    - pyautogui.mouseUp()
        - 只是释放鼠标按键
    - pyautogui.doubleClick()
        - 执行双击鼠标左键
    - pyautogui.rightClick(),pyautogui.middleClick()
        - 分别执行双击右键和双击中键
"""

# 5.3 拖动鼠标
import pyautogui, time
time.sleep(2)
pyautogui.click()
distance = 200
while distance > 0:
    pyautogui.dragRel(distance, 0, duration=0.2,button='left') # move right
    distance = distance - 5
    pyautogui.dragRel(0, distance, duration=0.2,button='left') # move down
    pyautogui.dragRel(-distance, 0, duration=0.2,button='left') # move left
    distance = distance - 5
    pyautogui.dragRel(0, -distance, duration=0.2,button='left') # move up

# 5.4 滚动鼠标
import pyautogui, time
time.sleep(2)
pyautogui.scroll(-300) #正整数向上滚动,负整数向下滚动

# 6 处理屏幕
# 6.1 获取屏幕快照
import pyautogui
im = pyautogui.screenshot()
im.save('./123.png')

# 6.2 分析屏幕快照
import pyautogui
im = pyautogui.screenshot()
print(im.getpixel((500, 200)))
result = pyautogui.pixelMatchesColor(300, 200, (248, 248, 248))
print(result) #如果屏幕上指定的 x、y 坐标处的像素与指定的颜色匹配,PyAutoGUI 的pixelMatchesColor() 函数将返回 True
"""
pip install opencv-python==3.4.5.20
- 操作
    - 打开腾讯会议,识别【加入会议】按钮,对其进行点击操作
"""

import cv2
import pyautogui
import time
time.sleep(2)
#获取带有腾讯会议的屏幕快照且保存到本地
im = pyautogui.screenshot()
im.save('screen.png')

#基于cv2读取照片
screen = cv2.imread('./screen.png')
joinMeeting = cv2.imread('./joinMeeting.png')
#在屏幕快照中对比加入会议按钮照片,定位其准确位置
result = cv2.matchTemplate(joinMeeting,screen, cv2.TM_CCOEFF_NORMED)
#result是一个二维列表,列表中最大值元素的位置就是我们对比后相似度最高的图片【最上角】位置
print(result)

#minMaxLoc返回一个元组,其中三个元素,以此为最不相似点分数,最相似点分数,最不相似点位置坐标,最相似点位置坐标
pos_start = cv2.minMaxLoc(result)[3] #获取最相似点相似坐标
print(pos_start)
# x = pos_start[0]
# y = pos_start[1]

#定位到点击图片的中间位置
x = int(pos_start[0]) + int(joinMeeting.shape[1] / 2)
y = int(pos_start[1]) + int(joinMeeting.shape[0] / 2)

time.sleep(1)
pyautogui.click(x,y)
import cv2
import os
import pyperclip #用于复制粘贴的模块
import pyautogui
import time
time.sleep(2)

#从屏幕screen中找到source的位置坐标(找到微信搜索框的位置)
def findImg():
    im = pyautogui.screenshot()
    im.save('screen.png')
    screen = cv2.imread('./screen.png')
    joinMeeting = cv2.imread('./wechat.png')
    result = cv2.matchTemplate(joinMeeting,screen, cv2.TM_CCOEFF_NORMED)
    pos_start = cv2.minMaxLoc(result)[3] #获取最相似点相似坐标
    x = int(pos_start[0]) + int(joinMeeting.shape[1] / 2)
    y = int(pos_start[1]) + int(joinMeeting.shape[0] / 2)
    return x,y

#向搜索框中录入要查找的好友名称:name好友名称,x,y搜索框位置
def send_name_to_search(x,y,name):
    pyautogui.click(x,y)
    time.sleep(1)
    #赋值好友名称
    pyperclip.copy(name)
    #粘贴复制内容
    pyautogui.hotkey('command', 'v')
    time.sleep(1)
    pyautogui.hotkey('enter')
    #向下移动100个像素定位到搜索到第一个好友位置点击
#     pyautogui.moveTo(x, y+80)
#     pyautogui.click(x, y+80)


#向好友发送消息
def send_msg(msg):
    pyperclip.copy(msg)
    pyautogui.hotkey('command', 'v')
    pyautogui.hotkey('enter')


#主要程序
x,y = findImg()
send_name_to_search(x,y,'传输')
send_msg('i love learn Python!!!')
time.sleep(1)
send_msg('i love learn Python!!!')
time.sleep(1)

send_name_to_search(x,y,'站山')
send_msg('GUI测试,无需理会')
time.sleep(1)
send_msg('GUI测试,无需理会')
import pyautogui
import cv2
import yagmail
import schedule
import time

def run():
    print('开始监视......')
    #截取屏幕图片
    myScreenshot = pyautogui.screenshot()
    myScreenshot.save(r'screen.png')
    #基于cv2打开电脑摄像头,捕获实施照片
    cap = cv2.VideoCapture(0)
    ret, frame = cap.read()
    time.sleep(3)
    cv2.imwrite('photo.jpg', frame)
    #关闭摄像头
    cap.release()

    received = ['zhangxiaobo@oldboyedu.com']
    yag = yagmail.SMTP(user='328410948@qq.com', host='smtp.qq.com')
    contents = ['<b> <font color="#FF1493" size="10"> Bobo大人您好,一切都在监视中,尽情放心!</font> </b>',
        "screen.png",
        'photo.jpg' ]

    yag.send(received, '来自小鬼侦探的报告', contents)

schedule.every().minute.at(":30").do(run)
while True:
    schedule.run_pending()
    time.sleep(5)
pyautogui自动化:
"""
pyautogui库的最全使用方法
参考文章:https://cloud.tencent.com/developer/article/1741066
"""

## 1常用操作
import pyautogui
pyautogui.PAUSE = 1 # 调用在执行动作后暂停的秒数,只能在执行一些pyautogui动作后才能使用,建议用time.sleep
pyautogui.FAILSAFE = True # 启用自动防故障功能,左上角的坐标为(0,0),将鼠标移到屏幕的左上角,来抛出failSafeException异常

# 判断(x,y)是否在屏幕上
x, y = 122, 244
flag=pyautogui.onScreen(x, y) # 结果为true
print(flag)

width, height = pyautogui.size() # 屏幕的宽度和高度
print(width, height)


# 2鼠标操作
import pyautogui
currentMouseX, currentMouseY = pyautogui.position() # 鼠标当前位置
print(currentMouseX, currentMouseY)
# 控制鼠标移动,duration为持续时间
for i in range(2):
    pyautogui.moveTo(100, 100, duration=0.25) # 移动到 (100,100)
    pyautogui.moveTo(200, 100, duration=0.25)
    pyautogui.moveTo(200, 200, duration=0.25)
    pyautogui.moveTo(100, 200, duration=0.25)

pyautogui.moveRel(50, 0, duration=0.25) # 从当前位置右移100像素
pyautogui.moveRel(0, 50, duration=0.25) # 向下
pyautogui.moveRel(-50, 0, duration=0.25) # 向左
pyautogui.moveRel(0, -50, duration=0.25) # 向上
# 按住鼠标左键,把鼠标拖拽到(100, 200)位置
pyautogui.dragTo(100, 200, button='left')
# 按住鼠标左键,用2秒钟把鼠标拖拽到(300, 400)位置
pyautogui.dragTo(300, 400, 2, button='left')
# 按住鼠标左键,用0.2秒钟把鼠标向上拖拽
pyautogui.dragRel(0, -60, duration=0.2)
# pyautogui.click(x=moveToX, y=moveToY, clicks=num_of_clicks, interval=secs_between_clicks, button='left')
# 其中,button属性可以设置成left,middle和right。
pyautogui.click(10, 20, 2, 0.25, button='left')
pyautogui.click(x=100, y=200, duration=2) # 先移动到(100, 200)再单击
pyautogui.click() # 鼠标当前位置点击一下
pyautogui.doubleClick() # 鼠标当前位置左击两下
pyautogui.doubleClick(x=100, y=150, button="left") # 鼠标在(100,150)位置左击两下
pyautogui.tripleClick() # 鼠标当前位置左击三下
pyautogui.mouseDown() # 鼠标左键按下再松开
pyautogui.mouseUp()
pyautogui.mouseDown(button='right') # 按下鼠标右键
pyautogui.mouseUp(button='right', x=100, y=200) # 移动到(100, 200)位置,然后松开鼠标右键
# scroll函数控制鼠标滚轮的滚动,amount_to_scroll参数表示滚动的格数。正数则页面向上滚动,负数则向下滚动
# pyautogui.scroll(clicks=amount_to_scroll, x=moveToX, y=moveToY)
pyautogui.scroll(5, 20, 2)
pyautogui.scroll(10) # 向上滚动10格
pyautogui.scroll(-10) # 向下滚动10格
pyautogui.scroll(10, x=100, y=100) # 移动到(100, 100)位置再向上滚动10格
# 缓动/渐变函数可以改变光标移动过程的速度和方向。通常鼠标是匀速直线运动,这就是线性缓动/渐变函数。
# PyAutoGUI有30种缓动/渐变函数,可以通过pyautogui.ease*?查看。
# 开始很慢,不断加速
pyautogui.moveTo(100, 100, 2, pyautogui.easeInQuad)
# 开始很快,不断减速
pyautogui.moveTo(100, 100, 2, pyautogui.easeOutQuad)
# 开始和结束都快,中间比较慢
pyautogui.moveTo(100, 100, 2, pyautogui.easeInOutQuad)
# 一步一徘徊前进
pyautogui.moveTo(100, 100, 2, pyautogui.easeInBounce)
# 徘徊幅度更大,甚至超过起点和终点
pyautogui.moveTo(100, 100, 2, pyautogui.easeInElastic)


# 3获取鼠标在屏幕中的位置

# 案例获取鼠标的位置,方便复制我们定位的鼠标坐标点到代码中
import pyautogui
import time
# 获取鼠标位置
def get_mouse_positon():
    time.sleep(5) # 准备时间
    print('开始获取鼠标位置')
    try:
        for i in range(10):
            # Get and print the mouse coordinates.
            x, y = pyautogui.position()
            positionStr = '鼠标坐标点(X,Y)为:{},{}'.format(str(x).rjust(4), str(y).rjust(4))
            pix = pyautogui.screenshot().getpixel((x, y)) # 获取鼠标所在屏幕点的RGB颜色
            positionStr += ' RGB:(' + str(pix[0]).rjust(3) + ',' + str(pix[1]).rjust(3) + ',' + str(pix[2]).rjust(
            3) + ')'
            print(positionStr)
            time.sleep(0.5) # 停顿时间
    except:
        print('获取鼠标位置失败')


## 4 键盘操作

import pyautogui
pyautogui.typewrite('Hello world!') # 输入Hello world!字符串
pyautogui.typewrite('Hello world!', interval=0.25) # 每次输入间隔0.25秒,输入Hello world!
pyautogui.press('enter') # 按下并松开(轻敲)回车键
pyautogui.press(['left', 'left', 'left', 'left']) # 按下并松开(轻敲)四下左方向键
pyautogui.keyDown('shift') # 按下`shift`键
pyautogui.keyUp('shift') # 松开`shift`键
pyautogui.keyDown('shift')
pyautogui.press('4')
pyautogui.keyUp('shift') # 输出 $ 符号的按键
pyautogui.hotkey('ctrl', 'v') # 组合按键(Ctrl+V),粘贴功能,按下并松开'ctrl'和'v'按键
# pyautogui.KEYBOARD_KEYS数组中就是press(),keyDown(),keyUp()和hotkey()函数可以输入的按键名称
pyautogui.KEYBOARD_KEYS = ['\t', '\n', '\r', ' ', '!', '"', '#', '$', '%', '&', "'", '(', ')', '*', '+', ',', '-', '.',
'/', '0', '1', '2', '3', '4', '5', '6', '7', '8', '9', ':', ';', '<', '=', ' ', '?', '@',
'[', '\\', ']', '^', '_', '`', 'a', 'b', 'c', 'd', 'e', 'f', 'g', 'h', 'i', 'j', 'k', 'l',
'm', 'n', 'o', 'p', 'q', 'r', 's', 't', 'u', 'v', 'w', 'x', 'y', 'z', '{', '|', '}', '~',
'accept', 'add', 'alt', 'altleft', 'altright', 'apps', 'backspace', 'browserback',
'browserfavorites', 'browserforward', 'browserhome', 'browserrefresh', 'browsersearch',
'browserstop', 'capslock', 'clear', 'convert', 'ctrl', 'ctrlleft', 'ctrlright', 'decimal',
'del', 'delete', 'divide', 'down', 'end', 'enter', 'esc', 'escape', 'execute', 'f1', 'f10',
'f11', 'f12', 'f13', 'f14', 'f15', 'f16', 'f17', 'f18', 'f19', 'f2', 'f20', 'f21', 'f22',
'f23', 'f24', 'f3', 'f4', 'f5', 'f6', 'f7', 'f8', 'f9', 'final', 'fn', 'hanguel', 'hangul',
'hanja', 'help', 'home', 'insert', 'junja', 'kana', 'kanji', 'launchapp1', 'launchapp2',
'launchmail', 'launchmediaselect', 'left', 'modechange', 'multiply', 'nexttrack',
'nonconvert', 'num0', 'num1', 'num2', 'num3', 'num4', 'num5', 'num6', 'num7', 'num8', 'num9',
'numlock', 'pagedown', 'pageup', 'pause', 'pgdn', 'pgup', 'playpause', 'prevtrack', 'print',
'printscreen', 'prntscrn', 'prtsc', 'prtscr', 'return', 'right', 'scrolllock', 'select',
'separator', 'shift', 'shiftleft', 'shiftright', 'sleep', 'space', 'stop', 'subtract', 'tab',
'up', 'volumedown', 'volumemute', 'volumeup', 'win', 'winleft', 'winright', 'yen', 'command',
'option', 'optionleft', 'optionright']


## 5弹窗操作

import pyautogui
# 显示一个简单的带文字和OK按钮的消息弹窗。用户点击后返回button的文字。
pyautogui.alert(text='', title='', button='OK')
b = pyautogui.alert(text='要开始程序么?', title='请求框', button='OK')
print(b) # 输出结果为OK
# 显示一个简单的带文字、OK和Cancel按钮的消息弹窗,用户点击后返回被点击button的文字,支持自定义数字、文字的列表。
pyautogui.confirm(text='', title='', buttons=['OK', 'Cancel']) # OK和Cancel按钮的消息弹窗
pyautogui.confirm(text='', title='', buttons=range(10)) # 10个按键0-9的消息弹窗
a = pyautogui.confirm(text='', title='', buttons=range(10))
print(a) # 输出结果为你选的数字
# 可以输入的消息弹窗,带OK和Cancel按钮。用户点击OK按钮返回输入的文字,点击Cancel按钮返回None。
pyautogui.prompt(text='', title='', default='')
# 样式同prompt(),用于输入密码,消息用*表示。带OK和Cancel按钮。用户点击OK按钮返回输入的文字,点击Cancel按钮返回None。
pyautogui.password(text='', title='', default='', mask='*')


## 6图像操作

import pyautogui
pyautogui.screenshot(r'C:\Users\ZDH\Desktop\PY\my_screenshot.png') # 截全屏并设置保存图片的位置和名称
im = pyautogui.screenshot(r'C:\Users\ZDH\Desktop\PY\my_screenshot.png') # 截全屏并设置保存图片的位置和名称
print(im) # 打印图片的属性
# 不截全屏,截取区域图片。截取区域region参数为:左上角XY坐标值、宽度和高度
pyautogui.screenshot(r'C:\Users\ZDH\Desktop\PY\region_screenshot.png', region=(0, 0, 300, 400))
pix = pyautogui.screenshot().getpixel((220, 200)) # 获取坐标(220,200)所在屏幕点的RGB颜色
positionStr = ' RGB:(' + str(pix[0]).rjust(3) + ',' + str(pix[1]).rjust(3) + ',' + str(pix[2]).rjust(3) + ')'
print(positionStr) # 打印结果为RGB:( 60, 63, 65)
pix = pyautogui.pixel(220, 200) # 获取坐标(220,200)所在屏幕点的RGB颜色与上面三行代码作用一样
positionStr = ' RGB:(' + str(pix[0]).rjust(3) + ',' + str(pix[1]).rjust(3) + ',' + str(pix[2]).rjust(3) + ')'
print(positionStr) # 打印结果为RGB:( 60, 63, 65)
# 如果你只是要检验一下指定位置的像素值,可以用pixelMatchesColor(x,y,RGB)函数,把X、Y和RGB元组值穿入即可
# 如果所在屏幕中(x,y)点的实际RGB三色与函数中的RGB一样就会返回True,否则返回False
# tolerance参数可以指定红、绿、蓝3种颜色误差范围
pyautogui.pixelMatchesColor(100, 200, (255, 255, 255))
pyautogui.pixelMatchesColor(100, 200, (255, 255, 245), tolerance=10)
# 获得文件图片在现在的屏幕上面的坐标,返回的是一个元组(top, left, width, height)
# 如果截图没找到,pyautogui.locateOnScreen()函数返回None
a = pyautogui.locateOnScreen(r'C:\Users\ZDH\Desktop\PY\region_screenshot.png')
print(a) # 打印结果为Box(left=0, top=0, width=300, height=400)
x, y = pyautogui.center(a) # 获得文件图片在现在的屏幕上面的中心坐标
print(x, y) # 打印结果为150 200
x, y = pyautogui.locateCenterOnScreen(r'C:\Users\ZDH\Desktop\PY\region_screenshot.png') # 这步与上面的四行代码作用一样
print(x, y) # 打印结果为150 200
# 匹配屏幕所有与目标图片的对象,可以用for循环和list()输出
pyautogui.locateAllOnScreen(r'C:\Users\ZDH\Desktop\PY\region_screenshot.png')
for pos in pyautogui.locateAllOnScreen(r'C:\Users\ZDH\Desktop\PY\region_screenshot.png'):
print(pos)
# 打印结果为Box(left=0, top=0, width=300, height=400)
a = list(pyautogui.locateAllOnScreen(r'C:\Users\ZDH\Desktop\PY\region_screenshot.png'))
print(a) # 打印结果为[Box(left=0, top=0, width=300, height=400)]

if __name__ == "__main__":
    get_mouse_positon()
"""
安装:
pip install pyautogui
参考:https://cloud.tencent.com/developer/article/1741066

示例:自动化打地鼠脚本
"""

import pyautogui
import time

pyautogui.PAUSEA =0.1
pyautogui.FAILSAFE=True

while True:
    coords =pyautogui.locateOnScreen("images/shrewmouse.jpg",confidence=0.8)
    if coords is not None:
        print("找到了,进行点击")
        x,y =pyautogui.center(coords)
        pyautogui.leftClick(x,y)
        pyautogui.moveTo(1223,503)
    else:
        print("没找到")
import time
import pyautogui
import cv2

"""
1.点击主屏幕的"终端"二字
2.点击终端中的"主题曲"图标
3.点击主题曲中的"HOUR OF AN AWAKENING"字样
4.点击"黑暗时代"字样
5.向右拖动鼠标
6.点击"1-7"
7.点击"代理指挥"
8.点击"开始行动"
9.点击作战页的"开始行动"
10.作战结束后点击"行动结束"
11.重复第6项至第10项
"""


def get_xy(img_model_path):
    """
    用来判定游戏画面的点击坐标
    :param img_model_path:用来检测的图片
    :return:以元组形式返回检测到的区域中心的坐标
    """
    # 将图片截图并且保存
    pyautogui.screenshot().save("./pic/screenshot.png")
    # 待读取图像
    img = cv2.imread("./pic/screenshot.png")
    # 图像模板
    img_terminal = cv2.imread(img_model_path)
    # 读取模板的高度宽度和通道数
    height, width, channel = img_terminal.shape
    # 使用matchTemplate进行模板匹配(标准平方差匹配)
    result = cv2.matchTemplate(img, img_terminal, cv2.TM_SQDIFF_NORMED)
    # 解析出匹配区域的左上角图标
    upper_left = cv2.minMaxLoc(result)[2]
    # 计算出匹配区域右下角图标(左上角坐标加上模板的长宽即可得到)
    lower_right = (upper_left[0] + width, upper_left[1] + height)
    # 计算坐标的平均值并将其返回
    avg = (int((upper_left[0] + lower_right[0]) / 2), int((upper_left[1] + lower_right[1]) / 2))
    return avg


def auto_Click(var_avg):
    """
    输入一个元组,自动点击
    :param var_avg: 坐标元组
    :return: None
    """
    pyautogui.click(var_avg[0], var_avg[1], button='left')
    time.sleep(1)


def routine(img_model_path, name):
    avg = get_xy(img_model_path)
    print(f"正在点击{name}")
    auto_Click(avg)


def click_part1():
    """
    1.点击主屏幕的"终端"二字
    2.点击终端中的"主题曲"图标
    3.点击主题曲中的"HOUR OF AN AWAKENING"字样
    4.点击"黑暗时代"字样
    5.向右拖动鼠标
    :return:
    """
    # 点击终端
    routine("./pic/terminal.png", "主界面终端")
    # 点击主题曲
    routine("./pic/theme.png", "主题曲")
    # 点击HOUR OF....字样
    routine("./pic/hour_of_an_awakening.png", 'HOUR OF ...字样')
    # 点击黑暗时代
    routine("./pic/evil_time.png", '黑暗时代')


def click_part2(times):
    """
    6.点击"1-7"
    7.点击"代理指挥"
    8.点击"开始行动"
    9.点击作战页的"开始行动"
    10.作战结束后点击"行动结束"
    11.重复第6项至第10项
    可循环操作
    :param times:循环次数
    :return: None
    """
    for i in range(times):
        time.sleep(1)
        # 点击1-7 注意要先让模拟器记忆1-7
        routine("./pic/1-7.png", "1-7")
        # 点击代理指挥
        routine("./pic/PRTS.png", '代理指挥')
        # 点击开始行动
        routine("./pic/start-1.png", '开始行动')
        # 点击作战页的开始行动
        routine("./pic/start-2.png", "作战页的开始行动")
        # 等待行动结束
        time.sleep(90)
        # 点击结算页面退出
        routine("./pic/operation_over.png", '结算页面的行动结束')
        # 因为黑屏比较长,设置较长时间的睡眠
        time.sleep(3)


click_part1()
click_part2(2)
# -*- coding: utf-8 -*-

import pyautogui

class AutoWork(object):
    def __init__(self):
        pass

    def GetImgXY(self, strImgPath):
        x = y = None
        try:
            # x,y,width,height =  pyautogui.locateOnScreen(strImgPath, confidence=0.8) #安装opencdv-python后使用
            x,y,width,height =  pyautogui.locateOnScreen(strImgPath)
        except Exception as error:
            print("ERROR:", error)
        return x,y

    def GetImgCenterXY(self, strImgPath):
        x = y = None
        try:
            # x,y,width,height =  pyautogui.locateOnScreen(strImgPath, confidence=0.8) #安装opencdv-python后使用
            x,y,width,height =  pyautogui.locateOnScreen(strImgPath)
            position =  pyautogui.locateOnScreen(strImgPath)
            x,y = pyautogui.center(position)
        except Exception as error:
            print("ERROR:", error)

        return x,y

    def MouseLeftClick(self, iX, iY):
        try:
            pyautogui.click(x=iX, y=iY, button='left')
        except Exception as error:
            print("ERROR:", error)

    def MouseRightClick(self, iX, iY):
        try:
            pyautogui.click(x=iX, y=iY, button='right')
        except Exception as error:
            print("ERROR:", error)

    def MouseLeft2Click(self, iX, iY):
        try:
            pyautogui.doubleClick(x=iX, y=iY, button='left')
        except Exception as error:
            print("ERROR:", error)

    def MouseRight2Click(self, iX, iY):
        try:
            pyautogui.doubleClick(x=iX, y=iY, button='right')
        except Exception as error:
            print("ERROR:", error)

    def MouseMoveToXY(self, iX, iY):
        pyautogui.moveTo(x=iX,y=iY,duration=0.25)

    def MouseScroll(self, iup, idown):  # 滚轮上下
        if iup > 0:
            pyautogui.scroll(iup)
        if idown > 0:
            pyautogui.scroll(-idown)

    def KeyClickUpDown(self, strKey):
         pyautogui.press(strKey)

    def KeyClickDown(self, strKey):
        pyautogui.keyDown(strKey)

    def KeyClickUp(self, strKey):
        pyautogui.keyUp(strKey)

    def KeyClickUpDown2(self, strKey1, strKey2):
        pyautogui.hotkey(strKey1, strKey2)

    def InputStr(self, strLine):
        pyautogui.typewrite(strLine)


def main():
    pyautogui.hotkey('win','r')
    strKey = 'enter'
    pyautogui.press(strKey)


if __name__ == '__main__':
    main()
7 鼠标,键盘监听
技术:logger(日志),thread(多线程),pynput
"""
模块:pynput,loguru,threading
功能:1监控键盘 2监控鼠标 3 记录监控日志
"""
from pynput import keyboard, mouse
from loguru import logger
from threading import Thread

# 定义日志文件
logger.add('moyu.log')


def on_press(key):
    logger.debug(f'{key} :pushed')


def on_release(key):
    if key == keyboard.Key.esc:
        return False


# 定义键盘监听线程
def press_thread():
    with keyboard.Listener(on_press=on_press, on_release=on_release) as lsn:
        lsn.join()


def on_click(x, y, button, pressed):
    if button == mouse.Button.left:
        logger.debug('left was pressed!')
    elif button == mouse.Button.right:
        logger.debug('right was pressed!')
    else:
        return False


# 定义鼠标监听线程
def click_thread():
    with mouse.Listener(on_click=on_click) as listener:
        listener.join()


if __name__ == '__main__':
    # 起两个线程分别监控键盘和鼠标
    t1 = Thread(target=press_thread())
    t2 = Thread(target=click_thread())
    t1.start()
    t2.start()
8 Click--命令行界面工
![]()
# 官网:https://click.palletsprojects.com/en/8.0.x/options/#name-your-options
# 参考:https://mp.weixin.qq.com/s/QNhO_EeF7_wKqtoyq9dwRg

# 作用:命令行界面实现工具—Click

import click

@click.command()
@click.option("--count",default=1,help="Number of grettings")
@click.option("--name",prompt="Your name",help="The person to greet")#提示文本
def hello(count,name):
    for i in range(count):
        click.echo(f"Hello {name}!")


@click.command()
@click.option('--n', default=1)  # 设定了默认值
def dots1(n):
    click.echo('.' * n)


@click.command()
@click.option('--n', required=True, type=int)  # 设定必须传入参数值
def dots2(n):
    click.echo('.' * n)

@click.command()
@click.option('--from', '-f', 'from_')
@click.option('--to', '-t')
def reserved_param_name(from_, to):
    click.echo(f"from {from_} to {to}")

@click.command()
@click.option('--pos', nargs=2, type=float) #多值参数 --pos 5 2
def findme(pos):
    a, b = pos
    click.echo(f"{a} / {b}")

@click.command()
@click.option('--message', '-m', multiple=True) #多值参数 -m python -m list
def commit(message):
    click.echo(' '.join(message))


import sys
@click.command()
@click.option('--shout/--no-shout', default=False) # 布尔标志
def info(shout):
    rv = sys.platform
    if shout:
        rv = rv.upper() + '!!!!111'
    click.echo(rv)

@click.command()
@click.option('--hash-type',
              type=click.Choice(['MD5', 'SHA1'], case_sensitive=False)) #选择选项
def digest(hash_type):
    click.echo(hash_type)


if __name__ == '__main__':
    # hello()
    # dots1()
    # dots2()
    # reserved_param_name()
    digest()
10 文件共享
python -m http.server 9090
11 测网速
pip3 install speedtest-cli
$ speedtest
12 curl2py--爬虫工具
1 pip install filestools
2 谷歌游览器->copy->copy as cURL(bash)
3 cmd ->curl2py
"""
作用:curl命令转化为requests代码
参考文章:https://developer.aliyun.com/article/1024225
1 pip install filestools
2 谷歌游览器->copy->copy as cURL(bash)

"""

#方法一(推荐)
# 复制curl到剪切板后->cmd ->curl2py


#方法二
from curl2py import curlParseTool

curl_cmd = """curl 'http://www.shixi.com/search/index?key=python' \
  -H 'Connection: keep-alive' \
  -H 'Cache-Control: max-age=0' \
  -H 'Upgrade-Insecure-Requests: 1' \
  -H 'User-Agent: Mozilla/5.0 (Windows NT 10.0; Win64; x64) AppleWebKit/537.36 (KHTML, like Gecko) Chrome/91.0.4472.124 Safari/537.36' \
  -H 'Accept: text/html,application/xhtml+xml,application/xml;q=0.9,image/avif,image/webp,image/apng,*/*;q=0.8,application/signed-exchange;v=b3;q=0.9' \
  -H 'Referer: http://www.shixi.com/' \
  -H 'Accept-Language: zh-CN,zh;q=0.9' \
  -H 'Cookie: UM_distinctid=17a50a2c8ea537-046c01e944e72f-6373267-100200-17a50a2c8eb4ff; PHPSESSID=rpprvtdrcrvt54fkr7msgcde17; CNZZDATA1261027457=1711789791-1624850487-https%253A%252F%252Fwww.baidu.com%252F%7C1627741311; Hm_lvt_536f42de0bcce9241264ac5d50172db7=1627741268; Hm_lpvt_536f42de0bcce9241264ac5d50172db7=1627741334' \
  --compressed \
  --insecure"""

output = curlParseTool.curlCmdGenPyScript(curl_cmd)
print(output)
13 you-get 视频下载神器
1 安装
pip install you-get  -i https://pypi.tuna.tsinghua.edu.cn/simple
2 常用命令
-h,--help
-i, --info ,输出视频信息
--format ,指令分辨率
3 demo:
you-get -i "https://www.bilibili.com/video/BV1Dt4y1e7mM?share_source=copy_web"
you-get --format=flv720 "https://www.bilibili.com/video/BV1Dt4y1e7mM?share_source=copy_web"
13.1 lux下载工具
github:https://github.com/iawia002/lux
1下载视频
lux "https://www.youtube.com/watch?v=dQw4w9WgXcQ"

该-i选项显示所有可用质量的视频而无需下载。
lux -i "https://www.youtube.com/watch?v=dQw4w9WgXcQ"

2 下载图片
$ lux "https://img9.bcyimg.com/drawer/15294/post/1799t/1f5a87801a0711e898b12b640777720f.jpg"


3一次下载多个URL
lux -i "https://www.bilibili.com/video/av21877586" "https://www.bilibili.com/video/av21990740"

4 文件中读取 URL
这些 URL 将被一个一个地下载。

lux -F ~/Desktop/u.txt
14 文件操作
# -*- coding: utf-8 -*-
##[命令 操作]
import copy

class AutoFile:
    def __init__(self):
        self._listData = list()

    def readFile(self, strFilePath):
        ret = False
        self._listData.clear()
        with open(strFilePath, 'r') as fin:
            strLineData = fin.readline()
            while strLineData:
                strLineData = strLineData.strip('\n')  # 去除头尾的字符
                listOneData = strLineData.split(',')
                self._listData.append(listOneData)
                strLineData = fin.readline()
        if len(self._listData) > 0:
            ret = True
        return ret

    def writeFile(self, strFilePath):
         with open(strFilePath, 'w') as fout:
             for listOneData in self._listData:
                 strLineData = listOneData[0] + ',' + listOneData[1] + '\n'
                 fout.write(strLineData)
         return True

    def getListData(self):
        return self._listData

    def setListData(self, listData):
        self._listData.clear()
        self._listData = copy.deepcopy(listData)
        return None

    def getListDataSize(self):
        return len(self._listData)

    def delListData(self):
        return self._listData.clear()

def main():
    listData = list()
    listData.append(["get","Data aaa"])
    listData.append(["set","Data bbb"])
    f1 = AutoFile()
    f1.setListData(listData)
    f1.writeFile("Drivers/test.csv")
    f1.delListData()
    lens = f1.getListDataSize()
    print(lens)
    f1.readFile("Drivers/test.csv")
    listData.clear()
    listData = f1.getListData()

if __name__ == '__main__':
    main()
16 文本转语音
"""
从Python使用Microsoft Edge的在线文本转换语音服务(无需Microsoft Edge/Windows或API密钥)
git:https://github.com/rany2/edge-tts
#安装
pip install edge-tts
"""

import edge_tts
import asyncio
import random
from edge_tts import VoicesManager
from gooey import Gooey, GooeyParser


async def my_function():
    TEXT = ""
    with open('text2voicetest.txt', 'rb') as f:
        data = f.read()
        TEXT = data.decode('utf-8')

    print(TEXT)
    # voices = ['zh-CN-YunxiNeural',"zh-CN-YunjianNeural",'zh-CN-YunxiaNeural','zh-CN-YunyangNeural',"zh-CN-XiaoxiaoNeural","zh-CN-XiaoyiNeural"]
    voice = ''
    output = 'text2voicetest4.mp3'
    rate = '-0%'
    volume = '+0%'
    voices = await VoicesManager.create()
    # # voices_list =voices.voices
    # # print(voices_list) #所有列表
    voice_zh_list = voices.find(Locale="zh-CN")  # 筛选中文
    for index,i in enumerate(voice_zh_list):
        print(index,i)
    input_num =input("输入你想要的声音序号:")

    # voice=random.choice(voice_zh_list)["ShortName"]
    voice =voice_zh_list[int(input_num)]["ShortName"]
    print(voice)
    tts = edge_tts.Communicate(text=TEXT, voice=voice, rate=rate, volume=volume)
    await tts.save(output)


if __name__ == '__main__':
    loop = asyncio.get_event_loop()
    loop.run_until_complete(my_function())
    # try:
    #     loop.run_until_complete(my_function())
    # finally:
    #     loop.close()
17 Gradio演示机器学习的web界面

"""
Gradio演示的机器学习模型与友好的web界面
git:https://github.com/gradio-app/gradio
demo:https://www.gradio.app/
"""


#写个简单的RGB转灰度

import gradio as gr
import cv2
def to_black(image):
    output = cv2.cvtColor(image, cv2.COLOR_BGR2GRAY)
    return output
interface = gr.Interface(fn=to_black, inputs="image", outputs="image",
                        examples=[["cat.jpg"]])
interface.launch(share=True)

if 0:
# 写个简单的RGB转灰度
    import gradio as gr
    import cv2

    def to_black(image):
        output = cv2.cvtColor(image, cv2.COLOR_BGR2GRAY)
        return output


    interface = gr.Interface(fn=to_black, inputs="image", outputs="image")
    interface.launch()

#图像分类
if 0:
    import gradio as gr
    import torch
    from torchvision import transforms
    import requests
    from PIL import Image
    model = torch.hub.load('pytorch/vision:v0.6.0', 'resnet18', pretrained=True).eval()
    # Download human-readable labels for ImageNet.
    response = requests.get("https://git.io/JJkYN")
    labels = response.text.split("\n")

    def predict(inp):
        inp = Image.fromarray(inp.astype('uint8'), 'RGB')
        inp = transforms.ToTensor()(inp).unsqueeze(0)
        with torch.no_grad():
            prediction = torch.nn.functional.softmax(model(inp)[0], dim=0)
        return {labels[i]: float(prediction[i]) for i in range(1000)}
    inputs = gr.inputs.Image()
    outputs = gr.outputs.Label(num_top_classes=3)
    gr.Interface(fn=predict, inputs=inputs, outputs=outputs).launch()
作者:华王
博客:https://www.cnblogs.com/huahuawang/

 浙公网安备 33010602011771号