
第二章 spring
一、Bean作用域
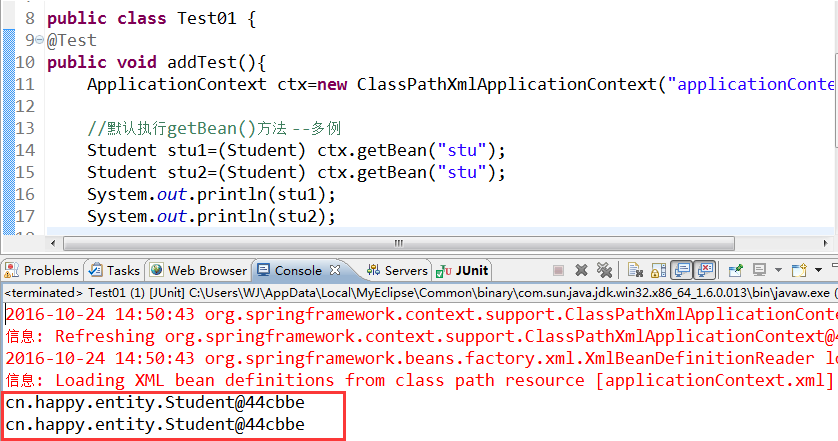
spring容器创建的时候,会将所有配置的bean对象创建出来,默认bean都是单例的。代码通过getBean()方法从容器获取指定的bean实例,容器首先会调用Bean类的无参构造器,创建实例对象
那么?我们如何说明出bean是单例的呢?
构建出两份学生对象,执行,发现两个对象的内存地址相同,内存中只有一份
如何使它成为多例的呢?那么则需要在配置文件中添加scope="prototype"该属性即可!
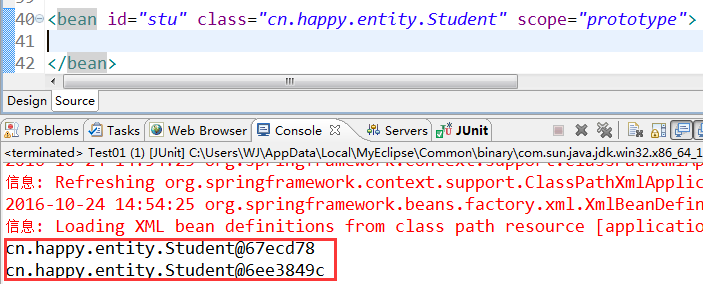
scope="prototype" 原型模式(N个对象):真正使用时才会创建,每获取一次,都会创建不同对象
scope="singleton" 单例模式:容器初始化时需要使用name建,每次获取的都是同一个对象,默认值
二、基于xml的DI(Dependency Injection)
注入类型:
定义学生Student实体类和小汽车Car实体类:进行封装和生成ToString(),并自定义属性Car
|
1
2
3
4
5
6
7
8
9
10
11
12
13
14
15
16
17
18
19
20
21
22
23
24
25
26
27
28
29
30
31
32
33
34
35
36
37
38
39
40
41
42
43
44
45
46
47
48
49
50
|
public class Student {private String name;private String age;private Car car;//无参构造public Student() { //System.out.println("Student.Student()");}//带参构造public Student(String name, String age, Car car) { this.name = name; this.age = age; this.car = car;}@Overridepublic String toString() { return "Student [name=" + name + ", age=" + age + ", car=" + car + "]";}public Car getCar() { return car;}public void setCar(Car car) { this.car = car;}public String getAge() { return age;}public void setAge(String age) { this.age = age;}public String getName() { return name;}public void setName(String name) { this.name = name;}} |
Car:
|
1
2
3
4
5
6
7
8
9
10
11
12
13
14
15
16
17
18
19
20
21
22
23
24
25
26
27
28
29
30
31
32
33
34
35
36
37
38
|
public class Car {private String color;private String brand;//无参构造public Car() { }//带参构造public Car(String color, String brand) { super(); this.color = color; this.brand = brand;}@Overridepublic String toString() { return "Car [color=" + color + ", brand=" + brand + "]";}public String getColor() { return color;}public void setColor(String color) { this.color = color;}public String getBrand() { return brand;}public void setBrand(String brand) { this.brand = brand;}} |
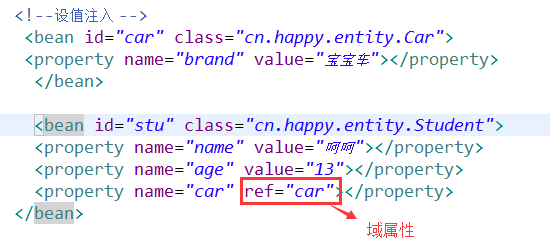
1.1设值注入(set方法注入):本质上是调用了Bean的setXXX()进行值的注入。分为普通属性和域属性
测试类:
|
1
2
3
4
5
6
7
8
|
public class Test01 {@Testpublic void addTest(){ ApplicationContext ctx=new ClassPathXmlApplicationContext("applicationContext.xml"); Student student=(Student) ctx.getBean("stu"); System.out.println(student);} |
实现效果:

1.2构造注入
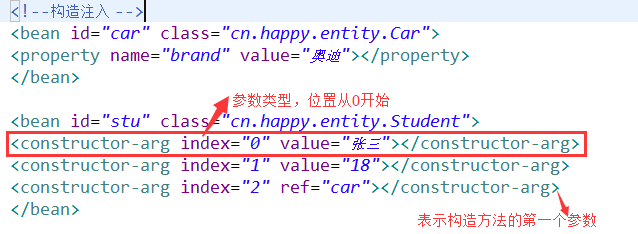
实现效果:

1.3命名空间p注入
使用前要先要在Spring配置文件中引入p命名空间
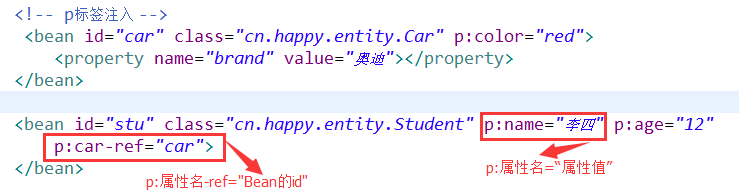
实现效果:

三、集合属性注入[List、Set、Map]
|
1
2
3
4
5
6
7
8
9
10
11
12
13
14
15
16
17
18
19
20
21
22
23
24
25
26
27
28
|
public class MyCollection {private List<String> list;private Set<String> set;private Map<String,String> map;public Map<String, String> getMap() { return map;}public void setMap(Map<String, String> map) { this.map = map;}public Set<String> getSet() { return set;}public void setSet(Set<String> set) { this.set = set;}public List<String> getList() { return list;}public void setList(List<String> list) { this.list = list;} |
Spring配置文件:
List与Set同理:


Map双列集合:

测试类:调用对应的方法:
|
1
2
3
4
5
6
7
8
9
10
|
public class Test01 {@Testpublic void addTest(){ ApplicationContext ctx=new ClassPathXmlApplicationContext("applicationContext.xml"); MyCollection collection=(MyCollection) ctx.getBean("collection"); //System.out.println(collection.getList()); //System.out.println(collection.getSet()); System.out.println(collection.getMap());} |

四、基于注解的DI
注:在项目中添加Spring AOP相关的JAR文件以及xsd约束文件。
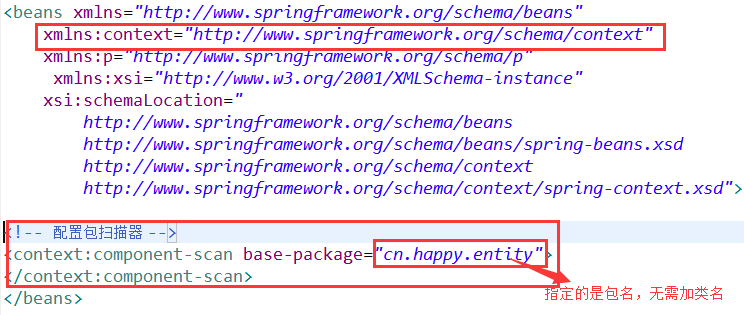
由于是基于注解的DI,所以无需再Spring配置文件中进行节点配置,只需配置包扫描器即可!
配置包扫描器用途:
该包下以及子包中的类才可以被Spring扫描,去寻找被注解的类和属性,让Spring容器管理赋值
Student类:
指定@Component中的value即可在测试类中的getBean()中植入即可。
@Value为该属性赋值
|
1
2
3
4
5
6
7
8
9
10
11
12
13
14
15
16
17
18
19
20
21
22
23
24
|
@Component(value="stu")public class Student {@Value("呵呵") private String name;@Value("13")private String age;/* * JDK注解 @Resource(name="car2") *//* * Spring注解 */@Autowired@Qualifier(value="car2")private Car car;@Overridepublic String toString() { return "Student [name=" + name + ", age=" + age + ", car=" + car + "]";} |
Car类:
|
1
2
3
4
5
6
7
8
9
10
11
12
13
|
@Component(value="car2")public class Car {@Value("黑色")private String color;@Value("奥迪")private String brand;@Overridepublic String toString() { return "Car [color=" + color + ", brand=" + brand + "]";} |
测试类:
|
1
2
3
4
5
6
7
8
9
|
public class Test01 {@Testpublic void addTest(){ ApplicationContext ctx=new ClassPathXmlApplicationContext("applicationContext.xml"); Student student=(Student) ctx.getBean("stu"); System.out.println(student);}} |
实现效果:

等价于@Component的注解:
@Component[不分层的情况下]
@Repository() [Dao层]
@Service() [Biz层]
@Controller() [Action类]

 浙公网安备 33010602011771号