
基于Java+TestNG+Allure实现接口测试框架的自动化报告
做一个简单的基于Java+TestNG+Allure的自动化报告demo
1 环境准备
- JDK 1.8+
- Maven 3.6+
- IntelliJ IDEA(推荐)
2 项目结构
src
├── main
│   └── java
│       └── com
│           └── example
│               └── utils
│                   └── HttpUtil.java
└── test
    ├── java
    │   └── com
    │       └── example
    │           └── tests
    │               └── ApiTest.java
    └── resources
        ├── testng.xml
        └── allure.properties
3 添加依赖(pom.xml)
<dependencies>
    <!-- TestNG -->
    <dependency>
        <groupId>org.testng</groupId>
        <artifactId>testng</artifactId>
        <version>7.4.0</version>
    </dependency>

    <!-- Allure -->
    <dependency>
        <groupId>io.qameta.allure</groupId>
        <artifactId>allure-testng</artifactId>
        <version>2.13.8</version>
    </dependency>

    <!-- HTTP Client -->
    <dependency>
        <groupId>org.apache.httpcomponents</groupId>
        <artifactId>httpclient</artifactId>
        <version>4.5.13</version>
    </dependency>

    <!-- JSON处理 -->
    <dependency>
        <groupId>com.google.code.gson</groupId>
        <artifactId>gson</artifactId>
        <version>2.8.8</version>
    </dependency>
</dependencies>

<build>
    <plugins>
        <!-- Maven编译插件 -->
        <plugin>
            <groupId>org.apache.maven.plugins</groupId>
            <artifactId>maven-compiler-plugin</artifactId>
            <version>3.8.1</version>
            <configuration>
                <source>1.8</source>
                <target>1.8</target>
            </configuration>
        </plugin>

        <!-- TestNG执行插件 -->
        <plugin>
            <groupId>org.apache.maven.plugins</groupId>
            <artifactId>maven-surefire-plugin</artifactId>
            <version>3.0.0-M5</version>
            <configuration>
                <suiteXmlFiles>
                    <suiteXmlFile>src/test/resources/testng.xml</suiteXmlFile>
                </suiteXmlFiles>
                <argLine>
                    -javaagent:"${settings.localRepository}/org/aspectj/aspectjweaver/1.9.7/aspectjweaver-1.9.7.jar"
                </argLine>
            </configuration>
            <dependencies>
                <dependency>
                    <groupId>org.aspectj</groupId>
                    <artifactId>aspectjweaver</artifactId>
                    <version>1.9.7</version>
                </dependency>
            </dependencies>
        </plugin>

        <!-- Allure报告插件 -->
        <plugin>
            <groupId>io.qameta.allure</groupId>
            <artifactId>allure-maven</artifactId>
            <version>2.10.0</version>
            <configuration>
                <reportVersion>2.13.8</reportVersion>
            </configuration>
        </plugin>
    </plugins>
</build>
4 工具类实现(HttpUtil.java)
package com.example.utils;

import org.apache.http.HttpResponse;
import org.apache.http.client.methods.HttpGet;
import org.apache.http.client.methods.HttpPost;
import org.apache.http.entity.StringEntity;
import org.apache.http.impl.client.CloseableHttpClient;
import org.apache.http.impl.client.HttpClients;
import org.apache.http.util.EntityUtils;

public class HttpUtil {
    public static String doGet(String url) throws Exception {
        try (CloseableHttpClient client = HttpClients.createDefault()) {
            HttpGet request = new HttpGet(url);
            HttpResponse response = client.execute(request);
            return EntityUtils.toString(response.getEntity());
        }
    }

    public static String doPost(String url, String jsonBody) throws Exception {
        try (CloseableHttpClient client = HttpClients.createDefault()) {
            HttpPost request = new HttpPost(url);
            request.setHeader("Content-Type", "application/json");
            request.setEntity(new StringEntity(jsonBody));
            HttpResponse response = client.execute(request);
            return EntityUtils.toString(response.getEntity());
        }
    }
}
5 测试用例(ApiTest.java)
package com.example.tests;

import com.example.utils.HttpUtil;
import io.qameta.allure.*;
import org.testng.Assert;
import org.testng.annotations.Test;

public class ApiTest {

    @Test(description = "测试GET请求")
    @Description("验证GET请求返回状态和内容")
    @Severity(SeverityLevel.CRITICAL)
    @Story("基础API测试")
    @Feature("API功能测试")
    public void testGetRequest() throws Exception {
        String url = "https://jsonplaceholder.typicode.com/posts/1";
        String response = HttpUtil.doGet(url);

        // 验证响应包含关键字段
        Assert.assertTrue(response.contains("\"userId\": 1"), "验证userId");
        Assert.assertTrue(response.contains("\"id\": 1"), "验证id");
    }

    @Test(description = "测试POST请求")
    @Description("验证POST请求创建资源")
    @Severity(SeverityLevel.NORMAL)
    @Story("数据创建测试")
    @Feature("API功能测试")
    public void testPostRequest() throws Exception {
        String url = "https://jsonplaceholder.typicode.com/posts";
        String jsonBody = "{\"title\":\"foo\",\"body\":\"bar\",\"userId\":1}";

        String response = HttpUtil.doPost(url, jsonBody);

        // 验证响应包含创建的数据
        Assert.assertTrue(response.contains("\"title\": \"foo\""), "验证title");
        Assert.assertTrue(response.contains("\"id\": 101"), "验证新资源ID");
    }
}
6 TestNG 配置文件(testng.xml)
<!DOCTYPE suite SYSTEM "https://testng.org/testng-1.0.dtd">
<suite name="API_Test_Suite">
    <test name="API_Tests">
        <classes>
            <class name="com.example.tests.ApiTest"/>
        </classes>
    </test>
</suite>
7 Allure配置文件(allure.properties)
allure.results.directory=target/allure-results
allure.link.issue.pattern=https://example.com/issue/{}
allure.link.tms.pattern=https://example.com/tms/{}
8 配置实现(关键点):maven的settings.xml文件
文件路径
${user.home}/.m2/settings.xml(例如:C:\Users\你的用户名.m2\settings.xml)
具体配置
<?xml version="1.0" encoding="UTF-8"?>
<settings xmlns="http://maven.apache.org/SETTINGS/1.0.0"
          xmlns:xsi="http://www.w3.org/2001/XMLSchema-instance"
          xsi:schemaLocation="http://maven.apache.org/SETTINGS/1.0.0
          http://maven.apache.org/xsd/settings-1.0.0.xsd">

  <!-- 本地仓库位置 -->
  <localRepository>${user.home}/.m2/repository</localRepository>

  <!-- 插件组配置(包含Allure插件) -->
  <pluginGroups>
    <pluginGroup>io.qameta.allure</pluginGroup>
  </pluginGroups>

  <!-- 代理设置(根据实际需要配置) -->
  <!--
  <proxies>
    <proxy>
      <id>optional</id>
      <active>true</active>
      <protocol>http</protocol>
      <username>proxyuser</username>
      <password>proxypass</password>
      <host>proxy.host.net</host>
      <port>80</port>
      <nonProxyHosts>local.net|some.host.com</nonProxyHosts>
    </proxy>
  </proxies>
  -->

  <!-- 镜像设置(推荐使用阿里云镜像加速下载) -->
  <mirrors>
    <mirror>
      <id>aliyunmaven</id>
      <mirrorOf>*</mirrorOf>
      <name>阿里云公共仓库</name>
      <url>https://maven.aliyun.com/repository/public</url>
    </mirror>
  </mirrors>

  <!-- 配置文件激活条件 -->
  <profiles>
    <!-- JDK 1.8 配置 -->
    <profile>
      <id>jdk-1.8</id>
      <activation>
        <activeByDefault>true</activeByDefault>
        <jdk>1.8</jdk>
      </activation>
      <properties>
        <maven.compiler.source>1.8</maven.compiler.source>
        <maven.compiler.target>1.8</maven.compiler.target>
        <maven.compiler.compilerVersion>1.8</maven.compiler.compilerVersion>
      </properties>
    </profile>

    <!-- Allure 配置 -->
    <profile>
      <id>allure</id>
      <properties>
        <allure.results.directory>${project.build.directory}/allure-results</allure.results.directory>
      </properties>
    </profile>
  </profiles>

  <!-- 激活的配置文件 -->
  <activeProfiles>
    <activeProfile>jdk-1.8</activeProfile>
    <activeProfile>allure</activeProfile>
  </activeProfiles>
</settings>
说明:具体有三点:
1)本地仓库位置:
<localRepository>${user.home}/.m2/repository</localRepository>
2)Allure 插件组配置:
<pluginGroups>
  <pluginGroup>io.qameta.allure</pluginGroup>
</pluginGroups>
3)Allure 结果目录
<profile>
  <id>allure</id>
  <properties>
    <allure.results.directory>${project.build.directory}/allure-results</allure.results.directory>
  </properties>
</profile>
9 测试执行
方式一:使用Maven命令
# 运行测试生成 Allure 结果数据
# 这会在 target/allure-results 目录下生成原始结果数据
mvn clean test

# 生成Allure报告(HTML 格式)
mvn allure:serve
方式二:使用TestNG直接运行
1.右键点击testng.xml -> Run
会在target/allure-results/下生成测试结果的 .json 文件
2.生成allure报告
# 生成Allure报告
mvn allure:serve
会自动打开测试报告的html地址: http://192.168.82.224:49195/
10 报告效果
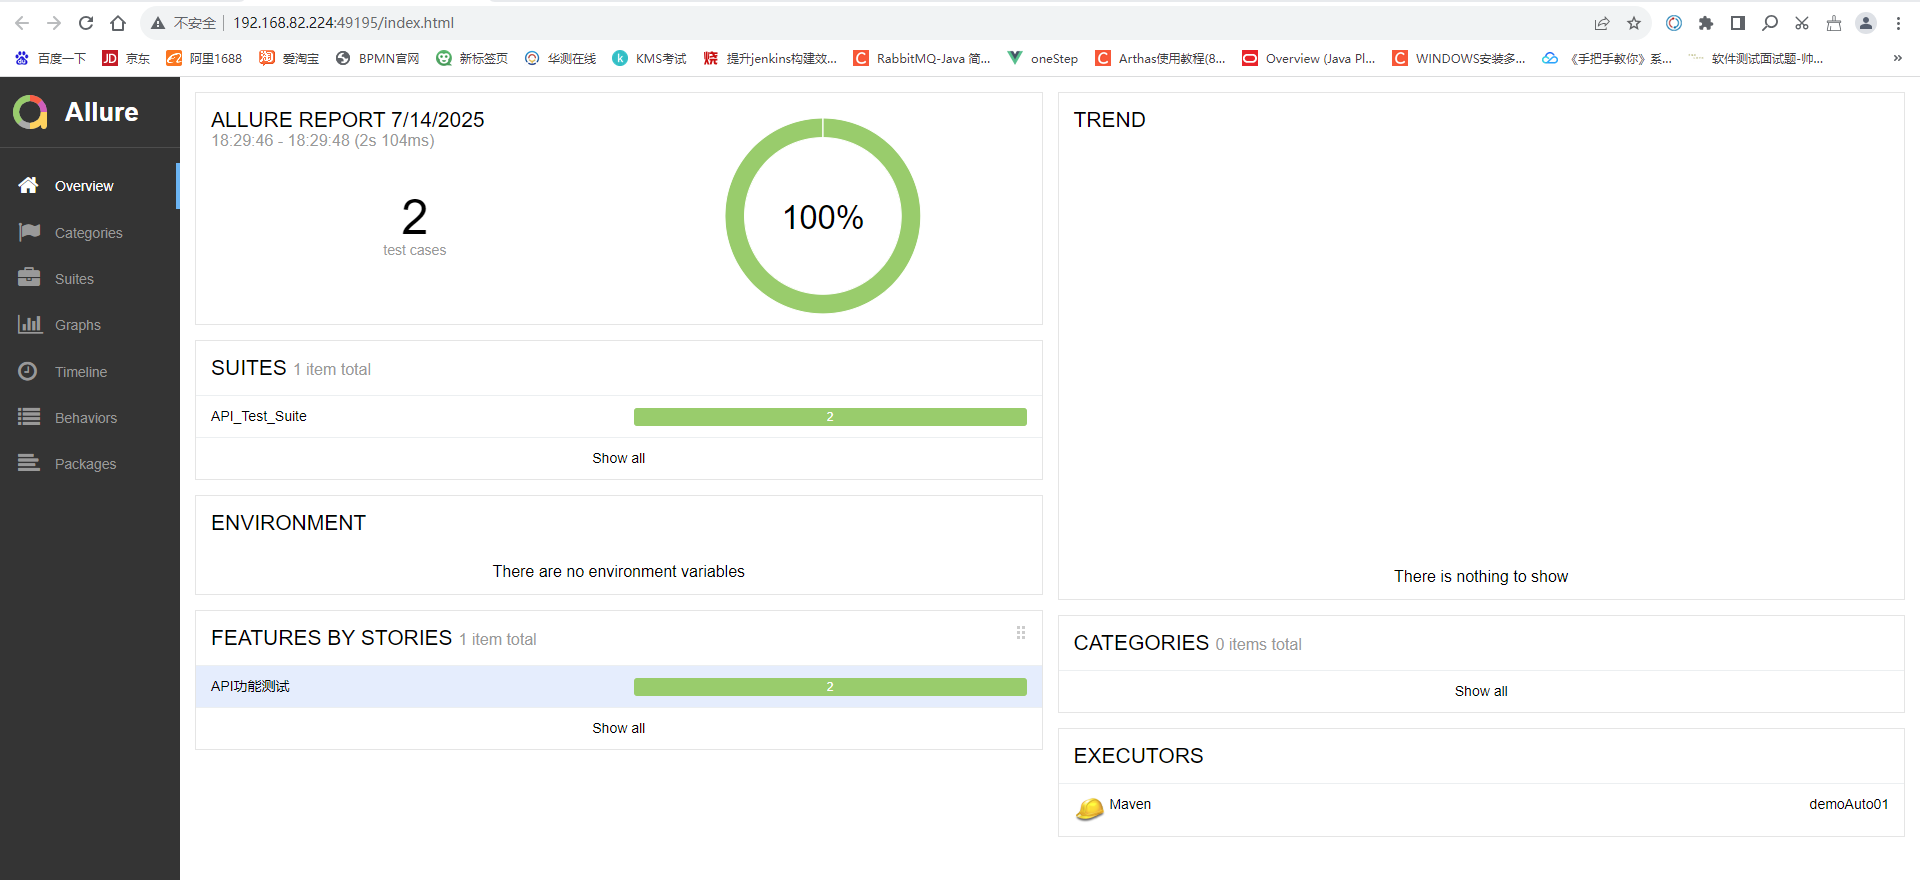
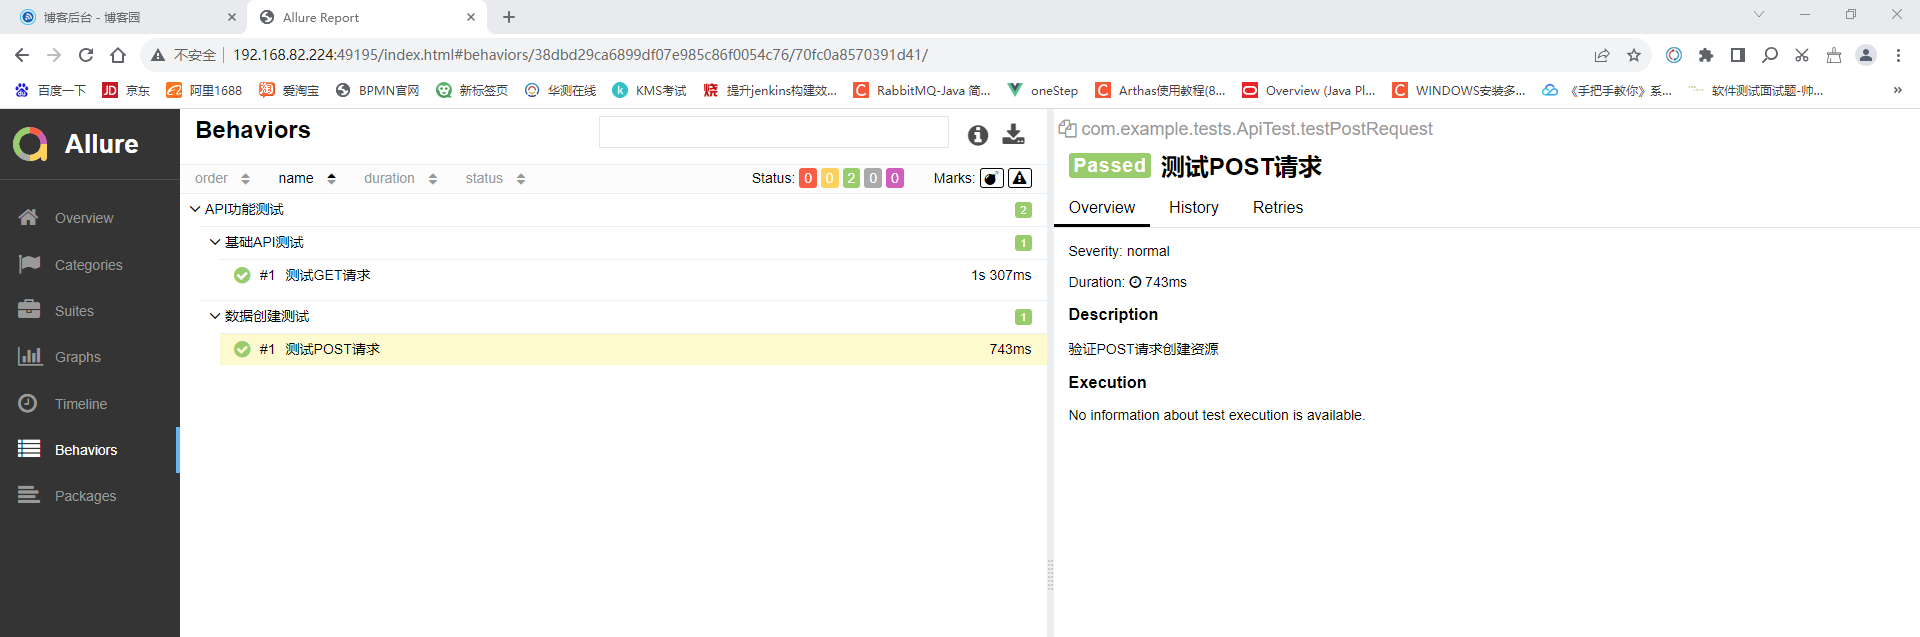
说明:
Allure报告将包含:
- 测试套件概览
- 用例详细步骤
- 请求/响应详情
- 严重级别标记
- 历史趋势分析
- 环境信息

 浙公网安备 33010602011771号