


本节内容
一、MySQL安装
1、卸载MariaDB
1) 查询所安装的MariaDB组件
[root@localhost logs]# rpm -qa | grep Maria*
MariaDB-server-5.5.49-1.el7.centos.x86_64
MariaDB-common-5.5.49-1.el7.centos.x86_64
MariaDB-client-5.5.49-1.el7.centos.x86_64

[root@s35 MySQL]# rpm -qa |grep mariadb
mariadb-libs-5.5.56-2.el7.x86_64
2) 卸载
卸载数据库
#yum方式
[root@localhost logs]# yum -y remove mari*

#rpm方式
[root@s21 MySQL]# rpm -e mariadb-libs-5.5.56-2.el7.x86_64
error: Failed dependencies:
	libmysqlclient.so.18()(64bit) is needed by (installed) postfix-2:2.10.1-6.el7.x86_64
	libmysqlclient.so.18(libmysqlclient_18)(64bit) is needed by (installed) postfix-2:2.10.1-6.el7.x86_64
[root@s21 MySQL]# rpm -e --nodeps mariadb-libs-5.5.56-2.el7.x86_64
删除数据库文件
[root@localhost logs]# rm -rf /var/lib/mysql/*
2、安装MySQL
1) 下载MySQL安装包并解压
[root@s21 MySQL]# tar xvf MySQL-5.5.59-1.el7.x86_64.rpm-bundle.tar
MySQL-embedded-5.5.59-1.el7.x86_64.rpm
MySQL-client-5.5.59-1.el7.x86_64.rpm
MySQL-server-5.5.59-1.el7.x86_64.rpm
MySQL-test-5.5.59-1.el7.x86_64.rpm
MySQL-shared-5.5.59-1.el7.x86_64.rpm
MySQL-shared-compat-5.5.59-1.el7.x86_64.rpm
MySQL-devel-5.5.59-1.el7.x86_64.rpm
2) 安装
[root@s35 MySQL]# rpm -ivh MySQL-devel-5.5.59-1.el7.x86_64.rpm
warning: MySQL-devel-5.5.59-1.el7.x86_64.rpm: Header V3 DSA/SHA1 Signature, key ID 5072e1f5: NOKEY
Preparing...                          ################################# [100%]
Updating / installing...
   1:MySQL-devel-5.5.59-1.el7         ################################# [100%]
[root@s35 MySQL]# rpm -ivh MySQL-server-5.5.59-1.el7.x86_64.rpm MySQL-client-5.5.59-1.el7.x86_64.rpm MySQL-embedded-5.5.59-1.el7.x86_64.rpm MySQL-shared-5.5.59-1.el7.x86_64.rpm MySQL-shared-compat-5.5.59-1.el7.x86_64.rpm
warning: MySQL-server-5.5.59-1.el7.x86_64.rpm: Header V3 DSA/SHA1 Signature, key ID 5072e1f5: NOKEY
Preparing...                          ################################# [100%]
Updating / installing...
   1:MySQL-shared-compat-5.5.59-1.el7 ################################# [ 20%]
   2:MySQL-shared-5.5.59-1.el7        ################################# [ 40%]
   3:MySQL-embedded-5.5.59-1.el7      ################################# [ 60%]
   4:MySQL-client-5.5.59-1.el7        ################################# [ 80%]
   5:MySQL-server-5.5.59-1.el7        ################################# [100%]
3) 扩展 - yum方式安装MySQL
#安装MySQL的镜像仓库
[root@typecodes ~]# rpm -Uvh http://dev.mysql.com/get/mysql-community-release-el7-5.noarch.rpm
Retrieving http://dev.mysql.com/get/mysql-community-release-el7-5.noarch.rpm
Preparing...                          ################################# [100%]
Updating / installing...
   1:mysql-community-release-el7-5    ################################# [100%]

#这时查看当前可用的mysql安装资源:
[root@typecodes ~]# yum repolist enabled | grep "mysql.*-community.*"

mysql-connectors-community/x86_64 MySQL Connectors Community                 14
mysql-tools-community/x86_64      MySQL Tools Community                      17
mysql56-community/x86_64          MySQL 5.6 Community Server                139

#从上面的列表可以看出, mysql56-community/x86_64 和 MySQL 5.6 Community Server 可以使用。
#因此,我们就可以直接用yum方式安装了MySQL5.6版本了。
[root@typecodes ~]# yum -y install mysql-community-server

#可以修改mysql-community.repo源,改变默认安装的mysql版本。比如要安装5.6版本,将5.7源的enabled=1改成enabled=0,然后再将5.6源的enabled=0改成enabled=1即可。
[root@typecodes ~]# vim /etc/yum.repos.d/mysql-community.repo
4) 视需要进行配置文件拷贝、修改(数据文件目录、端口号等)
[root@localhost ~]# cp /usr/share/mysql/my-medium.cnf /etc/my.cnf
注意:
如果修改了数据文件目录,需要将目录移动到指定位置,还要注意目录的属主和权限。
[root@s21 MySQL]# mv /var/lib/mysql /home/mysql/data/
MYSQL启动后报:ERROR! The server quit without updating PID file错误的问题解决
1、权限不够:chown -R mysql:mysql /home/mysql/data” “chmod -R 755 /home/mysql/data
2、centos7的selinux问题:打开/etc/selinux/config,把SELINUX=enforcing改为SELINUX
5) 启动
[root@s35 ~]# systemctl start mysqld

查看MySQL启动状态
[root@s35 ~]# systemctl status mysqld
● mysqld.service - MySQL Community Server
   Loaded: loaded (/usr/lib/systemd/system/mysqld.service; enabled; vendor preset: disabled)
   Active: active (running) since Tue 2018-04-24 16:16:58 CST; 2s ago
  Process: 1622 ExecStartPost=/usr/bin/mysql-systemd-start post (code=exited, status=0/SUCCESS)
  Process: 982 ExecStartPre=/usr/bin/mysql-systemd-start pre (code=exited, status=0/SUCCESS)
 Main PID: 1620 (mysqld_safe)
   CGroup: /system.slice/mysqld.service
           ├─1620 /bin/sh /usr/bin/mysqld_safe --basedir=/usr
           └─1886 /usr/sbin/mysqld --basedir=/usr --datadir=/var/lib/mysql --plugin-dir=/usr/lib64/mysql/plugin --log-error=s35.err --pid-file...

Apr 24 16:16:57 s35 mysql-systemd-start[982]: 2018-04-24 16:16:57 1594 [Note] InnoDB: Shutdown completed; log sequence number 1625987
Apr 24 16:16:57 s35 mysql-systemd-start[982]: PLEASE REMEMBER TO SET A PASSWORD FOR THE MySQL root USER !
Apr 24 16:16:57 s35 mysql-systemd-start[982]: To do so, start the server, then issue the following commands:
Apr 24 16:16:57 s35 mysql-systemd-start[982]: /usr/bin/mysqladmin -u root password 'new-password'
Apr 24 16:16:57 s35 mysql-systemd-start[982]: /usr/bin/mysqladmin -u root -h s35 password 'new-password'
Apr 24 16:16:57 s35 mysql-systemd-start[982]: Alternatively you can run:
Apr 24 16:16:57 s35 mysql-systemd-start[982]: /usr/bin/mysql_secure_installation
Apr 24 16:16:57 s35 mysqld_safe[1620]: 180424 16:16:57 mysqld_safe Logging to '/var/lib/mysql/s35.err'.
Apr 24 16:16:57 s35 mysqld_safe[1620]: 180424 16:16:57 mysqld_safe Starting mysqld daemon with databases from /var/lib/mysql
Apr 24 16:16:58 s35 systemd[1]: Started MySQL Community Server.
6) 开机自启
[root@s35 ~]# systemctl enable mysqld
[root@s35 ~]# systemctl daemon-reload
7) 配置MySQL(设置密码等)
[root@typecodes ~]# mysql_secure_installation

NOTE: RUNNING ALL PARTS OF THIS SCRIPT IS RECOMMENDED FOR ALL MySQL
      SERVERS IN PRODUCTION USE!  PLEASE READ EACH STEP CAREFULLY!

In order to log into MySQL to secure it, we'll need the current
password for the root user.  If you've just installed MySQL, and
you haven't set the root password yet, the password will be blank,
so you should just press enter here.

Enter current password for root (enter for none):
OK, successfully used password, moving on...

Setting the root password ensures that nobody can log into the MySQL
root user without the proper authorisation.

Set root password? [Y/n] y                  [设置root用户密码]
New password:
Re-enter new password:
Password updated successfully!
Reloading privilege tables..
 ... Success!

By default, a MySQL installation has an anonymous user, allowing anyone
to log into MySQL without having to have a user account created for
them.  This is intended only for testing, and to make the installation
go a bit smoother.  You should remove them before moving into a
production environment.

Remove anonymous users? [Y/n] y                 [删除匿名用户]
 ... Success!

Normally, root should only be allowed to connect from 'localhost'.  This
ensures that someone cannot guess at the root password from the network.

Disallow root login remotely? [Y/n] y       [禁止root远程登录]
 ... Success!

By default, MySQL comes with a database named 'test' that anyone can
access.  This is also intended only for testing, and should be removed
before moving into a production environment.

Remove test database and access to it? [Y/n] y          [删除test数据库]
 - Dropping test database...
ERROR 1008 (HY000) at line 1: Can't drop database 'test'; database doesn't exist
 ... Failed!  Not critical, keep moving...
 - Removing privileges on test database...
 ... Success!

Reloading the privilege tables will ensure that all changes made so far
will take effect immediately.

Reload privilege tables now? [Y/n] y            [刷新权限]
 ... Success!

All done!  If you've completed all of the above steps, your MySQL
installation should now be secure.

Thanks for using MySQL!

Cleaning up...
8) 开启远程连接(需要重新开启时)
# mysql -uroot -p
mysql>use mysql;
mysql>GRANT ALL PRIVILEGES ON *.* TO 'root'@'%' IDENTIFIED BY '123456' WITH GRANT OPTION;

PS:开启远程访问权限“%”代表所有的ip地址,但是不包括localhost
9) 配置默认编码为utf8
修改/etc/my.cnf配置文件,在[mysqld]下添加编码配置,如下所示:
[mysqld]
character_set_server=utf8
init_connect='SET NAMES utf8'

重新启动mysql服务,查看数据库默认编码如下所示:
mysql> show variables like '%character%';
+--------------------------+----------------------------+
| Variable_name            | Value                      |
+--------------------------+----------------------------+
| character_set_client     | utf8                       |
| character_set_connection | utf8                       |
| character_set_database   | utf8                       |
| character_set_filesystem | binary                     |
| character_set_results    | utf8                       |
| character_set_server     | utf8                       |
| character_set_system     | utf8                       |
| character_sets_dir       | /usr/share/mysql/charsets/ |
+--------------------------+----------------------------+
8 rows in set (0.00 sec)

默认配置文件路径:
配置文件:/etc/my.cnf
日志文件:/var/log//var/log/mysqld.log
服务启动脚本:/usr/lib/systemd/system/mysqld.service
socket文件:/var/run/mysqld/mysqld.pid
3、(附)安装MariaDB
1) 安装
[root@localhost ~]# yum -y install mariadb*
2) 启动与开机自启
[root@localhost ~]# systemctl start mariadb.service
[root@localhost ~]# systemctl enable mariadb.service
3) 简单配置
查看数据库
[root@localhost ~]# mysql
Welcome to the MariaDB monitor.  Commands end with ; or \g.
Your MariaDB connection id is 3
Server version: 5.5.37-MariaDB MariaDB Server
Copyright (c) 2000, 2014, Oracle, Monty Program Ab and others.
Type 'help;' or '\h' for help. Type '\c' to clear the current input statement.
MariaDB [(none)]> show databases;
+--------------------+
| Database           |
+--------------------+
| information_schema |
| mysql              |
| performance_schema |
| test               |
+--------------------+
4 rows in set (0.00 sec)
MariaDB [(none)]> use test
Database changed
MariaDB [test]> show tables;
Empty set (0.00 sec)
MariaDB [test]> exit
Bye
安全配置向导
[root@localhost ~]# mysql_secure_installation
/usr/bin/mysql_secure_installation: line 379: find_mysql_client: command not found
NOTE: RUNNING ALL PARTS OF THIS SCRIPT IS RECOMMENDED FOR ALL MariaDB
      SERVERS IN PRODUCTION USE!  PLEASE READ EACH STEP CAREFULLY!
In order to log into MariaDB to secure it, we'll need the current
password for the root user.  If you've just installed MariaDB, and
you haven't set the root password yet, the password will be blank,
so you should just press enter here.
ERROR 1045 (28000): Access denied for user 'root'@'localhost' (using password: YES)
Enter current password for root (enter for none):
OK, successfully used password, moving on...
Setting the root password ensures that nobody can log into the MariaDB
root user without the proper authorisation.
Set root password? [Y/n] y                  [设置root用户密码]
New password:
Re-enter new password:
Password updated successfully!
Reloading privilege tables..
 ... Success!
By default, a MariaDB installation has an anonymous user, allowing anyone
to log into MariaDB without having to have a user account created for
them.  This is intended only for testing, and to make the installation
go a bit smoother.  You should remove them before moving into a
production environment.
Remove anonymous users? [Y/n] y                 [删除匿名用户]
 ... Success!
Normally, root should only be allowed to connect from 'localhost'.  This
ensures that someone cannot guess at the root password from the network.
Disallow root login remotely? [Y/n] y       [禁止root远程登录]
 ... Success!
By default, MariaDB comes with a database named 'test' that anyone can
access.  This is also intended only for testing, and should be removed
before moving into a production environment.
Remove test database and access to it? [Y/n] y          [删除test数据库]
 - Dropping test database...
 ... Success!
 - Removing privileges on test database...
 ... Success!
Reloading the privilege tables will ensure that all changes made so far
will take effect immediately.
Reload privilege tables now? [Y/n] y             [刷新权限]
 ... Success!
Cleaning up...
All done!  If you've completed all of the above steps, your MariaDB
installation should now be secure.
Thanks for using MariaDB!
使用账户密码登录
[root@localhost ~]# mysql -uroot -p
Enter password:
Welcome to the MariaDB monitor.  Commands end with ; or \g.
Your MariaDB connection id is 15
Server version: 5.5.37-MariaDB MariaDB Server
Copyright (c) 2000, 2014, Oracle, Monty Program Ab and others.
Type 'help;' or '\h' for help. Type '\c' to clear the current input statement.
MariaDB [(none)]> show databases;
+--------------------+
| Database           |
+--------------------+
| information_schema |
| mysql              |
| performance_schema |
| zbphp.com          |
+--------------------+
4 rows in set (0.00 sec)
MariaDB [(none)]>
修改字符集等
# vim /etc/my.conf

[mysqld]

datadir=/var/lib/mysql
socket=/var/lib/mysql/mysql.sock

character-set-server=utf8
collation-server=utf8_bin
二、MySQL主从复制与读写分离
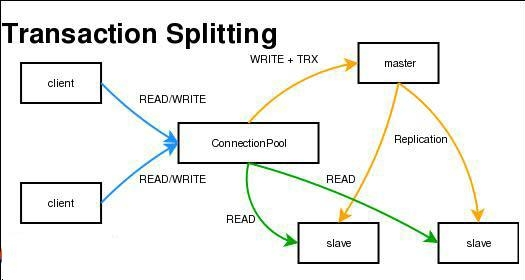
MySQL一般来说都是通过主从复制(Master-Slave)的方式来同步数据,再通过读写分离(MySQL-Proxy)来提升数据库的并发负载能力。
1、MySQL主从
MySQL主从配置官方文档,Replication
MySQL主从复制与读写分离,简书
MySQL的Replication是一个异步的复制过程,从一个MySQL instace(我们称之为 Master)复制到另一个MySQL instance(我们称之 Slave)。在 Master 与 Slave 之间的实现整个复制过程主要由三个线程来完成,其中两个线程(Sql线程和IO线程)在 Slave 端,另外一个线程(IO线程)在 Master端。MySQL复制的基本过程如下:
- Slave 上面的IO线程连接上 Master,并请求从指定日志文件的指定位置(或者从最开始的日志)之后的日志内容;
- Master 接收到来自 Slave 的 IO 线程的请求后,通过负责复制的 IO 线程根据请求信息读取指定日志指定位置之后的日志信息,返回给 Slave 端的 IO 线程。返回信息中除了日志所包含的信息之外,还包括本次返回的信息在 Master 端的 BinaryLog 文件的名称以及在 Binary Log 中的位置;
- Slave 的 IO 线程接收到信息后,将接收到的日志内容依次写入到 Slave 端的Relay Log文件(mysql-relay-bin.xxxxxx)的最末端,并将读取到的Master端的bin-log的文件名和位置记录到master- info文件中,以便在下一次读取的时候能够清楚的高速Master“我需要从某个bin-log的哪个位置开始往后的日志内容,请发给我”
- Slave 的 SQL 线程检测到 Relay Log 中新增加了内容后,会马上解析该 Log 文件中的内容成为在 Master 端真实执行时候的那些可执行的 Query 语句,并在自身执行这些 Query。这样,实际上就是在 Master 端和 Slave 端执行了同样的 Query,所以两端的数据是完全一样的。
2、MySQL读写分离
MySQL读写分离是利用MySQL Proxy来实现的。MySQL Proxy最强大的一项功能是实现“读写分离(Read/Write Splitting)”。基本的原理是让主数据库处理事务性查询,而从数据库处理SELECT查询。数据库复制被用来把事务性查询导致的变更同步到集群中的从数据库。
三、MySQL常用命令
MySQL语句语法官网介绍,SQL Statement Syntax
在SELECT或SHOW命令最后加\G,结果会将每行分列显示。
1、数据库管理语句
MySQL数据库管理语句官网介绍,Database Administration Statements
(1) 查看当前用户
mysql> select user();
+----------------+
| user()         |
+----------------+
| root@localhost |
+----------------+
1 row in set (0.00 sec)
(2) 查看数据库
mysql> show databases;
+------------------------+
| Database               |
+------------------------+
| information_schema     |
| mysql                  |
| yusuke_demo            |
+------------------------+
(3) 查看数据库表
mysql> show tables;
+---------------------------+
| Tables_in_mysql           |
+---------------------------+
| columns_priv              |
| ...                       |
| time_zone_transition      |
| time_zone_transition_type |
| user                      |
+---------------------------+
2、创建数据库
#创建数据库
mysql> CREATE DATABASE mydatabase CHARACTER SET utf8 COLLATE utf8_general_ci;
#查看创建命令
mysql> SHOW CREATE DATABASE mydatabase;
3、添加用户
#添加用户
mysql> CREATE USER 'finley'@'localhost' IDENTIFIED BY 'password';
mysql> CREATE USER 'finley'@'%' IDENTIFIED BY 'password';
4、权限管理
#授予用户所有权利
mysql> GRANT ALL PRIVILEGES ON *.* TO 'finley'@'localhost';
#授予个别权利
mysql> GRANT RELOAD,PROCESS ON *.* TO 'admin'@'localhost';
#授予用户对所有数据库的所有权利,可将自己的权限授权给其他用户
mysql> GRANT ALL PRIVILEGES ON *.* TO 'finley'@'localhost'
    ->     WITH GRANT OPTION;
mysql> revoke all privileges on wp_expertlounge.* from 'wordpressuser'@'localhost';
mysql> revoke all privileges on wp_expertlounge.* from 'wordpressuser'@'%';
mysql> FLUSH PRIVILEGES;

 浙公网安备 33010602011771号