第十二周作业—N42-虚怀若谷
一、配置chrony服务,实现服务器时间自动同步
1. 安装chrony服务,并编辑配置文件
[root@centos7 ~]# vim /etc/chrony.conf
#找到server开头的行,配置同步时间的服务器
server 192.168.27.1 iburst
#以下两个选项,当作为时间服务器时可开启
# Allow NTP client access from local network.
allow 192.168.27.0/24
# Serve time even if not synchronized to a time source.
local stratum 10
2. 启动chrony服务,并设置为开机启动
[root@centos7 ~]# systemctl start chronyd
[root@centos7 ~]# systemctl enable chronyd
二、实现cobbler+pxe自动化装机
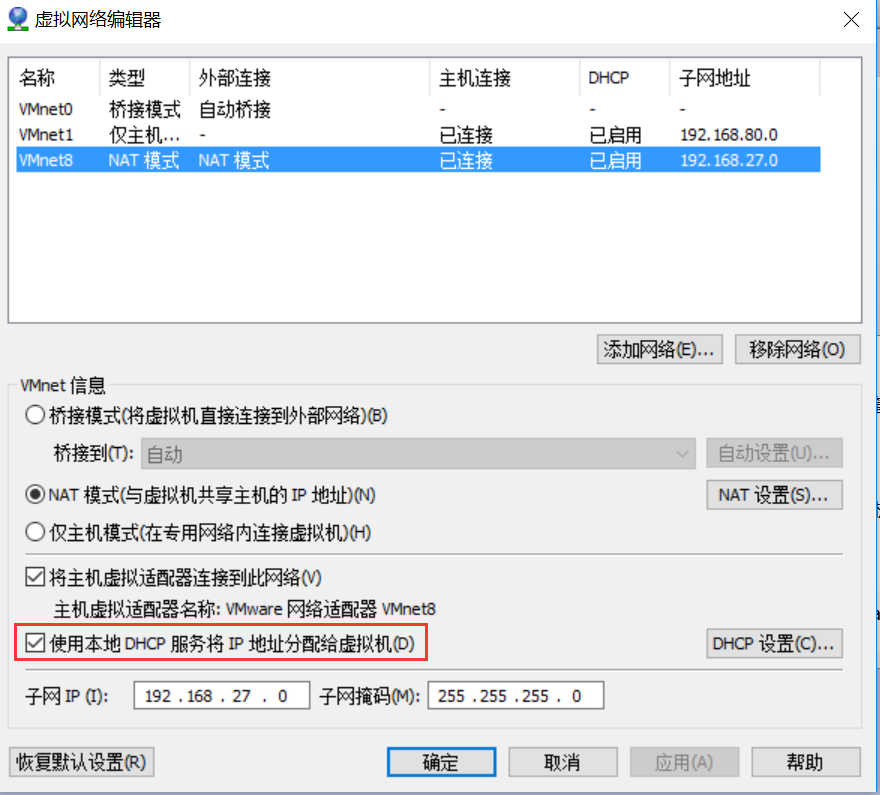
1. 关闭vmware虚拟机的dhcp服务,点击菜单栏"编辑" ---> "虚拟网络编辑器",选择VMnet8网卡(虚拟机连接的网卡),取消勾选"使用本地DHCP服务将IP地址分配给虚拟机";如下图所示
2. 在虚拟机上安装cobbler与dhcp服务,cobbler基于epel源


[development]
name=dvdbase repo
baseurl=file:///mnt/cdrom/
enabled=1
gpgcheck=1
gpgkey=file:///mnt/cdrom/RPM-GPG-KEY-CentOS-7

[aliyunEpel]
name=aliyun epel
baseurl=https://mirrors.aliyun.com/epel/$releasever/$basearch
enabled=1
gpgcheck=1
gpgkey=https://mirrors.aliyun.com/epel/RPM-GPG-KEY-EPEL-$releasever
[root@centos7 ~]# yum install cobbler dhcp
3. 启动相关服务,并执行cobbler check 检查cobbler环境
[root@centos7 ~]# systemctl start cobblerd httpd tftp
[root@centos7 ~]# cobbler check
The following are potential configuration items that you may want to fix:

1 : The 'server' field in /etc/cobbler/settings must be set to something other than localhost, or kickstarting features will not work.  This should be a resolvable hostname or IP for the boot server as reachable by all machines that will use it.
2 : For PXE to be functional, the 'next_server' field in /etc/cobbler/settings must be set to something other than 127.0.0.1, and should match the IP of the boot server on the PXE network.
3 : change 'disable' to 'no' in /etc/xinetd.d/tftp
4 : Some network boot-loaders are missing from /var/lib/cobbler/loaders, you may run 'cobbler get-loaders' to download them, or, if you only want to handle x86/x86_64 netbooting, you may ensure that you have installed a *recent* version of the syslinux package installed and can ignore this message entirely.  Files in this directory, should you want to support all architectures, should include pxelinux.0, menu.c32, elilo.efi, and yaboot. The 'cobbler get-loaders' command is the easiest way to resolve these requirements.
5 : enable and start rsyncd.service with systemctl
6 : debmirror package is not installed, it will be required to manage debian deployments and repositories
7 : The default password used by the sample templates for newly installed machines (default_password_crypted in /etc/cobbler/settings) is still set to 'cobbler' and should be changed, try: "openssl passwd -1 -salt 'random-phrase-here' 'your-password-here'" to generate new one
8 : fencing tools were not found, and are required to use the (optional) power management features. install cman or fence-agents to use them

Restart cobblerd and then run 'cobbler sync' to apply changes.
4. 根据上一步提示修改 /etc/cobbler/settings 文件,并下载网络相关引导文件
[root@centos7 ~]# openssl passwd -1    #按照第7步提示,生成一个密码 centos
Password:
Verifying - Password:
$1$6BKZ9Pwy$BguiL5ElgmNc5UYxkJv3z/

#然后按照1,2,7步提示,修改/etc/cobbler/settings文件
[root@centos7 ~]# vim /etc/cobbler/settings
#找到server: 127.0.0.1行,将IP改为本机配置的IP
server: 192.168.27.7
#找到next_server: 127.0.0.1行,将IP改为本机配置的IP
next_server: 192.168.27.7
#找到default_password_crypted 行,将密码改为上面生成的密码串
default_password_crypted: "$1$6BKZ9Pwy$BguiL5ElgmNc5UYxkJv3z/"
#找到manage_dhcp行,将0改为1
#表示由cobbler按/etc/cobbler/dhcp.template 此文件自动生成DHCP配置文件
manage_dhcp: 1

#然后按照第4步提示,执行以下命令,下载网络相关引导文件
[root@centos7 ~]# cobbler get-loaders
[root@centos7 ~]# systemctl restart cobblerd  #然后重启cobblerd服务
5. 修改DHCP模板文件,生成DHCP配置文件,并启动DHCP服务
[root@centos7 ~]# vim /etc/cobbler/dhcp.template
#修改以下段中的IP信息即可

subnet 192.168.27.0 netmask 255.255.255.0 {
     option routers             192.168.27.1;
     option domain-name-servers 192.168.27.1;
     option subnet-mask         255.255.255.0;
     range dynamic-bootp        192.168.27.100 192.168.27.254;
     default-lease-time         21600;
     max-lease-time             43200;
     next-server                $next_server;
     class "pxeclients" {
          match if substring (option vendor-class-identifier, 0, 9) = "PXEClient";
          if option pxe-system-type = 00:02 {
                  filename "ia64/elilo.efi";
          } else if option pxe-system-type = 00:06 {
                  filename "grub/grub-x86.efi";
          } else if option pxe-system-type = 00:07 {
                  filename "grub/grub-x86_64.efi";
          } else if option pxe-system-type = 00:09 {
                  filename "grub/grub-x86_64.efi";
          } else {
                  filename "pxelinux.0";
          }
     }

}
...
[root@centos7 ~]# cobbler sync   #之后,同步一下,让其生成dhcp配置信息
[root@centos7 ~]# ll /etc/dhcp/dhcpd.conf
-rw-r--r-- 1 root root 1585 Jan 13 22:17 /etc/dhcp/dhcpd.conf
[root@centos7 ~]# systemctl start dhcpd  #然后,启动dhcpd服务
6. 创建镜像源
[root@centos7 ~]# cobbler import --path=/mnt/cdrom --name=CentOS7.6-x86_64 --arch=x86_64
task started: 2020-01-13_223456_import
task started (id=Media import, time=Mon Jan 13 22:34:56 2020)
Found a candidate signature: breed=redhat, version=rhel6
Found a matching signature: breed=redhat, version=rhel6
Adding distros from path /var/www/cobbler/ks_mirror/CentOS7.6-x86_64:
creating new distro: CentOS7.6-x86_64
trying symlink: /var/www/cobbler/ks_mirror/CentOS7.6-x86_64 -> /var/www/cobbler/links/CentOS7.6-x86_64
creating new profile: CentOS7.6-x86_64
associating repos
checking for rsync repo(s)
checking for rhn repo(s)
checking for yum repo(s)
starting descent into /var/www/cobbler/ks_mirror/CentOS7.6-x86_64 for CentOS7.6-x86_64
processing repo at : /var/www/cobbler/ks_mirror/CentOS7.6-x86_64
need to process repo/comps: /var/www/cobbler/ks_mirror/CentOS7.6-x86_64
looking for /var/www/cobbler/ks_mirror/CentOS7.6-x86_64/repodata/*comps*.xml
Keeping repodata as-is :/var/www/cobbler/ks_mirror/CentOS7.6-x86_64/repodata
*** TASK COMPLETE ***
[root@centos7 ~]# cobbler distro list    #查看镜像源
   CentOS7.6-x86_64
[root@centos7 ~]# cobbler profile list    #查看安装配置文件,相当于kickstart文件
   CentOS7.6-x86_64
7. 如要自定义安装,则准备kictstart文件,然后生成配置列表
#将kickstart文件复制到/var/lib/cobbler/kickstarts/ 文件夹
[root@centos7 ~]# cp ks7_mini.cfg /var/lib/cobbler/kickstarts/
#修改kictstart文件网络安装方式处,将url 处改为 url --url=$tree
[root@centos7 ~]# vim /var/lib/cobbler/kickstarts/ks7_mini.cfg
url --url=$tree
#添加生成配置文件
[root@centos7 ~]# cobbler profile add --name=CentOS7.6_mini-x86_64 --distro=CentOS7.6-x86_64 --kickstart=/var/lib/cobbler/kickstarts/ks7_mini.cfg
[root@centos7 ~]# cobbler profile list
   CentOS7.6-x86_64
   CentOS7.6_mini-x86_64
#如要移除配置文件,用以下命令即可
[root@centos7 ~]# cobbler profile remove --name=CentOS7.6_mini-x86_64
[root@centos7 ~]# cobbler profile list
   CentOS7.6-x86_64
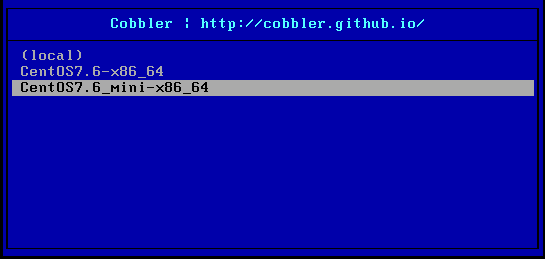
8. 新建虚拟机,安装测试。如下图,可以看到安装菜单,选择一个安装即可
9. cobbler的web管理
① 安装cobbler-web包(epel源),并重启httpd服务
[root@centos7 ~]# yum install cobbler-web
[root@centos7 ~]# systemctl restart httpd
② 在浏览器访问测试,https://192.168.27.7/cobbler_web,默认用户名与密码为 cobbler
③ 如要修改密码,使用 htdigest 命令
#默认的验证方式为文件形式
#查看/etc/cobbler/modules.conf可看到
[root@centos7 ~]# vim /etc/cobbler/modules.conf
[authentication]
module = authn_configfile   #默认文件形式,用别的方式,修改此处即可
#验证文件为 /etc/cobbler/users.digest
[root@centos7 ~]# cat /etc/cobbler/users.digest
cobbler:Cobbler:a2d6bae81669d707b72c0bd9806e01f3
[root@centos7 ~]# htdigest -h
Usage: htdigest [-c] passwordfile realm username
The -c flag creates a new file
#修改cobbler用户的密码
[root@centos7 ~]# htdigest /etc/cobbler/users.digest Cobbler cobbler
Changing password for user cobbler in realm Cobbler
New password:
Re-type new password:

 浙公网安备 33010602011771号