

MySQL 8.0+ InnoDB Cluster 高可用部署
一、引言
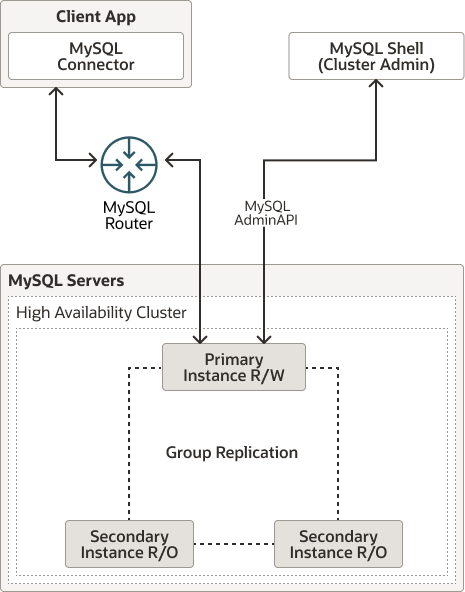
MySQL InnoDB Cluster 提供了一个完整的高可用性解决方案,通过 MySQL Shell 中的 AdminAPI 可以轻松配置和管理一组至少包含三个 MySQL 服务器实例的集群,使其作为 InnoDB Cluster 运行。
二、环境准备
1. 服务器架构说明
| 服务器角色 | IP 示例 | 部署服务 |
|---|---|---|
| MySQL 主节点 | 192.168.10.30 | MySQL InnoDB Cluster(主) |
| MySQL 从节点1 | 192.168.10.31 | MySQL InnoDB Cluster(从) |
| MySQL 从节点2 | 192.168.10.32 | MySQL InnoDB Cluster(从) |
| HAProxy + Router1 | 192.168.10.33 | HAProxy、Keepalived、MySQL Router 实例1 |
| HAProxy + Router2 | 192.168.10.34 | HAProxy、Keepalived、MySQL Router 实例2 |
| Virtual IP Address | 192.168.10.36 |
架构特点:
- 数据库层:3 台 MySQL 节点,组成 InnoDB Cluster,确保数据高可用。
- 中间件层:2 台服务器同时运行 HAProxy、Keepalived 和 MySQL Router,避免单点故障。
2. 安装 MySQL
在每台服务器上安装 MySQL Server,并配置以下内容:
sudo -s
apt install mysql-server-8.0 -y
-
系统时区
-
防火墙规则(开放 3306 端口)
-
基本参数优化(如
innodb_buffer_pool_size) -
配置hosts
# 在每个节点的hosts文件中添加以下内容
192.168.10.30    mysql-cls-01
192.168.10.31    mysql-cls-02
192.168.10.32    mysql-cls-03
3、配置文件修改
在每个节点的mysqld.cnf中添加以下配置(以单主模式为例):
[mysqld]

# 复制与GTID配置
server_id = 1
log_bin = mysql-bin
binlog_format = ROW
gtid_mode = ON
enforce_gtid_consistency = ON
log_slave_updates = ON
binlog_transaction_dependency_tracking = WRITESET

# MGR插件配置
plugin_load_add = 'group_replication.so'
group_replication_group_name = "aaaaaaaa-aaaa-aaaa-aaaa-aaaaaaaaaaaa"  # 唯一UUID
group_replication_start_on_boot = OFF
group_replication_bootstrap_group = OFF
group_replication_single_primary_mode = ON   # 单主模式
group_replication_local_address = "mysql-cls-01:33061"  # 当前节点通信地址
group_replication_group_seeds = "mysql-cls-01:33061,mysql-cls-02:33061,mysql-cls-03:33061"  # 所有节点地址
三、配置 MySQL Group Replication
InnoDB Cluster 使用 MySQL Group Replication 实现数据复制和内置故障转移。
注意:使用 AdminAPI 时,无需手动配置 Group Replication,AdminAPI 会自动处理。
四、部署 InnoDB Cluster
1. 安装mysql-shell(任一节点或客户端)
cd /tmp
wget https://dev.mysql.com/get/Downloads/MySQL-Shell/mysql-shell-8.0.41-linux-glibc2.28-x86-64bit.tar.gz
cd /usr/local
tar -zxvf /tmp/mysql-shell-8.0.41-linux-glibc2.28-x86-64bit.tar.gz
mv mysql-shell-8.0.41-linux-glibc2.28-x86-64bit/ mysql-shell
ln -s /usr/local/mysql-shell/bin/mysqlsh /usr/bin/mysqlsh

# 或

apt install mysql-shell -y
2. 启动 MySQL Shell
在任意一台服务器上启动 MySQL Shell:
mysqlsh --uri = admin@mysql-cls-01:3306 --js
3. 创建 InnoDB Cluster
验证目标实例是否符合加入集群的条件
dba.checkInstanceConfiguration('admin@mysql-cls-01:3306')
# 预期输出
{
    "status": "ok"
}
使用mysqlsh创建群集
var cluster = dba.createCluster('myCluster');
cluster.status()
# 预期输出
{
    "clusterName": "myCluster",
    "defaultReplicaSet": {
        "name": "default",
        "primary": "mysql-cls-01:3306",
        "ssl": "REQUIRED",
        "status": "OK_NO_TOLERANCE",
        "statusText": "Cluster is NOT tolerant to any failures.",
        "topology": {
            "mysql-cls-01:3306": {
                "address": "mysql-cls-01:3306",
                "memberRole": "PRIMARY",
                "mode": "R/W",
                "readReplicas": {},
                "replicationLag": "applier_queue_applied",
                "role": "HA",
                "status": "ONLINE",
                "version": "8.0.41"
            }
        },
        "topologyMode": "Single-Primary"
    },
    "groupInformationSourceMember": "mysql-cls-01:3306"
}
4. 添加实例到集群
# Primary 导出备份(可选):
mysqldump -uroot -p --single-transaction --set-gtid-purged=ON \
--all-databases > backup.sql
# Secondary 重置数据,如之前有MGR配置(可选):
RESET MASTER;
SET @@GLOBAL.gtid_purged = 'Primary 的 GTID 集合';
# 导入备份(可选):
mysql -uroot -p < backup.sql
// 加入集群:
var cluster=dba.getCluster()
// 添加第二个实例
cluster.addInstance('admin@mysql-cls-02:3306');
// 添加第三个实例
cluster.addInstance('admin@mysql-cls-03:3306');
5. 检查集群状态
cluster.status()
{
    "clusterName": "myCluster",
    "defaultReplicaSet": {
        "name": "default",
        "primary": "mysql-cls-02:3306",
        "ssl": "REQUIRED",
        "status": "OK",
        "statusText": "Cluster is ONLINE and can tolerate up to ONE failure.",
        "topology": {
            "mysql-cls-01:3306": {
                "address": "mysql-cls-01:3306",
                "memberRole": "PRIMARY",
                "mode": "R/W",
                "readReplicas": {},
                "replicationLag": "applier_queue_applied",
                "role": "HA",
                "status": "ONLINE",
                "version": "8.0.41"
            },
            "mysql-cls-02:3306": {
                "address": "mysql-cls-02:3306",
                "memberRole": "SECONDARY",
                "mode": "R/O",
                "readReplicas": {},
                "replicationLag": "applier_queue_applied",
                "role": "HA",
                "status": "ONLINE",
                "version": "8.0.41"
            },
            "mysql-cls-03:3306": {
                "address": "mysql-cls-03:3306",
                "memberRole": "SECONDARY",
                "mode": "R/O",
                "readReplicas": {},
                "replicationLag": "applier_queue_applied",
                "role": "HA",
                "status": "ONLINE",
                "version": "8.0.41"
            }
        },
        "topologyMode": "Single-Primary"
    },
    "groupInformationSourceMember": "mysql-cls-02:3306"
}
关键输出验证:
"status": "OK"- 所有实例的
"role"和"state"正常(如ONLINE)。
6. 测试故障转移
手动停止主节点:
systemctl stop mysql
观察集群选举:
cluster.status();  // 检查新主节点是否自动选举
{
  "clusterName": "myCluster",
  "defaultReplicaSet": {
      "name": "default",
      "primary": "mysql-cls-02:3306",
      "ssl": "REQUIRED",
      "status": "OK_NO_TOLERANCE_PARTIAL",
      "statusText": "Cluster is NOT tolerant to any failures. 1 member is not active.",
      "topology": {
          "mysql-cls-01:3306": {
              "address": "mysql-cls-01:3306",
              "memberRole": "SECONDARY",
              "mode": "n/a",
              "readReplicas": {},
              "role": "HA",
              "shellConnectError": "MySQL Error 2003: Could not open connection to 'mysql-cls-01:3306': Can't connect to MySQL server on 'mysql-cls-01:3306' (111)",
              "status": "(MISSING)"
          },
          "mysql-cls-02:3306": {
              "address": "mysql-cls-02:3306",
              "memberRole": "PRIMARY",
              "mode": "R/W",
              "readReplicas": {},
              "replicationLag": "applier_queue_applied",
              "role": "HA",
              "status": "ONLINE",
              "version": "8.0.41"
          },
          "mysql-cls-03:3306": {
              "address": "mysql-cls-03:3306",
              "memberRole": "SECONDARY",
              "mode": "R/O",
              "readReplicas": {},
              "replicationLag": "applier_queue_applied",
              "role": "HA",
              "status": "ONLINE",
              "version": "8.0.41"
          }
      },
      "topologyMode": "Single-Primary"
  },
  "groupInformationSourceMember": "mysql-cls-02:3306"
五、配置 MySQL Router 高可用
1. 安装 MySQL Router、HAProxy、keepalived
sudo apt update
sudo apt install -y mysql-router haproxy keepalived

# 检查mysqlrouter是否创建
grep mysqlrouter /etc/passwd
# 不存在则手动创建(系统用户、禁止交互登录)
useradd -r -s /bin/false mysqlrouter
2. 配置 MySQL Router 实例
# 检查服务文件
ls /lib/systemd/system/mysqlrouter@.service  # 确认模板文件存在
cp /lib/systemd/system/mysqlrouter@.service /etc/systemd/system/mysqlrouter@.service

# 不存在则手动创建
vim /etc/systemd/system/mysqlrouter@.service

[Unit]
Description=MySQL Router for instance %i
After=network.target

[Service]
Type=notify
User=mysqlrouter
Group=mysqlrouter
RuntimeDirectory=mysqlrouter-%i
ExecStart=/usr/bin/mysqlrouter -c /etc/mysqlrouter-%i/mysqlrouter.conf
Restart=on-failure
RestartSec=5

[Install]
WantedBy=multi-user.target
初始化实例--节点 192.168.10.33(Router1)
mysqlrouter --bootstrap admin@192.168.10.31:3306 \
          --directory /etc/mysqlrouter-1 \
          --user=mysqlrouter \
          --conf-base-port 6446 \
          --force
# 修改目录权限
sudo chown -R mysqlrouter:mysqlrouter /etc/mysqlrouter-1

# 加载并启动服务
sudo systemctl daemon-reload
sudo systemctl start mysqlrouter@1
sudo systemctl status mysqlrouter@1
初始化实例--节点 192.168.10.34(Router2)
mysqlrouter --bootstrap admin@192.168.10.31:3306 \
          --directory /etc/mysqlrouter-2 \
          --user=mysqlrouter \
          --conf-base-port 6448 \
          --force
# 修改目录权限
sudo chown -R mysqlrouter:mysqlrouter /etc/mysqlrouter-2

# 加载并启动服务
sudo systemctl daemon-reload
sudo systemctl start mysqlrouter@2
3. 配置 HAProxy 负载均衡
# 在 192.168.10.33 和 192.168.10.34 上配置相同 HAProxy
# /etc/haproxy/haproxy.cfg
frontend mysql_write
  bind *:3306
  mode tcp
  default_backend router_primary

frontend mysql_read
  bind *:3307
  mode tcp
  default_backend router_replicas

backend router_primary
  mode tcp
  balance roundrobin
  server router1 192.168.10.33:6446 check  # 本地 Router1 写端口
  server router2 192.168.10.34:6448 check  # 对端 Router2 写端口

backend router_replicas
  mode tcp
  balance leastconn
  server router1 192.168.10.33:6447 check  # 本地 Router1 读端口
  server router2 192.168.10.34:6449 check  # 对端 Router2 读端口
重启 HAProxy
sudo systemctl restart haproxy
4. 配置 Keepalived 实现 VIP 漂移
主节点配置(192.168.10.33)
# /etc/keepalived/keepalived.conf
vrrp_instance VI_1 {
  state MASTER
  interface enp0s3
  virtual_router_id 51
  priority 100
  advert_int 1
  authentication {
      auth_type PASS
      auth_pass 1111
  }
  virtual_ipaddress {
      192.168.10.36/24  # 虚拟 IP (VIP)
  }
}
备节点配置(192.168.10.34)
# # /etc/keepalived/keepalived.conf
vrrp_instance VI_1 {
  state BACKUP
  interface enp0s3
  virtual_router_id 51
  priority 90
  advert_int 1
  authentication {
      auth_type PASS
      auth_pass 1111
  }
  virtual_ipaddress {
      192.168.10.36/24
  }
}
启动 Keepalived
sudo systemctl start keepalived
六、验证与维护
验证 VIP 绑定
# 在主节点执行
ip addr show enp0s3 | grep "192.168.10.36"  # 应显示 VIP
验证负载均衡
# 通过VIP访问数据库
horace@hp15:/$ mysql -u admin -p -h 192.168.10.36 -P 3306 -e "\s"
Enter password:
--------------
mysql  Ver 8.0.41 for Linux on x86_64 (MySQL Community Server - GPL)

Connection id:          111879
Current database:
Current user:           admin@192.168.10.33
SSL:                    Cipher in use is TLS_AES_256_GCM_SHA384
Current pager:          stdout
Using outfile:          ''
Using delimiter:        ;
Server version:         8.0.41-0ubuntu0.24.04.1 (Ubuntu)
Protocol version:       10
Connection:             192.168.10.36 via TCP/IP
Server characterset:    utf8mb4
Db     characterset:    utf8mb4
Client characterset:    utf8mb4
Conn.  characterset:    utf8mb4
TCP port:               3306
Binary data as:         Hexadecimal
Uptime:                 1 day 12 hours 31 min 34 sec

Threads: 17  Questions: 1520222  Slow queries: 1  Opens: 807  Flush tables: 3  Open tables: 709  Queries per second avg: 11.561
horace@hp15:/$ mysql -u admin -p -h 192.168.10.36 -P 3306 -e "show databases;"
Enter password:
+-------------------------------+
| Database                      |
+-------------------------------+
| information_schema            |
| mysql                         |
| mysql_innodb_cluster_metadata |
| performance_schema            |
| stocks                        |
| sys                           |
| test                          |
| zabbix                        |
+-------------------------------+
horace@hp15:/$ mysql -u admin -p -h 192.168.10.36 -P 3306 \
-e "select * from performance_schema.replication_group_members\G "
Enter password:
*************************** 1. row ***************************
              CHANNEL_NAME: group_replication_applier
                 MEMBER_ID: 1c8655ed-1182-11f0-a661-5254003d9863
               MEMBER_HOST: mysql-cls-02
               MEMBER_PORT: 3306
              MEMBER_STATE: ONLINE
               MEMBER_ROLE: PRIMARY
            MEMBER_VERSION: 8.0.41
MEMBER_COMMUNICATION_STACK: MySQL
*************************** 2. row ***************************
              CHANNEL_NAME: group_replication_applier
                 MEMBER_ID: 267273ee-1182-11f0-9ded-5254009c100d
               MEMBER_HOST: mysql-cls-03
               MEMBER_PORT: 3306
              MEMBER_STATE: ONLINE
               MEMBER_ROLE: SECONDARY
            MEMBER_VERSION: 8.0.41
MEMBER_COMMUNICATION_STACK: MySQL
*************************** 3. row ***************************
              CHANNEL_NAME: group_replication_applier
                 MEMBER_ID: a629edef-11c4-11f0-8f61-525400cea827
               MEMBER_HOST: mysql-cls-01
               MEMBER_PORT: 3306
              MEMBER_STATE: ONLINE
               MEMBER_ROLE: SECONDARY
            MEMBER_VERSION: 8.0.41
MEMBER_COMMUNICATION_STACK: MySQL
七、注意事项
- 资源分配
- 确保 HAProxy + Router 节点至少配置 4 核 8GB 内存,避免资源争用。
- 端口隔离
- MySQL Router 使用端口(6446-6449)需与 HAProxy 监听端口(3306、3307)无冲突。
- 故障演练
- 定期模拟 HAProxy 或 Keepalived 节点故障,验证 VIP 漂移和请求切换是否正常。

 浙公网安备 33010602011771号