

java线程间的共享
本次内容主要讲synchronized、volatile和ThreadLocal。
1、synchronized内置锁
线程开始运行,拥有自己的栈空间,就如同一个脚本一样,按照既定的代码一步一步地执行,直到终止。但是,每个运行中的线程,如果仅仅是孤立地运行,那么价值会很少,如果多个线程能够相互配合完成工作,包括数据之间的共享、协同处理事情。这将会带来巨大的价值。
Java支持多个线程同时访问一个对象或者对象的成员变量,关键字synchronized可以修饰方法或者以同步块的形式来进行使用,它主要确保多个线程在同一个时刻,只能有一个线程处于方法或者同步块中,它保证了线程对变量访问的可见性和排他性,又称为内置锁机制。synchronized使用的3种情况:
(1)用在实例方法上,此时锁住的是InstanceSyn这个类的实例对象,先来看正确的使用方式,每个线程持有的是同一个InstanceSyn实例。
public class InstanceSyn {
    private List<Integer> list = new ArrayList<>();

    public synchronized void instance() {
        System.out.println(Thread.currentThread().getName() + " 调用instance()");
        list.add(1);
        try {
            Thread.sleep(1000);
        } catch (InterruptedException e) {
            e.printStackTrace();
        }
        System.out.println(Thread.currentThread().getName() + " 结束instance()");
    }

    static class InstanceSynTest extends Thread {
        private InstanceSyn instanceSyn;
        public InstanceSynTest(InstanceSyn instanceSyn) {
            this.instanceSyn = instanceSyn;
        }

        public void run() {
            instanceSyn.instance();
        }
    }

    public static void main(String[] args) {
        InstanceSyn instanceSyn = new InstanceSyn();
        for (int i = 0; i < 3; i++) {
            Thread thread = new InstanceSynTest(instanceSyn);
            thread.start();
        }
    }
}
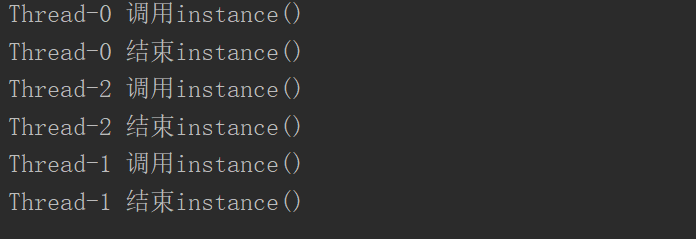
可以看到3个线程按同步方式对instance()方法进行访问:

再看一下synchronized是怎么失效的,只是挪动了一行代码,此时3个线程持有的是不同的InstanceSyn实例,导致同步失效。
import java.util.ArrayList;
import java.util.List;

public class InstanceSyn {
    private List<Integer> list = new ArrayList<>();

    public synchronized void instance() {
        System.out.println(Thread.currentThread().getName() + " 调用instance()");
        list.add(1);
        try {
            Thread.sleep(1000);
        } catch (InterruptedException e) {
            e.printStackTrace();
        }
        System.out.println(Thread.currentThread().getName() + " 结束instance()");
    }

    static class InstanceSynTest extends Thread {
        private InstanceSyn instanceSyn;

        public InstanceSynTest(InstanceSyn instanceSyn) {
            this.instanceSyn = instanceSyn;
        }

        public void run() {
            instanceSyn.instance();
        }
    }

    public static void main(String[] args) {
        for (int i = 0; i < 3; i++) {
            InstanceSyn instanceSyn = new InstanceSyn();
            Thread thread = new InstanceSynTest(instanceSyn);
            thread.start();
        }
    }
}
此时的输出:

(2)用在代码块上
① synchronized(this),此时锁住的是InstanceSyn这个类的实例对象,和synchronized用在实例方法上原理一样,失效的情况也一样,这里就不具体演示了。
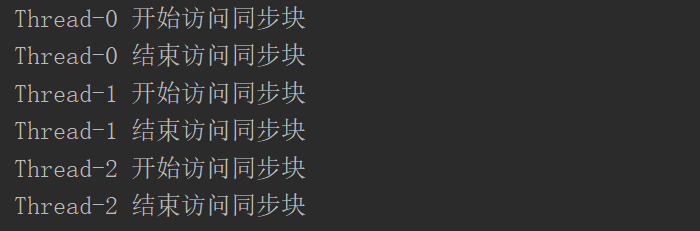
import java.util.ArrayList;
import java.util.List;

public class InstanceSyn {
    private List<Integer> list = new ArrayList<>();

    public void instance() {
        //do something
        synchronized (this) {
            System.out.println(Thread.currentThread().getName() + " 开始访问同步块");
            list.add(1);
            try {
                Thread.sleep(1000);
            } catch (InterruptedException e) {
                e.printStackTrace();
            }
            System.out.println(Thread.currentThread().getName() + " 结束访问同步块");
        }
        //do something
    }

    static class InstanceSynTest extends Thread {
        private InstanceSyn instanceSyn;

        public InstanceSynTest(InstanceSyn instanceSyn) {
            this.instanceSyn = instanceSyn;
        }

        public void run() {
            instanceSyn.instance();
        }
    }

    public static void main(String[] args) {
        InstanceSyn instanceSyn = new InstanceSyn();
        for (int i = 0; i < 3; i++) {
            Thread thread = new InstanceSynTest(instanceSyn);
            thread.start();
        }
    }
}
② 锁住一个静态对象,由于静态变量是属于整个类,不属于某个类的实例,全局唯一,所以就不会出现上面synchronized同步失效的情况。
import java.util.ArrayList;
import java.util.List;

public class InstanceSyn {
    private List<Integer> list = new ArrayList<>();

    private static Object object = new Object();

    public void instance() {
        //do something
        synchronized (object) {
            System.out.println(Thread.currentThread().getName() + " 开始访问同步块");
            list.add(1);
            try {
                Thread.sleep(1000);
            } catch (InterruptedException e) {
                e.printStackTrace();
            }
            System.out.println(Thread.currentThread().getName() + " 结束访问同步块");
        }
        //do something
    }

    static class InstanceSynTest extends Thread {
        private InstanceSyn instanceSyn;

        public InstanceSynTest(InstanceSyn instanceSyn) {
            this.instanceSyn = instanceSyn;
        }

        public void run() {
            instanceSyn.instance();
        }
    }

    public static void main(String[] args) {
//        InstanceSyn instanceSyn = new InstanceSyn();
        for (int i = 0; i < 3; i++) {
            InstanceSyn instanceSyn = new InstanceSyn();//尽管每个线程持有的不是同一个实例对象,但是由于锁住的是静态对象,所以也可以正确执行同步操作
            Thread thread = new InstanceSynTest(instanceSyn);
            thread.start();
        }
    }
}
尽管每个线程持有的不是同一个实例对象,但是由于锁住的是静态对象,所以也可以正确执行同步操作。代码输出如下:
(3)用在静态方法上,此时锁住的是InstanceSyn这个类的Class对象,InstanceSyn的Class对象全局唯一,所以就算每个线程持有的InstanceSyn不一样,也可以进行同步访问操作。
import java.util.ArrayList;
import java.util.List;

public class InstanceSyn {
    private static List<Integer> list = new ArrayList<>();

    public static synchronized void instance() {
        System.out.println(Thread.currentThread().getName() + " 调用instance()");
        list.add(1);
        try {
            Thread.sleep(1000);
        } catch (InterruptedException e) {
            e.printStackTrace();
        }
        System.out.println(Thread.currentThread().getName() + " 结束instance()");

    }

    static class InstanceSynTest extends Thread {
        private InstanceSyn instanceSyn;

        public InstanceSynTest(InstanceSyn instanceSyn) {
            this.instanceSyn = instanceSyn;
        }

        public void run() {
            instanceSyn.instance();
        }
    }

    public static void main(String[] args) {
//        InstanceSyn instanceSyn = new InstanceSyn();
        for (int i = 0; i < 3; i++) {
            InstanceSyn instanceSyn = new InstanceSyn();//尽管每个线程持有的不是同一个实例对象,但是由于锁住的是类对象,所以也可以正确执行同步操作
            Thread thread = new InstanceSynTest(instanceSyn);
            thread.start();
        }
    }
}
程序输出:
注:实例锁和类锁
实例锁是用于对象实例方法,类锁是用于类的静态方法上的。我们知道,类的对象实例可以有很多个,但是每个类只有一个Class对象,所以不同对象实例的对象锁是互不干扰的。有一点必须注意的是,其实类锁只是一个概念上的东西,并不是真实存在的,类锁其实锁的是每个类的对应的Class对象。类锁和对象锁之间也是互不干扰的,下面用代码说明。
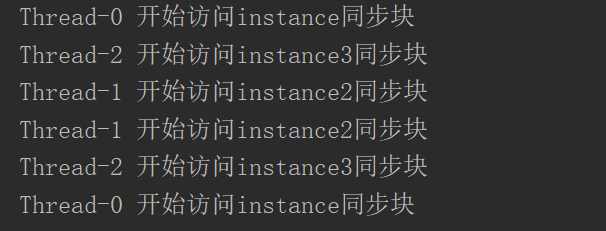
import java.util.ArrayList;
import java.util.List;

public class InstanceSyn {
    private static List<Integer> list = new ArrayList<>();

    private static Object object = new Object();

    public void instance() {
        synchronized (object) {
            System.out.println(Thread.currentThread().getName() + " 开始访问instance同步块");
            list.add(1);
            try {
                Thread.sleep(1000);
            } catch (InterruptedException e) {
                e.printStackTrace();
            }
            System.out.println(Thread.currentThread().getName() + " 开始访问instance同步块");
        }
    }

    public void instance2() {
        synchronized (this) {
            System.out.println(Thread.currentThread().getName() + " 开始访问instance2同步块");
            list.add(1);
            try {
                Thread.sleep(1000);
            } catch (InterruptedException e) {
                e.printStackTrace();
            }
            System.out.println(Thread.currentThread().getName() + " 开始访问instance2同步块");
        }
    }

    public static synchronized void instance3() {
        System.out.println(Thread.currentThread().getName() + " 开始访问instance3同步块");
        list.add(1);
        try {
            Thread.sleep(1000);
        } catch (InterruptedException e) {
            e.printStackTrace();
        }
        System.out.println(Thread.currentThread().getName() + " 开始访问instance3同步块");
    }

    /**
     * 调用锁静态对象的方法
     */
    static class InstanceSynTest extends Thread {
        private InstanceSyn instanceSyn;

        public InstanceSynTest(InstanceSyn instanceSyn) {
            this.instanceSyn = instanceSyn;
        }

        public void run() {
            instanceSyn.instance();
        }
    }

    /**
     * 调用锁this的方法
     */
    static class InstanceSynTest2 extends Thread {
        private InstanceSyn instanceSyn;

        public InstanceSynTest2(InstanceSyn instanceSyn) {
            this.instanceSyn = instanceSyn;
        }

        public void run() {
            instanceSyn.instance2();
        }
    }

    /**
     * 调用锁类对象的方法
     */
    static class InstanceSynTest3 extends Thread {
        private InstanceSyn instanceSyn;

        public InstanceSynTest3(InstanceSyn instanceSyn) {
            this.instanceSyn = instanceSyn;
        }

        public void run() {
            instanceSyn.instance3();
        }
    }

    public static void main(String[] args) {
        InstanceSyn instanceSyn = new InstanceSyn();
        Thread thread1 = new InstanceSynTest(instanceSyn);
        Thread thread2 = new InstanceSynTest2(instanceSyn);
        Thread thread3 = new InstanceSynTest3(instanceSyn);

        thread1.start();
        thread2.start();
        thread3.start();
    }
}
从程序输出可以看到,3个线程并没有同步访问。虽然这3个方法在同一个类中,但是由于3个方法锁住的对象不一样,所以他们之间互不干扰,不会进行同步访问。
2、 volatile
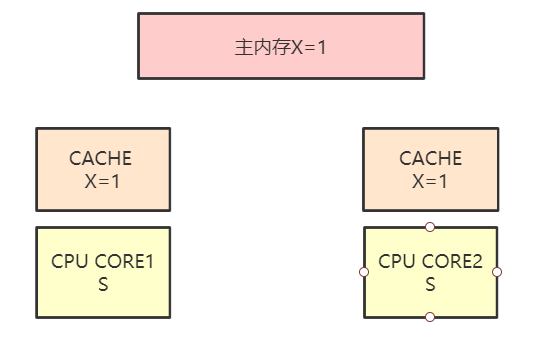
volatile保证了不同线程对这个变量进行操作时的可见性,即一个线程修改了某个变量的值,这新值对其他线程来说是立即可见的。volatile底层采用了MESI缓存一致性协议来实现。M代表修改modify,E代表独占exclusive,S代表共享share,I代表失效invalid。下面画图进行说明。
E状态:独一份,且有效。在共享内存中有一个变量X,值是1。当只有一个线程把X读取到自己的工作内存中时,X处于独占状态,仅被1个线程持有。
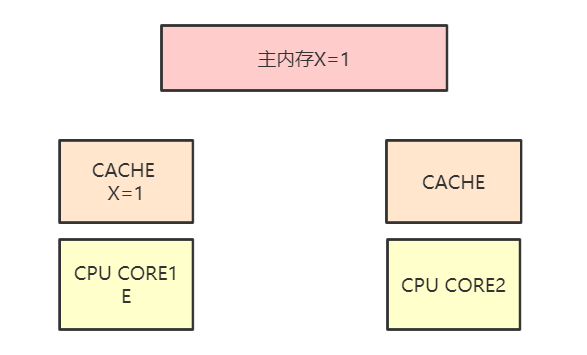
S状态:每个线程工作内存中的变量值都是一样的。
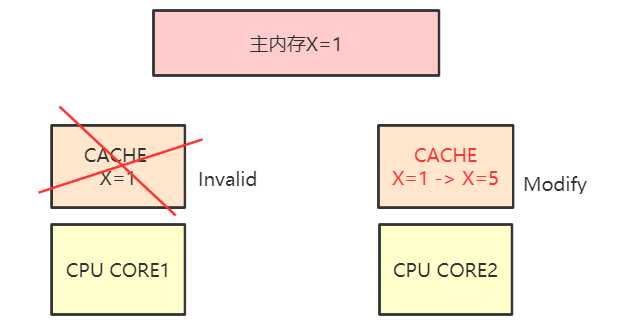
M和I状态:一个线程修把X的值由1修改成5,是M状态;另外一个线程通过CPU总线嗅探机制得知X的值已经改变,使自己工作内存中X的值失效,是I状态。
下面用一段代码来演示volatile的用法。
public class VolatileCase {
    private volatile static boolean ready = false;
    private static int number;

    private static class PrintThread extends Thread {
        @Override
        public void run() {
            System.out.println("PrintThread is running.......");
            while (!ready) {

            }
            System.out.println("number = " + number);
        }
    }

    public static void main(String[] args) {
        new PrintThread().start();
        try {
            Thread.sleep(3000);
        } catch (InterruptedException e) {
            e.printStackTrace();
        }
        number = 51;
        ready = true;
        try {
            Thread.sleep(3000);
        } catch (InterruptedException e) {
            e.printStackTrace();
        }
        System.out.println("main is ended!");
    }
}
从程序执行情况可以看出,主线程在执行3秒后,PrintThread线程得知ready状态变成true,迅速退出循环。不加volatile关键字时,PrintThread线程无法得知ready状态变成true,从而不会退出循环。
刚刚演示的是volatile修饰一个简单变量,那么volatile来修饰一个复杂对象的时候又是什么样的呢?我们通过代码来测试,定义一个Entity类和一个测试类。
public class VolatileEntity {int first = 0;
    int first = 0;

    private static class VolatileEntityInstance {
        private static VolatileEntity instance = new VolatileEntity();
    }

    public static VolatileEntity getInstance() {
        return VolatileEntityInstance.instance;
    }
}
 1 public class VolatileEntityTest {
 2     private volatile static VolatileEntity volatileEntity = VolatileEntity.getInstance();
 3
 4     public static void main(String args[]) {
 5         //读线程
 6         new Thread(() -> {
 7             int localValue = volatileEntity.first;
 8             while (localValue < 3) {
 9                 if (volatileEntity.first != localValue) {
10                     System.out.printf("first is update to [%d]\n", volatileEntity.first);
11                     localValue = volatileEntity.first;
12                 }
13             }
14         }, "read").start();
15
16         //写线程
17         new Thread(() -> {
18             int localValue = volatileEntity.first;
19             while (localValue < 3) {
20                 System.out.printf("first will be changed to [%d]\n", ++localValue);
21                 volatileEntity.first = localValue;
22                 try {
23                     Thread.sleep(1);
24                 } catch (InterruptedException e) {
25                     e.printStackTrace();
26                 }
27             }
28         }, "write").start();
29     }
30 }
运行代码可以输出以下信息:

可以看到first字段在一个线程发生改变时,另外一个线程可以检测到它发生的变化。可以认为volatile修饰的对象,对象里面的每一个字段也被volatile修饰了。再看看使用volatile修饰数组的情况。
public class VolatileArray {
    static volatile int[] array = new int[]{0, 0};

    public static void main(String args[]) {
        //读线程
        new Thread(() -> {
            int localValue = 0;
            while (true) {
                if (array[0] > localValue) {
                    System.out.printf("array[0] is update to [%d]\n", array[0]);
                    localValue = array[0];
                }
            }
        }, "read").start();

        //写线程
        new Thread(() -> {
            for (int i = 1; i <= 5; i++) {
                System.out.printf("array[0] will be changed to [%d]\n", i);
                array[0] = i;
                try {
                    Thread.sleep(1);
                } catch (InterruptedException e) {
                    e.printStackTrace();
                }
            }
        }, "write").start();
    }
}
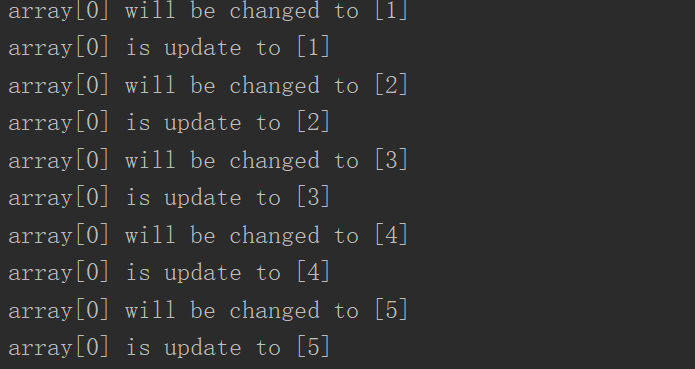
程序输出:
如果把修饰数组的volatile关键字去掉,再次执行程序输出如下:
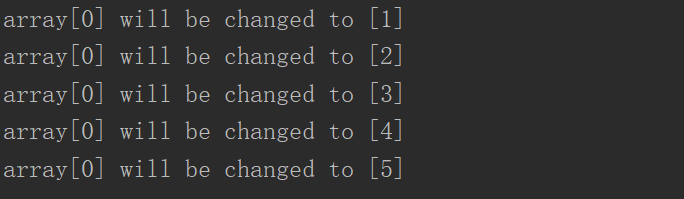
由此可以得出一个结论,volatile修饰的数组,可以看作是对其中每一个元素使用了volatile关键字。
注:volatile不能保证原子性,多个线程同时写会造成数据不安全问题,下面使用例子说明。
public class VolatileNotSafe {
    private volatile long count = 0;

    public long getCount() {
        return count;
    }

    public void setCount(long count) {
        this.count = count;
    }

    public void increase() {
        count++;
    }

    //工作线程
    private static class CountIncrease extends Thread {
        private VolatileNotSafe volatileNotSafe;

        public CountIncrease(VolatileNotSafe volatileNotSafe) {
            this.volatileNotSafe = volatileNotSafe;
        }

        @Override
        public void run() {
            for (int i = 0; i < 10000; i++) {
                volatileNotSafe.increase();
            }
        }
    }

    public static void main(String[] args) throws InterruptedException {
        VolatileNotSafe volatileNotSafe = new VolatileNotSafe();
        for (int i = 0; i < 5; i++) {
            CountIncrease counter = new CountIncrease(volatileNotSafe);
            counter.start();
        }
        Thread.sleep(2000);
        System.out.println(volatileNotSafe.count);
    }
}
程序说明:启动5个线程对共享数据count进行一个累加操作,每个线程累加1万次。线程安全情况下,count的输出应该是50000。来看看这段代的输出:
![]()


多次运行这段代码,可以看到count的结果是小于等于50000,所以volatile不能保证数据在多个线程下同时写的线程安全,具体原因后面单独介绍。
3、ThreadLocal
ThreadLocal和synchronized都用于解决多线程并发访问,但是他们之间有本质的区别。synchronized是利用锁机制,使方法或代码块在同一时间只能由一个线程访问,其他没有抢到锁的线程处于阻塞状态。而ThreadLocal为每个线程都提供了变量的副本,使得每个线程在某一时间访问到的是不同的对象,这样就隔离了多个线程对数据的共享。看一下TheadLocal的实现,先上一张图。
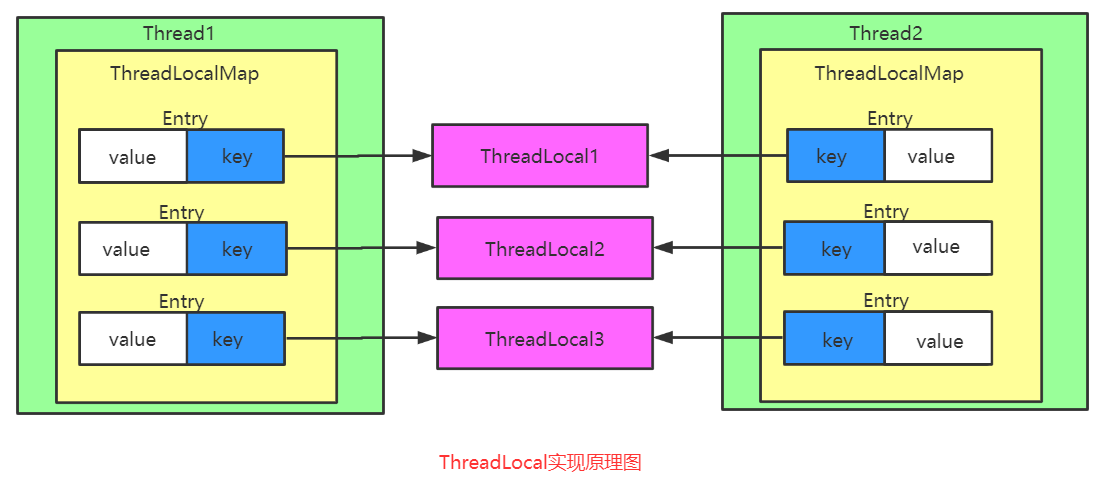
简单的对图做一个说明:在Thread这个类中,有一个ThreadLocalMap的成员变量,ThreadLocalMap这个类是ThreadLocal的一个内部类。ThreadLocalMap中有一个Entry数组用来保存数据,因为可能有多个变量需要线程隔离访问。Entry这个类类似于map的key-value结构,key就是ThreadLocal,value是需要隔离访问的变量。再通过源码看看,看下ThreadLocal最常用方法:
public class ThreadLocal<T> {

 public T get() {
        Thread t = Thread.currentThread();
        ThreadLocalMap map = getMap(t);
        if (map != null) {
            ThreadLocalMap.Entry e = map.getEntry(this);
            if (e != null) {
                @SuppressWarnings("unchecked")
                T result = (T)e.value;
                return result;
            }
        }
        return setInitialValue();
    }

 public void set(T value) {
        Thread t = Thread.currentThread();
        ThreadLocalMap map = getMap(t);
        if (map != null)
            map.set(this, value);
        else
            createMap(t, value);
    }

  public void remove() {
         ThreadLocalMap m = getMap(Thread.currentThread());
         if (m != null)
             m.remove(this);
     }

 protected T initialValue() {
        return null;
    }
}
get()方法返回当前线程所对应的线程局部变量;set()方法设置当前线程的线程局部变量的值;remove()方法将当前线程局部变量的值删除,目的是为了减少内存的占用,该方法是JDK 5.0新增的方法。需要指出的是,当线程结束后,对应该线程的局部变量将自动被垃圾回收,所以显式调用该方法清除线程的局部变量并不是必须的操作,但它可以加快内存回收的速度。initialValue()方法返回该线程局部变量的初始值,该方法是一个protected的方法,显然是为了让子类覆盖而设计的。这个方法是一个延迟调用方法,在线程第1次调用get()或set(Object)时才执行,并且仅执行1次。ThreadLocal中的缺省实现直接返回一个null。具体的实现原理在这里不详细展开,后面单独介绍。下面用代码演示下ThreadLocal的用法:
public class UseThreadLocal {
    static ThreadLocal<String> threadLocal = new ThreadLocal<>();

    public static class TestThread implements Runnable {
        int id;

        public TestThread(int id) {
            this.id = id;
        }

        public void run() {
            threadLocal.set("线程-" + id);
            System.out.println(Thread.currentThread().getName() + "的threadLocal :" + threadLocal.get());
            threadLocal.remove();
        }
    }

    public static void main(String[] args) throws InterruptedException {
        for (int i = 0; i < 3; i++) {
            new Thread(new TestThread(i)).start();
        }
        Thread.sleep(5);
    }
}
这段代码的main()方法中启动了3个线程,分别给threadLocal变量赋值,程序输出的结果不一样,可以看出每个线程对threadLocal变量是隔离访问的。

注:使用ThreadLocal的坑
看下面代码:
public class ThreadLocalUnSafe implements Runnable {
    public ThreadLocalUnSafe(Number number) {
        this.number = number;
    }

    public Number number;
    public static ThreadLocal<Number> threadLocal = new ThreadLocal<>();

    public void run() {
        threadLocal.set(number);
        Number numberInner = threadLocal.get();
        numberInner.setNumber(numberInner.getNumber() + 1);//每个线程计数加一
        try {
            Thread.sleep(2); //休眠2毫秒,模拟实际业务
        } catch (Exception e) {
            e.printStackTrace();
        }
        System.out.println(Thread.currentThread().getName() + "=" + threadLocal.get().getNumber());
    }

    public static void main(String[] args) {
        Number number = new Number(0);
        for (int i = 0; i < 5; i++) {
            new Thread(new ThreadLocalUnSafe(number)).start();
        }
        try {
            Thread.sleep(10); //休眠10毫秒,保证5个线程全部启动
        } catch (Exception e) {
            e.printStackTrace();
        }
    }

    private static class Number {
        private int number;

        public Number(int number) {
            this.number = number;
        }

        public int getNumber() {
            return number;
        }

        public void setNumber(int num) {
            this.number = num;
        }

        @Override
        public String toString() {
            return "Number [number=" + number + "]";
        }
    }
}
main()方法中启动5个线程,每个线程对Number对象中的number字段加1,number默认为0,所以每个线程输出的number应该是1。看看实际输出:

纳尼!!!怎么跟我想的不是一个东西~~~怎么全部变成5了。难道他们没有独自保存自己的Number副本吗?为什么其他线程还是能够修改这个值?仔细考察ThreadLocal的代码,我们发现ThreadLocalMap中保存的其实是对象的一个引用,这样的话,当有其他线程对这个引用指向的对象实例做修改时,其实也同时影响了所有的线程持有的对象引用所指向的同一个对象实例。这也就是为什么上面的程序为什么会输出一样的结果,5个线程中保存的是同一Number对象的引用,在线程睡眠的时候,其他线程将number变量进行了修改,而修改的对象Number的实例是同一份,因此它们最终输出的结果是相同的。
想要上面的程序正常工作,其实也非常简单,用法是让每个线程的ThreadLocal持有不同的Number对象,使用刚刚提到的initialValue()方法即可,代码如下:
public class ThreadLocalUnSafe implements Runnable {
    private static class Number {
        private int number;

        public Number(int number) {
            this.number = number;
        }

        public int getNumber() {
            return number;
        }

        public void setNumber(int num) {
            this.number = num;
        }

        @Override
        public String toString() {
            return "Number [number=" + number + "]";
        }
    }

    //重写initialValue()方法
    public static ThreadLocal<ThreadLocalUnSafe.Number> threadLocal = new ThreadLocal<ThreadLocalUnSafe.Number>() {
        @Override
        protected ThreadLocalUnSafe.Number initialValue() {
            return new ThreadLocalUnSafe.Number(0);
        }
    };

    public void run() {
        Number numberInner = threadLocal.get();
        numberInner.setNumber(numberInner.getNumber() + 1);//每个线程计数加一
        try {
            Thread.sleep(2); //休眠2毫秒,模拟实际业务
        } catch (Exception e) {
            e.printStackTrace();
        }
        System.out.println(Thread.currentThread().getName() + "=" + threadLocal.get().getNumber());
    }

    public static void main(String[] args) {
        for (int i = 0; i < 5; i++) {
            new Thread(new ThreadLocalUnSafe()).start();
        }
        try {
            Thread.sleep(10); //休眠10毫秒,保证5个线程全部启动
        } catch (Exception e) {
            e.printStackTrace();
        }
    }
}
执行代码,输出的是我们想要的结果,上面的坑成功填平。

线程之间的协作在下一篇文章中介绍,在阅读过程中如发现描述有误,请指出,谢谢。

 浙公网安备 33010602011771号