Tornado基本操作
一、Tornado各模块
# 主要模块
    web        - FriendFeed 使用的基础 Web 框架,包含了 Tornado 的大多数重要的功能
    escape     - XHTML, JSON, URL 的编码/解码方法
    database   - 对 MySQLdb 的简单封装,使其更容易使用
    template   - 基于 Python 的 web 模板系统
    httpclient - 非阻塞式 HTTP 客户端,它被设计用来和 web 及 httpserver 协同工作
    auth       - 第三方认证的实现(包括 Google、Facebook、Yahoo BBAuth、FriendFeed...)
    locale     - 针对本地化和翻译的支持
    options    - 命令行和配置文件解析工具,针对服务器环境做了优化

# 底层模块
    httpserver - 服务于 web 模块的一个非常简单的 HTTP 服务器的实现
    iostream   - 对非阻塞式的 socket 的简单封装,以方便常用读写操作
    ioloop     - 核心的 I/O 循环
二、路由系统
路由系统其实就是 url 和 类对应关系,这里不同于其他框架,其他很多框架均是 url 对应 函数,Tornado中每个url对应的是一个类。
import tornado.ioloop
import tornado.web


class MainHandler(tornado.web.RequestHandler):
    def get(self):
        self.write("Hello, world")

class StoryHandler(tornado.web.RequestHandler):
    def get(self, story_id):
        self.write("You requested the story " + story_id)

class BuyHandler(tornado.web.RequestHandler):
    def get(self):
        self.write("buy.wupeiqi.com/index")

application = tornado.web.Application([
    (r"/index", MainHandler),
    (r"/story/([0-9]+)", StoryHandler),
])

application.add_handlers('buy.wupeiqi.com$', [
    (r'/index',BuyHandler),
])

if __name__ == "__main__":
    application.listen(80)
    tornado.ioloop.IOLoop.instance().start()
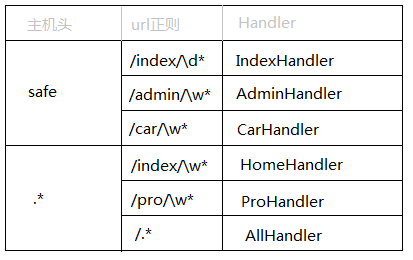
Tornado中原生支持二级域名的路由,如:
三、方法
1、处理程序和参数
请求来时,程序会用正则匹配相应路由地址,并交付于 tornado.web.RequestHandler 的子类处理;子类会根据请求方式(post / get / delete ...)的不同调用并执行相应的方法,方法返回字符串内容并发送到浏览器。

self.write("<h1>Hello, World</h1>")    # html代码直接写在浏览器客户端
self.render("index.html")              # 返回html文件,调用render_string(),内部其实是打开并读取文件,返回内容
self.redirect("http://www.baidu.com",permanent=False) # 跳转重定向,参数代表是否永久重定向

name = self.get_argument("name")       # 获取客户端传入的参数值
name = self.get_arguments("name")      # 获取多个值,类别形式
file = self.request.files["filename"]  # 获取客户端上传的文件

raise tornado.web.HTTPError(403)       # 返回错误信息给客户端
2、重写 RequestHandler 的方法函数
对于一个请求的处理过程代码调用次序如下:
- 程序为每一个请求创建一个 RequestHandler 对象;
- 程序调用
initialize()函数,这个函数的参数是Application配置中的关键字参数定义。(initialize方法是 Tornado 1.1 中新添加的,旧版本中你需要重写__init__以达到同样的目的)initialize方法一般只是把传入的参数存到成员变量中,而不会产生一些输出或者调用像send_error之类的方法。 - 程序调用
prepare()。无论使用了哪种 HTTP 方法,prepare都会被调用到,因此这个方法通常会被定义在一个基类中,然后在子类中重用。prepare可以产生输出信息。如果它调用了finish(或send_error` 等函数),那么整个处理流程就此结束。 - 程序调用某个 HTTP 方法:例如
get()、post()、put()等。如果 URL 的正则表达式模式中有分组匹配,那么相关匹配会作为参数传入方法。
重写 initialize() 函数(会在创建RequestHandler对象后调用):
class ProfileHandler(tornado.web.RequestHandler):

    def initialize(self,database):
        self.database = database

    def get(self):
        self.write("result:" + self.database)

application = tornado.web.Application([
    (r"/init", ProfileHandler, dict(database="database"))
])
四、模板引擎
Tornao中的模板语言和django中类似,模板引擎将模板文件载入内存,然后将数据嵌入其中,最终获取到一个完整的字符串,再将字符串返回给请求者。
Tornado 的模板支持“控制语句”和“表达语句”,控制语句是使用 {% 和 %} 包起来的 例如 {% if len(items) > 2 %}。表达语句是使用 {{ 和 }} 包起来的,例如 {{ items[0] }}。
控制语句和对应的 Python 语句的格式基本完全相同。我们支持 if、for、while 和 try,这些语句逻辑结束的位置需要用 {% end %} 做标记。还通过 extends 和 block 语句实现了模板继承。这些在 template 模块 的代码文档中有着详细的描述。
注:在使用模板前需要在setting中设置模板路径:"template_path" : "tpl"
1、基本使用


#!/usr/bin/env python
# -*- coding:utf-8 -*-

import tornado.ioloop
import tornado.web


class MainHandler(tornado.web.RequestHandler):
    def get(self):
        self.render("index.html", list_info = [11,22,33])

application = tornado.web.Application([
    (r"/index", MainHandler),
])


if __name__ == "__main__":
    application.listen(8888)
    tornado.ioloop.IOLoop.instance().start()

app.py
<!DOCTYPE html>
<html>
<head>
    <meta http-equiv="Content-Type" content="text/html; charset=UTF-8"/>
    <title>老男孩</title>
    <link href="{{static_url("css/common.css")}}" rel="stylesheet" />
</head>
<body>

    <div>
        <ul>
            {% for item in list_info %}
                <li>{{item}}</li>
            {% end %}
        </ul>
    </div>

    <script src="{{static_url("js/jquery-1.8.2.min.js")}}"></script>

</body>
</html>

index.html
在模板中默认提供了一些函数、字段、类以供模板使用:

escape:         tornado.escape.xhtml_escape 的別名
xhtml_escape:   tornado.escape.xhtml_escape 的別名
url_escape:     tornado.escape.url_escape 的別名
json_encode:    tornado.escape.json_encode 的別名
squeeze:        tornado.escape.squeeze 的別名
linkify:        tornado.escape.linkify 的別名
datetime:       Python 的 datetime 模组
handler:        当前的 RequestHandler 对象
request:        handler.request 的別名
current_user:   handler.current_user 的別名
locale:         handler.locale 的別名
_:              handler.locale.translate 的別名
static_url:     for handler.static_url 的別名
xsrf_form_html: handler.xsrf_form_html 的別名

其它方法
2、母版
<!DOCTYPE html>
<html>
<head>
    <meta http-equiv="Content-Type" content="text/html; charset=UTF-8"/>
    <title>老男孩</title>
    <link href="{{static_url("css/common.css")}}" rel="stylesheet" />
    {% block CSS %}{% end %}
</head>
<body>

    <div class="pg-header">

    </div>

    {% block RenderBody %}{% end %}

    <script src="{{static_url("js/jquery-1.8.2.min.js")}}"></script>

    {% block JavaScript %}{% end %}
</body>
</html>

layout.html
{% extends 'layout.html'%}
{% block CSS %}
    <link href="{{static_url("css/index.css")}}" rel="stylesheet" />
{% end %}

{% block RenderBody %}
    <h1>Index</h1>

    <ul>
    {%  for item in li %}
        <li>{{item}}</li>
    {% end %}
    </ul>

{% end %}

{% block JavaScript %}

{% end %}

index.html
3、导入
复制代码
<div>
    <ul>
        <li>1024</li>
        <li>42区</li>
    </ul>
</div>
<!DOCTYPE html>
<html>
<head>
    <meta http-equiv="Content-Type" content="text/html; charset=UTF-8"/>
    <title>老男孩</title>
    <link href="{{static_url("css/common.css")}}" rel="stylesheet" />
</head>
<body>

    <div class="pg-header">
        {% include 'header.html' %}
    </div>

    <script src="{{static_url("js/jquery-1.8.2.min.js")}}"></script>

</body>
</html>

index.html
4、自定义UIMethod以UIModule
a.定义
# uimethods.py

def tab(self):
    return 'UIMethod'
#!/usr/bin/env python
# -*- coding:utf-8 -*-
from tornado.web import UIModule
from tornado import escape

class custom(UIModule):

    def render(self, *args, **kwargs):
        return escape.xhtml_escape('<h1>nick</h1>')
        #return escape.xhtml_escape('<h1>suoning</h1>')
b.注册
#!/usr/bin/env python
# -*- coding:utf-8 -*-

import tornado.ioloop
import tornado.web
from tornado.escape import linkify
import uimodules as md
import uimethods as mt

class MainHandler(tornado.web.RequestHandler):
    def get(self):
        self.render('index.html')

settings = {
    'template_path': 'template',
    'static_path': 'static',
    'static_url_prefix': '/static/',
    'ui_methods': mt,
    'ui_modules': md,
}

application = tornado.web.Application([
    (r"/index", MainHandler),
], **settings)


if __name__ == "__main__":
    application.listen(8009)
    tornado.ioloop.IOLoop.instance().start()
c.使用
<!DOCTYPE html>
<html>
<head lang="en">
    <meta charset="UTF-8">
    <title>Nick</title>
    <link href="{{static_url("commons.css")}}" rel="stylesheet" />
</head>
<body>
    <h1>hello</h1>
    {% module custom(123) %}
    {{ tab() }}
</body>

DEMO.html
五、静态文件
在应用配置 settings 中指定 static_path 选项来提供静态文件服务;

在应用配置 settings 中指定 static_url_prefix 选项来提供静态文件前缀服务;

在导入静态文件时用 {{static_url('XX.css')}} 方式实现主动缓存静态文件;
settings = {
    'template_path': 'views',
    'static_path': 'static',
    'static_url_prefix': '/static/',
}
# html使用

<head lang="en">
    <title>Nick</title>
    <link href="{{static_url("commons.css")}}" rel="stylesheet" />
</head>
六、Cookie
1,用法
set_cookie 方法在用户的浏览中设置 cookie;
get_cookie 方法在用户的浏览中获取 cookie。
class MainHandler(tornado.web.RequestHandler):
    def get(self):
        if not self.get_cookie("mycookie"):
            self.set_cookie("mycookie", "myvalue")
            self.write("Your cookie was not set yet!")
        else:
            self.write("Your cookie was set!")
2、加密Cookie(签名)
Cookie 很容易被恶意的客户端伪造。加入你想在 cookie 中保存当前登陆用户的 id 之类的信息,你需要对 cookie 作签名以防止伪造。Tornado 通过 set_secure_cookie 和 get_secure_cookie 方法直接支持了这种功能。 要使用这些方法,你需要在创建应用时提供一个密钥,名字为 cookie_secret。 你可以把它作为一个关键词参数传入应用的设置中:
class MainHandler(tornado.web.RequestHandler):
    def get(self):
        if not self.get_secure_cookie("mycookie"):
            self.set_secure_cookie("mycookie", "myvalue")
            self.write("Your cookie was not set yet!")
        else:
            self.write("Your cookie was set!")

application = tornado.web.Application([
    (r"/", MainHandler),
], cookie_secret="61oETzKXQAGaYdkL5gEmGeJJFuYh7EQnp2XdTP1o/Vo=")
加密Cookice的本质:
写cookie过程:
- 将值进行base64加密
- 对除值以外的内容进行签名,哈希算法(无法逆向解析)
- 拼接 签名 + 加密值
读cookie过程:
- 读取 签名 + 加密值
- 对签名进行验证
- base64解密,获取值内容
注:许多API验证机制和安全cookie的实现机制相同。
#!/usr/bin/env python
# -*- coding:utf-8 -*-

import tornado.ioloop
import tornado.web


class MainHandler(tornado.web.RequestHandler):

    def get(self):
        login_user = self.get_secure_cookie("login_user", None)
        if login_user:
            self.write(login_user)
        else:
            self.redirect('/login')


class LoginHandler(tornado.web.RequestHandler):
    def get(self):
        self.current_user()

        self.render('login.html', **{'status': ''})

    def post(self, *args, **kwargs):

        username = self.get_argument('name')
        password = self.get_argument('pwd')
        if username == 'nick' and password == 'nicknick':
            self.set_secure_cookie('login_user', 'nick')
            self.redirect('/')
        else:
            self.render('login.html', **{'status': '用户名或密码错误'})

settings = {
    'template_path': 'template',
    'static_path': 'static',
    'static_url_prefix': '/static/',
    'cookie_secret': 'aiuasdhflashjdfoiuashdfiuh'
}

application = tornado.web.Application([
    (r"/index", MainHandler),
    (r"/login", LoginHandler),
], **settings)


if __name__ == "__main__":
    application.listen(8888)
    tornado.ioloop.IOLoop.instance().start()

基于cookie实现用户验证-DEMO
3、JavaScript操作Cookie
由于Cookie保存在浏览器端,所以在浏览器端也可以使用JavaScript来操作Cookie
/*
设置cookie,指定秒数过期
 */
function setCookie(name,value,expires){
    var temp = [];
    var current_date = new Date();
    current_date.setSeconds(current_date.getSeconds() + 5);
    document.cookie = name + "= "+ value +";expires=" + current_date.toUTCString();
}
对于参数:
- domain 指定域名下的cookie
- path 域名下指定url中的cookie
- secure https使用
注:jQuery中也有指定的插件 jQuery Cookie 专门用于操作cookie猛击这里

 浙公网安备 33010602011771号