
APP学习2
1. 相关说明
图片资源分类:
应用图标:存放在mipmap文件夹中
界面中使用的图片资源:存放在drawable文件夹中
2. 调用
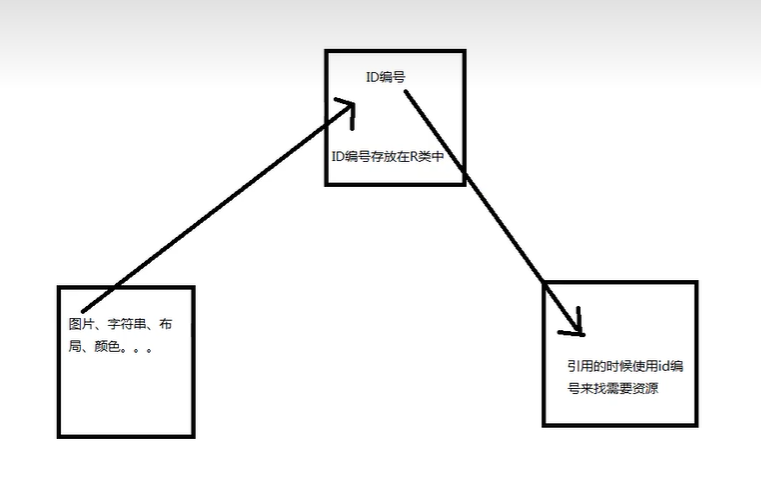
所以在java中可以通过this.getResources().get文件名(R.xxx.xxx)方法来引用,R.xxx来引用资源。
在xml中通过@文件名+资源name属性
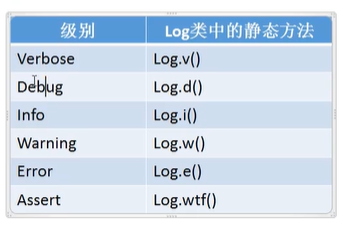
3. LogCat
LogCat是Android中的命令行工具,用于获取程序从启动到关闭的日志信息。
Log类所输出的日志内容分为六个级别。
4.布局
4.1线性布局(LinearLayout)
特点:以水平或垂直方向排列,关键设置orientation的值(horizontal(默认)、vertical)
id:设置并布局标识
layout_width:设置布局宽度
layout_height:设置布局高度
background:设置布局背景
layout_margin:外边距,设置布局于屏幕边界或周围控件的距离
padding:内边距,设置当前布局于该布局中控件的距离
layout_weight:权重,一般用了权重,layout_width要改为0而不是wrap_content。
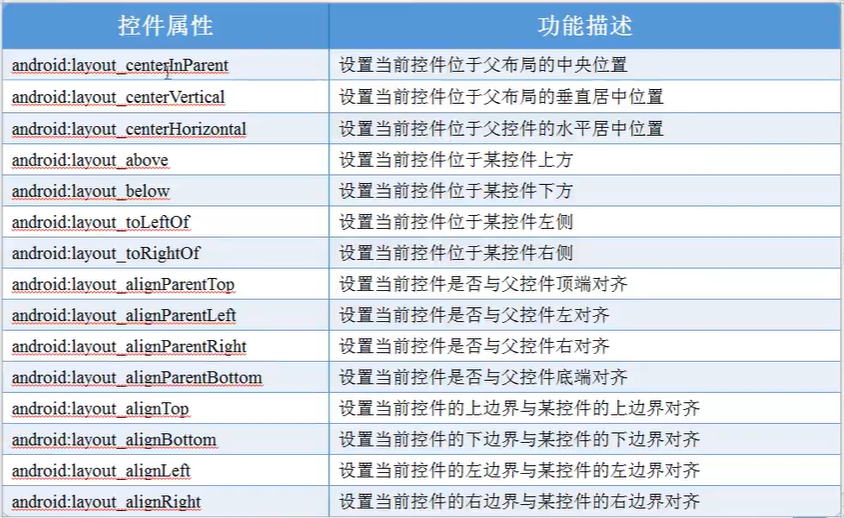
4.2 相对布局(RelativeLayout)
特点:通过相对定位排序
4.3 帧布局(FrameLayout)
特点:开辟空白区域,帧里的控件(层)叠加。
所有控件都默认显示在屏幕的左上角,后放进去的回覆盖前放进去的。
属性:在FrameLayout标签里面,有foreground和foregroundGravity。表示设置背景,这张背景永远在所有控件的最上方,第二个属性用来设置位置。
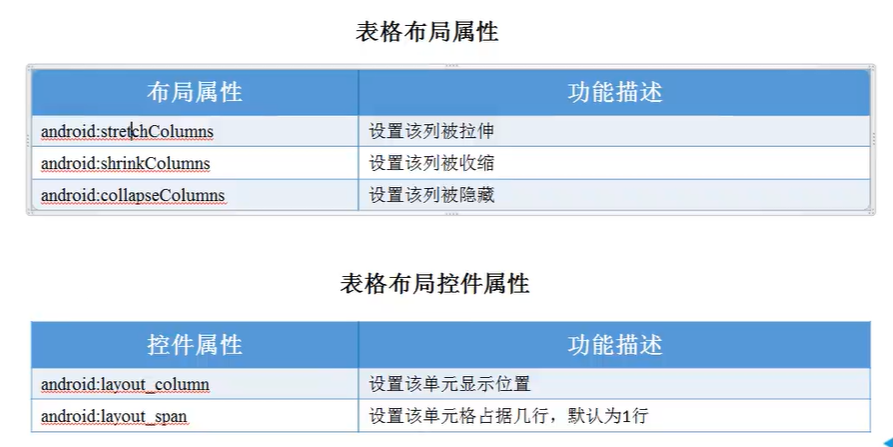
4.4 表格布局(TableLayout)
特点:表格形式排列
注意:表格中的列是从0开始的,而不是1.
拉伸效果是在TableLayout中设置的。而不是它里面的控件。
属性:
4.5 约束布局(ConstrainLayout)
特点:可视化的方式编写布局。
练习
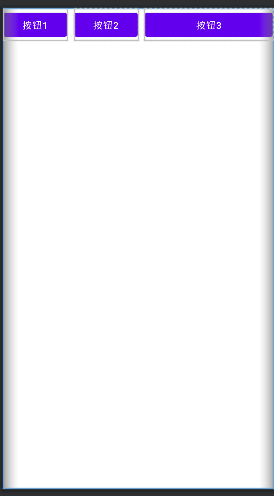
4.1 线性布局
制作一个如图布局的界面

主要在于这个按钮宽度是不一样的,如果硬性规定大小,是不好的,因为对于不同的屏幕大小效果不一样。这里可以用属性权重。
效果图:
代码:


<?xml version="1.0" encoding="utf-8"?>
<LinearLayout xmlns:android="http://schemas.android.com/apk/res/android"
    android:layout_width="match_parent"
    android:layout_height="match_parent"
    android:orientation="horizontal"
    >
    <Button
        android:layout_width="0dp"
        android:layout_height="wrap_content"
        android:text="按钮1"
        android:layout_weight="1"
        android:layout_marginRight="10dp"
        >
    </Button>
    <Button
        android:layout_width="0dp"
        android:layout_height="wrap_content"
        android:text="按钮2"
        android:layout_weight="1"
        android:layout_marginRight="10dp"
        >
    </Button>
    <Button
        android:layout_width="0dp"
        android:layout_height="wrap_content"
        android:text="按钮3"
        android:layout_weight="2"
        >
    </Button>

</LinearLayout>
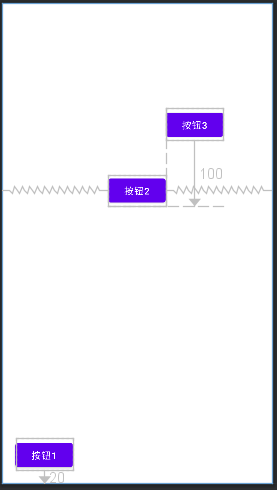
4.2 相对布局
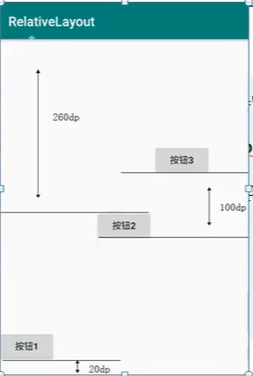
使用相对布局+设置外边距,这里主要要灵活使用两者的结合。
效果图:
代码:
<?xml version="1.0" encoding="utf-8"?>
<RelativeLayout xmlns:android="http://schemas.android.com/apk/res/android"
    android:layout_width="match_parent"
    android:layout_height="match_parent"
    >

    <Button
        android:layout_width="wrap_content"
        android:layout_height="wrap_content"
        android:layout_alignParentBottom="true"
        android:layout_margin="20dp"
        android:text="按钮1"
        ></Button>
    <Button
        android:layout_width="wrap_content"
        android:layout_height="wrap_content"
        android:id="@+id/bt2"
        android:layout_centerHorizontal="true"
        android:layout_marginTop="260dp"
        android:text="按钮2"
        ></Button>

    <Button
        android:layout_width="wrap_content"
        android:layout_height="wrap_content"
        android:layout_toRightOf="@id/bt2"
        android:layout_alignBottom="@id/bt2"
        android:layout_marginBottom="100dp"
        android:text="按钮3"
        ></Button>
</RelativeLayout>
4.4表格布局
要求:
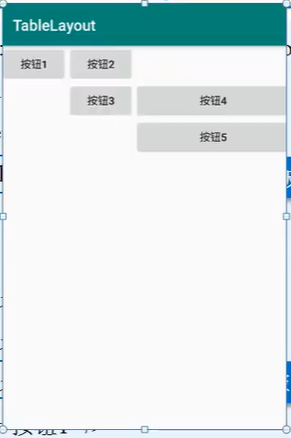
注意的问题:表格列是从0开始的,而不是1.
实现效果图:
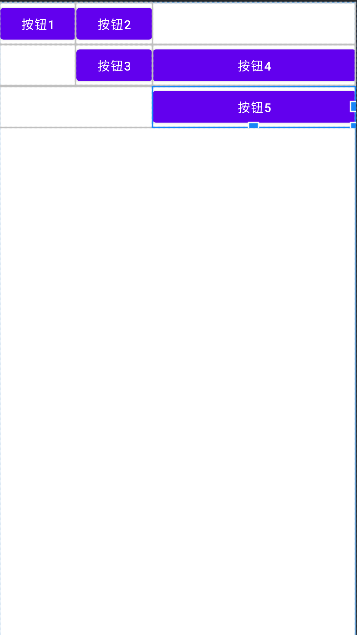
代码:
<?xml version="1.0" encoding="utf-8"?>
<TableLayout xmlns:android="http://schemas.android.com/apk/res/android"
    android:layout_width="match_parent"
    android:layout_height="match_parent"
    android:stretchColumns="2"
    >
    <TableRow>
        <Button android:text="按钮1" ></Button>
        <Button android:text="按钮2" ></Button>
    </TableRow>
    <TableRow>
       <Button android:text="按钮3"
           android:layout_column="1"
           ></Button>
        <Button android:text="按钮4"></Button>
    </TableRow>
    <TableRow>
        <Button android:text="按钮5"
            android:layout_column="2"
            ></Button>
    </TableRow>

</TableLayout>

 浙公网安备 33010602011771号