


Nginx 可以基于ngx_http_upstream_module模块提供服务器分组转发、权重分配、状态监测、调度算法等高级功能。
server address [parameters];
#配置一个后端web服务器,配置在upstream内,至少要有一个server服务器配置。
定义服务器的address和其他parameters 。该地址可以指定为域名或 IP 地址,带有可选端口。
如果未指定端口,则使用端口80。
#server支持的parameters如下:
weight=number #设置服务器的权重,默认为1,实现类似于LVS中的WRR加权轮询、WLC加权最少连接等
max_conns=number #给当前后端server设置最大活动链接数,默认为0,表示没有限制
max_fails=number #设置在参数设置的持续时间内与服务器通信的不成功尝试次数。后端服务器的下线条件,
当客户端访问时,对本次调度选中的后端服务器连续进行检测多少次,如果都失败就标记为不可用。
默认情况下,不成功的尝试次数设置为 1。可以设置为3。
当客户端访问时,才会利用TCP触发对探测后端服务器健康性检查,而非周期性的探测
fail_timeout=time #后端服务器的上线条件,对已经检测到处于不可用的后端服务器,每隔此时间间隔再次
进行检测是否恢复可用,如果发现可用,则将后端服务器参与调度,默认为10秒,可以设置为1秒。
backup #设置为备份服务器,当主服务器不可用时,才会启用此备用服务器
#注意:该参数不能与 hash、ip_hash和random 随机负载均衡算法一起使用。
random [two [method]]; #该指令出现在版本 Nginx1.15.1版本中。
#随机负载均衡算法,将请求传递到随机选择的服务器,同时考虑服务器的权重。
可选two参数指示 nginx 随机选择两个服务器,然后使用指定的method.
默认方法是least_conn,将请求传递给活动连接数最少的服务器。
down #将服务器标记为不可用状态,可以平滑下线后端服务器
resolve #监控服务器域名对应的IP地址变化,此指令为Nginx的商业版本所支持
当server定义的是主机名的时候,当A记录发生变化会自动应用新IP而不用重启Nginx
为了使此参数起作用,resolver必须在 http块或相应的upstream块中指定该指令。
nginx负载均衡中常见的算法及原理
1、rr轮询
rr轮询算法为nginx默认调度算法,按客户端请求顺序把客户端的请求逐一分配到不同的后端节点服务器,这相当于LVS中的rr轮询算法。如果后端节点服务器宕机,宕机的服务器会被自动从节点服务器池中剔除,以使客户端的用户访问不受影响。新的请求会分配给正常的服务器。
 1     upstream webservers {
 2         server 10.0.0.17;
 3         server 10.0.0.27;
 4 }
 5
 6 #代码实现
 7 [root@nginx1 ~]#vim /apps/nginx/conf/nginx.conf
 8 http {
 9      upstream webservers {
10          server 10.0.0.17:80;
11          server 10.0.0.27:80;
12     }
13
14 [root@nginx1 ~]#vim /apps/nginx/conf/conf.d/pc.conf
15 server{
16     listen 80;
17     server_name www.linux2022.com;
18     location / {
19         root /data/nginx/html/pc;
20         proxy_pass http://webservers;
21     }
22 [root@nginx1 ~]#nginx -t
23 [root@nginx1 ~]#nginx -s reload
24
25 #测试验证
26 [root@client ~]#curl http://www.linux2022.com/
27 10.0.0.17
28 [root@client ~]#curl http://www.linux2022.com/
29 10.0.0.27
30 [root@client ~]#curl http://www.linux2022.com/
31 10.0.0.17
32 [root@client ~]#curl http://www.linux2022.com/
33 10.0.0.27
34 [root@client ~]#curl http://www.linux2022.com/
35 10.0.0.17
36 [root@client ~]#curl http://www.linux2022.com/
37 10.0.0.27
38
39 #Nginx默认带健康性检查
40 #后端服务器健康性检查,停掉后端10.0.0.27的Apache服务器,再次测试
41 [root@httpd ~]#hostname -I
42 10.0.0.27
43 [root@httpd ~]#systemctl stop httpd
44 [root@client ~]#curl http://www.linux2022.com/
45 10.0.0.17
46 [root@client ~]#curl http://www.linux2022.com/
47 10.0.0.17
48 [root@client ~]#curl http://www.linux2022.com/
49 10.0.0.17
2、wrr加权轮询
在rr轮询算法的基础上加上权重,即为权重轮询算法。权重越高,在被访问的概率越大 。可以根据服务器的配置和性能指定权重值大小,达到合理有效的地利用主机资源 。
 1 upstream webservers {
 2     server 10.0.0.17 weight=2;
 3     server 10.0.0.27 weight=8;
 4 }
 5 #代码实现
 6 [root@nginx1 ~]#vim /apps/nginx/conf/nginx.conf
 7 http {
 8      upstream webservers {
 9          server 10.0.0.17:80 weight=3;
10          server 10.0.0.27:80;
11     }
12
13 [root@nginx1 ~]#nginx -t
14 [root@nginx1 ~]#nginx -s reload
15
16 #测试验证
17 [root@client ~]#curl http://www.linux2022.com/
18 10.0.0.27
19 [root@client ~]#curl http://www.linux2022.com/
20 10.0.0.17
21 [root@client ~]#curl http://www.linux2022.com/
22 10.0.0.17
23 [root@client ~]#curl http://www.linux2022.com/
24 10.0.0.17
25 [root@client ~]#curl http://www.linux2022.com/
26 10.0.0.27
3、ip_hash源地址hash
源地址hash调度算法,基于的客户端的remote_addr(源地址IPv4的前24位或整个IPv6地址)做hash计算,以实现会话保持。该方法确保来自同一客户端的请求将始终传递到同一服务器,除非该服务器不可用。在该服务器不可用的情况下,客户端请求将被传递到另一台服务器。很可能,它也将始终是同一台服务器。
注意:当负载均衡算法为ip_hash时,后端服务器在负载均衡调度中的状态不能有weight和backup。
 1 upstream webservers {
 2     ip_hash;
 3     server 10.0.0.17;
 4     server 10.0.0.27;
 5 }
 6 如果需要临时下线其中一台服务器,则应使用down参数对其进行标记,以保留客户端 IP 地址的当前散列。
 7 upstream backend {
 8     ip_hash;
 9     server 10.0.0.17;
10     server 10.0.0.27;
11     server 10.0.0.37 down;
12 }
13 #代码实现
14 [root@nginx1 ~]#vim /apps/nginx/conf/nginx.conf
15 http {
16      upstream webservers {
17          ip_hash;
18          server 10.0.0.17:80;
19          server 10.0.0.27:80;
20     }
21
22 [root@nginx1 ~]#nginx -t
23 [root@nginx1 ~]#nginx -s reload
24
25 #测试验证
26 [root@client ~]#curl http://www.linux2022.com/
27 10.0.0.27
28 [root@client ~]#curl http://www.linux2022.com/
29 10.0.0.27
30 [root@client ~]#curl http://www.linux2022.com/
31 10.0.0.27
32 [root@client ~]#curl http://www.linux2022.com/
33 10.0.0.27
4、least_conn最少连接
最少连接调度算法,优先将客户端请求调度到当前连接最少的后端服务器,相当于LVS中的WLC加权最少连接算法。同时考虑服务器的权重,如果后端服务器的连接数都相同时,则使用WRR加权轮询调度算法。
 1 upstream backserver {
 2     least_conn;
 3     server 10.0.0.17;
 4     server 10.0.0.27;
 5 }
 6 #代码实现
 7 [root@nginx1 ~]#vim /apps/nginx/conf/nginx.conf
 8 http {
 9      upstream webservers {
10          least_conn;
11          server 10.0.0.17:80;
12          server 10.0.0.27:80;
13     }
14
15 [root@nginx1 ~]#nginx -t
16 [root@nginx1 ~]#nginx -s reload
17
18 #测试验证,后端服务器的连接数都相同时,则使用WRR加权轮询调度算法,默认权重是1
19 [root@client ~]#curl http://www.linux2022.com/
20 10.0.0.17
21 [root@client ~]#curl http://www.linux2022.com/
22 10.0.0.27
23 [root@client ~]#curl http://www.linux2022.com/
24 10.0.0.17
25 [root@client ~]#curl http://www.linux2022.com/
26 10.0.0.27
5、hash KEY [consistent] 一致性hash算法
基于指定请求报文中首部字段或者URI等key做hash计算。可以包含文本、key变量及其组合。
如果consistent指定了参数,将使用ketama一致性hash算法。该方法确保在将服务器添加到组或从组中删除时,只有少数密钥将重新映射到不同的服务器。这有助于为缓存服务器实现更高的缓存命中率。
一致性hash算法适用于后端是Cache服务器(如varnish)时使用,consistent定义使用一致性hash运算,一致性hash基于取模运算
注意:从组中添加或删除服务器可能会导致将大部分密钥重新映射到不同的服务器。
  1 hash $request_uri consistent;  #基于用户请求的uri做hash,使用一致性hash运算
  2
  3 hash $cookie_sessionid  #基于cookie中的sessionid这个key进行hash调度,实现会话绑定
  4
  5 #基于用户请求的uri做hash
  6 #代码实现
  7 [root@nginx1 ~]#vim /apps/nginx/conf/nginx.conf
  8 http {
  9      upstream webservers {
 10          hash $request_uri;
 11          server 10.0.0.17:80;
 12          server 10.0.0.27:80;
 13     }
 14
 15 [root@nginx1 ~]#nginx -t
 16 [root@nginx1 ~]#nginx -s reload
 17
 18 [root@nginx2 html]#pwd
 19 /apps/nginx/html
 20 [root@nginx2 html]#for i in {1..10};do echo 10.0.0.17 test$i > test$i.html;done
 21 [root@nginx2 html]#ls
 22 50x.html    test10.html  test2.html  test4.html  test6.html  test8.html
 23 index.html  test1.html   test3.html  test5.html  test7.html  test9.html
 24 [root@nginx2 html]#cat test1.html
 25 10.0.0.17 test1
 26 [root@nginx2 html]#cat test2.html
 27 10.0.0.17 test2
 28
 29 [root@httpd html]#pwd
 30 /var/www/html
 31 [root@httpd html]#for i in {1..10};do echo 10.0.0.27 test$i > test$i.html;done
 32 [root@httpd html]#ls
 33 index.html   test1.html  test3.html  test5.html  test7.html  test9.html
 34 test10.html  test2.html  test4.html  test6.html  test8.html
 35
 36 #测试验证
 37 [root@client ~]#curl http://www.linux2022.com/test1.html
 38 10.0.0.27 test1
 39 [root@client ~]#curl http://www.linux2022.com/test1.html
 40 10.0.0.27 test1
 41 [root@client ~]#curl http://www.linux2022.com/test1.html
 42 10.0.0.27 test1
 43 [root@client ~]#curl http://www.linux2022.com/test2.html
 44 10.0.0.27 test2
 45 [root@client ~]#curl http://www.linux2022.com/test3.html
 46 10.0.0.27 test3
 47 [root@client ~]#curl http://www.linux2022.com/test4.html
 48 10.0.0.17 test4
 49 [root@client ~]#curl http://www.linux2022.com/test4.html
 50 10.0.0.17 test4
 51 [root@client ~]#curl http://www.linux2022.com/test4.html
 52 10.0.0.17 test4
 53 [root@client ~]#curl http://www.linux2022.com/test4.html
 54 10.0.0.17 test4
 55
 56 #基于用户请求的uri做hash,使用一致性hash运算
 57 #代码实现
 58 [root@nginx1 ~]#vim /apps/nginx/conf/nginx.conf
 59 http {
 60      upstream webservers {
 61          hash $request_uri consistent;
 62          server 10.0.0.17:80;
 63          server 10.0.0.27:80;
 64     }
 65
 66 [root@nginx1 ~]#nginx -t
 67 [root@nginx1 ~]#nginx -s reload
 68
 69 #测试验证
 70 [root@client ~]#curl http://www.linux2022.com/test3.html
 71 10.0.0.27 test3
 72 [root@client ~]#curl http://www.linux2022.com/test3.html
 73 10.0.0.27 test3
 74 [root@client ~]#curl http://www.linux2022.com/test3.html
 75 10.0.0.27 test3
 76 [root@client ~]#curl http://www.linux2022.com/test3.html
 77 10.0.0.27 test3
 78
 79
 80 #基于Cookie实现会话绑定
 81 #代码实现
 82 [root@client ~]#curl -b 'name=xiaoming' http://www.linux2022.com/test3.html
 83 10.0.0.27 test3
 84 [root@nginx1 ~]#vim /apps/nginx/conf/nginx.conf
 85 http {
 86      upstream webservers {
 87          hash $cookie_name consistent;
 88          server 10.0.0.17:80;
 89          server 10.0.0.27:80;
 90     }
 91
 92 [root@nginx1 ~]#nginx -t
 93 [root@nginx1 ~]#nginx -s reload
 94
 95 #测试验证
 96 [root@client ~]#curl -b 'name=xiaoming' http://www.linux2022.com/test4.html
 97 10.0.0.17 test4
 98 [root@client ~]#curl -b 'name=xiaoming' http://www.linux2022.com/test3.html
 99 10.0.0.17 test3
100 [root@client ~]#curl -b 'name=xiaoming' http://www.linux2022.com/test2.html
101 10.0.0.17 test2
102 [root@client ~]#curl -b 'name=xiaoming' http://www.linux2022.com/test1.html
103 10.0.0.17 test1
104
105 #修改cookie值
106 [root@client ~]#curl -b 'name=xiaohong' http://www.linux2022.com/test1.html
107 10.0.0.17 test1
108
109 #再次测试
110 [root@client ~]#curl -b 'name=xiaohong' http://www.linux2022.com/test2.html
111 10.0.0.17 test2
112 [root@client ~]#curl -b 'name=xiaohong' http://www.linux2022.com/test3.html
113 10.0.0.17 test3
114 [root@client ~]#curl -b 'name=xiaohong' http://www.linux2022.com/test4.html
115 10.0.0.17 test4
116
117 #停掉后端Nginx2服务器
118 [root@nginx2 html]#hostname -I
119 10.0.0.17
120 [root@nginx2 html]#systemctl stop nginx
121
122 #再次测试,之前绑定的会话会丢失,会自动调度到另一台服务器
123 [root@client ~]#curl -b 'name=xiaohong' http://www.linux2022.com/test4.html
124 10.0.0.27 test4
2、使用rewrite规则实现将所有到a域名的访问rewrite到b域名
rewrite flag 使用介绍
利用nginx的rewrite的指令,可以实现url的重新跳转,rewrite有四种不同的flag,分别是redirect(临时重定向302)、permanent(永久重定向301)、break和last。其中前两种是跳转型的flag,后两种是代理型的flag
跳转型指由客户端浏览器重新对新地址进行请求
代理型是在WEB服务器内部实现跳转
rewrite 格式
Syntax: rewrite regex replacement [flag]; #通过正则表达式处理用户请求并返回替换后的数据包。
Default: —
Context: server, location, if
flag 说明
redirect;
#临时重定向,重写完成后以临时重定向方式直接返回重写后生成的新URL给客户端,由客户端重新发起请求;
使用相对路径,或者http://或https://开头,状态码:302
permanent;
#重写完成后以永久重定向方式直接返回重写后生成的新URL给客户端,由客户端重新发起请求,状态码:301
break;
#重写完成后,停止对当前URL在当前location中后续的其它重写操作,而后直接跳转至重写规则配置块之后
的其它配置;结束循环,建议在location中使用
#适用于一个URL一次重写
last;
#重写完成后,停止对当前URI在当前location中后续的其它重写操作,而后对新的URL启动新一轮重写检查,
不建议在location中使用
#适用于一个URL多次重写,要注意避免出现超过十次以及URL重写后返回错误的给用户
1、301永久重定向
域名永久型调整,即域名永远跳转至另外一个新的域名,之前的域名再也不使用,跳转记录可以缓存到客户端浏览器
永久重定向会缓存DNS解析记录,浏览器中有 from disk cache 信息,即使nginx服务器无法访问,浏览器也会利用缓存进行重定向
 1 #实现单页301重定向
 2 [root@centos7 conf.d]#pwd
 3 /apps/nginx/conf/conf.d
 4 [root@centos7 conf.d]#vim pc.conf
 5 server{
 6     listen 80;
 7     server_name www.linux2022.com;
 8     location / {
 9         root /data/nginx/html/pc;
10     }
11     location /gz {
12         rewrite ^/gz/(.*) /guangzhou/$1 permanent;
13     }
14
15 }
16 [root@centos7 conf.d]#nginx -t
17 [root@centos7 conf.d]#nginx -s reload
18
19 [root@centos7 conf.d]#cd /data/nginx/html/pc/
20 [root@centos7 pc]#mkdir guangzhou/
21 [root@centos7 pc]#pwd
22 /data/nginx/html/pc
23 [root@centos7 pc]#pwd > guangzhou/index.html
24 [root@centos7 pc]#vim guangzhou/index.html
25 /data/nginx/html/pc/guangzhou/index.html
26
27 #测试验证
28 [root@ubuntu1804 ~]#curl www.linux2022.com/gz/
29 <html>
30 <head><title>301 Moved Permanently</title></head>
31 <body>
32 <center><h1>301 Moved Permanently</h1></center>
33 <hr><center>nginx</center>
34 </body>
35 </html>
36 [root@ubuntu1804 ~]#curl www.linux2022.com/gz/ -L
37 /data/nginx/html/pc/guangzhou/index.html
38 [root@ubuntu1804 ~]#curl www.linux2022.com/guangzhou/ -L
39 /data/nginx/html/pc/guangzhou/index.html
40
41 #实现域名301重定向
42 [root@centos7 conf.d]#pwd
43 /apps/nginx/conf/conf.d
44 [root@centos7 conf.d]#vim pc.conf
45 server{
46     listen 80;
47     server_name www.linux2022.com;
48     location / {
49         root /data/nginx/html/pc;
50         rewrite / http://www.linux2022.cn permanent;
51     }
52     location /gz {
53         rewrite ^/gz/(.*) /guangzhou/$1 permanent;
54     }
55
56 }
57 server{
58     listen 80;
59     server_name www.linux2022.cn;
60     location / {
61         root /data/nginx/html/product/;
62     }
63 }
64 [root@centos7 conf.d]#nginx -t
65 [root@centos7 conf.d]#nginx -s reload
66
67 [root@centos7 conf.d]#cd /data/nginx/html/pc/
68 [root@centos7 pc]#mkdir product
69 [root@centos7 pc]#vim product/index.html
70 www.linux2022.cn/product
71
72 #测试验证
73 [root@ubuntu1804 ~]#vim /etc/hosts
74 10.0.0.7 www.linux2022.com m.linux2022.com www.linux2022.cn
75 [root@ubuntu1804 ~]#curl www.linux2022.com -I
76 HTTP/1.1 301 Moved Permanently
77 Server: nginx
78 Date: Tue, 05 Apr 2022 04:28:45 GMT
79 Content-Type: text/html
80 Content-Length: 162
81 Connection: keep-alive
82 Location: http://www.linux2022.cn
2、302 临时重定向
域名临时重定向,告诉浏览器域名不是固定重定向到当前目标域名,后期可能随时会更改,因此浏览器不会缓存当前域名的解析记录,而浏览器会缓存永久重定向的DNS解析记录,这也是临时重定向与永久重定向最大的本质区别 。
 1 [root@centos7 conf.d]#pwd
 2 /apps/nginx/conf/conf.d
 3 [root@centos7 conf.d]#vim pc.conf
 4 server{
 5     listen 80;
 6     server_name www.linux2022.com;
 7     location / {
 8         root /data/nginx/html/pc;
 9         rewrite / http://www.linux2022.cn redirect;
10     }
11 }
12
13 [root@centos7 conf.d]#nginx -t
14 [root@centos7 conf.d]#nginx -s reload
15
16 #测试验证
17 [root@ubuntu1804 ~]#curl www.linux2022.com -I
18 HTTP/1.1 302 Moved Temporarily
19 Server: nginx
20 Date: Tue, 05 Apr 2022 05:00:12 GMT
21 Content-Type: text/html
22 Content-Length: 138
23 Connection: keep-alive
24 Location: http://www.linux2022.cn
3、实现反向代理客户端IP透传
Nginx实现多级反向代理客户端IP透传
反向代理配置参数
proxy_pass;
#用来设置将客户端请求转发给的后端服务器的主机,可以是主机名(将转发至后端服务做为主机头首部)、IP地址:端口的方式
#也可以代理到预先设置的主机群组,需要模块ngx_http_upstream_module支持
proxy_hide_header field;
#用于nginx作为反向代理的时候,在返回给客户端http响应时,隐藏后端服务器相应头部的信息,可以设置在http,server或location块
proxy_hide_header ETag;
#隐藏后端服务器ETag首部字段
proxy_set_header;
#可更改或添加客户端的请求头部信息内容并转发至后端服务器,比如在后端服务器想要获取客户端的真实IP的时候,就要更改每一个报文的头部
#proxy_set_header X-Forwarded-For $proxy_add_x_forwarded_for;
#添加客户端IP和反向代理服务器IP到请求报文头部
“X-Forwarded-For”客户端请求标头字段,$remote_addr附加变量,用逗号分隔。
如果客户端请求标头中不存在“X-Forwarded-For”字段,
则该$proxy_add_x_forwarded_for变量等于该$remote_addr变量。
proxy_set_header X-Real-IP $remote_addr;
#添加HOST到报文头部,如果客户端为NAT上网那么其值为客户端的共用的公网IP地址,常用于在日之中记录客户端的真实IP地址。
#在后端httpd服务器修改配置,添加日志记录X-Forwarded-For字段
LogFormat "%h %l %u %t \"%r\" %>s %b \"%{Referer}i\" \"%{User-Agent}i\" \"%{X-Forwarded-For}i\"" combined
反向代理缓存配置参数proxy_cache zone_name | off; 默认off
#指明调用的缓存,或关闭缓存机制;Context:http, server, location
#zone_name 表示缓存的名称.需要由proxy_cache_path事先定义
proxy_cache_key string;
#缓存中用于“键”的内容,默认值:proxy_cache_key $scheme$proxy_host$request_uri;
proxy_cache_valid [code ...] time;
#定义对特定响应码的响应内容的缓存时长,定义在http{...}中
proxy_cache_path;
#设置缓存的路径和其他参数。缓存数据存储在文件中。
#在http配置定义缓存信息
#定义缓存保存路径,proxycache会自动创建
proxy_cache_path /data/nginx/proxycache
levels=1:2:2
#定义缓存目录结构层次,1:2:2可以生成2^4x2^8x2^8=2^20=1048576个目录
keys_zone=proxycache:20m
#指内存中缓存的大小,主要用于存放key和metadata(如:使用次数),一般1M可存放8000个左右的key
inactive=120s
#缓存有效时间
max_size=1g;
#最大磁盘占用空间,磁盘存入文件内容的缓存空间最大值
proxy_cache_key $request_uri;
#对指定的数据进行MD5的运算做为缓存的key
proxy_cache_key $scheme$proxy_host$uri$is_args$args;
#默认情况下,指令的值接近字符串
proxy_cache proxycache;
#调用缓存功能,需要定义在相应的配置段,如server{...};或者location等
proxy_cache_valid 200 302 301 10m;
#指定的状态码返回的数据缓存多长时间
proxy_cache_valid any 1m;
#除指定的状态码返回的数据以外的缓存多长时间,必须设置,否则不会缓存
响应报文头部配置参数
add_header X-Via $server_addr;
#当前nginx主机的IP
add_header X-Cache $upstream_cache_status;
#是否缓存命中
add_header X-Accel $server_name;
#客户访问的FQDN
环境准备
四台机器:
client :10.0.0.150 测试
nginx1 :10.0.0.7 X-Forwarded-For:client ip
nginx2 :10.0.0.17 X-Forwarded-For:client ip
httpd :10.0.0.27 X-Forwarded-For:client ip,nginx1
1.第一个代理服务器
 1 #定义反向代理
 2 [root@nginx1 conf.d]#pwd
 3 /apps/nginx/conf/conf.d
 4 [root@nginx1 conf.d]#vim /apps/nginx/conf/conf.d/pc.conf
 5 server{
 6     listen 80;
 7     proxy_cache off;
 8     proxy_cache_key $host$uri$is_args$args;
 9     proxy_cache_valid 200 302 301 10m;
10     proxy_cache_valid any 5m;
11     proxy_set_header X-Forwarded-For $proxy_add_x_forwarded_for;
12     proxy_hide_header ETag;
13     add_header X-Via $server_addr;
14     add_header X-Cache $upstream_cache_status;
15     add_header X-Accel $server_name;
16
17     server_name www.linux2022.com;
18     location / {
19         root /data/nginx/html/pc;
20         proxy_pass http://10.0.0.17;
21     }
22 }
23 [root@nginx1 conf.d]#nginx -t
24 [root@nginx1 conf.d]#nginx -s reload
25
26 #开启日志格式,记录x_forwarded_for
27 [root@nginx1 conf.d]#vim /apps/nginx/conf/nginx.conf
28 http {
29     server_tokens off;
30     include       mime.types;
31     default_type  application/octet-stream;
32     proxy_cache_path /data/nginx/proxycache levels=1:1:1 keys_zone=proxycache:20m inactive=120s max_size=1g;
33     log_format  main  '$remote_addr - $remote_user [$time_local] "$request" '
34                       '$status $body_bytes_sent "$http_referer" '
35                       '"$http_user_agent" "$http_x_forwarded_for"';
36
37     access_log  logs/access.log  main;
38
39 [root@nginx1 conf.d]#nginx -s reload
2.第二个代理服务器
 1 #定义反向代理
 2 [root@nginx2 conf.d]#pwd
 3 /apps/nginx/conf/conf.d
 4 [root@nginx2 conf.d]#vim /apps/nginx/conf/conf.d/pc.conf
 5 server{
 6     listen 80;
 7     server_name www.linux2022.com;
 8     root /data/nginx;
 9     proxy_set_header X-Forwarded-For $proxy_add_x_forwarded_for;
10     location / {
11         proxy_pass http://10.0.0.27;
12     }
13 }
14
15 [root@nginx2 conf.d]#nginx -t
16 [root@nginx2 conf.d]#nginx -s reload
17
18 #修改默认页面
19 [root@nginx2 conf.d]#vim /apps/nginx/html/index.html
20 10.0.0.17
21
22 [root@nginx2 conf.d]#vim /apps/nginx/conf/nginx.conf
23     include    /apps/nginx/conf/conf.d/*.conf; #设置Nginx子配置文件优先级,放在server语句块的前面
24     server {
25         listen       80;
26         server_name  localhost;
27
28 [root@nginx2 conf.d]#nginx -t
29 [root@nginx2 conf.d]#nginx -s reload
30
31 #开启日志格式,记录x_forwarded_for
32 [root@nginx2 conf.d]#vim /apps/nginx/conf/nginx.conf
33 http {
34     server_tokens off;
35     include       mime.types;
36     default_type  application/octet-stream;
37
38     log_format  main  '$remote_addr - $remote_user [$time_local] "$request" '
39                       '$status $body_bytes_sent "$http_referer" '
40                       '"$http_user_agent" "$http_x_forwarded_for"';
41
42     access_log  logs/access.log  main;
43
44 [root@nginx2 conf.d]#nginx -s reload
3.在第一个proxy上面查看日志
1 [root@nginx1 ~]#tail -f /apps/nginx/logs/access.log
2 10.0.0.150 - - [06/Apr/2022:10:10:57 +0800] "GET /index.html HTTP/1.1" 200 10 "-" "curl/7.58.0" "-"
4.在第二个proxy上面查看日志
[root@nginx2 conf.d]#tail -f /apps/nginx/logs/access.log
10.0.0.7 - - [06/Apr/2022:10:10:57 +0800] "GET /index.html HTTP/1.0" 200 10 "-" "curl/7.58.0" "10.0.0.150"
5.后端Apache服务器配置
 1 #安装Apache
 2 [root@httpd ~]#yum -y install httpd
 3
 4 #后端Apache服务器配置日志格式
 5 [root@httpd ~]#vim /etc/httpd/conf/httpd.conf
 6 LogFormat "%h %l %u %t \"%r\" %>s %b \"%{Referer}i\" \"%{User-Agent}i\" \"%{X-Forwarded-For}i\"" combined
 7
 8 [root@httpd ~]#httpd -t
 9 [root@httpd ~]#systemctl start httpd
10
11 #设置访问页面
12 [root@httpd ~]#vim /var/www/html/index.html
13 10.0.0.27
6.客户端测试访问
1 [root@client ~]#curl http://www.linux2022.com/index.html
2 10.0.0.27
7.后端Apache服务器查看日志
[root@httpd ~]#tail -f /var/log/httpd/access_log
10.0.0.17 - - [06/Apr/2022:10:10:57 +0800] "GET /index.html HTTP/1.0" 200 10 "-" "curl/7.58.0" "10.0.0.150, 10.0.0.7"
4、利用LNMP实现wordpress站点搭建
项目实战 : 利用 LNMP 实现WordPress站点搭建
LNMP项目实战环境说明
L:Linux(CentOS7)https://mirrors.aliyun.com/centos/7/isos/x86_64/
N:Nginx(1.18.0) https://nginx.org/en/download.html
M:MySQL(8.0.19) https://dev.mysql.com/downloads/mysql/
P:PHP(7.4.10) http://php.net/downloads.php
Wordpress(5.4.2):https://cn.wordpress.org/download/
#部署规划:
10.0.0.7:Nginx php-fpm 运行web服务
10.0.0.17:运行MySQL数据库,Redis服务
1 部署数据库
在10.0.0.17主机部署MySQL服务
1.1 二进制部署MySQL数据库
[root@centos7 ~]#cat install_mysql5.7or8.0_for_centos.sh
#!/bin/bash
. /etc/init.d/functions
SRC_DIR=`pwd`
MYSQL='mysql-5.7.29-linux-glibc2.12-x86_64.tar.gz'
COLOR='echo -e \E[01;31m'
END='\E[0m'
MYSQL_ROOT_PASSWORD=magedu
check (){
if [ $UID -ne 0 ]; then
action "当前用户不是root,安装失败" false
exit 1
fi
cd $SRC_DIR
if [ ! -e $MYSQL ];then
$COLOR"缺少${MYSQL}文件"$END
$COLOR"请将相关软件放在${SRC_DIR}目录下"$END
exit
elif [ -e /usr/local/mysql ];then
action "数据库已存在,安装失败" false
exit
else
return
fi
}
install_mysql(){
$COLOR"开始安装MySQL数据库..."$END
yum -y -q install libaio numactl-libs libaio &> /dev/null
cd $SRC_DIR
tar xf $MYSQL -C /usr/local/
MYSQL_DIR=`echo $MYSQL| sed -nr 's/^(.*[0-9]).*/\1/p'`
ln -s /usr/local/$MYSQL_DIR /usr/local/mysql
chown -R root.root /usr/local/mysql/
id mysql &> /dev/null || { useradd -s /sbin/nologin -r mysql ; action "创建mysql用户"; }
echo 'PATH=/usr/local/mysql/bin/:$PATH' > /etc/profile.d/mysql.sh
. /etc/profile.d/mysql.sh
ln -s /usr/local/mysql/bin/* /usr/bin/
cat > /etc/my.cnf <<-EOF
[mysqld]
server-id=1
log-bin
datadir=/data/mysql
socket=/data/mysql/mysql.sock
log-error=/data/mysql/mysql.log
pid-file=/data/mysql/mysql.pid
[client]
socket=/data/mysql/mysql.sock
EOF
mysqld --initialize --user=mysql --datadir=/data/mysql
cp /usr/local/mysql/support-files/mysql.server /etc/init.d/mysqld
chkconfig --add mysqld
chkconfig mysqld on
service mysqld start
sleep 3
[ $? -ne 0 ] && { $COLOR"数据库启动失败,退出!"$END;exit; }
MYSQL_OLDPASSWORD=`awk '/A temporary password/{print $NF}' /data/mysql/mysql.log`
mysqladmin -uroot -p$MYSQL_OLDPASSWORD password $MYSQL_ROOT_PASSWORD &>/dev/null
action "数据库安装完成"
}
check
install_mysql
[root@centos7 src]# bash install_mysql5.7or8.0_for_centos.sh
开始安装MySQL数据库...
创建mysql用户 [ 确定 ]
Starting MySQL. [ 确定 ]
数据库安装完成 [ 确定 ]
1.2 创建wordpress数据库和用户并授权
[root@centos7 src]# mysql -uroot -pmagedu
mysql: [Warning] Using a password on the command line interface can be insecure.
Welcome to the MySQL monitor. Commands end with ; or \g.
Your MySQL connection id is 3
Server version: 5.7.29-log MySQL Community Server (GPL)
Copyright (c) 2000, 2020, Oracle and/or its affiliates. All rights reserved.
Oracle is a registered trademark of Oracle Corporation and/or its
affiliates. Other names may be trademarks of their respective
owners.
Type 'help;' or '\h' for help. Type '\c' to clear the current input statement.
mysql> create database wordpress;
Query OK, 1 row affected (0.00 sec)
mysql> create user wordpress@'10.0.0.%' identified by '123456';
Query OK, 0 rows affected (0.01 sec)
mysql> grant all on wordpress.* to wordpress@'10.0.0.%';
Query OK, 0 rows affected (0.00 sec)
1.3 验证MySQL账户权限
[root@centos8 ~]# mysql -uwordpress -p123456 -h10.0.0.17
mysql: [Warning] Using a password on the command line interface can be insecure.
Welcome to the MySQL monitor. Commands end with ; or \g.
Your MySQL connection id is 4
Server version: 5.7.29-log MySQL Community Server (GPL)
Copyright (c) 2000, 2021, Oracle and/or its affiliates.
Oracle is a registered trademark of Oracle Corporation and/or its
affiliates. Other names may be trademarks of their respective
owners.
Type 'help;' or '\h' for help. Type '\c' to clear the current input statement.
mysql> show databases;
+--------------------+
| Database |
+--------------------+
| information_schema |
| wordpress |
+--------------------+
2 rows in set (0.00 sec)
2.部署PHP
在10.0.0.7主机部署php-fpm服务
2.1 编译安装 php
[root@nginx ~]#yum -y install gcc openssl-devel libxml2-devel bzip2-devel libmcrypt-devel sqlite-devel oniguruma-devel
[root@nginx ~]#cd /usr/local/src
[root@nginx src]#wget https://www.php.net/distributions/php-7.4.11.tar.xz
[root@nginx src]#ll -h php-7.4.11.tar.xz
-rw-r--r-- 1 root root 9.9M Sep 29 2020 php-7.4.11.tar.xz
[root@nginx src]#tar xf php-7.4.11.tar.xz
[root@nginx src]#cd php-7.4.11
[root@nginx src]#mkdir /apps/php74 -p
[root@nginx php-7.4.11]# ./configure \
> --prefix=/apps/php74 \
> --enable-mysqlnd \
> --with-mysqli=mysqlnd \
> --with-pdo-mysql=mysqlnd \
> --with-openssl \
> --with-zlib \
> --with-config-file-path=/etc \
> --with-config-file-scan-dir=/etc/php.d \
> --enable-mbstring \
> --enable-xml \
> --enable-sockets \
> --enable-fpm \
> --enable-maintainer-zts \
> --disable-fileinfo
[root@nginx php-7.4.11]#make -j 2 && make install
2.2准备 php 配置文件
#生成配置文件
[root@nginx php-7.4.11]#cp php.ini-production /etc/php.ini
[root@nginx php-7.4.11]#cd /apps/php74/etc
[root@nginx etc]#cp php-fpm.conf.default php-fpm.conf
[root@nginx etc]#cd php-fpm.d/
[root@nginx php-fpm.d]#cp www.conf.default www.conf
[root@nginx php-fpm.d]#vim www.conf
[root@nginx php-fpm.d]#grep '^[^;]' www.conf
[www]
user = www
group = www
listen = 127.0.0.1:9000 #监听地址及IP
pm = dynamic
pm.max_children = 5
pm.start_servers = 2
pm.min_spare_servers = 1
pm.max_spare_servers = 3
pm.status_path = /pm_status
ping.path = /ping
access.log = log/$pool.access.log
slowlog = log/$pool.log.slow #慢日志路径
#创建用户
[root@nginx php-fpm.d]#useradd -r -s /sbin/nologin www
#创建访问日志文件路径
[root@nginx php-fpm.d]#mkdir /apps/php74/log
[root@nginx ~]#vim /etc/php.ini
expose_php = Off #关闭PHP版本显示
post_max_size = 30M #设置最大上传数据大小,默认值为8M
upload_max_filesize = 20M #设置最大上传文件,默认值为2M
2.3启动并验证 php-fpm 服务
[root@nginx ~]#/apps/php74/sbin/php-fpm -t
[root@nginx ~]#cp /usr/local/src/php-7.4.11/sapi/fpm/php-fpm.service /usr/lib/systemd/system/
[root@nginx ~]#systemctl daemon-reload
[root@nginx ~]#systemctl enable --now php-fpm
[root@nginx ~]#ss -ntlp
State Recv-Q Send-Q Local Address:Port Peer Address:Port
LISTEN 0 128 127.0.0.1:9000 *:*users:(("php-fpm",pid=112880,fd=9),("php-fpm",pid=112879,fd=9),("php-fpm",pid=112878,fd=7))
LISTEN 0 128 *:80 *:*users:(("nginx",pid=2134,fd=6),("nginx",pid=1305,fd=6))
LISTEN 0 128 *:22 *:*users:(("sshd",pid=1293,fd=3))
LISTEN 0 100 127.0.0.1:25 *:*users:(("master",pid=1391,fd=13))
LISTEN 0 128 [::]:22 [::]:*users:(("sshd",pid=1293,fd=4))
LISTEN 0 100 [::1]:25 [::]:*users:(("master",pid=1391,fd=14))
[root@nginx ~]#pstree -p |grep php
|-php-fpm(112878)-+-php-fpm(112879)
| `-php-fpm(112880)
[root@nginx ~]#ps -ef |grep php
root 112878 1 0 22:32 ? 00:00:00 php-fpm: master process (/apps/php74/etc/php-fpm.conf)
www 112879 112878 0 22:32 ? 00:00:00 php-fpm: pool www
www 112880 112878 0 22:32 ? 00:00:00 php-fpm: pool www
root 112896 3200 0 22:37 pts/0 00:00:00 grep --color=auto php
3.部署 Nginx
3.1 编译安装 nginx
[root@centos7 src]# cd ~
[root@centos7 ~]# yum -y install gcc pcre-devel openssl-devel zlib-devel
[root@centos7 src]#wget http://nginx.org/download/nginx-1.18.0.tar.gz
[root@centos7 src]# tar xf nginx-1.18.0.tar.gz
[root@centos7 src]# cd nginx-1.18.0
[root@centos7 nginx-1.18.0]#./configure --prefix=/apps/nginx \
--user=www \
--group=www \
--with-http_ssl_module \
--with-http_v2_module \
--with-http_realip_module \
--with-http_stub_status_module \
--with-http_gzip_static_module \
--with-pcre \
--with-stream \
--with-stream_ssl_module \
--with-stream_realip_module
[root@centos7 nginx-1.18.0]#make -j 4 && make install
3.2 准备服务文件并启动 nginx
[root@centos7 nginx-1.18.0]# vim /usr/lib/systemd/system/nginx.service
[Unit]
Description=nginx - high performance web server
Documentation=http://nginx.org/en/docs/
After=network-online.target remote-fs.target nss-lookup.target
Wants=network-online.target
[Service]
Type=forking
PIDFile=/apps/nginx/run/nginx.pid
ExecStart=/apps/nginx/sbin/nginx -c /apps/nginx/conf/nginx.conf
ExecReload=/bin/kill -s HUP $MAINPID
ExecStop=/bin/kill -s TERM $MAINPID
[Install]
WantedBy=multi-user.target
#创建目录
[root@centos7 nginx-1.18.0]# mkdir /apps/nginx/run/
#修改配置文件
[root@centos7 nginx-1.18.0]# vim /apps/nginx/conf/nginx.conf
pid /apps/nginx/run/nginx.pid;
[root@centos7 nginx-1.18.0]# systemctl daemon-reload
[root@centos7 nginx-1.18.0]# systemctl enable --now nginx
Created symlink from /etc/systemd/system/multi-user.target.wants/nginx.service to /usr/lib/systemd/system/nginx.service.
[root@centos7 nginx-1.18.0]# ss -ntl
State Recv-Q Send-Q Local Address:Port Peer Address:Port
LISTEN 0 100 127.0.0.1:25 *:*
LISTEN 0 128 127.0.0.1:9000 *:*
LISTEN 0 128 *:80 *:*
LISTEN 0 128 *:22 *:*
LISTEN 0 100 [::1]:25 [::]:*
LISTEN 0 128 [::]:22 [::]:*
3.3 配置 Nginx 支持 fastcgi
[root@centos7 ~]#vim /apps/nginx/conf/nginx.conf
[root@centos7 ~]#grep -Ev '#|^$' /apps/nginx/conf/nginx.conf
worker_processes 1;
pid /apps/nginx/run/nginx.pid;
events {
worker_connections 1024;
}
http {
include mime.types;
default_type application/octet-stream;
sendfile on;
keepalive_timeout 65;
server {
listen 80;
server_name www.magedu.org; #指定主机名
location / {
root /data/nginx/wordpress; #指定数据目录
index index.php index.html index.htm; #指定默认主页
}
error_page 500 502 503 504 /50x.html;
location = /50x.html {
root html;
}
location ~ \.php$ { #实现php-fpm
root /data/nginx/wordpress;
fastcgi_pass 127.0.0.1:9000;
fastcgi_index index.php;
fastcgi_param SCRIPT_FILENAME $document_root$fastcgi_script_name;
include fastcgi_params;
}
location ~ ^/(ping|pm_status)$ { #实现状态页
include fastcgi_params;
fastcgi_pass 127.0.0.1:9000;
fastcgi_param PATH_TRANSLATED $document_root$fastcgi_script_name;
}
}
}
[root@centos7 ~]# /apps/nginx/sbin/nginx -t
nginx: the configuration file /apps/nginx/conf/nginx.conf syntax is ok
nginx: configuration file /apps/nginx/conf/nginx.conf test is successful
[root@centos7 ~]# /apps/nginx/sbin/nginx -s reload
3.4 准备 php 测试页
[root@nginx ~]#mkdir -p /data/nginx/wordpress
[root@nginx ~]#vim /data/nginx/wordpress/test.php
<?php
phpinfo();
?>
3.5 验证 php 测试页
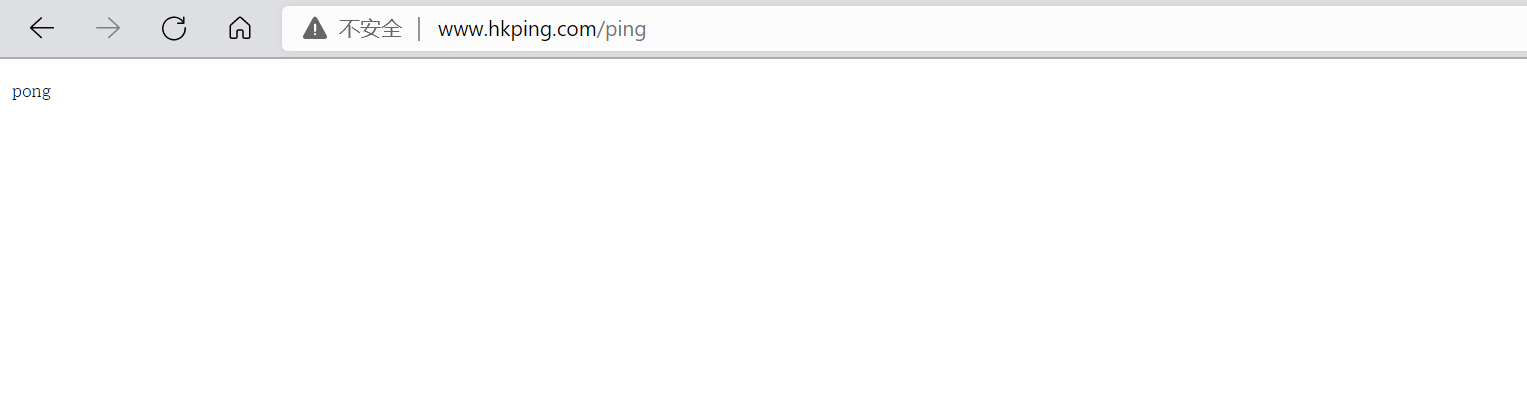
浏览器:www.magedu.org/ping
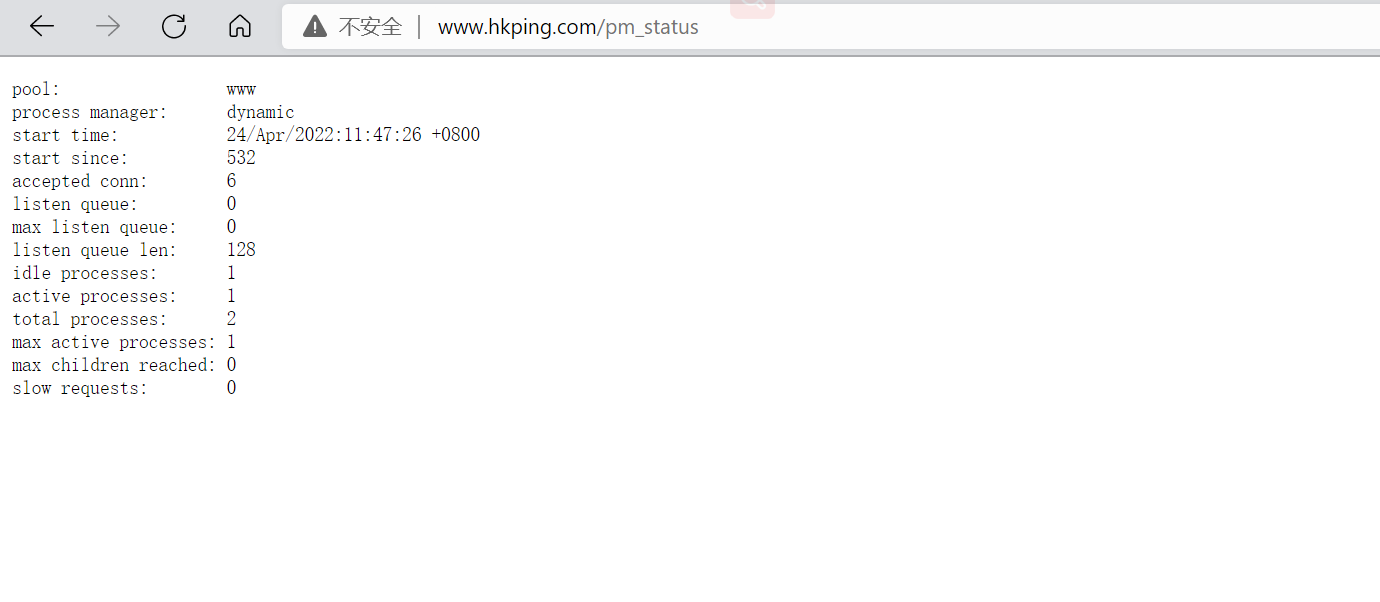
www.magedu.org/pm_status
www.magedu.org/test.php

4.部署WordPress
在10.0.0.7主机部署WordPress
4.1 准备 WordPress 文件
[root@centos7 ~]# tar xf wordpress-5.9.2-zh_CN.tar.gz
[root@centos7 ~]# cp -r wordpress/* /data/nginx/wordpress
[root@centos7 ~]# chown -R www.www /data/nginx/wordpress/
4.2 初始化web页面
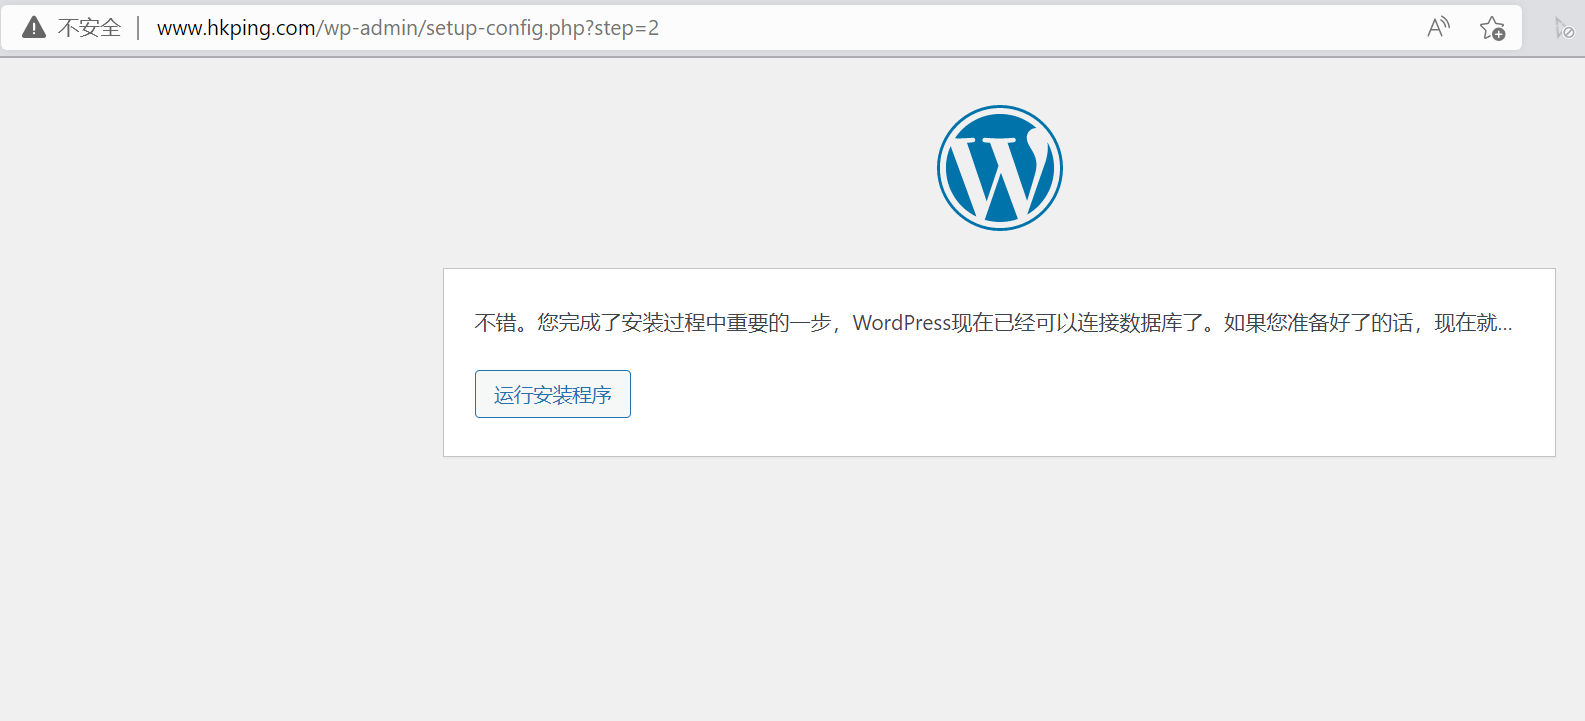
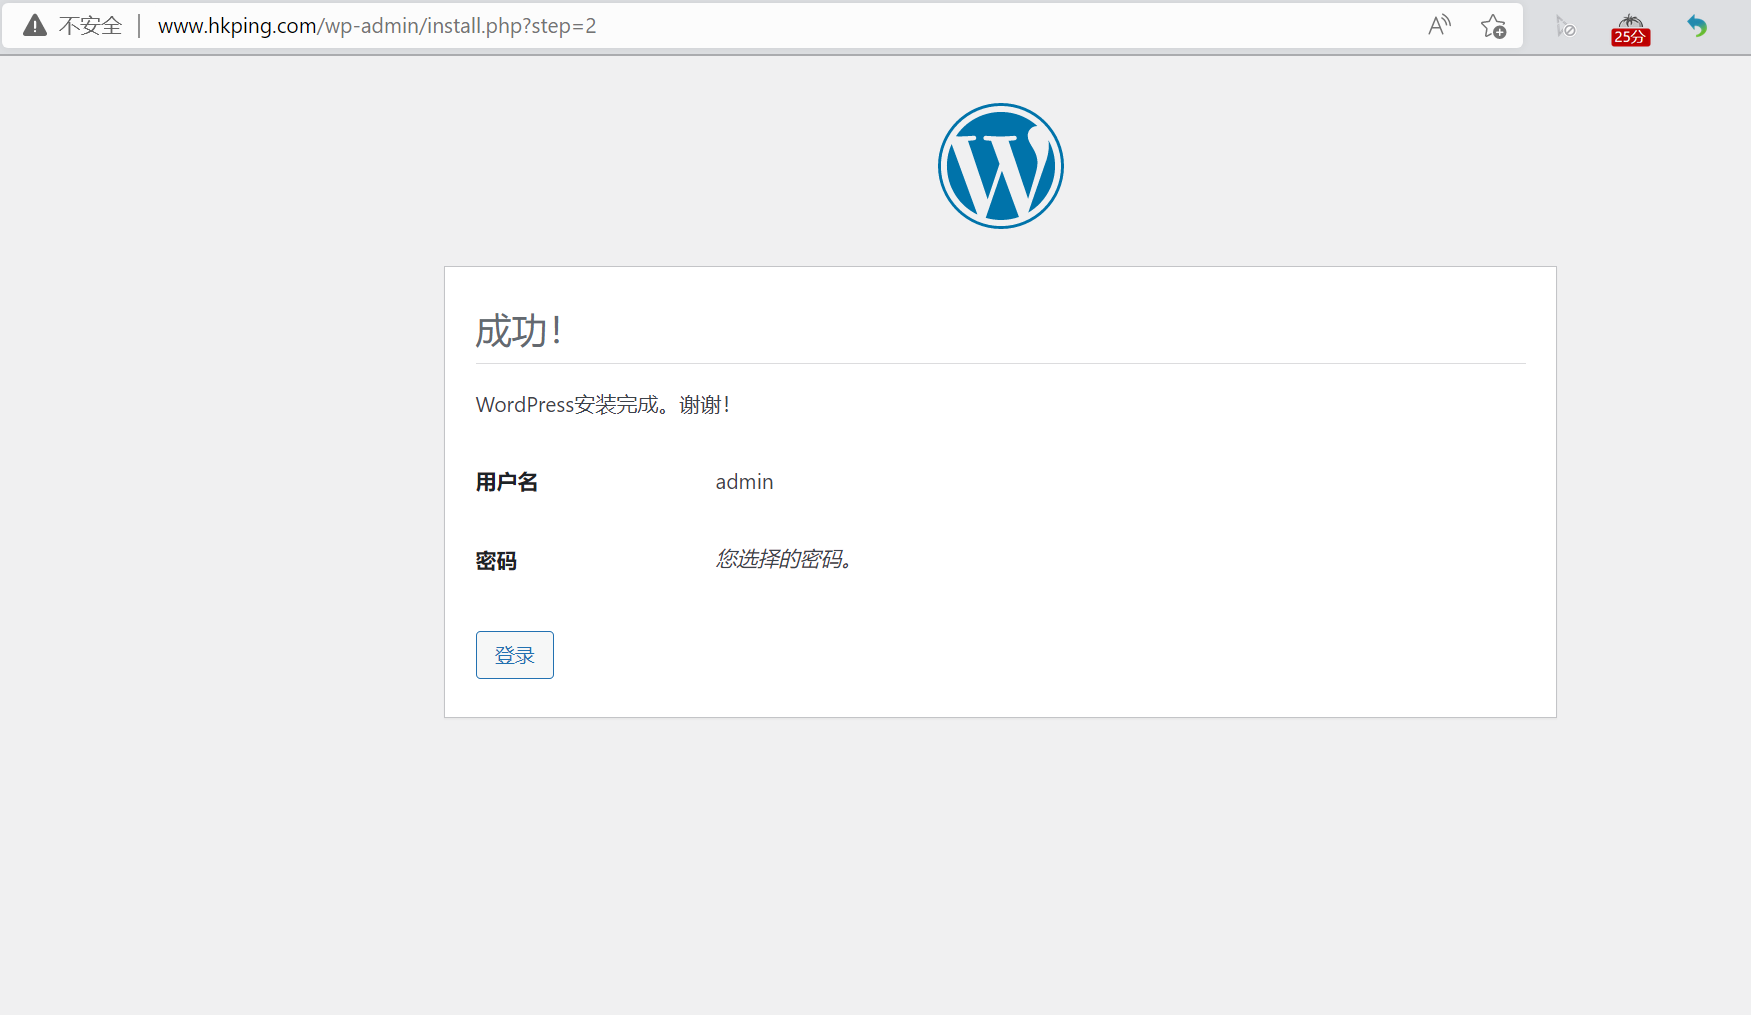
浏览器:http://www.hkping.com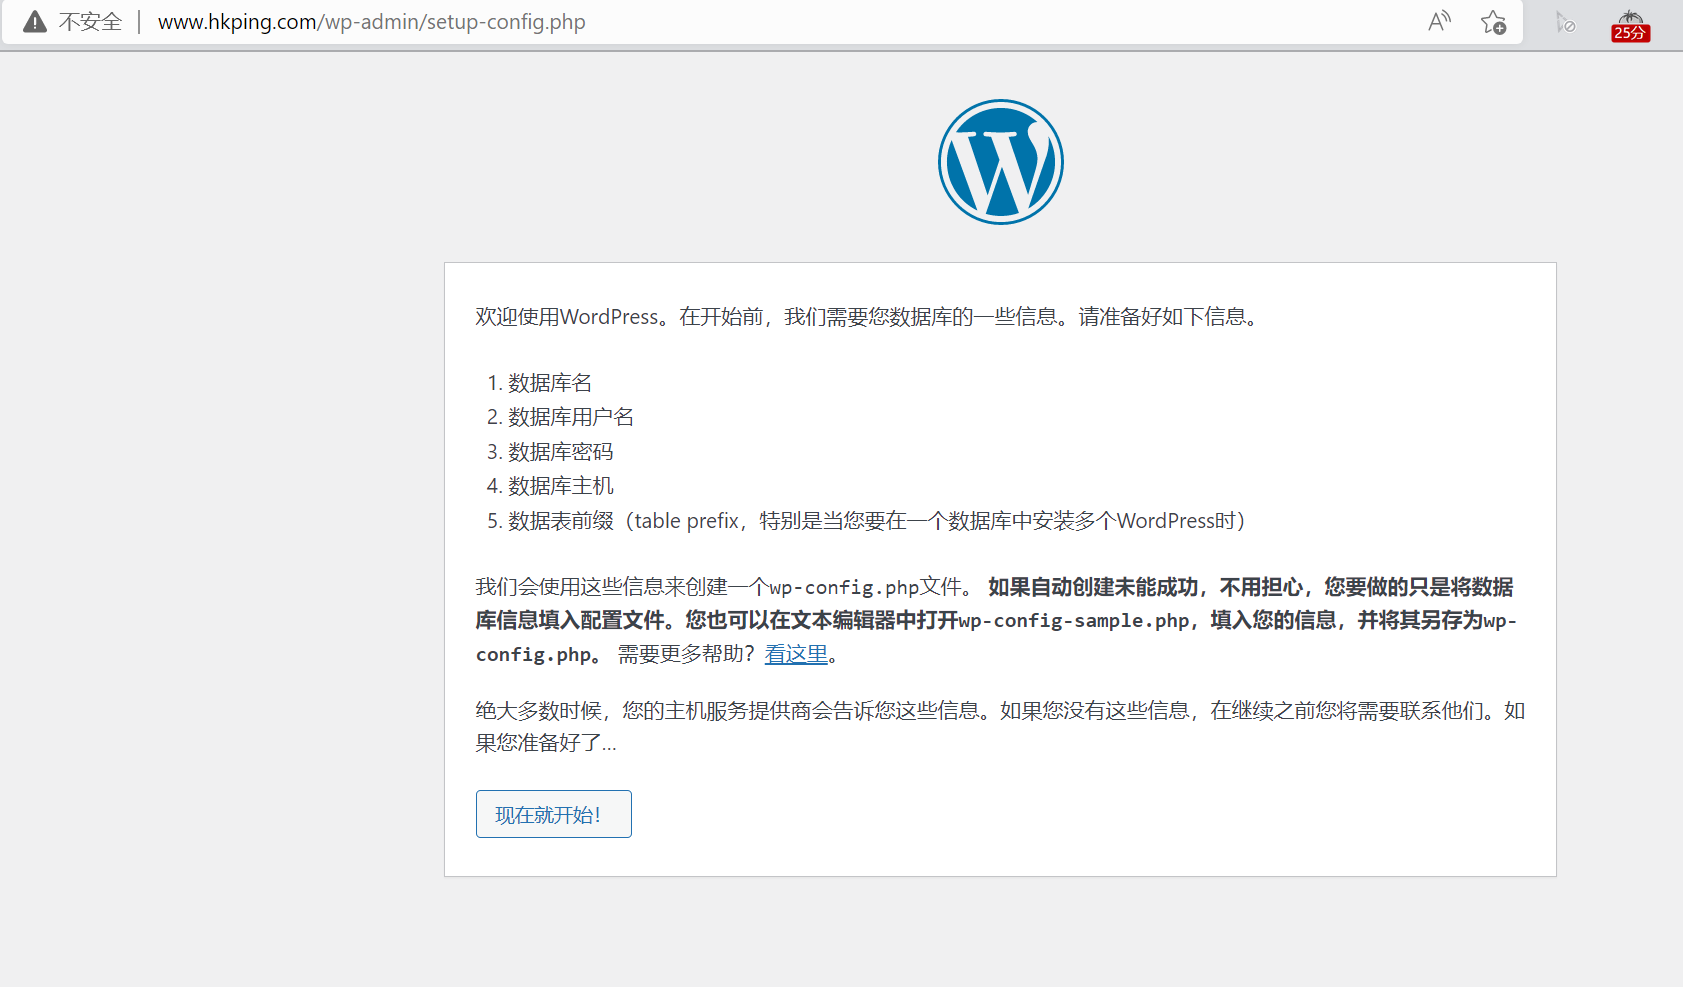


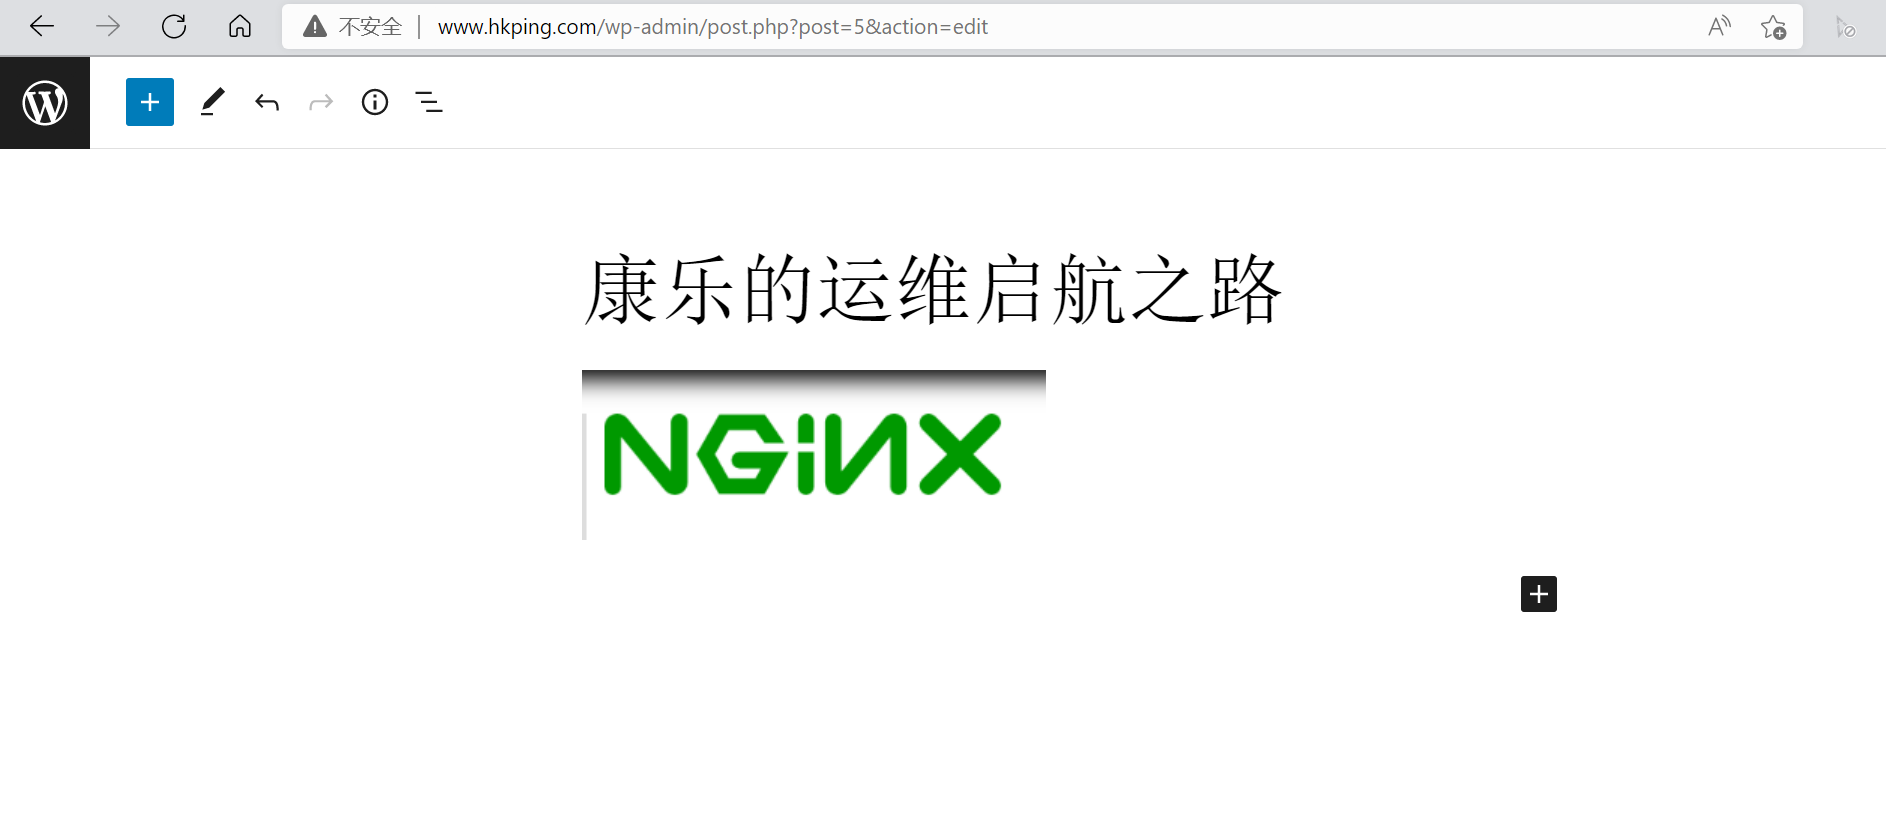
4.3 登录后台管理界面并发表文章
4.4 验证发表的文章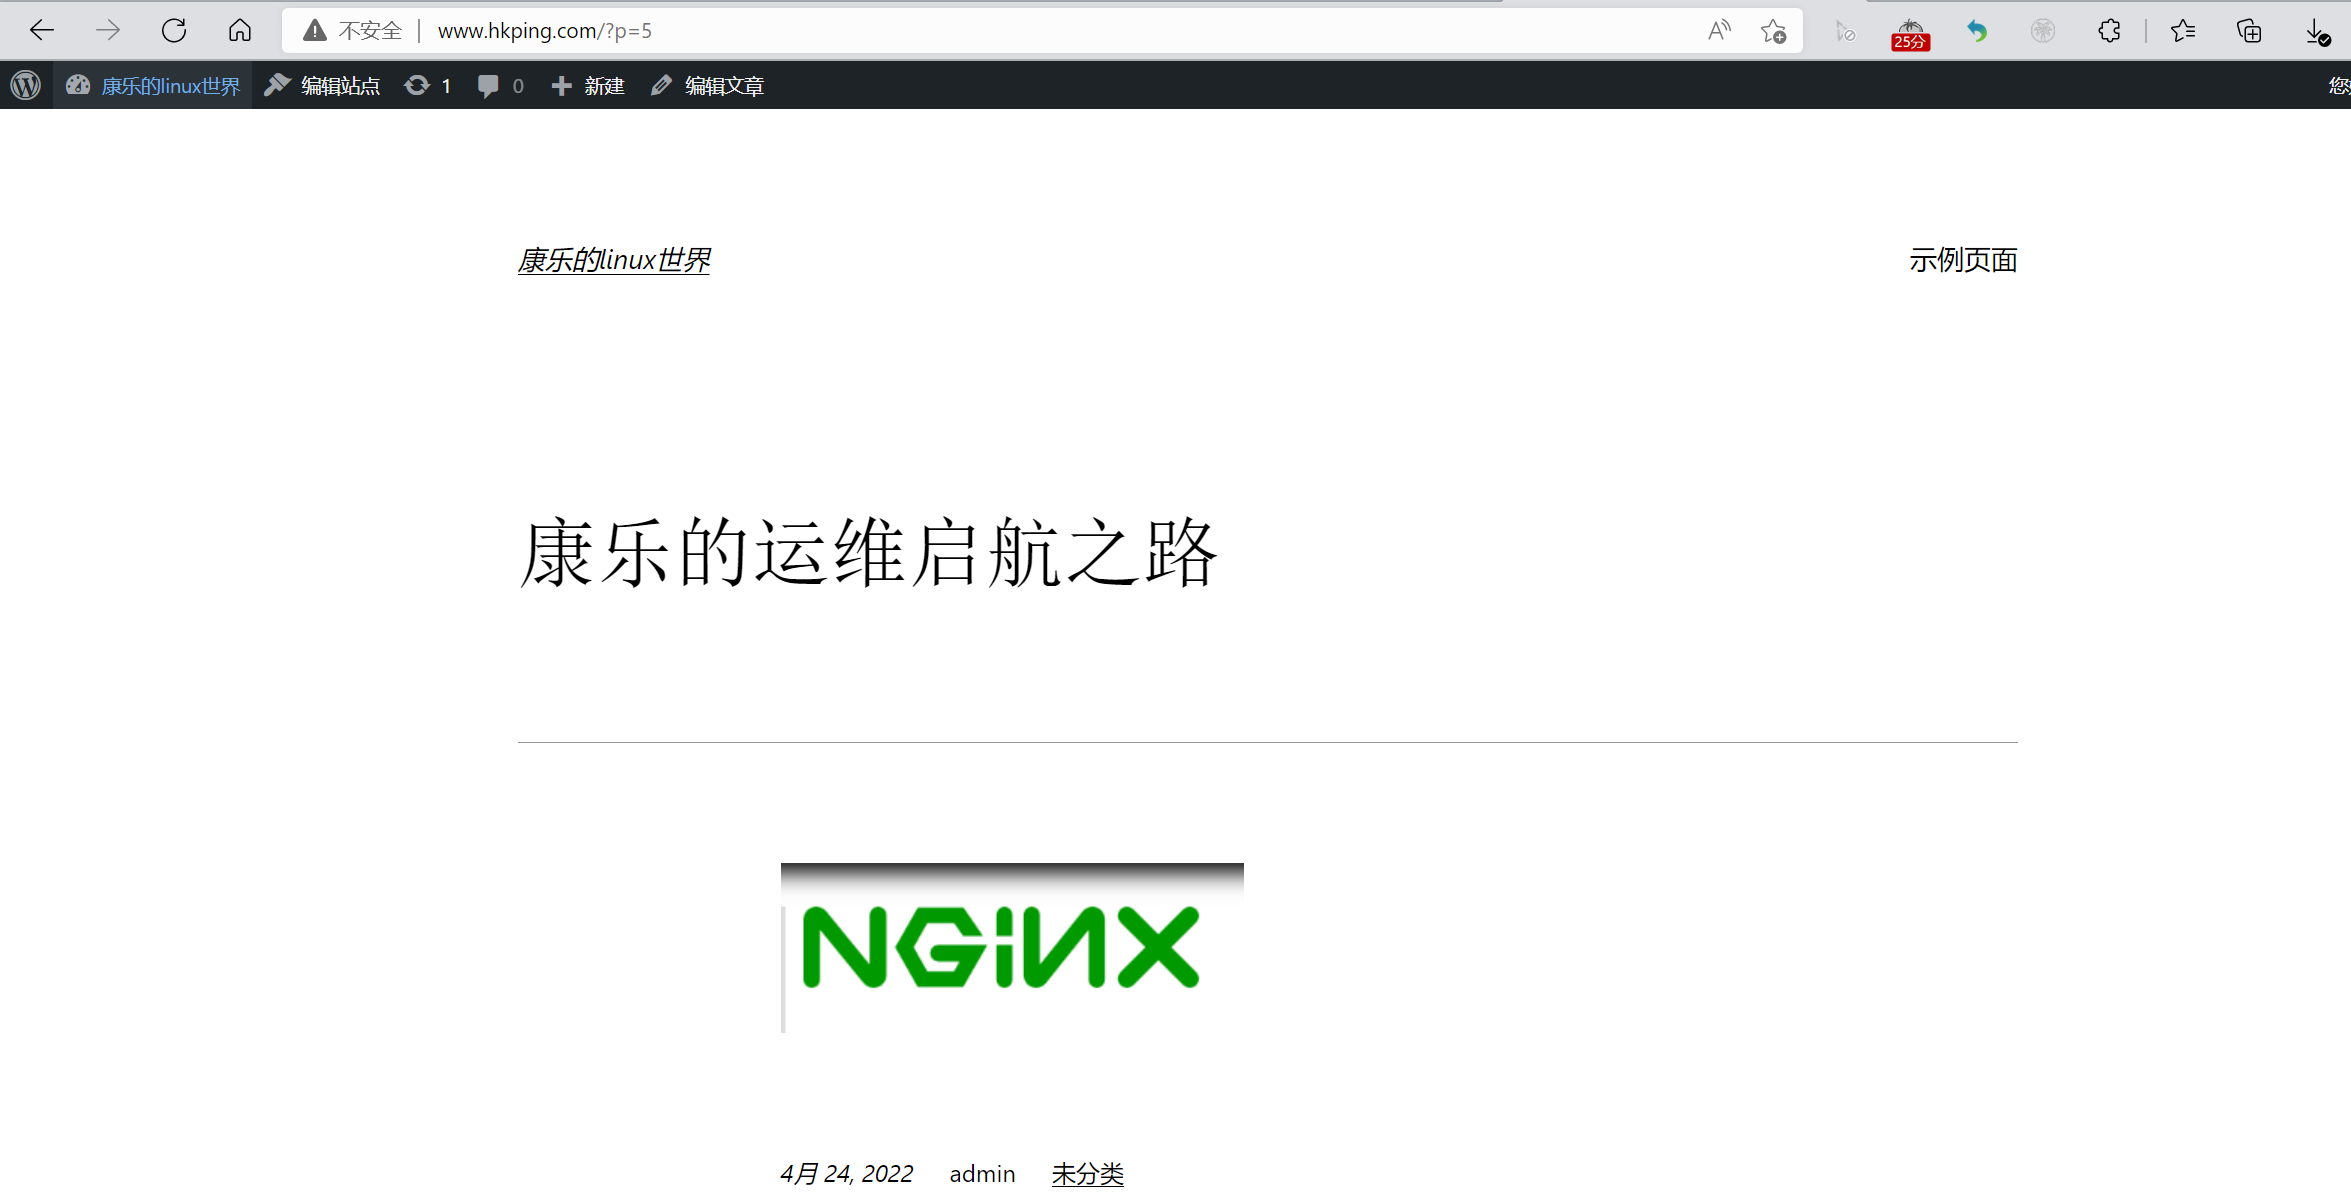
4.5 配置允许上传大文件
#注意:默认只支持1M以下文件上传,要利用php程序上传大图片,还需要修改下面三项配置,最大上传由三项值
的最小值决定
#直接上传大于1M文件,会出现下面413错误
#nginx上传文件大小限制
[root@centos7 ~]#vim /apps/nginx/conf/nginx.conf
server {
client_max_body_size 10m; #默认值为1M
.....
#php上传文件大小限制
[root@centos7 ~]#vim /etc/php.ini
post_max_size = 30M #默认值为8M
upload_max_filesize = 20M #默认值为2M
[root@centos7 ~]#systemctl restart nginx php-fpm
4.6 安全加固
[root@centos7 ~]#vim /apps/nginx/conf/nginx.conf
[root@centos7 ~]#grep -Ev '#|^$' /apps/nginx/conf/nginx.conf
worker_processes 1;
pid /apps/nginx/run/nginx.pid;
events {
worker_connections 1024;
}
http {
include mime.types;
default_type application/octet-stream;
sendfile on;
keepalive_timeout 65;
server {
listen 80;
server_name www.hkping.com;
server_tokens off; #是否在响应报文的Server首部显示nginx版本
client_max_body_size 10M;
location / {
root /data/nginx/wordpress;
index index.php index.html index.htm;
}
error_page 500 502 503 504 /50x.html;
location = /50x.html {
root html;
}
location ~ \.php$ {
root /data/nginx/wordpress;
fastcgi_pass 127.0.0.1:9000;
fastcgi_index index.php;
fastcgi_param SCRIPT_FILENAME $document_root$fastcgi_script_name;
include fastcgi_params;
fastcgi_hide_header X-Powered-By; #隐藏响应头指定信息
}
location ~ ^/(ping|pm_status)$ {
include fastcgi_params;
fastcgi_pass 127.0.0.1:9000;
fastcgi_param PATH_TRANSLATED $document_root$fastcgi_script_name;
}
}
}
[root@centos7 ~]# nginx -t
nginx: the configuration file /apps/nginx/conf/nginx.conf syntax is ok
nginx: configuration file /apps/nginx/conf/nginx.conf test is successful
[root@centos7 ~]# nginx -s reload
4.7 配置 php 开启 opcache 加速
在10.0.0.7主机进行以下修改配置
#编辑php.ini配置文件
[root@centos7 ~]#vim /etc/php.ini
[opcache]
; Determines if Zend OPCache is enabled
zend_extension=opcache.so
opcache.enable=1
.....
[root@centos7 ~]#systemctl restart php-fpm
#浏览器访问测试页确认开启opcache加速
5.PHP 扩展session模块支持redis
PECL是 PHP 扩展的存储库,提供用于下载和开发 PHP 扩展的所有已知扩展和托管功能的目录
官方链接: http://pecl.php.net/package-stats.php
github: https://github.com/phpredis/phpredis
github安装文档: https://github.com/phpredis/phpredis/blob/develop/INSTALL.markdown
开始在 PHP 中使用 Redis 前, 需要确保已经安装了 redis 服务及 PHP redis 驱动,
PHP redis 驱动下载地址为:https://github.com/phpredis/phpredis/releases
5.1 编译安装PHP redis
在10.0.0.7主机进行以下编译安装
[root@centos7 ~]#cd /usr/local/src
[root@centos7 src]#ls
[root@centos7 src]#wget http://pecl.php.net/get/redis-5.3.1.tgz
[root@centos7 src]#tar xf redis-5.3.1.tgz
[root@centos7 src]#cd redis-5.3.1/
[root@centos7 redis-5.3.1]# ls
arrays.markdown CREDITS redis_array_impl.c redis_session.c
cluster_library.c INSTALL.markdown redis_array_impl.h redis_session.h
cluster_library.h liblzf redis.c sentinel_library.c
cluster.markdown library.c redis_cluster.c sentinel_library.h
common.h library.h redis_cluster.h sentinel.markdown
config.m4 php_redis.h redis_commands.c tests
config.w32 README.markdown redis_commands.h
COPYING redis_array.c redis_sentinel.c
crc16.h redis_array.h redis_sentinel.h
#如果是yum安装php,需要执行yum -y install php-cli php-devel
#以下为编译安装php的对应方式
[root@centos7 redis-5.3.1]#/apps/php74/bin/phpize
Configuring for:
PHP Api Version: 20190902
Zend Module Api No: 20190902
Zend Extension Api No: 320190902
Cannot find autoconf. Please check your autoconf installation and the #报错提示
$PHP_AUTOCONF environment variable. Then, rerun this script.
[root@centos7 redis-5.3.1]#yum -y install autoconf
#重新执行成功
[root@centos7 redis-5.3.1]#/apps/php74/bin/phpize
Configuring for:
PHP Api Version: 20190902
Zend Module Api No: 20190902
Zend Extension Api No: 320190902
#查看生成configure脚本
[root@centos7 redis-5.3.1]#ls
arrays.markdown common.h COPYING library.h
redis_array_impl.h redis_sentinel.c sentinel_library.h
autom4te.cache config.h.in crc16.h php_redis.h redis.c
redis_sentinel.h sentinel.markdown
build config.m4 CREDITS README.markdown
redis_cluster.c redis_session.c tests
cluster_library.c configure INSTALL.markdown redis_array.c
redis_cluster.h redis_session.h
cluster_library.h configure.ac liblzf redis_array.h
redis_commands.c run-tests.php
cluster.markdown config.w32 library.c redis_array_impl.c
redis_commands.h sentinel_library.c
#yum安装php,无需指定--with-php-config
[root@centos7 redis-5.3.1]#./configure --with-php-config=/apps/php74/bin/php-config
[root@centos7 redis-5.3.1]#make -j 8 && make install
.....
See any operating system documentation about shared libraries for
more information, such as the ld(1) and ld.so(8) manual pages.
----------------------------------------------------------------------
Build complete.
Don't forget to run 'make test'.
Installing shared extensions: /apps/php74/lib/php/extensions/no-debug-zts-20190902/
#验证redis模块
#yum安装php,模块文件默认存放在 /usr/lib64/php/modules/redis.so
[root@centos7 redis-5.3.1]#ll /apps/php74/lib/php/extensions/no-debug-zts-20190902/
total 9584
-rwxr-xr-x 1 root root 4647668 Oct 22 10:44 opcache.a
-rwxr-xr-x 1 root root 2509416 Oct 22 10:44 opcache.so
-rwxr-xr-x 1 root root 2651320 Oct 22 12:10 redis.so
5.2 编辑php配置文件支持redis
#编辑php.ini配置文件,扩展redis.so模块
[root@centos7 ~]#vim /etc/php.ini
.....
#extension=/apps/php74/lib/php/extensions/no-debug-zts-20190902/redis.so
extension=redis.so #文件最后一行添加此行,路径可省略
[root@centos7 ~]#systemctl restart php-fpm
5.3 验证加载 redis 模块
#访问测试页确认redis模块开启
浏览器访问:http://www.hkping.com/test.php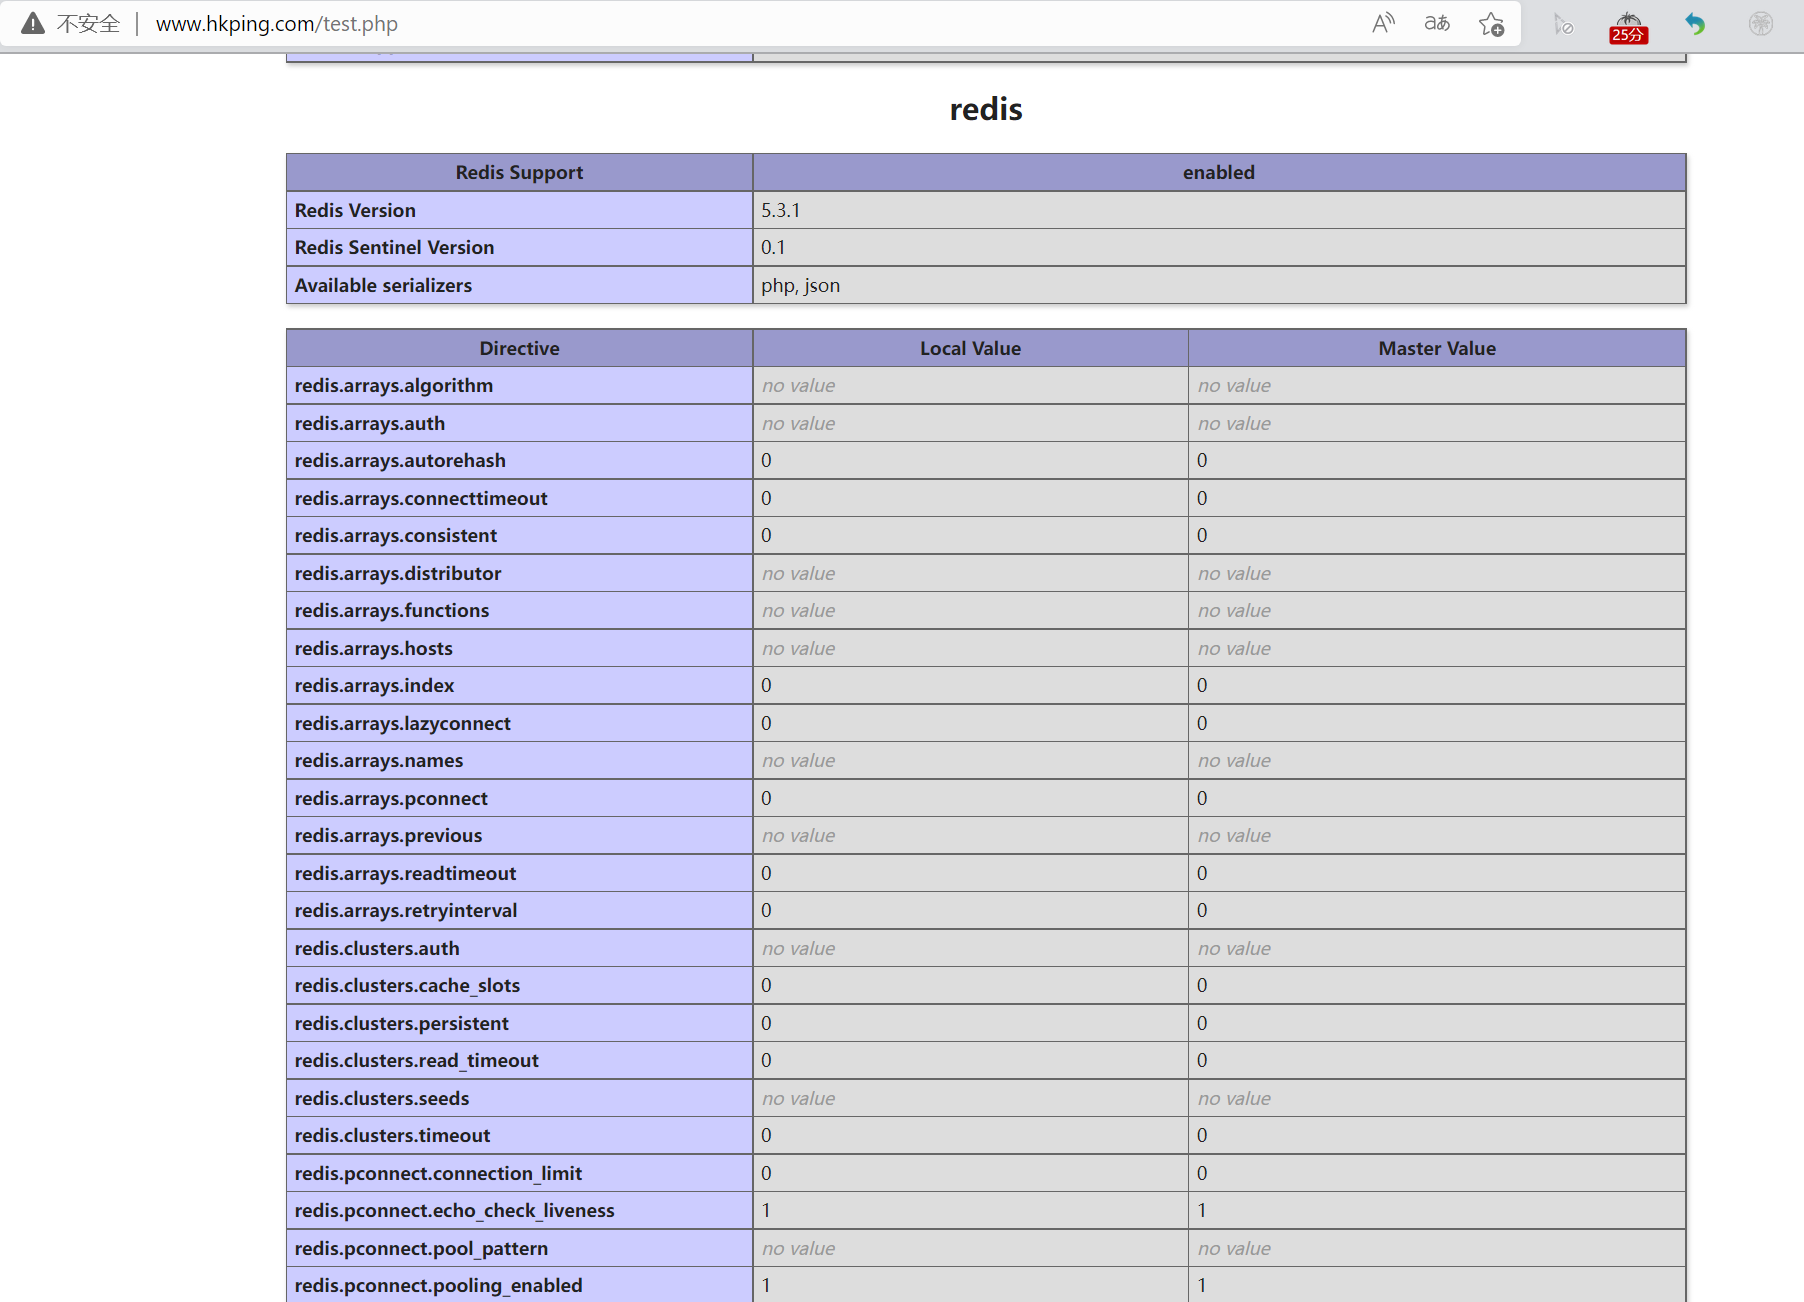
9.5.4 安装和配置 redis 服务
在10.0.0.17主机进行安装redis 服务
#在10.0.0.17主机安装redis服务
[root@centos7 ~]#yum install epel-release
[root@centos7 ~]#yum -y install redis
[root@centos7 ~]#vim /etc/redis.conf
bind 0.0.0.0
requirepass 123456
[root@centos7 ~]#systemctl enable --now redis
[root@centos7 ~]#ss -tnl
State Recv-Q Send-Q Local Address:Port
Peer Address:Port
LISTEN 0 128 *:22
*:*
LISTEN 0 100 127.0.0.1:25
*:*
LISTEN 0 128 *:6379
*:*
LISTEN 0 128 [::]:22
[::]:*
LISTEN 0 100 [::1]:25
[::]:*
LISTEN 0 70 [::]:33060
[::]:*
LISTEN 0 128 [::]:3306
[::]:*
5.5 配置 php 支持 redis 保存 session
在10.0.0.7 主机进行以下配置
#在10.0.0.7主机配置php的session保存在redis服务
[root@centos7 ~]#vim /etc/php.ini
[Session]
; Handler used to store/retrieve data.
; http://php.net/session.save-handler
session.save_handler = redis
session.save_path = "tcp://10.0.0.17:6379?auth=123456"
[root@centos7 ~]#systemctl restart php-fpm
9.5.6 准备 php实现 session 的测试页面
在10.0.0.7主机进行准备相关文件
[root@centos7 ~]#cat /data/nginx/wordpress/session.php
<?php
session_start();
//redis用session_id作为key 并且是以string的形式存储
$redisKey = 'PHPREDIS_SESSION:' . session_id();
// SESSION 赋值测试
$_SESSION['message'] = "Hello, I'm in redis";
$_SESSION['arr'] = [1, 2, 3, 4, 5, 6];
echo $_SESSION["message"] , "<br/>";
echo "Redis key = " . $redisKey . "<br/>";
echo "以下是从Redis获取的数据", "<br/>";
// 取数据'
$redis = new Redis();
$redis->connect('10.0.0.17', 6379);
$redis->auth('123456');
echo $redis->get($redisKey);
?>
5.7 访问 web 页面测试实现session保存在redis服务
浏览器访问:http://www.hkping.com/session.php
5.8 redis 主机验证 session 数据
在10.0.0.17主机进行验证
[root@centos7 ~]# redis-cli -h 10.0.0.17 -a 123456
10.0.0.17:6379> keys *
1) "PHPREDIS_SESSION:7gul0mrne9gk41fjbdqggja86q"
10.0.0.17:6379> get PHPREDIS_SESSION:7gul0mrne9gk41fjbdqggja86q
"message|s:19:\"Hello, I'm in redis\";arr|a:6:{i:0;i:1;i:1;i:2;i:2;i:3;i:3;i:4;i:4;i:5;i:5;i:6;}"

 浙公网安备 33010602011771号