1、私有registry
1.1、 启动registry
#启动远程docker容器
docker run -d -p 5000:5000 --restart=always --name registry -v /opt/registry:/var/lib/registry  registry

#查看仓库
http://106.15.206.243:5000/v2/_catalog
1.2、修改本地配置文件
cat >/etc/docker/daemon.json<<-EOF
{
  "registry-mirrors": ["https://68rmyzg7.mirror.aliyuncs.com"],
   "insecure-registries": ["106.15.206.243:5000"]
}
EOF
systemctl  restart docker
1.3、作本地镜像并push
docker tag hello-world 106.15.206.243:5000/test/hello-world:v1
docker images
docker push 106.15.206.243:5000/test/hello-world:v1

#查看仓库
http://106.15.206.243:5000/v2/_catalog
![]()
1.4、加密仓库
#生成密码
mkdir /opt/registry-auth/ -p
docker run \
  --entrypoint htpasswd \
  --rm \
  httpd:2 -Bbn testuser testpassword > /opt/registry-auth/htpasswd

#启动带有秘钥功能的registry容器
docker run -d \
  -p 5000:5000 \
  --restart=always \
  --name registry \
  -v /opt/registry-auth/:/auth \
  -v /opt/registry:/var/lib/registry  \
  -e "REGISTRY_AUTH=htpasswd" \
  -e "REGISTRY_AUTH_HTPASSWD_REALM=Registry Realm" \
  -e REGISTRY_AUTH_HTPASSWD_PATH=/auth/htpasswd \
  registry:2
1.5、push镜像,需要进行login
docker tag hello-world 106.15.206.243:5000/test/hello-world:v1

#没有登录时,推送会失败
[root@docker ~]# docker push 106.15.206.243:5000/test/hello-world:v1
The push refers to repository [106.15.206.243:5000/test/hello-world]
9c27e219663c: Preparing
no basic auth credentials

#登录
[root@docker ~]# docker login 106.15.206.243:5000
Username: testuser
Password:
2、容器退出解决办法
#方法一:--restart选项
docker run  --restart=always

#方法二:"live-restore": true
修改配置文件
vim /etc/docker/daemon.json
{
 "live-restore": true
}
3、habor实现图形化register
3.1、安装
#安装:
第一步:安装docker和docker-compose
yum install -y docker-compose

#下载文件
https://github.com/vmware/harbor/releases
wget https://github.com/vmware/harbor/releases/download/v1.2.0/harbor-offline-installer-v1.2.0.tgz

#解压
tar -xf harbor-offline-installer-v1.2.0.tgz -C                              /opt

#修改harbor.cfg配置文件

hostname = 106.15.206.243
harbor_admin_password = 123456

#安装
./install.sh
3.2、节点配置
cat >/etc/docker/daemon.json<<-EOF
{
  "registry-mirrors": ["https://68rmyzg7.mirror.aliyuncs.com"],
  "insecure-registries": ["106.15.206.243:5000","106.15.206.243"]
}
EOF
systemctl  restart docker
3.3、web界面
http://106.15.206.243/harbor/sign-in
![]()
3.3、habor上传下载镜像
# push habor中的镜像
docker pull hello-world
docker tag hello-world 106.15.206.243/test/hello-world:v1
docker login 106.15.206.243
docker push 106.15.206.243/test/hello-world:v1

#pull habor中的镜像
docker pull 106.15.206.243/test/hello-world:v1
4、网络
4.1、本地网络类型
#查看支持网络类型
docker network ls
435a6b92dcea   bridge    bridge    local #默认
8bbb192d74b9   host      host      local
0f79b42bd632   none      null      local

#测试使用各类网络类型
none   :    无网络模式
bridge : 默认模式,相当于NAT
host   :   共用宿主机Network NameSapce
container:与其他容器公用Network Namespace #集群中使用

#使用
docker run -it --network host centos:6.9
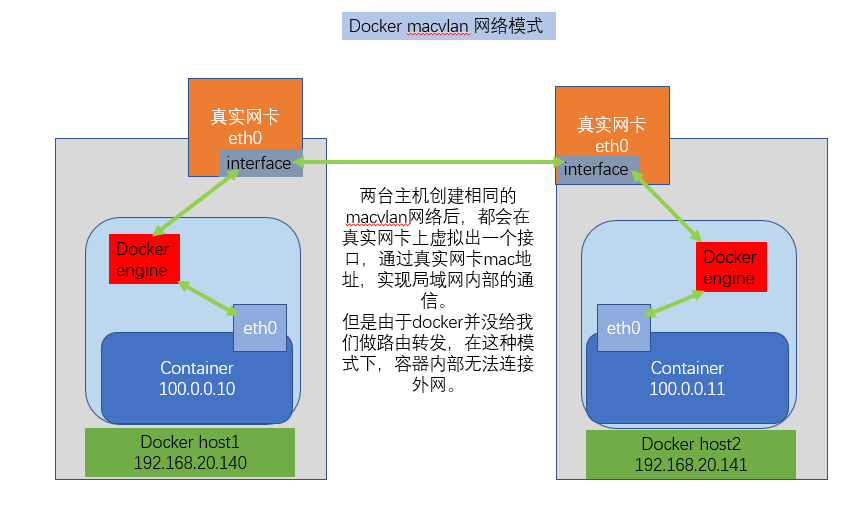
4.2、macvlan
4.2.1、macvlan介绍
macvlan 本身是 linxu kernel 模块,其功能是允许在同一个物理网卡上配置多个 MAC 地址,即多个interface,每个 interface 可以配置自己的 IP。macvlan 本质上是一种网卡虚拟化技术。
macvlan 的最大优点是性能极好,相比其他实现,macvlan 不需要创建 Linux bridge,而是直接通过以太 	  interface 连接到物理网络。
4.2.2、原理图(个人理解,仅供参考)
![]()
4.2.3、macvlan实现
#192.168.20.140
docker network create --driver macvlan --subnet=100.0.0.0/24 --gateway=100.0.0.2 -o parent=eth0 macvlan_1
docker run -it --network macvlan_1 --ip=100.0.0.10 centos:6.9 /bin/bash

[root@cf2f20acff8f /]# ifconfig
eth0      Link encap:Ethernet  HWaddr 02:42:64:00:00:0A
          inet addr:100.0.0.10  Bcast:100.0.0.255  Mask:255.255.255.0

#192.168.20.141
docker network create --driver macvlan --subnet=100.0.0.0/24 --gateway=100.0.0.2 -o parent=eth0 macvlan_1
docker run -it --network macvlan_1 --ip=100.0.0.11 centos:6.9 /bin/bash

[root@9113af909ec2 /]# ifconfig
eth0      Link encap:Ethernet  HWaddr 02:42:64:00:00:0B
          inet addr:100.0.0.11  Bcast:100.0.0.255  Mask:255.255.255.0
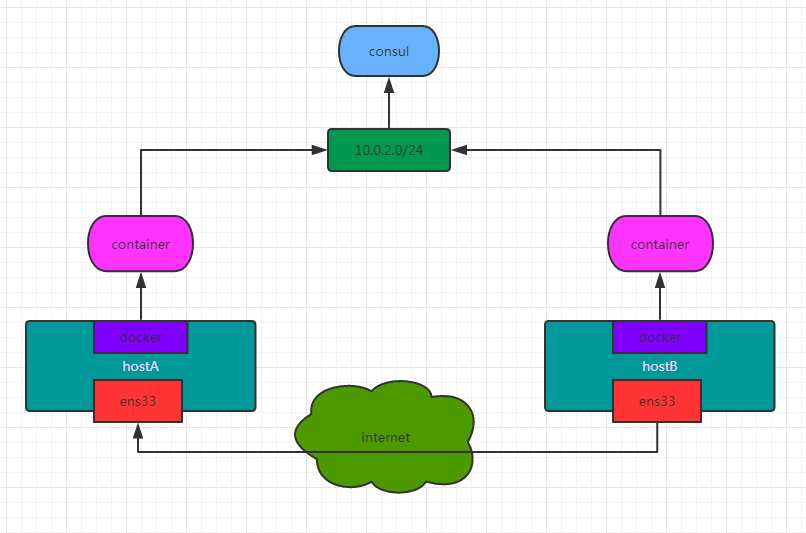
4.3、overlay
4.3.1、介绍
overlay它会虚拟出一个网络比如10.0.2.3这个ip地址。在这个overlay网络模式里面,有一个类似于服务网关的地址,然后把这个包转发到物理服务器这个地址,最终通过路由和交换,到达另一个服务器的ip地址。
要实现overlay网络,我们会有一个服务发现。比如说consul,会定义一个ip地址池,比如10.0.2.0/24之类的。我们通过配置docker,让其被consul发现。创建容器时,由docker与地址池通信,获取一个ip,交给容器。获取完了后,会通过ens33来进行通信,这样就实现跨主机的通信。
4.3.2、原理图
参考:http://www.dockone.io/article/2717
![]()
4.3.3、overlay实现
#启动 consul 服务,实现网络的统一配置管理
[root@client1 ~]# docker run -d -p 8400:8400 -p 8500:8500 -p 8600:53/udp -h consul progrium/consul -server -bootstrap -ui-dir /ui

#节点主机配置
[root@client1 ~]# vim /lib/systemd/system/docker.service
ExecStart=/usr/bin/dockerd -H tcp://0.0.0.0:2376 -H unix:///var/run/docker.sock --cluster-store=consul://106.15.206.243:8500 --cluster-advertise=192.168.20.140:2376 --insecure-registry=0.0.0.0/0

[root@client2~]# vim /lib/systemd/system/docker.service
ExecStart=/usr/bin/dockerd -H tcp://0.0.0.0:2376 -H unix:///var/run/docker.sock --cluster-store=consul://106.15.206.243:8500 --cluster-advertise=192.168.20.141:2376 --insecure-registry=0.0.0.0/0

#重启服务
systemctl daemon-reload
systemctl restart docker

#创建overlay网络:这是一个全局性的网络类型,创建一次即可
docker network create -d overlay --subnet 10.0.2.1/24 --gateway 10.0.2.2 overlay-net

[root@docker ~]# docker network ls
NETWORK ID     NAME          DRIVER    SCOPE
721d385e7994   bridge        bridge    local
68d85fca725c   host          host      local
9e0b5a787b20   macvlan_1     macvlan   local
e54177a84140   none          null      local
ed9150d52aa2   overlay-net   overlay   global

#启动容器测试
docker run -it --name bb1 --network overlay-net  busybox /bin/sh
docker run -it --name bb2 --network overlay-net  busybox /bin/sh
每个容器有两块网卡,eth0实现容器间的通讯,eth1实现容器访问外网


 浙公网安备 33010602011771号