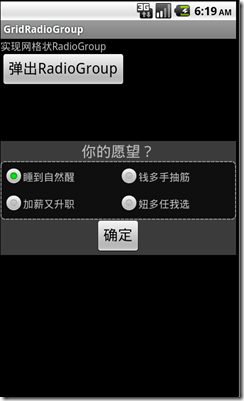
Android系统自带的RadioGroup只有两种排列方式:横向或纵向。 但是现实中可能需要将RadioGroup按网格状排列, 如何实现?
本文将介绍实现方法。
先看效果图:
思路:
1. 创建一个PopupWindow的弹出窗口
2. 在PopupWindow中填充一个GridView
3. 在GridView内填充多个由img和text组合而成的、外形类似于RadioButton的组合View视图
4. 当选项有改变的饿时候,更新GridView内的视图。
实现过程:
1. 创建由Img和Text组合而成的、外形类似于RadioButton的组合View视图(下面简称URadioButton)
先看URadioButton的布局,左图标右文字:只需要把图片或文字填充到<ImageView>或<TextView>中就可以实现内容不同的URadioButton。
item_radiobutton.xml:
<?xml version="1.0" encoding="utf-8"?>
<RelativeLayout xmlns:android="http://schemas.android.com/apk/res/android"
    android:id="@+id/item_radiobutton"
    android:orientation="horizontal"
    android:layout_width="fill_parent"
    android:layout_height="fill_parent"
    >
  <ImageView android:id="@+id/item_radioimg"
    android:layout_width="wrap_content"
    android:layout_height="wrap_content"
    android:layout_centerVertical="true"
    />
  <TextView
    android:layout_toRightOf="@+id/item_radioimg"
      android:id="@+id/item_radiotext"
    android:layout_width="wrap_content"
    android:layout_height="wrap_content"
    android:layout_centerVertical="true"
    />
</RelativeLayout>
我们的目标是把多个这个的URadioButton填充到GridView中,然而从GridView的填充函数:
GridView.setAdapter(ListAdapter adapter)
中,可以看出需要将一个Adapter填充到GridView中。那么先编写一个方法:该方法能够生成由多URadioButton组成的Adapter。
/*
 * 创建包含多个radiobutton的Adapter。
 * RadioButton的图片有redioImg指定,RadioButton的文字由radioNameArray指定
 * RadioButton的图片和文字的相对位置在item_radiobutton.xml布局文件中指定。
 */
private SimpleAdapter getRadioButtonAdapter(int redioImage, String[] radioNameArray) {
    ArrayList<HashMap<String, Object>> data = new ArrayList<HashMap<String, Object>>();
    for (int i = 0; i < radioNameArray.length; i++) {
        HashMap<String, Object> map = new HashMap<String, Object>();
        map.put("itemRadioImg", redioImage);
        map.put("itemRadioText", radioNameArray[i]);
        data.add(map);
    }
    SimpleAdapter simperAdapter = new SimpleAdapter(this, data,
            R.layout.item_radiobutton, new String[] { "itemRadioImg", "itemRadioText" },
            new int[] { R.id.item_radioimg, R.id.item_radiotext });
    return simperAdapter;
}
下面的代码为:调用上面定义的getRadioButtonAdapter方法生成我们所需要Adapter:
private SimpleAdapter mWishesAdapter;
private String[] mWishes = {"睡到自然醒", "钱多手抽筋", "加薪又升职", "妞多任我选"};
...
...
mWishesAdapter = getRadioButtonAdapter(R.drawable.btn_radio_off, mWishes);
其中R.drawable.btn_radio_off图标为:
2. 在GridView中填充URadioButtons
这里就直接贴代码了:
mWishesAdapter = getRadioButtonAdapter(R.drawable.btn_radio_off, mWishes);
LayoutInflater mLayoutInflater = (LayoutInflater) getSystemService(LAYOUT_INFLATER_SERVICE);
mViewGroup = (ViewGroup) mLayoutInflater.inflate(R.layout.radiogroup_gridview, null, true);
mGrid = (GridView)mViewGroup.findViewById(R.id.gridview);
mGrid.setAdapter(mWishesAdapter);
mGrid.requestFocus();
mGrid.setOnItemClickListener( new OnItemClickListener() {
    @Override
    public void onItemClick(AdapterView<?> arg0, View arg1, int arg2,long arg3) {
        if(mLastItme != arg2){
            //更新图标、实现单选
            if(mLastItme>=0){
                ChangeRadioImg(mWishesAdapter, mLastItme,false);
            }
            mLastItme = arg2;
            ChangeRadioImg(mWishesAdapter,arg2,true);
        }
    }
});
为了实现单选,所以每当选择了新选项的时候,就将以前的选中的选项的图标改为:off, 本次选中的选型的图标改为On,而实现这个功能的方法为:
ChangeRadioImg():
/*
 * 根据选中的状态来更新图标。也就是实现我们自定义RadioGroup的单选功能
 */
private void ChangeRadioImg(SimpleAdapter adapter,int selectedItem, boolean on) {
    HashMap<String, Object> map = (HashMap<String, Object>)adapter.getItem(selectedItem);
    if(on)
        map.put("itemRadioImg", R.drawable.btn_radio_on);
    else
        map.put("itemRadioImg", R.drawable.btn_radio_off);
    adapter.notifyDataSetChanged();

}
经过上面得两个步骤,我们已经构造了网格状的RadioGroup,下面我们将通过一个PopupWindow将其显示出来。
//注意,PopupWindow的第一个参数必须是没有父亲的view对象即顶层View。
mPopGridRadioGroup = new PopupWindow(mViewGroup, LayoutParams.FILL_PARENT, LayoutParams.WRAP_CONTENT,true);
mPopGridRadioGroup.setBackgroundDrawable(new BitmapDrawable());
mPopGridRadioGroup.setTouchInterceptor(new OnTouchListener() {
    public boolean onTouch(View v, MotionEvent event) {
        if (event.getAction() == MotionEvent.ACTION_OUTSIDE) {
            mPopGridRadioGroup.dismiss();
            return true;
        }
        return false;
    }
});

mPopGridRadioGroup.showAtLocation(findViewById(R.id.mainView), Gravity.CENTER, 0, 0);
mPopGridRadioGroup.update();
package com.cnblogs.hibraincol;

import java.util.ArrayList;
import java.util.HashMap;
import android.app.Activity;
import android.os.Bundle;
import android.widget.GridView;
import android.widget.PopupWindow;
import android.view.LayoutInflater;
import android.view.MotionEvent;
import android.view.ViewGroup;
import android.view.ViewGroup.LayoutParams;
import android.widget.Button;
import android.view.View;
import android.widget.SimpleAdapter;
import android.widget.AdapterView;
import android.widget.AdapterView.OnItemClickListener;
import android.graphics.drawable.BitmapDrawable;
import android.view.View.OnTouchListener;
import android.view.Gravity;

public class GridRadioGroup extends Activity {
    private PopupWindow mPopGridRadioGroup=null;
    private ViewGroup mViewGroup=null;
    private GridView mGrid=null;
    private SimpleAdapter mWishesAdapter;
    private int mLastItme=-1;
    private String[] mWishes = {"睡到自然醒", "钱多手抽筋", "加薪又升职", "妞多任我选"};

    /** Called when the activity is first created. */
    @Override
    public void onCreate(Bundle savedInstanceState) {
        super.onCreate(savedInstanceState);
        setContentView(R.layout.main);
        Button btnPop= (Button)findViewById(R.id.btn_pop);
        btnPop.setOnClickListener(new Button.OnClickListener(){
            public void onClick(View v){
                popGridRadioGroup();
            }
        });
    }

    private void popGridRadioGroup(){
        if(mPopGridRadioGroup==null){
            LayoutInflater mLayoutInflater = (LayoutInflater) getSystemService(LAYOUT_INFLATER_SERVICE);
            mWishesAdapter = getRadioButtonAdapter(R.drawable.btn_radio_off, mWishes);
            mViewGroup = (ViewGroup) mLayoutInflater.inflate(R.layout.radiogroup_gridview, null, true);
            mGrid = (GridView)mViewGroup.findViewById(R.id.gridview);
            mGrid.setAdapter(mWishesAdapter);
            mGrid.requestFocus();
            mGrid.setOnItemClickListener( new OnItemClickListener() {
                @Override
                public void onItemClick(AdapterView<?> arg0, View arg1, int arg2,long arg3) {
                    if(mLastItme != arg2){
                        //更新图标、实现单选
                        if(mLastItme>=0){
                            ChangeRadioImg(mWishesAdapter, mLastItme,false);
                        }
                        mLastItme = arg2;
                        ChangeRadioImg(mWishesAdapter,arg2,true);
                    }
                }
            });
            //注意,PopupWindow的第一个参数必须是没有父亲的view对象即顶层View。
            mPopGridRadioGroup = new PopupWindow(mViewGroup, LayoutParams.FILL_PARENT, LayoutParams.WRAP_CONTENT,true);
            mPopGridRadioGroup.setBackgroundDrawable(new BitmapDrawable());
            mPopGridRadioGroup.setTouchInterceptor(new OnTouchListener() {
                public boolean onTouch(View v, MotionEvent event) {
                    if (event.getAction() == MotionEvent.ACTION_OUTSIDE) {
                        mPopGridRadioGroup.dismiss();
                        return true;
                    }
                    return false;
                }
            });
        }
        mPopGridRadioGroup.showAtLocation(findViewById(R.id.mainView), Gravity.CENTER, 0, 0);
        mPopGridRadioGroup.update();
    }

    /*
     * 创建包含多个radiobutton的Adapter。
     * RadioButton的图片有redioImg指定,RadioButton的文字由radioNameArray指定
     * RadioButton的图片和文字的相对位置在item_radiobutton.xml布局文件中指定。
     */
    private SimpleAdapter getRadioButtonAdapter(int redioImage, String[] radioNameArray) {
        ArrayList<HashMap<String, Object>> data = new ArrayList<HashMap<String, Object>>();
        for (int i = 0; i < radioNameArray.length; i++) {
            HashMap<String, Object> map = new HashMap<String, Object>();
            map.put("itemRadioImg", redioImage);
            map.put("itemRadioText", radioNameArray[i]);
            data.add(map);
        }
        SimpleAdapter simperAdapter = new SimpleAdapter(this, data,
                R.layout.item_radiobutton, new String[] { "itemRadioImg", "itemRadioText" },
                new int[] { R.id.item_radioimg, R.id.item_radiotext });
        return simperAdapter;
    }

    /*
     * 根据选中的状态来更新图标。也就是实现我们自定义RadioGroup的单选功能
     */
    private void ChangeRadioImg(SimpleAdapter adapter,int selectedItem, boolean on) {
        HashMap<String, Object> map = (HashMap<String, Object>)adapter.getItem(selectedItem);
        if(on)
            map.put("itemRadioImg", R.drawable.btn_radio_on);
        else
            map.put("itemRadioImg", R.drawable.btn_radio_off);
        adapter.notifyDataSetChanged();

    }
}
布局文件除开第一步(创建由Img和Text组合而成的、外形类似于RadioButton的组合View视图)已经贴出的item_radiobutton.xml,还有:
main.xml:
<?xml version="1.0" encoding="utf-8"?>
<LinearLayout xmlns:android="http://schemas.android.com/apk/res/android"
    android:orientation="vertical"
    android:layout_width="fill_parent"
    android:layout_height="fill_parent"
    android:id="@+id/mainView"
    >
    <TextView
        android:layout_width="fill_parent"
        android:layout_height="wrap_content"
        android:text="@string/hello"
        />
    <Button
        android:id="@+id/btn_pop"
        android:layout_width="wrap_content"
        android:layout_height="wrap_content"
        android:gravity="center_horizontal"
        android:textSize="20sp"
        android:layout_alignParentBottom="true"
        android:layout_centerHorizontal="true"
        android:text="@string/popRadioGroup" />
</LinearLayout>
radiogroup_gridview.xml:
<?xml version="1.0" encoding="utf-8"?>
<LinearLayout xmlns:android="http://schemas.android.com/apk/res/android"
    android:orientation="vertical" android:layout_width="fill_parent"
    android:gravity="center" android:layout_height="fill_parent"
    android:layout_gravity="center" android:background="#b5555555" >
    <TextView android:id="@+id/rdaiogroup_title"
                android:layout_width="fill_parent"
                android:textSize="20sp"
                android:layout_height="wrap_content"
                android:gravity="center_horizontal"
                android:text="@string/your_wish_most"
                />
    <LinearLayout android:orientation="vertical"
        android:layout_width="wrap_content" android:gravity="center"
        android:layout_height="wrap_content" android:layout_gravity="center"
        android:background="@drawable/grid_corner">
        <GridView android:id="@+id/gridview" android:layout_width="fill_parent"
            android:layout_height="fill_parent" android:numColumns="2"
            android:verticalSpacing="5dip" android:horizontalSpacing="5dip"
            android:stretchMode="columnWidth" android:gravity="center"
            android:layout_gravity="center" />
    </LinearLayout>
    <Button android:id="@+id/bt_confirm"
            android:layout_width="wrap_content"
            android:layout_height="wrap_content"
            android:gravity="center_horizontal"
            android:textSize="20sp"
            android:layout_alignParentBottom="true"
            android:layout_centerHorizontal="true"
            android:text="@string/confirm" />
</LinearLayout>
grid_corner.xml:
<?xml version="1.0" encoding="UTF-8"?>
<shape xmlns:android="http://schemas.android.com/apk/res/android"
    android:shape="rectangle">

    <gradient android:startColor="#c0000000" android:endColor="#c0000000"
        android:angle="90" />

    <stroke android:dashWidth="5dp" android:dashGap="1dp"
        android:width="1dp" android:color="#FF999999"></stroke>
    <!--
        描边
    -->
    <corners android:bottomRightRadius="5dp"
        android:bottomLeftRadius="5dp" android:topLeftRadius="5dp"
        android:topRightRadius="5dp" /><!--设置圆角
-->
</shape>
如果本文能对你有所帮助,我会更开心![]() .
.


 posted on

 浙公网安备 33010602011771号