mybatis源码探索笔记-2(构建SqlSession并获取代理mapper)
前言
上篇笔记我们成功的装载了Configuration,并写入了我们全部需要的信息。根据这个Configuration创建了DefaultSqlSessionFactory。本篇我们实现构建SqlSession即mybatis的一次sql会话,并获取到我们常用的代理mapper接口类。在正文之前先放上之前的一段代码
    @Autowired
    private SqlSessionFactory sqlSessionFactory;

    @GetMapping("/get")
    public List<AssetInfo> get(){
        SqlSession sqlSession = sqlSessionFactory.openSession();
        AssetInfoMapper mapper = sqlSession.getMapper(AssetInfoMapper.class);
        List<AssetInfo> test = mapper.get("测试删除" , "123123123");
        System.out.println(test);
        return test;
    }
public interface AssetInfoMapper {
    List<AssetInfo> get(@Param("name") String name, @Param("id")String id);
}
<?xml version="1.0" encoding="UTF-8"?>
<!DOCTYPE mapper PUBLIC "-//mybatis.org//DTD Mapper 3.0//EN" "http://mybatis.org/dtd/mybatis-3-mapper.dtd">
<mapper namespace="com.mapper.AssetInfoMapper">
    <select id="get" resultType="com.entity.AssetInfo">
        select  * from asset_info where id =#{id} and `name` = #{name}
    </select>
</mapper>
这算是个比较经典的mybatis执行案例了,根据SqlSessionFactory获取到SqlSession,然后构建指定mapper接口的代理类,并最终调用执行xml中对应的sql,封装返回结果并返回。本文则根据这个案例来说明。注意这个SqlSessionFactory即是我们第一步中最终构建的DefaultSqlSessionFactory
正文
1.sqlSessionFactory.openSession();
根据图中代码可以知道我们是根据这个方法获取到SqlSession,我们看下方法的主要内容。方法进行了多次重载,我们直接看最终的方法
/*
 *execType 执行器类型 默认传入了ExecutorType.SIMPLE;
 *level 事物的隔离级别 默认传null
 * autoCommit 事物是否自动提交 默认为false
 **/
private SqlSession openSessionFromDataSource(ExecutorType execType, TransactionIsolationLevel level, boolean autoCommit) {
  Transaction tx = null;
  try {
    //获取到配置中设置的当前环境  里面包含了环境id   数据库信息  和事物信息
    //我们在构建的时候已经构建了一个environment
    final Environment environment = configuration.getEnvironment();
    //根据环境获取其事物级别,如果环境为空或者其事物级别为空则返回默认的ManagedTransactionFactory,
    //我们使用SPring集成  所以会使用Spring的事物管理器 SpringManagedTransactionFactory
    final TransactionFactory transactionFactory = getTransactionFactoryFromEnvironment(environment);
    //根据数据源,事物隔离级别,是否自动提交生成事物管理器 这儿会生成Spring的事物SpringManagedTransaction
    tx = transactionFactory.newTransaction(environment.getDataSource(), level, autoCommit);
    //根据事物和执行器类别生成执行器
    //由于二级缓存默认打开 所以这儿的SimpleExecutor会被包装为CacheExecutor
    final Executor executor = configuration.newExecutor(tx, execType);
    //返回DefaultSqlSession
    return new DefaultSqlSession(configuration, executor, autoCommit);
  } catch (Exception e) {
      //捕获到异常则关闭这次的事物
    closeTransaction(tx); // may have fetched a connection so lets call close()
    throw ExceptionFactory.wrapException("Error opening session.  Cause: " + e, e);
  } finally {
    ErrorContext.instance().reset();
  }

}
该方法的重要操作有两步,第一步是根据我们设置的Environment获取到对应的事物,第二步是根据事物和executor的type来构造一个Executor。两步的代码我们都看一下。
第一步 获取事物工厂的方法中可以看到如果我们没设置Environment,或者Environment中没有事物工厂,则会产生一个默认的,本例使用的是Spring的事物工厂。最后当然也会产生一SpringManagedTransaction
  private TransactionFactory getTransactionFactoryFromEnvironment(Environment environment) {
    if (environment == null || environment.getTransactionFactory() == null) {
      return new ManagedTransactionFactory();
    }
    return environment.getTransactionFactory();
  }
public class SpringManagedTransactionFactory implements TransactionFactory {
    ...
    public Transaction newTransaction(DataSource dataSource, TransactionIsolationLevel level, boolean autoCommit) {
        return new SpringManagedTransaction(dataSource);
    }
    ...
}
第二步 构造Executor,这儿即判断是否为空,然后选择对应的处理器,这儿选择普通执行器,并且包装一下为CacheExecutor ,最后记得这儿会执行一次所有拦截器的plugin方法,可以在拦截器中对Executor做自己的处理
public Executor newExecutor(Transaction transaction, ExecutorType executorType) {
  //如果为null则设置为默认的type 即ExecutorType.SIMPLE
  executorType = executorType == null ? defaultExecutorType : executorType;
  //如果默认的还是为null(config中默认的type被修改)则手动再设置为ExecutorType.SIMPLE
  executorType = executorType == null ? ExecutorType.SIMPLE : executorType;
  Executor executor;
  //批量操作模式
  if (ExecutorType.BATCH == executorType) {
    executor = new BatchExecutor(this, transaction);
  }
  //复用预处理语句
  else if (ExecutorType.REUSE == executorType) {
    executor = new ReuseExecutor(this, transaction);
  }
  //普通执行器
  else {
    executor = new SimpleExecutor(this, transaction);
  }
  //是否开启二级缓存  默认开启
  if (cacheEnabled) {
    //进行一次包装  为CachingExecutor
    executor = new CachingExecutor(executor);
  }
  //注意这儿会执行一次所有拦截器的plugin方法
  executor = (Executor) interceptorChain.pluginAll(executor);
  return executor;
}
两步操作完成后我们获取到了需要的Executor,并通过传入有参构造,构建出默认的DefaultSqlSession并返回
2.sqlSession.getMapper(Class<?> class)
根据代码我们可以看到,系统是根据这个方法最后获取到我们的代理mapper的。这儿SqlSession注意为DefaultSqlSession,我们先看下DefaultSqlSession的大概构造
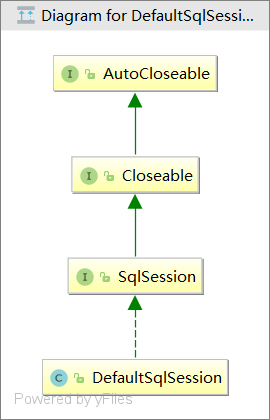
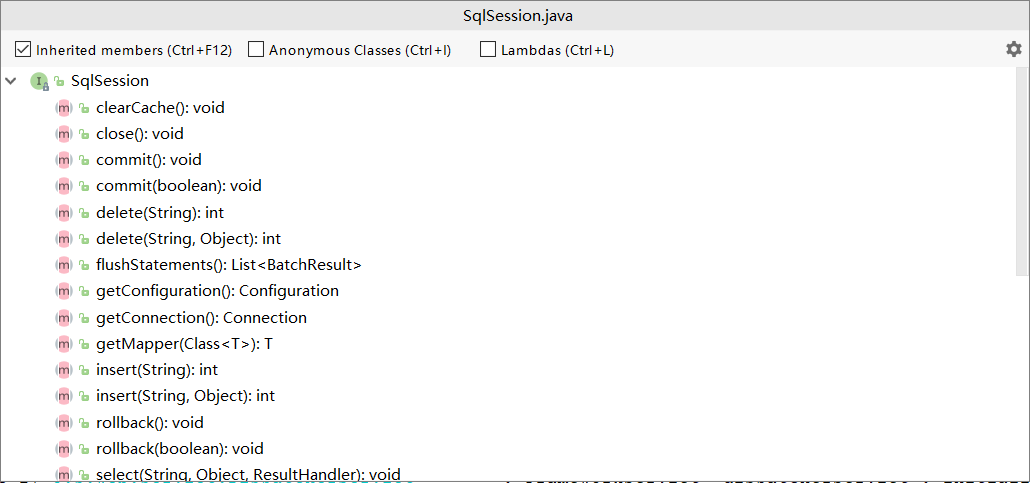
先看下其继承图,可以看到其实现了SqlSession接口,我们其实主要使用的方法即其接口中的方法。通过接口中的方法可以得知主要包含了事物操作方法,和数据库的增删改查。
相信根据方法名大家也都能明白其中的意思。具体的方法则等后面用到的时候再分析


然后再看下DefaultSqlSession中所包含的成员变量
  private final Configuration configuration;
  private final Executor executor;

  private final boolean autoCommit;
  private boolean dirty;
  private List<Cursor<?>> cursorList;
- configuration即我们一开始构建的config类,里面包含了mybatis所有的配置信息以及mapper信息
- executor 即执行器 我们这里是包装了SimpleExecutor的CachingExecutor,以便支持二级缓存
- autoCommit是否自动提交事务,默认为false
- dirty 记录本次executor执行过程中是否有过更改操作
- cursorList 新特性 分批读取时使用
了解完SqlSession的大致结构后,我们开始分析getMapper即获取mapper接口代理类的方法
2.getMapper
2.1 根据我们构建的configuration来获取代理
@Override
  public <T> T getMapper(Class<T> type) {
    return configuration.getMapper(type, this);
  }
2.2 configuration中根据mapperRegistry.getMapper获取
  public <T> T getMapper(Class<T> type, SqlSession sqlSession) {
    return mapperRegistry.getMapper(type, sqlSession);
  }
2.3 mapperRegistry最后的获取逻辑
  private final Configuration config; //即mybatis初始化的config
  private final Map<Class<?>, MapperProxyFactory<?>> knownMappers = new HashMap<>(); //存储mapper接口及其代理工厂的map

  @SuppressWarnings("unchecked")
  public <T> T getMapper(Class<T> type, SqlSession sqlSession) {
    //根据存储接口获取其MapperProxyFactory
    final MapperProxyFactory<T> mapperProxyFactory = (MapperProxyFactory<T>) knownMappers.get(type);
    if (mapperProxyFactory == null) {
      throw new BindingException("Type " + type + " is not known to the MapperRegistry.");
    }
    try {
        //根据MapperProxyFactory获取代理类并返回
      return mapperProxyFactory.newInstance(sqlSession);
    } catch (Exception e) {
      throw new BindingException("Error getting mapper instance. Cause: " + e, e);
    }
  }
可以看到,最终获取代理类的操作还是使用我们构建的config中MapperRegistry中的方法来获取。上面方法中knownMappers 中的key则是mapper.xml中nameSpace反射生成的接口class属性,value则是根据当前接口构建的代理工厂。在构建SqlSessionFactory中解析mapper.xml文件方法中就将所有的xml信息缓存到了这个knownMappers中。这点第一篇分析中已经有过分析,这儿不在赘述。本方法最终调用的是MapperProxyFactory的newInstance方法,我们接着看
3.MapperProxyFactory.newInstance
public class MapperProxyFactory<T> {
  //代理工厂对应的接口
  private final Class<T> mapperInterface;
  //对应的方法缓存
  private final Map<Method, MapperMethod> methodCache = new ConcurrentHashMap<>();

  public MapperProxyFactory(Class<T> mapperInterface) {
    this.mapperInterface = mapperInterface;
  }

  public Class<T> getMapperInterface() {
    return mapperInterface;
  }

  public Map<Method, MapperMethod> getMethodCache() {
    return methodCache;
  }
  //根据MapperProxy构建代理类并返回
  @SuppressWarnings("unchecked")
  protected T newInstance(MapperProxy<T> mapperProxy) {
    return (T) Proxy.newProxyInstance(mapperInterface.getClassLoader(), new Class[] { mapperInterface }, mapperProxy);
  }
  //本方法主要根据传入的SqlSession  构建一个MapperProxy
  public T newInstance(SqlSession sqlSession) {
    final MapperProxy<T> mapperProxy = new MapperProxy<>(sqlSession, mapperInterface, methodCache);
    return newInstance(mapperProxy);
  }

}
本类即是每个mapper接口的代理工厂类。注意其中的methodCache,这个为了支持mybatis缓存所创建的。本类有两个newInstance方法,上面的是根据传入的mapperProxy创建代理,我们都知道创建jdk代理需要一个实现InvocationHandler接口的类作为参数,而下面的newInstance则主要是为了创建实现了InvocationHandler接口的MapperProxy实例,注意传入了SqlSession,本mapper代表的接口,还有方法缓存
4.MapperProxy
我们都知道jdk动态代理类最终执行的是实现了InvocationHandler接口的类的方法。所以本类算是mapper最终方法执行的入口了。我们来看几个比较核心的属性
  private final SqlSession sqlSession;
  private final Class<T> mapperInterface;
  private final Map<Method, MapperMethod> methodCache;
- SqlSession即我们创建的一次会话
- mapperInterface即我们要代理的接口
- methodCache即MethodProxyFactory中的方法缓存
我们看下其构造方法,也就是做了简单的赋值操作
  public MapperProxy(SqlSession sqlSession, Class<T> mapperInterface, Map<Method, MapperMethod> methodCache) {
    this.sqlSession = sqlSession;
    this.mapperInterface = mapperInterface;
    this.methodCache = methodCache;
  }
到此InvocationHandler的接口实现类则创建完毕,然后回到步骤3中当做参数传入jdk动态代理的方法,最终构造出mapper的代理类并返回到我们的main方法中。
下面有一张流程图作为参考

完结
可以看到,我们通过之前初始化构造的SqlSessionFactory创建除了SqlSession,内部包含了执行器Executor,并根据这个SqlSession 通过我们初始化时对每个接口创建的代理类工厂proxyFactory来创建代理类并返回,我们mapper最终执行的方法也是mapperProxy中的invoke方法。
关于mapper的方法执行流程即mapperProxy的invoke方法的执行涉及到了mybatis的sql执行内容,这个在下一个章节中会解析


 浙公网安备 33010602011771号