
ios开发之--UICollectionView的使用
最近项目中需要实现一种布局,需要用到UICollectionView,特在此整理记录下!
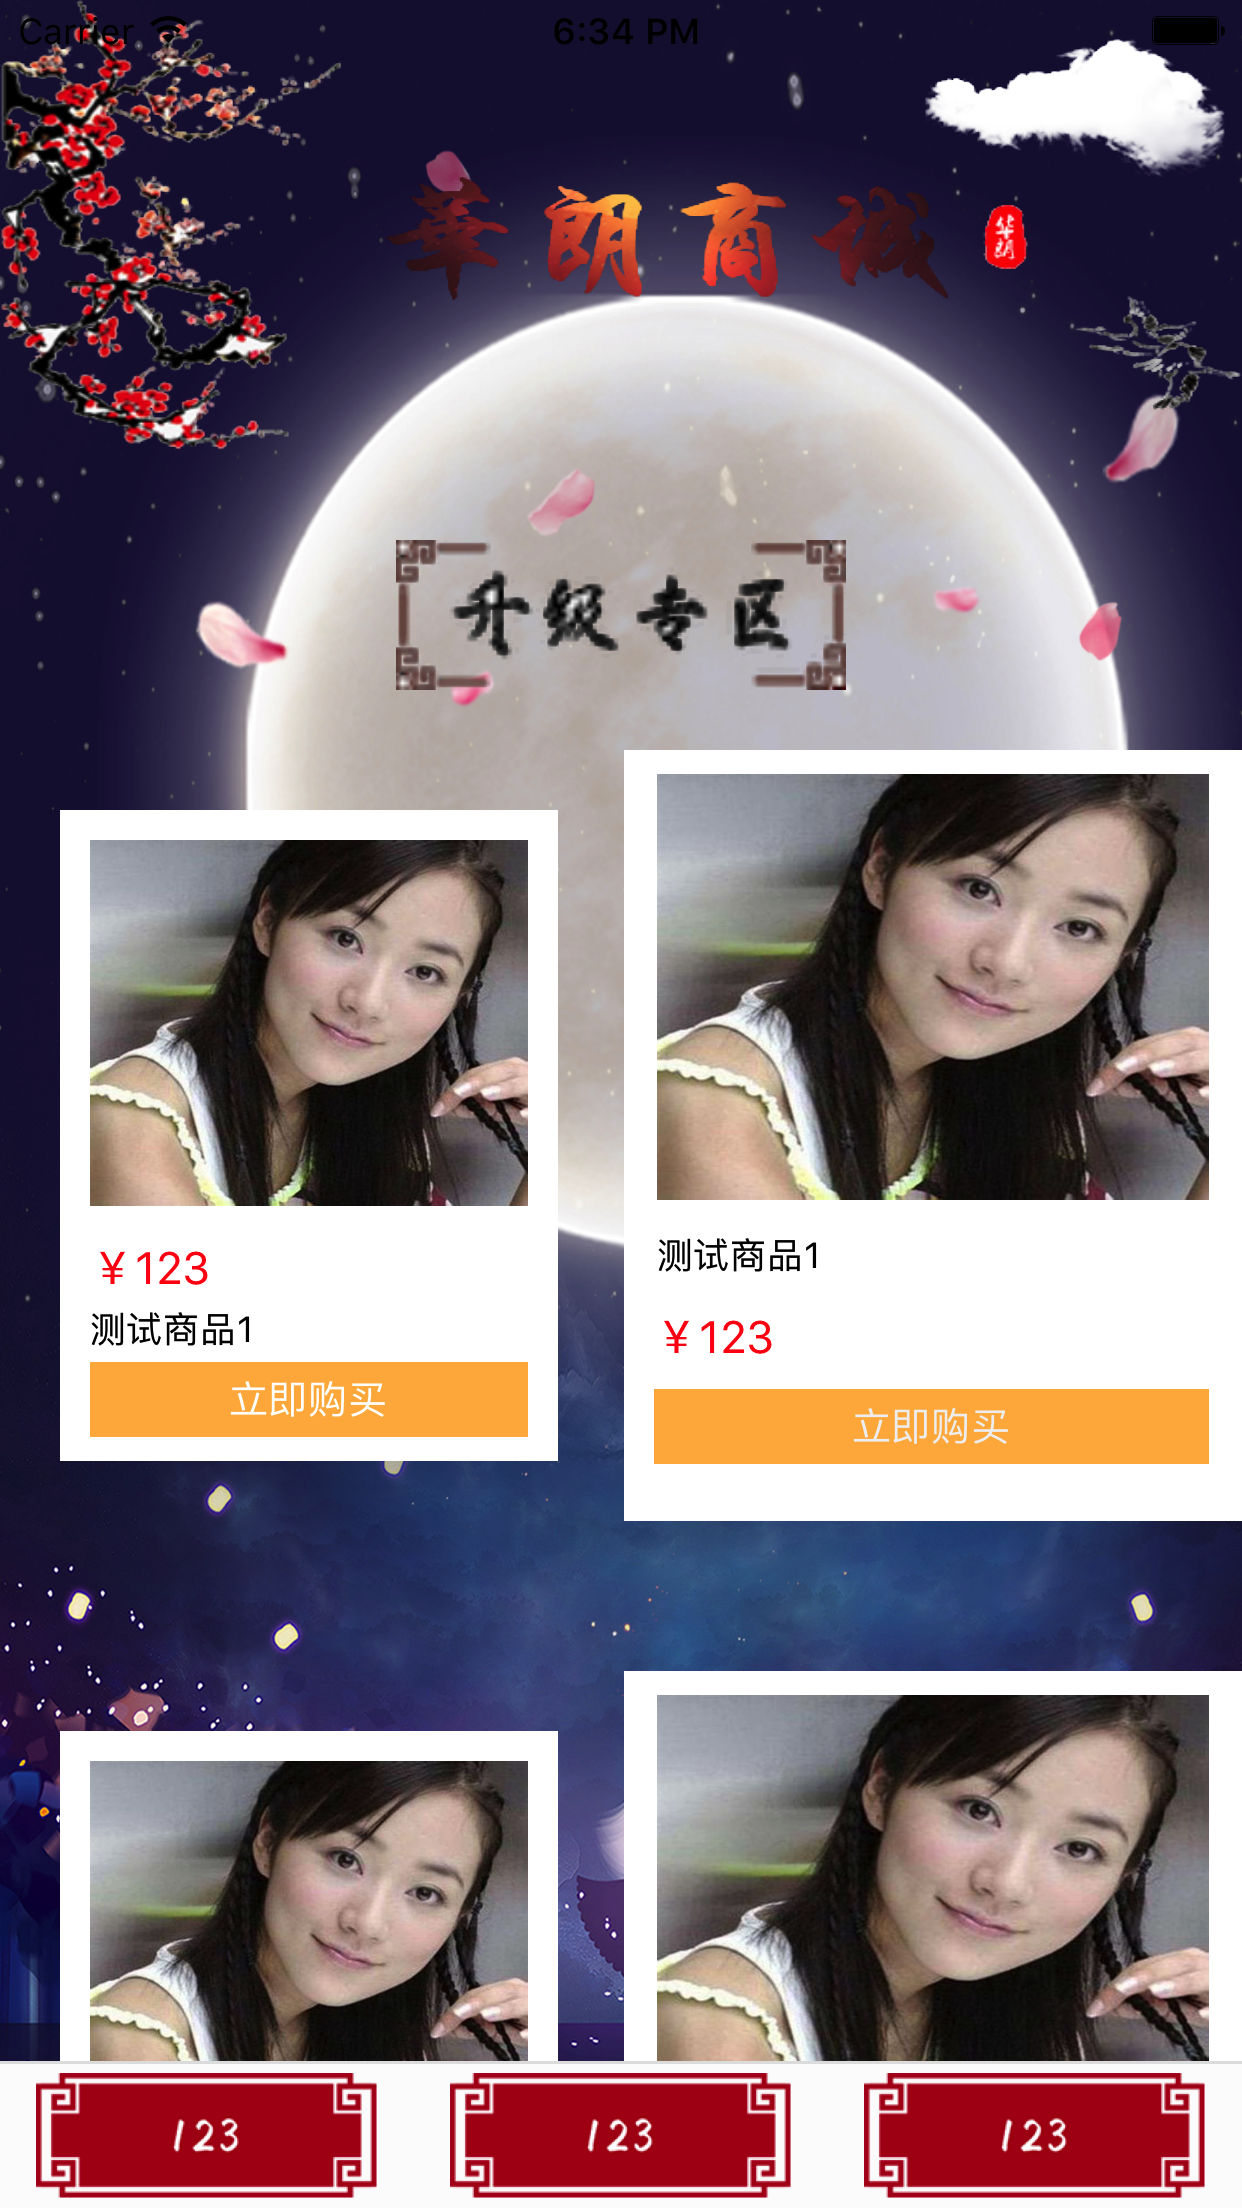
贴上最终实现的效果图:
1,声明
@interface FirstViewController ()<UICollectionViewDelegate,UICollectionViewDataSource,UICollectionViewDelegateFlowLayout>
@property(nonatomic,strong)UICollectionView *myCollectionView;

@property(nonatomic,strong)UICollectionViewFlowLayout *myLayout;
2,创建
a,设置一个背景图片
UIImageView *imgV = [[UIImageView alloc]initWithImage:[UIImage imageNamed:@"bgImg2.jpg"]];
    imgV.frame = CGRectMake(0, 0, KscreenW, KscreenH);
    imgV.autoresizingMask = UIViewAutoresizingFlexibleWidth;
    [self.view insertSubview:imgV atIndex:0];
b,创建UICollectionView和FlowLayout
-(void)creatUI
{
    self.myLayout = [[UICollectionViewFlowLayout alloc]init];
    self.myLayout.minimumLineSpacing = 50;
    self.myLayout.minimumInteritemSpacing = 1;
    self.myLayout.itemSize = CGSizeMake(KscreenW/2-1, (KscreenW/2)+50);
    self.myLayout.sectionInset = UIEdgeInsetsMake(0, 0, 20, 0);


    self.myCollectionView = [[UICollectionView alloc]initWithFrame:CGRectMake(0, 0, KscreenW, KscreenH-30) collectionViewLayout:self.myLayout];
    self.myCollectionView.delegate = self;
    self.myCollectionView.dataSource = self;
    self.myCollectionView.backgroundColor = [UIColor clearColor];
//    注册cell
    [self.myCollectionView registerNib:[UINib nibWithNibName:@"LeftCell" bundle:nil] forCellWithReuseIdentifier:@"LeftCell"];
    [self.myCollectionView registerNib:[UINib nibWithNibName:@"RightCell" bundle:nil] forCellWithReuseIdentifier:@"RightCell"];
    [self.myCollectionView registerNib:[UINib nibWithNibName:@"PublickCell" bundle:nil] forCellWithReuseIdentifier:@"PublickCell"];
//    注册头视图
    [self.myCollectionView registerClass:[UICollectionReusableView class] forSupplementaryViewOfKind:UICollectionElementKindSectionHeader withReuseIdentifier:@"SECTION_ONE"];
    [self.myCollectionView registerClass:[UICollectionReusableView class] forSupplementaryViewOfKind:UICollectionElementKindSectionHeader withReuseIdentifier:@"SECTION_TWO"];


    [self.view insertSubview:self.myCollectionView atIndex:1];
}
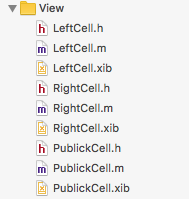
c,这里我用了三种自定义cell,上面的方法有具体的注册cell方法,还有头视图的注册
3,具体代理方法的实现
-(NSInteger)numberOfSectionsInCollectionView:(UICollectionView *)collectionView
{
    return 2;
}

-(NSInteger)collectionView:(UICollectionView *)collectionView numberOfItemsInSection:(NSInteger)section
{
    if (section == 0) {

        return 6;
    }else{

        return 6;
    }
}

-(UICollectionViewCell *)collectionView:(UICollectionView *)collectionView cellForItemAtIndexPath:(NSIndexPath *)indexPath
{
    if (indexPath.section == 0) {

        if (indexPath.item %2 == 0) {

            LeftCell *cell = [collectionView dequeueReusableCellWithReuseIdentifier:@"LeftCell" forIndexPath:indexPath];
            cell.backgroundColor = [UIColor clearColor];
            return cell;
        }else{
            RightCell *cell = [collectionView dequeueReusableCellWithReuseIdentifier:@"RightCell" forIndexPath:indexPath];
            cell.backgroundColor = [UIColor whiteColor];
            return cell;
        }
    }else{

        PublickCell *cell = [collectionView dequeueReusableCellWithReuseIdentifier:@"PublickCell" forIndexPath:indexPath];
        cell.backgroundColor = [UIColor whiteColor];

        return cell;
    }

    return nil;
}
比较简单!
4,创建头视图,PS:这里需要注意个问题:多组头部视图样式不一样复用时发生错乱问题,代码如下:
a,注册头视图,有两种方法:
// 防止cell和头部视图复用出现错乱
    [collectionView registerClass:[WOCOHomeSelectTypeCell class] forCellWithReuseIdentifier:@"SECTION_ONE"];
    [collectionView registerClass:[WOCOHomeDisplayCell class] forCellWithReuseIdentifier:@"SECTION_TWO"];
    [collectionView registerClass:[UICollectionReusableView class] forSupplementaryViewOfKind:UICollectionElementKindSectionHeader withReuseIdentifier:@"SECTION_ONE"];
    [collectionView registerClass:[UICollectionReusableView class] forSupplementaryViewOfKind:UICollectionElementKindSectionHeader withReuseIdentifier:@"SECTION_TWO"];
这两种方法都可以!
b,代理方法的实现:
-(UICollectionReusableView *)collectionView:(UICollectionView *)collectionView viewForSupplementaryElementOfKind:(NSString *)kind atIndexPath:(NSIndexPath *)indexPath
{
//    防止重用,定义重用标识符
    static NSString *reusableID;
    if (indexPath.section == 0) {
        reusableID = @"SECTION_ONE";
    }else{
        reusableID = @"SECTION_TWO";
    }


    UICollectionReusableView *header = [collectionView dequeueReusableSupplementaryViewOfKind:UICollectionElementKindSectionHeader withReuseIdentifier:reusableID forIndexPath:indexPath];
    header.backgroundColor = [UIColor clearColor];

    if (indexPath.section == 0) {
        headImg = [[UIImageView alloc]initWithFrame:CGRectMake(0, 0, KscreenW, 150)];
        headImg.image = [UIImage imageNamed:@"topLog"];
        [header addSubview:headImg];

        bottomImg = [[UIImageView alloc]initWithFrame:CGRectMake(KscreenW/2-150/2, 180, 150, 50)];
        bottomImg.image = [UIImage imageNamed:@"sj"];
        [header addSubview:bottomImg];

    }else{

        UIImageView *bottomImg2 = [[UIImageView alloc]initWithFrame:CGRectMake(KscreenW/2-150/2, 15, 150, 50)];
        bottomImg2.image = [UIImage imageNamed:@"sj1"];
        [header addSubview:bottomImg2];
    }

    return header;
}
此方法设置了一个str,作为标识符对不同的section进行标记,这样就可以解决重用的问题,根据不同的id进入不同的section,避免了头视图上面的内容多次创建,各自创建各自的!
c,设置不同section的高度,只需要实现此代理方法即可:
- (CGSize)collectionView:(UICollectionView *)collectionView layout:(UICollectionViewLayout*)collectionViewLayout referenceSizeForHeaderInSection:(NSInteger)section
{
    if (section == 0) {
        return CGSizeMake(KscreenW, 250);
    }else{
        return CGSizeMake(KscreenW, 80);
    }
}
完成上面的操作,就可以在不同的section之间随意操作了!
本文来自博客园,作者:稻草人11223,转载请注明原文链接:https://www.cnblogs.com/hero11223/p/7419651.html

 浙公网安备 33010602011771号