
『计算机视觉』Mask-RCNN_推断网络其五:目标检测结果精炼
一、Detections网络
经过了ROI网络,我们已经获取了全部推荐区域的信息,包含:
推荐区域特征(ROIAlign得到)
推荐区域类别
推荐区域坐标修正项(deltas)
再加上推荐区域原始坐标[IMAGES_PER_GPU, num_rois, (y1, x1, y2, x2)],我们将进行最后的目标检测精修部分。
            # Detections
            # output is [batch, num_detections, (y1, x1, y2, x2, class_id, score)] in
            # normalized coordinates
            detections = DetectionLayer(config, name="mrcnn_detection")(
                [rpn_rois, mrcnn_class, mrcnn_bbox, input_image_meta])
1、原始图片resize参数"window"
注意到我们的输入中一个input_image_meta项,它记录了每一张图片的原始信息,[batch, n]维矩阵,n是固定的,其生成与config.py文件中
        # Image meta data length
        # See compose_image_meta() for details
        self.IMAGE_META_SIZE = 1 + 3 + 3 + 4 + 1 + self.NUM_CLASSES
其信息在未来的(如果有的话)图像预处理中会介绍,本节使用了其中记录的原图大小信息和对应图片的"window"信息。图片大小信息为3个整数,对应输入图片(即已经预处理之后的图片)的长宽和深度,"window"信息包含4个整数,其含义为(top_pad, left_pad, h + top_pad, w + left_pad),和重置图片大小的处理有关,下面代码见utils.py的resize_image函数,
    if mode == "square":
        # Get new height and width
        h, w = image.shape[:2]
        top_pad = (max_dim - h) // 2
        bottom_pad = max_dim - h - top_pad
        left_pad = (max_dim - w) // 2
        right_pad = max_dim - w - left_pad
        padding = [(top_pad, bottom_pad), (left_pad, right_pad), (0, 0)]
        image = np.pad(image, padding, mode='constant', constant_values=0)
        window = (top_pad, left_pad, h + top_pad, w + left_pad)
即我们将深蓝色的原图(不要求w等于h)通过填充的方式扩展为浅灰色的大图用于feed网络,"window"记录了以新图左上角为原点建立坐标系,原图的左上角点和右下角点的坐标,由于坐标系选取的是像素坐标,"window"记录的就是原始图片的大小,其蕴含了输入图片中真正有意义的位置信息。
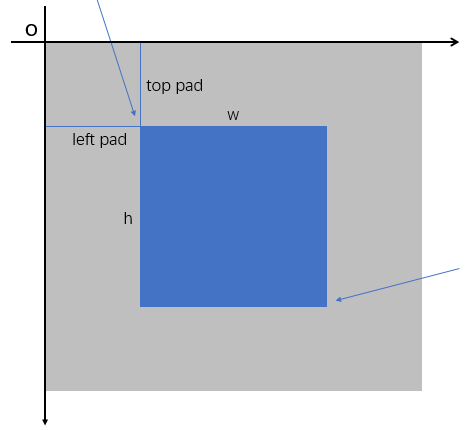
2、从"window"还原原始图片大小
有一点注意,假如top_pad=5,也就是我们在图像顶部填充了5行,实际上0、1、2、3、4为非图像区域,所以我们从第5行开始是图像;假设图像有3行(很极端),即5、6、7行为图像,但是:
top_pad+h=5+3=8
即[top_pad:top_pad+h-1]行为真实图片,列同理。
另外,用于解析image_meta结构的函数如下:
def parse_image_meta_graph(meta):
    """Parses a tensor that contains image attributes to its components.
    See compose_image_meta() for more details.

    meta: [batch, meta length] where meta length depends on NUM_CLASSES

    Returns a dict of the parsed tensors.
    """
    image_id = meta[:, 0]
    original_image_shape = meta[:, 1:4]
    image_shape = meta[:, 4:7]
    window = meta[:, 7:11]  # (y1, x1, y2, x2) window of image in in pixels
    scale = meta[:, 11]
    active_class_ids = meta[:, 12:]
    return {
        "image_id": image_id,
        "original_image_shape": original_image_shape,
        "image_shape": image_shape,
        "window": window,
        "scale": scale,
        "active_class_ids": active_class_ids,
    }
二、源码讲解
首先接收参数,初始化网络,
class DetectionLayer(KE.Layer):
    """Takes classified proposal boxes and their bounding box deltas and
    returns the final detection boxes.

    Returns:
    [batch, num_detections, (y1, x1, y2, x2, class_id, class_score)] where
    coordinates are normalized.
    """

    def __init__(self, config=None, **kwargs):
        super(DetectionLayer, self).__init__(**kwargs)
        self.config = config

    def call(self, inputs):
        rois = inputs[0]         # [batch, num_rois, (y1, x1, y2, x2)]
        mrcnn_class = inputs[1]  # [batch, num_rois, NUM_CLASSES]
        mrcnn_bbox = inputs[2]   # [batch, num_rois, NUM_CLASSES, (dy, dx, log(dh), log(dw))]
        image_meta = inputs[3]
1、原始图片尺寸获取
然后获取"window"参数即原始图片尺寸,然后获取其相对于输入图片的image_shape即[w, h, channels]的尺寸,
        # Get windows of images in normalized coordinates. Windows are the area
        # in the image that excludes the padding.
        # Use the shape of the first image in the batch to normalize the window
        # because we know that all images get resized to the same size.
        m = parse_image_meta_graph(image_meta)
        image_shape = m['image_shape'][0]
        window = norm_boxes_graph(m['window'], image_shape[:2])  # (y1, x1, y2, x2)
上面第5行调用函数如下(本文第一节中已经贴了),用于解析并获取输入图片的shape和原始图片的shape(即"window")。第7行函数如下:
def norm_boxes_graph(boxes, shape):
    """Converts boxes from pixel coordinates to normalized coordinates.
    boxes: [..., (y1, x1, y2, x2)] in pixel coordinates
    shape: [..., (height, width)] in pixels

    Note: In pixel coordinates (y2, x2) is outside the box. But in normalized
    coordinates it's inside the box.

    Returns:
        [..., (y1, x1, y2, x2)] in normalized coordinates
    """
    h, w = tf.split(tf.cast(shape, tf.float32), 2)
    scale = tf.concat([h, w, h, w], axis=-1) - tf.constant(1.0)
    shift = tf.constant([0., 0., 1., 1.])
    return tf.divide(boxes - shift, scale)
我们经过"window"获取了原始图片相对输入图片的坐标(像素空间),然后除以输入图片的宽高,得到了原始图片相对于输入图片的normalized坐标,分布于[0,1]区间上。
事实上由于anchors生成的4个坐标值均位于[0,1],在网络中所有的坐标都是位于[0,1]的,原始图片信息是新的被引入的量,不可或缺的需要被处理到正则空间。
对于每一张图片,我们有:
每个推荐区域的坐标
每个推荐区域的粗分类情况
每个推荐区域的坐标粗修
图片中真正有意义的位置坐标
下面我们基于这些信息,进行精提。
2、分类、回归信息精炼
        # Run detection refinement graph on each item in the batch
        detections_batch = utils.batch_slice(
            [rois, mrcnn_class, mrcnn_bbox, window],
            lambda x, y, w, z: refine_detections_graph(x, y, w, z, self.config),
注意,下面调用的函数,每次处理的是单张图片。
逻辑流程如下:
a 获取每个推荐区域得分最高的class的得分
b 获取每个推荐区域经过粗修后的坐标和"window"交集的坐标
c 剔除掉最高得分为背景的推荐区域
d 剔除掉最高得分达不到阈值的推荐区域
e 对属于同一类别的候选框进行非极大值抑制
f 对非极大值抑制后的框索引:剔除-1占位符,获取top k(100)
最后返回每个框(y1, x1, y2, x2, class_id, score)信息
step1
调用函数前半部分如下,
def refine_detections_graph(rois, probs, deltas, window, config):
    """Refine classified proposals and filter overlaps and return final
    detections.

    Inputs:
        rois: [N, (y1, x1, y2, x2)] in normalized coordinates
        probs: [N, num_classes]. Class probabilities.
        deltas: [N, num_classes, (dy, dx, log(dh), log(dw))]. Class-specific
                bounding box deltas.
        window: (y1, x1, y2, x2) in normalized coordinates. The part of the image
            that contains the image excluding the padding.

    Returns detections shaped: [num_detections, (y1, x1, y2, x2, class_id, score)] where
        coordinates are normalized.
    """
    # Class IDs per ROI
    class_ids = tf.argmax(probs, axis=1, output_type=tf.int32)  # [N],每张图片最高得分类
    # Class probability of the top class of each ROI
    indices = tf.stack([tf.range(probs.shape[0]), class_ids], axis=1)  # [N, (图片序号, 最高class序号)]
    class_scores = tf.gather_nd(probs, indices)  # [N], 每张图片最高得分类得分值

    # Class-specific bounding box deltas
    deltas_specific = tf.gather_nd(deltas, indices)  # [N, 4]
    # Apply bounding box deltas
    # Shape: [boxes, (y1, x1, y2, x2)] in normalized coordinates
    refined_rois = apply_box_deltas_graph(
        rois, deltas_specific * config.BBOX_STD_DEV)  # [N, 4]
    # Clip boxes to image window
    refined_rois = clip_boxes_graph(refined_rois, window)

    # TODO: Filter out boxes with zero area

    # Filter out background boxes
    # class_ids: N, where(class_ids > 0): [M, 1] 即where会升维
    keep = tf.where(class_ids > 0)[:, 0]

    # Filter out low confidence boxes
    if config.DETECTION_MIN_CONFIDENCE:  # 0.7
        conf_keep = tf.where(class_scores >= config.DETECTION_MIN_CONFIDENCE)[:, 0]
        # 求交集,返回稀疏Tensor,要求a、b除最后一维外维度相同,最后一维的各个子列分别求交集
        # a   = np.array([[{1, 2}, {3}], [{4}, {5, 6}]])
        # b   = np.array([[{1}   , {}] , [{4}, {5, 6, 7, 8}]])
        # res = np.array([[{1}   , {}] , [{4}, {5, 6}]])
        keep = tf.sets.set_intersection(tf.expand_dims(keep, 0),
                                        tf.expand_dims(conf_keep, 0))
        keep = tf.sparse_tensor_to_dense(keep)[0]

    # Apply per-class NMS
    # 1. Prepare variables
    pre_nms_class_ids = tf.gather(class_ids, keep)  # [n]
    pre_nms_scores = tf.gather(class_scores, keep)  # [n]
    pre_nms_rois = tf.gather(refined_rois,   keep)  # [n, 4]
    unique_pre_nms_class_ids = tf.unique(pre_nms_class_ids)[0]  # 去重后class类别
    '''
    # tensor 'x' is [1, 1, 2, 4, 4, 4, 7, 8, 8]
    y, idx = unique(x)
    y ==> [1, 2, 4, 7, 8]
    idx ==> [0, 0, 1, 2, 2, 2, 3, 4, 4]
    '''
这一部分代码主要对于当前的信息进行整理为精炼做准备,流程很清晰:
a 获取每个推荐区域得分最高的class的得分
b 获取每个推荐区域经过粗修后的坐标和"window"交集的坐标
c 剔除掉最高得分为背景的推荐区域
d 剔除掉最高得分达不到阈值的推荐区域
此时使用张量keep保存符合条件的推荐区域的index,即一个一维数组,每个值为一个框的序号,后面会继续对这个keep中的序号做进一步的筛选。
step2
e 对属于同一类别的候选框进行非极大值抑制。
注意下面的内嵌函数,包含keep(step1中保留的框索引)、pre_nms_class_ids(step1中保留的框类别)、pre_nms_scores(step1中保留的框得分)几个外部变量,
    def nms_keep_map(class_id):
        """Apply Non-Maximum Suppression on ROIs of the given class."""
        # 接受了外部变量pre_nms_class_ids、keep

        # Indices of ROIs of the given class
        # class_id表示当前NMS的目标类的数字,pre_nms_class_ids为全部的疑似目标类
        ixs = tf.where(tf.equal(pre_nms_class_ids, class_id))[:, 0]
        # Apply NMS
        class_keep = tf.image.non_max_suppression(
                tf.gather(pre_nms_rois, ixs),  # 当前class的全部推荐区坐标
                tf.gather(pre_nms_scores, ixs),  # 当前class的全部推荐区得分
                max_output_size=config.DETECTION_MAX_INSTANCES,  # 100
                iou_threshold=config.DETECTION_NMS_THRESHOLD)  # 0.3
        # Map indices
        # class_keep是对ixs的索引,ixs是对keep的索引
        class_keep = tf.gather(keep, tf.gather(ixs, class_keep))  # 由索引获取索引
        # Pad with -1 so returned tensors have the same shape
        gap = config.DETECTION_MAX_INSTANCES - tf.shape(class_keep)[0]
        class_keep = tf.pad(class_keep, [(0, gap)],
                            mode='CONSTANT', constant_values=-1)
        # Set shape so map_fn() can infer result shape
        class_keep.set_shape([config.DETECTION_MAX_INSTANCES])
        # 返回长度必须固定,否则tf.map_fn不能正常运行
        return class_keep

    # 2. Map over class IDs
    nms_keep = tf.map_fn(nms_keep_map, unique_pre_nms_class_ids,
                         dtype=tf.int64)  # [?, 默认100]:类别顺序,每个类别中的框索引
本步骤输出nms_keep,[?, 100]格式,?表示该张图片中保留的类别数(不是实例数注意)。
step3
f 对非极大值抑制后的框索引:剔除-1占位符,获取top k(100),返回每个框(y1, x1, y2, x2, class_id, score)信息。
    # 3. Merge results into one list, and remove -1 padding
    nms_keep = tf.reshape(nms_keep, [-1])  # 全部框索引
    nms_keep = tf.gather(nms_keep, tf.where(nms_keep > -1)[:, 0])  # 剔除-1索引
    # 4. Compute intersection between keep and nms_keep
    # nms_keep本身就是从keep中截取的,本步感觉冗余
    keep = tf.sets.set_intersection(tf.expand_dims(keep, 0),
                                    tf.expand_dims(nms_keep, 0))
    keep = tf.sparse_tensor_to_dense(keep)[0]
    # Keep top detections
    roi_count = config.DETECTION_MAX_INSTANCES
    class_scores_keep = tf.gather(class_scores, keep)  # 获取得分
    num_keep = tf.minimum(tf.shape(class_scores_keep)[0], roi_count)
    top_ids = tf.nn.top_k(class_scores_keep, k=num_keep, sorted=True)[1]
    keep = tf.gather(keep, top_ids)  # 由索引获取索引

    # Arrange output as [N, (y1, x1, y2, x2, class_id, score)]
    # Coordinates are normalized.
    detections = tf.concat([
        tf.gather(refined_rois, keep),  # 索引坐标[?, 4]
        tf.to_float(tf.gather(class_ids, keep))[..., tf.newaxis],  # 索引class,添加维[?, 1]
        tf.gather(class_scores, keep)[..., tf.newaxis]  # 索引的分,添加维[?, 1]
        ], axis=1)

    # 如果 detections < DETECTION_MAX_INSTANCES,填充0
    gap = config.DETECTION_MAX_INSTANCES - tf.shape(detections)[0]
    detections = tf.pad(detections, [(0, gap), (0, 0)], "CONSTANT")
    return detections
至此,我们得到了可以用于输出的目标检测结果,下一步就是Mask信息生成。

 浙公网安备 33010602011771号