离线安装Kubesphere
1.环境要求 【centos7.X】
1.1依赖项要求
master、node1节点安装
yum install -y socat conntrack ebtables ipset
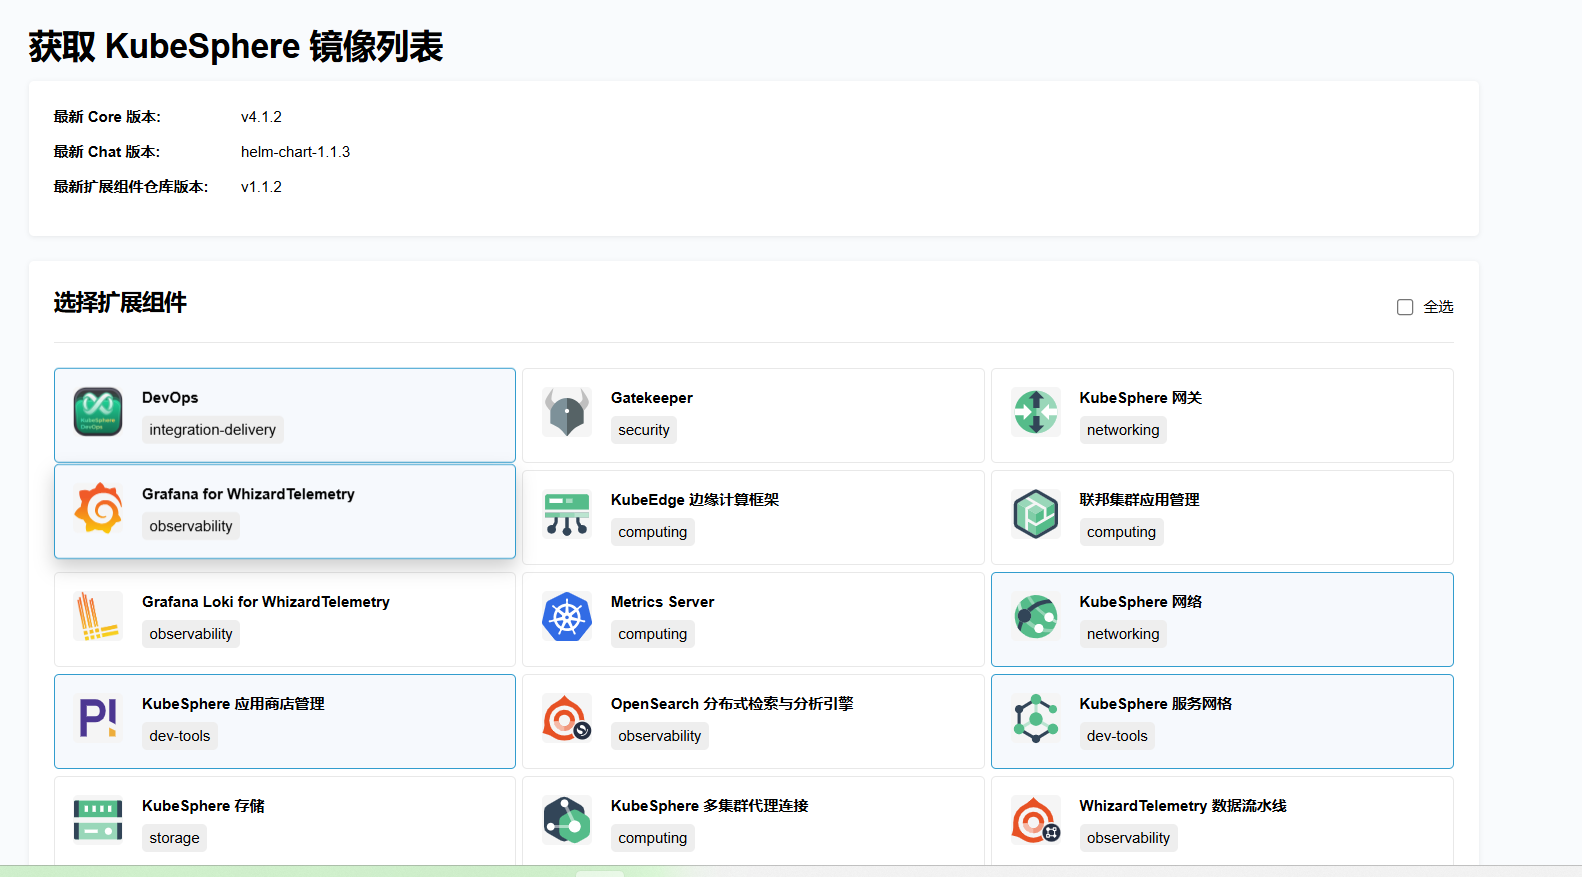
1.2获取镜像列表
- 访问 https://get-images.kubesphere.io/
- 选择需要部署的扩展组件。
- 填入邮箱地址。
- 点击获取镜像列表。
- 查看填写的邮箱,获取 KubeSphere 最新的版本信息以及镜像列表文件。
2.构建离线安装包【woker节点】
worker节点【联网主机,用于制作离线包】
2.1安装KubeKey
2.1.1下载上传安装包
https://github.com/kubesphere/kubekey/releases/download/v3.1.7/kubekey-v3.1.7-linux-amd64.tar.gz
2.1.2创建manifest文件
# 如需使用 kk 离线部署镜像仓库,添加 --with-registry 打包镜像仓库的安装文件
./kk create manifest --with-kubernetes v1.31.0 --with-registry
2.1.3编辑manifest文件
复制 kk-manifest-mirror.yaml中的镜像列表,添加到新创建的 manifest-sample.yaml 文件中。
2.1.4构建离线包
./kk artifact export -m manifest-sample.yaml -o kubesphere.tar.gz
执行成功后
23:09:47 CST success: [LocalHost]
23:09:47 CST [ChownOutputModule] Chown output file
23:09:47 CST success: [LocalHost]
23:09:47 CST [ChownWorkerModule] Chown ./kubekey dir
23:09:47 CST success: [LocalHost]
23:09:47 CST Pipeline[ArtifactExportPipeline] execute successfully
3. 下载 KubeSphere Core Helm Chart【woker节点】
-
安装 helm。
curl https://raw.githubusercontent.com/helm/helm/main/scripts/get-helm-3 | bash -
下载 KubeSphere Core Helm Chart。
VERSION=1.1.3     # Chart 版本
helm fetch https://charts.kubesphere.io/main/ks-core-1.1.3.tgz 【访问不了手动下载】
4.离线部署【master】
4.1 准备工作
将联网主机 node1 上的三个文件同步至离线环境的 master 节点。
kkkubesphere.tar.gzks-core-1.1.3.tgz
4.2.创建配置文件
-
创建离线集群配置文件。
[root@master ~]# ./kk create config --with-kubernetes v1.31.0 -f config-hmktest.yaml -
修改配置文件。
[root@master ~]# cat config-hmktest.yaml

apiVersion: kubekey.kubesphere.io/v1alpha2
kind: Cluster
metadata:
  name: sample
spec:
  hosts:
  - {name: master, address: 192.168.100.55, internalAddress: 192.168.100.55, user: root, password: "000000"}
  - {name: node1, address: 192.168.100.44, internalAddress: 192.168.100.44, user: root, password: "000000"}
  roleGroups:
    etcd:
    - master
    control-plane:
    - master
    worker:
    - node1
    registry:
    - node1
  controlPlaneEndpoint:
    ## Internal loadbalancer for apiservers
    # internalLoadbalancer: haproxy

    domain: lb.kubesphere.local
    address: ""
    port: 6443
  kubernetes:
    version: v1.31.0
    clusterName: cluster.local
    autoRenewCerts: true
    containerManager: containerd
  etcd:
    type: kubekey
  network:
    plugin: calico
    kubePodsCIDR: 10.233.64.0/18
    kubeServiceCIDR: 10.233.0.0/18
    ## multus support. https://github.com/k8snetworkplumbingwg/multus-cni
    multusCNI:
      enabled: false
  registry:
    auths:
       "dockerhub.kubekey.local":
         skipTLSVerify: true
    privateRegistry: "dockerhub.kubekey.local"
    namespaceOverride: "kubesphereio"
    registryMirrors: []
    insecureRegistries: []
  addons: []
4.3创建镜像仓库
./kk init registry -f config-hmktest.yaml -a kubesphere.tar.gz
00:02:05 CST success: [node1]
00:02:05 CST [ChownWorkerModule] Chown ./kubekey dir
00:02:05 CST success: [LocalHost]
00:02:05 CST Pipeline[InitRegistryPipeline] execute successfully
4.3.1 创建 harbor 项目(若镜像仓库为 Harbor)[上面配置文件应该有问题]
执行以下命令创建 harbor 项目。
-
创建脚本配置文件。
vi create_project_harbor.sh#!/usr/bin/env bash # Copyright 2018 The KubeSphere Authors. # # Licensed under the Apache License, Version 2.0 (the "License"); # you may not use this file except in compliance with the License. # You may obtain a copy of the License at # # http://www.apache.org/licenses/LICENSE-2.0 # # Unless required by applicable law or agreed to in writing, software # distributed under the License is distributed on an "AS IS" BASIS, # WITHOUT WARRANTIES OR CONDITIONS OF ANY KIND, either express or implied. # See the License for the specific language governing permissions and # limitations under the License. url="https://dockerhub.kubekey.local" # 或修改为实际镜像仓库地址 user="admin" passwd="Harbor12345" harbor_projects=( ks kubesphere kubesphereio coredns calico flannel cilium hybridnetdev kubeovn openebs library plndr jenkins argoproj dexidp openpolicyagent curlimages grafana kubeedge nginxinc prom kiwigrid minio opensearchproject istio jaegertracing timberio prometheus-operator jimmidyson elastic thanosio brancz prometheus ) for project in "${harbor_projects[@]}"; do echo "creating $project" curl -u "${user}:${passwd}" -X POST -H "Content-Type: application/json" "${url}/api/v2.0/projects" -d "{ \"project_name\": \"${project}\", \"public\": true}" -k # 注意在 curl 命令末尾加上 -k done -
创建 Harbor 项目。
chmod +x create_project_harbor.sh./create_project_harbor.sh
5.安装Kubernetes
执行以下命令创建 Kubernetes 集群:

./kk create cluster -f config-hmktest.yaml -a kubesphere.tar.gz --with-local-storage
显示信息
00:13:36 CST [DeployStorageClassModule] Deploy OpenEBS as cluster default StorageClass
00:13:36 CST success: [master]
00:13:36 CST Pipeline[CreateClusterPipeline] execute successfully
Installation is complete.
6. 安装 KubeSphere
安装 KubeSphere。
helm upgrade --install -n kubesphere-system --create-namespace ks-core ks-core-1.1.3.tgz \
     --set global.imageRegistry=dockerhub.kubekey.local/ks \
     --set extension.imageRegistry=dockerhub.kubekey.local/ks \
     --set ksExtensionRepository.image.tag=v1.1.2 \
     --debug \
     --wait
输出信息:
NOTES:
Thank you for choosing KubeSphere Helm Chart.

Please be patient and wait for several seconds for the KubeSphere deployment to complete.

1. Wait for Deployment Completion

    Confirm that all KubeSphere components are running by executing the following command:

    kubectl get pods -n kubesphere-system
2. Access the KubeSphere Console

    Once the deployment is complete, you can access the KubeSphere console using the following URL:

    http://192.168.100.55:30880

3. Login to KubeSphere Console

    Use the following credentials to log in:

    Account: admin
    Password: P@88w0rd

NOTE: It is highly recommended to change the default password immediately after the first login.
For additional information and details, please visit https://kubesphere.io.


 浙公网安备 33010602011771号