Spring进阶
Spring
Spring配置文件头信息
<?xml version="1.0" encoding="UTF-8"?>
<beans xmlns="http://www.springframework.org/schema/beans"
       xmlns:xsi="http://www.w3.org/2001/XMLSchema-instance"
       xsi:schemaLocation="http://www.springframework.org/schema/beans http://www.springframework.org/schema/beans/spring-beans.xsd">

</beans>
1. IOC
1.1 内聚和耦合
耦合:代码书写技术所使用的技术的结合紧密度,用于衡量软件中各个模块的互联程度
内聚:代码书写过程中单个模块内部各个组成部分间的联系,用于衡量软件各个功能模块内部的功能练习
- IoC(inversion of control)控制反转,Spring反向控制应用程序所需要使用的外部资源
- Spring控制的资源全部放置在Spring容器中,该容器称为IoC容器
1.2 IoC配置
bean
<bean id="userService" name="userService2,userService3" class="com.itheima.service.impl.UserServiceImpl" />
-
id:bean的名称,通过id值获取bean
-
class:bean的类型
-
name:bean可以定义多个名称,使用name属性完成,中间使用,分割,用于多人配合开发时给bean起别名
scope
用于控制bean创建后的对象是单例的还是多例的,默认不写就是单例bean
- singleton:设定创建出的对象保存在spring容器中,是一个单例对象
- prototype:设定创建出的对象保存在spring容器中,是一个多例对象
- request,session,application,websocket:设定创建出的对象放置在web容器对应的位置
注意:
单例是在构造方法执行时创建的,也就是bean容器初始化时候创建
bean的生命周期
init-method,destroy-method
<bean init-method="init" destroy-method="destroy" ></bean>
2.Spring整合Mybatis
- 环境准备
1.导入Spring坐标,MyBatis坐标,MySQL坐标,Druid坐标
- 业务类与接口准备
<?xml version="1.0" encoding="UTF-8"?>
<project xmlns="http://maven.apache.org/POM/4.0.0"
         xmlns:xsi="http://www.w3.org/2001/XMLSchema-instance"
         xsi:schemaLocation="http://maven.apache.org/POM/4.0.0 http://maven.apache.org/xsd/maven-4.0.0.xsd">
    <modelVersion>4.0.0</modelVersion>

    <groupId>com.itheima</groupId>
    <artifactId>Spring_day01_05_综合案例(spring整合mybatis)</artifactId>
    <version>1.0-SNAPSHOT</version>

    <dependencies>
        <dependency>
        <groupId>org.mybatis</groupId>
        <artifactId>mybatis</artifactId>
        <version>3.5.3</version>
    </dependency>
        <dependency>
            <groupId>mysql</groupId>
            <artifactId>mysql-connector-java</artifactId>
            <version>5.1.47</version>
        </dependency>
        <dependency>
            <groupId>org.springframework</groupId>
            <artifactId>spring-context</artifactId>
            <version>5.1.9.RELEASE</version>
        </dependency>
        <dependency>
            <groupId>org.springframework</groupId>
            <artifactId>spring-jdbc</artifactId>
            <version>5.1.9.RELEASE</version>
        </dependency>
        <dependency>
            <groupId>com.alibaba</groupId>
            <artifactId>druid</artifactId>
            <version>1.1.16</version>
        </dependency>
        <dependency>
            <groupId>org.mybatis</groupId>
            <artifactId>mybatis-spring</artifactId>
            <version>1.3.0</version>
        </dependency>
    </dependencies>

</project>
2.创建数据库表,并制作相应的实体类Account
3.定义业务层接口与数据层接口
4.在业务层调用数据层接口,并实现业务方法的调用
- 基础配置文件
5.jdbc.properties
jdbc.driver=com.mysql.jdbc.Driver
jdbc.url=jdbc:mysql://localhost:3306/spring_db
jdbc.username=root
jdbc.password=itheima
6.MyBatis映射配置文件
<?xml version="1.0" encoding="UTF-8"?>
<beans xmlns="http://www.springframework.org/schema/beans"
       xmlns:xsi="http://www.w3.org/2001/XMLSchema-instance"
       xmlns:context="http://www.springframework.org/schema/context"
       xsi:schemaLocation="http://www.springframework.org/schema/beans
        https://www.springframework.org/schema/beans/spring-beans.xsd
        http://www.springframework.org/schema/context
        https://www.springframework.org/schema/context/spring-context.xsd">

    <!--加载perperties配置文件的信息-->
    <context:property-placeholder location="classpath:*.properties"/>

    <!--加载druid资源-->
    <bean id="dataSource" class="com.alibaba.druid.pool.DruidDataSource">
        <property name="driverClassName" value="${jdbc.driver}"/>
        <property name="url" value="${jdbc.url}"/>
        <property name="username" value="${jdbc.username}"/>
        <property name="password" value="${jdbc.password}"/>
    </bean>

    <!--配置service作为spring的bean,注入dao-->
    <bean id="accountService" class="com.itheima.service.impl.AccountServiceImpl">
        <property name="accountDao" ref="accountDao"/>
    </bean>

    <!--spring整合mybatis后控制的创建连接用的对象-->
    <bean class="org.mybatis.spring.SqlSessionFactoryBean">
        <property name="dataSource" ref="dataSource"/>
        <property name="typeAliasesPackage" value="com.itheima.domain"/>
    </bean>

    <!--加载mybatis映射配置的扫描,将其作为spring的bean进行管理-->
    <bean class="org.mybatis.spring.mapper.MapperScannerConfigurer">
        <property name="basePackage" value="com.itheima.dao"/>
    </bean>

</beans>
3. 注解开发
3.1 启用注解功能
- 启动注解扫描,加载类中配置的注解项
<context:component-scan base-package="packageName" />
-
说明:
-
在进行包所扫描时,会对配置的包及其子包中所有文件进行扫描
-
扫描过程是以文件夹递归迭代的形式进行的
-
扫描过程仅读取合法的java文件
-
扫描时仅读取spring可识别的注解
-
扫描结束后会将可识别的有效注解转化为spring对应的资源加入IoC容器
-
-
注意:
-
无论是注解格式还是XML配置格式,最终都是将资源加载到IoC容器中,差别仅仅是数据读取方式不同
-
从加载效率上来说注解优于XML配置文件
-
3.2 Bean的定义
-
名称:@Component @Controller @Service @Repository
-
类型:类注解
-
位置:类定义上方
-
作用:设置该类为spring管理的bean
-
范例:
@Component public class ClassName{} -
说明:
- @Controller、@Service 、@Repository是@Component的衍生注解,功能同@Component
-
相关属性
- value(默认):定义bean的访问id
3.3 bean的作用域
-
名称:@Scope
-
类型:类注解
-
位置:类定义上方
-
作用:设置该类作为bean对应的scope属性
-
范例:
@Scope public class ClassName{} -
相关属性
- value(默认):定义bean的作用域,默认为singleton
3.4 bean的生命周期
-
名称:@PostConstruct、@PreDestroy
-
类型:方法注解
-
位置:方法定义上方
-
作用:设置该类作为bean对应的生命周期方法
-
范例:
@PostConstruct
public void init() { System.out.println("init..."); }
3.5 加载第三方资源
-
名称:@Bean
-
类型:方法注解
-
位置:方法定义上方
-
作用:设置该方法的返回值作为spring管理的bean
-
范例:
@Bean("dataSource") public DruidDataSource createDataSource() { return ……; } -
说明:
-
因为第三方bean无法在其源码上进行修改,使用@Bean解决第三方bean的引入问题
-
该注解用于替代XML配置中的静态工厂与实例工厂创建bean,不区分方法是否为静态或非静态
-
@Bean所在的类必须被spring扫描加载,否则该注解无法生效
-
-
相关属性
- value(默认):定义bean的访问id
3.6 bean的非引用类型属性注入
-
名称:@Value
-
类型:属性注解、方法注解
-
位置:属性定义上方,方法定义上方
-
作用:设置对应属性的值或对方法进行传参
-
范例:
@Value("${jdbc.username}") private String username; -
说明:
-
value值仅支持非引用类型数据,赋值时对方法的所有参数全部赋值
-
value值支持读取properties文件中的属性值,通过类属性将properties中数据传入类中
-
value值支持SpEL
-
@value注解如果添加在属性上方,可以省略set方法(set方法的目的是为属性赋值)
-
-
相关属性
- value(默认):定义对应的属性值或参数值
3.7 bean的引用类型属性注入
-
名称:@Autowired、@Qualifier
-
类型:属性注解、方法注解
-
位置:属性定义上方,方法定义上方
-
作用:设置对应属性的对象或对方法进行引用类型传参
-
范例:
@Autowired(required = false) @Qualifier("userDao") private UserDao userDao; -
说明:
- @Autowired默认按类型装配,指定@Qualifier后可以指定自动装配的bean的id
-
相关属性
- required:定义该属性是否允许为null
3.8 bean的引用类型属性注入
-
名称:@Primary
-
类型:类注解
-
位置:类定义上方
-
作用:设置类对应的bean按类型装配时优先装配
-
范例:
@Primary public class ClassName{} -
说明:
- @Autowired默认按类型装配,当出现相同类型的bean,使用@Primary提高按类型自动装配的优先级,多个@Primary会导致优先级设置无效
3.9 bean的引用类型属性注入
-
名称:@Inject、@Named、@Resource
-
说明:
- @Inject与@Named是JSR330规范中的注解,功能与@Autowired和@Qualifier完全相同,适用于不同架构场景
- @Resource是JSR250规范中的注解,可以简化书写格式
-
@Resource相关属性
-
name:设置注入的bean的id
-
type:设置注入的bean的类型,接收的参数为Class类型
-
3.10 加载properties文件
-
名称:@PropertySource
-
类型:类注解
-
位置:类定义上方
-
作用:加载properties文件中的属性值
-
范例:
@PropertySource(value = "classpath:filename.properties") public class ClassName { @Value("${propertiesAttributeName}") private String attributeName; } -
说明:
- 不支持*通配格式,一旦加载,所有spring控制的bean中均可使用对应属性值
-
相关属性
-
value(默认):设置加载的properties文件名
-
ignoreResourceNotFound:如果资源未找到,是否忽略,默认为false
-
3.11 纯注解格式
-
名称:@Configuration、@ComponentScan
-
类型:类注解
-
位置:类定义上方
-
作用:设置当前类为spring核心配置加载类
-
范例:
@Configuration @ComponentScan("scanPackageName") public class SpringConfigClassName{ } -
说明:
-
核心配合类用于替换spring核心配置文件,此类可以设置空的,不设置变量与属性
-
bean扫描工作使用注解@ComponentScan替代
-
AnnotationConfigApplicationContext
-
加载纯注解格式上下文对象,需要使用AnnotationConfigApplicationContext
AnnotationConfigApplicationContext ctx = new AnnotationConfigApplicationContext(SpringConfig.class);
3.12 第三方bean配置与管理
-
名称:@Import
-
类型:类注解
-
位置:类定义上方
-
作用:导入第三方bean作为spring控制的资源
-
范例:
@Configuration @Import(OtherClassName.class) public class ClassName { } -
说明:
-
@Import注解在同一个类上,仅允许添加一次,如果需要导入多个,使用数组的形式进行设定
-
在被导入的类中可以继续使用@Import导入其他资源(了解)
-
@Bean所在的类可以使用导入的形式进入spring容器,无需声明为bean
-
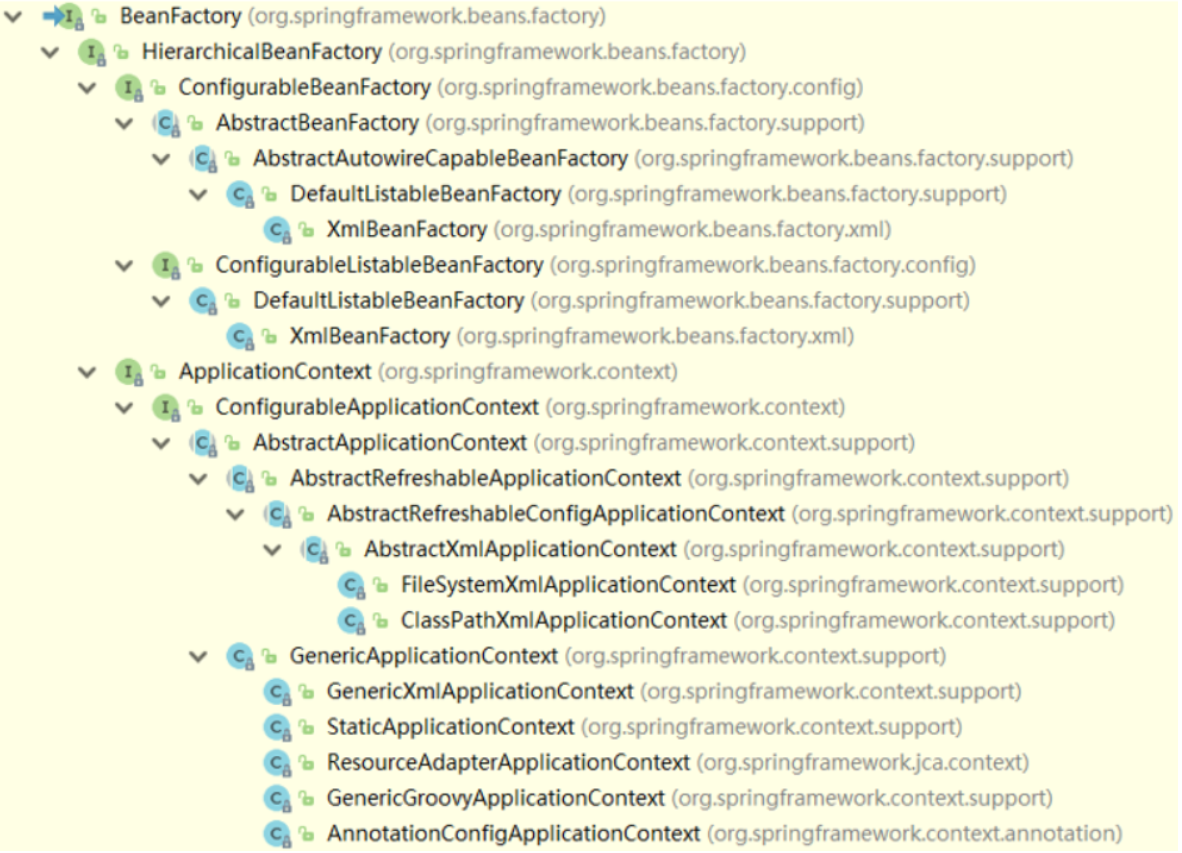
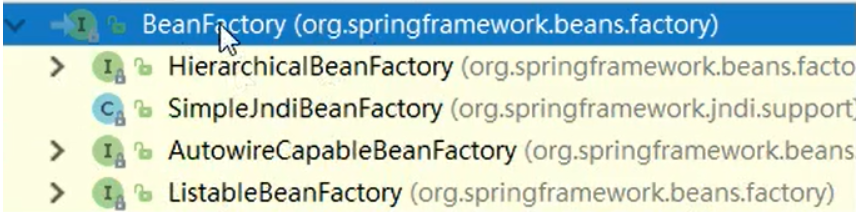
4. IoC底层核心原理
4.1 Ioc核心接口和BeanFactory
4.2 Bean初始化过程
-
BeanFactoryPostProcessor
-
作用:定义了在bean工厂对象创建后,bean对象创建前执行的动作,用于对工厂进行创建后业务处理
-
运行时机:当前操作用于对工厂进行处理,仅运行一次
-
-
BeanPostProcessor
-
作用:定义了所有bean初始化前后进行的统一动作,用于对bean进行创建前业务处理与创建后业务处理
-
运行时机:当前操作伴随着每个bean的创建过程,每次创建bean均运行该操作
-
-
InitializingBean
-
作用:定义了每个bean的初始化前进行的动作,属于非统一性动作,用于对bean进行创建前业务处理
-
运行时机:当前操作伴随着任意一个bean的创建过程,保障其个性化业务处理
-
-
注意:上述操作均需要被spring容器加载放可运行
5. AOP
5.1 AOP相关概念
- Joinpoint(连接点):就是方法
- Pointcut(切入点):就是挖掉共性功能的方法
- Advice(通知):就是共性功能,最终以一个方法的形式呈现
- Aspect(切面):就是共性功能与挖的位置的对应关系
- Target(目标对象):就是挖掉功能的方法对应的类产生的对象,这种对象是无法直接完成最终工作的
- Weaving(织入):就是将挖掉的功能回填的动态过程
- Proxy(代理):目标对象无法直接完成工作,需要对其进行功能回填,通过创建原始对象的代理对象实现
- Introduction(引入/引介) :就是对原始对象无中生有的添加成员变量或成员方法
5.2 AOP开发过程
-
开发阶段(开发者完成)
-
正常的制作程序
-
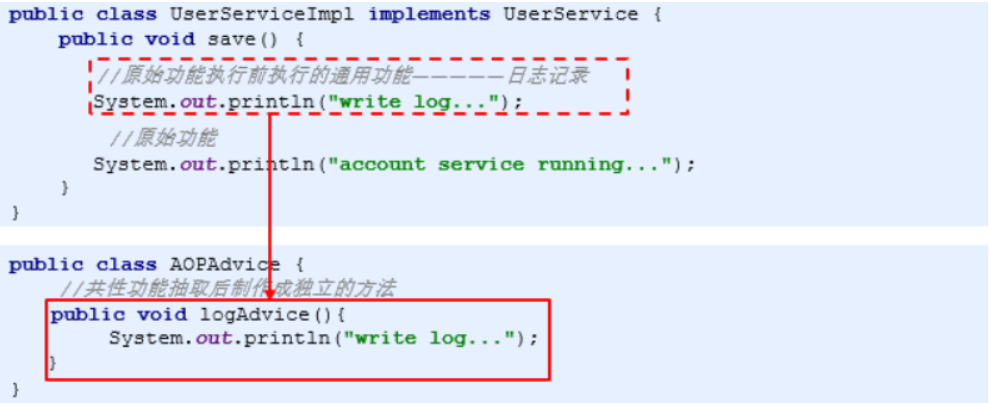
将非共性功能开发到对应的目标对象类中,并制作成切入点方法
-
将共性功能独立开发出来,制作成通知
-
在配置文件中,声明切入点
-
在配置文件中,声明切入点与通知间的关系(含通知类型),即切面
-
-
运行阶段(AOP完成)
- Spring容器加载配置文件,监控所有配置的切入点方法的执行
- 当监控到切入点方法被运行,使用代理机制,动态创建目标对象的代理对象,根据通知类别,在代理对象的对应位置将通知对应的功能织入,完成完整的代码逻辑并运行
5.3 AOP开发步骤
-
导入坐标
<dependency> <groupId>org.aspectj</groupId> <artifactId>aspectjweaver</artifactId> <version>1.9.4</version> </dependency> -
在业务层抽取公共功能方法
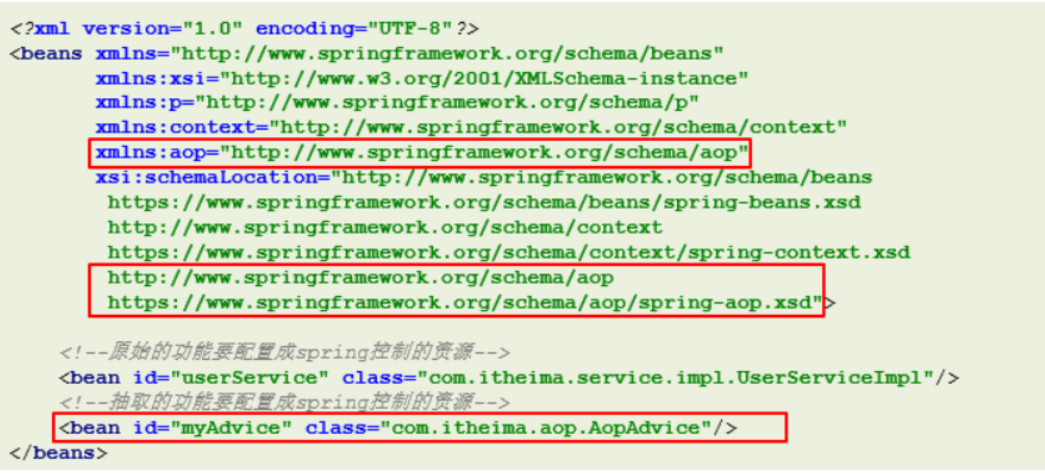
- 把通知加入spring容器管理
-
在配置文件中配置aop的配置
<!--aop配置-->
<aop:config>
    <!--配置切入点-->
    <aop:pointcut id="pt" expression="execution(* *..*())"/>
    <!--配置切面-->
    <aop:aspect ref="myAdvice">
        <!—通知与切入点之间的关系-->
        <aop:before method="logAdvice" pointcut-ref="pt"/>
    </aop:aspect>
</aop:config>
6. AOP配置(XML)
6.1 AspectJ
- Aspect(切面)用于描述切入点与通知间的关系,是AOP编程中的一个概念
- AspectJ是基于java语言对Aspect的实现
6.2 AOP配置
aop:config
作用:开启AOP,在beans标签内部,可以配置多个
格式:
<beans>
    <aop:config>……</aop:config>
    <aop:config>……</aop:config>
</beans>
aop:aspect
- 名称:aop:aspect
- 类型:标签
- 归属:aop:config标签
- 作用:设置具体的AOP通知对应的切入点
- 格式:
<aop:config>
    <aop:aspect ref="beanId">……</aop:aspect>
    <aop:aspect ref="beanId">……</aop:aspect>
</aop:config>
aop:pointcut
-
名称:aop:pointcut
-
类型:标签
-
归属:aop:config标签、aop:aspect标签
-
作用:设置切入点
-
格式:
<aop:config> <aop:pointcut id="pointcutId" expression="……"/> <aop:aspect> <aop:pointcut id="pointcutId" expression="……"/> </aop:aspect> </aop:config> -
说明:
一个aop:config标签中可以配置多个aop:pointcut标签,且该标签可以配置在aop:aspect标签内
-
基本属性:
-
id :识别切入点的名称
-
expression :切入点表达式
-
6.2 切入点
-
切入点描述的是某个方法
-
切入点表达式是一个快速匹配方法描述的通配格式,类似于正则表达式
6.3 切入点表达式的组成
-
切入点描述的是某个方法
-
切入点表达式是一个快速匹配方法描述的通配格式,类似于正则表达式
关键字(访问修饰符 返回值 包名.类名.方法名(参数)异常名)
关键字:描述表达式的匹配模式(参看关键字列表)
访问修饰符:方法的访问控制权限修饰符
类名:方法所在的类(此处可以配置接口名称)
异常:方法定义中指定抛出的异常
-
范例:
execution(public User com.itheima.service.UserService.findById(int))
6.3.1 切入点表达式——关键字
-
execution :匹配执行指定方法
-
args :匹配带有指定参数类型的方法
-
within :……
-
this :……
-
target :……
-
@within :……
-
@target :……
-
@args :……
-
@annotation :……
-
bean :……
-
reference pointcut :……
6.3.2 切入点表达式——通配符
-
*:单个独立的任意符号,可以独立出现,也可以作为前缀或者后缀的匹配符出现
execution(public * com.itheima.*.UserService.find*(*))
匹配com.itheima包下的任意包中的UserService类或接口中所有find开头的带有一个参数的方法
-
.. :多个连续的任意符号,可以独立出现,常用于简化包名与参数的书写
execution(public User com..UserService.findById(..))
匹配com包下的任意包中的UserService类或接口中所有名称为findById的方法
-
+:专用于匹配子类类型
execution(* *..*Service+.*(..))
6.3.4 切入点表达式——逻辑运算符
-
&& :连接两个切入点表达式,表示两个切入点表达式同时成立的匹配
-
|| :连接两个切入点表达式,表示两个切入点表达式成立任意一个的匹配
-
! :连接单个切入点表达式,表示该切入点表达式不成立的匹配
6.3.5 切入点表达式——范例
execution(* *(..))
execution(* *..*(..))
execution(* *..*.*(..))
execution(public * *..*.*(..))
execution(public int *..*.*(..))
execution(public void *..*.*(..))
execution(public void com..*.*(..))
execution(public void com..service.*.*(..))
execution(public void com.itheima.service.*.*(..))
execution(public void com.itheima.service.User*.*(..))
execution(public void com.itheima.service.*Service.*(..))
execution(public void com.itheima.service.UserService.*(..))
execution(public User com.itheima.service.UserService.find*(..))
execution(public User com.itheima.service.UserService.*Id(..))
execution(public User com.itheima.service.UserService.findById(..))
execution(public User com.itheima.service.UserService.findById(int))
execution(public User com.itheima.service.UserService.findById(int,int))
execution(public User com.itheima.service.UserService.findById(int,*))
execution(public User com.itheima.service.UserService.findById(*,int))
execution(public User com.itheima.service.UserService.findById())
execution(List com.itheima.service.*Service+.findAll(..))
6.4 切入点的三种配置方式
<aop:config>
    <!--配置公共切入点-->
    <aop:pointcut id="pt1" expression="execution(* *(..))"/>
    <aop:aspect ref="myAdvice">
        <!--配置局部切入点-->
        <aop:pointcut id="pt2" expression="execution(* *(..))"/>
        <!--引用公共切入点-->
        <aop:before method="logAdvice" pointcut-ref="pt1"/>
        <!--引用局部切入点-->
        <aop:before method="logAdvice" pointcut-ref="pt2"/>
        <!--直接配置切入点-->
        <aop:before method="logAdvice" pointcut="execution(* *(..))"/>
    </aop:aspect>
</aop:config>
6.5 切入点配置经验
-
企业开发命名规范严格遵循规范文档进行
-
先为方法配置局部切入点
-
再抽取类中公共切入点
-
最后抽取全局切入点
-
代码走查过程中检测切入点是否存在越界性包含
-
代码走查过程中检测切入点是否存在非包含性进驻
-
设定AOP执行检测程序,在单元测试中监控通知被执行次数与预计次数是否匹配
-
设定完毕的切入点如果发生调整务必进行回归测试
(以上规则适用于XML配置格式)
6.6 通知类型
AOP的通知类型共5种
-
前置通知:原始方法执行前执行,如果通知中抛出异常,阻止原始方法运行
应用:数据校验
-
后置通知:原始方法执行后执行,无论原始方法中是否出现异常,都将执行通知
应用:现场清理
-
返回后通知:原始方法正常执行完毕并返回结果后执行,如果原始方法中抛出异常,无法执行
应用:返回值相关数据处理
-
抛出异常后通知:原始方法抛出异常后执行,如果原始方法没有抛出异常,无法执行
应用:对原始方法中出现的异常信息进行处理
-
环绕通知:在原始方法执行前后均有对应执行执行,还可以阻止原始方法的执行
应用:十分强大,可以做任何事情
6.6.1 aop:before
-
名称:aop:before
-
类型:标签
-
归属:aop:aspect标签
-
作用:设置前置通知
-
格式:
<aop:aspect ref="adviceId"> <aop:before method="methodName" pointcut="……"/> </aop:aspect> -
说明:一个aop:aspect标签中可以配置多个aop:before标签
-
基本属性:
-
method :在通知类中设置当前通知类别对应的方法
-
pointcut :设置当前通知对应的切入点表达式,与pointcut-ref属性冲突
-
pointcut-ref :设置当前通知对应的切入点id,与pointcut属性冲突
-
6.6.2 aop:after
-
名称:aop:after
-
类型:标签
-
归属:aop:aspect标签
-
作用:设置后置通知
-
格式:
<aop:aspect ref="adviceId"> <aop:after method="methodName" pointcut="……"/> </aop:aspect> -
说明:一个aop:aspect标签中可以配置多个aop:after标签
-
基本属性:
-
method :在通知类中设置当前通知类别对应的方法
-
pointcut :设置当前通知对应的切入点表达式,与pointcut-ref属性冲突
-
pointcut-ref :设置当前通知对应的切入点id,与pointcut属性冲突
-
6.6.3 aop:after-returning
-
名称:aop:after-returning
-
类型:标签
-
归属:aop:aspect标签
-
作用:设置返回后通知
-
格式:
<aop:aspect ref="adviceId"> <aop:after-returning method="methodName" pointcut="……"/> </aop:aspect> -
说明:一个aop:aspect标签中可以配置多个aop:after-returning标签
-
基本属性:
-
method :在通知类中设置当前通知类别对应的方法
-
pointcut :设置当前通知对应的切入点表达式,与pointcut-ref属性冲突
-
pointcut-ref :设置当前通知对应的切入点id,与pointcut属性冲突
-
3.6.4 aop:after-throwing
-
名称:aop:after-throwing
-
类型:标签
-
归属:aop:aspect标签
-
作用:设置抛出异常后通知
-
格式:
<aop:aspect ref="adviceId"> <aop:after-throwing method="methodName" pointcut="……"/> </aop:aspect> -
说明:一个aop:aspect标签中可以配置多个aop:after-throwing标签
-
基本属性:
-
method :在通知类中设置当前通知类别对应的方法
-
pointcut :设置当前通知对应的切入点表达式,与pointcut-ref属性冲突
-
pointcut-ref :设置当前通知对应的切入点id,与pointcut属性冲突
-
3.6.5 aop:around
-
名称:aop:around
-
类型:标签
-
归属:aop:aspect标签
-
作用:设置环绕通知
-
格式:
<aop:aspect ref="adviceId"> <aop:around method="methodName" pointcut="……"/> </aop:aspect> -
说明:一个aop:aspect标签中可以配置多个aop:around标签
-
基本属性:
-
method :在通知类中设置当前通知类别对应的方法
-
pointcut :设置当前通知对应的切入点表达式,与pointcut-ref属性冲突
-
pointcut-ref :设置当前通知对应的切入点id,与pointcut属性冲突
-
环绕通知的开发方式
-
环绕通知是在原始方法的前后添加功能,在环绕通知中,存在对原始方法的显式调用
public Object around(ProceedingJoinPoint pjp) throws Throwable { Object ret = pjp.proceed(); return ret; } -
环绕通知方法相关说明:
-
方法须设定Object类型的返回值,否则会拦截原始方法的返回。如果原始方法返回值类型为void,通知方 也可以设定返回值类型为void,最终返回null
-
方法需在第一个参数位置设定ProceedingJoinPoint对象,通过该对象调用proceed()方法,实现对原始方法的调用。如省略该参数,原始方法将无法执行
-
使用proceed()方法调用原始方法时,因无法预知原始方法运行过程中是否会出现异常,强制抛出Throwable对象,封装原始方法中可能出现的异常信息
-
3.7 通知顺序(了解)
当同一个切入点配置了多个通知时,通知会存在运行的先后顺序,该顺序以通知配置的顺序为准
6.7 通知获取数据
-
参数
-
返回值
-
异常
6.7.1 通知获取参数数据
第一种情况:
-
设定通知方法第一个参数为JoinPoint,通过该对象调用getArgs()方法,获取原始方法运行的参数数组
public void before(JoinPoint jp) throws Throwable { Object[] args = jp.getArgs(); } -
所有的通知均可以获取参数
第二种情况:
-
设定切入点表达式为通知方法传递参数(锁定通知变量名)
-
原始方法

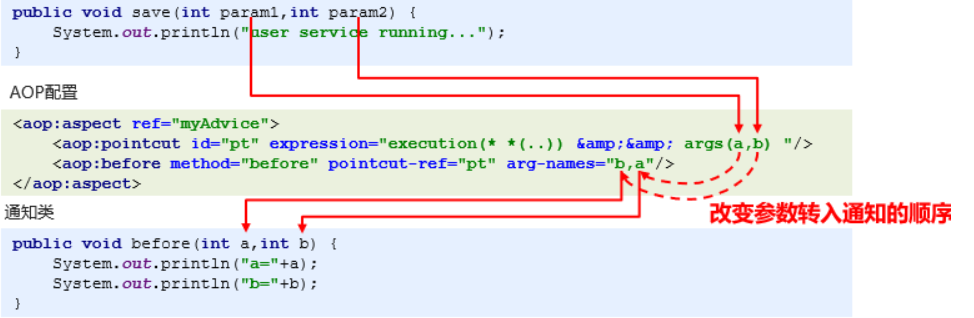
第三种情况
-
设定切入点表达式为通知方法传递参数(改变通知变量名的定义顺序)
-
原始方法
6.7.2 通知获取返回值数据
第一种:返回值变量名
-
设定返回值变量名
-
原始方法
public int save() { System.out.println("user service running..."); return 100; } -
AOP配置
<aop:aspect ref="myAdvice"> <aop:pointcut id="pt3" expression="execution(* *(..)) "/> <aop:after-returning method="afterReturning" pointcut-ref="pt3" returning="ret"/> </aop:aspect> -
通知类
public void afterReturning(Object ret) { System.out.println(ret); } -
适用于返回后通知(after-returning)
第二种:
-
在通知类的方法中调用原始方法获取返回值
-
原始方法
public int save() { System.out.println("user service running..."); return 100; } -
AOP配置l
<aop:aspect ref="myAdvice"> <aop:pointcut id="pt2" expression="execution(* *(..)) "/> <aop:around method="around" pointcut-ref="pt2" /> </aop:aspect> -
通知类
public Object around(ProceedingJoinPoint pjp) throws Throwable { Object ret = pjp.proceed(); return ret; } -
适用于环绕通知(around)
6.7.3 通知获取异常数据
第一种:通知类的方法中调用原始方法捕获异常
-
在通知类的方法中调用原始方法捕获异常
-
原始方法
public void save() { System.out.println("user service running..."); int i = 1/0; } -
AOP配置
<aop:aspect ref="myAdvice"> <aop:pointcut id="pt4" expression="execution(* *(..)) "/> <aop:around method="around" pointcut-ref="pt4" /> </aop:aspect> -
通知类
public Object around(ProceedingJoinPoint pjp) throws Throwable { Object ret = pjp.proceed(); //对此处调用进行try……catch……捕获异常,或抛出异常 return ret; } -
适用于环绕通知(around)
第二种:
-
设定异常对象变量名
-
原始方法
public void save() { System.out.println("user service running..."); int i = 1/0; } -
AOP配置
<aop:aspect ref="myAdvice"> <aop:pointcut id="pt4" expression="execution(* *(..)) "/> <aop:after-throwing method="afterThrowing" pointcut-ref="pt4" throwing="t"/> </aop:aspect> -
通知类
public void afterThrowing(Throwable t){ System.out.println(t.getMessage()); } -
适用于返回后通知(after-throwing)
7 AOP配置(注解)

7.1 注解开发AOP制作步骤
在XML格式基础上
-
导入坐标(伴随spring-context坐标导入已经依赖导入完成)
-
开启AOP注解支持
-
配置切面@Aspect
-
定义专用的切入点方法,并配置切入点@Pointcut
-
为通知方法配置通知类型及对应切入点@Before
7.2 注解开发AOP注意事项
1.切入点最终体现为一个方法,无参无返回值,无实际方法体内容,但不能是抽象方法
2.引用切入点时必须使用方法调用名称,方法后面的()不能省略
3.切面类中定义的切入点只能在当前类中使用,如果想引用其他类中定义的切入点使用“类名.方法名()”引用
4.可以在通知类型注解后添加参数,实现XML配置中的属性,例如after-returning后的returning属性
8. AOP注解详解
AOP注解驱动
-
名称:@EnableAspectJAutoProxy
-
类型:注解
-
位置:Spring注解配置类定义上方
-
作用:设置当前类开启AOP注解驱动的支持,加载AOP注解
-
格式:
@Configuration
@ComponentScan("com.itheima")
@EnableAspectJAutoProxy
public class SpringConfig {
}
8.1 @Aspect
-
名称:@Aspect
-
类型:注解
-
位置:类定义上方
-
作用:设置当前类为切面类
-
格式:
@Aspect public class AopAdvice { } -
说明:一个beans标签中可以配置多个aop:config标签
8.2 @Pointcut
-
名称:@Pointcut
-
类型:注解
-
位置:方法定义上方
-
作用:使用当前方法名作为切入点引用名称
-
格式:
@Pointcut("execution(* *(..))") public void pt() { } -
说明:被修饰的方法忽略其业务功能,格式设定为无参无返回值的方法,方法体内空实现(非抽象)
8.3 @Before
-
名称:@Before
-
类型:注解
-
位置:方法定义上方
-
作用:标注当前方法作为前置通知
-
格式:
@Before("pt()") public void before(){ } -
特殊参数:
- 无
8.4 @After
-
名称:@After
-
类型:注解
-
位置:方法定义上方
-
作用:标注当前方法作为后置通知
-
格式:
@After("pt()") public void after(){ } -
特殊参数:
- 无
8.5 @AfterReturning
-
名称:@AfterReturning
-
类型:注解
-
位置:方法定义上方
-
作用:标注当前方法作为返回后通知
-
格式:
@AfterReturning(value="pt()",returning = "ret") public void afterReturning(Object ret) { } -
特殊参数:
- returning :设定使用通知方法参数接收返回值的变量名
8.6 @AfterThrowing
-
名称:@AfterThrowing
-
类型:注解
-
位置:方法定义上方
-
作用:标注当前方法作为异常后通知
-
格式:
@AfterThrowing(value="pt()",throwing = "t") public void afterThrowing(Throwable t){ } -
特殊参数:
- throwing :设定使用通知方法参数接收原始方法中抛出的异常对象名
8.7 @Around
-
名称:@Around
-
类型:注解
-
位置:方法定义上方
-
作用:标注当前方法作为环绕通知
-
格式:
@Around("pt()") public Object around(ProceedingJoinPoint pjp) throws Throwable { Object ret = pjp.proceed(); return ret; } -
特殊参数:
- 无
8.8 AOP注解开发通知执行顺序控制(了解)
1.AOP使用XML配置情况下,通知的执行顺序由配置顺序决定,在注解情况下由于不存在配置顺序的概念的概念,参照通知所配置的方法名字符串对应的编码值顺序,可以简单理解为字母排序
-
同一个通知类中,相同通知类型以方法名排序为准
-
不同通知类中,以类名排序为准
-
使用@Order注解通过变更bean的加载顺序改变通知的加载顺序
2.企业开发经验
-
通知方法名由3部分组成,分别是前缀、顺序编码、功能描述
-
前缀为固定字符串,例如baidu、itheima等,无实际意义
-
顺序编码为6位以内的整数,通常3位即可,不足位补0
-
功能描述为该方法对应的实际通知功能,例如exception、strLenCheck
-
制通知执行顺序使用顺序编码控制,使用时做一定空间预留
-
003使用,006使用,预留001、002、004、005、007、008
-
使用时从中段开始使用,方便后期做前置追加或后置追加
-
最终顺序以运行顺序为准,以测试结果为准,不以设定规则为准
-
9. AOP底层原理
- 静态代理
- 动态代理——Proxy
- 动态代理——CGLIB
- 织入形式
9.1 静态代理
装饰者模式(Decorator Pattern):在不惊动原始设计的基础上,为其添加功能
public class UserServiceDecorator implements UserService{
    private UserService userService;
    public UserServiceDecorator(UserService userService) {
        this.userService = userService;
    }
    public void save() {
        //原始调用
        userService.save();
        //增强功能(后置)
        System.out.println("刮大白");
    }
}
9.2 动态代理——JDK Proxy
JDKProxy动态代理是针对对象做代理,要求原始对象具有接口实现,并对接口方法进行增强
public class UserServiceJDKProxy {
    public UserService createUserServiceJDKProxy(final UserService userService){
        //获取被代理对象的类加载器
        ClassLoader classLoader = userService.getClass().getClassLoader();
        //获取被代理对象实现的接口
        Class[] classes = userService.getClass().getInterfaces();
        //对原始方法执行进行拦截并增强
        InvocationHandler ih = new InvocationHandler() {
            public Object invoke(Object proxy, Method method, Object[] args) throws Throwable {
                //前置增强内容
                Object ret = method.invoke(userService, args);
                //后置增强内容
                System.out.println("刮大白2");
                return ret;
            }
        };
        //使用原始被代理对象创建新的代理对象
        UserService proxy = (UserService) Proxy.newProxyInstance(classLoader,classes,ih);
        return proxy;
    }
}
9.3 动态代理——CGLIB
- CGLIB(Code Generation Library),Code生成类库
- CGLIB动态代理不限定是否具有接口,可以对任意操作进行增强
- CGLIB动态代理无需要原始被代理对象,动态创建出新的代理对象
public class UserServiceImplCglibProxy {
    public static UserServiceImpl createUserServiceCglibProxy(Class clazz){
        //创建Enhancer对象(可以理解为内存中动态创建了一个类的字节码)
        Enhancer enhancer = new Enhancer();
        //设置Enhancer对象的父类是指定类型UserServerImpl
        enhancer.setSuperclass(clazz);
        Callback cb = new MethodInterceptor() {
            public Object intercept(Object o, Method m, Object[] a, MethodProxy mp) throws Throwable {
                Object ret = mp.invokeSuper(o, a);
                if(m.getName().equals("save")) {
                    System.out.println("刮大白");
                }
                return ret;
            }
        };
        //设置回调方法
        enhancer.setCallback(cb);
        //使用Enhancer对象创建对应的对象
        return (UserServiceImpl)enhancer.create();
    }
}
9.4 代理模式的选择**
Spirng可以通过配置的形式控制使用的代理形式,默认使用jdkproxy,通过配置可以修改为使用cglib
-
XML配置
<!--XMP配置AOP--> <aop:config proxy-target-class="false"> </aop:config> -
XML注解支持
<!--注解配置AOP--> <aop:aspectj-autoproxy proxy-target-class="false"/> -
注解驱动
//注解驱动
@EnableAspectJAutoProxy(proxyTargetClass = true)

 浙公网安备 33010602011771号