Spark源码阅读01:环境准备(Yarn集群)
源码阅读目录
1)环境准备(Yarn集群)
- Driver, Executor
2)组件通信
- Driver => Executor
- Executor => Driver
- Executor => Executor
3)应用程序的执行
- RDD依赖
- 阶段的划分
- 任务的切分
- 任务的调度
- 任务的执行
4)Shuffle
- Shuffle的原理和执行过程
- Shuffle写磁盘
- Shuffle读取磁盘
5)内存的管理
- 内存的分类
- 内存的配置
回顾
Driver
Spark驱动器节点,用于执行 Spark任务中的main方法,负责实际代码的执行工作
Driver在Spark作业执行时主要负责:
-
将用户程序转化为作业(Job)
-
在Executor之间调度任务(Task)
-
跟踪Executor的执行情况
-
通过UI展示查询运行情况
Executor
Spark Executor对象是负责在Spark作业中运行具体任务,任务彼此之间相互独立。Spark 应用启动时,ExecutorBackend节点被同时启动,并且始终伴随着整个Spark应用的生命周期而存在
如果有ExecutorBackend节点发生了故障或崩溃,Spark应用也可以继续执行,会将出错节点上的任务调度到其他Executor节点上继续运行
Executor有两个核心功能:
- 负责运行组成Spark应用的任务,并将结果返回给驱动器(Driver)
- 它们通过自身的块管理器(Block Manager)为用户程序中要求缓存的 RDD 提供内存式存储。RDD是直接缓存在Executor进程内的,因此任务可以在运行时充分利用缓存数据加速运算
Spark通用运行流程概述
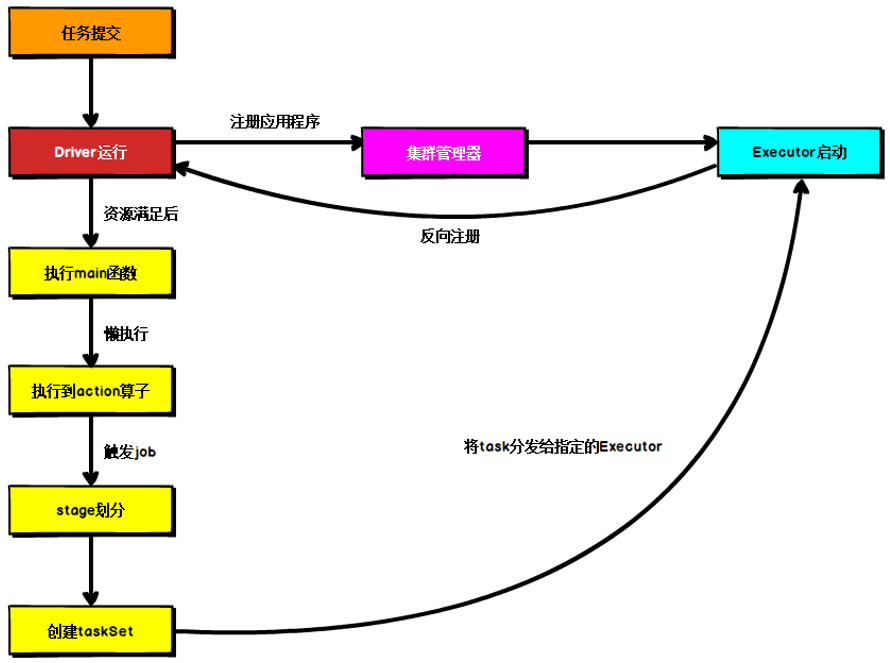
上图为Spark通用运行流程图,体现了基本的Spark应用程序在部署中的基本提交流程
这个流程是按照如下的核心步骤进行工作的:
-
任务提交后,都会先启动Driver程序
-
随后Driver向集群管理器注册应用程序
-
之后集群管理器根据此任务的配置文件分配Executor并启动
-
Driver开始执行main函数,Spark查询为懒执行,当执行到Action算子时开始反向推算,根据宽依赖进行Stage的划分,随后每一个Stage对应一个Taskset,Taskset中有多个Task,查找可用资源Executor进行调度
-
根据本地化原则,Task会被分发到指定的Executor去执行,在任务执行的过程中,Executor也会不断与Driver进行通信,报告任务运行情况
YARN模式运行机制
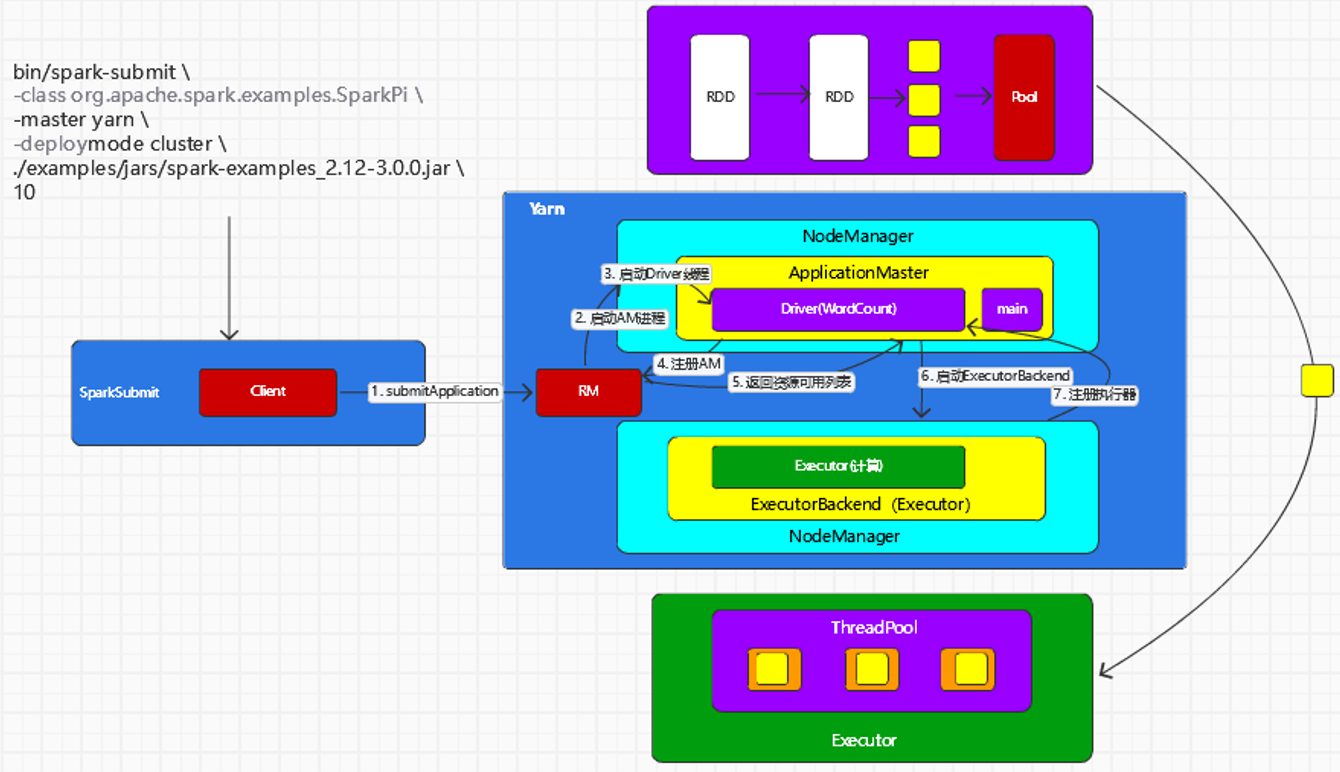
YARN Cluster模式
- 执行脚本提交任务,实际是启动一个 SparkSubmit 的 JVM进程
- SparkSubmit类中的main方法反射调用 YarnClusterApplication 的main方法
- YarnClusterApplication创建Yarn客户端,然后向Yarn服务器发送执行指令:bin/java ApplicationMaster
- Yarn框架收到指令后会在指定的NodeManager中启动ApplicationMaster
- ApplicationMaster启动Driver线程,执行用户的作业
- ApplicationMaster向 ResourceManager注册,申请资源
- 获取资源后AM向NM发送指令:bin/java CoarseGrainedExecutorBackend
- CoarseGrainedExecutorBackend进程会接收消息,跟Driver通信,注册已经启动的Executor;然后启动计算对象Executor等待接收任务
- Driver 线程继续执行完成作业的调度和任务的执行
- Driver 分配任务并监控任务的执行
注意:SparkSubmit、ApplicationMaster和CoarseGrainedExecutorBackend是独立的进程;Driver是独立的线程;Executor和YarnClusterApplication是对象
YARN Client模式
CLIENT 模式的区别关键在于Driver所运行的位置
-
执行脚本提交任务,实际是启动一个SparkSubmit的 JVM进程
-
SparkSubmit类中的main方法反射调用用户代码的main方法
-
启动Driver线程,执行用户的作业,并创建ScheduleBackend
-
YarnClientSchedulerBackend向RM发送指令:bin/java ExecutorLauncher
-
Yarn框架收到指令后会在指定的NM中启动ExecutorLauncher(实际上还是调用ApplicationMaster的main方法)
object ExecutorLauncher { def main(args: Array[String]): Unit = { ApplicationMaster.main(args) } } -
AM向RM注册,申请资源
-
获取资源后AM向NM发送指令:bin/java CoarseGrainedExecutorBackend
-
CoarseGrainedExecutorBackend进程会接收消息,跟Driver通信,注册已经启动的Executor;然后启动计算对象Executor等待接收任务
-
Driver分配任务并监控任务的执行
注意:SparkSubmit、ApplicationMaster和YarnCoarseGrainedExecutorBackend是独立的进程;Executor和Driver是对象
环境准备(Yarn集群)
返回上/下个光标地方:Ctrl+Alt+小键盘← 和 Ctrl+Alt+小键盘→(非常有用!!!)
讲解中的 // => 表示点击进入上一行的方法后会看见的内容,即代码跳转
bin/spark-submit \
--class org.apache.spark.examples.SparkPi \
--master yarn \
--deploy-mode cluster \
./examples/jars/spark-examples_2.12-3.0.0.jar \
10
阅读源码的起点 => 提交应用的时候 jvm 执行进程:
org.apache.spark.deploy.SparkSubmit
注意:在这里是以yarn模式进行讲解
1. 得到mainClass:YarnClusterApplication
// This entry point is used by the launcher library to start in-process Spark applications.
private[spark] object InProcessSparkSubmit {

  def main(args: Array[String]): Unit = {
    val submit = new SparkSubmit()
    submit.doSubmit(args)  // args: 命令行参数
  }

}
def doSubmit(args: Array[String]): Unit = {
  // Initialize logging if it hasn't been done yet. Keep track of whether logging needs to
  // be reset before the application starts.
  val uninitLog = initializeLogIfNecessary(true, silent = true)

  val appArgs = parseArguments(args) // 解析参数
  if (appArgs.verbose) {
    logInfo(appArgs.toString)
  }
  appArgs.action match {
    case SparkSubmitAction.SUBMIT => submit(appArgs, uninitLog)
    case SparkSubmitAction.KILL => kill(appArgs)
    case SparkSubmitAction.REQUEST_STATUS => requestStatus(appArgs)
    case SparkSubmitAction.PRINT_VERSION => printVersion()
  }
}
底层使用了 org.apache.spark.deploy.SparkSubmitArguments 类来对参数进行封装,它包括了master、action、mainClass、deploy-mode等需要的属性,其中action默认初始化为 SUBMIT
// Action should be SUBMIT unless otherwise specified
action = Option(action).getOrElse(SUBMIT)
在得到参数类实例 appArgs之后,我们继续看主流程 submit(appArgs, uninitLog) => doRunMain() => runMain(),这里会判断我们是否传入了proxyUser这个参数,即服务器的用户,来调整当前用户相应的权限,现在是没传这个参数的,所以我们进入else,来到runMain方法
// 准备提交环境
val (childArgs, childClasspath, sparkConf, childMainClass) = prepareSubmitEnvironment(args)
...
// 通过查看prepareSubmitEnvironment源码发现这里的childMainClass就是YarnClusterApplication类
mainClass = Utils.classForName(childMainClass)
...
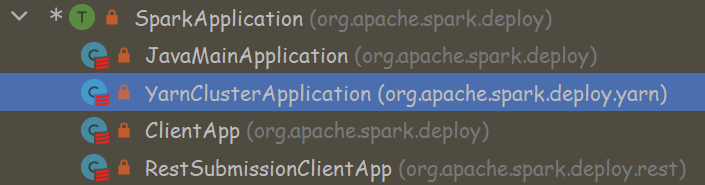
val app: SparkApplication = if (classOf[SparkApplication].isAssignableFrom(mainClass)) {
mainClass.newInstance().asInstanceOf[SparkApplication] // 如果属于SparkApplication类,通过反射拿到实例
} else {
// SPARK-4170
if (classOf[scala.App].isAssignableFrom(mainClass)) {
logWarning("Subclasses of scala.App may not work correctly. Use a main() method instead.")
}
new JavaMainApplication(mainClass) // 不是就创建一个SparkApplication
}
...
app.start(childArgs.toArray, sparkConf) // 启动
这里涉及的几个类继承关系如下图
那么这个childMainClass又是怎么得到的呢?进入prepareSubmitEnvironment,我们可以看到根据不同模式进行判断后,由于这里是yarn模式所以将其赋值为了YARN_CLUSTER_SUBMIT_CLASS,即 org.apache.spark.deploy.yarn.YarnClusterApplication
同时,我们在这里可以发现与 CLIENT 模式的区别关键在于Driver所运行的位置, CLIENT 模式下是在client端运行Driver,之后的代码逻辑是差不多的
// In client mode, launch the application main class directly
// In addition, add the main application jar and any added jars (if any) to the classpath
if (deployMode == CLIENT) {
  childMainClass = args.mainClass  // 直接运行主类
  if (localPrimaryResource != null && isUserJar(localPrimaryResource)) {
	childClasspath += localPrimaryResource
  }
  if (localJars != null) { childClasspath ++= localJars.split(",") }
}
...
// In yarn-cluster mode, use yarn.Client as a wrapper around the user class
if (isYarnCluster) {
  childMainClass = YARN_CLUSTER_SUBMIT_CLASS
  if (args.isPython) {
	childArgs += ("--primary-py-file", args.primaryResource)
	childArgs += ("--class", "org.apache.spark.deploy.PythonRunner")
  } else if (args.isR) {
	val mainFile = new Path(args.primaryResource).getName
	childArgs += ("--primary-r-file", mainFile)
	childArgs += ("--class", "org.apache.spark.deploy.RRunner")
  } else {
	if (args.primaryResource != SparkLauncher.NO_RESOURCE) {
	  childArgs += ("--jar", args.primaryResource)
	}
	childArgs += ("--class", args.mainClass)
  }
  if (args.childArgs != null) {
	args.childArgs.foreach { arg => childArgs += ("--arg", arg) }
  }
}
但是你会发现找不到YarnClusterApplication这个类,因为需要导入yarn依赖,然后发现它其实继承了org.apache.spark.deploy.SparkApplication
<dependency>
    <groupId>org.apache.spark</groupId>
    <artifactId>spark-yarn_2.11</artifactId>
    <version>2.4.8</version>
</dependency>
private[spark] class YarnClusterApplication extends SparkApplication {

  override def start(args: Array[String], conf: SparkConf): Unit = {
    // SparkSubmit would use yarn cache to distribute files & jars in yarn mode,
    // so remove them from sparkConf here for yarn mode.
    conf.remove("spark.jars")
    conf.remove("spark.files")

    new Client(new ClientArguments(args), conf).run()
  }

}
2. 向ResourceManager提交应用
在start方法中会创建一个Client对象,而这个对象中有一个很重要的属性yarnClient,继续往下点,最后发现YarnClientImpl中又有一个属性,即 ResourceManager
private val yarnClient = YarnClient.createYarnClient
// =>
YarnClient client = new YarnClientImpl();
// =>
protected ApplicationClientProtocol rmClient;
继续看Client.run()方法,官方注释得很详细,里面有一个submitApplication方法,剩下的就是对应用状态的监控了
Submit an application to the ResourceManager.
If set spark.yarn.submit.waitAppCompletion to true, it will stay alive reporting the application's status until the application has exited for any reason.
Otherwise, the client process will exit after submission. If the application finishes with a failed, killed, or undefined status, throw an appropriate SparkException.
def run(): Unit = {
  this.appId = submitApplication()
  if (!launcherBackend.isConnected() && fireAndForget) {
    val report = getApplicationReport(appId)
    val state = report.getYarnApplicationState
    logInfo(s"Application report for $appId (state: $state)")
    logInfo(formatReportDetails(report))
    if (state == YarnApplicationState.FAILED || state == YarnApplicationState.KILLED) {
      throw new SparkException(s"Application $appId finished with status: $state")
    }
  } else {
    val YarnAppReport(appState, finalState, diags) = monitorApplication(appId)
    if (appState == YarnApplicationState.FAILED || finalState == FinalApplicationStatus.FAILED) {
      diags.foreach { err =>
        logError(s"Application diagnostics message: $err")
      }
      throw new SparkException(s"Application $appId finished with failed status")
    }
    if (appState == YarnApplicationState.KILLED || finalState == FinalApplicationStatus.KILLED) {
      throw new SparkException(s"Application $appId is killed")
    }
    if (finalState == FinalApplicationStatus.UNDEFINED) {
      throw new SparkException(s"The final status of application $appId is undefined")
    }
  }
}
进入submitApplication方法,向 ResourceManager 提交应用
Submit an application running our ApplicationMaster to the ResourceManager.
The stable Yarn API provides a convenience method (YarnClient#createApplication) for creating applications and setting up the application submission context. This was not available in the alpha API.
def submitApplication(): ApplicationId = {
  var appId: ApplicationId = null
  try {
    launcherBackend.connect()
    yarnClient.init(hadoopConf)
    yarnClient.start()

    logInfo("Requesting a new application from cluster with %d NodeManagers"
      .format(yarnClient.getYarnClusterMetrics.getNumNodeManagers))

    // Get a new application from our RM
    val newApp = yarnClient.createApplication()
    val newAppResponse = newApp.getNewApplicationResponse()
    appId = newAppResponse.getApplicationId()

    new CallerContext("CLIENT", sparkConf.get(APP_CALLER_CONTEXT),
      Option(appId.toString)).setCurrentContext()

    // Verify whether the cluster has enough resources for our AM
    verifyClusterResources(newAppResponse)

    // Set up the appropriate contexts to launch our AM
    val containerContext = createContainerLaunchContext(newAppResponse)
    val appContext = createApplicationSubmissionContext(newApp, containerContext)

    // Finally, submit and monitor the application
    logInfo(s"Submitting application $appId to ResourceManager")
    yarnClient.submitApplication(appContext)
    launcherBackend.setAppId(appId.toString)
    reportLauncherState(SparkAppHandle.State.SUBMITTED)

    appId
  } catch {
    case e: Throwable =>
      if (appId != null) {
        cleanupStagingDir(appId)
      }
      throw e
  }
}
查看createContainerLaunchContext方法,发现准备containerContext其实就是封装一些指令提交给ResourceManager,然后ResourceManager 根据指令在某个NodeManager下创建ApplicationMaster
Set up a ContainerLaunchContext to launch our ApplicationMaster container. This sets up the launch environment, java options, and the command for launching the AM.
val amClass =
  if (isClusterMode) {
    Utils.classForName("org.apache.spark.deploy.yarn.ApplicationMaster").getName
  } else {  // 如果不是集群模式
    Utils.classForName("org.apache.spark.deploy.yarn.ExecutorLauncher").getName
  }
if (args.primaryRFile != null && args.primaryRFile.endsWith(".R")) {
  args.userArgs = ArrayBuffer(args.primaryRFile) ++ args.userArgs
}
val userArgs = args.userArgs.flatMap { arg =>
  Seq("--arg", YarnSparkHadoopUtil.escapeForShell(arg))
}
val amArgs =
  Seq(amClass) ++ userClass ++ userJar ++ primaryPyFile ++ primaryRFile ++ userArgs ++
  Seq("--properties-file", buildPath(Environment.PWD.$$(), LOCALIZED_CONF_DIR, SPARK_CONF_FILE))

// Command for the ApplicationMaster
val commands = prefixEnv ++
  Seq(Environment.JAVA_HOME.$$() + "/bin/java", "-server") ++
  javaOpts ++ amArgs ++
  Seq(
    "1>", ApplicationConstants.LOG_DIR_EXPANSION_VAR + "/stdout",
    "2>", ApplicationConstants.LOG_DIR_EXPANSION_VAR + "/stderr")

// TODO: it would be nicer to just make sure there are no null commands here
val printableCommands = commands.map(s => if (s == null) "null" else s).toList
amContainer.setCommands(printableCommands.asJava)
3. ApplicationMaster启动Driver
然后我们转到org.apache.spark.deploy.yarn.ApplicationMaster这个类,里面有 main方法,ApplicationMaster会初始化SparkContext,并启动Driver
def main(args: Array[String]): Unit = {
  SignalUtils.registerLogger(log)
  val amArgs = new ApplicationMasterArguments(args)
  master = new ApplicationMaster(amArgs)
  System.exit(master.run())
}
在ApplicationMaster对象中,会有一个client属性,即YarnRMClient
private val client = doAsUser { new YarnRMClient() }
YarnRMClient是用来同 YARN ResourceManager 进行交互的
Handles registering and unregistering the application with the YARN ResourceManager.
然后继续,run() => runDriver() => startUserApplication() ,启动用户的应用程序,在startUserApplication方法中
val mainMethod = userClassLoader.loadClass(args.userClass).getMethod("main", classOf[Array[String]])
// => 继续点发现userClass就是最初的 --class 的参数值
case ("--class") :: value :: tail =>
  userClass = value
  args = tail
在拿到 main方法后,会创建一个线程并启动,而线程的名字就叫做 Driver
val userThread = new Thread {
  override def run() {
	try {
	  if (!Modifier.isStatic(mainMethod.getModifiers)) {
		logError(s"Could not find static main method in object ${args.userClass}")
		finish(FinalApplicationStatus.FAILED, ApplicationMaster.EXIT_EXCEPTION_USER_CLASS)
	  } else {
		mainMethod.invoke(null, userArgs.toArray)
		finish(FinalApplicationStatus.SUCCEEDED, ApplicationMaster.EXIT_SUCCESS)
		logDebug("Done running user class")
	  }
	} catch {
	  case e: InvocationTargetException =>
		e.getCause match {
		  case _: InterruptedException =>
			// Reporter thread can interrupt to stop user class
		  case SparkUserAppException(exitCode) =>
			val msg = s"User application exited with status $exitCode"
			logError(msg)
			finish(FinalApplicationStatus.FAILED, exitCode, msg)
		  case cause: Throwable =>
			logError("User class threw exception: " + cause, cause)
			finish(FinalApplicationStatus.FAILED,
			  ApplicationMaster.EXIT_EXCEPTION_USER_CLASS,
			  "User class threw exception: " + StringUtils.stringifyException(cause))
		}
		sparkContextPromise.tryFailure(e.getCause())
	} finally {
	  // Notify the thread waiting for the SparkContext, in case the application did not
	  // instantiate one. This will do nothing when the user code instantiates a SparkContext
	  // (with the correct master), or when the user code throws an exception (due to the
	  // tryFailure above).
	  sparkContextPromise.trySuccess(null)
	}
  }
}
userThread.setContextClassLoader(userClassLoader)
userThread.setName("Driver")
userThread.start()
而回退到runDriver方法,在启动用户的应用程序,会阻塞线程,等待完成SparkContext的初始化
private def runDriver(): Unit = {
  addAmIpFilter(None)
  userClassThread = startUserApplication()

  // This a bit hacky, but we need to wait until the spark.driver.port property has
  // been set by the Thread executing the user class.
  logInfo("Waiting for spark context initialization...")
  val totalWaitTime = sparkConf.get(AM_MAX_WAIT_TIME)
  try {
    val sc = ThreadUtils.awaitResult(sparkContextPromise.future,
      Duration(totalWaitTime, TimeUnit.MILLISECONDS))
    if (sc != null) {
      rpcEnv = sc.env.rpcEnv  // 通信环境

      val userConf = sc.getConf
      val host = userConf.get("spark.driver.host")
      val port = userConf.get("spark.driver.port").toInt
      registerAM(host, port, userConf, sc.ui.map(_.webUrl))  // 注册ApplicationMaster,与yarn进行连接,申请资源等

      val driverRef = rpcEnv.setupEndpointRef(
        RpcAddress(host, port),
        YarnSchedulerBackend.ENDPOINT_NAME)
      createAllocator(driverRef, userConf)  // 利用YarnRMClient得到可分配的资源
    } else {
      // Sanity check; should never happen in normal operation, since sc should only be null
      // if the user app did not create a SparkContext.
      throw new IllegalStateException("User did not initialize spark context!")
    }
    resumeDriver()  // 最后让Driver继续执行
    userClassThread.join()
  } catch {
    case e: SparkException if e.getCause().isInstanceOf[TimeoutException] =>
      logError(
        s"SparkContext did not initialize after waiting for $totalWaitTime ms. " +
         "Please check earlier log output for errors. Failing the application.")
      finish(FinalApplicationStatus.FAILED,
        ApplicationMaster.EXIT_SC_NOT_INITED,
        "Timed out waiting for SparkContext.")
  } finally {
    resumeDriver()
  }
}
对于初始化SparkContext,其实就是对映我们所编写代码中的这一部分
val sparkConf: SparkConf = new SparkConf().setMaster("local").setAppName("api test")
val sc: SparkContext = new SparkContext(sparkConf)
在SparkContext初始化之后,注册AM,然后调用createAllocator方法利用YarnRMClient得到可分配的资源,allocatedContainers => handleAllocatedContainers 对可分配的容器进行处理(对同一个机架的容器进行分类等) => runAllocatedContainers(containersToUse) 运行已分配的容器
在runAllocatedContainers方法中,如果当前运行的 Executor 数目小于需要的数目,就会通过线程池 launcherPool 来启动Executor
if (runningExecutors.size() < targetNumExecutors) {
	numExecutorsStarting.incrementAndGet()
	if (launchContainers) {
	  launcherPool.execute(new Runnable {
		override def run(): Unit = {
		  try {
			new ExecutorRunnable(
			  Some(container),
			  conf,
			  sparkConf,
			  driverUrl,
			  executorId,
			  executorHostname,
			  executorMemory,
			  executorCores,
			  appAttemptId.getApplicationId.toString,
			  securityMgr,
			  localResources
			).run()
 ...
// =>
def run(): Unit = {
    logDebug("Starting Executor Container")
    nmClient = NMClient.createNMClient()  // 与NodeManager关联
    nmClient.init(conf)
    nmClient.start()
    startContainer()
}
startContainer 方法中会准备指令后 让某个 nmClient启动容器
def startContainer(): java.util.Map[String, ByteBuffer] = {
  val ctx = Records.newRecord(classOf[ContainerLaunchContext])
    .asInstanceOf[ContainerLaunchContext]
  val env = prepareEnvironment().asJava

  ctx.setLocalResources(localResources.asJava)
  ctx.setEnvironment(env)

  val credentials = UserGroupInformation.getCurrentUser().getCredentials()
  val dob = new DataOutputBuffer()
  credentials.writeTokenStorageToStream(dob)
  ctx.setTokens(ByteBuffer.wrap(dob.getData()))

  val commands = prepareCommand()  // 准备指令

  ctx.setCommands(commands.asJava)
  ctx.setApplicationACLs(
    YarnSparkHadoopUtil.getApplicationAclsForYarn(securityMgr).asJava)

  // If external shuffle service is enabled, register with the Yarn shuffle service already
  // started on the NodeManager and, if authentication is enabled, provide it with our secret
  // key for fetching shuffle files later
  if (sparkConf.get(SHUFFLE_SERVICE_ENABLED)) {
    val secretString = securityMgr.getSecretKey()
    val secretBytes =
      if (secretString != null) {
        // This conversion must match how the YarnShuffleService decodes our secret
        JavaUtils.stringToBytes(secretString)
      } else {
        // Authentication is not enabled, so just provide dummy metadata
        ByteBuffer.allocate(0)
      }
    ctx.setServiceData(Collections.singletonMap("spark_shuffle", secretBytes))
  }

  // Send the start request to the ContainerManager
  try {
    nmClient.startContainer(container.get, ctx)  // 让某个nmClient启动容器
  } catch {
    case ex: Exception =>
      throw new SparkException(s"Exception while starting container ${container.get.getId}" +
        s" on host $hostname", ex)
  }
}
那准备的指令又长啥样呢?
YarnSparkHadoopUtil.addOutOfMemoryErrorArgument(javaOpts)
val commands = prefixEnv ++
  Seq(Environment.JAVA_HOME.$$() + "/bin/java", "-server") ++
  javaOpts ++
  Seq("org.apache.spark.executor.CoarseGrainedExecutorBackend",
    "--driver-url", masterAddress,
    "--executor-id", executorId,
    "--hostname", hostname,
    "--cores", executorCores.toString,
    "--app-id", appId) ++
  userClassPath ++
  Seq(
    s"1>${ApplicationConstants.LOG_DIR_EXPANSION_VAR}/stdout",
    s"2>${ApplicationConstants.LOG_DIR_EXPANSION_VAR}/stderr")

// TODO: it would be nicer to just make sure there are no null commands here
commands.map(s => if (s == null) "null" else s).toList
好!我们继续来到org.apache.spark.executor.CoarseGrainedExecutorBackend类的 main方法,进入 run方法,发现run方法里有一个driver拿到 Driver 相关信息,然后创建了ExecutorEnv,最后创建当前类实例作为 Executor,没注册之前暂时只是用于通信交互消息的,注册之后new出来的才是真正的Executor
private def run(
    driverUrl: String,
    executorId: String,
    hostname: String,
    cores: Int,
    appId: String,
    workerUrl: Option[String],
    userClassPath: Seq[URL]) {

  Utils.initDaemon(log)

  SparkHadoopUtil.get.runAsSparkUser { () =>
    // Debug code
    Utils.checkHost(hostname)

    // Bootstrap to fetch the driver's Spark properties.
    val executorConf = new SparkConf
    val fetcher = RpcEnv.create(
      "driverPropsFetcher",
      hostname,
      -1,
      executorConf,
      new SecurityManager(executorConf),
      clientMode = true)
    val driver = fetcher.setupEndpointRefByURI(driverUrl)  // 与Driver通信
    val cfg = driver.askSync[SparkAppConfig](RetrieveSparkAppConfig)
    val props = cfg.sparkProperties ++ Seq[(String, String)](("spark.app.id", appId))
    fetcher.shutdown()

    // Create SparkEnv using properties we fetched from the driver.
    val driverConf = new SparkConf()
    for ((key, value) <- props) {
      // this is required for SSL in standalone mode
      if (SparkConf.isExecutorStartupConf(key)) {
        driverConf.setIfMissing(key, value)
      } else {
        driverConf.set(key, value)
      }
    }

    cfg.hadoopDelegationCreds.foreach { tokens =>
      SparkHadoopUtil.get.addDelegationTokens(tokens, driverConf)
    }

    val env = SparkEnv.createExecutorEnv(
      driverConf, executorId, hostname, cores, cfg.ioEncryptionKey, isLocal = false)

    env.rpcEnv.setupEndpoint("Executor", new CoarseGrainedExecutorBackend(  // 创建新的CoarseGrainedExecutorBackend实例为Executor
      env.rpcEnv, driverUrl, executorId, hostname, cores, userClassPath, env))
    workerUrl.foreach { url =>
      env.rpcEnv.setupEndpoint("WorkerWatcher", new WorkerWatcher(env.rpcEnv, url))
    }
    env.rpcEnv.awaitTermination()
  }
}
点进setupEndpoint发现它是一个抽象方法,于是全局搜索找到一个 org.apache.spark.rpc.netty.NettyRpcEnv#setupEndpoint的重写方法,在setupEndpoint方法中向分发器注册Executor终端
private val dispatcher: Dispatcher = new Dispatcher(this, numUsableCores)
...
override def setupEndpoint(name: String, endpoint: RpcEndpoint): RpcEndpointRef = {
  dispatcher.registerRpcEndpoint(name, endpoint)
}
注意这里有一个Dispatcher类来进行消息的分发
A message dispatcher, responsible for routing RPC messages to the appropriate endpoint(s).
Params:numUsableCores – Number of CPU cores allocated to the process, for sizing the thread pool. If 0, will consider the available CPUs on the host.
private[netty] class Dispatcher(nettyEnv: NettyRpcEnv, numUsableCores: Int) extends Logging {

  private class EndpointData(
      val name: String,
      val endpoint: RpcEndpoint,
      val ref: NettyRpcEndpointRef) {
    val inbox = new Inbox(ref, endpoint)
  }

  private val endpoints: ConcurrentMap[String, EndpointData] =
    new ConcurrentHashMap[String, EndpointData]
  private val endpointRefs: ConcurrentMap[RpcEndpoint, RpcEndpointRef] =
    new ConcurrentHashMap[RpcEndpoint, RpcEndpointRef]

  // Track the receivers whose inboxes may contain messages.
  private val receivers = new LinkedBlockingQueue[EndpointData]
  ...
在registerRpcEndpoint方法中得到终端的地址和引用,然后在向endpoints添加数据
def registerRpcEndpoint(name: String, endpoint: RpcEndpoint): NettyRpcEndpointRef = {
  val addr = RpcEndpointAddress(nettyEnv.address, name)
  val endpointRef = new NettyRpcEndpointRef(nettyEnv.conf, addr, nettyEnv)  // 通信的引用
  synchronized {
    if (stopped) {
      throw new IllegalStateException("RpcEnv has been stopped")
    }
    if (endpoints.putIfAbsent(name, new EndpointData(name, endpoint, endpointRef)) != null) {
      throw new IllegalArgumentException(s"There is already an RpcEndpoint called $name")
    }
    val data = endpoints.get(name)
    endpointRefs.put(data.endpoint, data.ref)
    receivers.offer(data)  // for the OnStart message
  }
  endpointRef
}
这里EndpointData类定义如下
private class EndpointData(
  val name: String,
  val endpoint: RpcEndpoint,
  val ref: NettyRpcEndpointRef) {
	val inbox = new Inbox(ref, endpoint)
}
private[netty] class Inbox(
    val endpointRef: NettyRpcEndpointRef,
    val endpoint: RpcEndpoint)
  extends Logging {

    ...

	// OnStart should be the first message to process
	inbox.synchronized {
		messages.add(OnStart)
	}

      ...

    /**
    * Process stored messages.
    */
    def process(dispatcher: Dispatcher): Unit = {
        ...

        case OnStart =>
            endpoint.onStart()
            if (!endpoint.isInstanceOf[ThreadSafeRpcEndpoint]) {
              inbox.synchronized {
                if (!stopped) {
                  enableConcurrent = true
                }
              }
            }

        ...
	}
}
处理发送的第一条消息OnStart,然后有CoarseGrainedExecutorBackend -> ThreadSafeRpcEndpoint -> RpcEndpoint的继承关系,根据RpcEndpoint类的官方注释,这其实也就是CoarseGrainedExecutorBackend 的生命周期
An end point for the RPC that defines what functions to trigger given a message.
It is guaranteed that onStart, receive and onStop will be called in sequence.
The life-cycle of an endpoint is: constructor -> onStart -> receive* -> onStop
Note: receive can be called concurrently. If you want receive to be thread-safe, please use ThreadSafeRpcEndpoint
If any error is thrown from one of RpcEndpoint methods except onError, onError will be invoked with the cause. If onError throws an error, RpcEnv will ignore it.
在这里调用CoarseGrainedExecutorBackend 里重写的onStart方法,向所有Driver发送消息进行反向注册,然后Driver会进行回复
override def onStart() {
  logInfo("Connecting to driver: " + driverUrl)
  rpcEnv.asyncSetupEndpointRefByURI(driverUrl).flatMap { ref =>
    // This is a very fast action so we can use "ThreadUtils.sameThread"
    driver = Some(ref)
    // 向所有Driver发送RegisterExecutor消息进行反向注册
    ref.ask[Boolean](RegisterExecutor(executorId, self, hostname, cores, extractLogUrls))
  }(ThreadUtils.sameThread).onComplete {
    // This is a very fast action so we can use "ThreadUtils.sameThread"
    case Success(msg) =>
      // Always receive `true`. Just ignore it
    case Failure(e) =>
      exitExecutor(1, s"Cannot register with driver: $driverUrl", e, notifyDriver = false)
  }(ThreadUtils.sameThread)
}
全局搜索SparkContext后会发现它有个_schedulerBackend: SchedulerBackend属性,然后找到org.apache.spark.scheduler.cluster.CoarseGrainedSchedulerBackend.DriverEndpoint#receiveAndReply方法,这里即Driver端的回复
在得到 Driver 的回复后,会调用CoarseGrainedExecutorBackend 的receive方法,最后创建 Executor 对象
override def receive: PartialFunction[Any, Unit] = {
  case RegisteredExecutor =>
    logInfo("Successfully registered with driver")
    try {
      executor = new Executor(executorId, hostname, env, userClassPath, isLocal = false) // 创建真正的Executor
    } catch {
      case NonFatal(e) =>
        exitExecutor(1, "Unable to create executor due to " + e.getMessage, e)
    }
    ...

 浙公网安备 33010602011771号