
rorangepi 学习笔记
rorangepi 学习笔记
Orange Pi Zero2-Orange Pi官网-香橙派(Orange Pi)开发板,开源硬件,开源软件,开源芯片,电脑键盘

用户:root
密码:orangepi
普通用户:orangpi
passwd:1
nmcli dev wifi //扫描周围的wifi
nmcli dev wifi connect user(用户名) password passwd(密码)
查看连接的ip: ip addr show wlan0


    使用 nmcli 管理网络连接
可以通过发出以下命令查看所有已保存的连接:

nmcli con show
如果连接到一个网络,但想使用不同的连接,可以通过将连接切换为down来断开连接。需要指定 SSID,或者如果有多个相同 SSID 的连接,请使用 UUID。

nmcli con down ssid/uuid


要连接到另一个保存的连接,只需要在 nmcli 命令中传递 up 选项。确保指定要连接的新网络的 SSID 或 UUID。
连接成功后,每次开机默认都会去连接wifi,此时去切换别的wifi会失败,可提前断开连接
nmcli dev dis wlan0
或者
nmcli con del wifi名称
断开连接后,再连接别的wifi就正常了。
修改开发板内核启动日志级别
sudo vi /boot/orangepiEnv,txt

修改输出等级和输出口:

官方外设库wiringPi库的安装和使用
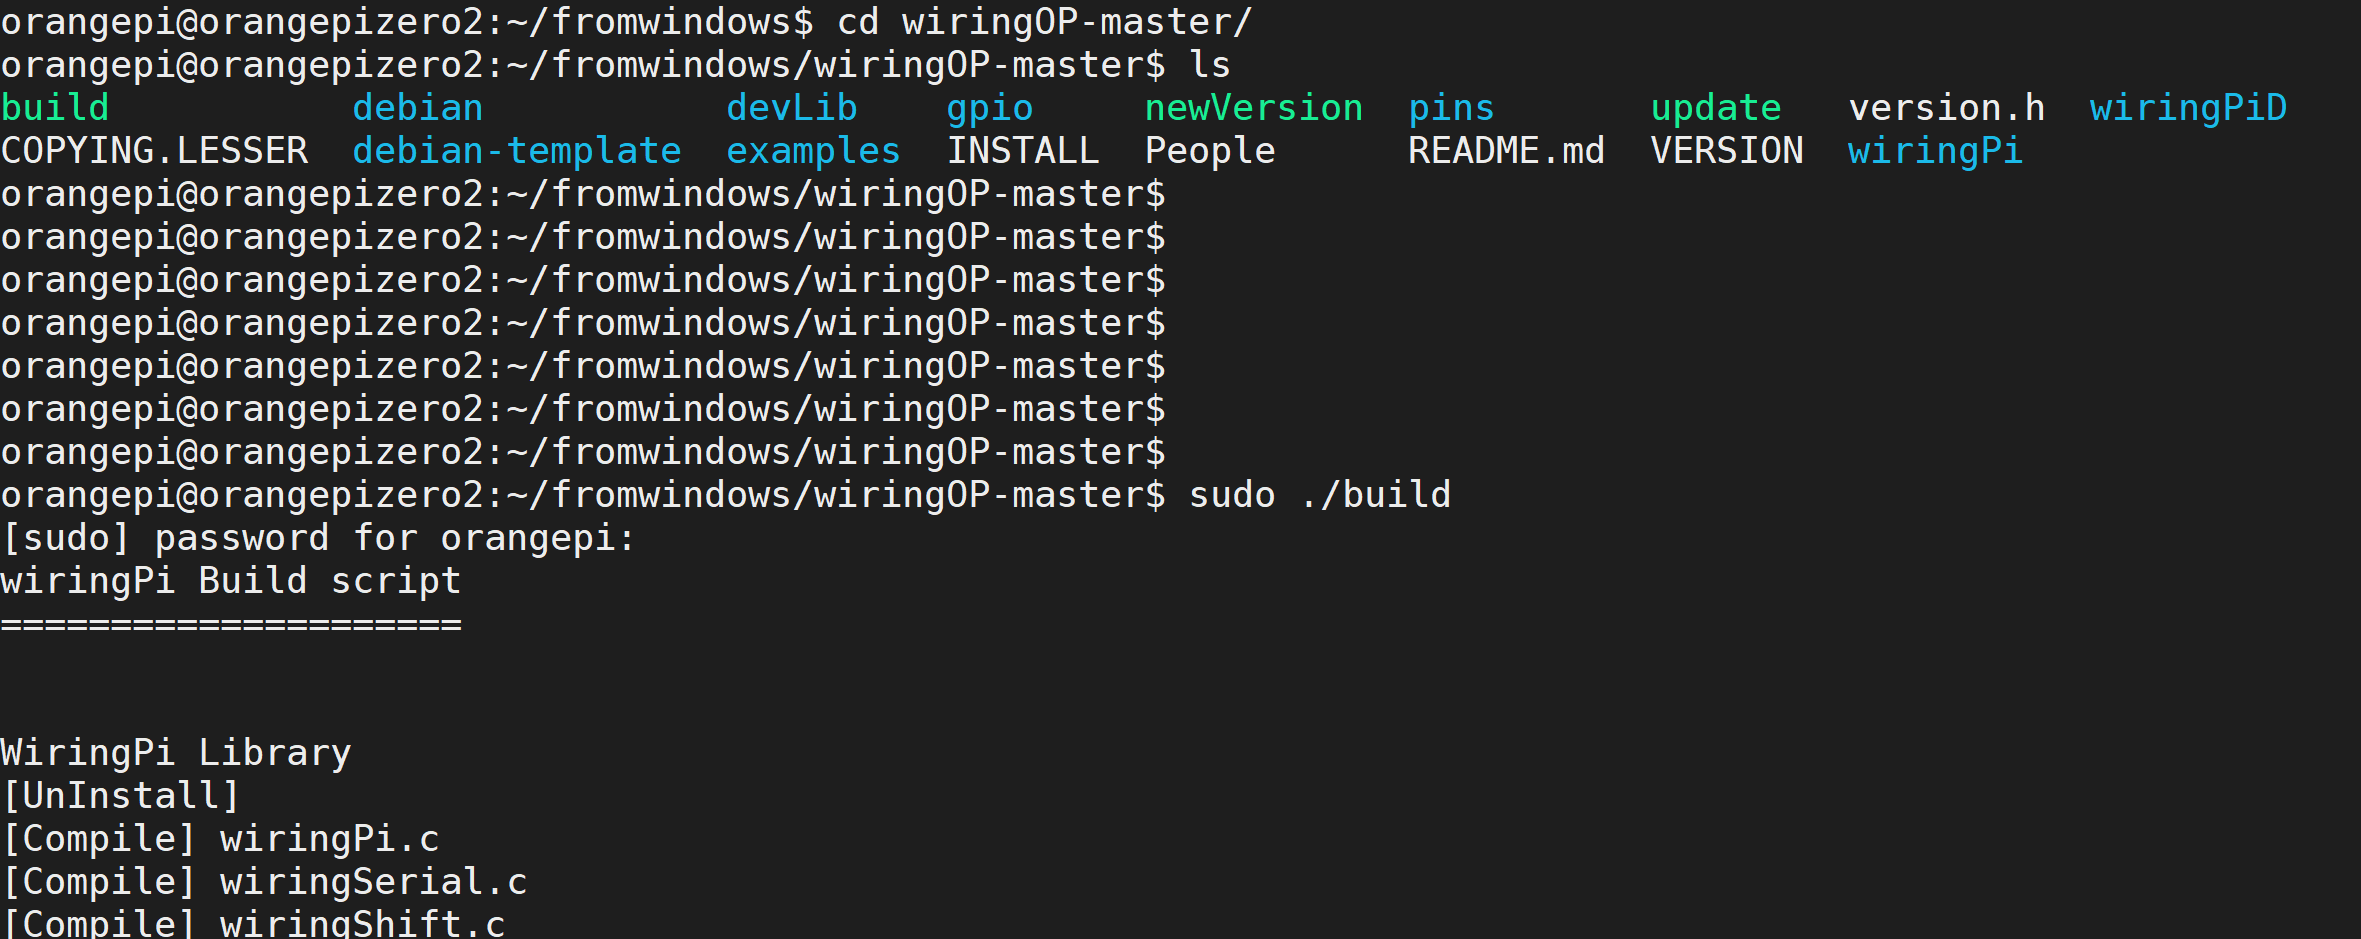
git clone https://github.com/orangepi-xunlong/wiringOP//下载源码
cd wringOP //进入文件夹
sudo ./build clean //清除编译信息
sudo ./build //编译

2.
通过windows打开https://github.com/orangepi-xunlong/wiringOP网址
下在相关的zip压缩包到本地
通过xterm上传到开发板
解压压缩包

解压压缩包:
unzip 压缩包名
cd /wiringOP-master
ls
sudo ./build

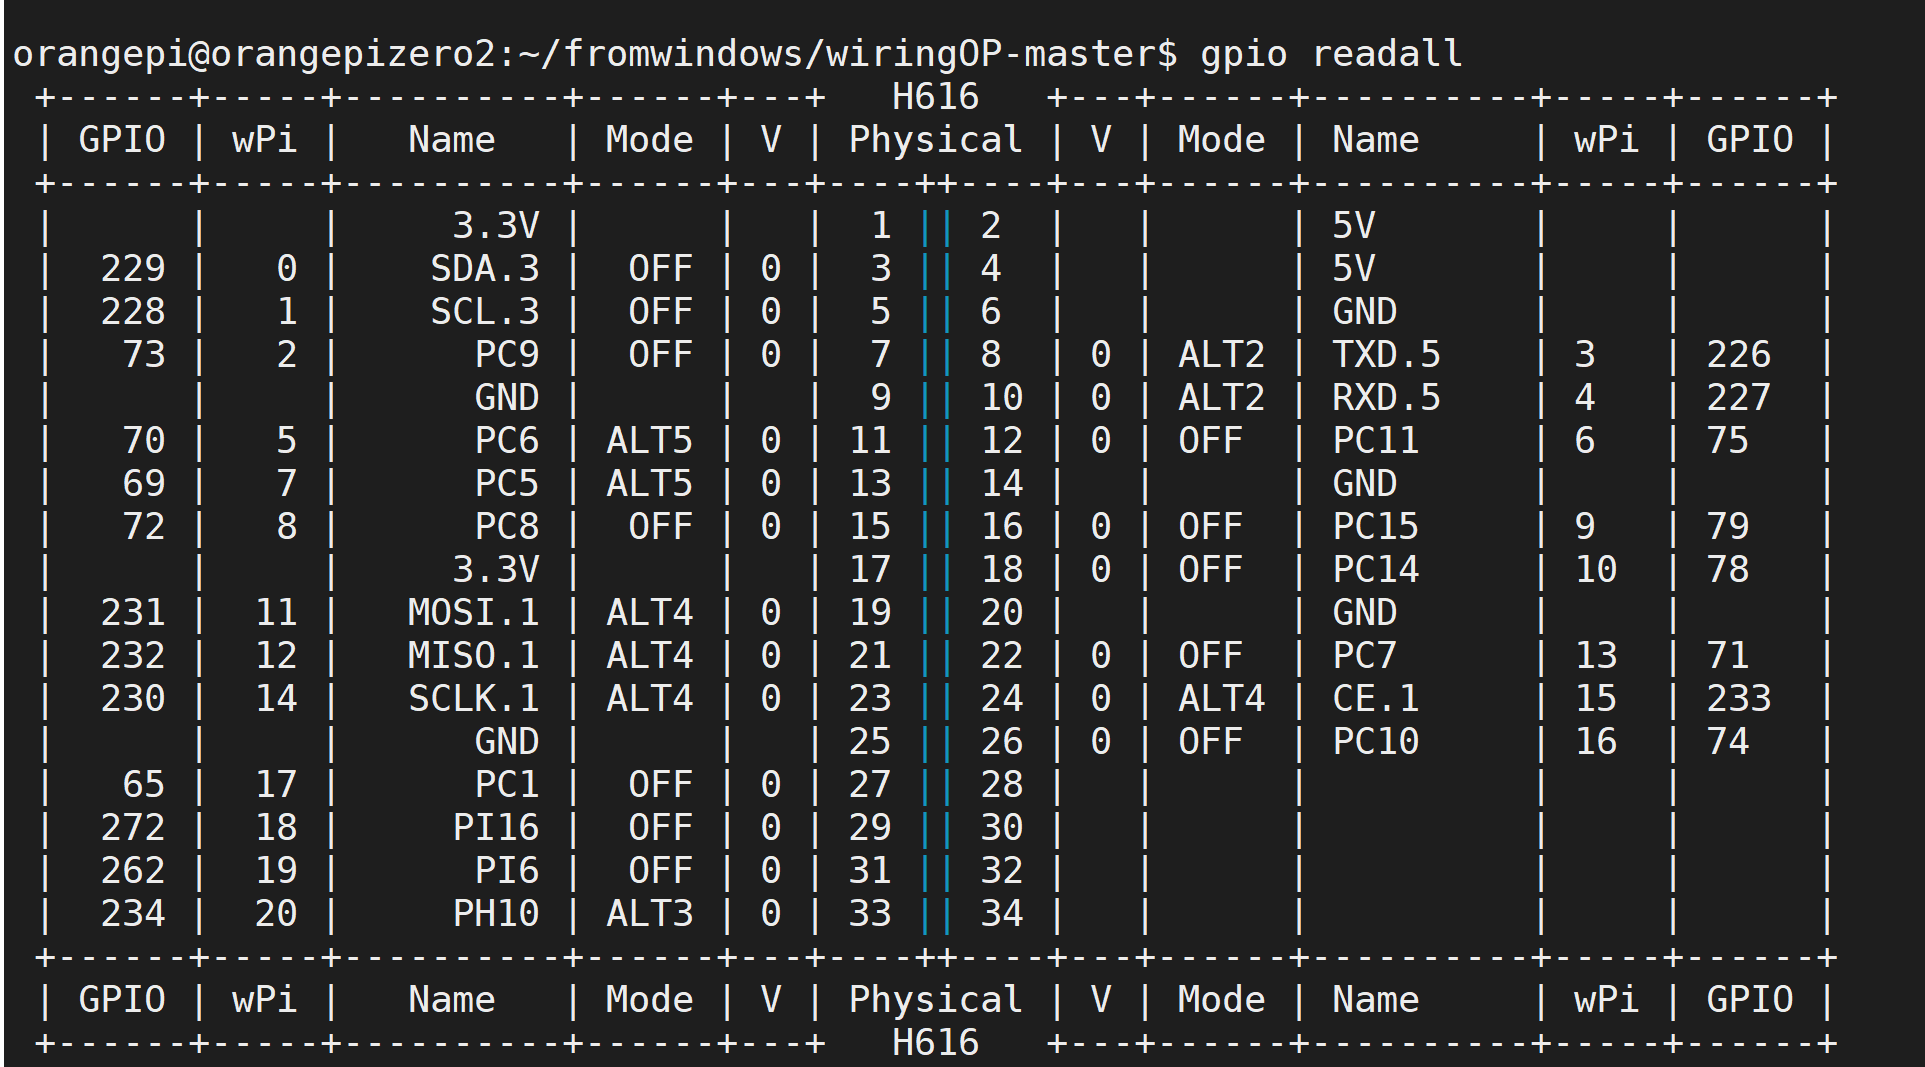
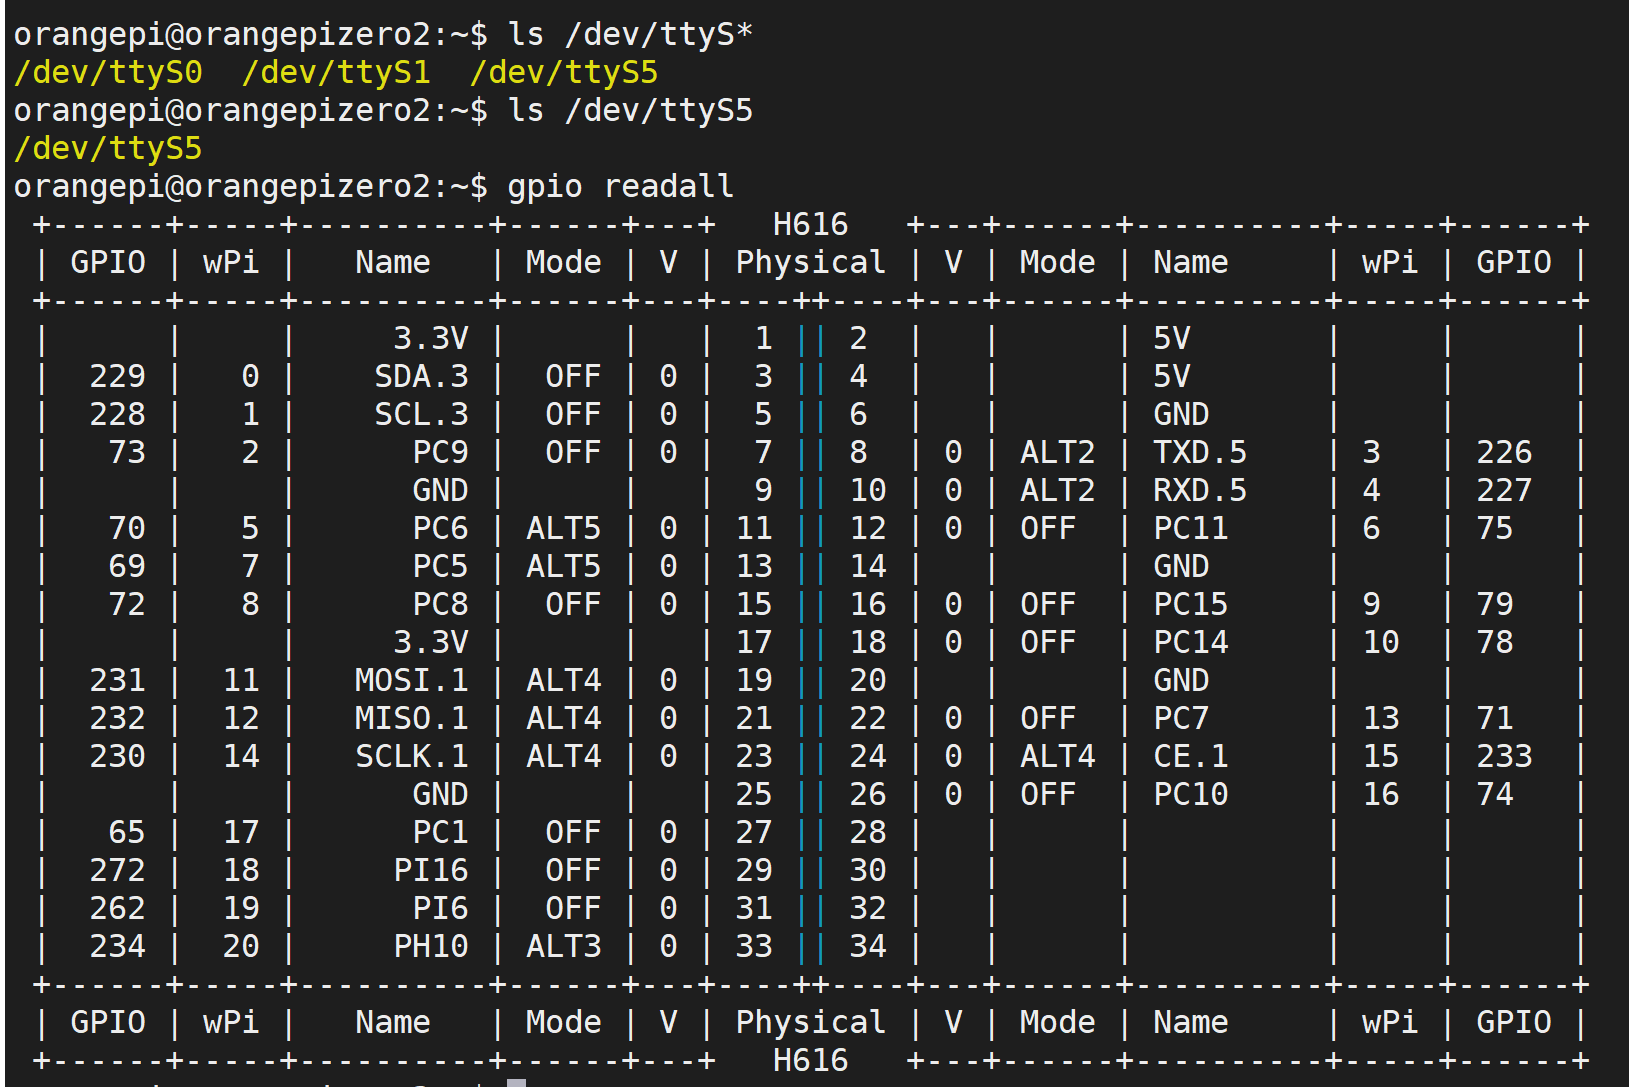
查看gpio外设驱动:
gpio readall
借助wiring库开发蜂鸣器响
vim: 使用=G对齐
1: set ts = 4//tab缩进=4,只对当前有效
2: 修改/etc/vim/vimrc,添加配置set tabstop=4//永久有效
set shiftwidth=4 //自动缩进的大小
vim显示行号
1:set number! //临时显示行号再次输入将消失
2://永久显示行号
# 打开 /etc/vim/vimrc文件
vim /etc/vimrc
# 最后一行添加 set number
set nu
# ESC命令,输入wq保存退出
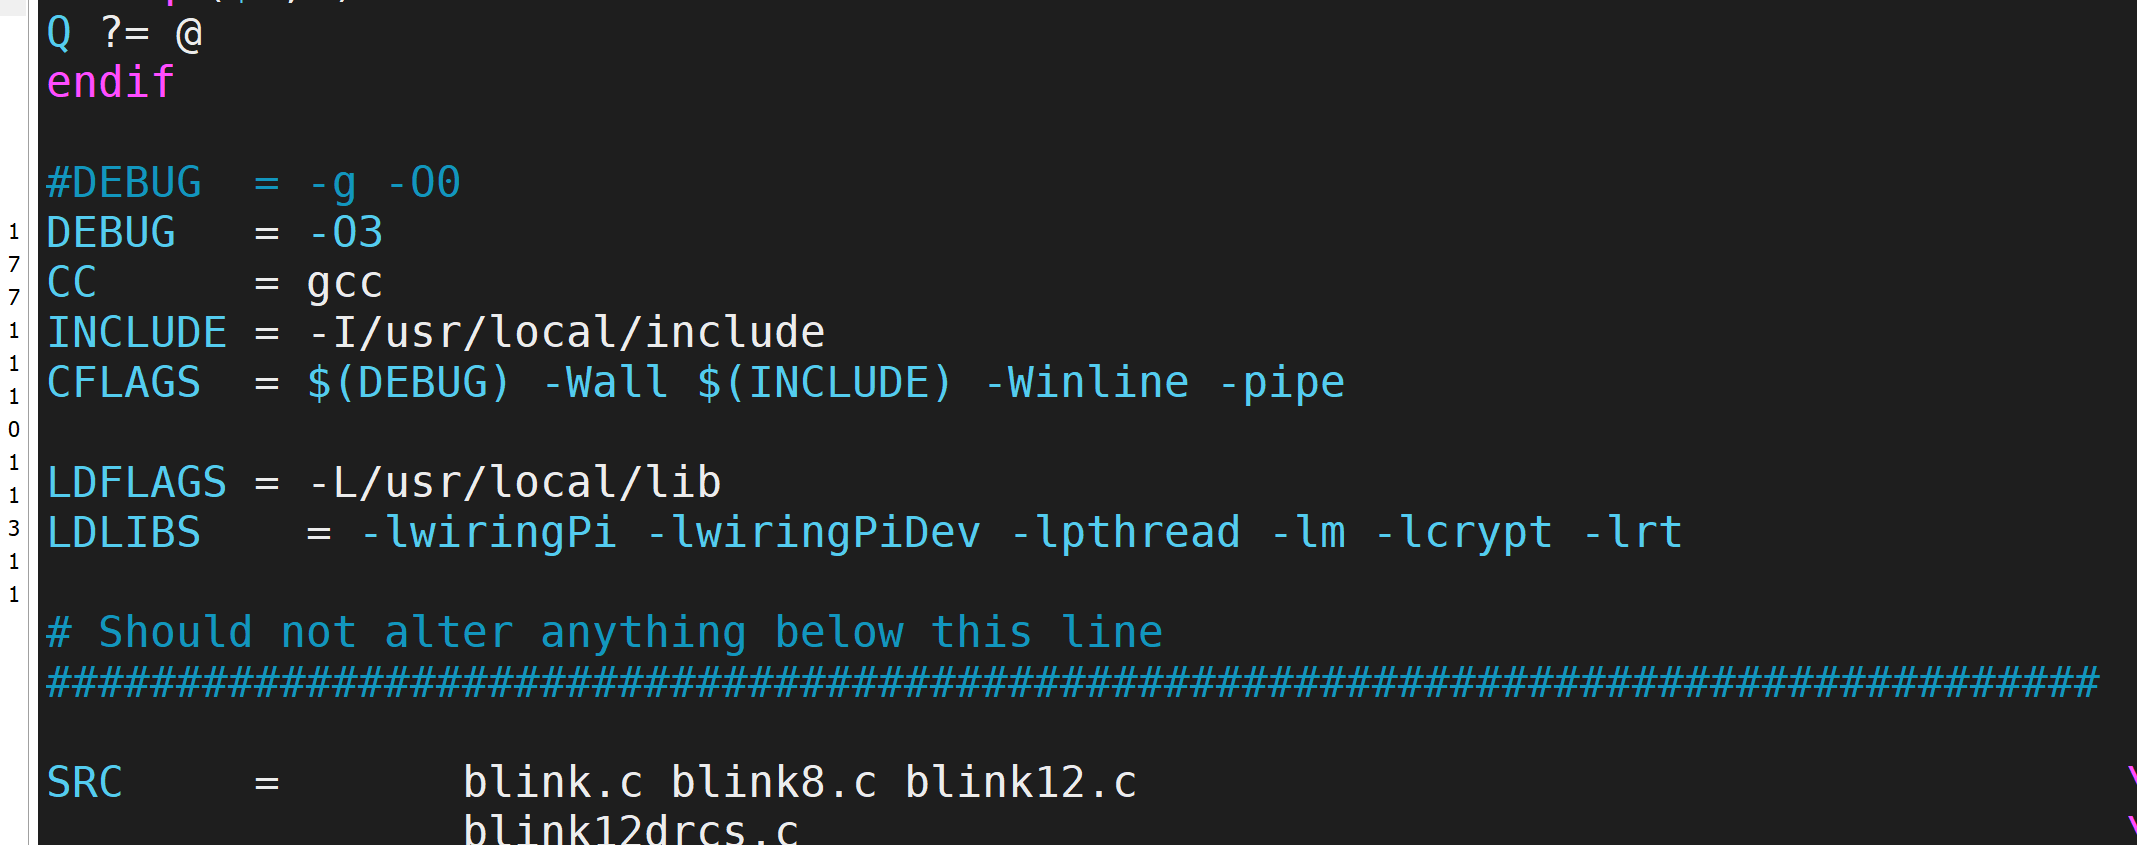
gcc blink.c -lwiringPi -lwiringPiDev -lpthread -lm -lcrypt -lrt //编译链接
为了方便起见,写一个build脚本进行使用,给其添加执行权限

#shell脚本简单
echo:输出
$1,$0:输出的第二个和第一个参数.

代码:
  1 #include <stdio.h>
  2 #include <wiringPi.h>
  3 #include <unistd.h>
  4
  5 #define BEEP 0   //设置pin0为蜂鸣器输出引脚
  6
  7 int main (void)
  8 {
  9     wiringPiSetup () ; //初始化wiring库。
 10     pinMode (BEEP, OUTPUT) ;//设置io口的输入输出
 11     digitalWrite (BEEP, HIGH) ; //设置io口输出低电平,蜂鸣器响
 12     while(1){
 13         digitalWrite(BEEP,LOW);
 14         usleep(100000); //等待100mm
 15         digitalWrite(BEEP,HIGH);
 16         usleep(100000); //等待100mm
 17     }
 18     return 0;
 19 }
超声波模块驱动
-
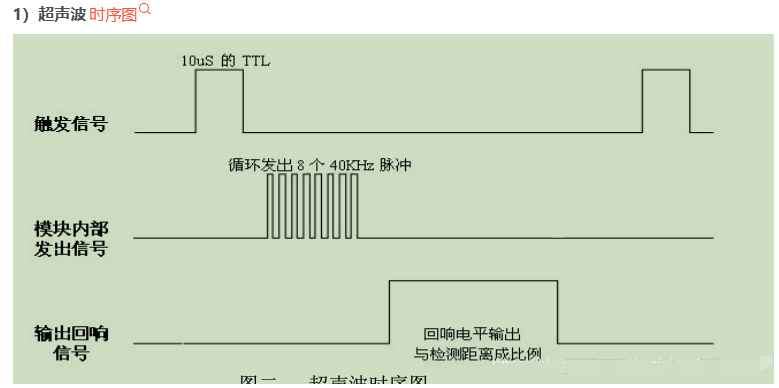
怎么让他发波:
Trig,给trig端口至少10us的高电平;
-
怎么知道开始发了:
Echo信号,由低电平转换为高电平表示开始发送波
-
怎么知道接收了返回波:
Echo,由高电平转换为低电平表示波回来了
-
怎么算时间:
Echo引脚维持高电平的时间
距离=高电平时间*声速(340m/s)/2(来回时间);
建议测量周期在60ms以上,防止发射信号对回响信号的影响。
#include <sys/time.h>
int gettimeofday(struct timeval *tv, struct timezone *tz);

struct timeval {
               long      tv_sec;     /* seconds */
               long tv_usec;    /* microseconds */
           };
struct timezone {
               int tz_minuteswest;     /* minutes west of Greenwich */
               int tz_dsttime;         /* type of DST correction */
           };
小技巧
cnt是count的缩写,用作计数器。
linux系统top命令,即资源管理器。
由于vi编辑器不能使用鼠标,所以一个大文件如果要到最后一行只用键盘下键的话会是一个很痛苦的过程,还好有各种比较快捷的方法归我们使用:
\1. vi 编辑器中跳到文件的第一行:
a 输入 :0 或者 :1 回车
b 键盘按下 小写 gg
2.vi 编辑器跳到文件最后一行:
a 输入 😒 回车
b 键盘按下大写 G
c 键盘按 shift + g (其实和第二种方法一样)
Vim快速移动光标至行首和行尾
1、 需要按行快速移动光标时,可以使用键盘上的编辑键Home,快速将光标移动至当前行的行首。除此之外,也可以在命令模式中使用快捷键"^"(即Shift+6)或0(数字0)。
2、 如果要快速移动光标至当前行的行尾,可以使用编辑键End。也可以在命令模式中使用快捷键"$"(Shift+4)。与快捷键"^"和0不同,快捷键"$"前可以加上数字表示移动的行数。例如使用"1$"表示当前行的行尾,"2$"表示当前行的下一行的行尾。
时序代码time.c:
  1 #include<stdio.h>
  2 #include <sys/time.h>
  3
  4 //int gettimeofday(struct timeval *tv, struct timezone *tz);
  5 int main()
  6 {
  7     struct timeval tv;
  8     gettimeofday(&tv,NULL);
  9
 10     printf("sec=%ld,usec=%ld\n",tv.tv_sec,tv.tv_usec);
 11
 12     return 0;
 13 }
超声波模块接线
trig -- 0
echo -- 1
5v -- 5v
GND -- GND
linux定时器开发实战
SG90舵机
简单回顾一下舵机的基本原理:通过向PWM信号线灌入一定占空比PWM(Pulse Width Modulation,脉冲宽度调制)信号,控制舵机上方的转向

以20ms为单位时间,则高电平持续时间、波形图与转动角度的关系如下表所示
| 高电平持续时间 | 低电平持续时间 | 波形图 | 角 度 |
|---|---|---|---|
| 0.5ms | 19.5ms |  |
0 |
| 1.0ms | 19ms |  |
45 |
| 1.5ms | 18.5ms |  |
90 |
| 2.0ms | 18ms | 如上图推理 | 135 |
| 2.5ms | 17.5ms | 如上图推理 | 180 |
Linux定时器实现
实现定时器,通过itimerval结构体以及函数setitimer产生的信号,系统随之使用signal信号处理
函数来处理产生的定时信号。从而实现定时器。
先看itimerval的结构体
struct itimerval
{
    /* Value to put into `it_value' when the timer expires. */
    struct timeval it_interval;
    /* Time to the next timer expiration. */
    struct timeval it_value;
};
it_interval:计时器的初始值,一般基于这个初始值来加或者来减,看控制函数的参数配置,这个值决定了多久启动以此计时器it_value:什么时候开始启动计时器
struct timeval
{
    __time_t tv_sec; /* Seconds. */
    __suseconds_t tv_usec; /* Microseconds. */
};
int setitimer (__itimer_which_t __which, const struct itimerval *__restrict __new, struct itimerval *__restrict __old)
setitimer()将value指向的结构体设为计时器的当前值,如果ovalue不是NULL,将返回计时器原有值
which的三种类型:
ITIMER_REAL//数值为0,计时器的值实时递减,发送的信号是SIGALRM。ITIMER_VIRTUAL//数值为1,进程执行时递减计时器的值,发送的信号是SIGVTALRM。ITIMER_PROF//数值为2,进程和系统执行时都递减计时器的值,发送的信号是SIGPROF。
很明显,这边需要捕获对应的信号进行逻辑相关处理 signal(SIGALRM,signal_handler);
返回说明:
成功执行时,返回0。失败返回-1
三个重点:
- 定时器结构体的设置,包括定时时间和开始生效时间。在试验的时候可以根据是调节时间长短并运行,观察实际时间判断避免弄反
settimer()启动定时器- 信号捕获
  1 #include <stdio.h>
  2 #include <sys/time.h>
  3 #include <signal.h>
  4 #include <stdlib.h>
  5
  6 static int i = 0;
  7
  8 void signal_handler(int signum)
  9 {
 10     i++;
 11     if(i == 1000)//0.5秒发一次
 12     {
 13         printf("hello world!\n");
 14         i = 0;
 15     }
 16
 17 }
 18
 19 int main()
 20 {
 21     struct itimerval itv;
 22     //设定启动定时器时间
 23     itv.it_interval.tv_sec = 0;
 24     itv.it_interval.tv_usec = 500;
 25     //设定定时器开始启动的时间
 26     itv.it_value.tv_sec = 3;
 27     itv.it_value.tv_usec = 0;
 28     //判断int setitimer()返回值是否成功,设定定时方式
 29     if(setitimer(ITIMER_REAL, &itv , NULL) == -1)
 30     {
 31         perror("error");
 32         exit(-1);
 33     }
 34     //判断信号返回值,执行相应的函数
 35     signal(SIGALRM,signal_handler);
 36     while(1);
 37
 38     return 0;
 39 }
sg90舵机驱动代码:
根据定时器代码改编
  1 #include <stdio.h>
  2 #include <sys/time.h>
  3 #include <signal.h>
  4 #include <stdlib.h>
  5 #include <wiringPi.h>
  6
  7 #define SG90 1
  8
  9 int angle;
 10 static int i = 0;
 11
 12 void signal_handler(int signum)
 13 {
 14     if(i <= angle){
 15         digitalWrite(SG90,HIGH);
 16         //printf("HIGH\n");
 17     }else{
 18         digitalWrite(SG90,LOW);
 19     }
 20     if(i == 40)//40*0.5 = 20ms
 21     {
 22         i = 0;
 23     }
 24     i++;
 25 }
 26
 27 int main()
 28 {
 29
 30     wiringPiSetup();
 31     pinMode(SG90,OUTPUT);
 32
 33     struct itimerval itv;
 34     //设定启动定时器时间
 35     itv.it_interval.tv_sec = 0;
 36     itv.it_interval.tv_usec = 500;
 37     //设定定时器开始启动的时间
 38     itv.it_value.tv_sec = 1;
 39     itv.it_value.tv_usec = 0;
 40     //判断int setitimer()返回值是否成功,设定定时方式
 41     if(setitimer(ITIMER_REAL, &itv , NULL) == -1)
 42     {
 43         perror("error");
 44         exit(-1);
 45     }
 46     //判断信号返回值,执行相应的函数
 47     signal(SIGALRM,signal_handler);
 48     while(1){
 49         printf("请输入转动的角度:1-0度,2-45度,3-90度,4-135度,5-180度\n");
 50         scanf("%d",&angle);
 51     }
 52     return 0;
 53 }
Linux IC2接口使用(驱动oled屏幕)
Oled和IIC基础回顾
Oled模块有四个针脚,其中两个数据相关的为SDA和SCL,使用IIC协议进行数据交互。IIC全称总集成电路总线,是Philips公司开发的一种两线式串行总线,用于连接微控制器及外围设备。IIC是全双工同步通信方式(两方可同时收发)
在51单片机部分,对IIC协议通信的信号特性、具体过程、时序逻辑等做了较为详细的介绍和练习,而在Linux内核中,这部分已经集成了,无需开发者去实现。

如上如所示,在/dev目录下存在两个i2c设备文件(Linux下,设备也是以文件形式管理)
OrangePi的IIC开发准备
根据香橙派官方提供的原理图可以得知,OrangePi Zero 2可用的I2C为i2c-3,对应接口为物理针脚对应3和5.
首先将Oled模块按照SDA-SDA,SCL-SCL的方式接到开发板上,然后安装i2c-tools:
sudo apt update
sudo apt install i2c-tools
使用i2cdetect命令检查模块是否正常接入:

这样就可以开发了
运行例程
cp ../fromwindows/wiringOP-master/examples/oled_demo.c .

使用
sudo ./a.out /dev/i2c-3 //携带上/dev/i2c-3才能正常运行
#include <stdio.h>
#include <stdlib.h>
#include <string.h>

// 获取CPU温度(摄氏度)
float get_cpu_temperature() {
    FILE* file = fopen("/sys/class/thermal/thermal_zone0/temp", "r");
    if (file == NULL) {
        printf("无法打开CPU温度文件\n");
        return -1;
    }
    int temperature;
    fscanf(file, "%d", &temperature);
    fclose(file);
    return temperature / 1000.0;
}

// 获取IP地址的数字部分
void extract_ipv4_digits(const char* ip_address, int* digits) {
    char* token;
    int i = 0;
    char ip_copy[20];
    strcpy(ip_copy, ip_address);
    token = strtok(ip_copy, ".");
    while (token != NULL && i < 4) {
        digits[i] = atoi(token);
        token = strtok(NULL, ".");
        i++;
    }
}

// 获取根目录的使用情况(大小、已使用、占用率)
void get_root_partition_usage(float* total_size, float* used_size, float* usage_percentage) {
    FILE* file = popen("df -h /", "r");
    if (file == NULL) {
        printf("无法执行df命令\n");
        return;
    }
    char buffer[256];
    // 读取表头行
    fgets(buffer, sizeof(buffer), file);
    // 读取根目录行
    fgets(buffer, sizeof(buffer), file);
    sscanf(buffer, "%*s %fG %fG %*s %f%%", total_size, used_size, usage_percentage);
    pclose(file);
}

int main() {
    char ip_address[20];
    float cpu_temperature, total_size, used_size, usage_percentage;
    int ipv4_digits[4];

    // 获取IP地址
    FILE* ip_file = popen("hostname -I", "r");
    if (ip_file == NULL) {
        printf("无法执行hostname命令\n");
        return 1;
    }
    fgets(ip_address, sizeof(ip_address), ip_file);
    pclose(ip_file);
    ip_address[strcspn(ip_address, "\n")] = '\0';

    // 获取CPU温度
    cpu_temperature = get_cpu_temperature();

    // 获取根目录使用情况
    get_root_partition_usage(&total_size, &used_size, &usage_percentage);

    // 提取IP地址的数字部分
    extract_ipv4_digits(ip_address, ipv4_digits);

    // 存储数据到文件
    FILE* file = fopen("demo1.txt", "w");
    if (file == NULL) {
        printf("无法创建文件\n");
        return 1;
    }
    fprintf(file, "IP地址: %s\n", ip_address);
    fprintf(file, "CPU温度: %.2f°C\n", cpu_temperature);
    fprintf(file, "根目录大小: %.2fG\n", total_size);
    fprintf(file, "根目录已使用: %.2fG\n", used_size);
    fprintf(file, "根目录使用率: %.2f%%\n", usage_percentage);
    fprintf(file, "IP地址数字部分: %d.%d.%d.%d\n", ipv4_digits[0], ipv4_digits[1], ipv4_digits[2], ipv4_digits[3]);
    fclose(file);

    printf("数据已存储到demo1.txt文件中\n");

    return 0;
}

要让Orange Pi Zero2在开机后自动执行一个脚本,你可以按照以下步骤进行设置:
-
编写你希望执行的脚本,比如脚本文件名为
myscript.sh,确保脚本文件的权限设置为可执行。 -
将脚本文件移动到适当的位置,比如
/usr/local/bin目录下。 -
打开终端或 SSH 连接到你的 Orange Pi Zero2。
-
编辑
rc.local文件,该文件包含在启动时执行的命令。bashCopy code sudo nano /etc/rc.local -
在
rc.local文件的exit 0行之前添加以下行:bashCopy codesleep 5 /usr/local/bin/myscript.sh &这将在开机后等待5秒后执行
/usr/local/bin/myscript.sh脚本,并且&符号使脚本在后台运行。 -
保存并关闭
rc.local文件。 -
重新启动 Orange Pi Zero2,脚本应该会在开机后自动执行。
请注意,上述步骤假定你使用的是基于 Debian 的操作系统,如 Armbian。如果你使用的是不同的操作系统或发行版,步骤可能会有所不同。此外,确保你在执行步骤时具有足够的权限以编辑和修改相应的文件。
问题:windows中文件拷贝到Linux下无法编辑保存
编码格式dos (windows的编码格式,因为文件是从windows拷贝过来的),而linux在默认情况下是utf-8 的编码格式,所以可能是编码的问题,然后再vim里面输入::set fileencoding=utf-8然后回车后就可以进行代码的修改和保存了。
System load
Memory usage
IP
CPU temp
Usage of /
/home/orangepi/OLED
串口开发
linux自己编写串口通信(C语言与内核交互)
uarTool.c:
#include <stdio.h>
#include <stdlib.h>
#include <stdint.h>
#include <stdarg.h>
#include <string.h>
#include <termios.h>
#include <unistd.h>
#include <fcntl.h>
#include <sys/ioctl.h>
#include <sys/types.h>
#include <sys/stat.h>

#include "wiringSerial.h"


int myserialOpen (const char *device, const int baud)
{
	struct termios options ;
  	speed_t myBaud ;
  	int    status, fd ;

	switch (baud)
	{
		case    9600:	myBaud =    B9600 ; break ;
		case  115200:	myBaud =  B115200 ; break ;
	}

	if ((fd = open (device, O_RDWR | O_NOCTTY | O_NDELAY | O_NONBLOCK)) == -1)
    return -1 ;

 	 fcntl (fd, F_SETFL, O_RDWR) ;

// Get and modify current options:

  	tcgetattr (fd, &options) ;

    cfmakeraw   (&options) ;
    cfsetispeed (&options, myBaud) ;
    cfsetospeed (&options, myBaud) ;

    options.c_cflag |= (CLOCAL | CREAD) ;
    options.c_cflag &= ~PARENB ;
    options.c_cflag &= ~CSTOPB ;
    options.c_cflag &= ~CSIZE ;
    options.c_cflag |= CS8 ;
    options.c_lflag &= ~(ICANON | ECHO | ECHOE | ISIG) ;
    options.c_oflag &= ~OPOST ;

    options.c_cc [VMIN]  =   0 ;
    options.c_cc [VTIME] = 100 ;	// Ten seconds (100 deciseconds)

 	 tcsetattr (fd, TCSANOW, &options) ;

 	 ioctl (fd, TIOCMGET, &status);

 	 status |= TIOCM_DTR ;
 	 status |= TIOCM_RTS ;

 	 ioctl (fd, TIOCMSET, &status);

  	 usleep (10000) ;	// 10mS

 	 return fd ;
}

void serialSendstring (const int fd, const char *s)
{
	int ret;
	ret = write (fd, s, strlen (s));
	if (ret < 0)
		printf("Serial Puts Error\n");
}

int serialGetstring (const int fd,char *buffer)
{
	int n_read;
	n_read = read(fd, buffer,32);
	return n_read;
}
uartTeast.c
#include <stdio.h>
#include <stdlib.h>
#include <stdint.h>
#include <stdarg.h>
#include <string.h>
#include <termios.h>
#include <unistd.h>
#include <fcntl.h>
#include <sys/ioctl.h>
#include <sys/types.h>
#include <sys/stat.h>

#include "uarTool.h"
#include <pthread.h>
#include <unistd.h>

int fd;

void *readSerial()
{
    char buffer[32];

    while(1){
        memset(buffer,'\0',sizeof(buffer));
        serialGetstring(fd,buffer);
        printf("GET ->%s\n",buffer);
    }

}

void *sendSerial()
{
    char buffer[32];
    while(1){
        memset(buffer,'\0',sizeof(buffer));
        scanf("%s",buffer);
        serialSendstring(fd,buffer);
    }

}


int main(int argc,char **argv)
{

    char deviceName[32] = {'\0'};
    pthread_t readt;
    pthread_t sendt;


    if(argc < 2)
    {
        printf("uage:%s /dev/ttyS?\n",argv[0]);
        return -1;
    }

    strcpy(deviceName, argv[1]);

    if((fd = myserialOpen(deviceName,115200)) == -1)
    {
        printf("open %s error\n",deviceName);
        return -1;
    }
    pthread_create(&sendt,NULL, sendSerial,NULL);

    pthread_create(&readt,NULL, readSerial,NULL);
    while(1){sleep(10);}
    return 0;
}
gcc uartTest.c uarTool.c -lpthread编译该文件
语音刷抖音项目


Ubuntu adb 报错:
no permissions (user in plugdev group; are your udev rules wrong);
在/etc/udev/rules.d文件夹下创建规则文件
在xiaomi—android.rules中写入:
SUBSYSTEM=="usb", ENV{DEVTYPE}=="usb_device", MODE="0666"
可以自动识别插入的usb设备并给它添加可读可写权限。

  208  sudo apt-get install adb
  209  dmesg
  210  adb devices
  211  dmesg
  212  adb devices
  213  adb shell
  214  found adb
  215  find adb
  216  ls
  217  adb devices
  218  dmesg
  219  adb devices
  220  cd /etc/udev/rules.d
  221  sudo vim xiaomi-android.rules
  222  adb devices
  223  adb shell


adb shell input swipe 540 1300 540 500 100 //向下滑动屏幕
adb shell input swipe 540 500 540 1300 100 //向上滑动屏幕
adb shell "seq 2 | while read i;do input tap 350 1050 & input tap 350 1050 & sleep 0.01;done;" //点赞
adb shell input keyevent 26 //锁屏

源码:
#include <stdio.h>
#include <stdlib.h>
#include <stdint.h>
#include <stdarg.h>
#include <string.h>
#include <termios.h>
#include <unistd.h>
#include <fcntl.h>
#include <sys/ioctl.h>
#include <sys/types.h>
#include <sys/stat.h>

#include "uarTool.h"
#include <pthread.h>
#include <unistd.h>

int fd;

void *readSerial()
{
    char x;
    while(1){
        x = myserialGetchar(fd);
        switch(x){
            case 'N':
                printf("next\n");
                system("adb shell input swipe 540 1300 540 500 100");
                break;
            case 'P':
                printf("pre\n");
                system("adb shell input swipe 540 500 540 1300 100");
                break;
            case 'Z':
                printf("zan\n");
                system("adb shell \"seq 2 | while read i;do input tap 350 1050 & input tap 350 1050 & sleep 0.1;done;\"");
                break;
            case 'Q':
                printf("quit\n");
                system("adb shell input keyevent 26");
                break;
        }
    }

}


int main(int argc,char **argv)
{

    char deviceName[32] = {'\0'};
    pthread_t readt;


    if(argc < 2)
    {
        printf("uage:%s /dev/ttyS?\n",argv[0]);
        return -1;
    }

    strcpy(deviceName, argv[1]);

    if((fd = myserialOpen(deviceName,115200)) == -1)
    {
        printf("open %s error\n",deviceName);
        return -1;
    }
    pthread_create(&readt,NULL, readSerial,NULL);
    while(1){sleep(10);}
    return 0;
}

//库文件
#include <stdio.h>
#include <stdlib.h>
#include <stdint.h>
#include <stdarg.h>
#include <string.h>
#include <termios.h>
#include <unistd.h>
#include <fcntl.h>
#include <sys/ioctl.h>
#include <sys/types.h>
#include <sys/stat.h>

#include "wiringSerial.h"


char myserialGetchar (const int fd)
{
    char x;
    if(read(fd,&x,1) != 1)
        return -1;
    return x;
}


int myserialOpen (const char *device, const int baud)
{
    struct termios options ;
    speed_t myBaud ;
    int    status, fd ;

    switch (baud)
    {
        case    9600:   myBaud =    B9600 ; break ;
        case  115200:   myBaud =  B115200 ; break ;
    }

    if ((fd = open (device, O_RDWR | O_NOCTTY | O_NDELAY | O_NONBLOCK)) == -1)
    return -1 ;

     fcntl (fd, F_SETFL, O_RDWR) ;

// Get and modify current options:

    tcgetattr (fd, &options) ;

    cfmakeraw   (&options) ;
    cfsetispeed (&options, myBaud) ;
    cfsetospeed (&options, myBaud) ;

    options.c_cflag |= (CLOCAL | CREAD) ;
    options.c_cflag &= ~PARENB ;
    options.c_cflag &= ~CSTOPB ;
    options.c_cflag &= ~CSIZE ;
    options.c_cflag |= CS8 ;
    options.c_lflag &= ~(ICANON | ECHO | ECHOE | ISIG) ;
    options.c_oflag &= ~OPOST ;

    options.c_cc [VMIN]  =   0 ;
    options.c_cc [VTIME] = 100 ;    // Ten seconds (100 deciseconds)

     tcsetattr (fd, TCSANOW, &options) ;

     ioctl (fd, TIOCMGET, &status);

     status |= TIOCM_DTR ;
     status |= TIOCM_RTS ;

     ioctl (fd, TIOCMSET, &status);

     usleep (10000) ;   // 10mS

     return fd ;
}

void serialSendstring (const int fd, const char *s)
{
    int ret;
    ret = write (fd, s, strlen (s));
    if (ret < 0)
        printf("Serial Puts Error\n");
}

int serialGetstring (const int fd,char *buffer)
{
    int n_read;
    n_read = read(fd, buffer,32);
    return n_read;
}
Linux系统下的UDEV机制
udev 是 Linux2.6 内核里的一个功能,它替代了原来的 devfs,成为当前 Linux 默认的设备管理工具。
udev 以守护进程的形式运行,通过侦听内核发出来的 uevent 来管理 /dev 目录下的设备文件。
不像之前的设备管理工具,udev 在用户空间 (user space) 运行,而不在内核空间 (kernel space) 运行。
我们都知道,所有的设备在 Linux 里都是以设备文件的形式存在。在早期的 Linux 版本中,/dev目录包含了所有可能出现的设备的设备文件。很难想象 Linux 用户如何在这些大量的设备文件中找到匹配条件的设备文件。现在 udev 只为那些连接到 Linux 操作系统的设备产生设备文件。并且 udev 能通过定义一个 udev 规则 (rule) 来产生匹配设备属性的设备文件,这些设备属性可以是内核设备名称、总线路径、厂商名称、型号、序列号或者磁盘大小等等。
- 动态管理:当设备添加 / 删除时,udev 的守护进程侦听来自内核的 uevent,以此添加或者删除
/dev下的设备文件,所以 udev 只为已经连接的设备产生设备文件,而不会在/dev下产生大量虚无的设备文件。 - 自定义命名规则:通过 Linux 默认的规则文件,udev 在 /dev/ 里为所有的设备定义了内核设备名称,比如
/dev/sda、/dev/hda、/dev/fd等等。由于 udev 是在用户空间 (user space) 运行,Linux 用户可以通过自定义的规则文件,灵活地产生标识性强的设备文件名,比如/dev/boot_disk、/dev/root_disk、/dev/color_printer等等。 - 设定设备的权限和所有者 / 组:udev 可以按一定的条件来设置设备文件的权限和设备文件所有者 / 组。在不同的 udev 版本中,实现的方法不同,在“如何配置和使用 udev”中会详解。
图 1. udev 工作流程图:

ppid = 0: 内核进程,跟随系统启动而启动,生命周期贯穿整个系统。
cmd列名带[]这种,叫内核守护进程。不带[],以d结尾的是用户空间的守护进程(应用曾的守护进程)
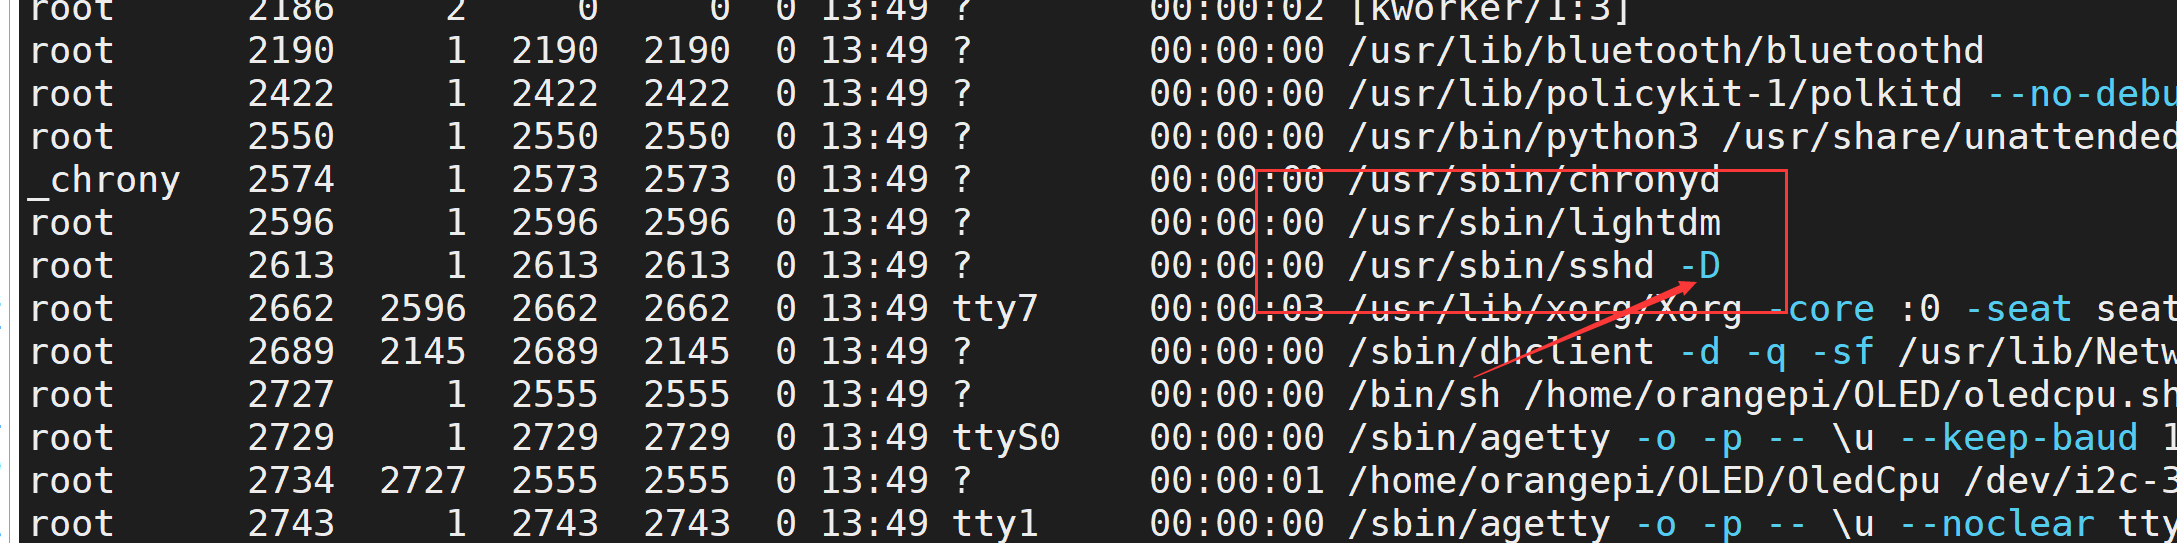
老祖init: 也是系统守护进程,它负责启动各个运行层次特定的系统服务;所以很多进程的PPID是init,也负责收养孤儿进程。
cmd列表中名字不带[]的普通守护进程(用户集守护进程)

查看进程指令ps -elf |grep a.out |grep -v grep,省略掉grep这个进程,查看a.out的进程。
使用./a.out &后台运行起来一个进程,在关闭终端后进程也就关闭了。
守护进程不会依赖于终端存活,可以自主运行
守护进程的基本特点
- 守护进程的周期长,一般操作系统启动时就启动,关闭时就关闭
- 守护进程和终端无关联,他们没有控制终端,所以当控制终端退出时,也不会导致守护进程退出。(一般进程,终端退出,进程也就退出了)
- 守护进程是在后台运行的,不会占着终端,终端可以执行其他命令
- 一个守护进程的父进程是init进程,因为它的真正父进程在fork出一个子进程后就先于子进程exit退出了,所以它是一个由init继承的孤儿进程。
例如
udev的父进程的pid = 1,就是init的进程号。
守护进程的开发方式,借助daemon方式来进行开发
#include <unistd.h>

int daemon(int nochdir, int noclose);
功能:创建一个守护进程

参数:

nochdir:=0将当前目录更改至“/”

noclose:=0将标准输入、标准输出、标准错误重定向至“/dev/null”
返回值:
成功:0
失败:-1

下面是 localtime() 函数的声明。
    struct tm *localtime(const time_t *timer)
#include <time.h>
struct tm {
   int tm_sec;         /* 秒,范围从 0 到 59                */
   int tm_min;         /* 分,范围从 0 到 59                */
   int tm_hour;        /* 小时,范围从 0 到 23                */
   int tm_mday;        /* 一月中的第几天,范围从 1 到 31                    */
   int tm_mon;         /* 月份,范围从 0 到 11                */
   int tm_year;        /* 自 1900 起的年数                */
   int tm_wday;        /* 一周中的第几天,范围从 0 到 6                */
   int tm_yday;        /* 一年中的第几天,范围从 0 到 365                    */
   int tm_isdst;       /* 夏令时                        */
};
 char *__cdecl asctime(const struct tm *_Tm);
  __CRT_INLINE struct tm *__cdecl localtime(const time_t *_Time);
 asctime函数可以将时间结构体转换为时间字符串格式。
用法:
#include <stdio.h>
#include <stdlib.h>
#include <time.h>


int main(int argc, char** argv)
{
  time_t now_time;
  struct tm *t;

   time(&now_time);
   t = localtime(&now_time);
   printf("%s ",asctime(t));
   return 0;
}
原文链接:https://blog.csdn.net/qq_20222919/article/details/122961926
create_daemon代码:
 \#include <unistd.h>

 \ pid_t setsid(void);
/调用进程必须是非当前进程组组长,调用后,产生一个新的会话期,且该会话期中只有一个进程组,且该进程组组长为调用进程,没有控制终端,新产生的group ID 和 session ID 被设置成调用进程的PID
编写守护进程的一般步骤步骤:

(1)在父进程中执行fork并exit推出;

(2)在子进程中调用setsid函数创建新的会话;

(3)在子进程中调用chdir函数,让根目录 ”/” 成为子进程的工作目录;

(4)在子进程中调用umask函数,设置进程的umask为0;

(5)在子进程中关闭任何不需要的文件描述符

void creat_daemon(void)
{
    pid_t pid;
    pid = fork();
    if( pid == -1)
        ERR_EXIT("fork error");
    if(pid > 0 )
        exit(EXIT_SUCCESS);
    if(setsid() == -1)
        ERR_EXIT("SETSID ERROR");
    chdir("/");
    int i;
    for( i = 0; i < 3; ++i)
    {
        close(i);
        open("/dev/null", O_RDWR);
        dup(0);
        dup(0);
    }
    umask(0);
    return;
}
错误:mount: /mnt: unknown filesystem type 'exfat'.
我们先来看一下目前的一些分区格式:FAT,FAT32,NTFS,exFAT;
FAT & FAT32
在早期的时候(我家是在我小学的时候就有了电脑)大家见得多的格式一般是 FAT 和 FAT32,不过目前由于单个文件越来越大(我记得当时的仙剑才几百兆最多,大一点的游戏有超过 1G,哎呀暴露了我小时候爱玩游戏的事实),超过 4G的文件, FAT 和 FAT32 格式不支持,所以现在的硬盘格式都会被转换成 NTFS 或 exFAT格式。
NTFS & exFAT分区格式的特点与区别
NTFS(New Technology File System) 是 WindowsNT 和高级服务器网络操作系统环境的文件系统,设计的目的是提供比 FAT32 更高的可靠性,并消除 FAT32 文件系统容量限制。它除了支持更大的分区和文件、更节约硬盘空间外,还提供了 FAT32 文件系统不能提供的长文件名、压缩分区、事件追踪、文件索引、高容错性、数据保护和恢复以及加密访问等功能。
那为什么闪盘和各种存储卡很少使用 NTFS 进行分区呢?
虽然 NTFS优点众多,但它是专为传统机械硬盘而设计的。它采用了一种“日志式”的文件系统,需要频繁记录磁盘的详细读写操作,会给闪盘或 SSD 这类储介质带来额外的负担。同时,NTFS 文件系统频繁的读写也影响到闪盘的性能,带来传输速率的下降。
为此,微软在传统 FAT 32分区的基础上开发了 exFAT文件系统(Extended File Allocation Table FileSystem),既弥补了 FAT32 的局限性和缺点,又没有NTFS那些会影响闪存寿命的功能,适合各种移动存储卡和闪盘使用。
exFAT 文件系统具有如下优点:
分区大小和支持的单个文件大小最大可达 16EB;
使用了剩余空间分配表,空间利用率更高;
同一目录下最大文件数可达65536个;
支持访问控制。
目前,只有固态硬盘、闪盘和存储卡才能格式化成 exFAT,传统硬盘是无法格式化成 exFAT 格式的,因此它是一种专门针对闪存的文件系统。
————————————————
版权声明:本文为CSDN博主「6曦轩」的原创文章,遵循CC 4.0 BY-SA版权协议,转载请附上原文出处链接及本声明。
原文链接:https://blog.csdn.net/weixin_42669785/article/details/107100918
要解决这个问题,您可以按照以下步骤来安装exFAT文件系统的支持:
-
安装exFAT文件系统驱动程序: 在大多数Linux发行版中,您可以通过安装
exfat-utils和exfat-fuse软件包来获取exFAT文件系统的支持。在终端中执行以下命令来安装这些软件包:对于Debian/Ubuntu系统:
bashCopy codesudo apt-get update
sudo apt-get install exfat-utils exfat-fuse
UDEV配置自动挂载U盘
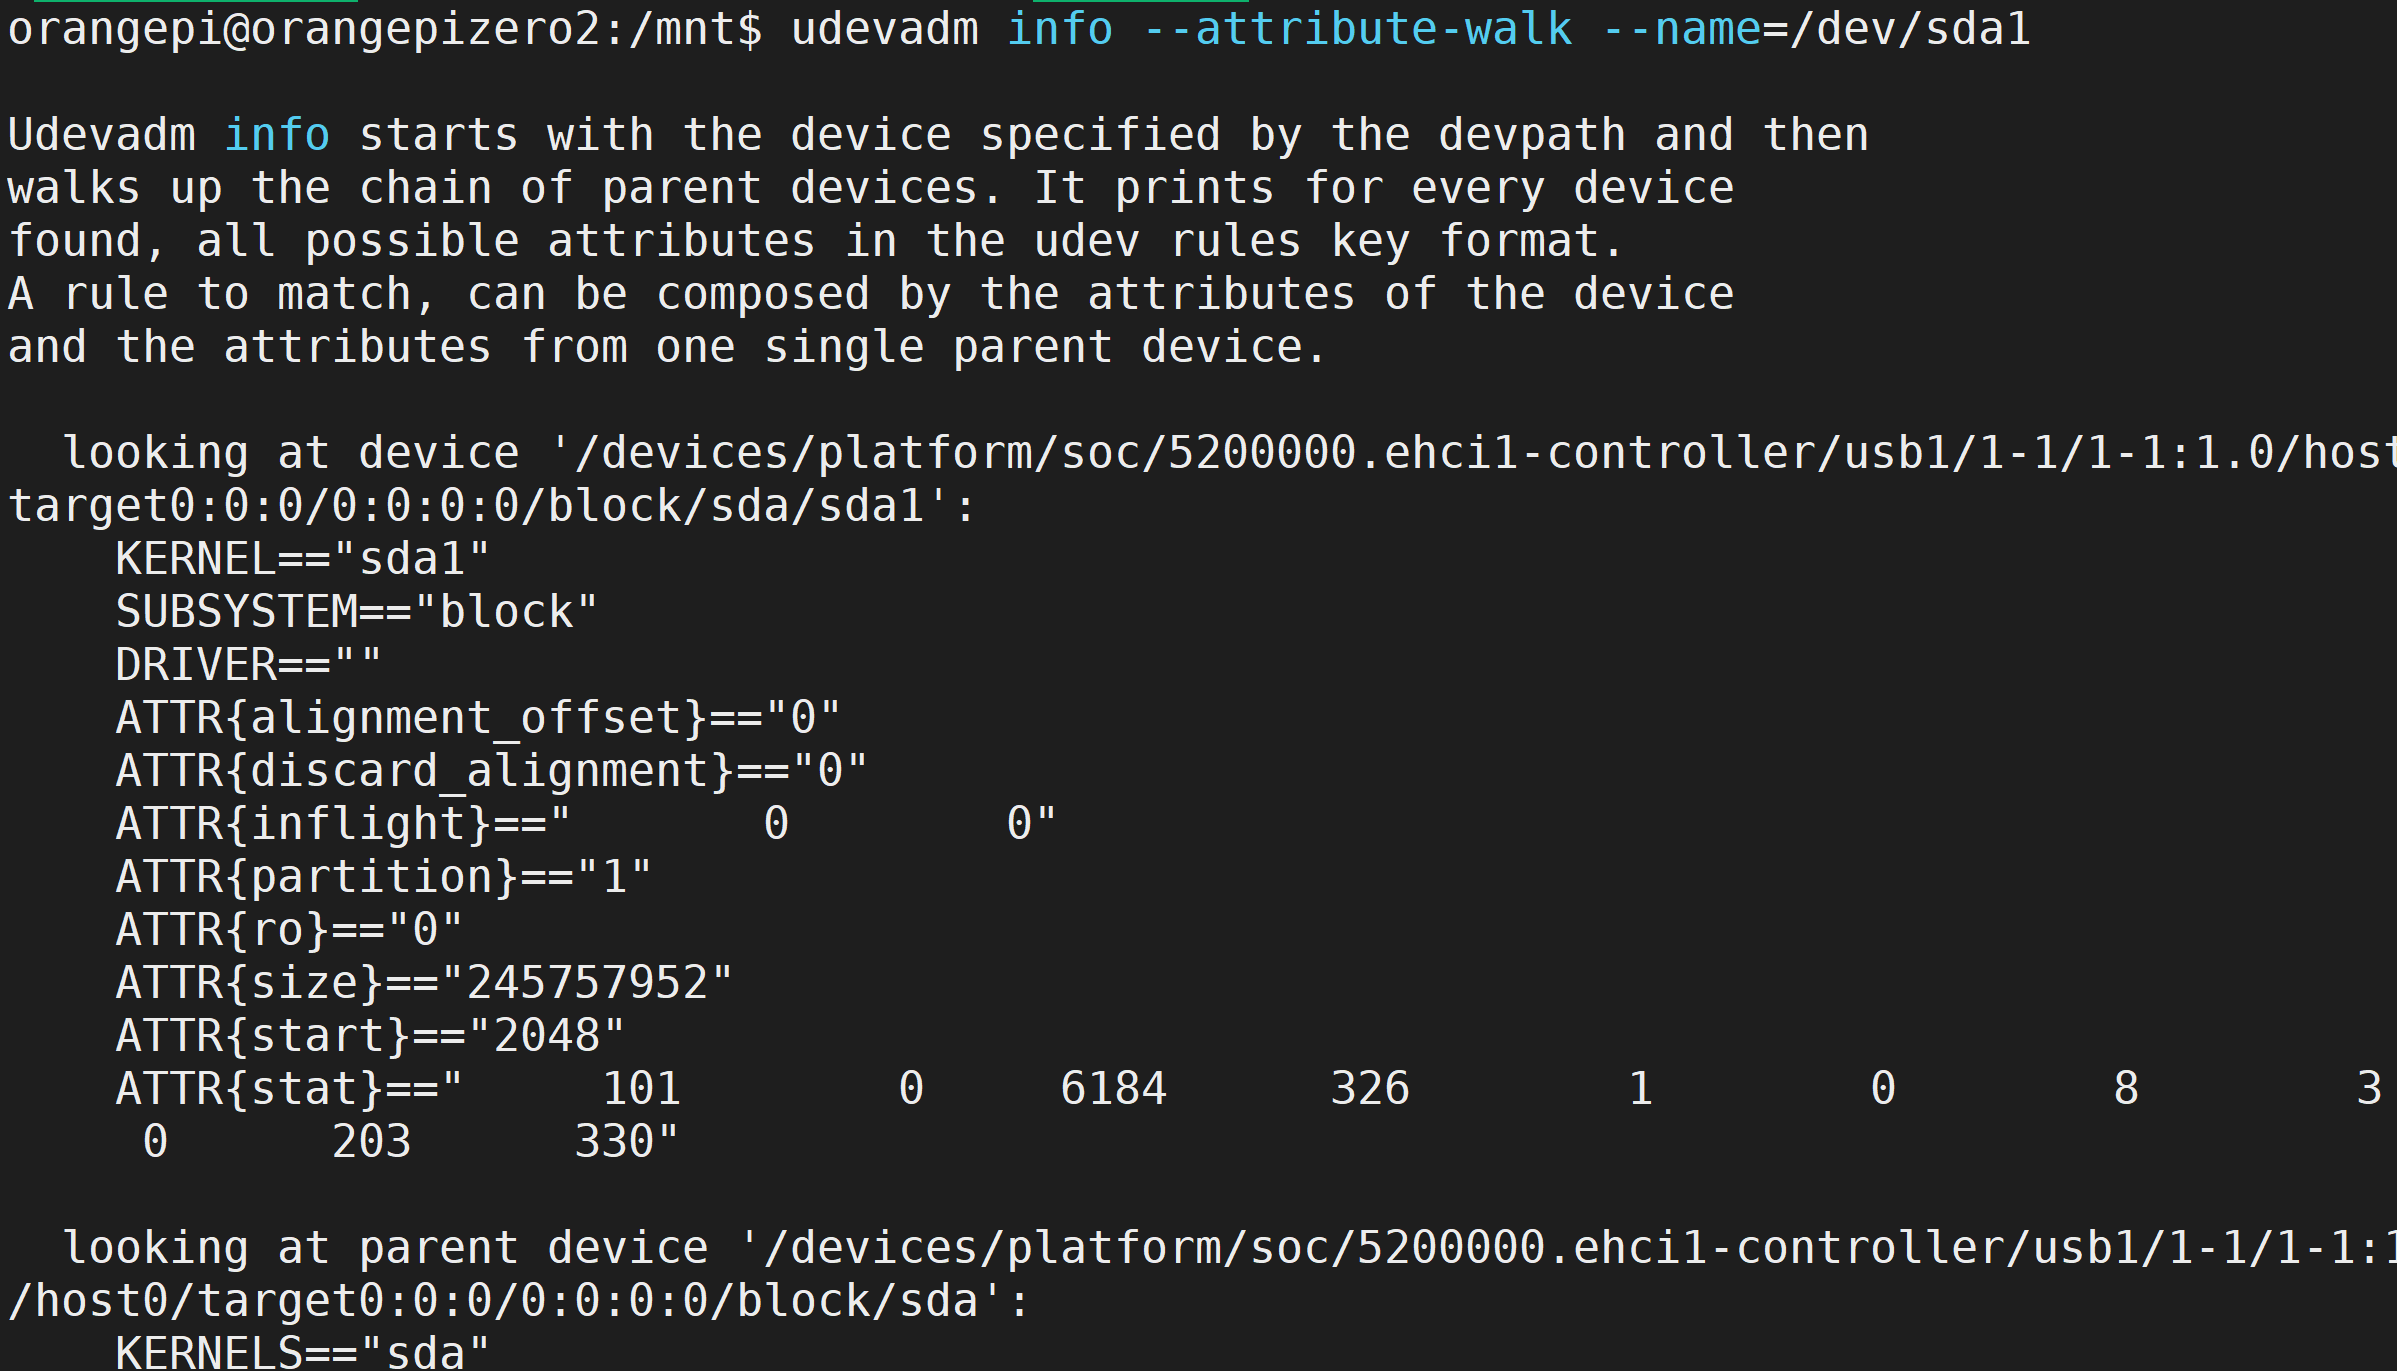
dmesg:获得内核打印的设备名字:sda1

挂载命令mount:
sudo mount /dev/设备名字 /mnt/
挂载设备到/mnt/
可以看到U盘被挂载到了/mnt/目录下,但是每次插入设备都需要挂载太麻烦,我们自己制作一个自动挂载的方式:
udevadm info --attribute-walk --name=/dev/设备名字
查看设备的详细信息
在/etc/udev/rules.d文件夹下创建规则文件
usbpan.rules:

ACTION=="add", SUBSYSTEMS=="usb", SUBSYSTEM=="block", RUN{program}+="/bin/mkdir /media/%k" ,RUN{program}+="/usr/bin/systemd-mount --no-block --collect $devnode /media/%k"
其中%k是内核分配给U盘的设备名称。
sudo udevadm control --reload
sudo service udev restart
重新启动udev服务

ACTION=="add", SUBSYSTEMS=="usb", SUBSYSTEM=="block", RUN+="/bin/mkdir /media/%k", RUN+="/usr/bin/systemd-mount --no-block --collect $devnode /media/%k"

ACTION=="add", SUBSYSTEMS=="usb", ENV{DEVTYPE}=="partition", RUN+="/bin/mkdir -p /mnt/%k", RUN+="/usr/bin/systemd-mount --no-block --collect $devnode /mnt/%k"
Python下载学习基础
安装python3.9
安装python需要的环境
sudo apt install -y build-essential zlib1g-dev \
libncurses5-dev libgdbm-dev libnss3-dev libssl-dev libsqlite3-dev \
libreadline-dev libffi-dev curl libbz2-dev
下载python3.9源码:
wget \
https://www.python.org/ftp/python/3.9.10/Python-3.9.10.tgz

tar xvf Python-3.9.10.tgzls
cd Python-3.9.10/
./configure --enable-optimizations //全志官方的配置建议

自己生成了makefile

编译源码:
make -j4 //编译源码(需要半个小时左右)
sudo make install //安装make(将编译好的文件copy到配置文件夹内)

orangepi@orangepizero2:/usr/local/bin$ ls /usr/bin/python -l
lrwxrwxrwx 1 root root 9 Apr 16  2018 /usr/bin/python -> python2.7 //软链接默认指向了2.7
 sudo rm -f /usr/bin/python

 rangepi@orangepizero2:/usr/bin$ ls |grep python
dh_python2
python2
python2.7
python3
python3.6
python3.6m
python3m

echo $PATH
/usr/local/sbin:/usr/local/bin:/usr/sbin:/usr/bin:/sbin:/bin:/usr/games:/usr/local/games:/snap/bin
环境变量路径包含了/usr/bin
使用ln命令可以创建软连接,类似于windows下的快捷方式:
ln -s /usr/local/bin/python3.9 /usr/bin/python
替换官方pip3为国内的pip3
sudo apt install -y python-pip python3-pip

创建一个面向pip的源:

epi@orangepizero2:~$mkdir .pip //隐藏文件夹
vim pip.conf
加入内容:
out = 6000
index-url = https://pypi.tuna.tsinghua.edu.cn/simple
trusted-host = pypi.tuna.tsinghua.edu.cn
apt官方网址:
python初探
使用C语言调用python。


 浙公网安备 33010602011771号