【转】使用Swagger生成JAVA Mock Server(Springboot)代码
Swagger为我们提供了非常多的工具,其中最强的还要算这个代码的生成工具。在前后端分离的大环境下,前后端之间订立的接口显得尤为重要,接口在订立之后变动的可能性已经很小,这就要求我们提前去设计接口,也就是我们为前端提供的API。
但是我们发现,在开发过程中订立的接口寿命其实很短,这是一件非常严重的事情。因此Swagger为我们提供了另外一种比较优雅的方式:就是你先订立接口,然后再去生成接口;也就是使用接口文档去生成代码,这是非常好的一种实践方式。
Mock Server为我们解决下面的问题:
1、我们设计了API,但后台还没有开发完成;
2、因为网络等原因,导致直接调用真实的后台API会很不稳定或者很耗时。
前期准备
先看下面文章,如何生成API文档,拿到文档后,我们才能生成Mock Server Code
SpringBoot中使用Swagger生成RESTful规范API文档
http://blog.csdn.net/a78270528/article/details/78506338
实现步骤:
1、访问:http://localhost:8090/v2/api-docs,会返回接口的JSON数据,复制(文章最后有完整JSON代码)。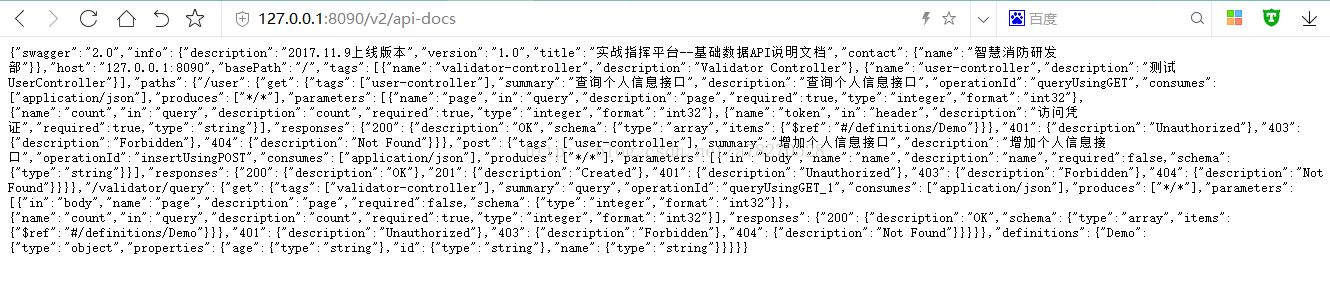
2、再打开Swagger Editor(https://editor.swagger.io),也可以下载代码,在本地部署访问。我们这里使用在线方式,粘贴刚刚复制的JSON,提示转成YAML:
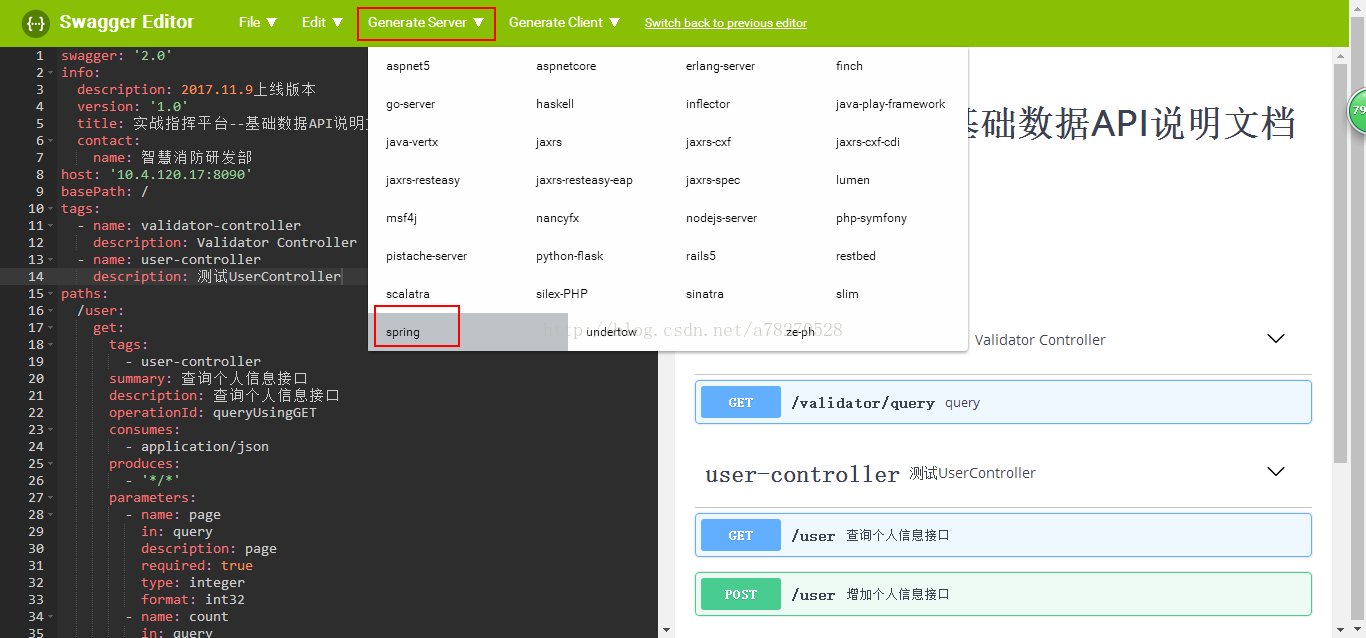
3、点击Generate Server,选择spring,直接弹出下载代码。
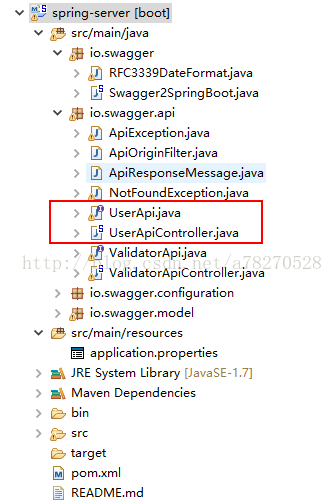
4、解压后,就是一个完整的Spring Boot工程,Import(Projects from Folder or Achive)到我们的MyEclipse:
5、这时候我们可以正常启动项目,Swagger2SpringBoot,右键Run as..
6、这里面推荐一个工具Postman,最好使用Chrome下的插件方式安装,单独的Postman不支持中文。在Postman中访问我们之前编写的接口:

7、我们按照接口要求填写了接口,发送后返回HTTP请求415错误 – 不支持的媒体类型(Unsupported media type)
8、解决方法是去除Swagger生成接口的Consumes,让其不限制请求类型:

9、修改后重启项目,再次发送请求,这回不是415了,变成了406错误(HTTP 406 Not acceptable,翻译过来是“不能接收”),因为Swagger生成的代码接口,必须指定Accept:
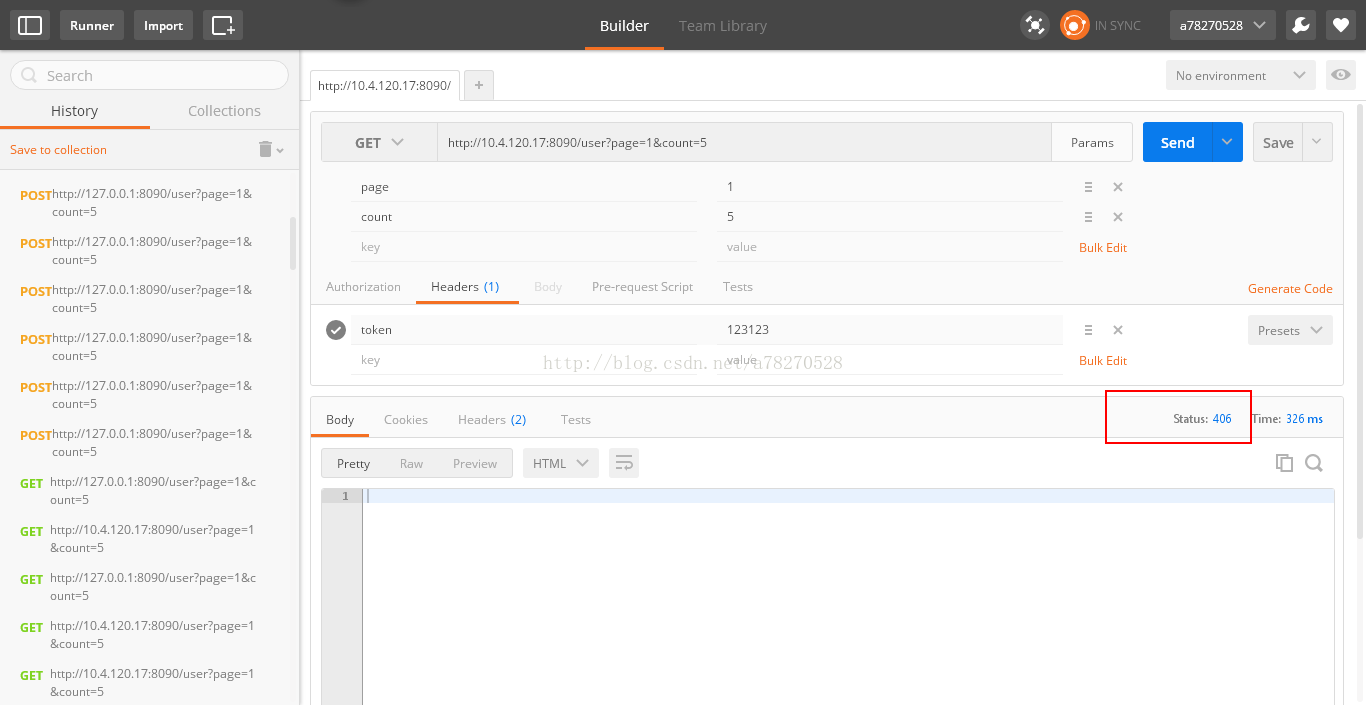
10、所以们在发送请求时在Headers中加入Accept: application/json,再次发送请求,这回返回提200,终于成功了:
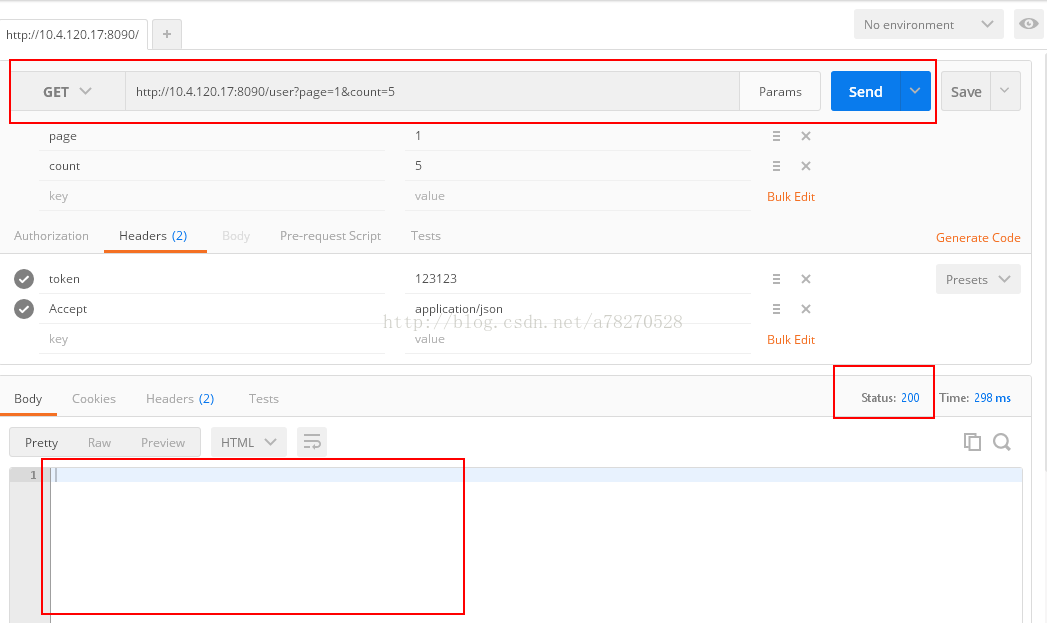
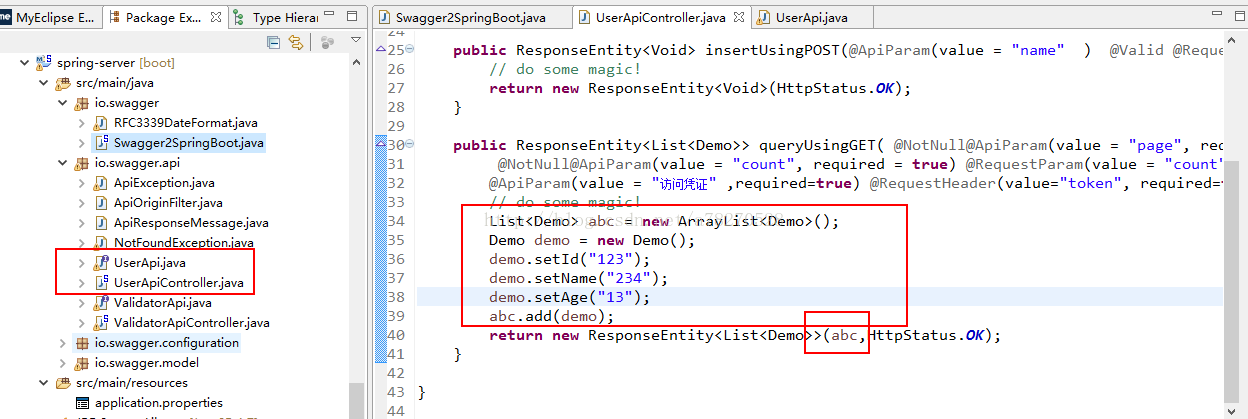
11、,但却发现并没有返回内容,BODY是空,原因是Swagger生成的Mock Server只能判断接口是否调用成功,并不能返回需要的数据,如果需要返回一些假数据给前端进行测试,需要手动增加代码,我们在第4步时红色框起来的两个JAVA类,UserApi是对应的接口,UserApiController是接口实现,我们需要修改UserApiController中对应的接口实现,以返回数据:
12、这时我们再次发送接口,返回如下:
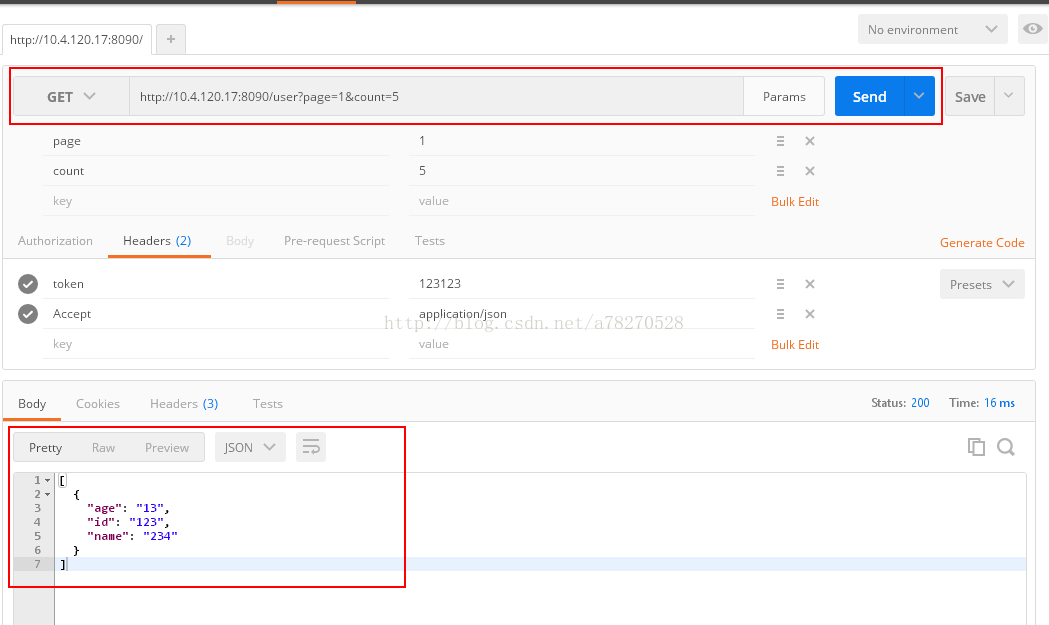
到此,我们整个Mock Server的代码已经调通,部署并可以正常使用了。
为什么406会报错,又要我们指定Accept: application/json,这是Swagger的问题,我们需要集成Swagger的源码,修改swagger.js如下:
if (this.type === "POST" || this.type === "GET" || this.type === "PATCH") {
    if (this.opts.responseContentType) {
      responseContentType = this.opts.responseContentType;
    } else {
      responseContentType = "application/json";
    }
}
再在swagger-ui.js中替换这一行:
opts.responseContentType = $("div select[name=responseContentType]", $(this.el)).val();
替换成:
if($("div select[name=responseContentType]", $(this.el)).val() === undefined) {
    opts.responseContentType = opts.parent.model.produces[0];
}
else {
    opts.responseContentType = $("div select[name=responseContentType]", $(this.el)).val();
}
这样就从根本敢406报错的问题,再请求时就不用加上Accept: application/json了。
下面附上接口的JSON文件,仅供测试使用。
{
    "swagger": "2.0",
    "info": {
        "description": "2017.11.9上线版本",
        "version": "1.0",
        "title": "实战指挥平台--基础数据API说明文档",
        "contact": {
            "name": "智慧消防研发部"
        }
    },
    "host": "127.0.0.1:8090",
    "basePath": "/",
    "tags": [
        {
            "name": "validator-controller",
            "description": "Validator Controller"
        },
        {
            "name": "user-controller",
            "description": "测试UserController"
        }
    ],
    "paths": {
        "/user": {
            "get": {
                "tags": [
                    "user-controller"
                ],
                "summary": "查询个人信息接口",
                "description": "查询个人信息接口",
                "operationId": "queryUsingGET",
                "consumes": [
                    "application/json"
                ],
                "produces": [
                    "*/*"
                ],
                "parameters": [
                    {
                        "name": "page",
                        "in": "query",
                        "description": "page",
                        "required": true,
                        "type": "integer",
                        "format": "int32"
                    },
                    {
                        "name": "count",
                        "in": "query",
                        "description": "count",
                        "required": true,
                        "type": "integer",
                        "format": "int32"
                    },
                    {
                        "name": "token",
                        "in": "header",
                        "description": "访问凭证",
                        "required": true,
                        "type": "string"
                    }
                ],
                "responses": {
                    "200": {
                        "description": "OK",
                        "schema": {
                            "type": "array",
                            "items": {
                                "$ref": "#/definitions/Demo"
                            }
                        }
                    },
                    "401": {
                        "description": "Unauthorized"
                    },
                    "403": {
                        "description": "Forbidden"
                    },
                    "404": {
                        "description": "Not Found"
                    }
                }
            },
            "post": {
                "tags": [
                    "user-controller"
                ],
                "summary": "增加个人信息接口",
                "description": "增加个人信息接口",
                "operationId": "insertUsingPOST",
                "consumes": [
                    "application/json"
                ],
                "produces": [
                    "*/*"
                ],
                "parameters": [
                    {
                        "in": "body",
                        "name": "name",
                        "description": "name",
                        "required": false,
                        "schema": {
                            "type": "string"
                        }
                    }
                ],
                "responses": {
                    "200": {
                        "description": "OK"
                    },
                    "201": {
                        "description": "Created"
                    },
                    "401": {
                        "description": "Unauthorized"
                    },
                    "403": {
                        "description": "Forbidden"
                    },
                    "404": {
                        "description": "Not Found"
                    }
                }
            }
        },
        "/validator/query": {
            "get": {
                "tags": [
                    "validator-controller"
                ],
                "summary": "query",
                "operationId": "queryUsingGET_1",
                "consumes": [
                    "application/json"
                ],
                "produces": [
                    "*/*"
                ],
                "parameters": [
                    {
                        "in": "body",
                        "name": "page",
                        "description": "page",
                        "required": false,
                        "schema": {
                            "type": "integer",
                            "format": "int32"
                        }
                    },
                    {
                        "name": "count",
                        "in": "query",
                        "description": "count",
                        "required": true,
                        "type": "integer",
                        "format": "int32"
                    }
                ],
                "responses": {
                    "200": {
                        "description": "OK",
                        "schema": {
                            "type": "array",
                            "items": {
                                "$ref": "#/definitions/Demo"
                            }
                        }
                    },
                    "401": {
                        "description": "Unauthorized"
                    },
                    "403": {
                        "description": "Forbidden"
                    },
                    "404": {
                        "description": "Not Found"
                    }
                }
            }
        }
    },
    "definitions": {
        "Demo": {
            "type": "object",
            "properties": {
                "age": {
                    "type": "string"
                },
                "id": {
                    "type": "string"
                },
                "name": {
                    "type": "string"
                }
            }
        }
    }
}
API详细说明:
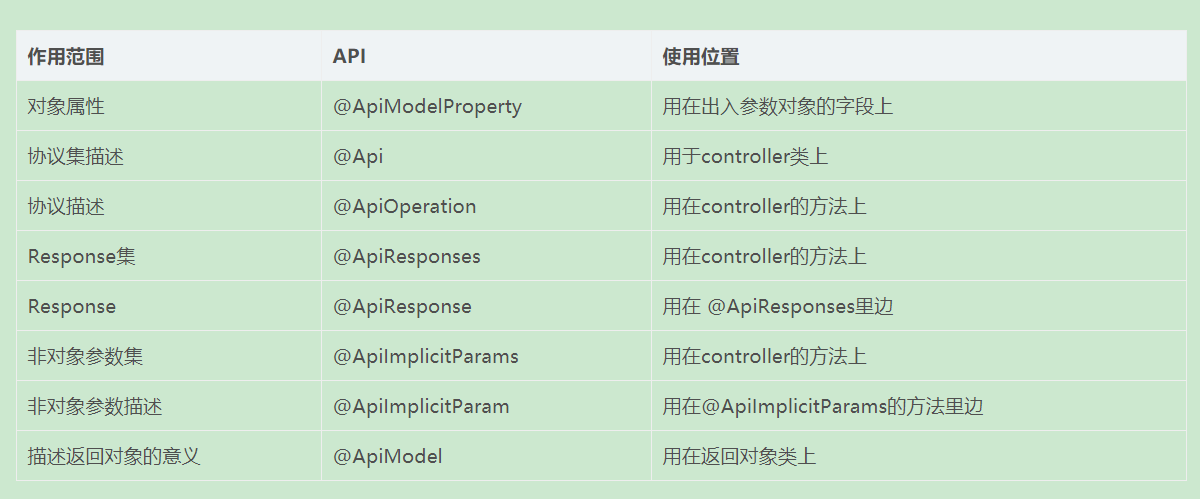
@ApiImplicitParam

以上就是使用Swagger搭建RESTful风格测试Mock Server,生成Springboot代码的全部过程,整个开发过程其实很简单,但网络上的资料太少,经过不断的踩坑,终于调试成功。
————————————————
版权声明:本文为CSDN博主「二一点」的原创文章,遵循 CC 4.0 BY-SA 版权协议,转载请附上原文出处链接及本声明。
原文链接:https://blog.csdn.net/a78270528/article/details/78530702

 浙公网安备 33010602011771号