
Ubuntu+docker+gitlab安装和使用
以前自己写的代码都是在本地,因为都是自己一个人维护,现在交给团队维护了,所以想着搭建一个gitlab
1,拉镜像
安装非常简单
docker search gitlab 搜索镜像
docker pull gitlab/gitlab-ce 拉取镜像
docker images 查询镜像
2,创建本地映射文件
test-team-server:~$ mkdir gitlab
test-team-server:~$ cd gitlab/
test-team-server:~/gitlab$ mkdir config logs data
3,安装
docker run --detach -p 8843:443 -p 8090:80 -p 2222:22 --name gitlab --restart always -v /home/dapeng/gitlab/config:/etc/gitlab -v /home/dapeng/gitlab/logs:/var/log/gitlab -v /home/dapeng/gitlab/data:/var/opt/gitlab gitlab/gitlab-ce
docker ps -a | grep gitlab
docker logs -f gitlab
4,配置
访问gitlab http://192.168.1.119:8090
(1)设置密码,初始账户为root,设置密码之后就可以登录了
(2)重启、启动、停止、状态
gitlab-ctl restart // 重启
gitlab-ctl stop // 停止
gitlab-ctl start // 启动
gitlab-ctl status //状态
(3)修改hostname
gitlab项目默认是以容器id作为hostname,ssh访问的时候会提示hostname找不到,所以我们需要修改一下配置文件
/home/dapeng/gitlab/config/gitlab.rb 主要修改以下几个值
external_url 'http://192.168.1.119' #修改为http访问的外部映射的主机ip和port
gitlab_rails['gitlab_ssh_host'] = '192.168.1.119' #修改为ssh访问的外部映射的主机ip或者hostname
gitlab_rails['gitlab_shell_ssh_port'] = 2222 #ssh默认是22端口,改成映射到外部的2222端口
然后执行一下docker restart gitlab
这样在项目中显示的访问gitlab仓库的地址是
ssh://git@192.168.1.119:8090:2222/automation/apitest.git
http://192.168.1.119/automation/apitest.git
(4)下载git.exe 到本地windows
- Git-2.8.1-64-bit.exe 安装,默认选项即可
- 打开git bash, 生成密钥,有关密钥的说明可以参考 http://192.168.1.119:8090/help/ssh/README#generating-a-new-ssh-key-pair
ssh-keygen -o -t rsa -b 4096 -C "xxxxxxxxx@xxxxx.com" 然后一直回车
- 复制~/.ssh/id_rsa.pub内容,
~表示用户目录,比如windows就是C:\Users\Administrator
Administrator@ERIC MINGW64 ~/.ssh
$ cat id_rsa.pub
ssh-rsa AAAAB3NzaC1yc2EAAAADAQABAAACAQCrPgBRiWV7d6yRTdkLkP0ae+6P571uMDtxAL1x2fsNGWvmzFZTHUrHS49UJgPpaGu0ZtOv4X7bX4mmEHlmSXo5v6lZ5YC+oEAWXgg2c+ES9jf4llfOggCYEIrek//xF6OTOrZxpvzrTkAroiTdeRtivnFnIMgaNz3rO53ryH0M5L9vzWFKm7ufuKyqY/910X73+9pP9Rf1txWgY8cd3iVGSjooKPND0rY34sVm7JQ16llx49MjIKTX79e2V3p+wy6LOuSawwH9XtQrakj01aXmhQHKIRIqTn0M0FYtEitEQxuagBdzeyMF46rMWrk8k87FnJaPsIm/WNRMVimiL4UlSjp3iSg4p/+GebzdBr8S3oXT6lWglQBVXLEYHZgXRQXNhTCOoeOWEdW1wtKYPpGY+LtMkSEGbt0/v68Fj3oDXllVle3SjlI4i9KF86snfQPd3jDvBu7padvDmwtl3bLWKA38/DLe+cTUSHgymTTmfW6fDT5VpcAlKkyh6Dvcyb0hlUGdNVzasQ4nqtQtODpGhb5pfdtJlhZN2P0QlI7n0KAEPkuQUnpNMKf94fmUxiH6QQLOeVrWuZw4CW/B+bnYHoe85vySNhUI+H2qat5+3/p09AD+mxffKbSgmR6QWE9DXFTIGjtJ01dMFy699Qi8YOVsXwViOiu9Lab9ymxqLQ== hailiangyou@dingtalk.com
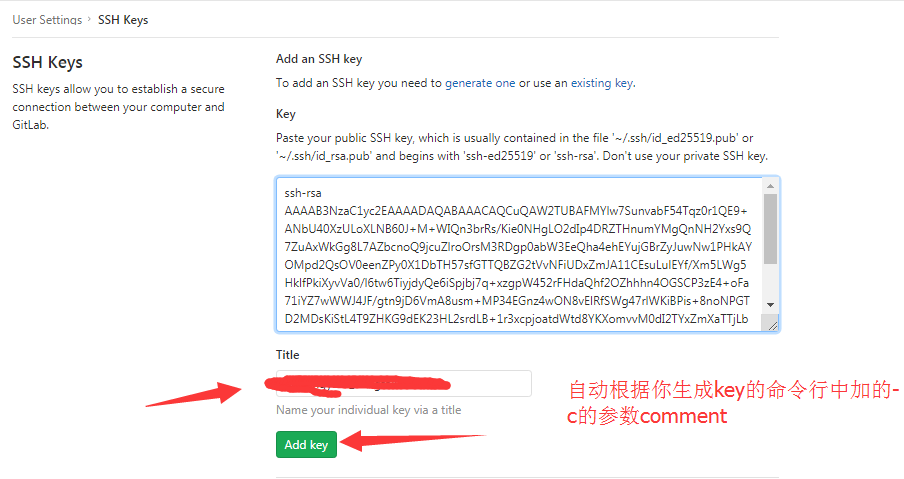
(4)网页上配置ssh-key
http://192.168.1.119:8090/profile/keys
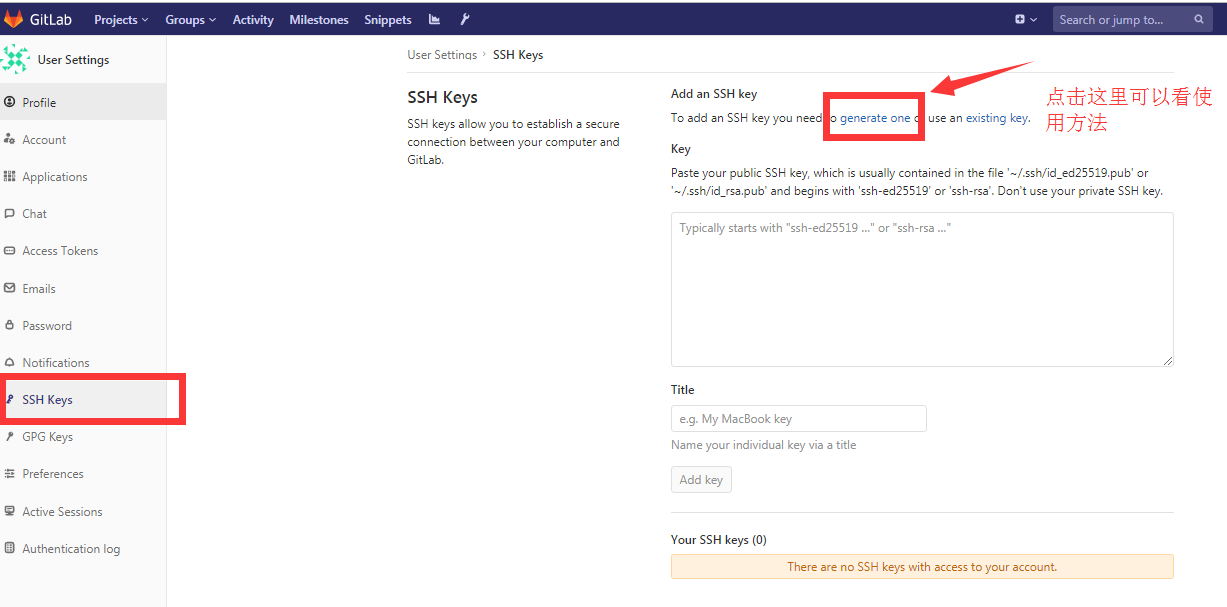
把上面cat出来的内容复制到gitlab页面上
5,拉取项目,git常规使用
1,创建一个文件夹作为仓库repo D盘下的repo文件夹
打开git bash, cd /d/repo
2,设置用户名和邮箱
git config --global user.name "eric"
git config --global user.email "xxxx@xxx.com"
3,克隆项目,默认拉取的是master分支
git clone ssh://git@192.168.1.119:2222/automation/apitest.git
Administrator@ERIC MINGW64 /d/repo
$ git clone ssh://git@192.168.1.119:2222/automation/apitest.git
Cloning into 'apitest-framework'...
The authenticity of host '[192.168.1.119]:2222 ([192.168.1.119]:2222)' can't be established.
ECDSA key fingerprint is SHA256:IoMGBM4jlCN20ynwVKKrvwUFb8pKP5BjfZy5QG0/A2c.
Are you sure you want to continue connecting (yes/no)? yes
Warning: Permanently added '[192.168.1.119]:2222' (ECDSA) to the list of known hosts.
remote: Enumerating objects: 3, done.
remote: Counting objects: 100% (3/3), done.
remote: Compressing objects: 100% (2/2), done.
remote: Total 3 (delta 0), reused 0 (delta 0)
Receiving objects: 100% (3/3), done.
Checking connectivity... done.
4,git使用
在本地创建一个待push的测试文件,test.md
touch test,md
git status #可以看到红色提示该分支有需要更新的文档 test.md

git add test.md #添加文件到待上传的缓冲区里
git commit -m "test push test.md" #提交并解释

git push origin master #提交到仓库主分支
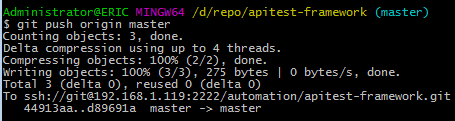
然后就可以在gitlab网页上看到刚刚提交的文件
关于更详细的git使用教程,可以查看https://www.runoob.com/git/git-tutorial.html
-------------------------------------------
有道无术,术尚可求。有术无道,则止于术!
如果觉得这篇文章对你有小小的帮助的话,记得在右下角点个“推荐”哦,博主在此感谢!

 浙公网安备 33010602011771号