源码包升级OpenSSH
升级openssh前需配好备用连接方式telnet,以防配置失败不能连接服务器。
[root@snowy201 ~]# yum install -y xinetd telnet-server
检查配置文件,如果存在/etc/xinetd.d/telnet文件则需要修改配置使root用户可以通过telnet登录,如果不存在该文件则无需配置
[root@snowy201 ~]# ls /etc/xinetd.d/telnet
ls: cannot access /etc/xinetd.d/telnet: No such file or directory
如果存在telnet的配置文件则 vi /etc/xinetd.d/telnet
改: disable = yes 为 disable = no
说明:如果文件/etc/xinetd.d/telnet不存在,又要确保服务器重启后,telnet服务能启动,就必须手动添加这个文件,否则服务器重启后,xinetd服务将无法管理启动telnet服务,如果只是临时用一下,就不用添加
手动添加如下内容即可:
[root@snowy201 ~]# vi /etc/xinetd.d/telnet
# default: on
# description: The telnet server serves telnet sessions; it uses \
# unencrypted username/password pairs for authentication.
service telnet
{
disable = no
flags = REUSE
socket_type = stream
wait = no
user = root
server = /usr/sbin/in.telnetd
log_on_failure  += USERID
}
增加telnet登录的终端类型pts
[root@snowy201 ~]# vi /etc/securetty   #增加以下4行内容
pts/0
pts/1
pts/2
pst/3
[root@snowy201 ~]# systemctl enable xinetd --now
[root@snowy201 ~]# systemctl enable telnet.socket --now
[root@snowy201 ~]# netstat -antup|grep 23
tcp        0      0 0.0.0.0:23              0.0.0.0:*               LISTEN      1/systemd
[root@snowy201 ~]# firewall-cmd --permanent --add-service=telnet
[root@snowy201 ~]# firewall-cmd --reload
备份旧的ssh配置文件
[root@snowy201 ~]# mkdir /opt/sshbak
[root@snowy201 ~]# mv /etc/ssh/* /opt/sshbak/
安装openssh升级包
[root@snowy201 ~]# wget -c https://cdn.openbsd.org/pub/OpenBSD/OpenSSH/portable/openssh-8.6p1.tar.gz
# wget -c 断点续传
[root@snowy201 ~]# mkdir /usr/local/ssh
[root@snowy201 ~]# tar -zxf openssh-8.6p1.tar.gz -C /usr/local/src/
[root@snowy201 ~]# cd /usr/local/src/openssh-8.6p1/
[root@snowy201 openssh-8.6p1]# yum install -y gcc gcc-c++ zlib zlib-devel openssh openssl-devel pam-devel libselinux-devel #安装依赖包
[root@snowy201 openssh-8.6p1]# ./configure --with-md5-passwords --with-pam --with-selinux --with-privsep-path=/usr/local/sshd --sysconfdir=/etc/ssh
安装完后出现下图提示

由于启用了PAM则需要安装一个配置文件,该配置文件在contrib目录下
[root@snowy201 openssh-8.6p1]# cp -a contrib/redhat/sshd.pam /etc/pam.d/sshd.pam
[root@snowy201 openssh-8.6p1]# cp -a contrib/redhat/sshd.init /etc/init.d/sshd  #复制开机启动脚本
[root@snowy201 openssh-8.6p1]# make -j 2 && make install
[root@snowy201 openssh-8.6p1]# vi /etc/ssh/sshd_config
38 #PermitRootLogin yes  改为:  PermitRootLogin yes
43 #PubkeyAuthentication yes 改为: PubkeyAuthentication yes
115 #UseDNS yes  改为: UseDNS no
[root@snowy201 openssh-8.6p1]# mv /usr/lib/systemd/system/sshd.service /opt/sshbak/ #旧的sshd开机启动项移到备份目录
[root@snowy201 openssh-8.6p1]# chkconfig -add sshd
[root@snowy201 openssh-8.6p1]# chkconfig sshd on
[root@snowy201 openssh-8.6p1]# systemctl stop sshd
[root@snowy201 openssh-8.6p1]# service sshd restart
因为前面编译openssh时,加载了selinux模块,如果服务器selinux默认是开启的,此时如果通过远程终端连接服务器就会报错,如下图所示:
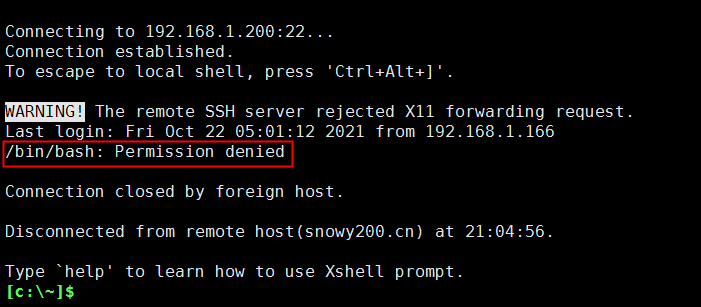
解决办法:
1.直接关闭selinux
[root@snowy201 openssh-8.6p1]# setenforce 0
[root@snowy201 openssh-8.6p1]# vi /etc/selinux/config
SELINUX=enforcing 改为 SELINUX=disabled
2.如果不想关闭selinux
[root@snowy201 openssh-8.6p1]# touch /.autorelabel  #重新打标
[root@snowy201 openssh-8.6p1]# reboot
[root@snowy201 openssh-8.6p1]# ssh -V
OpenSSH_8.6p1, OpenSSL 1.0.2k-fips  26 Jan 2017
openssh升级成功后关闭telnet登录服务
[root@snowy201 openssh-8.6p1]# systemctl disable telnet.socket --now #关闭telnet服务
[root@snowy201 openssh-8.6p1]# systemctl disable xinetd --now  #关闭xinetd服务

 浙公网安备 33010602011771号